
Chapter 8. Using Databases
In This Chapter
• Fetching Desired Rows from Data Tables
• Accessing Databases Through the ADB
• Accessing Databases Through Menus
• Creating Data Entry Forms
• Displaying Table Rows Via ListView
User-entered data needs to be saved somewhere so that it can be accessed at a later time. Android offers the SQLite relational database library for persisting data. It’s an open-source, lightweight, and powerful database available in the form of a C library. It uses SQL (Structured Query Language) for storing and retrieving information and performing database maintenance. SQLite is extremely reliable and is popularly used in devices with restricted computing power. Through SQLite, we can create individual databases for each application and store and manage application-related data.
Using the SQLiteOpenHelper Class
Android databases are stored in the /data/data/<package_name>/databases folder on devices or emulators.
To create an Android application that stores, accesses, and manipulates user information in a SQLite-relational database, we use the SQLiteOpenHelper class. The SQLiteOpenHelper class is an abstract class that provides a way to get read or write access to a database. The SQLiteOpenHelper class thus makes our task of manipulating the data stored in the database easy.
The SQLiteOpenHelper class is an abstract class used to create, open, and upgrade databases. It provides several methods including getWritableDatabase(), getReadableDatabase(), and close() that returns an SQLiteDatabase object that lets the calling code do the reading, writing, and closing of the database, respectively.
The SQLiteDatabase class also provides methods including insert() and query(), which are used to insert rows in the database table and execute different SQLite queries on the database table. The query() method accepts several parameters such as the database table to query, columns, and criteria, and returns a Cursor representing the rows that satisfy the supplied criteria. The Cursor class provides several methods to traverse the result set and move to the desired row and column position in the result set.
To understand how the information in an Android application can be stored and accessed from an SQLite database, let’s create a new Android application.
Building an SQLite Project
Launch Eclipse IDE and create a new Android project called DatabaseApp. In this application, we create a database called shopping, and in it we create a table called products. The products table consists of three columns: code, product_name, and price to store the code, product name, and price, respectively. To the products table, we add a couple of rows. Also, we access the rows in the products table and display them via the TextView control. To take advantage of the SQLiteOpenHelper class and its method, we need to extend it. That is, we add a Java class to our application and make it inherit the SQLiteOpenHelper class. The SQLiteOpenHelper class makes the task of maintaining the SQLite database easier by hiding the complexities of maintaining the database.
To add a Java class to our application, right-click the com.androidunleashed.database-app package in the Package Explorer window and select New, Class option. We see a New Java Class dialog box used to enter the new Java class information (see Figure 8.1). Enter the Java class name as DatabaseManager. The two boxes, Source folder and Package, appear automatically filled with the src folder location and the application package name, respectively. In the Modifiers options, public is selected by default. Keeping all the default information, click Finish to create the new Java file DatabaseManager.java.
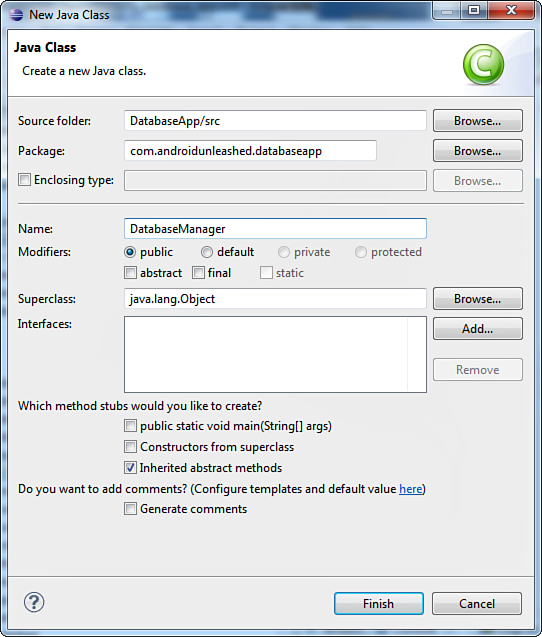
Figure 8.1. Creating a new Java file called DatabaseManager.java
The newly added DatabaseManager.java file has the initial contents shown here:
package com.androidunleashed.databaseapp;
public class DatabaseManager {
}
We write code in DatabaseManager.java to perform the following tasks:
• Inherit from the SQLiteOpenHelper class to access and take advantage of the methods defined in it.
• Open and return the writable and readable database file instance to perform writing and reading operations on the database, respectively.
• Create a database table, products, consisting of three columns: code, product_name, and price.
• Add rows to the products table. The information for the new product is supplied by the activity file DatabaseAppActivity.java.
• Fetch rows from the products table and return them to the activity file DatabaseAppActivity.java for displaying on the screen.
Note
The Java file is accessed and executed from the Java activity file of our application DatabaseAppActivity.java.
To perform these tasks, the code shown in Listing 8.1 is written into the Java file DatabaseManager.java.
Listing 8.1. Code Written into the Java Class DatabaseManager.java
package com.androidunleashed.databaseapp;
import android.database.sqlite.SQLiteDatabase;
import android.content.Context;
import android.content.ContentValues;
import android.database.Cursor;
import android.database.sqlite.SQLiteOpenHelper;
import android.util.Log;
public class DatabaseManager {
public static final String DB_NAME = "shopping";
public static final String DB_TABLE = "products";
public static final int DB_VERSION = 1;
private static final String CREATE_TABLE = "CREATE TABLE " + DB_TABLE + " (code
INTEGER PRIMARY KEY, product_name TEXT, price FLOAT);";
private SQLHelper helper;
private SQLiteDatabase db;
private Context context;
public DatabaseManager(Context c){
this.context = c;
helper=new SQLHelper(c);
this.db = helper.getWritableDatabase();
}
public DatabaseManager openReadable() throws android.database.SQLException {
helper=new SQLHelper(context);
db = helper.getReadableDatabase();
return this;
}
public void close(){
helper.close();
}
public void addRow(Integer c, String n, Float p){
ContentValues newProduct = new ContentValues();
newProduct.put("code", c);
newProduct.put("product_name", n);
newProduct.put("price", p);
try{db.insertOrThrow(DB_TABLE, null, newProduct);}
catch(Exception e)
{
Log.e("Error in inserting rows ", e.toString());
e.printStackTrace();
}
}
public String retrieveRows(){
String[] columns = new String[]{"code", "product_name", "price"};
Cursor cursor = db.query(DB_TABLE, columns, null, null, null, null, null);
String tablerows = "";
cursor.moveToFirst();
while (cursor.isAfterLast() == false) {
tablerows = tablerows + cursor.getInt(0) + ", "+cursor.getString(1)+", "
+ cursor.getFloat(2)+ "
";
cursor.moveToNext();
}
if (cursor != null && !cursor.isClosed()) {
cursor.close();
}
return tablerows;
}
public class SQLHelper extends SQLiteOpenHelper {
public SQLHelper(Context c){
super(c, DB_NAME, null, DB_VERSION);
}
@Override
public void onCreate(SQLiteDatabase db) {
db.execSQL(CREATE_TABLE);
}
@Override
public void onUpgrade(SQLiteDatabase db, int oldVersion, int newVersion) {
Log.w("Products table","Upgrading database i.e. dropping table and rec-
reating it");
db.execSQL("DROP TABLE IF EXISTS " + DB_TABLE);
onCreate(db);
}
}
}
Before we look at the code in detail, let’s examine what the code is doing.
The DatabaseManager is a class where we write all the methods related to database maintenance such as creating databases and tables, upgrading tables, and adding and retrieving rows to and from the database table. To make our task easier, the DatabaseManager class includes a SQLHelper class, which inherits the SQLiteOpenHelper class.
In this code, we see that an SQLHelper class is defined in the DatabaseManager class, which inherits the SQLiteOpenHelper class. The SQLHelper class instance, helper, is created by passing the context to its constructor. The SQLHelper’s constructor in turn invokes the constructor of the SQLiteOpenHelper class passing the context database name (shopping) and its version number (1) to it. The helper instance is set to refer to version 1 of the database, shopping. The SQLiteOpenHelper class provides two methods, getWritableDatabase() and getReadableDatabase(), that are used to open and return the writable and readable instance of the referred database. We can see that the getWritableDatabase() method is called on by the helper instance to get an SQLiteDatabase object called db. The SQLiteDatabase object, db, now refers to the shopping database that is opened in write mode, and we can perform write operations on the database.
The SQLiteOpenHelper onCreate and onUpgrade class methods are overridden in the SQLHelper class to create a new database and to upgrade it to a new version. The onCreate() method creates a products table in the shopping database by calling the execSQL()SQLiteDatabase method through its object, db. The products database table consists of three columns: code, product_name, and price, where code is the primary key in the products table. In the onUpgrade method, the existing table, products, is dropped and re-created.
The openReadable() method calls the getReadableDatabase() on the helper object to get the SQLiteDatabase object db that refers to the readable instance of the shopping database. The close() method calls the close() method on the helper class to close it.
The addRow() method accepts the values for the new row of the products table as parameters and inserts them in the products table by calling the SQLiteDatabase insert-OrThrow() method through its object db. The ContentValues is used to insert rows in the products table. Each ContentValues object represents a single table row as a map of column names to values. A ContentValues object, newProduct, is created, and through its put() methods, we supply the code, product_name, and price columns’ values. Thereafter, the insertOrThrow() method is called, and the ContentValues object, newProduct, is passed to it to insert a new row in the table, supplying the content specified in the ContentValues object. An exception is thrown in case an error occurs while inserting the row.
The retrieveRows() method fetches all the rows from the products table by executing the query() method of the SQLiteDatabase object and returns in the form of a Cursor object. The query() method helps in running the query with the specified criteria to get the desired number of rows.
Fetching the Desired Rows from Tables
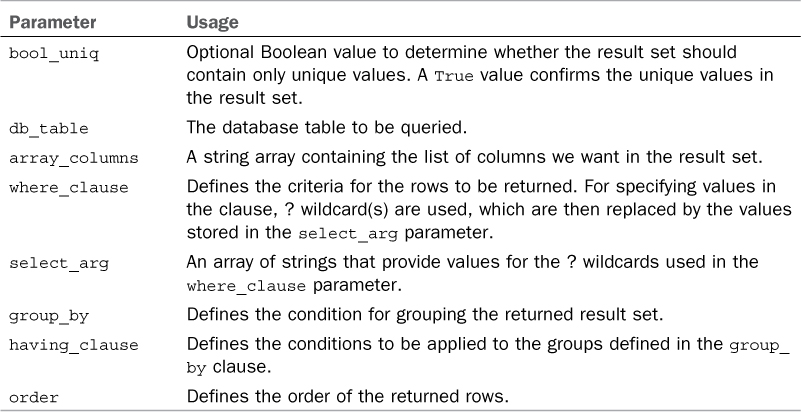
To fetch the desired rows from a database table, we execute queries containing a criterion against the given database. The queries are executed through the query() method provided by the SQLiteDatabase class. The parameters that are passed to the query() method are shown here: db.query(bool_uniq, db_table, array_columns, where_clause, select_arg, group_by, having_clause, order);.
Table 8.1 shows the meaning of these parameters.
Table 8.1. Parameters Used in the query() Method
Examples:
The following two queries return all the products table rows for the code, product_name, and price columns. The first query confirms that only unique rows should be fetched:
public static final String DB_TABLE = "products";
String[] columns = new String[]{"code", "product_name", "price"};
Cursor cursor = db.query(true, DB_TABLE, columns, null, null, null, null, null);
Cursor cursor = db.query(DB_TABLE, columns, null, null, null, null, null);
The following query returns the rows with the product name Camera and the result set is sorted on the product code:
String whereClause="product_name=Camera";
String order="code";
Cursor cursor = db.query(DB_TABLE, columns, whereClause, null, null, null, order);
The returned rows from the query() method are in the form of Cursor objects. A Cursor object does not create a separate result set of the extracted rows, but points at the result set that is part of a database table. When we call the moveToFirst() method on the Cursor object, the cursor is moved to the first row in the result set. Thereafter, all the products table rows that exist in the Cursor object are fetched one by one by calling the moveTo-Next() method and returned. The Cursor is closed when all the rows pointed at in its result set are traversed.
Using Cursors
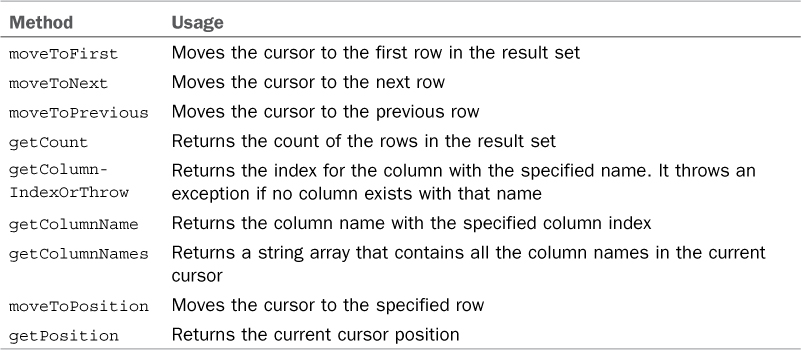
Cursors are pointers pointing at the result set of the underlying data and can be set to traverse the rows and retrieve column data of the result set. The Cursor class provides several methods that can be used to set the pointer at the desired row and column position of the result set. Table 8.2 lists the methods provided by a Cursor object to set the pointer at the desired location in the result set.
Table 8.2. The Cursor Class Methods Used to Set the Pointer at the Desired Location
The DatabaseManager class is accessed through an instance created in our Activity file. Let’s write the code for it. Modify the DatabaseAppActivity.java file to appear as shown in Listing 8.2.
Listing 8.2. Code Written into the Java Activity File DatabaseAppActivity.java
package com.androidunleashed.databaseapp;
import android.app.Activity;
import android.os.Bundle;
import android.widget.TextView;
public class DatabaseAppActivity extends Activity {
private DatabaseManager mydManager;
private TextView response;
private TextView productRec;
@Override
public void onCreate(Bundle savedInstanceState) {
super.onCreate(savedInstanceState);
setContentView(R.layout.activity_database_app);
response=(TextView)findViewById(R.id.response);
productRec=(TextView)findViewById(R.id.prodrec);
mydManager = new DatabaseManager(this);
mydManager.addRow(101, "Camera", Float.parseFloat("15"));
mydManager.addRow(102, "Laptop", Float.parseFloat("1005.99"));
mydManager.close();
mydManager = new DatabaseManager(this);
mydManager.openReadable();
String tableContent = mydManager.retrieveRows();
response.setText("The rows in the products table are:");
productRec.setText(tableContent);
mydManager.close();
}
}
We can see that TextView controls with the response and prodrec IDs are captured from the layout file activity_database_app.xml and mapped to the TextView objects, response and productRec, respectively. To access different methods defined in the DatabaseManager Java class that we just created above, its instance is created called mydManager. Through the mydManager instance, we access the addRow() method of DatabaseManager to add two rows to the products table of our shopping database. After we insert the rows in the products table, mydManager is closed so that it can be re-created to open the database in read mode. The readable database instance is obtained by calling the openReadable() method of the DatabaseManager class through its instance mydManager. The text in the response TextView control is set to The rows in the products table are:. The text is a header for the products rows that are displayed through another TextView control. All the rows in the products table are accessed by calling the retrieveRows() method and displayed via the TextView object productRec.
It’s clear that we need to define two TextView controls in our applications, one to display the rows in the products table and the other as the header or title for the rows being displayed. To define two TextView controls in activity_database_app.xml, use the code shown in Listing 8.3.
Listing 8.3. Code Written into the Layout File activity_database_app.xml
<LinearLayout xmlns:android="http://schemas.android.com/apk/res/android"
android:orientation="vertical"
android:layout_width="match_parent"
android:layout_height="match_parent">
<TextView
android:layout_width="match_parent"
android:layout_height="wrap_content"
android:id="@+id/response" />
<TextView
android:id="@+id/prodrec"
android:layout_width="match_parent"
android:layout_height="wrap_content" />
</LinearLayout>
Our application is complete, and we can run it. The rows in the products database table are displayed, as shown in Figure 8.2.
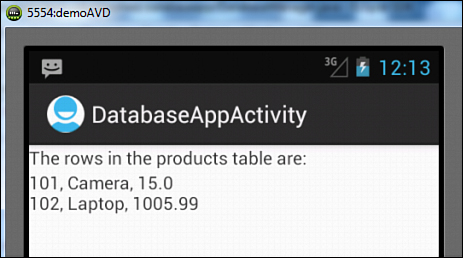
Figure 8.2. The rows in the products table displayed via the TextView control
To confirm whether the two rows we inserted with the previous application were actually inserted into the products table of our shopping SQLite database, let’s learn how to access the database through ADB.
Accessing Databases with the ADB
Recall from Chapter 1, “Introduction to Android,” that the ADB (Android Debug Bridge) is a client/server program that is part of the Android SDK and is used to communicate with, control, and manage Android devices and emulators. We can perform several tasks via adb commands, including viewing applications, deleting them, installing new applications, and executing shell commands.
To access the ADB through the Windows operating system, open the command prompt and navigate to the folder where adb.exe is located. By default, the file, adb.exe is installed in C:Program Files (x86)Androidandroid-sdkplatform-tools. We can issue the following commands to interact with a device or emulator.
The adb devices command shows the list of currently running emulator(s) and devices:
C:Program Files (x86)Androidandroid-sdkplatform-tools>adb devices
List of devices attached
emulator-5554 offline
The adb shell command activates the shell, where we can issue Unix-like commands:
C:Program Files (x86)Androidandroid-sdkplatform-tools>adb shell
#
The ls -l long listing command shows the list of directories in the emulator/device:
# ls -l
ls -l
drwxrwxrwt root root 2011-08-06 09:14 sqlite_stmt_journals
drwxrwx--- system cache 2011-07-22 23:14 cache
d---rwxrwx system system 1970-01-01 05:30 sdcard
lrwxrwxrwx root root 2011-08-06 09:14 etc -> /system/etc
drwxr-xr-x root root 2009-07-01 05:54 system
drwxr-xr-x root root 1970-01-01 05:30 sys
drwxr-x--- root root 1970-01-01 05:30 sbin
dr-xr-xr-x root root 1970-01-01 05:30 proc
-rwxr-x--- root root 9075 1970-01-01 05:30 init.rc
-rwxr-x--- root root 1677 1970-01-01 05:30 init.goldfish.rc
-rwxr-x--- root root 106568 1970-01-01 05:30 init
-rw-r--r-- root root 118 1970-01-01 05:30 default.prop
drwxrwx--x system system 2009-07-01 05:54 data
drwx------ root root 1970-01-01 05:30 root
drwxr-xr-x root root 2011-08-06 09:14 dev
The ls /data/data command shows the list of files and directories in the subdirectory of the data directory. We see the list of all installed applications in the emulator. The installed application’s package names are also displayed:
# ls /data/data
ls /data/data
com.android.mms
com.android.googlesearch
com.android.launcher
:::::::::::
:::::::::::
com.androidunleashed.databaseapp
The following command shows the content of the application package’s databases directory:
# ls /data/data/com.androidunleashed.databaseapp/databases
ls /data/data/com.androidunleashed.databaseapp/databases
shopping
The output, shopping, confirms that the shopping database has been created in our application package com.androidunleashed.databaseapp.
Let’s go into the databases directory of our application package:
# cd /data/data/com.androidunleashed.databaseapp/databases
cd /data/data/com.androidunleashed.databaseapp/databases
On executing the ls command, we see the list of files and directories in the databases subdirectory. As expected, the name of our shopping database is displayed:
# ls
ls
shopping
Then, we make the shopping database active by using the sqlite3 shopping command:
# sqlite3 shopping
sqlite3 shopping
SQLite version 3.5.9
Enter ".help" for instructions
The SQLite version information is displayed with the directive to type the .help command to see help instructions. We also see an sqlite> prompt to issue database-related commands.
The .tables command displays the tables that exist in the currently active database:
sqlite> .tables
.tables
android_metadata products
The .schema command displays the structure (field names, their types, width, and so on) of all the tables that exist in the currently active database:
sqlite> .schema
.schema
CREATE TABLE android_metadata (locale TEXT);
CREATE TABLE products (code INTEGER PRIMARY KEY, product_name TEXT, price
FLOAT)
;
The SQL SELECT command can be used to see the number of rows in the products table of our shopping database:
sqlite> select * from products;
select * from products;
101|Camera|15.0
102|Laptop|1005.98999023438
This output confirms that our DatabaseApp application successfully inserted two rows into the products table.
We can also issue an SQL DELETE command to delete a row. The following command deletes a row from the products table that has a product code equal to 102.
sqlite> delete from products where code=102;
delete from products where code=102;
To confirm that the row was really deleted, we can give a SQL SELECT command as shown here:
sqlite> select * from products;
select * from products;
101|Camera|15.0
This output shows only one row in the products table, confirming that one of the two rows was deleted. Similarly we can give an SQL UPDATE command to update or modify the information of any row. The following SQL UPDATE command updates the product name to Handy Cam, whose code is equal to 101.
sqlite> update products set product_name='Handy Cam' where code=101;
update products set product_name='Handy Cam' where code=101;
We can confirm whether the row was successfully updated by issuing an SQL SELECT command:
sqlite> select * from products;
select * from products;
101|Handy Cam|15.0
The preceding output confirms that the product name was updated. Similarly, we can give a different SQL command at the sqlite> prompt to manipulate our database. When finished, we can leave the sqlite> prompt by giving an .exit command:
sqlite>.exit
Note
An alternative to viewing all this data is to transfer the database file to the developer machine and then use many of the free SQLite utilities to view the data in a simple GUI-like fashion. Remember, the preceding commands work only on emulators or rooted devices.
Accessing the Database Through Menus
To make our DatabaseApp application accessible through menus, we need to define a few menu items in the menu file activity_database_app available in the res/menu folder.
In the menu file, we define a menu consisting of two menu items called Insert Rows and List Rows. These are used to initiate the tasks of inserting and accessing rows from the products table. The activity_database_app.xml file with the two menu items appears as shown in Listing 8.4.
Listing 8.4. Code Written into the Menu File activity_database_app.xml
<menu xmlns:android="http://schemas.android.com/apk/res/android">
<item android:id="@+id/insert_rows"
android:title="Insert Rows"
android:icon="@drawable/ic_launcher" />
<item android:id="@+id/list_rows"
android:title="List Rows"
android:icon="@drawable/ic_launcher" />
</menu>
We can see that the IDs assigned to the two menu items of the menu are insert_rows and list_rows, respectively. In addition, the ic_launcher image from the res/drawable folder is displayed in the menu items. To insert and fetch rows from the database table when a menu item is selected, we need to write some Java code into the DatabaseAppActivity.java activity file. Note, there is no need to change the Java file DatabaseManager.java.
The Java code we adds performs the following tasks:
• Display the menu on the screen. Recall from the previous chapter that the onCreateOptionsMenu() method is called when a user clicks the Menu button on the device or emulator. So, in the activity file, we need to override this method to inflate the menu defined in the mymenu.xml file.
• Enclose the commands for inserting and fetching rows from the database table into two separate methods so that they can be invoked when the respective menu item is selected.
• Handle menu item selections and direct them to the respective methods for performing desired tasks.
To do all these tasks, the code shown in Listing 8.5 is written into the Java activity file DatabaseAppActivity.java. Only the code in bold is added or modified code; the rest of the code is the same as we saw in Listing 8.2.
Listing 8.5. Code in the DatabaseAppActivity.java Activity File
package com.androidunleashed.databaseapp;
import android.app.Activity;
import android.os.Bundle;
import android.widget.TextView;
import android.view.Menu;
import android.view.MenuInflater;
import android.view.MenuItem;
public class DatabaseAppActivity extends Activity {
private DatabaseManager mydManager;
private TextView response;
private TextView productRec;
@Override
public void onCreate(Bundle savedInstanceState) {
super.onCreate(savedInstanceState);
setContentView(R.layout.activity_database_app);
response=(TextView)findViewById(R.id.response);
productRec=(TextView)findViewById(R.id.prodrec);
response.setText("Press MENU button to display menu");
}
@Override
public boolean onCreateOptionsMenu(Menu menu) {
MenuInflater inflater = getMenuInflater();
inflater.inflate(R.menu.activity_database_app, menu);
return true;
}
@Override
public boolean onOptionsItemSelected(MenuItem item) {
switch (item.getItemId()) {
case R.id.insert_rows: insertRec();
break;
case R.id.list_rows: showRec();
break;
}
return true;
}
public boolean insertRec(){
mydManager = new DatabaseManager(this);
mydManager.addRow(101, "Camera", Float.parseFloat("15"));
mydManager.addRow(102, "Laptop", Float.parseFloat("1005.99"));
response.setText("The rows in the products table are inserted");
productRec.setText("");
mydManager.close();
return true;
}
public boolean showRec(){
mydManager = new DatabaseManager(this);
mydManager.openReadable();
String tableContent = mydManager.retrieveRows();
response.setText("The rows in the products table are:");
productRec.setText(tableContent);
mydManager.close();
return true;
}
}
We can see that the response TextView object is set to display the text Press MENU button to display menu. The Activity class’s onCreateOptionsMenu() method is overridden to display the menu defined in the mymenu.xml file.
Initially, there is no menu defined in the menu parameter of the onCreateOptionsMenu() method. To inflate the menu that we defined in mymenu.xml, we get the MenuInflater from the Activity class and invoke its inflate method to inflate, or merge, our own menu defined in mymenu.xml to the menu parameter of this method. The onCreateOptionsMenu() method is set to return the boolean value, true, to allow Android to display the menu. Two methods, insertRec() and showRec(), are defined that contain the code to insert and fetch rows from the database table. In the insertRec() method, a DatabaseManager class instance is created called mydManager, and through this instance, the addRow() method is invoked to insert two rows in the products table. On successful insertion of the rows, the TextView response displays the text: The rows in the products table are inserted.
In the showRec() method, the DatabaseManager class instance called mydManager is created. It obtains the read-only reference of the database and invokes the DatabaseManager class’s retrieveRows() method that fetches all the rows in the products table and returns a string. The rows returned as a string by retrieveRows() are assigned to the product-Rec TextView for display. To display the header above the displayed rows, the response TextView object is set to The rows in the products table are:.
The onOptionItemSelected() method handles the menu item selections. It calls the insertRec() and showRec() methods when the menu items with the ID insert_rows and list_rows are selected by the user.
After running the application, we get the initial screen shown in Figure 8.3 (left), where the TextView control prompts to call the menu. The menu appears with two menu items, Insert Rows and List Rows. After we select Insert Rows, the activity class method insert-Rec() is executed, which inserts two rows in the products table and displays the message The rows in the products table are inserted (see Figure 8.3—middle). After we select List Rows, the rows in the products database table are accessed and displayed on the screen through the TextView control, as shown in Figure 8.3 (right).
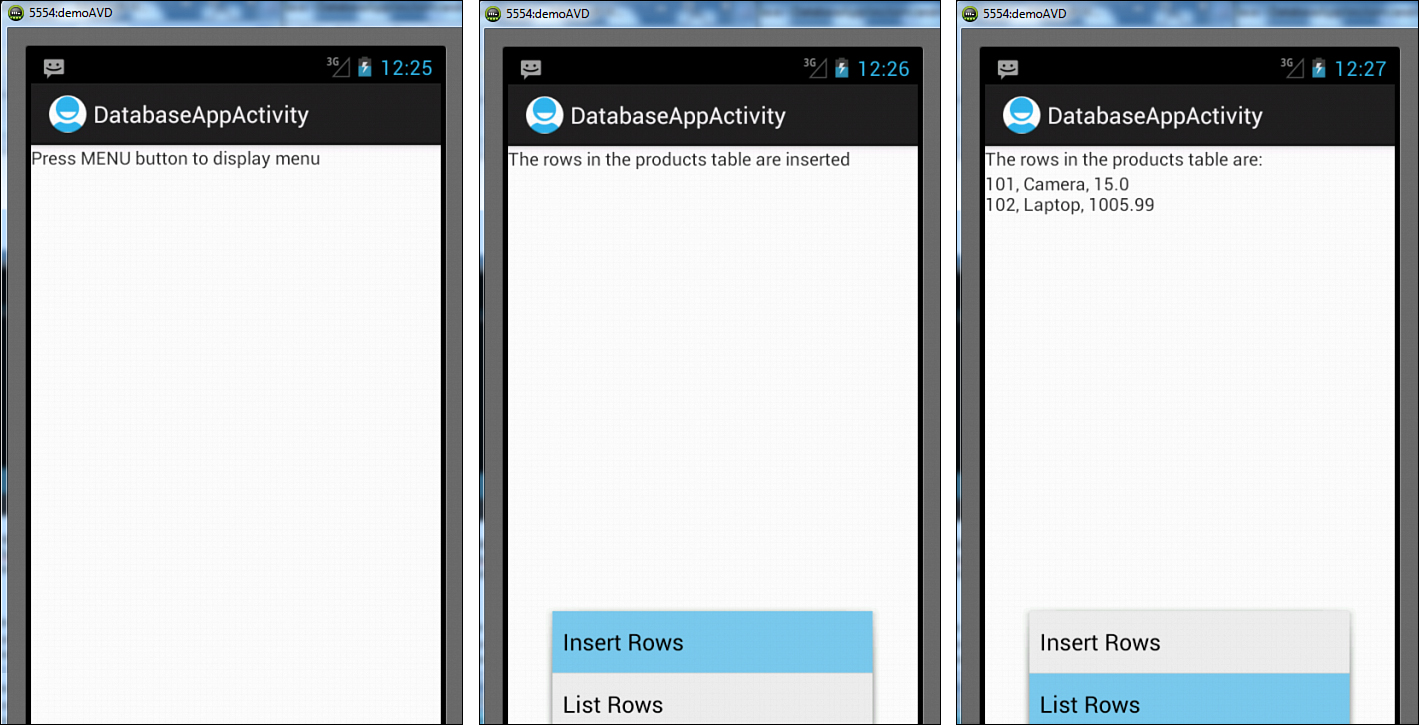
Figure 8.3. The TextView asking the user to press the MENU button to invoke the application’s menu (left), the menu is displayed and the TextView shows that the Insert Rows menu item was selected (middle), and the rows in the products table displayed after selecting the List Rows menu item (right)
Our application looks pretty good, but there seems to be a limitation. It doesn’t ask the user to provide information for adding new products to the products table. Instead the two rows to be added are hard-coded. To add more user interaction, we need to allow the user to enter new product information to the products table. Let’s see how it can be done.
Creating a Data Entry Form
To create a form for entering new product information (see Figure 8.5—left), three TextViews, three EditText controls, and two Button controls are arranged in tabular format in the TableLayout. The layout file activity_database_app.xml is modified to appear as shown in Listing 8.6. Only the code in bold is the newly added code; the rest is the same as we saw in Listing 8.3.
Listing 8.6. Code Written into the Layout File activity_database_app.xml
<LinearLayout xmlns:android="http://schemas.android.com/apk/res/android"
android:orientation="vertical"
android:layout_width="match_parent"
android:layout_height="match_parent" >
<TextView
android:layout_width="match_parent"
android:layout_height="wrap_content"
android:id="@+id/response" />
<TextView
android:id="@+id/prodrec"
android:layout_width="match_parent"
android:layout_height="wrap_content" />
<TableLayout
android:id="@+id/add_table"
android:layout_width="match_parent"
android:layout_height="wrap_content" >
<TableRow >
<TextView
android:text="Product Code:"
android:padding="3dip" />
<EditText
android:id="@+id/prod_code"
android:layout_width="match_parent"
android:layout_height="wrap_content"/>
</TableRow>
<TableRow >
<TextView
android:text="Product Name:"
android:padding="3dip" />
<EditText
android:id="@+id/prod_name"
android:layout_width="wrap_content"
android:layout_height="wrap_content"
android:minWidth="150dip" />
</TableRow>
<TableRow >
<TextView
android:text="Product Price:"
android:padding="3dip" />
<EditText
android:id="@+id/prod_price"
android:layout_width="wrap_content"
android:layout_height="wrap_content"
android:minWidth="50dip" />
</TableRow>
<TableRow >
<Button
android:id="@+id/add_button"
android:text="Add Product"
android:layout_width="wrap_content"
android:layout_height="wrap_content"
android:padding="3dip" />
<Button
android:id="@+id/cancel_button"
android:text="Cancel"
android:layout_width="wrap_content"
android:layout_height="wrap_content"
android:padding="3dip" />
</TableRow>
</TableLayout>
</LinearLayout>
We can see that the three TextView controls are set to display the text Product Code:, Product Name:, and Product Price:. The captions in the two Button controls are set to Add Product and Cancel. The IDs assigned to the three EditText controls are prod_code, prod_name, and prod_price. The Button controls are assigned the IDs add_button and cancel_button.
There are no major changes to the Java file DatabaseManager.java. Only three statements are modified, as shown in bold in Listing 8.7.
Listing 8.7. Code Written into the Java Class DatabaseManager.java
package com.androidunleashed.databaseapp;
import android.database.sqlite.SQLiteDatabase;
import android.content.Context;
import android.content.ContentValues;
import android.database.Cursor;
import android.database.sqlite.SQLiteOpenHelper;
import android.util.Log;
public class DatabaseManager {
public static final String DB_NAME = "shopping";
public static final String DB_TABLE = "products";
public static final int DB_VERSION = 1;
private static final String CREATE_TABLE = "CREATE TABLE " + DB_TABLE + " (code
INTEGER PRIMARY KEY, product_name TEXT, price FLOAT);";
private SQLHelper helper;
private SQLiteDatabase db;
private Context context;
public DatabaseManager(Context c){
this.context = c;
helper=new SQLHelper(c);
this.db = helper.getWritableDatabase();
}
public DatabaseManager openReadable() throws android.database.SQLException {
helper=new SQLHelper(context);
db = helper.getReadableDatabase();
return this;
}
public void close(){
helper.close();
}
public boolean addRow(int c, String n, float p){
ContentValues newProduct = new ContentValues();
newProduct.put("code", c);
newProduct.put("product_name", n);
newProduct.put("price", p);
try{db.insertOrThrow(DB_TABLE, null, newProduct);}
catch(Exception e) {
Log.e("Error in inserting rows ", e.toString());
e.printStackTrace();
return false;
}
db.close();
return true;
}
public String retrieveRows(){
String[] columns = new String[]{"code", "product_name", "price"};
Cursor cursor = db.query(DB_TABLE, columns, null, null, null, null, null);
String tablerows = "";
cursor.moveToFirst();
while (cursor.isAfterLast() == false) {
tablerows = tablerows + cursor.getInt(0) + ", "+cursor.getString(1)+",
"+ cursor.getFloat(2)+ "
";
cursor.moveToNext();
}
if (cursor != null && !cursor.isClosed()) {
cursor.close();
}
return tablerows;
}
public class SQLHelper extends SQLiteOpenHelper {
public SQLHelper(Context c){
super(c, DB_NAME, null, DB_VERSION);
}
@Override
public void onCreate(SQLiteDatabase db) {
db.execSQL(CREATE_TABLE);
}
@Override
public void onUpgrade(SQLiteDatabase db, int oldVersion, int newVersion) {
Log.w("Products table","Upgrading database i.e. dropping table and rec-
reating it");
db.execSQL("DROP TABLE IF EXISTS " + DB_TABLE);
onCreate(db);
}
}
}
We can see that the addRow() method is set to return a boolean value instead of void, as it was before. The reason is that we use the returned boolean value to see whether the row was successfully inserted into the products table. The database is closed after the row insertion in the products table.
In the activity file, we need to write Java code to perform the following tasks:
• Access the TableLayout container and make it visible when the Insert Rows menu item is selected. Also make it invisible when the List Rows menu item is selected.
• Map the EditText and Button controls defined in the TableLayout to the EditText and Button objects, respectively.
• Associate ClickListener to the Add Product button defined in the TableLayout to listen for the click event occurrence on the Button control.
• Through the callback event of the ClickListener, onClick(), access the new product information entered by the user and send it to the addRow() method defined in DatabaseManager.java as parameters to insert them in the products table.
• Hide the soft keyboard when the user is finished entering new product information.
To perform these tasks, add the code shown in Listing 8.8 into the DatabaseAppActivity.java activity file. Only the code in bold is the newly added code; the rest is the same as we saw in Listing 8.5.
Listing 8.8. Code Written into the DatabaseAppActivity.java Java Activity File
package com.androidunleashed.databaseapp;
import android.app.Activity;
import android.content.Context;
import android.os.Bundle;
import android.widget.TextView;
import android.view.Menu;
import android.view.MenuInflater;
import android.view.MenuItem;
import android.view.View;
import android.widget.Button;
import android.widget.EditText;
import android.widget.TableLayout;
import android.view.View.OnClickListener;
import android.view.inputmethod.InputMethodManager;
public class DatabaseAppActivity extends Activity {
private DatabaseManager mydManager;
private TextView response;
private TextView productRec;
EditText pcode, pname, price;
Button addButton;
private TableLayout addLayout;
private boolean recInserted;
@Override
public void onCreate(Bundle savedInstanceState) {
super.onCreate(savedInstanceState);
setContentView(R.layout.activity_database_app);
response=(TextView)findViewById(R.id.response);
productRec=(TextView)findViewById(R.id.prodrec);
addLayout=(TableLayout)findViewById(R.id.add_table);
addLayout.setVisibility(View.GONE);
response.setText("Press MENU button to display menu");
Button addButton = (Button) findViewById(R.id.add_button);
addButton.setOnClickListener(new OnClickListener() {
public void onClick(View v) {
mydManager = new DatabaseManager(DatabaseAppActivity.this);
pcode=(EditText)findViewById(R.id.prod_code);
pname=(EditText)findViewById(R.id.prod_name);
price=(EditText)findViewById(R.id.prod_price);
recInserted=mydManager.addRow(Integer.parseInt(pcode.getText().
toString()), pname.getText().toString(),
Float.parseFloat (price.getText().toString()));
addLayout.setVisibility(View.GONE);
if(recInserted)
response.setText("The row in the products table is inserted");
else
response.setText("Sorry, some errors occurred while inserting
the row in the products table");
InputMethodManager imm = (InputMethodManager)
getSystemService(Context.INPUT_METHOD_SERVICE);
imm.hideSoftInputFromWindow(price.getWindowToken(), InputMethodMa-
nager.HIDE_NOT_ALWAYS);
mydManager.close();
pcode.setText("");
pname.setText("");
price.setText("");
productRec.setText("");
}
});
}
@Override
public boolean onCreateOptionsMenu(Menu menu) {
MenuInflater inflater = getMenuInflater();
inflater.inflate(R.menu.activity_database_app, menu);
return true;
}
@Override
public boolean onOptionsItemSelected(MenuItem item) {
switch (item.getItemId()) {
case R.id.insert_rows: addLayout.setVisibility(View.VISIBLE);
response.setText("Enter information of the new product");
productRec.setText("");
break;
case R.id.list_rows: showRec();
break;
}
return true;
}
public boolean showRec(){
addLayout.setVisibility(View.GONE);
mydManager = new DatabaseManager(this);
mydManager.openReadable();
String tableContent = mydManager.retrieveRows();
response.setText("The rows in the products table are:");
productRec.setText(tableContent);
mydManager.close();
return true;
}
}
We can see that the TableLayout container is captured from the layout file and mapped to the TableLayout object addLayout. It is initially set to the GONE mode and is be displayed only when the InsertRows menu item is selected by the user. The TableLayout contains controls to enter new product information. The Button control defined in the TableLayout with the ID add_button, is accessed and mapped to the Button object add_button. A ClickListener is associated with the add_button object so that the callback method, onClick(), is executed when the Button with the caption Add Button is selected by the user.
In the onClick() method, the information entered by the user in the three EditText controls, prod_code, prod_name, and prod_price, is accessed, converted into a string data type, and passed as arguments to the addRow() method defined in DatabaseManager.java. To add a new row in the products table, the addRow() method accepts three parameters of the string data type. The boolean value returned by addRow() is checked to see whether the new row was successfully inserted in the products table. If the boolean value returned by addRow() is true, it means that the new row was successfully inserted and the message The row in the products table is inserted is displayed. If not, the message Sorry, some errors occurred while inserting the row in the products table is shown instead. Finally, the soft keyboard that appeared while inserting new product information is hidden.
Note, there is no need to make any changes to the menu file mymenu.xml.
Our application is complete and is ready to accept new product information from the user. After we run the application, the first screen that we see on startup is shown in Figure 8.4 (left). The screen displays a message via a TextView control asking the user to select the MENU button. Two menu items, Insert Rows and List Rows, are displayed. After we select the List Rows menu item, the information stored in the products table is displayed, as shown in Figure 8.4 (right).
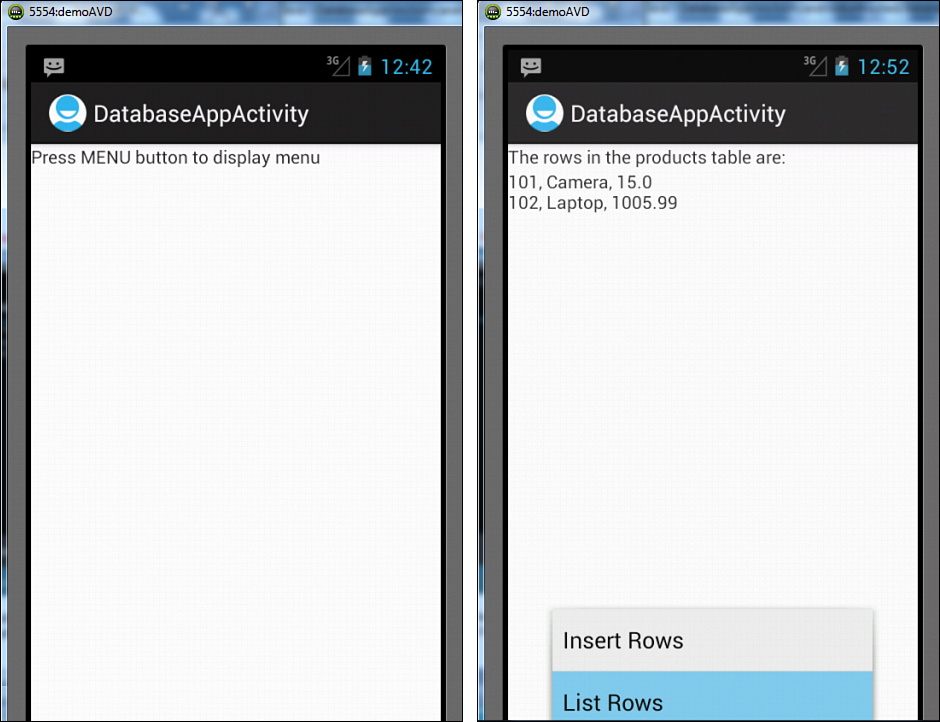
Figure 8.4. The TextView asking the user to press the MENU button to invoke application’s menu (left), and the rows in the products table displayed after selecting the List Rows menu item (right)
After we select the Insert Rows menu item, a form is displayed for entering new product information. A TextView at the top displays the text Enter information of the new product. The user can enter the new product information, as shown in the Figure 8.5 (left), and then click the Add Product button to add a new row into the products table. If the row is successfully inserted, the message The row in the products table is inserted appears on the screen, as shown in Figure 8.5 (middle). After we select the List Rows menu item, the newly added row is displayed on the screen, as shown in Figure 8.5 (right).
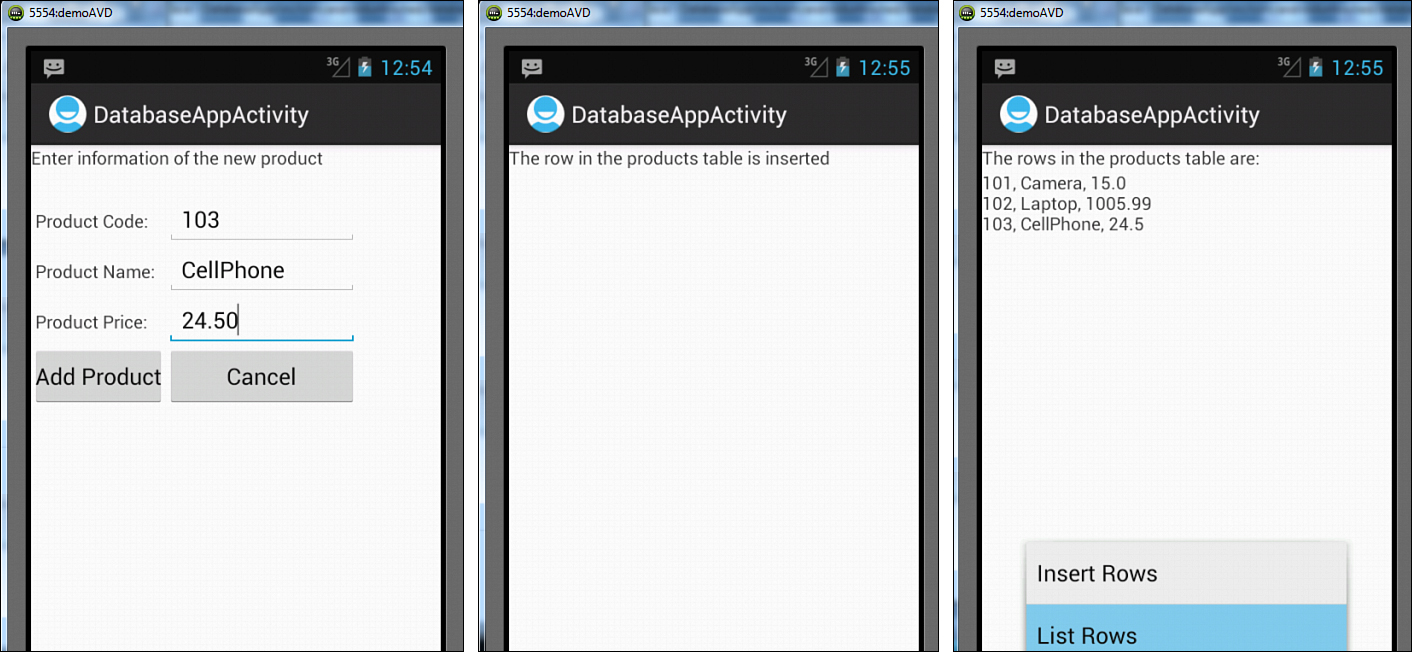
Figure 8.5. The form filled with the new product information (left), the confirmation message, indicating the row was successfully inserted (middle), and the newly added rows (right)
If, for any reason, the row could not be added to the products table, the error message Sorry, some errors occurred while inserting the row in the products table appears on the screen.
We can make our application more attractive and interactive by displaying the products table rows via the ListView control, shown in Figure 8.6, instead of through the TextView control shown in Figure 8.5 (right).
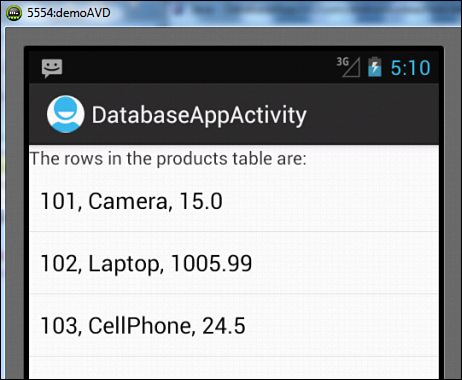
Figure 8.6. The products table rows displayed via the ListView control
Displaying Table Rows Via ListView
To display the information fetched from the database table with the ListView control instead of the TextView control, the first step is to replace the response TextView that we used to display products table rows with a ListView control. After we replace the TextView control with a ListView control, activity_database_app.xml appears as shown in Listing 8.9. Only the code in bold is modified; the rest of the code is the same as we saw in Listing 8.6.
Listing 8.9. Code Written into the Layout File activity_database_app.xml
<LinearLayout xmlns:android="http://schemas.android.com/apk/res/android"
android:orientation="vertical"
android:layout_width="match_parent"
android:layout_height="match_parent">
<TextView
android:layout_width="match_parent"
android:layout_height="wrap_content"
android:id="@+id/response" />
<ListView
android:id="@+id/prodrec"
android:layout_width="match_parent"
android:layout_height="match_parent"
android:drawSelectorOnTop="false"/>
<TableLayout
android:id="@+id/add_table"
android:layout_width="match_parent"
android:layout_height="wrap_content" >
<TableRow >
<TextView
android:text="Product Code:"
android:padding="3dip" />
<EditText
android:id="@+id/prod_code"
android:layout_width="match_parent"
android:layout_height="wrap_content"/>
</TableRow>
<TableRow >
<TextView
android:text="Product Name:"
android:padding="3dip" />
<EditText
android:id="@+id/prod_name"
android:layout_width="wrap_content"
android:layout_height="wrap_content"
android:minWidth="150dip" />
</TableRow>
<TableRow >
<TextView
android:text="Product Price:"
android:padding="3dip" />
<EditText
android:id="@+id/prod_price"
android:layout_width="wrap_content"
android:layout_height="wrap_content"
android:minWidth="50dip"/>
</TableRow>
<TableRow >
<Button
android:id="@+id/add_button"
android:text="Add Product"
android:layout_width="wrap_content"
android:layout_height="wrap_content"
android:padding="3dip"/>
<Button
android:id="@+id/cancel_button"
android:text="Cancel"
android:layout_width="wrap_content"
android:layout_height="wrap_content"
android:padding="3dip" />
</TableRow>
</TableLayout>
</LinearLayout>
In the Java file, DatabaseManager.java, we need to modify the retrieveRows() method that returns the products table rows in string data format. Currently, the retrieveRows() method is set to return a data of type String, as the information returned by it was displayed via a TextView control. Now, because we want to display the data via a ListView control, we must modify the method return type to ArrayList<String>. A productRows of ArrayList<String> variable data type is defined, and every row fetched from the products table is added to it. The method returns the variable productRows, containing the products table rows in the ArrayList format. The Java file DatabaseManager.java is modified to appear as shown in Listing 8.10. Only the statements shown in bold are modified; the rest of the code is the same as we saw in Listing 8.7.
Listing 8.10. Code Written into the Java Class DatabaseManager.java
package com.androidunleashed.databaseapp;
import android.database.sqlite.SQLiteDatabase;
import android.content.Context;
import android.content.ContentValues;
import android.database.Cursor;
import android.database.sqlite.SQLiteOpenHelper;
import android.util.Log;
import java.util.ArrayList;
public class DatabaseManager {
public static final String DB_NAME = "shopping";
public static final String DB_TABLE = "products";
public static final int DB_VERSION = 1;
private static final String CREATE_TABLE = "CREATE TABLE " + DB_TABLE + " (code
INTEGER PRIMARY KEY, product_name TEXT, price FLOAT);";
private SQLHelper helper;
private SQLiteDatabase db;
private Context context;
public DatabaseManager(Context c){
this.context = c;
helper=new SQLHelper(c);
this.db = helper.getWritableDatabase();
}
public DatabaseManager openReadable() throws android.database.SQLException {
helper=new SQLHelper(context);
db = helper.getReadableDatabase();
return this;
}
public void close(){
helper.close();
}
public boolean addRow(int c, String n, float p){
ContentValues newProduct = new ContentValues();
newProduct.put("code", c);
newProduct.put("product_name", n);
newProduct.put("price", p);
try{db.insertOrThrow(DB_TABLE, null, newProduct);}
catch(Exception e)
{
Log.e("Error in inserting rows ", e.toString());
e.printStackTrace();
return false;
}
db.close();
return true;
}
public ArrayList<String> retrieveRows(){
ArrayList<String> productRows=new ArrayList<String>();
String[] columns = new String[]{"code", "product_name", "price"};
Cursor cursor = db.query(DB_TABLE, columns, null, null, null, null, null);
cursor.moveToFirst();
while (cursor.isAfterLast() == false) {
productRows.add(Integer.toString(cursor.getInt(0)) + ", "+cursor.get-
String(1)+",
"+Float.toString(cursor.getFloat(2)));
cursor.moveToNext();
}
if (cursor != null && !cursor.isClosed()) {
cursor.close();
}
return productRows;
}
public class SQLHelper extends SQLiteOpenHelper {
public SQLHelper(Context c){
super(c, DB_NAME, null, DB_VERSION);
}
@Override
public void onCreate(SQLiteDatabase db) {
db.execSQL(CREATE_TABLE);
}
@Override
public void onUpgrade(SQLiteDatabase db, int oldVersion, int newVersion) {
Log.w("Products table","Upgrading database i.e. dropping table and rec-
reating it");
db.execSQL("DROP TABLE IF EXISTS " + DB_TABLE);
onCreate(db);
}
}
}
Again, a small modification is required in DatabaseAppActivity.java. In its showRec() method, we write the code to access the ListView control from the layout file and map it to the ListView object, productRec. The rows returned by calling the retrieveRows() method of DatabaseManager in the ArrayList<String> format are temporarily stored in the variable tableContent. An ArrayAdapter called arrayAdpt is created through the tableContent array. Finally, the ArrayAdapter, arrayAdpt, is set to the ListView control productRec to display the products table rows in the ListView control. The activity file DatabaseAppActivity.java is modified to appear as shown in Listing 8.11. Only the code in bold is modified; the rest of the code is exactly the same as we saw in Listing 8.8.
Listing 8.11. Code Written into the DatabaseAppActivity.java Java Activity File
package com.androidunleashed.databaseapp;
import android.app.Activity;
import android.content.Context;
import android.os.Bundle;
import android.widget.TextView;
import android.view.Menu;
import android.view.MenuInflater;
import android.view.MenuItem;
import android.view.View;
import android.widget.Button;
import android.widget.EditText;
import android.widget.TableLayout;
import android.view.View.OnClickListener;
import android.view.inputmethod.InputMethodManager;
import android.widget.ListView;
import android.widget.ArrayAdapter;
import java.util.ArrayList;
public class DatabaseAppActivity extends Activity {
private DatabaseManager mydManager;
private TextView response;
private ListView productRec;
EditText pcode, pname, price;
Button addButton;
private TableLayout addLayout;
private Boolean recInserted;
ArrayList<String> tableContent;
@Override
public void onCreate(Bundle savedInstanceState) {
super.onCreate(savedInstanceState);
setContentView(R.layout.activity_database_app);
response=(TextView)findViewById(R.id.response);
productRec=(ListView)findViewById(R.id.prodrec);
addLayout=(TableLayout)findViewById(R.id.add_table);
addLayout.setVisibility(View.GONE);
response.setText("Press MENU button to display menu");
Button add_button = (Button) findViewById(R.id.add_button);
add_button.setOnClickListener(new OnClickListener() {
public void onClick(View v) {
mydManager = new DatabaseManager(DatabaseAppActivity.this);
pcode=(EditText)findViewById(R.id.prod_code);
pname=(EditText)findViewById(R.id.prod_name);
price=(EditText)findViewById(R.id.prod_price);
recInserted=mydManager.addRow(Integer.parseInt (pcode.get-
Text().toString()), pname.getText().toString(),Float.parseFloat(price.getText().
toString()));
addLayout.setVisibility(View.GONE);
if(recInserted)
response.setText("The row in the products table is inserted");
else
response.setText("Sorry, some errors occurred while inserting
the row in the products table");
InputMethodManager imm = (InputMethodManager)
getSystemService(Context.INPUT_METHOD_SERVICE);
imm.hideSoftInputFromWindow(price.getWindowToken(), InputMethodMa-
nager.HIDE_NOT_ALWAYS);
mydManager.close();
pcode.setText("");
pname.setText("");
price.setText("");
productRec.setVisibility(View.GONE);
}
});
}
@Override
public boolean onCreateOptionsMenu(Menu menu) {
MenuInflater inflater = getMenuInflater();
inflater.inflate(R.menu.activity_database_app, menu);
return true;
}
@Override
public boolean onOptionsItemSelected(MenuItem item) {
switch (item.getItemId()) {
case R.id.insert_rows:
addLayout.setVisibility(View.VISIBLE);
response.setText("Enter information of the new product");
productRec.setVisibility(View.GONE);
break;
case R.id.list_rows: showRec();
break;
}
return true;
}
public boolean showRec(){
addLayout.setVisibility(View.GONE);
mydManager = new DatabaseManager(this);
mydManager.openReadable();
tableContent = mydManager.retrieveRows();
response.setText("The rows in the products table are:");
productRec = (ListView)findViewById(R.id.prodrec);
ArrayAdapter<String> arrayAdpt=new ArrayAdapter<String>(this,
android.R.layout.simple_list_item_1, tableContent);
productRec.setAdapter(arrayAdpt);
productRec.setVisibility(View.VISIBLE);
mydManager.close();
return true;
}
}
Our application is updated to show the database table rows via a ListView control. After running the application, we get the usual startup screen (as you saw earlier in Figure 8.4—left), asking the user to bring up the menu. The menu shows two menu items, Insert Rows and List Rows, as shown earlier in Figure 8.4 (right). After we select the List Rows menu item, the rows in the products table are fetched and displayed via the ListView control, as shown in Figure 8.6.
Summary
In this chapter we learned to use databases in Android applications. We saw how to use SQLiteOpenHelper and cursors, as well as how to fetch desired rows from the table. We learned to access a database through the ADB and menus. Finally, we learned to create data entry forms and display database table rows via ListView.
The next chapter focuses on understanding animation. We learn to use Canvas and Paints, measure screen coordinates, and apply frame-by-frame animation. We also learn about tweening animation and the use of interpolators.