
Data Storage and Cryptography
We touched on cryptography very briefly in Chapter 4. This chapter will focus more on the importance of using cryptography to obfuscate and secure user data that you will either store or transport. First, we will cover the basics of cryptography and how they apply to us in the context of application development. Next, we will look at the various mechanisms of storing data on the Android platform. Along the way, I will give examples of how to store and retrieve data from different mechanisms and outline what function each store is ideally suited to perform.
One very important point to keep in mind is you should never attempt to write your own cryptographic routines unless you are familiar with cryptographic topics. I have seen many developers try to do this and end up with vulnerable applications both on mobile devices and in web applications. Cryptography is a vast subject by itself; and, in my opinion, I think it is best left to the folks who dedicate their lives to the subject. As an application developer, you will only be interested in a specific subset of topics in cryptography.
I won’t cover the history of cryptography. You only need to keep one thing in mind: make your sensitive user data unreadable to unauthorized users. If an attacker compromises your application using either an indirect or direct attack, then your additional layer (see Figure 5-1) of cryptography will not make it trivial for him to steal the sensitive user data. Instead, he has an additional layer that he has to attack. This principle is similar to the Information Assurance principle of Defense in Depth that the US National Security Agency developed.
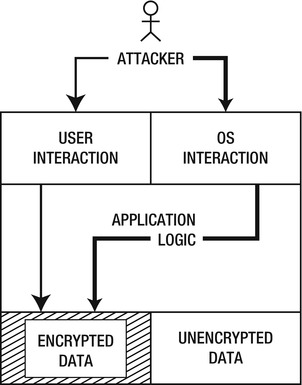
Figure 5-1. An example of the Defense in Depth principle
Since we’re on the subject of cryptography, it is worthwhile learning a bit about Public Key Infrastructure (PKI). PKI is based on the principle of identity and trust verification based on a trusted third party. Let’s examine a scenario that illustrates the principles involved. Bear in mind that this example has nothing to do with application development for the moment. We will look at that subject in depth soon enough.
Mr. Krabs owns Krusty Krab, one of the most popular fast food restaurants in the city. He credits his famous Krabby Patty (a wonderfully moist, delicious burger) with the reason for its popularity. No one except Mr. Krabs knows the Krabby Patty’s super-secret recipe. Given his popularity, he recently started selling franchises to his restaurant. As most of the new branches under his franchise will be geographically distant, Mr. Krabs decides to dispatch his secret recipe to the owners via courier. The only problem with this approach is that Mr. Krabs’s rival, Sheldon James Plankton, has attempted to steal his secret recipe before, and it is likely that he will try again.
I love food, especially burgers, so I decide to open a Krusty Krab franchise in my city. I contact Mr. Krabs; and along with the relevant paperwork, he attaches a document on how I should receive and safeguard his secret Krabby Patty recipe. I’ll spare you the countless pages of details and legalese, and instead list only the most salient points. The instructionsstate that I am to do the following:
- Register myself at the nearest police department under the KK program through the IV department.
- Receive one padlock with one key that opens the padlock from the police department’s IV department.
- Give the padlock to my police department.
- Guard the key with my life.
- Receive and open the steel box that will be sent to me via courier.
Sure enough, after I complete these steps, a package arrives in the mail. Oddly, the outer cardboard packaging seems tampered with, but not the padlock or the solid steel box inside. The key opens the padlock easily and viola! I have the secret Krabby Patty recipe. Later, I hear from Mr. Krabs that Plankton had attempted to hijack and open the steel box, but failed. This explains the outer package tampering that I noticed.
To spare you from more of my idiocy, I’m going to correlate characters and objects in this story to elements associated with PKI (see Table 5-1).
Table 5-1. The Relationship Between the Story and PKI
| Story Element | PKI Element |
|---|---|
| Mr. Krabs | The message sender |
| Me | The message receiver |
| Plankton | The attacker |
| The secret recipe | The message/sensitive data |
| The steel box | The encrypted message |
| My padlock | My public key |
| The key to my padlock | My private key |
| The police department | The Certificate Authority (CA) |
| The KK program | The CA domain |
| The IV department | The Registration Authority (RA) |
When you look at Table 5-1, it is immediately evident that the setup and running of a PKI is quite complex. All of the elements are essential, however, and serve a very specific purpose to ensure the exchange of messages and keys in a secure and trustworthy manner. Let’s analyze each element.
- Mr. Krabs and I: These are the sender and receiver, respectively. We need to exchange sensitive data (the secret recipe) and follow PKI policies and procedures to do so.
- Plankton: He is the attacker. He wants access to the sensitive data and decides to attack it in transit.
- Secret recipe: This is the sensitive data. We want to exchange this recipe and keep it private.
- The steel box: This is the encrypted message. The sender will encrypt it or lock it so that only the key holder can open it. The key holder (me) is the receiver.
- My padlock: This is my public key. When you consider the story, you might wonder how a padlock can also be a key, but look at it from a metaphorical sense. My padlock is something anyone can use to lock or encrypt a message. I am not afraid to give anyone my padlock or public key because only I can open the message. I can have an unlimited number of padlocks to give out to anyone who wants to send me a message securely.
- The key to my padlock: This is my private key. It is private because no one else has a copy. Only I am able to open my padlocks with this key. I have to safeguard this key at all times because if an attacker gains access to this key, then he can open all the steel boxes locked with my padlock, thereby gaining access to the sensitive data.
- The police department: This is the Certificate Authority (CA). One of the fundamental components of a PKI, the CA is the equivalent of a trusted third party. Both Mr. Krabs and I trust our local police departments, and thus they make good candidates for the CA. We rely on them to uphold the law and act with integrity. Therefore, even if somebody who I don’t know or have never met wants to send me a secure message, I don’t have to worry about trusting the person. I only have to trust the authority that tells me the person is who he says he is.
- The KK program: For our story, this is the CA domain. For instance, the police department or CA may be able to act as the trusted third party for many different scenarios. The CA domain will ensure that all transactions occur within the same context. The KK program therefore exists only to deal with Mr. Krabs’s franchise.
- The IV department: This is our Registration Authority (RA). If a person wants to send or receive secure messages, he first has to register himself with the RA. The RA will require that you prove your identity with an officially issued document, such as a national identification card or a passport. The RA will determine the authenticity of this document and may possibly use other means to decide if the person is who he says he is. On satisfactorily meeting the RA’s registration requirements, the person is registered and given a public and private key.
One question that you might have is this: how do two police departments in two separate cities, or even countries, trust each other? We will assume that all police departments establish trust through an internal mechanism to a degree in which many departments can act as one entity.
So to summarize, both Mr. Krabs and I will use a trusted third party to make sure we avoid sending or receiving messages to impostors. So what about attacking this system? There are two key ways to attack this system: 1) The attacker can try to trick the registration process and hijack the identity of a legitimate user, and 2) the attacker can try to conduct a physical attack of the encrypted message while in transit.
The benefit of this infrastructure is that if Plankton tries to impersonate Mr. Krabs or me, he has to do so by tricking the registration process of the CA. In many cases, this is very difficult to accomplish because of the proof of identity stage. To mitigate physical attacks of the message in transit, the system employs strong, unbreakable locks. These locks are the cryptographic encryption algorithms that are used.
Terms Used in Cryptography
I would like to acknowledge Bruce Schneier and his book Applied Cryptography (John Wiley & Sons, 1996) in this chapter. I have referred to it on many occasions, including when writing this book. It provides an excellent grounding in the subject of cryptography and is very comprehensive. If you want to gain a more in-depth understanding of cryptography, then I highly recommend this book.
It is essential to learn the correct terminology in cryptography. Without learning the correct terminology, you can still master cryptography, but probably at a slower pace. Table 5-2 lists the terms used in cryptography in the context of writing and securing your own applications.
Table 5-2. Terms Used in Cryptography
| Term | Description |
|---|---|
| Plaintext/cleartext | This is your message. It is the text file you write, the user data you store, or the raw message that you wish to protect from prying eyes. It is generally readable by everyone. |
| Encryption | This process is used to take plaintext and render it unreadable or obfuscated. |
| Ciphertext | This is the result of encrypting plaintext. This is the encrypted message. |
| Decryption | This is the reverse of encryption. It is the process by which you turn obfuscated ciphertext back into readable plaintext. |
| Cryptographic algorithm/algorithm/cipher | This is the specific type of mathematical function that is used to encrypt and decrypt plaintext. |
| Key | This value will uniquely affect the encryption or decryption algorithm in use. There can be separate keys for encryption or decryption. Most commonly used algorithms depend on a key to work. |
| Shared key/Symmetric key | This is one key that both encrypts and decrypts data. The sender and receiver both have this key; hence, it is defined as a shared key. |
| Asymmetric key | This is when there is one key for encryption and another for decryption. You can use this type of key to encrypt data to a specific person. All you need to do is encrypt the data using the person’s public key and he can then decrypt it using his private key. Therefore, there is a one key for encryption (public key) and another for decryption (private key). |
| Cryptanalysis | This refers to the study of breaking ciphertext without having prior knowledge of the key or algorithm. |
Cryptography in Mobile Applications
Implementing PKI for general, every day applications seems like overkill, especially when you consider the amount of work and complexity involved. When you consider mobile applications, you’re faced with an even tougher task due to the limited resources available. It is possible to do, however, and a paper detailing the theory of Lightweight PKI in mobile environments (LPKI) was presented at the 11th IEEE Singapore International Conference held at Singapore in 2008 (http://ieeexplore.ieee.org/xpl/freeabs_all.jsp?arnumber = 4737164).
But we will not be using PKI or LPKI in any of our applications. Instead, we will try to strike a balance and use techniques from cryptography in a manner that suits the limited resources of a mobile computing environment. So let’s examine how we want cryptography to fit in with our application. As I’ve mentioned in previous chapters, protecting your user data is critical. If you look back at the example in Chapter 2 with the Contact Object encryption, can you identify what type of key we used? We used the Advanced Encryption Standard (AES) algorithm. This is a symmetric key algorithm because there is only one key for both encryption and decryption. If you look closely, you will begin to question my sanity for using a random 256-bit key. One question you might ask is, how do we decrypt data if we just used a random key to encrypt the data in the first place? I’m hoping you answered this question in the exercise at the end of Chapter 2. If you haven’t, then let’s go ahead and tackle that now.
Symmetric Key Algorithms
AES is a symmetric key algorithm or block cipher. As we saw, this means that there is only one key used in encryption and decryption. Algorithms work to encrypt or decrypt data. How this data is processed gives rise to a further division of symmetric algorithms. For instance, we can process a fixed number of data bits at a time, known as a block of data; or we can process data one bit at a time, known as a stream. This distinction gives us block ciphers and stream ciphers. Generally, AES is considered a block cipher that operates on groups of data 128 bits long. A block of plaintext 128 bits long will have a resulting block of ciphertext of the same length. AES allows for a key size from 0 to 256 bits. In our example, we used the maximum key size. For this book, I will use of the AES block cipher. I’ve included some other notable block ciphers in Table 5-3 that come packaged with Android. The principle for generating keys for the other block ciphers remains the same as in Listing 5-1, shown in the next section. Simply substitute the algorithm name in the KeyGenerator.getInstance() method from AES to one of the block ciphers listed in the table.
Table 5-3. Block Ciphers that Can Be Used in Android 2.3.3
| Block Cipher | Block Size | Key Size (in bits) |
|---|---|---|
| AES | 128 bit | 0–256 |
| Camellia | 128 bit | 128, 192, 256 |
| Blowfish | 64 bit | 0–448 |
| Twofish | 128 bit | 128, 192, 256 |
A key is an integral part of cryptography. Most modern cryptographic algorithms require a key to work correctly. In our example in Chapter 2, I used a pseudo-random number generator (PRNG) to generate our encryption key (see Listing 5-1). A good rule of thumb that I use is to always pick the maximum key size of an algorithm. If I find that my application is severely lagging when I test it, then I reduce my key size to the next smaller one. In cryptography, you will always want to use the largest possible key size for your algorithm. The reason for this is to make it harder to perform brute-force attacks on your key.
To illustrate, let’s suppose you picked a key size of 16 bits. This means an attacker has to try a combination of 1s and 0s a total of 216 or 65,536 times. If, however, you picked the full 256-bit key size, then the attacker has to make 2256 or 11.677 (1.16e77) attempts to crack your key, which will take him several years to achieve. Of course, this duration can be reduced with the progression of computing power, but this is true in all areas of cryptanalysis. Thus, the large key sizes and strong algorithms ensure that an attacker cannot easily compromise your ciphertext.
In most cases, encrypted data acts as a deterrent to attackers who are after the low-hanging fruit. Rather than spending time breaking your cryptography, they will move onto the next easy-to-attack application—assuming, of course, that the value of your data does not exceed the value of time, effort, and resources your attacker is willing to invest in breaking your cryptography.
Note A brute-force attack on a key or password occurs when an attacker keeps trying to guess the correct password by sequentially creating and trying passwords based on combinations of different character sets such as A–Z, a–z, 0–9, and special characters. Eventually, in the course of trying all possible combinations, she is likely to guess the correct password.
I know a few developers who still believe that an encryption key is equivalent to a password. It is not. Well, not strictly. In our key generation example, we use a random 256-bit key. Generally, these encryption routines all take place behind the scenes; and although user passwords can be turned into keys, I don’t advise doing this. One reason to avoid doing this is that user passwords are almost always no greater than 10 to 12 bytes, and this does not even cover half the key length (256 / 8 = 32 bytes). Given what we know about brute-force attacks, it is better to pick the maximum allowable key length.
Listing 5-1. A Key Generation Algorithm
public staticbyte[] generateKey(byte[] randomNumberSeed) {
                SecretKey sKey  =  null;
                try {
                     KeyGenerator keyGen  =  KeyGenerator.getInstance("AES");
                     SecureRandom random  =  SecureRandom.getInstance("SHA1PRNG");
                     random.setSeed(randomNumberSeed);
                     keyGen.init(256,random);
                     sKey  =  keyGen.generateKey();
                } catch (NoSuchAlgorithmException e) {
                     Log.e(TAG,"No such algorithm exception");
                }
                return sKey.getEncoded();
        }
So far, I’ve talked about symmetric algorithms processing a fixed block size of data. However, what about the situation that occurs when your data is less than the input block size required by the algorithm? Consider the case in Figure 5-2. Here, we have two blocks of data, but only one of them contains the full block size (we will use an 8-byte block size to simplify things); the second one contains only 4 bits. If we ran this last block through our AES algorithm, it would fail. To counter situations like this, there are several different padding options available.
![]()
Figure 5-2. Two blocks of data without proper alignment
Possibly one of your first thoughts when you encounter the situation in Figure 5-2 is to pad the remaining 4 bits with zeros. This is possible and is known as Zero Padding. Other different padding options exist. I won’t go into too much detail at this point, but you will need to keep in mind that you can’t simply take plaintext and run it through a block cipher. Block ciphers always work with a fixed input block size and will always have a fixed output block size. Figures 5-3 and 5-4 show examples of Zero Padding and PKCS5/7 Padding.
![]()
Figure 5-3. Two blocks of data with Zero Padding. Padding is in bold.
![]()
Figure 5-4. Two blocks of data with PKCS5/7 Padding. Padding is in bold.
Note PKCS5/7 Padding is when you take the length of the remaining bits you need to pad and use that as the pad bit. For example, if there are 10 bits left to pad the block to the correct size, then the pad bit is 0A (which is 10 in hexadecimal). Similarly, if there were 28 bits to pad, then the padding bit would be 1C.
My example in Chapter 2 does not specify any padding. By default, Android will use PKCS5 Padding.
Modes of Operation for Block Ciphers
Block ciphers have various mechanisms of encryption and decryption. The simplest form of encryption is when one block of plaintext is encrypted to provide one block of ciphertext. The next block of plaintext is then encrypted to give the next block of ciphertext, and so on. This is known as the Electronic Code Book (ECB) mode. Figure 5-5 shows a visual representation of ECB encryption.
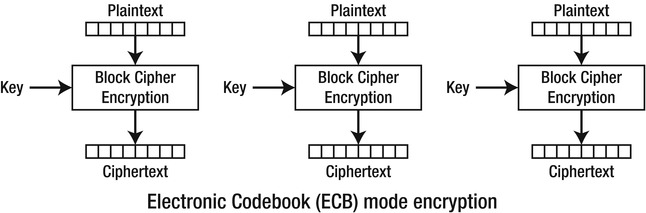
Figure 5-5. ECB encryption (courtesy Wikipedia)
Although simple, ECB mode offers no protection against a pattern recognition cryptanalysis. This means that if the message text contains two identical plaintext blocks, then there will also be two corresponding ciphertext blocks. When conducting a cryptanalysis, one of the techniques used is to identify and locate patterns within ciphertext. After patterns are identified, it can be significantly easier to deduce that ECB encryption is used and, thus, an attacker only needs to focus on decrypting a specific block of the ciphertext. He need not decrypt the entire message.
To prevent this, there are several other modes of operation for block ciphers: 1) cipher-block chaining (CBC), 2) propagating cipher-block chaining (PCBC), 3) cipher feedback (CFB), and 4) output feedback (OFB). I cover only the encryption routines in this section (simply reverse the steps in the encryption mode to get the decryption routines):
- CBC
mode
: Cipher-block chaining mode (see Figure 5-6) uses an additional value known as an initialization vector (IV) that is used to perform a XOR operation on the first block of plaintext. After this, each resulting ciphertext block is XORd with the next plaintext block, and so on. This type of mode ensures that each resulting ciphertext block is dependent on the previous plaintext block.

Figure 5-6. CBC encryption (courtesy Wikipedia)
- PCBC mode: Propagating cipher-block chaining mode (see Figure 5-7) is very similar to CBC mode. The difference is that, instead of only XORing the IV for the first block and the ciphertext for subsequent blocks, PCBC mode XORs the IV and the ciphertext for the first block and then plaintext and ciphertext for additional blocks. The design of this mode is such that a small change in the ciphertext propagates throughout the encryption or decryption process.
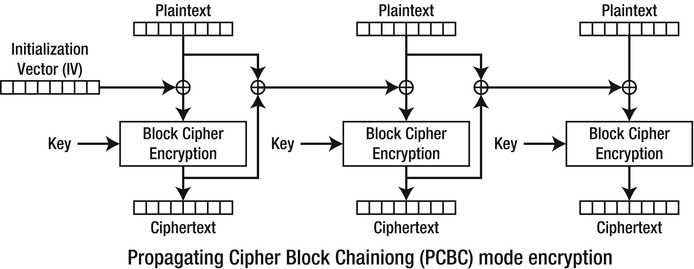
Figure 5-7. PCBC encryption (courtesy Wikipedia)
- CFBmode: Cipher feedback mode (see Figure 5-8) switches places between the IV and plaintext in CBC mode. Therefore, instead of XORing the plaintext and encrypting it, and subsequently XORing the ciphertext with the plaintext; CFB mode will encrypt the IV first, then XOR it with the plaintext to receive the ciphertext. Then, for subsequent blocks, the ciphertext is again encrypted and XORd with the plaintext to give the next block of ciphertext.
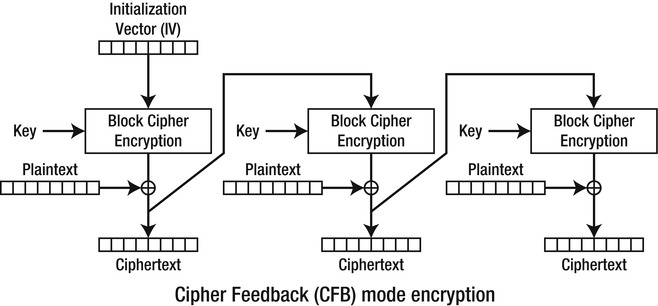
Figure 5-8. CFB encryption (courtesy Wikipedia)
- OFBmode: Output feedback mode (see Figure 5-9) is very similar to CFB mode. The difference is that, instead of using the XORd IV and ciphertext, it is used before the XORing takes place. So, for the first block, the IV is encrypted with the key and this is used as input for the next block. The ciphertext from the first block is then XORd with the first block of plaintext. Subsequent encryptions take place with the ciphertext from the previous block before XORing.

Figure 5-9. OFB encryption (courtesy Wikipedia)
Note XOR (denoted by the symbol ^) is the standard abbreviation for the logical operation exclusive or (also known as exclusive disjunction). Its truth table is as follows:
0 ^ 0 = 0
0 ^ 1 = 1
1 ^ 0 = 1
1 ^ 1 = 0
If you look at my original example, you will see that I am not using a specific encryption mode. By default, Android will use the ECB mode to perform its encryption or decryption. It is up to you as the developer to select a more complex encryption mode, such as CBC or CFB.
Now that you are more aware of the inner workings of the AES symmetric algorithm, I will show how you can change the padding and mode of operation when encrypting. Going back to our original example, change the code to read the same as Listing 5-2. Note the line of bold code. We have only made a couple changes. First, we changed AES to AES/CBC/PKCS5Padding; second, we have added the initialization vector (IV) to our init() method. As I mentioned before, the default mode that Android will use when you specify just AES encoding is AES/ECB/PKCS5Padding. You can verify this by running the program twice, once with AES and once with AES/ECB/PKC5Padding. Both will give you the same ciphertext.
Listing 5-2. Reworked Encryption Routine with CBC Encryption Mode
private static byte[] encrypt(byte[] key, byte[] data, byte[] iv){
                SecretKeySpec sKeySpec  =  new SecretKeySpec(key,"AES");
                Cipher cipher;
                byte[] ciphertext  =  null;
                try {
                     cipher  =  Cipher.getInstance("AES/CBC/PKCS5Padding");
                     IvParameterSpec ivspec  =  new IvParameterSpec(iv);
                     cipher.init(Cipher.ENCRYPT_MODE, sKeySpec, ivspec);
                     ciphertext  =  cipher.doFinal(data);
                } catch (NoSuchAlgorithmException e) {
                     Log.e(TAG,"NoSuchAlgorithmException");
                } catch (NoSuchPaddingException e) {
                     Log.e(TAG,"NoSuchPaddingException");
                } catch (IllegalBlockSizeException e) {
                     Log.e(TAG,"IllegalBlockSizeException");
                } catch (BadPaddingException e) {
                     Log.e(TAG,"BadPaddingException");
                } catch (InvalidKeyException e) {
                     Log.e(TAG,"InvalidKeyException");
             }
             return ciphertext;

        }
Assume you were to select the secret key of your choice. Instead of using the random number generator to generate your secret key, you could write a routine similar to that shown in Listing 5-3. In this listing, stringKey is the key you want to encrypt your data.
Listing 5-3. Reworked Key Generation Example with Fixed Key Value
public static byte[] generateKey(String stringKey) {
                try {
                     SecretKeySpec sks  =  new
                     SecretKeySpec(stringKey.getBytes(),"AES");

                } catch (NoSuchAlgorithmException e) {
                     Log.e(TAG,"No such algorithm exception");
                }
                return sks.getEncoded();
  }
Data Storage in Android
I wanted to cover the topic of cryptography and data storage in one chapter because I believe you can link the two to provide a more secure application. Android runs applications in separate security contexts. This means that each application will run with its own UID and GID; when one application writes data, other applications will not be able to read that data. If you want to share data between applications, then you will need to explicitly enable this sharing by using a content provider. I can see your question forming now: “Why cover all the crypto topics if Android already protects data?” As I alluded to at the start of this chapter, we can build another layer of security over the Android security layer, just for those unforeseen times when a vulnerability, virus, or Trojan rears its ugly head.
Android allows you to store data using five different options (see Table 5-4). Obviously, you will need to decide where to store your application-specific data based on your requirements.
Table 5-4. Mechanisms of Data Storage on Android
| Storage Method | Description | Data Privacy |
|---|---|---|
| Shared preferences | Allows you to store primitive data types (e.g., int, Boolean, float, long, and String) that will persist across the device session. Even if your application is not running, your data will persist until the device is restarted. | Can set four modes of privacy: MODE_PRIVATE, MODE_WORLD_READABLE, MODE_WORLD_WRITABLE, and MODE_MULTI_PROCESS. Default mode is MODE_PRIVATE |
| Internal storage | Allows you to store your data in the device’s internal memory. Generally, this data is not accessible by other applications or even the end user. This is a private data storage area. Data stored here will persist even after a device restarts. When the end user removes your application, Android will also delete your data. | Can set three modes of privacy: MODE_PRIVATE, MODE_WORLD_READABLE, and MODE_WORLD_WRITABLE. Default mode is MODE_PRIVATE. |
| External storage | Data stored here is world-readable. The device user and other applications can read, modify, and delete this data. The external storage is associated with SD Cards or device internal storage (which is nonremovable). | Data is world readable by default. |
| SQLite databases | If you need to create a database for your application to take advantage of SQLite’s searching and data management capabilities, use the SQLite database storage mechanism. | Databases that you create are accessible by any class within your application. Outside applications have no access to this database. |
| Network connection | You can store and retrieve data remotely through web services. You can read more about this in Chapter 6. | Based on your web service settings. |
Which mechanism you choose to store your data largely depends on your requirements. Looking at our Proxim application in Chapter 2, we can also consider storing our data in a SQLite database because this will save us from unnecessarily deciding to enforce a data structure. Let’s look at a few examples of how to store and retrieve data using each of these mechanisms.
Shared preferences are mostly useful for storing application settings that will be valid until a device reboot takes place. As the name states, the storage mechanism is best suited to holding user preferences for an application. Let’s say we have to store information about an e-mail server that our application needs to retrieve data from. We need to store the mail server hostname, port, and whether the mail server uses SSL. I’ve given basic code to store (see Listing 5-4) and retrieve (see Listing 5-5) data into the shared preferences. The StorageExample1 class puts it all together (see Listing 5-6), and the accompanying output is shown in Figure 5-10.
Listing 5-4. Code that Stores Data to the SharedPreferences
package net.zenconsult.android;

import java.util.Hashtable;

import android.content.Context;
import android.content.SharedPreferences;
import android.content.SharedPreferences.Editor;
import android.preference.PreferenceManager;

public class StoreData {
        public static boolean storeData(Hashtable data, Context ctx) {
                SharedPreferences prefs  =  PreferenceManager
                     .getDefaultSharedPreferences(ctx);
                String hostname  =  (String) data.get("hostname");
                int port  =  (Integer) data.get("port");
                boolean useSSL  =  (Boolean) data.get("ssl");
                Editor ed  =  prefs.edit();
                ed.putString("hostname", hostname);
                ed.putInt("port", port);
                ed.putBoolean("ssl", useSSL);
                return ed.commit();
        }
}
Listing 5-5. Code that Retrieves Data from the SharedPreferences
package net.zenconsult.android;

import java.util.Hashtable;

import android.content.Context;
import android.content.SharedPreferences;
import android.preference.PreferenceManager;

public class RetrieveData {
        public static Hashtable get(Context ctx) {
                String hostname  =  "hostname";
                String port  =  "port";
                String ssl  =  "ssl";

                Hashtable data  =  new Hashtable();
                SharedPreferences prefs  =  PreferenceManager
                     .getDefaultSharedPreferences(ctx);
                data.put(hostname, prefs.getString(hostname, null));
                data.put(port, prefs.getInt(port, 0));
                data.put(ssl, prefs.getBoolean(ssl, true));
                return data;
        }
}
Listing 5-6. StorageExample1, the Main Class
package net.zenconsult.android;

import java.util.Hashtable;

import android.app.Activity;
import android.content.Context;
import android.os.Bundle;
import android.util.Log;
import android.widget.EditText;

public class StorageExample1Activity extends Activity {
        /** Called when the activity is first created. */
        @Override
        public void onCreate(Bundle savedInstanceState) {
                super.onCreate(savedInstanceState);
                setContentView(R.layout.main);
                Context cntxt  =  getApplicationContext();

                Hashtable data  =  new Hashtable();
                data.put("hostname", "smtp.gmail.com");
                data.put("port", 587);
                data.put("ssl", true);

                if (StoreData.storeData(data, cntxt))
                     Log.i("SE", "Successfully wrote data");
                else
                     Log.e("SE", "Failed to write data to Shared Prefs");

                EditText ed  =  (EditText) findViewById(R.id.editText1);
                ed.setText(RetrieveData.get(cntxt).toString());
        }
}
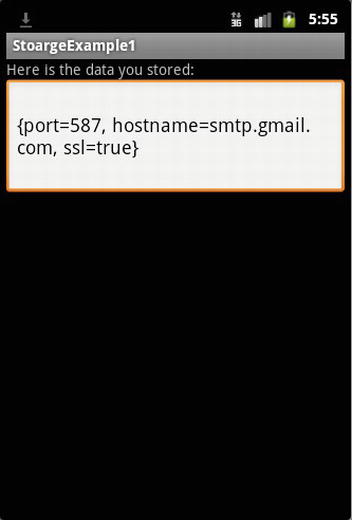
Figure 5-10. The output of the StorageExample1 application
Internal Storage
As we saw, SharedPreferences is ideally suited to key-value pair data types. This is somewhat similar to a Hashtable or even the standard Java Properties object. The limitation with the SharedPreferences mechanism is that you are limited to storing only primitive data types. You wouldn’t be able to store more complex types such as Vectors or Hashtables. If you want to store data other than primitive types, you can look to the internal storage. The internal storage mechanism will allow you to write your data via an OutputStream. Thus, any object that can be serialized into a string of bytes can be written to the internal storage. Let’s begin by creating our StorageExample2 class (see Listing 5-7). As before, I’ve shown the storage and retrieval modules in separate listings (see Listings 5-8 and 5-9, respectively). Figure 5-11 shows the output.
Listing 5-7. StorageExample2, the Main Class
package net.zenconsult.android;

import android.app.Activity;
import android.content.Context;
import android.os.Bundle;
import android.widget.EditText;

public class StorageExample2Activity extends Activity {
        /** Called when the activity is first created. */
        @Override
        public void onCreate(Bundle savedInstanceState) {
                super.onCreate(savedInstanceState);
                setContentView(R.layout.main);

                Context ctx  =  getApplicationContext();

                // Store data
                Contact contact  =  new Contact();
                contact.setFirstName("Sheran");
                contact.setLastName("Gunasekera");
                contact.setEmail("[email protected]");
                contact.setPhone("  +  12120031337");

                StoreData.storeData(contact.getBytes(), ctx);

                // Retrieve data

                EditText ed  =  (EditText) findViewById(R.id.editText1);
                ed.setText(new String(RetrieveData.get(ctx)));

        }
}
Listing 5-8. Use StoreData.java to Store Data in the Internal Storage
package net.zenconsult.android;

import java.io.FileNotFoundException;
import java.io.FileOutputStream;
import java.io.IOException;

import android.content.Context;
import android.util.Log;

public class StoreData {
        public static final String file  =  "contacts";

        public static void storeData(byte[] data, Context ctx) {

                try {
                     FileOutputStream fos  =  ctx.openFileOutput(file, ctx.MODE_PRIVATE);
                     fos.write(data);
                     fos.close();
                } catch (FileNotFoundException e) {
                     Log.e("SE2", "Exception: "  +  e.getMessage());
                } catch (IOException e) {
                     Log.e("SE2", "Exception: "  +  e.getMessage());
                }
        }
}
Listing 5-9. Use RetrieveData.java to Retrieve Data from the Internal Storage
package net.zenconsult.android;

import java.io.ByteArrayOutputStream;
import java.io.FileInputStream;
import java.io.FileNotFoundException;
import java.io.IOException;

import android.content.Context;
import android.util.Log;

public class RetrieveData {
        public static final String file  =  "contacts";

        public static byte[] get(Context ctx) {
                byte[] data  =  null;
                try {
                     int bytesRead  =  0;
                     FileInputStream fis  =  ctx.openFileInput(file);
                     ByteArrayOutputStream bos  =  new ByteArrayOutputStream();
                     byte[] b  =  new byte[1024];
                     while ((bytesRead  =  fis.read(b)) !  =  -1) {
                     bos.write(b, 0, bytesRead);
                     }
                     data  =  bos.toByteArray();

                } catch (FileNotFoundException e) {
                     Log.e("SE2", "Exception: "  +  e.getMessage());
                } catch (IOException e) {
                     Log.e("SE2", "Exception: "  +  e.getMessage());
                }
                return data;
        }
}
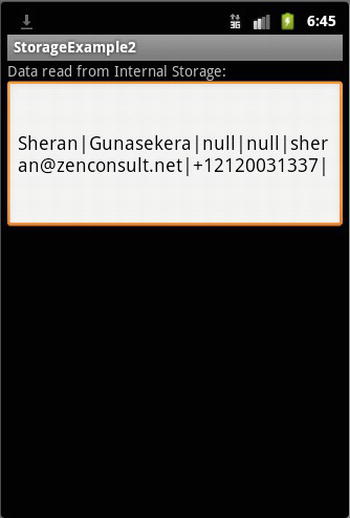
Figure 5-11. The output of the StorageExample2 application
Notice that Listing 5-7 uses the old Contact object from the Proxim example to store the data.
I’m going to skip the external storage examples because you already know how to store data externally (e.g., take a look at the source code for the Proxim application). It stores all its data on the external store. Instead, let’s focus on how to create, store, and retrieve data using Android’s SQLite database object. I will create a database table that we can use to store Contact objects from our Proxim application. Table 5-5 shows the layout of the table. I have taken the easy way out and designated all columns as TEXT. When you’re creating your own table, make sure to specify columns that are numbers, dates, or times based on your data types.
Table 5-5. The Contacts Table Inside the ContactsDB SQLite Database
| Column Name | Column Data Type |
|---|---|
| FIRSTNAME | TEXT |
| LASTNAME | TEXT |
| TEXT | |
| PHONE | TEXT |
| ADDRESS1 | TEXT |
| ADDRESS2 | TEXT |
Create a new project called StorageExample3 in your development environment with the structure shown in Figure 5-12. If you need the Contact object, copy it from the Proxim example.
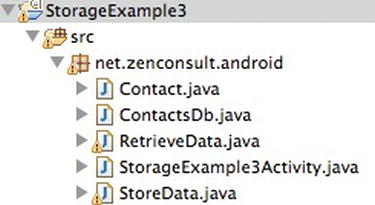
Figure 5-12. The StorageExample3 project structure
The StorageExample3 class shows the main class for working with a SQLite database, creating a Contact object with data in it (see Listing 5-10). Listing 5-11 shows a helper class that you can use to manipulate a SQLite database, while Listing 5-12 shows how to use a class to write data from the Contact object into the database. Finally, Figure 5-13 shows you how to fetch data from a SQLite database and return a contact object. One you’ve had a chance to peruse these listings, we’ll take a closer look at what each piece of this code does and how it does it.
Listing 5-10. The StorageExample3
package net.zenconsult.android;

import android.app.Activity;
import android.os.Bundle;
import android.util.Log;
import android.widget.EditText;

public class StorageExample3Activity extends Activity {
        /** Called when the activity is first created. */
        @Override
        public void onCreate(Bundle savedInstanceState) {
                super.onCreate(savedInstanceState);
                setContentView(R.layout.main);

                // Store data
                Contact contact  =  new Contact();
                contact.setFirstName("Sheran");
                contact.setLastName("Gunasekera");
                contact.setEmail("[email protected]");
                contact.setPhone("  +  12120031337");

                ContactsDb db  =  new ContactsDb(getApplicationContext(),"ContactsDb",null,1);
                Log.i("SE3",String.valueOf(StoreData.store(db, contact)));

                Contact c  =  RetrieveData.get(db);

                db.close();

                EditText ed  =  (EditText)findViewById(R.id.editText1);
                ed.setText(c.toString());

        }
}
Listing 5-11. The ContactsDB Helper Class Handles Our SQLite Database
package net.zenconsult.android;

import android.content.Context;
import android.database.sqlite.SQLiteDatabase;
import android.database.sqlite.SQLiteOpenHelper;
import android.database.sqlite.SQLiteDatabase.CursorFactory;

public class ContactsDb extends SQLiteOpenHelper {
        public static final String tblName  =  "Contacts";

        public ContactsDb(Context context, String name, CursorFactory factory,
                     int version) {
                super(context, name, factory, version);
        }

        @Override
        public void onCreate(SQLiteDatabase db) {
                String createSQL  =  "CREATE TABLE "  +  tblName
                     + " ( FIRSTNAME TEXT, LASTNAME TEXT, EMAIL TEXT,"
                     + " PHONE TEXT, ADDRESS1 TEXT, ADDRESS2 TEXT);";
                db.execSQL(createSQL);
        }

        @Override
        public void onUpgrade(SQLiteDatabase db, int oldVersion, int newVersion) {
                // Use this to handle upgraded versions of your database
        }
}
Listing 5-12. The StoreData Class Writes Data from the Contact Object into the Database
package net.zenconsult.android;

import android.content.ContentValues;
import android.database.sqlite.SQLiteDatabase;

public class StoreData {
        public static long store(ContactsDb db, Contact contact) {
                // Prepare values
                ContentValues values  =  new ContentValues();
                values.put("FIRSTNAME", contact.getFirstName());
                values.put("LASTNAME", contact.getLastName());
                values.put("EMAIL", contact.getEmail());
                values.put("PHONE", contact.getPhone());
                values.put("ADDRESS1", contact.getAddress1());
                values.put("ADDRESS2", contact.getAddress2());

                SQLiteDatabase wdb  =  db.getWritableDatabase();
                return wdb.insert(db.tblName, null, values);
        }
}
Listing 5-13. The RetrieveData class Fetches Data from the SQLite Database and Returns a Contact Object
package net.zenconsult.android;

import android.database.Cursor;
import android.database.sqlite.SQLiteDatabase;

public class RetrieveData {
        public static Contact get(ContactsDb db) {
                SQLiteDatabase rdb  =  db.getReadableDatabase();
                String[] cols  =  { "FIRSTNAME", "LASTNAME", "EMAIL", "PHONE" };
                Cursor results  =  rdb.query(db.tblName, cols, "", null, "", "", "");

                Contact c  =  new Contact();
                results.moveToLast();
                c.setFirstName(results.getString(0));
                c.setLastName(results.getString(1));
                c.setEmail(results.getString(2));
                c.setPhone(results.getString(3));
                return c;
        }
}
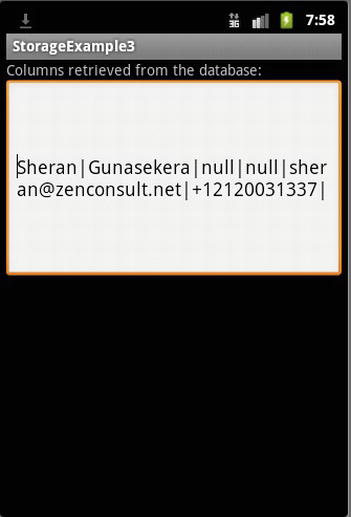
Figure 5-13. The output of the StorageExample3 application
In my experience, it is very rare that I’ve had to use a flat file to store my data. Unless I work with pure binary data (e.g., photos, videos, or music), most of the data that I store is done either as a key-value pair or stored inside a SQLite database. Therefore, I can use Android’s SharedPreferences or SQLiteDatabase to do this. Both mechanisms offer very good manageability and that is the biggest draw for me. If you haven’t worked with SQLite databases before, then you might want to consider looking into it a bit more. Indeed, most modern mobile operating systems, including Apple’s iOS and RIM’s BlackBerry Smartphone OS, offer native support for SQLite databases. The good part is that SQLite databases are very portable, and you can create, read, and modify a SQLite database on just about any major operating system, including Mac OS X, Linux, and Windows.
Let’s analyze the source from our StorageExample3 project. Listing 5-10 is the main class, and it creates a Contact object with data in it:
Contact contact  =  new Contact();
contact.setFirstName("Sheran");
contact.setLastName("Gunasekera");
contact.setEmail("[email protected]");
contact.setPhone("  +  12120031337");
Next, it uses the ContactsDb class (Listing 5-11) that subclasses the SQLiteOpenHelper class:
ContactsDb db = new ContactsDb(getApplicationContext(),"ContactsDb",null,1);
If you want to create your own database, then subclassing SQLiteOpenHelper is the way to go. The code then uses the StoreData class’s (Listing 5-12) store() method to save the just created Contact object. We call the store() method and pass our newly created SQLite database and our Contact object. StoreData will then break down the Contact object into a ContentValues object:
ContentValues values  =  new ContentValues();
values.put("FIRSTNAME", contact.getFirstName());
values.put("LASTNAME", contact.getLastName());
values.put("EMAIL", contact.getEmail());
values.put("PHONE", contact.getPhone());
values.put("ADDRESS1", contact.getAddress1());
values.put("ADDRESS2", contact.getAddress2());
Tip If you are creating your own data objects and you know you are going to use the SQLite database mechanism to store your data, you might want to consider extending ContentValues for your data object. This makes it a lot easier to pass to when storing and retrieving data.
Next, we write the values to our database table. The SQLiteOpenHelper object can retrieve a WritableDatabase or a ReadableDatabase. We use the most appropriate one when inserting or querying data from our table:
SQLiteDatabase wdb  =  db.getWritableDatabase();
return wdb.insert(db.tblName, null, values);
The RetrieveData class handles data retrieval from the database. Here, we are only interested in the last row of values inserted. In a production application, we would iterate over our Cursor to fetch each row:
SQLiteDatabase rdb  =  db.getReadableDatabase();
String[] cols  =  { "FIRSTNAME", "LASTNAME", "EMAIL", "PHONE" };
Cursor results  =  rdb.query(db.tblName, cols, "", null, "", "", "");
After fetching the data from the table, we re-create a Contact object that we return:
Contact c  =  new Contact();
results.moveToLast();
c.setFirstName(results.getString(0));
c.setLastName(results.getString(1));
c.setEmail(results.getString(2));
c.setPhone(results.getString(3));
return c;
The output (see Figure 5-13) looks predictably the same from the previous example.
Combining Data Storage with Encryption
We covered two very important points in this chapter, but we did so separately. If you attempted the exercises in Chapter 2, then you already have a fair idea of what we need to do next. We can clearly see that whatever data we store is placed in the clear inside whichever storage mechanism we select. We can rely on Android to ensure that our data is not read by unauthorized applications, but what if a brand new virus is released into the wild next week? This virus affects only Android phones and is able to bypass the SQLite database permissions to read all databases present on the device. Now your only hope of keeping your data private has been compromised and all your data is vulnerable to being copied off your device.
We discussed such attacks in previous chapters and classified them as indirect attacks. They are indirect because the virus does not go after your application directly. Instead, it goes after the Android OS. The aim is to copy all SQLite databases in the hopes that the virus author can copy any sensitive information stored there. If you had added another layer of protection, however, then all the virus author would see is garbled data. Let’s build a more permanent cryptographic library that we can reuse in all our applications. Let’s start by creating a brief set of specifications:
- Uses symmetric algorithms: Our library will use a symmetric algorithm, or block cipher, to encrypt and decrypt our data. We will settle on AES, although we should be able to modify this at a later date.
- Uses a fixed key: We need to be able to include a key that we can store on the device that will be used to encrypt and decrypt data.
- Key stored on device: The key will reside on the device. While this is a risk to our application from the perspective of direct attacks, it should suffice in protecting us against indirect attacks.
Let’s start with our key management module (see Listing 5-14). Because we plan to use a fixed key, we won’t need to generate a random one as we did in the past examples. The KeyManager will therefore perform the following tasks:
- Accept a key as a parameter (the setId(byte[] data) method)
- Accept an initialization vector as a parameter (the setIv(byte[] data) method)
- Store the key inside a file in the internal store
- Retrieve the key from a file in the internal store (the getId(byte[] data) method)
- Retrieve the IV from a file in the internal store (the getIv(byte[] data) method)
Listing 5-14. The KeyManager Module
package net.zenconsult.android.crypto;

import java.io.ByteArrayOutputStream;
import java.io.FileInputStream;
import java.io.FileNotFoundException;
import java.io.FileOutputStream;
import java.io.IOException;

import android.content.Context;
import android.util.Log;

public class KeyManager {
        private static final String TAG  =  "KeyManager";
        private static final String file1  =  "id_value";
        private static final String file2  =  "iv_value";

        private static Context ctx;

        public KeyManager(Context cntx) {
                ctx  =  cntx;
        }

        public void setId(byte[] data) {
                writer(data, file1);
        }

        public void setIv(byte[] data) {
                writer(data, file2);
        }

        public byte[] getId() {
                return reader(file1);
        }

        public byte[] getIv() {
                return reader(file2);
        }
        public byte[] reader(String file) {
                byte[] data  =  null;
                try {
                     int bytesRead  =  0;
                     FileInputStream fis  =  ctx.openFileInput(file);
                     ByteArrayOutputStream bos  =  new ByteArrayOutputStream();
                     byte[] b  =  new byte[1024];
                     while ((bytesRead  =  fis.read(b)) !  =  -1) {
                     bos.write(b, 0, bytesRead);
                     }
                     data  =  bos.toByteArray();
                } catch (FileNotFoundException e) {
                     Log.e(TAG, "File not found in getId()");
                } catch (IOException e) {
                     Log.e(TAG, "IOException in setId(): "  +  e.getMessage());
                }
                return data;
        }

        public void writer(byte[] data, String file) {
                try {
                     FileOutputStream fos  =  ctx.openFileOutput(file,
                     Context.MODE_PRIVATE);
                     fos.write(data);
                     fos.flush();
                     fos.close();
                } catch (FileNotFoundException e) {
                     Log.e(TAG, "File not found in setId()");
                } catch (IOException e) {
                     Log.e(TAG, "IOException in setId(): "  +  e.getMessage());
                }
        }

}
Next, we do the Crypto module (see Listing 5-15). This module takes care of the encryption and decryption. I have added an armorEncrypt() and armorDecrypt() method to the module to make it easier to convert the byte array data into printable Base64 data and vice versa.
Listing 5-15. The Cryptographic Module
package net.zenconsult.android.crypto;

import java.security.InvalidAlgorithmParameterException;
import java.security.InvalidKeyException;
import java.security.NoSuchAlgorithmException;

import javax.crypto.BadPaddingException;
import javax.crypto.Cipher;
import javax.crypto.IllegalBlockSizeException;
import javax.crypto.NoSuchPaddingException;
import javax.crypto.spec.IvParameterSpec;
import javax.crypto.spec.SecretKeySpec;

import android.content.Context;
import android.util.Base64;

public class Crypto {
        private static final String engine  =  "AES";
        private static final String crypto  =  "AES/CBC/PKCS5Padding";
        private static Context ctx;

        public Crypto(Context cntx) {
                ctx  =  cntx;
        }

        public byte[] cipher(byte[] data, int mode)
                     throws NoSuchAlgorithmException, NoSuchPaddingException,
                     InvalidKeyException, IllegalBlockSizeException,
                     BadPaddingException, InvalidAlgorithmParameterException {
                KeyManager km  =  new KeyManager(ctx);
                SecretKeySpec sks  =  new SecretKeySpec(km.getId(), engine);
                IvParameterSpec iv  =  new IvParameterSpec(km.getIv());
                Cipher c  =  Cipher.getInstance(crypto);
                c.init(mode, sks, iv);
                return c.doFinal(data);
        }

        public byte[] encrypt(byte[] data) throws InvalidKeyException,
                     NoSuchAlgorithmException, NoSuchPaddingException,
                     IllegalBlockSizeException, BadPaddingException,
                     InvalidAlgorithmParameterException {
                return cipher(data, Cipher.ENCRYPT_MODE);
        }

        public byte[] decrypt(byte[] data) throws InvalidKeyException,
                     NoSuchAlgorithmException, NoSuchPaddingException,
                     IllegalBlockSizeException, BadPaddingException,
                     InvalidAlgorithmParameterException {
                return cipher(data, Cipher.DECRYPT_MODE);
        }

        public String armorEncrypt(byte[] data) throws InvalidKeyException,
                     NoSuchAlgorithmException, NoSuchPaddingException,
                     IllegalBlockSizeException, BadPaddingException,
                     InvalidAlgorithmParameterException {
                return Base64.encodeToString(encrypt(data), Base64.DEFAULT);
        }
        public String armorDecrypt(String data) throws InvalidKeyException,
                     NoSuchAlgorithmException, NoSuchPaddingException,
                     IllegalBlockSizeException, BadPaddingException,
                     InvalidAlgorithmParameterException {
                return new String(decrypt(Base64.decode(data, Base64.DEFAULT)));
        }

}
You can include these two files in any of your applications that require data storage to be encrypted. First, make sure that you have a value for your key and initialization vector, then call any one of the encrypt or decrypt methods on your data before you store it. Listing 5-16 shows the changes required to the StorageExample3 class. Additionally, Listings 5-17 and 5-18 show the changes required to the StoreData and RetrieveData files, respectively.
Listing 5-16. The New StorageExample3 with Encryption
package net.zenconsult.android;

import net.zenconsult.android.crypto.Crypto;
import net.zenconsult.android.crypto.KeyManager;
import android.app.Activity;
import android.os.Bundle;
import android.util.Log;
import android.widget.EditText;

public class StorageExample3Activity extends Activity {
        /** Called when the activity is first created. */
        @Override
        public void onCreate(Bundle savedInstanceState) {
                super.onCreate(savedInstanceState);
                setContentView(R.layout.main);

                String key  =  "12345678909876543212345678909876";
                String iv  =  "1234567890987654";

                KeyManager km  =  new KeyManager(getApplicationContext());
                km.setIv(iv.getBytes());
                km.setId(key.getBytes());

                // Store data
                Contact contact  =  new Contact();
                contact.setFirstName("Sheran");
                contact.setLastName("Gunasekera");
                contact.setEmail("[email protected]");
                contact.setPhone("  +  12120031337");

                ContactsDb db  =  new ContactsDb(getApplicationContext(), "ContactsDb",
                     null, 1);
                Log.i("SE3", String.valueOf(StoreData.store(new Crypto(
                     getApplicationContext()), db, contact)));

                Contact c  =  RetrieveData.get(new Crypto(getApplicationContext()), db);

                db.close();

                EditText ed  =  (EditText) findViewById(R.id.editText1);
                ed.setText(c.toString());

        }
}
Listing 5-17. The Modified StoreData Class
package net.zenconsult.android;

import java.security.InvalidAlgorithmParameterException;
import java.security.InvalidKeyException;
import java.security.NoSuchAlgorithmException;

import javax.crypto.BadPaddingException;
import javax.crypto.IllegalBlockSizeException;
import javax.crypto.NoSuchPaddingException;

import net.zenconsult.android.crypto.Crypto;
import android.content.ContentValues;
import android.database.sqlite.SQLiteDatabase;
import android.util.Log;

public class StoreData {
        public static long store(Crypto crypto, ContactsDb db, Contact contact) {
                // Prepare values
                ContentValues values  =  new ContentValues();
                try {
                     values.put("FIRSTNAME", crypto.armorEncrypt(contact.getFirstName()
                     .getBytes()));
                     values.put("LASTNAME", crypto.armorEncrypt(contact.getLastName()
                     .getBytes()));
                     values.put("EMAIL", crypto.armorEncrypt(contact.getEmail()
                     .getBytes()));
                     values.put("PHONE", crypto.armorEncrypt(contact.getPhone()
                     .getBytes()));
                     values.put("ADDRESS1", contact.getAddress1());
                     values.put("ADDRESS2", contact.getAddress2());
                } catch (InvalidKeyException e) {
                     Log.e("SE3", "Exception in StoreData: "  +  e.getMessage());
                } catch (NoSuchAlgorithmException e) {
                     Log.e("SE3", "Exception in StoreData: "  +  e.getMessage());
                } catch (NoSuchPaddingException e) {
                     Log.e("SE3", "Exception in StoreData: "  +  e.getMessage());
                } catch (IllegalBlockSizeException e) {
                     Log.e("SE3", "Exception in StoreData: "  +  e.getMessage());
                } catch (BadPaddingException e) {
                     Log.e("SE3", "Exception in StoreData: "  +  e.getMessage());
                } catch (InvalidAlgorithmParameterException e) {
                     Log.e("SE3", "Exception in StoreData: "  +  e.getMessage());
                }
                SQLiteDatabase wdb  =  db.getWritableDatabase();
                return wdb.insert(ContactsDb.tblName, null, values);
        }
}
Listing 5-18. The Modified RetrieveData Class
package net.zenconsult.android;

import java.security.InvalidAlgorithmParameterException;
import java.security.InvalidKeyException;
import java.security.NoSuchAlgorithmException;

import javax.crypto.BadPaddingException;
import javax.crypto.IllegalBlockSizeException;
import javax.crypto.NoSuchPaddingException;

import net.zenconsult.android.crypto.Crypto;
import android.database.Cursor;
import android.database.sqlite.SQLiteDatabase;
import android.util.Log;

public class RetrieveData {
        public static Contact get(Crypto crypto, ContactsDb db) {
                SQLiteDatabase rdb  =  db.getReadableDatabase();
                String[] cols  =  { "FIRSTNAME", "LASTNAME", "EMAIL", "PHONE" };
                Cursor results  =  rdb.query(ContactsDb.tblName, cols, "", null, "", "",
                     "");

                Contact c  =  new Contact();
                results.moveToLast();

                try {
                     c.setFirstName(crypto.armorDecrypt(results.getString(0)));
                     c.setLastName(crypto.armorDecrypt(results.getString(1)));
                     c.setEmail(crypto.armorDecrypt(results.getString(2)));
                     c.setPhone(crypto.armorDecrypt(results.getString(3)));
                } catch (InvalidKeyException e) {
                     Log.e("SE3", "Exception in RetrieveData: "  +  e.getMessage());
                } catch (NoSuchAlgorithmException e) {
                     Log.e("SE3", "Exception in RetrieveData: "  +  e.getMessage());
                } catch (NoSuchPaddingException e) {
                     Log.e("SE3", "Exception in RetrieveData: "  +  e.getMessage());
                } catch (IllegalBlockSizeException e) {
                     Log.e("SE3", "Exception in RetrieveData: "  +  e.getMessage());
                } catch (BadPaddingException e) {
                     Log.e("SE3", "Exception in RetrieveData: "  +  e.getMessage());
                } catch (InvalidAlgorithmParameterException e) {
                     Log.e("SE3", "Exception in RetrieveData: "  +  e.getMessage());
                }

                return c;
        }
}
Figure 5-14 shows what it would look like for anyone accessing the SQLite database without decrypting the information. To replicate this, I didn’t have the RetrieveData class decrypt any of the data.
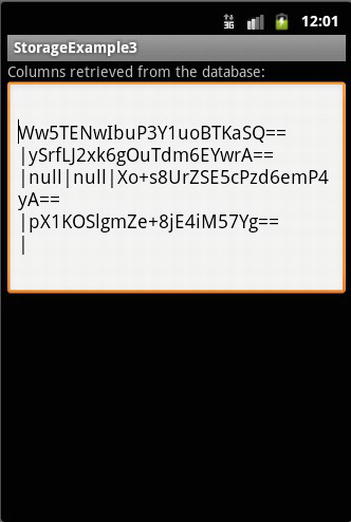
Figure 5-14. What the data would look like without decryption
Summary
In this chapter, we covered the basics of cryptography. We examined how PKI and trusted third parties work, as well as how, for our purposes, PKI or even LPKI would be overkill. We then looked at simple mechanisms of encrypting data and learned the terminology. We saw that encryption was not as straightforward as picking a symmetric algorithm, and that you must consider the different aspects such as padding and modes of operation.
We then looked at the various mechanisms of storing data on Android. We covered examples of each of these and settled on SQLite databases and SharedPreferences to enable us to store application data. We then looked at how we could obfuscate our data using encryption, and we built a general-purpose library to perform encryption and decryption. This library can be included in any of our future programs where we need to store data in a secure manner.