
At some point, you will have to interface with a web application. Whether you’re talking to a RESTful API from a third party or exchanging data with your own back-end web application, your mobile app needs to be open to the idea of interaction with other applications. Naturally, as a responsible developer, it is your job to ensure that the data exchange is done so that attackers cannot access or alter private data belonging to the end user. We spent time exploring “data at rest” in previous chapters, when we looked at data storage and encryption. In this chapter, we will cover “data in transit.”
Originally, I was not planning to spend a lot of time discussing the merits of encrypting your data in transit. Usually, SSL or TLS will handle the secure components of the data in transit. Lately, however, the intrusion into the Certificate Authority called DigiNotar in the Netherlands has led me to reconsider this option (see http://en.wikipedia.org/wiki/DigiNotar for more information). In the end, I’ll leave it up to you as the developer to decide how to secure your transport data; but clearly, this recent attack has made me think that even trusting SSL is not always the best option. Thus, I will cover some topics related to web application security and how your mobile application should interact with such web applications. I will briefly cover the Open Web Application Security Project (OWASP), as well; it is a very good resource with which to secure your web applications.
Consider how secure the source code in Listing 6-1 is. Now ask yourself what would you do to make it more secure? (Check at the end of the chapter for the solution and compare your own notes to see if you were on the right track.)
Listing 6-1. The Client Login
package net.zenconsult.android.examples;

import java.io.IOException;
import java.io.UnsupportedEncodingException;
import java.util.ArrayList;
import java.util.List;

import org.apache.http.HttpResponse;
import org.apache.http.NameValuePair;
import org.apache.http.client.ClientProtocolException;
import org.apache.http.client.HttpClient;
import org.apache.http.client.entity.UrlEncodedFormEntity;
import org.apache.http.client.methods.HttpPost;
import org.apache.http.impl.client.DefaultHttpClient;
import org.apache.http.message.BasicNameValuePair;

import android.util.Log;

public class Login {
  private final String TAG = "HttpPost";

  public Login() {

  }

  public HttpResponse execute() {
       HttpClient client = new DefaultHttpClient();
       HttpPost post = new HttpPost("
        http://logindemo1.appspot.com/logindemo");
       HttpResponse response = null;

       // Post data with number of parameters
       List  <  NameValuePair  >       nvPairs = new ArrayList  <  NameValuePair  >  (2);
       nvPairs.add(new BasicNameValuePair("username", "sheran"));
  nvPairs.add(new BasicNameValuePair("password", "s3kretc0dez"));

       // Add post data to http post
       try {
       UrlEncodedFormEntity params = new UrlEncodedFormEntity(nvPairs);
       post.setEntity(params);
       response = client.execute(post);

       } catch (UnsupportedEncodingException e) {
       Log.e(TAG, "Unsupported Encoding used");
       } catch (ClientProtocolException e) {
       Log.e(TAG, "Client Protocol Exception");
       } catch (IOException e) {
       Log.e(TAG, "IOException in HttpPost");
       }
       return response;
       }

}
Preparing Our Environment
Let’s begin by setting up our testing environment. We obviously will need a ready-made web application-hosting infrastructure. I usually rely on Google App Engine when I need to deploy or test a web application fast. It saves me a lot of time, and I don’t have to worry about setting up the hardware, web server, and application server. With Google App Engine, I can start coding with minimal setup overhead.
Let’s first sign up for an account on Google App Engine (if you already have a Google account for Gmail, then you can skip the following steps and use that ):
- Navigate to http://code.google.com/appengine/ (see Figure 6-1).
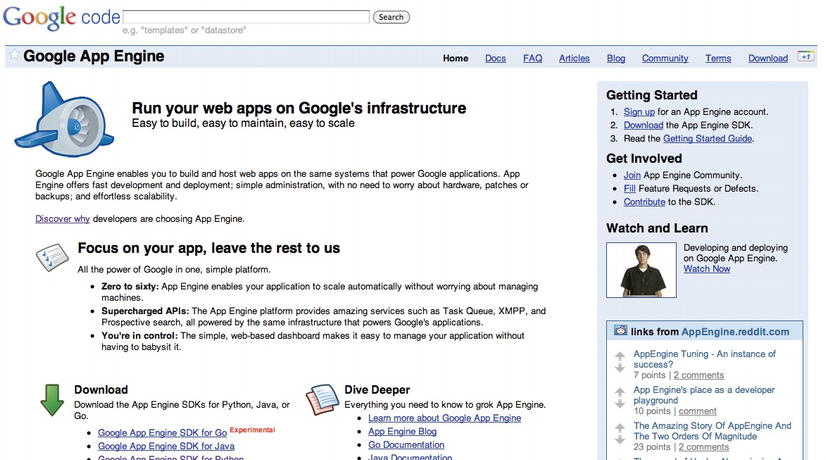
Figure 6-1. The Google App Engine home page
- Click the Sign Up link. When prompted, sign in with your Gmail account. You will then be taken to your Applications list (see Figure 6-2).
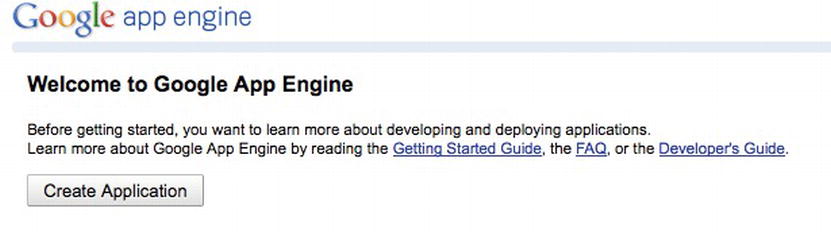
Figure 6-2. The applications list
- Click the Create Application button. The next page allows you to select details about your application. (see Figure 6-3). Since your application will be publicly visible, Google provides you with a subdomain for .appspot.com. This subdomain pool is shared among the entire user base of App Engine developers; so, in some cases, you may not receive the application name you are after. For instance, you’re unlikely to receive the logindemo1 subdomain because I have already registered it. You can check the availability of the subdomain by clicking the Check Availability button.

Figure 6-3. Giving your application a name
- Fill in the subdomain of the application you want; it should be something like <your name > ogindemo1 .appspot.com (see Figure 6-3). Give your application a title, say Login Demo 1. Leave the rest of the options as they are and click Create Application.
- If all went well, you will see a page similar to Figure 6-4 telling you that your application was created successfully. Next, you can explore the status of your application by clicking the “dashboard” link. Your application hasn’t done anything yet, so the statistics will still be empty (see Figure 6-5).
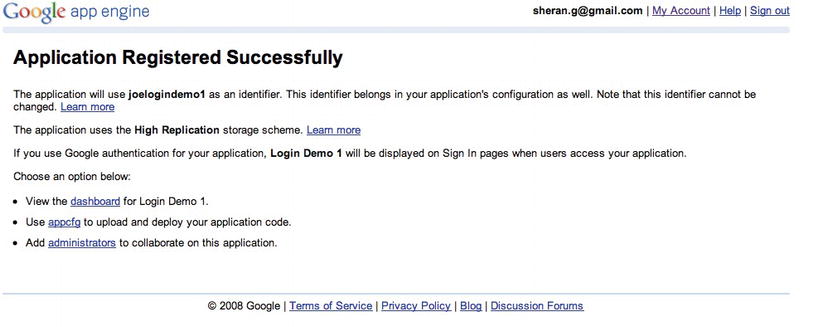
Figure 6-4. Successful app creation

Figure 6-5. The application dashboard
Next, you have to download the SDK for Google App Engine, so that you can write, run, and debug your applications on your local computer before you publish them to the Google App Engine servers. I use Eclipse for most of my development, and I will outline the steps required to download the SDK and integrate it directly with Eclipse. Also, since we’re covering Android, we will stick to the Java SDK for App Engine.
You will find detailed instructions on how to install the Google Apps plugin for Eclipse at the following URL: http://code.google.com/eclipse/docs/getting_started.html. Even if the final URL changes, you should always be able to reach the documentation section by navigating to the base URL, which is http://code.google.com/eclipse.
We’re not going to write any back-end code yet. First, let’s write a stub application that we can start with and build onto. In your Eclipse IDE, create a new Google App Engine Project by going to File ![]() New
New ![]() Web Application Project. Fill in the Project Name as LoginDemo and the package as net.zenconsult.gapps.logindemo. Uncheck the box next to Use Google Web Toolkit (see Figure 6-6). When you’re done, click Finish. You will end up with a project named LoginDemo; and inside the named package, you will find one file called LoginDemoServlet. The file contains the code shown in Listing 6-2. For the moment, it does nothing special. The code waits for an HTTP GET request and then responds with the plain text: “Hello, world.”
Web Application Project. Fill in the Project Name as LoginDemo and the package as net.zenconsult.gapps.logindemo. Uncheck the box next to Use Google Web Toolkit (see Figure 6-6). When you’re done, click Finish. You will end up with a project named LoginDemo; and inside the named package, you will find one file called LoginDemoServlet. The file contains the code shown in Listing 6-2. For the moment, it does nothing special. The code waits for an HTTP GET request and then responds with the plain text: “Hello, world.”

Figure 6-6. Creating a new Google App Engine project
Listing 6-2. The default stub application package , net.zenconsult.gapps.logindemo
import java.io.IOException;
import javax.servlet.http.*;

@SuppressWarnings("serial")
public class LoginDemoServlet extends HttpServlet {
  public void doGet(HttpServletRequest req, HttpServletResponse resp)
            throws IOException {
            resp.setContentType("text/plain");
            resp.getWriter().println("Hello, world");
  }

}
Let’s deploy this application to Google App Engine and see if we can reach it through our web browser. To deploy the application, right-click it in the Eclipse Package Manager and click Google ![]() Deploy to App Engine.
Deploy to App Engine.
You’re then prompted to choose the name of the remote application that you created on the Google website. Enter the name you created in the Application ID field (see Figure 6-7) and click OK. In the next window, click Deploy to upload your application to Google (see Figure 6-8).
Figure 6-7. Selecting the name of the remote application
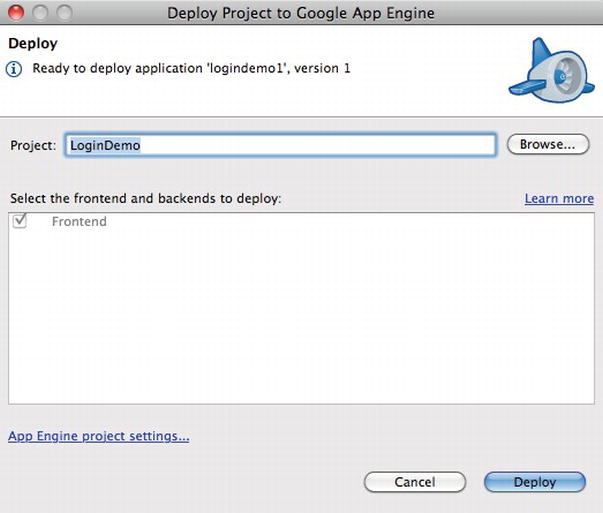
Figure 6-8. Deploying the application to Google
Once you have successfully deployed your app, you can check it by navigating to the URL that you selected when you created your application (http://<your name > logindemo1.appspot.com). In my case, when I navigate to http://logindemo1.appspot.com, I see the “Hello, world” response message (see Figure 6-9).
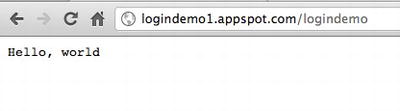
Figure 6-9. Accessing the login servlet
We now have our very own working web application that we can use for whatever we choose. You may have noticed how convenient it was to set up a Google App Engine application. It certainly saves us the time and effort of building a server, installing an operating system, installing server software, and configuring it. Let’s look at a bit of theory related to web applications.
HTML, Web Applications, and Web Services
Any web developer will know what HTML is. It is one of the fundamental building blocks of any modern website. HTML (Hyper Text Markup Language) started its life as a draft write up in 1991; it was a very simple language that could be leveraged to create basic web pages. Fast-forward to 2008, when the draft for HTML version 5 was released. Pure HTML pages are referred to as static pages. In other words, they render on an end user’s browser and remain there until the user navigates to another page.
A web application is a piece of software that end users access over a network—just like HTML pages. A web application, however, consists of more dynamic elements than plain vanilla HTML. For instance, modern web applications have a lot of server-side languages. These languages (e.g., PHP, JSP, and ASP) generate static HTML on the fly at runtime, based on an end user’s input. The web application is installed on a web server and is hosted on hardware that can be accessed by end users over a network such as the Internet. The server-side application framework takes care of rendering the user interface, any application logic (e.g., search, calculation, or any other process), and data storage or retrieval functions. All the end user has to do is show up to the party with his favorite web browser. In other words, because all the complex processing takes place at the back end or server side, the thinner, lighter web browser is nothing more than a mechanism of interacting with the user interface.
Web applications offer developers a number of advantages and are a ubiquitous part of online life today. One of their biggest advantages is the ability to roll out updates or patches to the server and not have to worry about updating hundreds or thousands of clients. Another big advantage of web applications is that end users only require a thin client—a web browser—and that’s it. Thus, you can reach not only a large number of users from the personal computing crowd, but also the mobile computing crowd.
A web service is similar to a web application in that it can be accessed remotely over a network. It is also similar in that it also runs some sort of server software. The primary difference, however, is that users do not access the service interactively. In most cases, web services interact with other client or server applications. A web service is, in most cases, capable of describing the services it offers and how other applications can access them. It uses a Web Services Description Language (WSDL) file to do this. Other applications can understand how to work with the web service by processing the WSDL file that is published. Generally, web services use a specific XML format to exchange information. One of the popular protocols is SOAP (Simple Object Access Protocol). SOAP is made up of various XML payloads based on the specific application. An example of a SOAP message is shown in Listing 6-3.
Listing 6-3. An Example of a SOAP Message (courtesy of Wikipedia)
POST /InStock HTTP/1.1
Host:www.example.org
Content-Type: application/soap  +  xml; charset = utf-8
Content-Length: 299
SOAPAction: "http://www.w3.org/2003/05/soap-envelope"
<?xml version = "1.0"?>
<soap:Envelope xmlns:soap = "http://www.w3.org/2003/05/soap-envelope">
<soap:Body>
<m:GetStockPrice xmlns:m = "http://www.example.org/stock">
<m:StockName > IBM</m:StockName>
</m:GetStockPrice>
</soap:Body>
</soap:Envelope>
Another way web services can work is by exposing a RESTful API. REST, or Representational State Transfer, is an architecture that uses an underlying, stateless, client-server protocol to expose end-points of web services. The premise of REST is to use a much simpler medium of access (like HTTP) with separate URIs for each resource, rather than relying on more complex protocols like SOAP (which works with a single URI and multiple parameters).
You can read more about REST in Roy Fielding’s dissertation at www.ics.uci.edu/∼fielding/pubs/dissertation/rest_arch_style.htm or on Wikipedia at http://en.wikipedia.org/wiki/Representational_state_transfer. Although using a RESTful web service is simple, it can still perform the same tasks as a web service that uses SOAP. Take our SOAP example in Listing 6-3. If our web service exposed this to us as a RESTful API, then we would do something like this:
http://www.example.com/stocks/price/IBM
Note that this is the extent of the request. It can be sent as a simple HTTP GET request to the server, which can then respond. Sometimes, servers can return data in several different representations. For example, if we were to request the server for XML output, we could add an extension of xml. If we wanted it in JSON format instead, we could append a json extension, as shown here:
http://www.example.com/stocks/price/IBM.xml


http://www.example.com/stocks/price/IBM.json
Now is a great time to talk a bit about HTTP (HyperText Transfer Protocol). HTTP is the protocol that drives the web. While HyperText originally referred to plain old HTML, it can now be expanded to include XML (Extensible Markup Language). XML follows the rules of HTTP, but it includes custom HTML tags (or keywords) that can be used. HTTP functions as a request-and-response protocol. The request-response cycle takes place between two parties, known as the client and server. The client, or user-agent (a web browser), makes a request to a web server that sends back a response of either HTML or XML. Most veteran web developers will also sometimes expect comparable formats to XML, such as JSON (JavaScript Object Notation).
HTTP requests are further broken down into request types, or methods. While there are several methods, the most popularly used ones are GET and POST. GET requests are used to retrieve data, and POST requests are used to submit data. If you’re filling in a registration form, clicking the Submit button prompts the browser to POST your data to the server. If you look back at Listing 6-1 at the beginning of the chapter, you will see this line:
HttpPost post = new HttpPost("
http://logindemo1.appspot.com/logindemo
");
This is the creation of an HTTP POST request to a specific URL. As you’re probably aware, a URL (Uniform Resource Locator) is a type of address that tells user-agents where to retrieve a specific resource from. Resources can be files, documents, or objects stored on servers remotely. HTTP requests and responses both have similar structures. Both contain headers and content areas. You can find lots of additional information regarding HTTP at www.w3.org.
Components in a Web Application
Web applications are composed of various layers, or tiers. Typical web applications will have three tiers (see Figure 6-10): the Presentation tier, the Logic tier, and the Data tier. Based on the requirements and complexity of an application, the number of tiers can increase. There are many advantages to having multi-tiered applications: one of them is that system owners can replace or scale hardware or server configurations independently of the other tiers. Consider the scenario where a company needs to increase its amount of data storage; the IT department can upgrade this tier without making significant changes in the other tiers. The next advantage is that the security teams can have control that is more granular at each tier. Each tier has a different function, and thus a different set of requirements and related security controls. Multi-tiered applications allow owners to have more locked-down controls at individual tiers rather than leaving gaps because all three tiers are on one system.
Therefore, based on the three-tier architecture, a web application will contain a web server to present its data, an application server to handle all requests for exchanging data, and a database server that stores and retrieves data.
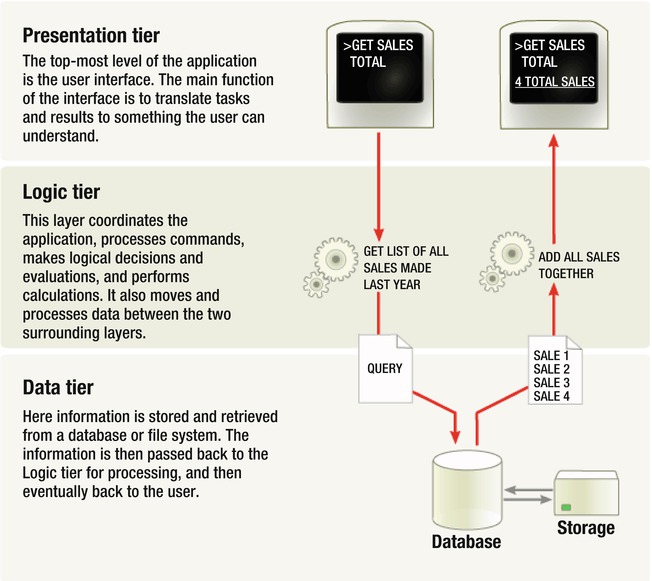
Figure 6-10. A three-tiered web application (courtesy of Wikipedia)
Let’s look at how each tier is involved by considering an example.
A standard user-authentication session that a client makes with a server will look something like this:
- The client requests the Login page from the web server [Web Server/Presentation Tier].
- The client sends credentials to the web server [Web Server/Presentation Tier].
- The application server receives the data and checks whether it conforms to validation rules [Application Server/Logic Tier].
- If the data is good, the application server queries the database server to find out whether matching credentials exist [Application Server/Logic Tier].
- The database server responds to the application server with success or failure [Database Server/Data Tier].
- The application server tells the web server to give the client its portal (if the credentials were correct) or an error message (if the credentials didn’t match) [Application Server/Logic Tier].
- Web Server displays message from Application Server [Web Server/Presentation Tier].
While this is a simplified example, it does illustrate how the process flow moves from the outside to the inside—and back again.
Web App Technology
There are multiple technologies that you can use for each tier of a web application. You can choose from many web servers, application frameworks, application servers, server-side scripting languages, and database servers. Your selection criteria depend on factors such as application requirements, budget, and availability of support for the technology you choose.
Since Android development is predominantly done on Java, I’ve decided to stick with Java for our web application, as well. Apart from Java, you can use other server-side technologies. Some of them are listed here:
- PHP: www.php.net
- Python: www.python.org
- Django: www.djangoproject.com
- Perl: www.perl.org (less common but still sometimes used)
- Cold Fusion: www.adobe.com/product/coldfusion-family.html
- ASP.NET: www.asp.net
- Ruby on Rails: www.rubyonrails.org
Similarly, you can use many popular databases for your application for the data tier, depending on your requirements. Many free and commercial databases exist. This is one more decision that you or your application architect will have to make initially. Here’s a short list of popular databases and a URL indicating where you can learn more about them:
- Oracle: www.oracle.com
- Microsoft SQL Server: www.microsoft.com/sqlserver
- MySQL: www.mysql.com
- PostgreSQL: www.postgresql.org
- CouchDB: http://couchdb.apache.org
- MongoDB: www.mongodb.org
Let’s take a few minutes now to complete our web application, so that it supports rudimentary password checks. Note that I have deliberately made the example very simple. Authentication routines for actual web applications will be more complex. Check Listing 6-4 for the code.
Listing 6-4. The New Credential Verification Code
package net.zenconsult.gapps.logindemo;

import java.io.IOException;
import javax.servlet.http.*;

@SuppressWarnings("serial")
public class LoginDemoServlet extends HttpServlet {
  private String username = "sheran";
  private String password = "s3kr3tc0dez"; // Hardcoded here intended to
  // simulate a database fetch

  public void doGet(HttpServletRequest req, HttpServletResponse resp)
      throws IOException {
    resp.setContentType("text/plain");
  resp.getWriter().println("Hello, world");
  }

  public void doPost(HttpServletRequest req, HttpServletResponse resp)
      throws IOException {
    String user = req.getParameter("username"); // No user input validation
                                                    // here!
    String pass =   req.getParameter("password"); // No user input validation
                                                    // here!

    resp.setContentType("text/plain");
    if (user.equals(username) && pass.equals(password)) {
      resp.getWriter().println("Login success!!");
    } else {
      resp.getWriter().println("Login failed!!");
      }

    }
}
The next step is to publish your code, just as you did when you first set up your Google App Engine account, and then create a new Android project that handles authentication (see Figure 6-11 for the project structure). Listings 6-5, 6-6, 6-7, and 6-8 contain the source code for the Login, LoginDemoClient1Activity, strings.xml, and main.xml files, respectively. Make sure to add this line to your AndroidManifest.xml file, as you will need to access the Internet to reach your Google App Engine application:
<uses-permission android:name = "android.permission.INTERNET" > </uses-permission>
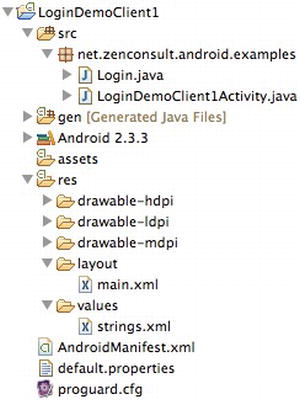
Figure 6-11. The project structure
Listing 6-5. The Login Class
package net.zenconsult.android.examples;

import java.io.IOException;
import java.io.UnsupportedEncodingException;
import java.util.ArrayList;
import java.util.List;

import org.apache.http.HttpResponse;
import org.apache.http.NameValuePair;
import org.apache.http.client.ClientProtocolException;
import org.apache.http.client.HttpClient;
import org.apache.http.client.entity.UrlEncodedFormEntity;
import org.apache.http.client.methods.HttpPost;
import org.apache.http.impl.client.DefaultHttpClient;
import org.apache.http.message.BasicNameValuePair;

import android.util.Log;

public class Login {
  private final String TAG = "HttpPost";
  private String username;
  private String password;

  public Login(String user, String pass) {
       username = user;
       password = pass;
  }

  public HttpResponse execute() {
       Log.i(TAG, "Execute Called");
       HttpClient client = new DefaultHttpClient();
       HttpPost post = new HttpPost("http://logindemo1.appspot.com/logindemo");
       HttpResponse response = null;

       // Post data with number of parameters
       List<     NameValuePair  >       nvPairs = new ArrayList  <  NameValuePair  >  (2);
       nvPairs.add(new BasicNameValuePair("username", username));
       nvPairs.add(new BasicNameValuePair("password", password));

       // Add post data to http post
  try {
            UrlEncodedFormEntity params = new UrlEncodedFormEntity(nvPairs);
            post.setEntity(params);
            response = client.execute(post);
            Log.i(TAG, "After client.execute()");

       } catch (UnsupportedEncodingException e) {
       Log.e(TAG, "Unsupported Encoding used");
       } catch (ClientProtocolException e) {
            Log.e(TAG, "Client Protocol Exception");
       } catch (IOException e) {
            Log.e(TAG, "IOException in HttpPost");
  }
  return response;
  }

}
The code listing in 6-5 contains the login routine. The class constructor, Login, takes two parameters, which are username and password. The execute() method will use these parameters to make an HTTP POST request to the server.
Listing 6-6. The LoginDemoClient1Activity Class
package net.zenconsult.android.examples;

import java.io.BufferedReader;
import java.io.IOException;
import java.io.InputStreamReader;

import org.apache.http.HttpResponse;
import org.apache.http.HttpStatus;

import android.app.Activity;
import android.os.Bundle;
import android.util.Log;
import android.view.View;
import android.view.View.OnClickListener;
import android.widget.Button;
import android.widget.EditText;

public class LoginDemoClient1Activity extends Activity implements
  OnClickListener {
  private final String TAG = "LoginDemo1";
  private HttpResponse response;
  private Login login;

  /** Called when the activity is first created. */
  @Override
  protected void onCreate(Bundle savedInstanceState) {
      super.onCreate(savedInstanceState);
      setContentView(R.layout.main);

      Button button =     (Button) findViewById(R.id.login);
      button.setOnClickListener(this);

  }

  @Override
  public void onClick(View v) {
      String u = ((EditText) findViewById(R.id.username)).toString();
      String p = ((EditText) findViewById(R.id.password)).toString();

      login = new Login(u, p);

      String msg = "";
      EditText text =         (EditText) findViewById(R.id.editText1);
  text.setText(msg);

  response = login.execute();
      Log.i(TAG, "After login.execute()");

      if (response ! = null) {
  if (response.getStatusLine().getStatusCode() == HttpStatus.SC_OK) {
      try {
  BufferedReader reader =     new BufferedReader(
  new InputStreamReader(response.getEntity()
  .getContent()));
  StringBuilder sb =     new StringBuilder();
  String line;
      while ((line = reader.readLine()) ! = null) {
  sb.append(line);
  }
  msg = sb.toString();
  } catch (IOException e) {
  Log.e(TAG, "IO Exception in reading from stream.");
      }

  } else {
      msg = "Status code other than HTTP 200 received";
  }
  } else {
  msg = "Response is null";
  }
      text.setText(msg);
  }
}
The code listing in 6-6 is a standard Android activity. This can be considered the application’s entry, or start point.
Listing 6-7. The strings.xml File
<?xml version = "1.0" encoding = "utf-8"?>
<resources>
  <string name = "hello"  >  Web Application response:</string>
  <string name = "app_name"  >  LoginDemoClient1</string>
  <string name = "username"  >  Username</string>
  <string name = "password"  >  Password</string>
  <string name = "login"  >  Login</string>
</resources>
Listing 6-8. The main.xml File
<?xml version = "1.0" encoding = "utf-8"?>
<LinearLayout xmlns:android = "
http://schemas.android.com/apk/res/android
"
  android:orientation = "vertical"
  android:layout_width = "fill_parent"
  android:layout_height = "fill_parent"
  android:weightSum = "1">
  <TextView android:textAppearance = "?android:attr/textAppearanceLarge"
  android:id = "@  +  id/textView1" android:layout_height = "wrap_content"
  android:layout_width = "wrap_content" android:text = "@string/username">
  </TextView>
<EditText android:layout_height = "wrap_content"
  android:layout_width = "match_parent" android:id = "@  +  id/username">
</EditText>
<TextView android:textAppearance = "?android:attr/textAppearanceLarge"
  android:id = "@  +  id/textView2" android:layout_height = "wrap_content"
  android:layout_width = "wrap_content" android:text = "@string/password">
</TextView>
<EditText android:layout_height = "wrap_content"
  android:layout_width = "match_parent" android:inputType = "textPassword"
  android:id = "@  +  id/password">
</EditText>
<Button android:text = "@string/login" android:layout_height = "wrap_content"
  android:layout_width = "166dp" android:id = "@  +  id/login">
</Button>
<TextView android:text = "@string/hello" android:layout_height = "wrap_content"
  android:layout_width = "fill_parent">
</TextView>
<EditText android:id = "@  +  id/editText1" android:layout_height = "wrap_content"
  android:layout_width = "match_parent" android:inputType = "textMultiLine"
  android:layout_weight = "0.13">
  <requestFocus  >  </requestFocus>
</EditText>
</LinearLayout>
The strings.xml and main.xml files contain our set of defined string constants and the graphical layout of the application, respectively.
Run your application and enter different usernames and passwords. You should see two distinct response messages, one for success and another for a failed password (see Figure 6-12). That’s it! You’re done writing both your mobile login client and server. Next, we’ll go over security on the web and the various attacks that you may have to face on your web applications.
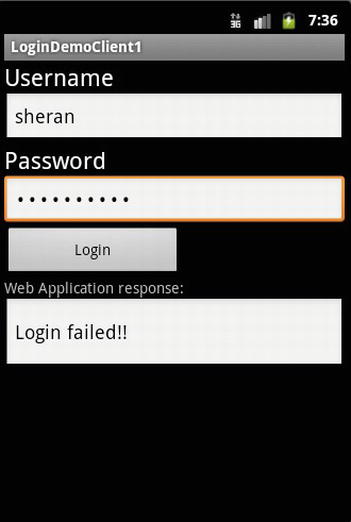
Figure 6-12. Logon failure
The Open Web Application Security Project (OWASP) at www.owasp.org is an organization that provides a body of knowledge, techniques, and guidelines for testing and securing web applications. OWASP was founded in December 2001 and attained US not-for-profit charitable status in 2004. It lists, as its core purpose, to “be the thriving global community that drives visibility and evolution in the safety and security of the world’s software.” It is a great resource for learning about and fixing your web application’s security.
The OWASP Top Ten project has been a sub-project of the OWASP foundation since 2004. On a semi-regular basis, the OWASP Top Ten lists the ten most critical application security vulnerabilities. The vulnerabilities are listed as a broad consensus of what project members and security experts globally have experienced in web applications. The Top Ten list is used and adopted by a large number of commercial organizations, and it has become a de facto standard for web application security.
At the time this book was published, the 2010 OWASP Top Ten was still the most recent update to the list. It can be found here: www.owasp.org/index.php/Top_10_2010.
The topics for the 2010 OWASP Top Ten are listed here:
- A1: Injection
- A2: Cross-Site Scripting (XSS)
- A3: Broken Authentication and Session Management
- A4: Insecure Direct Object References
- A5: Cross-Site Request Forgery (CSRF)
- A6: Security Misconfiguration
- A7: Insecure Cryptographic Storage
- A8: Failure to Restrict URL Access
- A9: Insufficient Transport Layer Protection
- A10: Unvalidated Redirects and Forwards
One of the newer OWASP projects is the Mobile Top Ten, which is part of the OWASP Mobile Security Project. The project is still in development, and no finalized lists have been released at the time of writing. There is, however, a list of practical tips on the website that will prove of immense help to you as a mobile developer. Most of the topics covered in this chapter share many techniques and principles with the Mobile Top Ten. Here are the topics covered by the list:
- Identify and protect sensitive data on the mobile device.
- Handle password credentials securely on the device.
- Ensure that sensitive data is protected in transit.
- Implement user authentication/authorization and session management correctly.
- Keep the back-end APIs (services) and the platform (server) secure.
- Perform data integration with third party services/applications securely.
- Pay specific attention to the collection and storage of consent for the collection and use of the user’s data.
- Implement controls to prevent unauthorized access to paid-for resources (e.g., wallet, SMS, and phone calls).
- Ensure secure distribution/provisioning of mobile applications.
- Carefully check any runtime interpretation of code for errors.
Let’s continue with our topic of securing “data in transit” now. I wanted you to have a fair understanding of what goes on behind the scenes in a web application, and that is why I covered topics related to web applications in this chapter. If you’ve dedicated your life to being a mobile application developer, then it is interesting to see how your application communicates with the web app you want to talk to. A better understanding of the application can also lead you to make improvements in security and performance. If, like me, you do all your coding from end-to-end, including web application development, then you may already be familiar with the topics I’ll discuss. Either way, since you’ve now had a short refresher on web applications and security, let’s move onto the main task at hand.
Authentication is an important feature of mobile applications that need to interact with remote web applications. Almost all present-day applications rely on some form of a username and password or PIN combination to grant access to their data. The username and password are stored on the server, and whenever an end user wishes to authenticate with the application, a comparison is made. If you take a new look at Listing 6-1, you’ll see that we are doing exactly that. The following lines contain the username and password for the web application:
nvPairs.add(new BasicNameValuePair("username", "sheran"));
nvPairs.add(new BasicNameValuePair("password", "s3kretc0dez"));
In this case, the information is hard-coded, but it could just as easily be stored on the device (with encryption, of course!) and retrieved whenever a user wants to log in. But what if our traffic was intercepted while it was in transit? “Aha! But we have SSL!” you say. That’s true, but we don’t seem to be using it in our example because our POST request goes to a non-SSL/TLS port:
HttpPost post = new HttpPost("
http://logindemo1.appspot.com/logindemo
");
OK, that was a cheap shot. But let’s seriously consider that our SSL traffic has been breached. The attacker that is eavesdropping on our conversation with the web application now has access to our credentials. All she has to do now is to use them directly on the full web application or on another mobile device. If she does, she will have full control over our user profile. If this were a social networking site, then we might not be too concerned; however, if it were our online banking application, then we would be pretty worried.
Thus far, we know the risks that we face when authenticating remotely. Although our data may traverse a secure channel, it is still vulnerable to attacks. And it doesn’t have to be a severe attack like the DigiNotar incident, where an attacker can issue her own certificates. For example, the attack could be as prosaic as an SSL man-in-the-middle attack.
Since I’ve mentioned DigiNotar and not trusting SSL more than once, I think it is only fair that I outline my reasoning.
You can’t always trust SSL. In general, end users think SSL means they are secure. A padlock icon and the address bar on the browser turning green are indicators that tell you that you are browsing a secure site. This need not be necessarily true, however. I’d like to take a moment to go over some of the concepts of SSL.
SSL (Secure Sockets Layer) is a transport protocol that encrypts data in transit between two computers. An eavesdropper cannot intercept encrypted data—at least not without going through some effort. Thus, SSL ensures that data remains private between the client and server computers. SSL is old. Most people refer to encrypted HTTP data transfer between client and server as SSL; but in reality, the newer protocol is TLS (Transport Layer Security). An integral part of SSL and TLS is the X.509 Certificate. X.509 is the standard for Public Key Infrastructure (PKI) that I covered briefly in Chapter 5. Commonly, users will refer to the X.509 server certificate as an SSL certificate. This is a key and very important component of SSL. Figure 6-13 shows a browser setting up an SSL session.

Figure 6-13. Setting up an SSL/TLS Session
TLS and SSL use a combination of cryptographic techniques to ensure data transmission is secure. Let’s look at this session setup now. I’m not giving you surgical detail because you will almost never need to write your own TLS negotiation algorithm. Instead, this section will give you an idea of how encryption is set up and what takes place during a TLS session.
First, the client or browser will contact a web server and send it some information. The information contains details of the version of TLS it can support and a list of encryption algorithms. These are called CipherSuites, and they contain supported algorithms for various tasks like key exchange, authentication, and bulk ciphers.
Next, the server responds after selecting a specific CipherSuite that it supports and the highest common TLS version that both the client and server support. The server will then also send the client its SSL Certificate.
The client then uses the server’s public key to encrypt and exchange a PreMaster key, a key that generates a Master key.
Once the PreMaster key is exchanged, the client and server will use random values and the PreMaster key to generate a final Master key. This master key is stored on the client and server.
The server and client then switch to encrypting all data sent back and forth. The selected CipherSuite is used, and the symmetric Master key is used at both ends to encrypt and decrypt data. Figure 6-14 shows what you would see if you were able to capture an encrypted data session between the client and server. Figure 6-15 shows the handshake and other relevant details when viewed using OpenSSL. One look at it will immediately tell you that there is absolutely no usable data for an attacker. What does this mean to you as a developer, then? That you should use SSL and never worry about prying eyes when you exchange sensitive data between the client and server? I won’t accept your answer just yet. Let’s first look at a few details, and we will come back to your answer later.
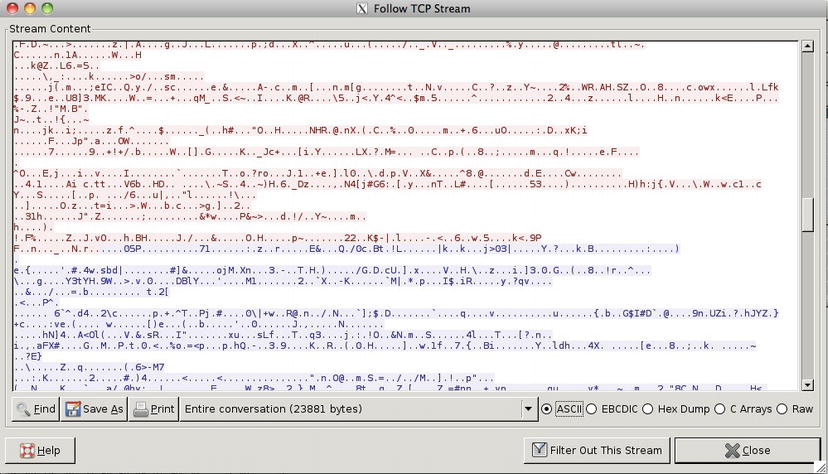
Figure 6-14. A traffic capture of an SSL session
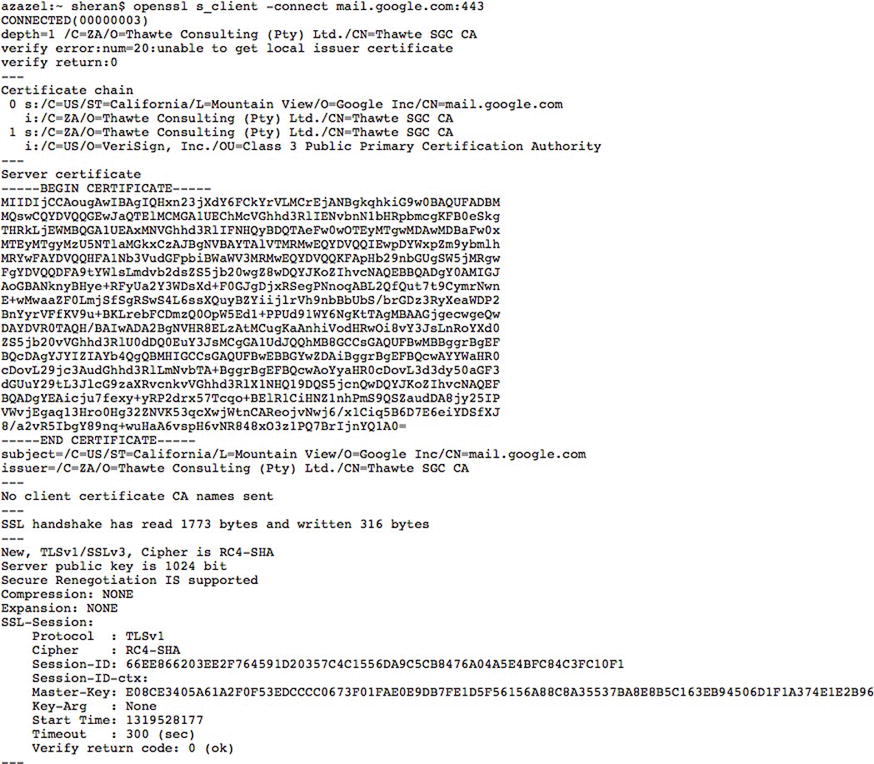
Figure 6-15. An SSL Handshake when viewed using the s_client option of OpenSSL
SSL is all about trust. Well, actually, X.509 is all about trust. An SSL certificate is issued to an individual or company based on certain criteria. The issuing authority, known as the CA or Certificate Authority, is responsible for determining if you are who you say you are. For example, you couldn’t just request a www.google.com certificate without proving that you were somehow affiliated with, or had the capacity to act on behalf of, the company. This matters because, if the CA does not check these credentials, then anyone can apply for an SSL certificate and install it on his web server.
By tricking an end user into believing your server is a google.com server, you could conduct a man-in-the-middle (MitM) attack and intercept all his data. We’ll look at a man-in-the-middle attack shortly; but first, I want to cover another topic that you may be aware of, the self-signed certificate.
Note A CA issues SSL certificates to clients. While issuing the certificate, the CA will also sign the SSL certificate with its own Root certificate. This signature indicates that the CA trusts the issued SSL certificate. A browser can verify the SSL certificate by looking at the CA signature first and verifying whether the signature is a match to the Root certificate.
Many well-known Root CAs exist around the world. Generally, the CA Root certificates come packaged inside your web browser. This allows the browser to verify SSL certificates issued by different CAs.
For example, let’s say you applied to VeriSign for a certificate for your domain, example.com. VeriSign first establishes that you are the correct owner for this domain, and it then issues you a certificate for your web server. It signs this certificate with its own Root certificate. After you receive your SSL certificate, you install it on your web server and set up your website. Now when I visit your website, my browser first looks at your SSL certificate, and then tries to verify whether your certificate is indeed issued by a trusted CA. To do this, my browser will look at its internal store of trusted Root certificates to determine whether the VeriSign Root certificate’s signature matches the signature on your certificate. If it does, then I can continue browsing your site. However, if there is difficulty in verifying your certificate, then my browser warns me that it was unable to verify the certificate.
Note that your browser will verify a number of other details about the certificate before giving it the green light.
Self-Signed Certificates
During the development and testing phase of some projects, developers will sometimes use a self-signed certificate on their websites. This type of certificate is identical in all respects to the SSL certificate issued by a CA. The main difference, however, is that the signature on this certificate is not from a trusted CA. Instead, the developer signs the certificate himself. When a browser connects to a site with a self-signed SSL certificate, it has no way of verifying who signed certificate. That is because the person who signed it is not listed in the browser’s internal trusted certificate store. The browser will then alert the user with a warning similar to the one shown in Figure 6-16.
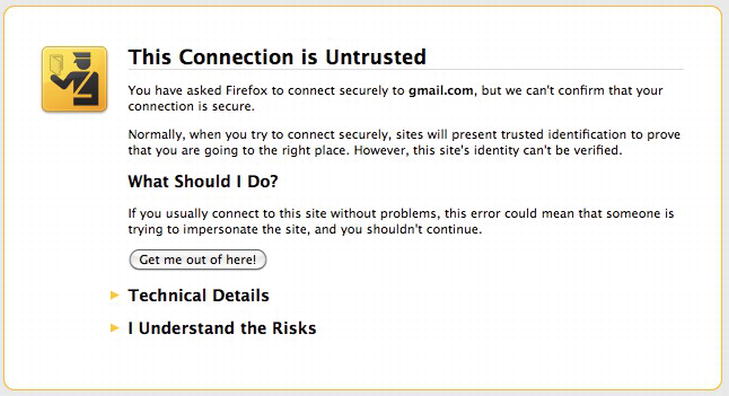
Figure 6-16. A warning for an untrusted or self-signed certificate
This verification phase that takes place on the browser is very important. It exists so that an attacker can’t simply issue himself a certificate belonging to www.google.com and trick users. The browser will always alert a user if it cannot verify the SSL certificate.
Man-in-the-Middle Attack
A man-in-the-middle (MitM) attack is a method by which an attacker can eavesdrop on network traffic or data flowing between two parties. The attacker positions herself so that he is able to intercept traffic from both the sender and receiver, effectively putting himself in the middle of the two (see Figure 6-17). In this position, he is able to intercept and relay information between the two parties. If executed correctly, the users at either end of the conversation will not know that the attacker is relaying and intercepting their traffic.

Figure 6-17. Mallory in the middle of Alice and Bob (courtesy of Wikipedia)
What follows is an example of an MitM attack using Figure 6-17 as a reference:
Alice "Hi Bob, it's Alice. Give me your key"--> Mallory Bob
Alice Mallory "Hi Bob, it's Alice. Give me your key"--> Bob
Alice Mallory <--[Bob's_key] Bob
Alice <--[Mallory's_key] Mallory Bob
Alice "Meet me at the bus stop!"[encrypted with Mallory's key]--> Mallory Bob
Alice Mallory "Meet me in the windowless van at 22nd Ave!"[encrypted with Bob's
 key]--> Bob
Most of the time, the attacks that we see are focused on self-signed certificates or tricking browsers into believing that the attacker possesses a valid certificate. Until recently, attackers knew very little about CA security, and there were far fewer incidents involving CAs. This was true until June 2011, anyway.
In theory, attacking a CA to obtain legitimately signed, trusted SSL certificates is also an option. Not many attackers would consider this because they would obviously expect a high degree of security when it comes to CAs. Right? Wrong! In June 2011, a CA called DigiNotar was attacked. The attacker issued himself over 500 rogue SSL certificates signed by DigiNotar. As a trusted CA, DigiNotar had its Root certificate in all modern browsers. This meant that the attacker had legitimate SSL certificates that he could use to carry out MitM attacks. Since the browsers already trusted the DigiNotar Root certificate, they would always validate these rogue SSL certificates, and an end user would never know that the attacker was intercepting her data.
Why did this happen? DigiNotar had very lax security controls in its infrastructure. The attacker was able to remotely compromise its servers and gain access to the very systems that are responsible for issuing legitimate certificates. After this, it is a relatively simple task for the attacker to keep issuing himself certificates whenever he wants. Some of the more prominent websites that had rogue certificates include:
- *.google.com (This means any sub-domain of google.com, including mail.google.com, docs.google.com, plus.google.com, and so on)
- *.android.com
- *.microsoft.com
- *.mozilla.org
- *.wordpress.org
- www.facebook.com
- www.mossad.gov.il
- www.sis.gov.uk
All the web browser developers blacklisted DigiNotar’s Root certificate, and DigiNotar began to systematically revoke all the rogue certificates. Unfortunately, by the time all of this took place, DigiNotar had lost the trust of thousands of users worldwide. The company declared bankruptcy in September 2011.
If such a large CA can suffer such a big breach of security, which compromised hundreds of SSL certificates, then can we really just rely on SSL all the time? Actually, yes we can. Events such as DigiNotar occur very infrequently, so I would choose to trust SSL. However, I would also choose to deploy my own layer of data encryption between my mobile app and the server. Then, if the SSL layer is breached in any way, the attacker will have yet another layer of encryption to deal with. In most cases, this additional layer will act as a deterrent, and the attacker may leave your application alone.
Is there a way we can prevent an attacker from snooping on our credentials while traveling over SSL? Yes indeed! Let’s look at two ways we can prevent our credentials from being compromised even if our secure transport channels fail. One is OAuth, and the other is Challenge/Response.
The OAuth protocol allows third-party sites or applications, known as consumers, to use end-user data on a web application called a service provider. The end user has ultimate control over the amount of access he can grant to these third parties and will do so without having to divulge or store his existing web application credentials.
Take the example of Picasa Web Albums; the photo editing application Picnik (www.picnik.com) allows end users to edit their photographs. Picnik also allows end users to import from other sites like Picasa and Flickr. Before OAuth, a user would have to log in to Picnik and also enter his Picasa or Flickr username and password, so that Picnik could begin importing photos from these sites. The problem with this approach is that now the user has saved or used his credentials with Picnik. His level of exposure has increased because he has stored his credentials at Picasa and Picnik.
If the same scenario were to be re-enacted with OAuth, then the user would not have to enter his credentials once again on the Picnik site. Instead, Picnik (the consumer) would redirect him to his Picasa (service provider) site (see Figure 6-18) and ask him to grant or deny access to the photographs stored on Picasa (see Figure 6-19). In this way, the user’s credentials are safer.
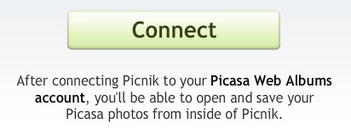
Figure 6-18. Picnik requesting to connect to Picasa, so that it can request an access token
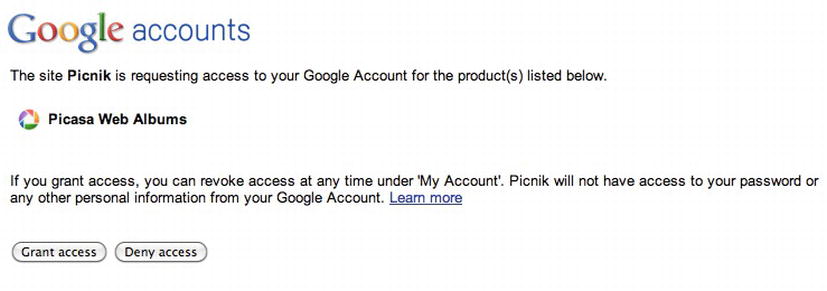
Figure 6-19. Picasa requests authorization for Picnik to look at some photos
OAuth works by using request tokens. Sites that want to access data in a web application need to be granted a token from that same application before they can start accessing this data.
Let’s take a look at how OAuth works for the Picasa Web Albums first. As an example, suppose you have written an Android application that lists a user’s Picasa albums. Your Android application requires access to a user’s Picasa Web Album to do this. In this case, the actors are your Android app (the consumer), Picasa (the service provider), and your end user.
OAuth requires that you first register your consumer application on the site that you are authenticating against. This is necessary because you will receive an application identifier that you will need to use in your code. To register your application, you have to visit http://code.google.com/apis/console (see Figure 6-20), create a project, and create an OAuth client ID (see Figures 6-21, 6-22, 6-23, and 6-24).
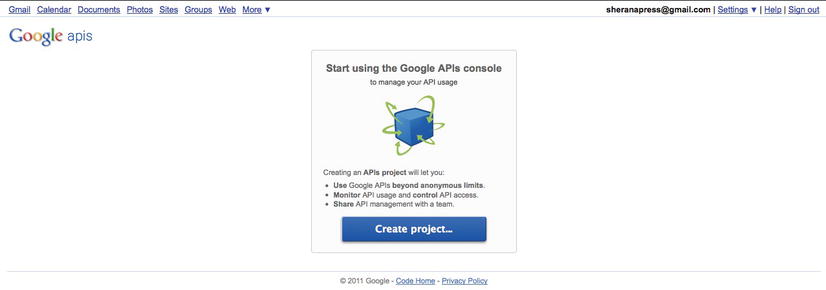
Figure 6-20. Creating a new project on Google APIs
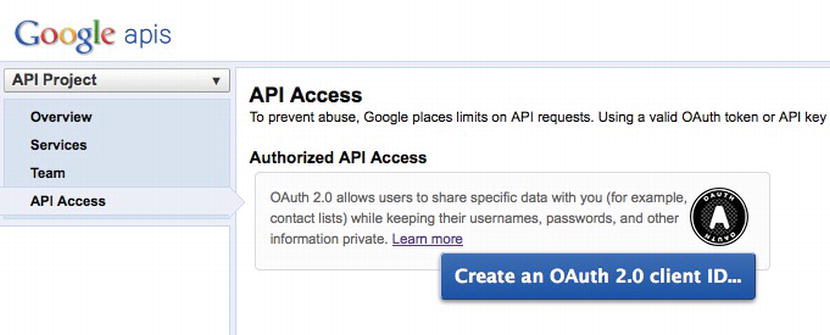
Figure 6-21. Creating a new client ID
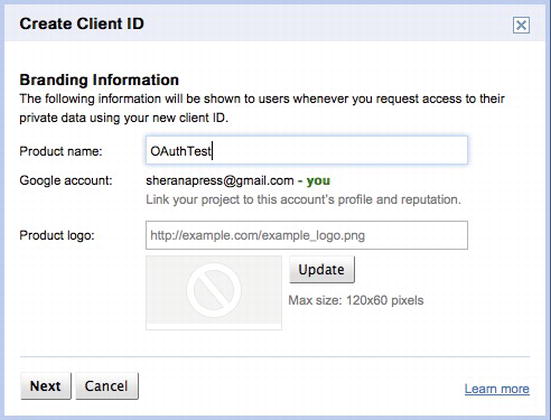
Figure 6-22. Fill in the details of your application
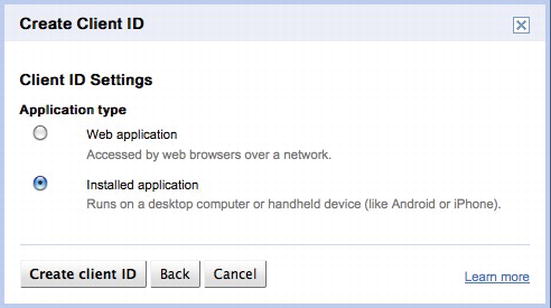
Figure 6-23. Choose your application type
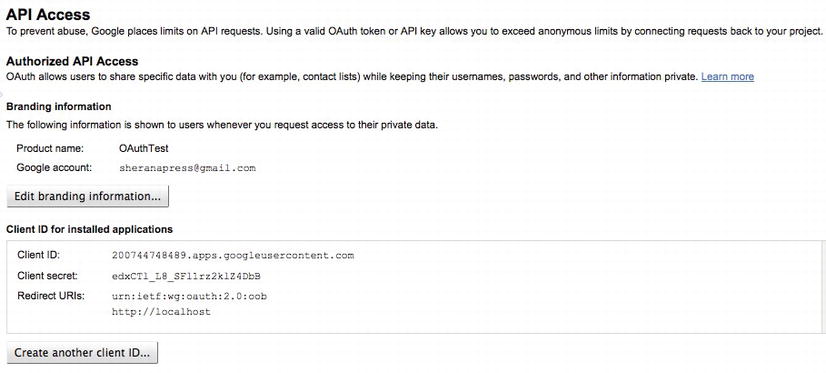
Figure 6-24. Your Client ID and Client Secret are now created
Now that you’ve got your OAuth Client ID, let’s take a look at the authentication flow of an OAuth Application (see Figure 6-25)
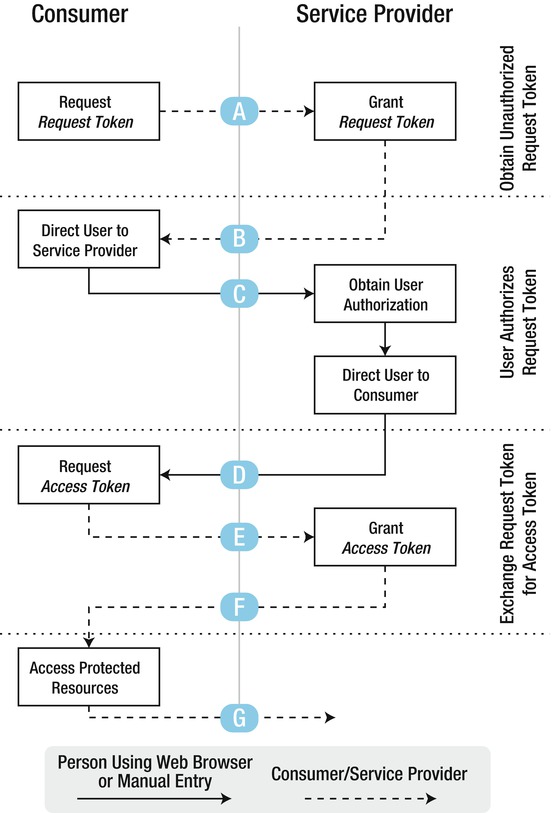
Figure 6-25. OAuth authentication flow (courtesy of Google)
OAuth is a multi-stage process that has three main interacting parties. The consumer is the application that wishes to access data from a service provider, and this can only happen if the user authorizes the consumer explicitly. Let’s go over the steps in detail:
The following scenario is initiated when the end user opens your Android app:
- Flow A: The Consumer application (your Android App) asks the Service Provider (Picasa) for a Request Token.
- Flow B: Picasa tells your application to redirect the end user to Picasa’s web page. Your app then opens up a browser page that will direct the end user to the specific URL.
- Flow C: The end user enters her credentials in this screen. Remember that she is logging into the service provider (Picasa) website and granting access to your app. She is sending her credentials to the website and not storing them anywhere on the device.
- Flow D: Once Picasa is happy that the end user has entered the correct username and password and has granted access to your app, it replies with a response indicating whether the Request Token has been authorized. At this point, your application has to detect this response and act accordingly. Assuming authorization was granted, your application now has an authorized Request Token.
- Flow E: Using this authorized Request Token, your app makes another request to the service provider.
- Flow F: The service provider then exchanges the Request Token for an Access Token and sends that back in the response.
- Flow G: Your app now uses this Access Token to access any protected resources (in this case, the user’s Picasa Albums) until such time that the token expires.
Your app has now successfully gained access to Picasa without needing to store the end user’s credentials. If the user’s phone is ever compromised and an attacker copies all the application data, he is not going to find the Picasa username and password in your app data. In this way, you’ve ensured that your app does not unnecessarily leak sensitive data.
I’ve used Picasa here simply as a frame of reference. Our ultimate goal is to create an OAuth authentication system for our back-end applications, as well. Therefore, instead of Picasa being the service provider, your back-end web application will be the OAuth service provider. Your end user has to log onto your application via a web browser and explicitly authorize it to access resources. Next, your mobile app and back-end web app will communicate using Request and Access tokens. Most importantly, your mobile app will not save the username and password for your web app.
To illustrate these concepts, I have created an example application for Picasa. I will show you how to implement OAuth on your web application in Chapter 8.
Challenge/Response with Cryptography
The second mechanism for protecting your end-user credentials from traversing the Internet is to use the Challenge/Response technique. This technique is similar in many respects to OAuth in that no credentials go across the wire. Instead, one party requests the other party for a challenge. The other party will then encrypt a random piece of information according to a specifically chosen algorithm and cryptographic function. The key used to encrypt this data is the user password. This encrypted data is sent to the challenging party, which then encrypts the same piece of information by using the password stored at its end. The ciphertext is then compared; if it matches, the user is allowed access. The best way to learn about this technique is to work through an actual example. As with OAuth, I have included source code and examples of applications in Chapter 8.
Summary
In this chapter, we focused a lot on how to transport our data securely from mobile application to web application. We also covered how there are mature protocols and mechanisms to secure our data in transit. At the same time, we saw that, in some cases, we are unable to trust the protocols themselves. In cases like this, we looked at options that can help us protect our end user’s credentials from being stolen or intercepted.
We also covered topics that involve web application security. Considering that most mobile applications communicate with a web application in some form or another, it is always good to know how that side of technology works. Finally, we looked at some useful resources for helping us secure our web applications, as well as some concrete examples for protecting our user credentials while in transit.