Web Services
A majority of Android applications work with data, either generated or consumed by the user. In most cases, the amount of data is too great to store on the device locally, so we need a way to keep data somewhere else and retrieve it. Web services provide this functionality by exposing application programming interfaces (APIs) on remote servers that our Android applications consume. In this chapter you will learn how to access those APIs and then how to build web services yourself, securely. But first you need to understand web services in a general way. Throughout the chapter, we will refactor our ToDo Android application, moving the data storage from a local SQLite database to a web service hosted in the cloud.
Web Service Types
The two most popular web service architectures are Simple Object Access Protocol (SOAP) and Representational State Transfer (REST). These architectures expose remote APIs differently and both possess their own strengths and weaknesses. In general, a majority of the services your application may consume fall into these two categories.
Before the rise of mobile devices, web services were often based on SOAP, and this type of service architecture is frequently referred to as Service Oriented Architecture (SOA). SOAP web services use a remote procedure call (RPC) architecture, in which the SOAP message (or envelope) is passed from the client to the server via a single URI (Universal Resource Identifier). The SOAP envelope, which is often an XML document, contains the function name to execute, the necessary parameters, and security details. The server executes the requested function, creates a new envelope, inserts the result, and returns the new envelope to the client. The nature of the envelope allows SOAP to be very secure, and the WS-Security extension to SOAP provides methods that ensure the integrity and security of messages.
Another strength of SOAP for developers is the WSDL (Web Services Description Language) file, which describes in detail the structure of the inputs and outputs for each function call. Usually the developer tools used to build SOAP services generate the WSDL automatically, creating instant documentation about the SOAP services. The WSDL represents the contract, the services provided to clients. Often developer tools can also read the WSDL files and automatically generate Java objects that match the inputs and outputs of the SOAP services for the client applications. SOAP services operate independently of the transport layer, but most often utilize the HTTP protocol.
The downsides to SOAP are the message size resulting from the use of XML, and the overhead associated with processing the envelope. The bandwidth on mobile networks is often constrained, so larger messages take longer to transfer. And although they are constantly improving, mobile devices are limited in their CPU and available memory; so XML parsing is not the best practice for most service-based mobile solutions. But if security is paramount in your design, SOAP is a viable solution despite the drawbacks.
REST is quite different from SOAP in a number of ways. Services built using REST architecture rely on HTTP protocol procedures. SOAP does not have this dependency, even though it commonly uses HTTP. REST accomplishes this dependency on HTTP by combining a URI representing the resource name with an HTTP verb to allow client applications to manage server-side resources, such as databases. The mapping of URIs and verbs to resources and actions distinguishes REST from the function-based architecture of SOAP. In a SOAP implementation the function name and action is part of the envelope, not part of the URI, allowing for flexibility and possibly resulting in added complexity.
The HTTP verbs used in REST calls include but are not limited to GET, POST, PUT, and DELETE. Frequently server-side REST applications map these verbs to Read, Update, Create and Delete actions, respectively. Additionally, the services use the same HTTP response codes that web sites use. For example, if we request a database record from our service using an ID that doesn’t exist in the database, the service would return a 404 (Not Found) response. This is the same response that browsers receive when a user asks for a page that is not part of the web site.
Note There is some controversy about whether PUT or POST should map to a Create action, with the other mapping to Update. At this time there is no definitive answer; in fact, you can spend some interesting and considerable time reading up on the controversy. For now, when creating your own services, choose one verb for Update and the other for Create, and be consistent about it.
REST services can accept and return data in a number of formats, including HTML, XML (extensible markup language), plain text, and JSON (JavaScript Object Notation).
The Richardson Maturity Model
REST web service implementations vary in their adherence to the purest definition of a REST service. The Richardson Maturity Model describes how well a REST service adheres to the definition by assigning the service a Level designation from zero to three.
Level 0 implementations simply use HTTP as the transport mechanism between the client and web server. The Level 0 web service clients use the same URI and HTTP verb, such as POST, for all calls, typically moving XML back and forth. Most of the early Ajax-style web services were built this way. Level 0 differs little from traditional SOAP implementations, except that the SOAP envelope is not used.
Level 1 implementations move one step closer to the pure REST definition by introducing the definition of a resource related to a specific URI. For example, the ID of an item represented in a database becomes part of the URI, so that URI only ever points to that database record. Level 1 implementations are still using only one or two HTTP verbs, typically POST and GET, even though there are now many URIs.
Adding HTTP verbs to the unique URI defines a Level 2 implementation. The HTTP verbs match closely to the actions performed on the resources:
- PUT = Create
- GET = Read
- POST = Update
- DELETE = Delete
Note These actions collectively are often referred to as CRUD, an acronym for Create, Read, Update, and Delete.
Now we have many URIs, which each respond to one or more HTTP verbs. When services behave this way, it enables the basic routing infrastructure of the web to use the same caching mechanisms that web pages use, which improves performance and reliability.
At the highest level, Level 3, services implement all of the Level 2 features but add hypermedia formats. This is often referred to as Hypertext As The Engine Of Application State (HATEOAS). This means that the service is providing URIs in the response headers and/or response body. For example, a record created via PUT would return the URI necessary to perform a GET on that same data; the response data resulting from a GET request for a list of ToDos would include the URIs necessary for manipulation of each element in the result set. This allows the service to become self-describing, and the developer does not need to learn or compose all the URIs necessary for interacting with a service. Level 3 services meet the strictest definition of REST.
Consuming Web Services
As an Android developer, and therefore a builder of clients, eventually your development effort will concern consuming web services. In an Android app, we’ll follow a specific flow to talk to a web service:
- In your Activity, send an Intent to an IntentService.
- The IntentService receives and processes the Intent and calls a web service.
- The IntentService places the result in a new Intent and sends it back to the Activity.
- The Activity processes the new Intent and displays the result, perhaps in a ListView.
Our apps will call web services to get needed data, or they will call services to save data that they generate. We need to understand what the data we will consume looks like.
XML or JSON
Most web services provide data as either XML or JSON, or possibly both, although other formats are possible. XML became a W3C specification in 1998, it and has long been used for service-oriented systems. JSON is somewhat newer and has gained in popularity recently. JSON was defined in an RFC posted in 2006, although it was in use before that time.
Most of the discussions and implementations of SOA services a few years back focused on SOAP services, and implemented protocols like WS-Security. Therefore, SOAP-based (and therefore XML-based) services are in widespread use in many enterprises.
Mobile devices have a constrained network pipe, so you want the smallest message possible. Also, mobile devices tend to be CPU-constrained, so parsing large messages takes more CPU power, and thus more battery power.
Let’s look at a simple message, an address, formatted as both XML and JSON in Listing 8-1.
Listing 8-1. An Address Represented in Both XML and JSON Formats
XML

<address>
    <street>123 Main St.</street>
    <city>Anytown</city>
    <state>MI</state>
    <postal>48123</postal>
</address>

JSON

{
    "street": "123 Main St.",
    "city" : "Anytown",
    "state" : "MI",
    "postal" : "48123"
}
The JSON message uses 100 characters to represent the data, while the XML message uses 128. While this difference does not seem tremendous, transmitting the JSON message will take less time and bandwidth. If an application uses web services regularly, this size difference adds up quickly. Remember, many of your application’s users are paying for the bandwidth they consume.
For services consumed by Android applications, JSON is preferred. JSON messages allow for structured data, and they are smaller than the same data formatted as an XML message, accommodating the limited bandwidth mobile applications encounter. Additionally, parsing JSON is easier than parsing XML, so the mobile device uses less CPU, memory, and consequently battery power. Web apps are good at consuming JSON as well, so a well-designed service could be consumed by both mobile apps and web apps.
The benefits of JSON won’t always rule out using XML. REST-based services do not yet supply all the standards existing in SOAP. If your application needs a high level of security, like that provided by the WS-Security standard in SOAP, or if only XML-based services are available, you may need to use XML.
The HTTP Protocol dictates that each call to a web server returns a status code along with the data in the response (if there is any data). The protocol defines a large number of codes, but web services often respond with a common subset of codes:
- 200 – OK. The request succeeded.
- 302 - Found. The resource has moved, and a new URI is returned in the Location HTTP header. Browsers often automatically load the new URI without the user’s intervention.
- 304 – Not Modified. The requested resource has not changed. For instance, a browser checks an image on an HTML page and finds it can use a cached copy of the image instead of requesting another copy from the web server. Proper use of 304 status and caching can be important to network-constrained mobile devices.
- 400 – Bad Request. The request sent to the web server contained malformed syntax, such as invalid JSON or XML.
- 401 – Unauthorized. The server requires authentication, and the request did not contain the proper credentials.
- 404 – Not Found. The resource is no longer at that URI.
- 500 – Internal Server Error. The server encountered an error that prevented it from responding to the request.
When handling the responses from web services our Android applications may need to handle these situations explicitly. The World Wide Web Consortium (W3C) hosts the full list of status codes in the HTTP protocol at http://www.w3.org/Protocols/rfc2616/rfc2616-sec10.html.
Reading and Sending Data
We know that a web service consists of a URI that we call to access some data that may be formatted as JSON or XML. Let’s access a web service with the Android API.
There are two classes in the Android API that allow you to connect to web services. They are the Apache HTTP Client (DefaultHttpClient) and HttpURLConnection. The Android team recommends using HttpURLConnection unless you are developing for versions of Android older than Gingerbread. Also, if you need to use the NTLM authentication protocol to connect securely to Windows-based networks and services, you will need to use the Apache HTTP client. On the other hand, HttpURLConnection has more features to improve the performance of your application. HttpURLConnection can follow up to five HTTP 302 (Found) redirects, which can be very important when dealing with authentication against web servers or when interacting with resources that are part of an existing web application. The Apache HTTP Client requires you to handle redirections yourself with your own code. HttpURLConnection also includes support for gzip compression starting in Gingerbread, and resource caching based on the HTTP 304 (Not Modified) response code starting in Ice Cream Sandwich. The Android team is putting all its development effort going forward into HttpURLConnection, so plan to use that class.
In order to consume web services in our ToDo application, we need to implement a function that uses HttpURLConnection. Listing 8-2 demonstrates a function that can perform HTTP-based actions to call web services with HttpURLConnection. The function contains three sections. The first part sets up the connection, specifying the HTTP method and URI. The second section adds JSON input to the body of the request if a body is necessary. The last part of the function reads the response from the server at the URI and converts it into a string. The function returns a Plain Old Java Object (POJO) called WebResult, which contains the HTTP status code and the response data. The Android application can examine the status code for success or errors and handle the result data appropriately.
Listing 8-2. A Function to Execute REST-based HTTP Tasks
public WebResult executeHTTP(String url, String method, String input) throws IOException {

    OutputStream os = null;
    BufferedReader in = null;
    final WebResult result = new WebResult();

    try {
        final URL networkUrl = new URL(url);
        final HttpURLConnection conn = (HttpURLConnection) networkUrl.openConnection();
        conn.setRequestMethod(method);

        if (input !=null && !input.isEmpty()) {
            //Create HTTP Headers for the content length and type
            conn.setFixedLengthStreamingMode(input.getBytes().length);
            conn.setRequestProperty("Content-Type", "application/json");
            //Place the input data into the connection
            conn.setDoOutput(true);
            os = new BufferedOutputStream(conn.getOutputStream());
            os.write(input.getBytes());
            //clean up
            os.flush();
        }

        final InputStream inputFromServer = conn.getInputStream();

        in = new BufferedReader(new InputStreamReader(inputFromServer));
        String inputLine;
        StringBuffer json = new StringBuffer();

        while ((inputLine = in.readLine()) != null) {
            json.append(inputLine);
        }

        result.setHttpBody(json.toString());
        result.setHttpCode(conn.getResponseCode());
        return result;

    } catch (Exception ex) {
        Log.d("WebHelper", ex.getMessage());
        result.setHttpCode(500);
        return result;
    } finally {
        //clean up
        if (in != null) {
            in.close();
        }
        if (os != null) {
            os.close();
        }
    }
}

public class WebResult {

    private int mCode;
    private String mBody;

    public int getHttpCode() {
        return mCode;
    }

    public void setHttpCode(int mCode) {
        this.mCode = mCode;
    }

    public String getHttpBody() {
        return mBody;
    }

    public void setHttpBody(String mResult) {
        this.mBody = mResult;
    }
}
The results returned from web services are actually just strings, either XML or JSON, which we would like to transform into POJOs. There are many ways to parse JSON, from built-in APIs to many-third party libraries. To simplify working with string results, we are going to use a library called Gson to convert the JSON results into POJOs.
Download the Gson library from: https://code.google.com/p/google-gson/. Extract the jar files, and import them into the libs folder of your Android project. Add this library to your classpath using the Build Path in Eclipse.
Using Gson is straightforward. Pass it the JSON string result from the web service call and the type of POJO you expect from the JSON as in Listing 8-3.
Listing 8-3. Creating an ArrayList of ToDo Objects from JSON
final Gson parser = new Gson();
results = parser.fromJson(webResult, new TypeToken<ArrayList<ToDo>>(){}.getType());
parser.toJson(newToDo, ToDo.class);
Of course there is more to parsing the JSON than just passing some parameters into the library.
To use Gson, you will have to annotate your objects. We do that in our ToDo class in Listing 8-4, mapping the field names from our JSON result to the member variables of our ToDo class. This allows us to name our class member variables according to convention and not be forced to match the names and cases of the fields in the JSON.
Listing 8-4. An Annotated, Parcelable ToDo Class for Gson Serialization, Getter and Setters Omitted
public class ToDo implements Parcelable {
    @SerializedName("id")
    private Long mId;

    @SerializedName("title")
    private String mTitle;

    @SerializedName("email")
    private String mEmail;

    // Default constructor for general object creation
    public ToDo() {
    }

    // Constructor needed for parcelable object creation
    public ToDo(Parcel item) {
        mId = item.readLong();
        mTitle = item.readString();
        mEmail = item.readString();
    }

    //Getters and setters omitted

    // Used to generate parcelable classes from a parcel
    public static final Parcelable.Creator<ToDo> CREATOR
            = new Parcelable.Creator<ToDo>() {
        public ToDo createFromParcel(Parcel in) {
            return new ToDo(in);
        }

        public ToDo[] newArray(int size) {
            return new ToDo[size];
        }
    };

    @Override
    public int describeContents() {
        return 0;
    }

    @Override
    public void writeToParcel(Parcel parcel, int i) {
        if(mId != null) {
            parcel.writeLong(mId);
        }
        else {
            parcel.writeLong(-1);
        }
        parcel.writeString(mTitle);
        parcel.writeString(mEmail);
    }
}
Also notice the class in Listing 8-4 that implements the Parcelable interface. A parcelable class in Android allows the application to pass the data across process boundaries using intents. There are two items to note about the Parcelable class in Listing 8-4. The first is that the writeToParcel() function and matching constructor write and read the items into the parcel in the same order. There is no key to match up the fields; you must get the order correct. The second item of note is a Creator function that allows the Parcelable class to be stored and regenerated from a parcel.
Performance
Accessing web services means that our applications usually communicate over a slow and sometimes less-than-reliable network. Therefore, these integration points can become bottlenecks in our application’s performance. In order to make our applications feel responsive during these calls, there are a number of design approaches we can take, from running on different threads to optimizations of the HTTP calls, to the services the application consumes.
Services and the AsyncTask Class
When calling web services, our applications must make those calls asynchronously. Therefore, any call to the web service should occur on a different thread than the UI thread. If the application doesn’t do this, a number of bad things may occur, depending on the version of Android running the app:
- The UI becomes unresponsive or blocked.
- The user gets an Application Not Responding (ANR) dialog.
- The app throws an exception immediately.
Any well-written app should avoid all of those scenarios. The basic idea is to move any calls to web services into their own thread.
Many examples show how to accomplish this using the AsyncTask class from within an Activity. While this approach will work most of the time, an orientation change from portrait to landscape or vice versa will have an unintended effect. The Activity that created the AsyncTask is destroyed on the orientation change and re-created in the new orientation. The AsyncTask remains associated with the destroyed activity, so the result cannot return to the new activity. Additionally, references to callback methods in the original Activity in the AsyncTask prevent the garbage collector from reclaiming the memory of the original Activity unless special care is taken when the activity is destroyed. There are some solutions to this problem using AsyncTask, but a better way to solve the problem is to use an IntentService class because it lives outside the Activity lifecycle.
Besides an IntentService, the Android SDK also provides a Service class. The IntentService class has a number of benefits when compared to the Service class. First, it behaves asynchronously on its own thread. But one of the best features of the IntentService is that once completed, it stops itself. There is no need for your application to manage the state of the IntentService. By contrast, the Service class requires you to manage threading yourself, as well as starting and stopping the Service. Some situations may warrant the control imposed by implementing a Service, but an IntentService can handle most service calls with less code.
Before we can use an IntentService in the app, it must be registered in our project’s androidmanifest.xml file, in the <application> tag, as shown in Listing 8-5. Setting the android:exported attribute to false ensures that the service cannot be used by components outside the application.
Listing 8-5. Declaring an IntentService in androidmanifest.xml
<service android:name="com.logicdrop.todos.service.RestService" android:exported="false"></service>
Once our IntentService is registered in androidmanifest.xml, starting it is straightforward. Simply create an Intent, and then call startService(intent) as in Listing 8-6.
Listing 8-6. Starting an IntentService from an Activity
Intent intent = new Intent(this, ToDoService.class);
intent.setAction("todo-list");
intent.putExtra("email", emailAddress);
startService(intent);
The IntentService itself is also straightforward. It has only one method to implement, onHandleIntent(). This function is the listener for any intents sent to the IntentService. If the IntentService handles multiple functions, set the action on the incoming intent to differentiate the incoming requests and then check the action inside the IntentService.
Listing 8-7 shows an implementation of onHandleIntent(). The function is passed the Intent sent from the Activity. It checks the action of the Intent and responds by calling different functions that ultimately call a REST service using the executeHTTP() function described previously.
Listing 8-7. Implementing an IntentService that Handles Multiple Intent Actions
public class RestService extends IntentService {

    public static final String SERVICE_NAME ="REST-TODO";

    public static final String LIST_ACTION = "todo-list";
    public static final String ADD_ACTION = "todo-add";
    public static final String DELETE_ACTION = "todo-remove";

    public RestService() {
        super("RestService");
    }

    @Override
    protected void onHandleIntent(Intent intent) {

        if (LIST_ACTION.equals(intent.getAction())) {
            final String email = intent.getStringExtra("email");
            listToDos(email);
        }
        else if (ADD_ACTION.equals(intent.getAction())) {
            final ToDo item = intent.getParcelableExtra("todo");
            addToDo(item);
        }
        else if (DELETE_ACTION.equals(intent.getAction())) {
            final long id = intent.getLongExtra("id", -1);
            final int position = intent.getIntExtra("position", -1);

            removeToDo(id, position);
        }
    }
    //Other private methods not shown....
}
Once the executeHTTP() function returns some JSON, it is converted back into a Parcelable POJO and returned to the activity via another Intent.
The most important aspect of sending the data back via Intent in Listing 8-8 is the LocalBroadcastManager class. This class is part of the Support Library, an add-on to the Android SDK, and provides some important benefits. The first is that the scope of the Intent is kept within our application. Normal Intents that applications throw can be seen and responded to by other applications installed on the Android device, including malware. Also, the LocalBroadcastManager allows the Activity to process the result while in the background, so your app wouldn’t be forced to the foreground when a long-running result returns, as it would when listening for an Intent that starts an Activity.
Listing 8-8. Sending Back an Intent from the IntentService
final Intent sendBack = new Intent(SERVICE_NAME);
sendBack.putExtra("result", result);
sendBack.putExtra("function", LIST_ACTION);

if(results != null){
    sendBack.putParcelableArrayListExtra("data", results);
}

//Keep the intent local to the application
LocalBroadcastManager.getInstance(this).sendBroadcast(sendBack);
The main negative to the IntentService is that it handles all requests sequentially; requests do not run in parallel. If you need to download many items in a short period of time, an IntentService may not be a good solution.
Now that the IntentService is sending back results, let’s examine how to handle those results properly using the same LocalBroadcastManager that we used to send the Intents. Earlier we discussed the shortcoming of AsyncTask with regard to device rotation. The LocalBroadcastManager provides a solution as shown in Listing 8-9.
Listing 8-9. Processing the Return Intent in an Activity
// Unhook the BroadcastManager that is listening for service returns before rotation
@Override
protected void onPause() {
    super.onPause();
    LocalBroadcastManager.getInstance(this).unregisterReceiver(onNotice);
}

// Hook up the BroadcastManager to listen to service returns
@Override
protected void onResume() {
    super.onResume();

    IntentFilter filter = new IntentFilter(RestService.SERVICE_NAME);
    LocalBroadcastManager.getInstance(this).registerReceiver(onNotice, filter);

    //Check for records stored locally if service returned while activity was not in the foreground
    mData = findPersistedRecords();
    if(!mData.isEmpty()) {
        BindToDoList();
    }
}

// The listener that responds to intents sent back from the service
private BroadcastReceiver onNotice = new BroadcastReceiver() {

    @Override
    public void onReceive(Context context, Intent intent) {
        final int serviceResult = intent.getIntExtra("result", -1);
        final String action = intent.getStringExtra("function");

        if (serviceResult == RESULT_OK) {

            if(action.equalsIgnoreCase(RestService.LIST_ACTION)){
                mData = intent.getParcelableArrayListExtra("data");
            }
            else if(action.equals(RestService.ADD_ACTION)) {

                final ToDo newItem = intent.getParcelableExtra("data");
                mData.add(newItem);
                etNewTask.setText("");

            } else if(action.equals(RestService.DELETE_ACTION)) {
                final int position = intent.getIntExtra("position", -1);
                if(position > -1){
                    mData.remove(position);
                }
            }

            BindToDoList();

        } else {
            Toast.makeText(TodoActivity.this, "Rest call failed.", Toast.LENGTH_LONG).show();
        }

        Log.d("BroadcastReciever", "onNotice called");
    }
};
In the OnResume event handler, we create an IntentFilter for the intents returned from our IntentService. The OnResume event is part of the activity life cycle and is always called when an activity is created. We register a BroadcastReceiver with the LocalBroadcastManager to use this filter to listen for incoming intents.
In the OnPause event handler, we unhook the BroadcastReceiver from the LocalBroadcastManager. This event is also part of the activity life cycle, and is called when an activity is destroyed, such as during an orientation change. Because the IntentService lives on its own thread, the creation and destruction of activities has no bearing on its behavior, in contrast to an AsyncTask. A pitfall in this pattern is that the IntentService may complete and send the resulting intent when the activity is no longer in the foreground or has been destroyed. To mitigate this condition, the IntentService should write the web service call results to a database. When the activity resumes, it can check the database for pending web service results.
When the BroadcastManager gets the data from the service call, it places the list of ToDos in a class-level member variable and binds the list to the UI.
Dealing with Long-Running Calls
If the problem you are solving requires a long-running web service call, it may be better to implement a Service instead of an IntentService. In a long-running call, there are some problems to be solved. First is that a long running call should notify the user of the status of the call. Otherwise, the application may seem unresponsive. Also, the operating system could kill our service if it needs memory, because it seems idle during the long-running call.
To solve this problem, we implement a Service instead of an IntentService. The Service class provides the facilities needed to both inform the user of the status and keep the operating system from killing the application when it is actually busy. Each service can run in its own process separate from the application, and can be set to restart should the operating system kill the service. This type of service is declared in the AndroidManifest.xml file, as shown in Listing 8-10. This type of service implementation should only be used when necessary. Starting another process uses more memory resources, which good applications minimize.
Listing 8-10. A Service Declaration in the AndroidManifest.xml File, Which Runs in Its Own Process
<service
  android:name="LongRunningService"
  android:process=":serviceconsumer_process"
  android:icon="@drawable/service-icon"
  android:label="@string/service_name">
</service>
In order to tell the Android operating system that our service is functional during a long-running call, we need to call startForeground() on our service as in Listing 8-11. The onStartCommand() function returns the constant Service.START_REDELIVER_INTENT. This allows the OS to kill the service in low-memory situations, and then to restart the service with the last delivered intent. The service can then attempt to reprocess the last intent it needs to do that because the OS killed off service before finishing last time.
Listing 8-11. Methods for Setting Up a Service for a Long-Running Call in a Service
private static final int mServiceId = 42;

@Override
public IBinder onBind(Intent intent) {

    Notification notice;
    if(Build.VERSION.SDK_INT >= Build.VERSION_CODES.HONEYCOMB) {
        notice = APIv11.createNotice(this);
    } else {
        notice = new Notification(R.drawable.icon, "Service Finished", System.currentTimeMillis());
    }

    startForeground(mServiceId, notice);
    return null;
}

private static class APIv11 {
    public static Notification createNotice(Service context){
        Notification notice = new Notification.Builder(context.getApplicationContext()).setContentTitle("Service finished").build();
        return notice;
    }
}

@Override
 public int onStartCommand(Intent intent, int flags, int startId) {

    return Service. START_REDELIVER_INTENT;
 }

@Override
public boolean onUnbind (Intent intent){
    stopForeground(true);
    return false;
}
Optimizations
Because network bandwidth acts as a constraint for mobile devices, our web service need to exploit the optimizations available in modern web servers to reduce the bandwidth our Android apps consume. These optimizations include compression and caching.
Modern web servers, like IIS, Nginx, and Apache’s httpd all support gzip compression. Compression of text is very effective, and since our web services pass around only text, our code should take advantage of compression. As mentioned previously, the HttpURLConnection object has built in support for gzip from Gingerbread going forward, and in fact is set to use this feature by default when calling getInputStream() on the connection. That call causes the HttpURLConnection object to add the HTTP header Accept-Encoding: gzip automatically to the request. As long as the web server is configured for gzip, the HTTP request/response pair will be compressed, which is important for mobile devices using limited bandwidth.
When a web server sends content to a client, it can add an expiration date to the content via the expires HTTP header. Often larger, static items like images frequently have an expires header set days or weeks into the future to keep web browsers from continually re-downloading these files when users return to pages that have already downloaded the images. With Ice Cream Sandwich, HttpURLConnection supports HTTP-based caching. If an item previously fetched by HttpURLConnection comes with a future expires header or the web server responds with a 304 code due to conditional expiration, these items are loaded from local storage instead of over the network, again minimizing bandwidth usage. Because only Ice Cream Sandwich or newer supports this feature, a little reflection allows our code to use the feature as shown in Listing 8-12.
Listing 8-12. A Method for Selectively Enabling HTTP Caching for Android Versions that Support Caching
private void enableHttpResponseCache() {
try {
    long httpCacheSize = 10 * 1024 * 1024; // 10 MiB
    File httpCacheDir = new File(getCacheDir(), "http");
    Class.forName("android.net.http.HttpResponseCache")
        .getMethod("install", File.class, long.class)
        .invoke(null, httpCacheDir, httpCacheSize);
    } catch (Exception httpResponseCacheNotAvailable) {}
}
We previously noted that IntentServices operate serially, which is not good in all situations, such as downloading a large number of images. At Google I/O 2013, Google announced the release of a new library called Volley (http://www.youtube.com/watch?v=yhv8l9F44qo). Volley supports concurrent downloads and has built-in support for image handling and client-controllable caching. Volley is not currently part of the Android SDK but may be in the future, but it represents a good solution when serial HTTP connections don’t provide the necessary performance.
Security
In a time of frequent security breaches and organizations impinging upon the privacy of users, security on both the client and server sides of an application has become a main concern for application developers.
The Open Web Application Security Project (OWASP) is a nonprofit organization dedicated to educating developers about security threats and supplying them with tools and information to mitigate those threats. Periodically OWASP publishes a list of the top ten threats to application security. In 2013, OWASP published a new Top 10 for web applications (https://www.owasp.org/index.php/Category:OWASP_Top_Ten_Project), and in 2011 expanded to include a list of the top 10 mobile threats as well:
- M1: Insecure Data Storage
- M2: Weak Server Side Controls
- M3: Insufficient Transport Layer Protection
- M4: Client Side Injection
- M5: Poor Authorization and Authentication
- M6: Improper Session Handling
- M7: Security Decisions Via Untrusted Inputs
- M8: Side Channel Data Leakage
- M9: Broken Cryptography
- M10: Sensitive Information Disclosure
A number of these threats apply directly to Android applications consuming web services, including these:
- M1: Insecure Data Storage. This problem arises from not properly securing or encrypting data stored on the device, such as a user ID, or storing data intended to be temporary, such as a password.
- M3: Insufficient Transport Layer Protection. Applications that do not use transport layer security or ignore security warnings such as certificate errors are susceptible to this vulnerability.
- M5: Poor Authorization and Authentication. This often happens when an application uses a hardware-based identifier such as the IMEI (International Mobile Equipment Identity) number that can be determined by an attacker and used to impersonate the user.
- M6: Improper Session Handling. Mobile user sessions tend to be much longer than web site sessions, so at the user’s convenience the mobile app keeps users logged in longer. Long sessions can lead to unauthorized access, especially when the device is lost. Make users re-authenticate periodically, and ensure that your server-side application can revoke a session remotely if necessary.
- M9: Broken Cryptography. Do not confuse encoding, obfuscation, or serialization with encryption. Use the strongest cryptographic algorithm possible. Do not store a key used for two-way encryption with the data or in an insecure location, such as in the application code.
- M10: Sensitive Information Disclosure. Android application code can be easily decompiled back into Java code. Any sensitive information stored in the code, such as encryption keys, usernames, passwords, and API keys will be discovered.
Be sure to spend time on OWASP’s web site at https://www.owasp.org to become more familiar with each threat and with all the tools OWASP can provide to help you build secure applications.
Dos and Don’ts for Web Services
Security is an extensive subject, and is covered more in depth in other books, such as Android Apps Security by Sheran Gunasekera (Apress, 2012). As we move on to talk about building your own web services, here are some general practices to follow as you build web services.
If you must store passwords in your service database, do not store them in clear text. The proper procedure is to salt the password with a unique value, and then perform a one-way hash to the salted password with a strong hashing algorithm (at least SHA-256, or bcrypt). Simpler hashing algorithms, such as MD-5 or SHA-1, are often chosen for their speed, but security professionals have demonstrated those algorithms as insecure. A fast hashing algorithm is the enemy of hashed password storage, as the computing power to break those hashes is becoming more and more available.
Salting is appending or prepending a value to the password. When a user attempts to authenticate, the application can recreate the salted hash from the password entered by the user, and then compare that result to the result stored in the database. The salt adds randomness and size to the password, making it more difficult to guess should the database become compromised.
Attackers attempt to break hashes using a technique called a Rainbow Table, which is essentially a precompiled, reverse engineering of the hashing algorithm. Sufficiently strong hashing algorithms make Rainbow Tables very large and take an extremely long time to calculate. The addition of a salt forces an attacker to use a separate rainbow table for each possible salt, which increases the time and computing power necessary to find a match and successfully recover a password. At this point in late 2013, a sufficiently strong hash with a random salt is too difficult to break. As computing power and the availability of disturbed computing increase over time, hashing algorithms will become less secure.
If you can avoid sending a user’s password over the network, there is no way an attacker can discover the password remotely. On Android devices, typically the user is already authenticated to Google via the Google account stored on the device. Your web services can integrate with Google’s OAuth services to use the device account for authentication (who is this user) and authorization (what is this user allowed do). Listing 8-13 shows how to get the Google account names currently on the Android device. Of course, some Android devices, such as the Kindle Fire, do not allow for Google accounts to be stored on the device.
Listing 8-13. A Method for Acquiring the List of Google Accounts on an Android Device
private String[] getAccountNames() {
    try {
        AccountManager accountManager = AccountManager.get(this);
        Account[] accounts = accountManager.getAccountsByType(GoogleAuthUtil.GOOGLE_ACCOUNT_TYPE);
        String[] names = new String[accounts.length];
        for (int i = 0; i < names.length; i++) {
            names[i] = accounts[i].name;
        }
        return names;
    } catch (Exception ex) {
        Log.d(APP_TAG, "Account error", ex);
        return null;
    }
}
Once you have the Google account from the device, you can generate a token for the OAuth-based Google services as in Listing 8-14. This token allows the user to access other Google services and APIs without re-authenticating for each service and without ever sending a password over the network from the device. The token is typically sent as part of the JSON body of a request, although it can also be part of the URI or sent in an HTTP header. The token also carries an expiration date, and the services that accept the token will check the token for validity before fulfilling the request. This function also needs a client_id from the application whose services we are consuming. This value is acquired by the web service developers when integrating with Google, and must be shared with the clients in order to perform Google OAuth authentication.
Listing 8-14. Getting the Google OAuth token
private String authenticateGoogle(String accountName) {
    String token = "";
    try {
        String key = "audience:server:client_id:123456.apps.googleusercontent.com";
        token = GoogleAuthUtil.getToken(this, accountName,  key, null);

    } catch (IOException e) {
        Log.d("IO error", e.getMessage());
    } catch (GoogleAuthException ge) {
        Log.d("Google auth error", ge.getMessage());
    } catch (Exception ex) {
        Log.d("error", ex.getMessage());
    }
    return token;
}
If you do not store the password in your database, attackers cannot exploit your users if your database becomes compromised. Large providers like Google, Yahoo, Twitter, and Facebook offer integration APIs that allow users to log in to your application using credentials from one of those providers. While you need to trust those providers to keep their users safe, there is less risk for your application by integrating with one of those providers.
OpenID is a decentralized, open authentication protocol that makes it easy for people to sign up and access web accounts using mobile applications. Many of the same providers just listed participate in OpenID. StackOverflow, the popular crowd-sourced discussion site for developers, uses OpenID to authenticate users. OpenID Connect is an API layer on top of OpenID designed for mobile application use, and should see general release in the near future.
Use Transport Layer Security (TLS/SSL)
At a minimum, web services that transmit user credentials or any kind of personal information need to be secured using Transport Layer Security (TLS). TLS protects data in transit from unauthorized access or modification between the mobile application and the web services. The term TLS is often used interchangeably with Secure Sockets Layer (SSL). TSL v1.0 is indeed equivalent to SSL v3.1. Most modern browsers support the various versions of SSL and TLS.
Web services built using REST architecture are inherently stateless, and therefore sessionless. I am not suggesting we violate this tenet of REST. By sessions, I mean using a session token that is created upon login and subsequently sent along with each request to verify the authenticity of the request. The token should not be sent as part of the URL, but in the body of the request or in the HTTP headers. These session tokens should have an expiration date and rotate with each request to prevent replays of tokens. OWASP provides an open-source web application security control library called the Enterprise Security API you can use to create and manage session tokens in your web services (https://www.owasp.org/index.php/Category:OWASP_Enterprise_Security_API). The library is released for Java and Ruby, and in development for other platforms, including PHP, .Net, and Python.
There are a number of ways to authenticate users to web services, mostly based on traditional web technologies. While it is possible to use your own authentication method, that is not a good idea. Many smart, security-oriented professionals have spent thousands of hours thinking through, designing, and implementing these protocols to keep data safe. Your web services should take advantage of these protocols.
HTTP Basic Authentication is the simplest protocol, and is supported natively by the Android SDK. The username and password are passed in the Authorization HTTP header. The username and password are concatenated with a colon, and then Base-64 encoded. Encoding is not encryption, and is not secure. Therefore, any use of Basic Authentication requires the use of TLS/SSL. Because Basic Authentication is part of the HTTP protocol specification, all modern web servers support it, making it easy to develop services that use Basic Authentication, since that plumbing already exists on the server side.
Listing 8-15 demonstrates how to implement Basic Authentication in an Android client application. The Authenticator class sets the authentication handler for subsequent calls to HttpURLConnection, so place this code before any calls to HttpURLConnection. You could calculate the HTTP Authorization header yourself and add it via a call to the setHeader() function on the Request object, but that method won’t support the preemptive authentication checks that many web servers support. A preemptive check occurs before the actual request in order to reduce the overhead of making the initial HTTP connection, which is important because of the constrained bandwidth the mobile device typically operates with.
Listing 8-15. Use of the Authenticator Class to Implement Basic Authentication in an Android Client
Authenticator.setDefault(new Authenticator() {
     protected PasswordAuthentication getPasswordAuthentication() {
       return new PasswordAuthentication(username, password.toCharArray());
   });
 }
Many of the largest web sites on the Internet, including Google, Twitter, Facebook, Yahoo, and LinkedIn implement their web service authentication via OAuth, an open standard for authorization that is more like a framework than a strictly defined protocol. Currently OAuth exists as two versions, 1.0 and 2.0, both of which are in production across the sites mentioned previously. Generally OAuth allows users to authorize an application to act on their behalf without sharing their password with the application. As a side effect of this authorization process, users also need to be authenticated, thereby also allowing the application to authenticate users. OAuth servers typically provide a token that expires at some point in the future to authenticated users. Applications can use this token to provide additional services. For instance, a user of an Android device with a Google account can acquire a token from Google that allows the phone to access other Google services, such as the Google Maps API that may be used within your custom application (see Listing 8-14 earlier). The user never enters their password, nor is any password ever sent to the Google Maps API. The token acquired from the Google OAuth Service manages all those authorizations.
Create Your Own Web Service
Most web frameworks in just about every programming language provide a way to create your own web services. Because we are writing Android code in Java, for our example we will create some basic web services using Java. While many options exist for creating web services using Java, we will focus on the JAX-RS API.
JAX-RS is a Java API for RESTful web services first introduced in Java SE 5. JAX-RS uses annotations to map a POJO (Plain Old Java Object) to a web service. We can write a function in a Java class as we have done any number of times in the past, but this time add annotations to make the function available via a REST URI. A number of frameworks implement the JAX-RS specification including Jersey, Restlet, Apache CXF, and RESTeasy. Jersey provides a straightforward, understandable approach, so we will build our examples using Jersey.
Sample Web Services
Web services that you can consume in your apps can come from literally anywhere. Large Internet companies like Google, Facebook, Twitter, ESPN, Amazon, eBay, and Yahoo, local and federal government departments all offer a myriad of services you (or your users) can consume. Some examples of available services include shipping rates, location services, social media integration, financial data, and even fantasy sports. Many of these services are free while others come at a small cost. In all these cases, the service providers typically require you sign up for their developer program. There are also web sites, such as programmableweb.com and usgovxml.com, that act as directories for sites that offer web services you can consume.
Google App Engine
An easy and cost effective way to get started writing your own web services is to host them in the cloud on Google App Engine (GAE). As an Android developer, you probably already have an account set up with Google.
GAE supports web applications written in Java (as well as Python, Go, and PHP), so we can build a REST service using the Jersey library to store our ToDo data in the cloud instead of on the device. This allows our applications a number of advantages, including storing larger amounts of data than would be appropriate on a mobile device, allowing our ToDo lists to be shared across multiple devices for the same user, such as a phone and a tablet, and providing for easier upgrades to the app on the device, because we no longer have to worry about what happens to the local database during the upgrade process.
We’ll start building our own web service on GAE by browsing to https://appengine.google.com. Sign in with your Google account. You may be prompted for a second factor for authentication, such as receiving and SMS with a code or an automated phone call. Once that step is complete you will be prompted to create an application. Click that button, and then you will be prompted for some additional information regarding the application. Each GAE application needs a unique URL, so you will need to be creative for a unique Application Identifier for your service. Leave the service open to all Google Account users, agree to the Terms of Service, and create the application (see Figure 8-1).
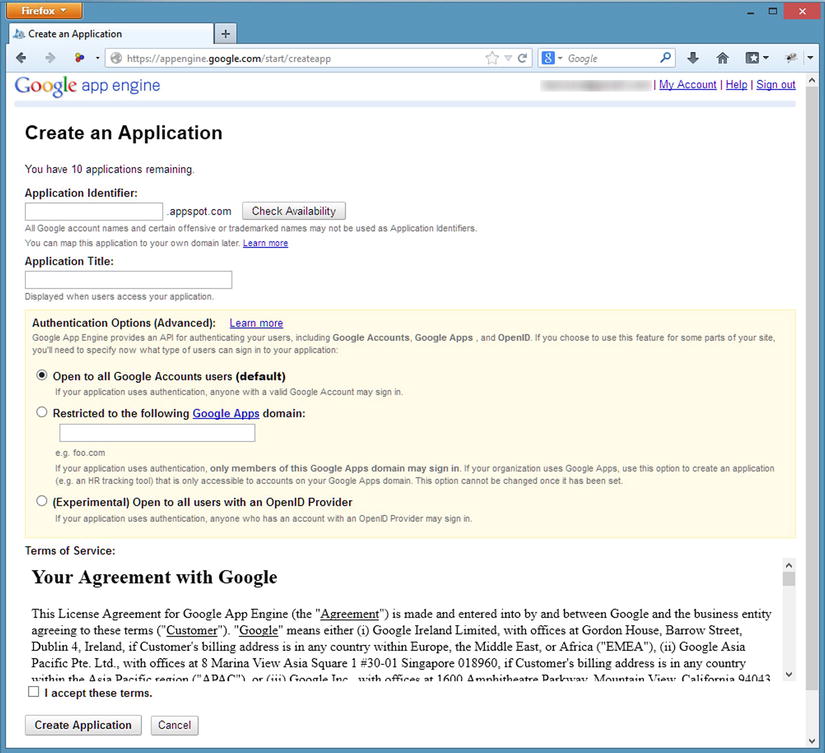
Figure 8-1. Creating an application on the Google App Engine site
Setting Up Eclipse
Before we begin writing Java code, we need to download the Google App Engine SDK for Java and set up ADT (or Eclipse) to work with GAE. First we need to download the Google plug-in for Eclipse and the GAE SDK:
- In ADT, open the Help menu and click Install New Software (see Figure 8-2).
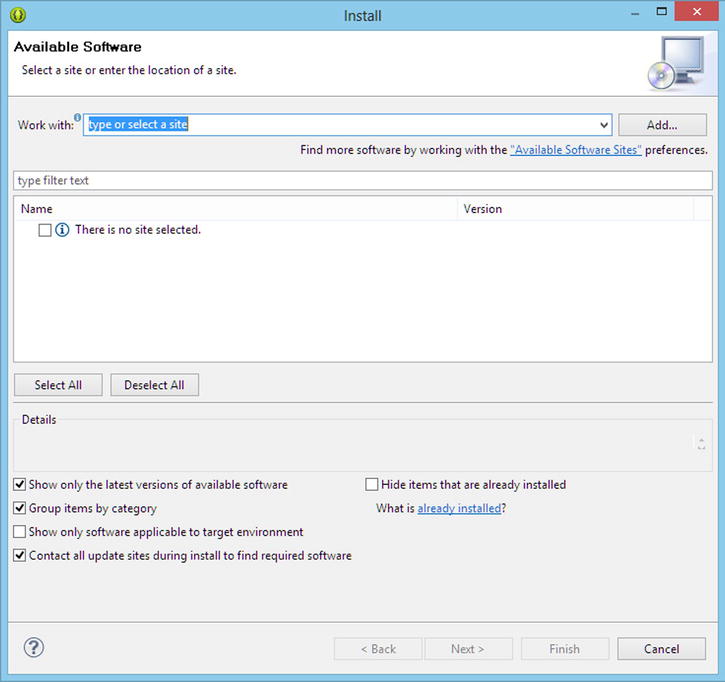
Figure 8-2. The Install software dialog
- Click the Add button in the upper-right part of the dialog. The Add Repository dialog opens (see Figure 8-3).
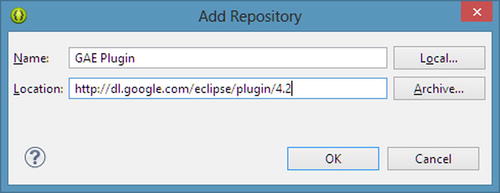
Figure 8-3. The Add Repository dialog for adding the URL to repository for the GAE Eclipse plug-in
- Name the repository GAE Plugin, and enter this URL from the Google Developer site in the Location field: http://dl.google.com/eclipse/plugin/4.2.
- Click OK.
- Expand the Google App Engine Tools for Android (requires ADT) item, and select Google App Engine Tools for Android (see Figure 8-4).
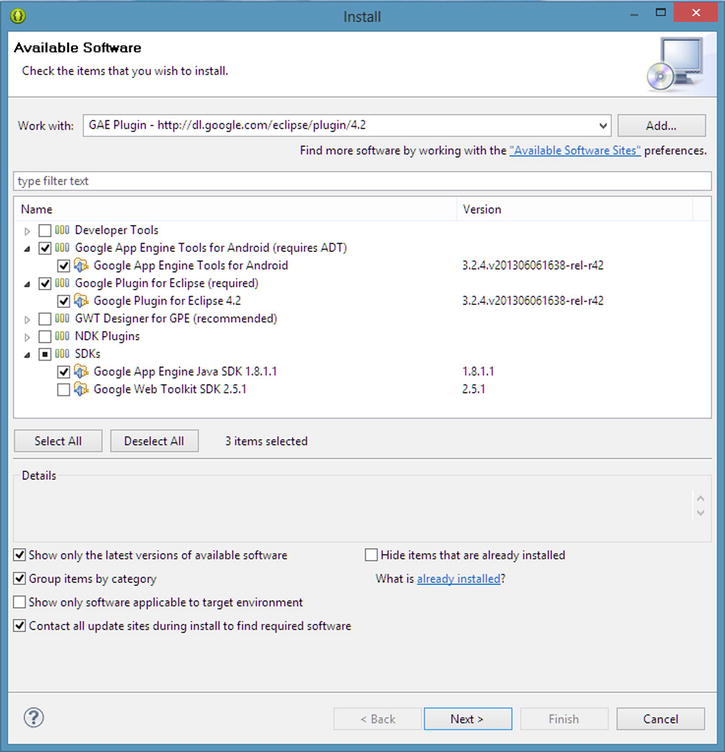
Figure 8-4. Choosing the plug-ins needed to support GAE
- Expand the Google Plugin for Eclipse (required) item and select Google Plugin for Eclipse 4.2 (see Figure 8-4).
- Expand the SDKs item, and choose Google App Engine Java SDK 1.8.1.1 (see Figure 8-4).
- Click Next.
- Click Next again on the Install Details dialog.
- Review and accept the license agreements.
- Click Finish and the software installs into ADT. You may be prompted to restart ADT.
We will also use the Jersey implementation of JAX-RS. For this example we will download and use the zip bundle of version 1.17.1 of Jersey from https://jersey.java.net. Decompress the archive into a location on your computer where you will get the JAR files needed for the project.
Create the Project
Now that you have the necessary components and SDKs downloaded, set up the project in Eclipse.
- In Eclipse, in the GDT pull-down menu in the toolbar, choose New Web Application Project (see Figure 8-5).
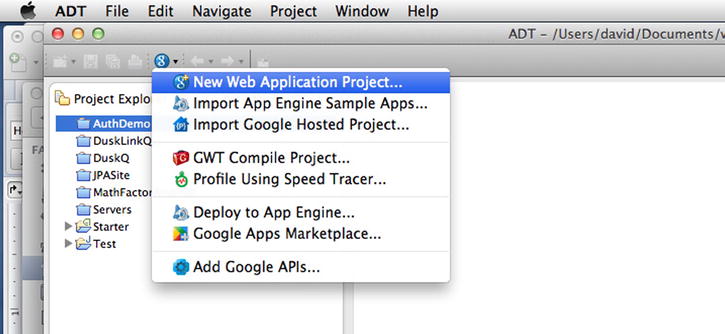
Figure 8-5. Creating a new Web Application project
- Enter a name for your project, such as AppEngineToDoService, and a Package name, such as com.example.todo (see Figure 8-6).
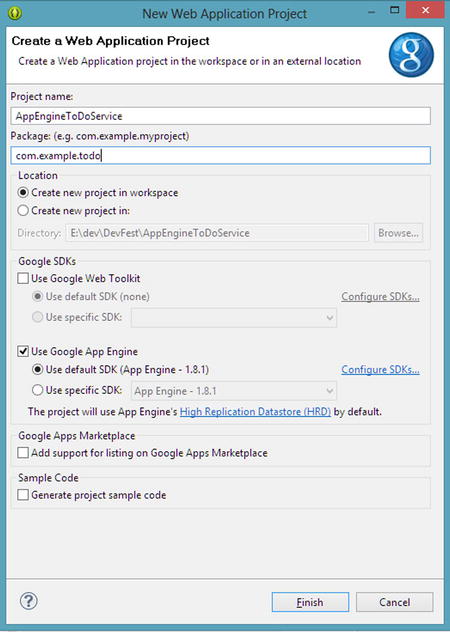
Figure 8-6. Setting up a new web application project for the ToDo service
- Uncheck the Use Google Web Toolkit option.
- Uncheck the Sample Code option.
- Click the Finish button. Eclipse creates the project structure.
Now that the project is created, we need to make a configuration change in the project to ensure compatibility between the GAE SDK and Jersey.
Configure the Project
The project requires some configuration changes in order to allow GAE to use the Jersey library. JDO/JPA version 2 conflicts with the version of Jersey in this example.
- Right-click the project in the Package Explorer, and choose Properties.
- Expand the Google item in the left pane, and then click App Engine (see Figure 8-7).

Figure 8-7. Changing the project configuration for GAE
- Change the Datanucleus JDO/JPA version to v1 and click OK.
Now that you saved the JDO/JPA version change in the project configuration, add the JARs that make up the Jersey library.
- Expand the war, WEB-INF, and lib folders of your project in the Package Explorer (see Figure 8-8).
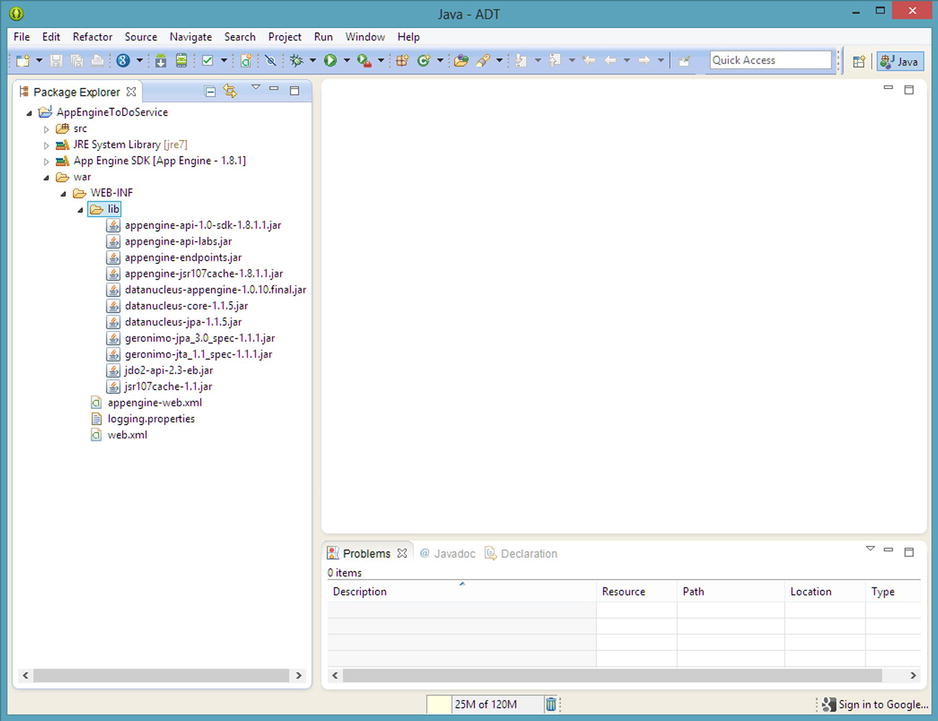
Figure 8-8. The project location for the Jersey JARs
- Right-click the lib folder and choose Import.
- Expand the General item.
- Click the File System item under General (see Figure 8-9).
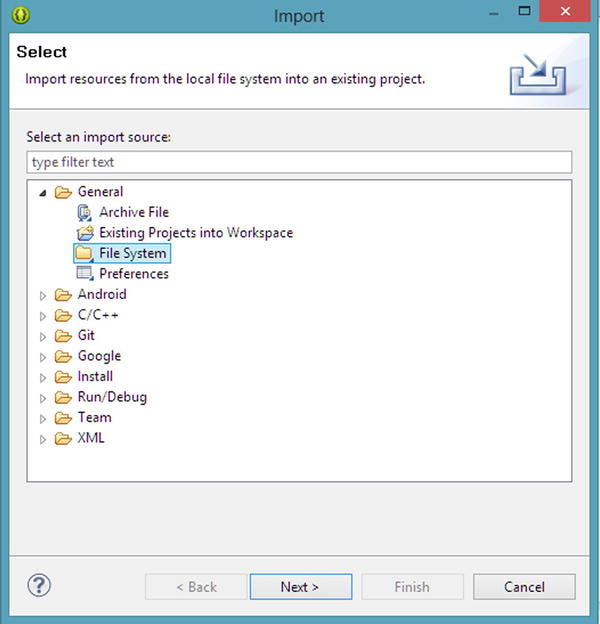
Figure 8-9. Importing from the file system
- Click Next.
- Browse to the location where you expanded the Jersey archive downloaded earlier and select the lib folder.
- In the Import dialog, click the lib folder in the left pane, which selects all the jars in the right pane (see Figure 8-10).
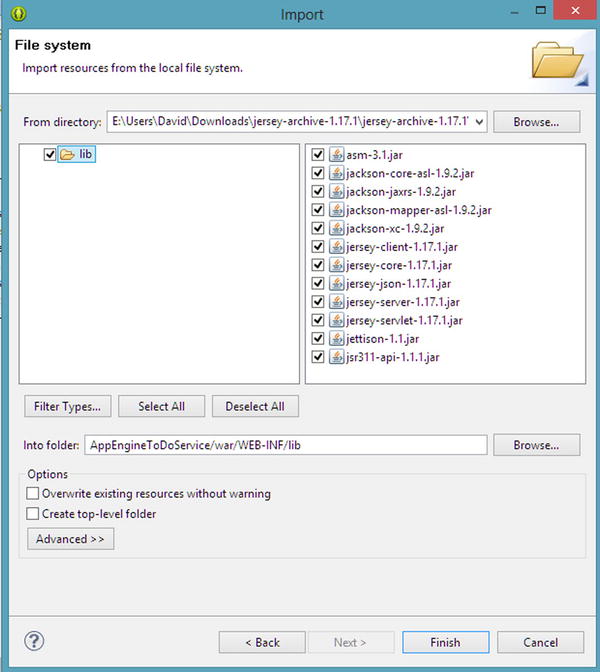
Figure 8-10. Importing the Jersey JARs
- Click Finish.
Add Jersey to the Classpath
After adding the JARs to the project, you must add them to the Classpath in order for Eclipse to compile your project correctly.
- Right click the project in the Package Explorer, and choose Build Path and then Configure Build Path (see Figure 8-11).
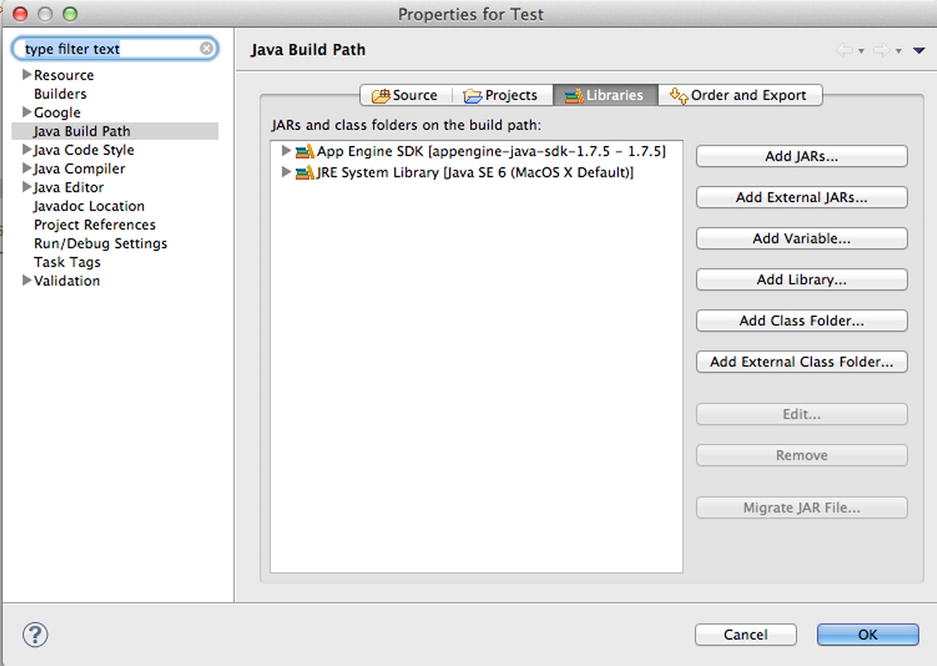
Figure 8-11. The Build Path dialog for adding Jersey as a library
- Click the Libraries tab.
- Click the Add Library button.
- Click User Library (see Figure 8-12).

Figure 8-12. Creating a user library for the Build Path
- Click Next.
- Click the User Libraries button.
- Click the New button on the right side of the Preferences dialog box.
- Type Jersey for the library name.
- Click the OK button.
- Click the Add JARs button.
- Select the JARs that belong to Jersey (see Figure 8-13).
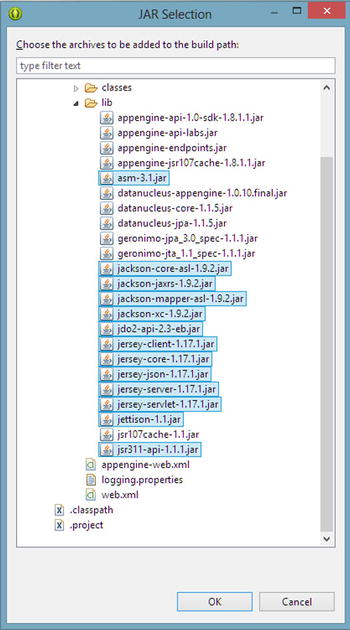
Figure 8-13. Choosing the JARs for inclusion in the User Library
- Click OK.
- Click the next OK button.
- Click Finish.
- Click the OK button. The Jersey Library should appear in the Package Explorer (see Figure 8-14).
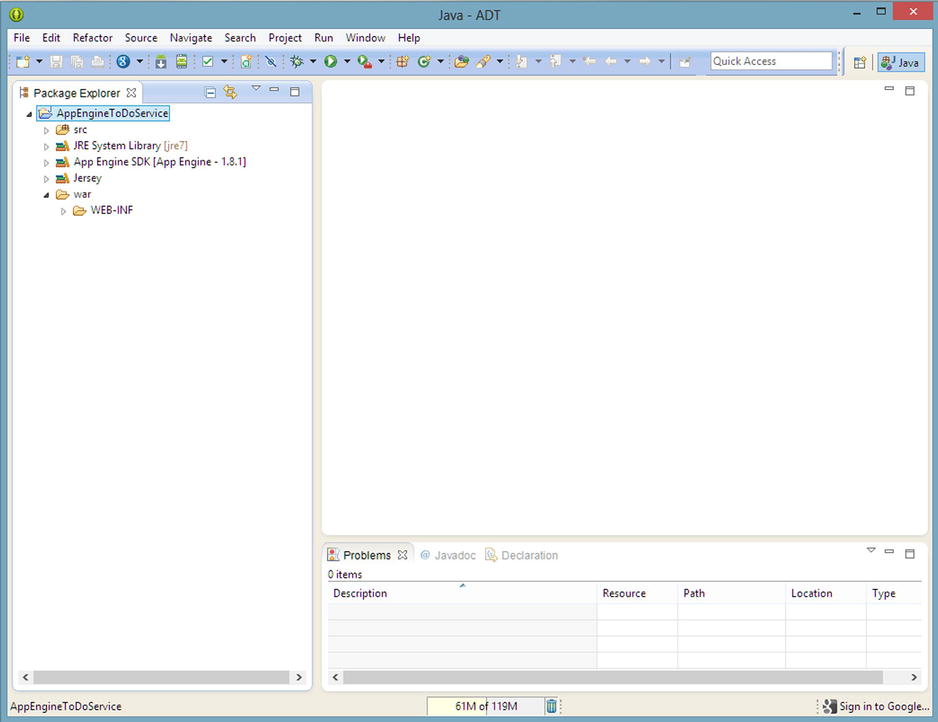
Figure 8-14. The result of adding the Jersey JARs as a User Library
Now that we have the libraries set up, we should configure the web.xml file for Jersey. The web.xml file is located in the WEB-INF folder of the project. Open web.xml, and you’ll see a single XML tag, <web-app>. Take note that the version in this tag is 2.5, which is the servlet specification supported by Google App Engine currently.
Add the servlet tag within the <web-app> tag of web.xml as shown in Listing 8-16.
Listing 8-16. Servlet tag contents for the Jersey library
<servlet>
    <servlet-name>Jersey REST Service</servlet-name>
    <servlet-class>com.sun.jersey.spi.container.servlet.ServletContainer</servlet-class>
    <init-param>
        <param-name>com.sun.jersey.config.property.packages</param-name>
        <param-value>com.example.todo.service</param-value>
    </init-param>
    <init-param>
        <param-name>com.sun.jersey.api.json.POJOMappingFeature</param-name>
        <param-value>true</param-value>
    </init-param>
    <load-on-startup>1</load-on-startup>
</servlet>
Notice in Listing 8-16 that our package name is included in an <init-param> tag. This tells Jersey where to look for the classes that comprise our web service. The POJOMappingFeature is also important; it allows classes to automatically serialize to XML or JSON, saving us from writing code to map our classes to a format for the input and output of the web service.
Below the servlet tag we’ll add a servlet mapping, but still inside the <web-app> tag as shown in Listing 8-17. The <url-pattern> tag in Listing 8-17 provides a way to map a base URI pattern for Jersey to listen for when receiving requests from clients. The mapping also allows web projects to host both web pages and services.
Listing 8-17. Mapping the base URI structure in web.xml
<servlet-mapping>
        <servlet-name>Jersey REST Service</servlet-name>
    <url-pattern>/api/*</url-pattern>
</servlet-mapping>
Create the Service
Now that the project is all set up, we can finally write some Java code for our service. We’ll start with the data and work our way out of the service to the client.
The data will be stored using a NoSQL database built into GAE, known as the datastore. The datastore holds objects known as entities, which map to a Java classes in our service. Each entity contains properties, which map to the member variables of a Java class. Each entity we store must have a key unique among all stored instances of like entities. When an application deployed to GAE contains entity definitions, the datastore will be able to store those entities without any administrative work, such as creating a table or setting up a data schema. Additionally, the datastore can be manipulated from the Admin Console of the Google App Engine web site (see Figure 8-15).
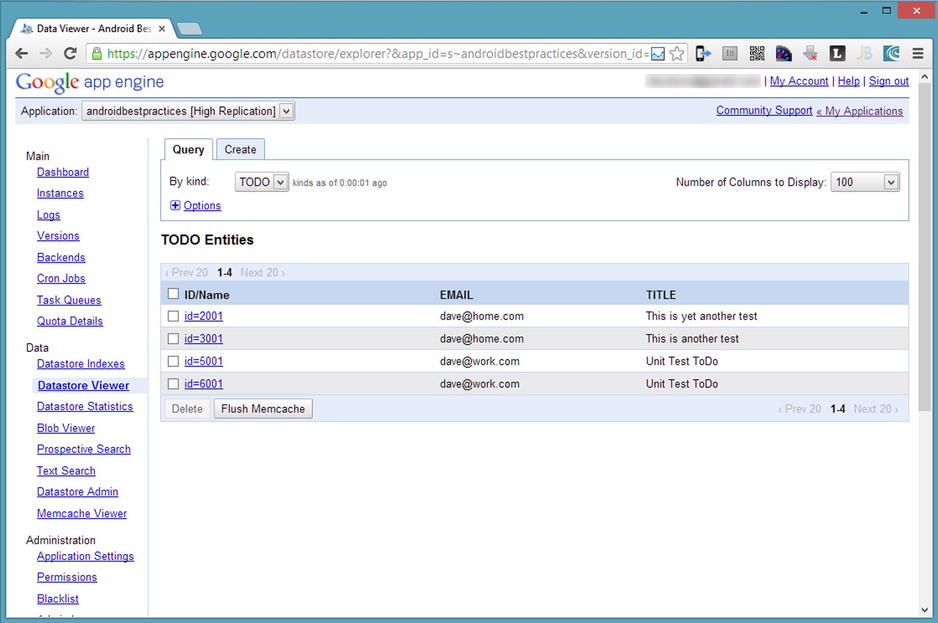
Figure 8-15. The GAE datastore management web page
Our service will utilize the JPA 1.0 implementation that ships with the Google App Engine SDK. This version is compatible with Jersey, which the JPA 2.0 version currently is not compatible with—even though it shares some libraries with Jersey; unfortunately, the Jersey and GAE JPA 2.0 use incompatible versions of these libraries.
Let’s start with a ToDo class that is a slight variation on what we built earlier. The ToDo class will serve two purposes. The first is to act as the schema for the data we will persist on GAE. The second purpose is to provide a data structure that will become both input and output from our web service.
The class in Listing 8-18 is annotated with a number of JPA attributes, including @PersistenceCapable to tell JPA to persist this data structure, and @Persistent to mark the member variables that we want to save. Note that the primary key is a Long, which is a requirement for GAE, and that the primary key will be auto-generated when new records are created. We have also added an email address, so that we can store the records of many different users.
Listing 8-18. The ToDo data class annotated for JPA persistence
@PersistenceCapable
public class ToDo {

    @PrimaryKey
    @Persistent(valueStrategy = IdGeneratorStrategy.IDENTITY)
    private Long id;

    @Persistent
    private String title;

    @Persistent
    private String email;

    public Long getId() {
        return id;
    }

    public void setId(Long id) {
        this.id = id;
    }

    public String getTitle() {
        return title;
    }

    public void setTitle(String title) {
        this.title = title;
    }

    public String getEmail() {
        return email;
    }

    public void setEmail(String email) {
        this.email = email;
    }
}
Listing 8-19 defines different actions in a data layer to manipulate ToDo records in the GAE datastore:
- Create
- Delete
- List ToDos for a user
Listing 8-19. Data Layer Class for Manipulating ToDos in the Cloud
public class ToDoAppEngineData {
    //Ensure there is only one instance of the factory
    private static final PersistenceManagerFactory factory = JDOHelper
               .getPersistenceManagerFactory("transactions-optional");
    private PersistenceManager manager;

    public ToDoAppEngineData(){
        manager = factory.getPersistenceManager();
    }

    public Long createToDo(ToDo item) {
        ToDo newItem;
        Transaction trans = manager.currentTransaction();
        try {
            trans.begin();
            newItem = manager.makePersistent(item);
            trans.commit();
            return newItem.getId();
        } catch (Exception ex) {
            trans.rollback();
            return -1l;
        } finally {
            manager.close();
        }
    }

    public boolean deleteToDo(Long id) {
        ToDo item = getToDo(id);

        if(item == null)
            return false;
        Transaction trans = manager.currentTransaction();

        try {
            trans.begin();
            manager.deletePersistent(item);
            trans.commit();
            return true;
        } catch (Exception ex) {
            trans.rollback();
            return false;
        } finally {
            manager.close();
        }
    }

    public List<ToDo> getAll(String email) {

        if(email == null || email.isEmpty()) {
            return new ArrayList<ToDo>();
        }

        PersistenceManager manager = factory.getPersistenceManager();

        Query query = manager.newQuery(ToDo.class);
        query.setFilter("email == emailParam");
        query.declareParameters("String emailParam");
        List<ToDo> results;

        try {
            List<ToDo> temp = (List<ToDo>) query.execute(email);
            if (temp.isEmpty()) {
                return new ArrayList<ToDo>();
            }

            results = (List<ToDo>) manager.detachCopyAll(temp);
        } catch (Exception e){
            results = new ArrayList<ToDo>();
            e.printStackTrace();
        } finally {
            query.closeAll();
            manager.close();
        }
        return results;
    }
}
Most of the code in Listing 8-19 is fairly straightforward and somewhat repetitive. Each method retrieves an instance of a PersistenceManager, which takes the annotated ToDo class and performs CRUD operations wrapped in a Transaction.
The last function in Listing 8-19, getAll(), contains some interesting elements. This function creates a Query object and searches for the saved ToDo entities that match an email address specified in the input parameter. Also, the functions that read data call a function that detaches the objects from the PersistenceManager. The detachment action ensures that if consumers of our read functions modify any ToDo entities, those changes won’t be accidentally persisted to the datastore.
Now that the ToDo entities are persistable, those CRUD operations can be exposed as web services by wrapping them in a class annotated with attributes from the Jersey library.
At the start of Listing 8-20, our class is annotated with the @Path attribute. This attribute provides Jersey with a piece of the URI that our class responds to. At this point, all the URIs mapped the function calls in our class will start with http://localhost:8888/api/todo. Remember that the /api/ portion of the URI came from the Jersey configuration in web.xml. Each function may also have an @Path annotation that denotes additional elements of the URI needed for mapping incoming parameters.
Listing 8-20 A Jersey-Annotated Class Exposing ToDo Entities via REST Operations
@Path("/todo")
public class ToDoResource {

    private ToDoAppEngineData datastore;

    public ToDoResource(){
        datastore = new ToDoAppEngineData();
    }

    @GET
    @Path("list/{email}")
    @Produces(MediaType.APPLICATION_JSON)
    public List<ToDo> getToDoList(@PathParam("email") String email) {

        List<ToDo> result = datastore.getAll(email);

        return result;
    }

    @DELETE
    @Path("{id}")
    public void deleteToDo(@PathParam("id") long id) {

        if(!datastore.deleteToDo(id)) {
            throw new WebApplicationException(Response.Status.NOT_FOUND);
        }
    }

    @PUT
    @Consumes(MediaType.APPLICATION_JSON)
    @Produces(MediaType.APPLICATION_JSON)
    public ToDoId createToDo(ToDo item) {

        Long newId = datastore.createToDo(item);

        if(newId == -1){
            throw new WebApplicationException(Response.Status.INTERNAL_SERVER_ERROR);
        }

        ToDoId result = new ToDoId(newId);

        return result;
    }
}
Each function is annotated with the HTTP verb corresponding to the CRUD operation in the data layer class we created. There can be more than one operation per HTTP verb. For instance, our class could have more than one GET operation. The @Path annotation distinguishes these functions from one another in our REST URIs. Each function must be annotated with a unique combination of HTTP verb and @Path attributes.
The functions returning data are annotated with @Produces(MediaType.APPLICATION_JSON), which tells Jersey to serialize the output of the function into JSON. Additionally, the content type in the HTTP header of the response will be application/JSON, telling the consumers of our REST service to expect JSON in the response body. The functions that accept ToDo entities as input are annotated with @Consumes(MediaType.APPLICATION_JSON). This forces the client calling our REST function to add the content type application/JSON to the header of the incoming HTTP call. If this annotation is absent, the client could conceivably send XML or even plain text instead. Because mobile apps consume these services, JSON is our preferred format. If the content type were not set at the Android client, our service would throw an HTTP 400 error, indicating that the combined HTTP headers and body are not formatted properly.
Notice that none of the function calls contain any code converting the incoming messages from JSON or the outgoing results to JSON. In the web.xml file the POJOMappingFeature is enabled, which allows the Jackson library (included as part of the set of jars that make up Jersey) to perform the serialization of our ToDo objects to or from JSON automatically.
The createToDo() function returns a new type, the ToDoId class. This simple class simply returns the new id generated by the datastore when a new ToDo is inserted into the datastore.
By returning a class instead of a single number, clients to our API will get a JSON object and not just plain text in the body of the response which would happen if we simply returned a long. Notice the lack of annotations in Listing 8-21. We don’t persist this class in the datastore; we simply use it as a data transfer object.
Listing 8-21. A Data Transfer Object for Returning Newly Generated ToDo IDs
public class ToDoId {

    public ToDoId(Long id){
        Id = id;
    }

    private Long Id;

    public Long getId() {
        return Id;
    }

    public void setId(Long id) {
        Id = id;
    }
}
For the version of Jersey that we are using, we need to create an application class that knows which specific Java classes we would like to expose as web services, as shown in Listing 8-22.
Listing 8-22. The Jersey Application object that registers the service class
public class ToDoApplication extends Application {

    public Set<Class<?>> getClasses() {
               Set<Class<?>> s = new HashSet<Class<?>>();
               s.add(ToDoResource.class);
               return s;
    }
}
Tools
Once we create a service, we want to be able to test our code. There are a few options for testing a service before we have built the Android client.
The first and most valuable tool for testing web services is to write unit tests. No matter which testing framework you choose, you can write Java code that calls the service. If you host the service remotely, tests can be a challenge, since the data is not local to the unit tests. The upside to unit tests is much greater than with manual testing because the unit tests can become part of a continuous integration (CI) cycle. The CI build provides regular feedback and may help development teams find and fix bugs in the service sooner than when the service is released for manual testing.
Another option to exercise a service is to use a pre-made REST client, such as Advanced REST Client for Google Chrome or RESTClient for Firefox (https://addons.mozilla.org/en-us/firefox/addon/restclient/). These manual tools help you compose raw HTTP calls, including the HTTP method, headers and body. They also show the resulting HTTP response and headers.
We will test our service manually using Advanced REST Client for Google Chrome.
- In ADT, run the web services project.
- Open Google Chrome.
- Follow this URL in Chrome (https://chrome.google.com/webstore/detail/advanced-rest-client/hgmloofddffdnphfgcellkdfbfbjeloo?hl=en-US) and install the app.
- Open a new tab in Chrome, and navigate to the installed apps. Click Advanced REST Client (see Figure 8-16).
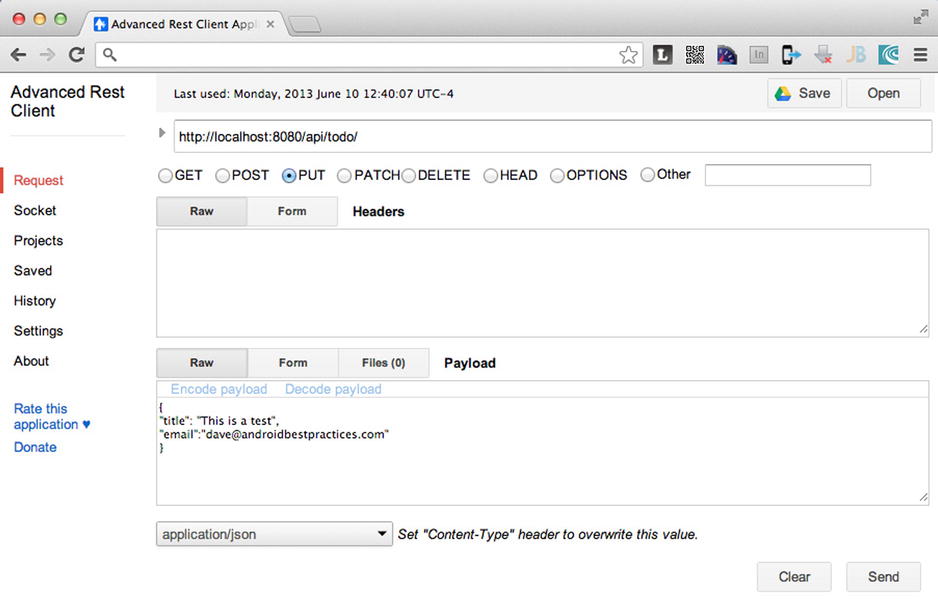
Figure 8-16. Advanced REST Client for testing the ToDo web service
- In the URL box, enter http://localhost:8080/api/todo/.
- Choose the PUT method.
- In the Payload box enter:
{
"title": "This is a test",
"email":"[email protected]"
} - In the drop-down list below the Payload box, choose application/json.
- Click the Send button. The service should return a new ID for the record sent to the web service (see Figure 8-17).
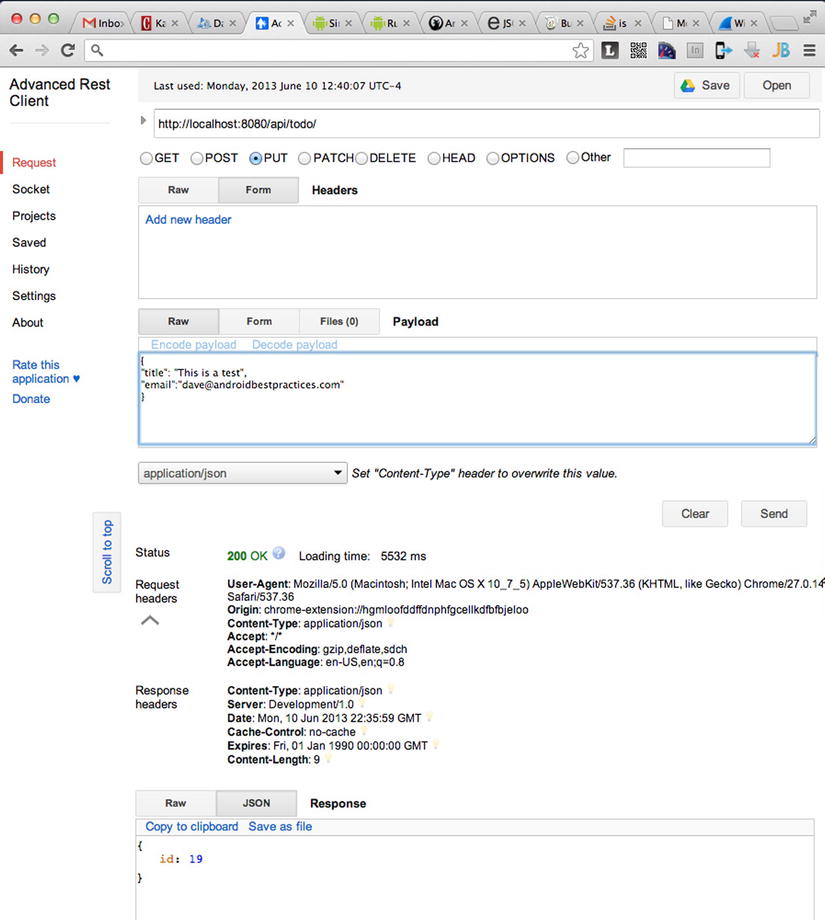
Figure 8-17. Inserting a new ToDo record using Advanced REST Client
Once you move from debugging the service to debugging an Android application, you may want to examine the raw HTTP message after the Android client generates it. An HTTP proxy set up between the Android emulator and the web server allows for capture and examination of the message and response. There are a number of HTTP proxy tools, including Charles Proxy (http://www.charlesproxy.com/), WireShark (http://www.wireshark.org/), and the PC-only Fiddler (http://fiddler2.com/). Device traffic can be captured if your computer is set up to share its wireless network connection and the Android device attaches to the computer instead of the normal wireless access point.
As we create our own services, there are some infrastructure considerations we must account for. These are the concepts of availability and scalability. Availability is the amount of time our application is “up,” that the web services are available to use by our clients. Availability is often expressed as a percentage, like 99.9%, or “three nines.” That represents 8.76 hours/per year of down time, which translates to about 10 minutes of down time per week. A system gains availability by adding redundant servers, so that in the event that one server goes down, whether intentionally or not, another server is available to service requests.
Scalability, on the other hand, is the ability of your service to handle increasing numbers or spiking numbers of requests. If you build a successful mobile app using your own web services, you will eventually encounter scalability issues. You will need more servers to handle the increasing number of requests.
A load balancer is a network tool for managing both availability and scalability, provided by either software or dedicated hardware. A load balancer sits in front of a pool of servers hosting your web services. The load balancer distributes the requests among the available servers in the pool. Should the pool of servers increase or decrease, the load balancer automatically handles the situation, shifting traffic automatically. From the outside, the consumers of your web services see a single URL that is the load balancer, making the number of servers in the pool irrelevant to the consuming application.
Load balancing does not solve scalability problems completely, as an app could still generate more traffic than the pool of servers could handle. The load balancer does allow you to add or remove servers from the pool easily to adjust for the incoming traffic without disrupting the existing servers.
Additionally, your code can be written in a way that inhibits scalability. Your application code should be using memory and external resources properly, like connections to databases or the file system, in order to scale well. Poor design and coding is the main cause for an application to scale poorly.
If you host your web services in the cloud, one of the main benefits of a cloud platform is rapid scaling. Creating new server instances in quick and relatively easy, so an app scales up faster than with traditional hosting, where a hardware server needs to be purchased, configured, and deployed before your app can scale upward. Alternatively, if your traffic drops off, servers removed from the pool stop being a cost immediately, unlike the situation where you purchased a hardware server that is no longer needed. Google App Engine, where we hosted our service, automatically load balances and scales your application during its life cycle. GAE manages your application itself, automatically building the new servers and installing your application. Other cloud services, like Amazon’s Elastic Beanstalk and Microsoft’s Windows Azure, also offer automated scalability.
Summary
In this chapter we covered many aspects of web services as they relate to Android applications. We examined the types of web services, and saw that REST is the best fit for mobile applications. We also explored data formatting, noting that JSON is much smaller and better for data transfer over mobile networks.
We then looked at the many ways to access web services using Android, examining the design options, and how to transform JSON data into Java objects.
Finally, we built our own web services in the cloud, using Google App Engine and the Jersey REST library.
