Agile Android
As a developer, you want to get better at Android development, have fewer bugs, make a better product, or simply make the customer happy. Whether you’re developing for the web, mobile, or even the desktop, it pays to adopt an Agile approach to your development and testing.
Benefits
I’m going to talk about the real benefits of the Agile approach for Android and indeed mobile development in general. By the end of this chapter, it should be clear just how much of a sweet spot Agile really is for Android developers.
Let’s begin with the most obvious benefits of Agile development:
- You’ll have fewer errors.
- You’ll get faster feedback.
- It’s repeatable and reliable.
- You’ll need less manual testing.
- It’s cheaper.
- It offers built in regression testing.
Using test-driven development (TDD) will result in fewer defects and remove the need for lots of people doing manual testing, which makes the development of an app much cheaper. Continuous integration (CI) will provide faster feedback to the customer and by its nature make the APKs creation process repeatable and reliable as well as providing built-in regression testing for any new features that you introduce into your app.
What is the goal behind adding Agile practices to your Android projects? If we’re using continuous integration we’re going to get faster feedback from the business, with repeatable and reliable development and all the time making sure that you’re producing something useful for what people are trying to do to perform their basic needs. In a nutshell, if you’re using Agile in mobile development, it makes the business happy, as there are fewer defects and team members get to see how the app is progressing day to day.
For me, Agile is about lessons learned and how to integrate best practices to make sure we raise the bar for everyone, not just a single app. It’s about trying to make sure that people are using Agile the right way and the customers are happy, whoever they may be.
When I first started working on mobile apps, it came as a surprise that when people started mobile development they got so excited they just started coding and seemed to forget everything we’ve learned in the last 10 years.
One of the main reasons I favor adopting Agile practices is to make sure everyone is following the same standard so we can have repeatable quality over many different apps. I see when people don’t use Agile and when they do in mobile, and there is no reason we would go back to not using TDD and behavior-driven development (BDD) in our development. Without them the quality goes out the window. Using Agile is also about trying to make sure that as new developers come in, they’re all doing their work the way they should be.
We’ll look at the elements of Agile in the next section. I’m sure your list may be different, but for me at its most basic Agile development includes TDD, BDD, and CI. BDD isn’t ever really an issue for developers to adopt. That’s probably because it’s mainly the job of the Business Analyst and QA folks to get BDD up and running. CI also tends to be readily adopted, as it allows any and all code deployment and integration issues to be fixed much earlier in the process. CI takes away those last-minute deployment snafus or issues that have plagued software development for decades now.
TDD, on the other hand, can be difficult for many developers to grasp and properly adopt. As its name suggests, TDD means writing a unit test first and then writing the simplest piece of code to make the test pass. Once it passes the test, the code is cleaned up or refactored. Then rinse and repeat to add any new requested features. TDD does not mean adding unit tests after the code is complete. This is a huge reversal of the coding practices for many developers; and for many it is the software world’s equivalent of quantum mechanics, as it just does not make intuitive sense.
However, there are two great benefits that TDD provides to developers. First, it tilts development into a YAGNI—You Aren’t Going to Need It—mindset. There is often a temptation to develop a truly wonderful new framework or architecture for your new app, but trust me, You Aren’t Going to Need It. TDD takes away that temptation and makes sure that you’re only writing code for functionality that is necessary and nothing more. Second, TDD also provides developer insurance against defects. For any new feature, you write a new test and then the corresponding code to make the test pass; then, if the unit tests all pass, you can be relatively sure that the new code did not introduce any unwanted side effects.
The Sweet Spot
Agile lends itself very well to mobile development for a number of reasons. I’ve mentioned some of its benefits in the previous sections, but Agile processes and mobile development make a particularly good partnership, as it is so much easier to do mobile Agile than it is to do mainframe Agile or even web Agile.
The first reason for this is that mobile projects have smaller teams and also have shorter development lifecycles than other development work. According to Kinvey, which runs cloud back-end services for mobile developers, the average time to create a mobile application is 18 weeks (see http://www.kinvey.com/blog/2086/how-long-does-it-take-to-build-a-mobile-app).
The reason for this is that mobile apps tend not to be as complex as web sites, and have fewer features developed from start to finish. Often the work can be completed in a handful of sprints, where s sprint is an Agile term that means a regular period of time (2 weeks is common) in which some work is completed and made ready for review.
The Kinvey report further notes that the work takes approximately 8 weeks for the front-end and 10 weeks for the back-end work.
Because mobile apps and teams tend to be smaller, adopting Agile practices for mobile application development does not require a huge company reorganization. All that is required is the team’s interest in trying an Agile approach, and the benefits listed in previous section can be quickly realized.
Second, although we’ll see later that the Google TDD and BDD aren’t the best place to start, there are open source alternatives that make it very easy to adopt Agile Android development practices.
So even if you start off in small steps using just TDD or even something as simple as recording your scripts using Monkey Runner, Agile will help you in the long run keeping your customer happy, whoever that might be.
Elements of Agile
Let’s take a look at what are we going to need to have in our Agile Android project in its basic form. There was a time when you could get away with just doing unit testing and claim you were doing Agile development. But what we’re ultimately trying to do is make sure the customer is happy, and unit testing alone probably won’t get us that. Ideally we’re looking for more, at the very least for a continuous integration process with unit testing and functional tests.
The elements of Agile Android are as follows:
- Continuous integration server
- Unit testing
- BDD or functional testing
- Deployment; that is, emailing out an APK
The rest of this chapter will show how you can create Android projects using those elements.
Before we look at in the details of setting up an Agile Android project, let’s talk a little about our goals.
Tests should be automated; we don’t want to be running them manually over and over again, as that’s not efficient. We also want to build early and build often so we don’t have any deployment issues. And we want to run the unit and functional tests before sending out the APK to anyone. How often you run the whole process is up to you. Some people run it every evening, others choose to run tests every time any new code is checked in.
So ideally we want an automated build process that starts when the code is checked into our source code repository, such as GitHub. Then the CI server checks it out and builds the code, and the unit tests are automatically run, followed by the functional tests (in the form of executable requirements). If nothing fails—that is, if everything is green—then the APK is emailed to the customer so it can be installed on a device.
I’d be lying if I said we were completely finished. Code coverage is an issue, but the goal here is to pass on information so you can get started, too. I’ll try to point out the main elements you’re going to need and what you can and currently cannot do.
Following the Agile approach we can start small with the basic elements and build from there. You may want to add more elements later, such as load testing, performance testing, or security testing, but for now if we do TDD, BDD and CI, then we are including the primary elements of Agile Android.
Roll Call
Now I’d like to introduce you to the names behind these elements of Agile Android, as the rest of this chapter is going to be practical rather than theoretical. Table 4-1 shows the Android development tools we’ll use for each element of the Agile model.
Table 4-1. Agile Android Element Names
Agile Element |
Android Tool Name |
|---|---|
TDD |
Robolectric |
BDD |
Calabash |
CI |
Jenkins |
Source Code Management |
GitHub |
From Table 4-1 we can see that our elements now become the following:
- Robolectric (robolectric.org): Although jUnit is the out-of-the-box unit-testing system with Android, it has some drawbacks and I do not recommend it as a good place to start. You should be able to run unit tests quickly and efficiently, but jUnit on Android device emulators does not lend itself to efficient unit testing. Instead we’re going to use Robolectric, which has none of the jUnit drawbacks and is also jUnit4 and not jUnit3.
- Calabash (calaba.sh): We’re going to use Calabash for our BDD or executable requirements. Calabash allows us to impose executable requirements in a given-when-then format. Calabash is the easiest system to get BDD up and running for your Android projects.
- Jenkins (jenkins-ci.org): The de facto industry standard continuous integration server, formerly known as Hudson.
- GitHub (github.org): Rapidly becoming the de facto industry standard source version control or source code repository. Although people often treat them as the same thing, I should point out that Git is the version control system and GitHub is a website where you can post your Git projects.
Test-driven development (TDD) has been around for some time now; it comes from XP’s test-first programming in the late 1990s. The concept is simple: write a test for each new feature, run the test so that it fails, write code to satisfy the test, and finally tidy or refactor the code; Figure 4-1 illustrates the process. Each test is typically called a unit test.
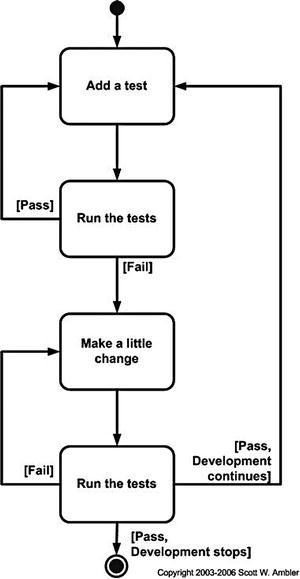
Figure 4-1. Test-driven development
And although the idea isn’t exactly new, it hasn’t been massively adopted by the programming community, as it seems counterintuitive to many developers. However, in smaller applications such as mobile development projects, TDD can show dramatic improvements. It can reduce the number of defects as well as increase the speed of development.
A huge benefit of TDD is the built-in regression testing. If the TDD tests all pass after you make a small change during the refactoring phase or when adding a new feature, then you can be sure your app is behaving correctly. Unit tests are the best insurance against problems that can be introduced by refactoring or adding new functionality.
The other major benefit of TDD is the focus it brings to the development process. Gone are the great architectural additions to the code or inventing new frameworks that no one will ever use again. The developer’s job becomes writing a unit test or tests to satisfy the next feature and then writing the simplest code to make the unit test pass. This is also called YAGNI or You Aren’t Going to Need It, another XP principle. So a decision about whether to use an ORM instead of just using SQLite, for example, becomes much simpler; the question becomes “do I need an ORM to make the unit test pass?” And the answer is inevitably no or YAGNI.
As noted earlier, we’ll use Roboelectric to write our unit tests, because the built-in solution from Android uses an older version of jUnit and requires us to use the incredibly slow Android emulator to run tests, which makes TDD a very painful exercise. And while Roboelectric simplifies the process, code coverage reporting (how much of your code is covered by unit tests) can still be an issue.
Behavior-driven development (BDD), in this case in the form of executable requirements, extends TDD by adding another layer, as shown in Figure 4-2. What it means is that we’re adding executable requirements as one of our elements. These are use case or user story–type requirements, which are written in the gherkin format, also known as given/when/then to you and me.
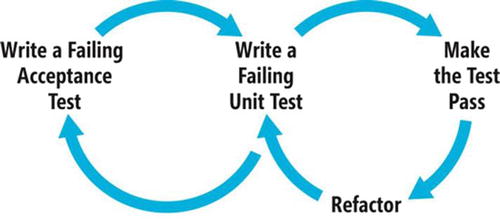
Figure 4-2. Behavior-driven development
Figure 4-3 shows a simple example of an executable requirement. It doesn’t matter if this is for an Android game or something on the web; the description of the requirement is still the same. It’s not a huge stretch to see how you would convert your old-style user stories into this gherkin format.

Figure 4-3. A sample feature file
Executable requirements are written in feature files, which are made up of one or more scenarios, often with a small table of data to drive the scenarios. Feature files always go hand-in-hand with step definition files, which usually include some Ruby code to drive the web or mobile application. Simple regex expressions in the step definition files glue the two together and make your requirements executable.
It can sometimes take a few minutes for the whole given/when/then idea (as used by the Cucumber approach we discuss later in the chapter) to sink in. I hope Figure 4-4 will make the penny drop for you, too. Given a set of preconditions, when you do X, then you expect the following testable outcome.
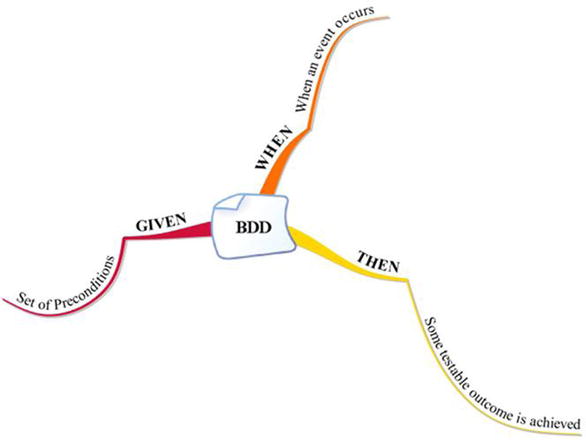
Figure 4-4. The Given/When/Then development model
When I started trying to adopt Agile practices to Android work, BDD tools simply weren’t available, but now there is plenty of scope to allow you to use given/when/then development.
We’re going to use Calabash for our BDD tool because it’s so easy to use. One of the main reasons Calabash is so easy is its library of step definition functions that allow you to test Android apps, often without needing to write any of your own step definitions.
So how do you decide how much unit testing vs. functional testing to do? The Agile pyramid shown in Figure 4-5 gives us a good idea. How does this diagram apply to Android? The GUI Tests and Acceptance Tests layers are implemented using BDD, and the Unit Tests/Component Tests layer is obviously done using unit tests.

Figure 4-5. The Agile testing triangle
What is the difference between a unit test and a GUI test? Unit tests act on a method, typically a public method; by contrast, GUI tests or BDD functional tests are tests that typically run against the emulator.
Android apps are usually client-server apps; they’re front-ends with corresponding back-end databases. So they typically have APIs that we’ll test using BDD. We’ll also be testing for exceptions and wrong paths as well as the “ideal path.”
Continuous Integration (CI) takes the form of a build server where each developer’s code is merged together on a regular basis, usually daily or whenever any code is checked into the project’s source code repository. Originally CI was created to stop the integration hell that arose when multiple developers’ code was merged just before an application is released; all sorts of new defects, unforeseen dependencies, and performance issues could conspire to delay a project’s launch. CI makes the code merging happen much more often, so theoretically the integration should be less painful, as it’s only at most a day’s code that you’re merging.
CI servers automate the build process, simplifying deployment and making it much easier to spot any dependencies earlier in the project. CI servers also allow us to do other things, such as run our unit tests (TDD) and executable requirements (BDD) along with performance testing, device testing and all sorts of reporting. They will even stop the deployment if any of tests fail, preventing the app from getting the business user when it’s not ready for prime time.
We’ll be using Jenkins as the CI server in this chapter. Jenkins and CI in general work very well for mobile projects. If you can run a command manually from the command line, then you can automate it in Jenkins. There are also lots of plugins available that make the build, test, and deployment stages easy to set up and maintain.
We’ll also look at using CI for automated testing on multiple phones and tablets, which for me has long been the holy grail of Android development.
Putting It All Together
We start off adopting Agile in our mobile development processes by using Jenkins as our CI server. Download Jenkins from http://jenkins-ci.org/. You can also download and install a windows or Mac OS native binary, but it’s just as easy to download the war file and run java -jar jenkins.war from the command line. Next, point your browser at http://localhost:8080 to load Jenkins; you should see something like the dashboard page in Figure 4-6.
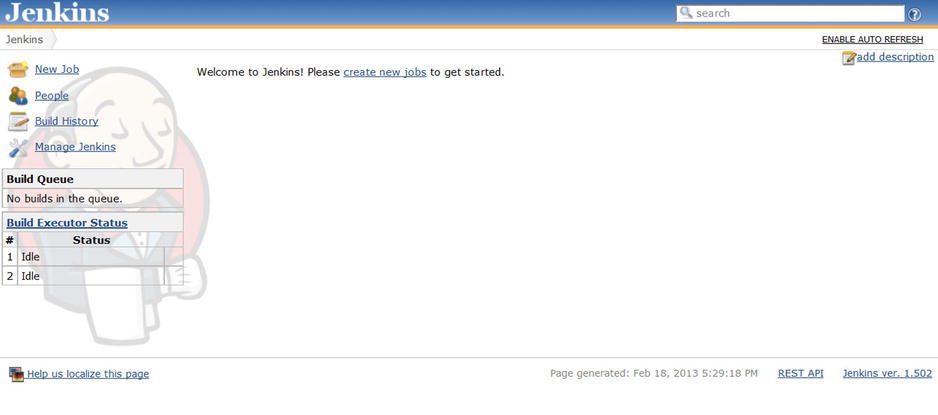
Figure 4-6. The Jenkins opening dashboard display
Tip There are also web sites such as Cloudbees (cloudbees.com) that will host Jenkins for you. With Cloudbees you can have it simply compile your apps or set up slave clients to compile the code and just get Cloudbees to orchestrate everything.
There are two areas where we typically go when we’re working with Jenkins, as shown in the Manage Jenkins screen in Figure 4-7. The first is Manage Plugins, where we can pull in the Ant, GitHub, and Android emulator plugins. We also need to go to Configure System to add the default project settings for the JDK, Ant location, and so on.
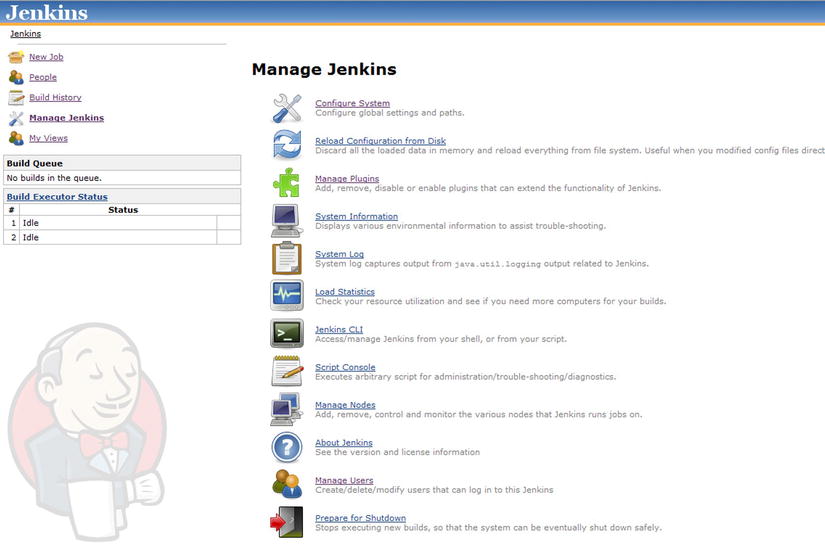
Figure 4-7. The Manage Jenkins screen
What gives Jenkins its power is the availability of literally thousands of plugins. Figure 4-8 shows the Manage Plugins ➤ Installed tab; be sure to grab the plugins listed earlier if you don’t have them.
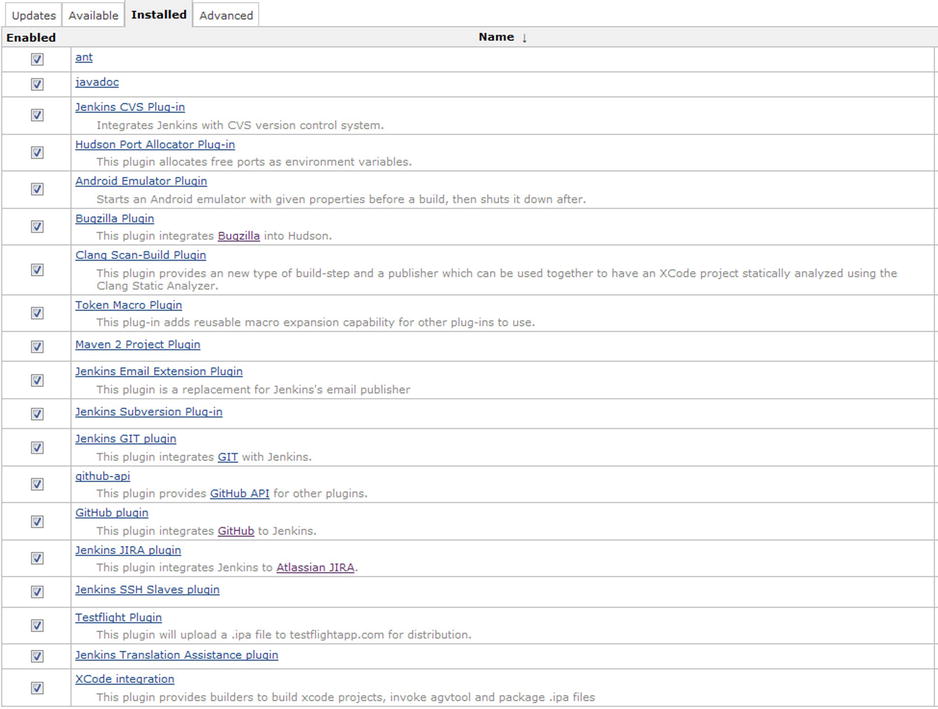
Figure 4-8. Managing plugins in Jenkins
Next go to Configure System to add the Android SDK, JDK, Git, and Ant locations on your CI server; Figure 4-9 shows this display on a Mac.
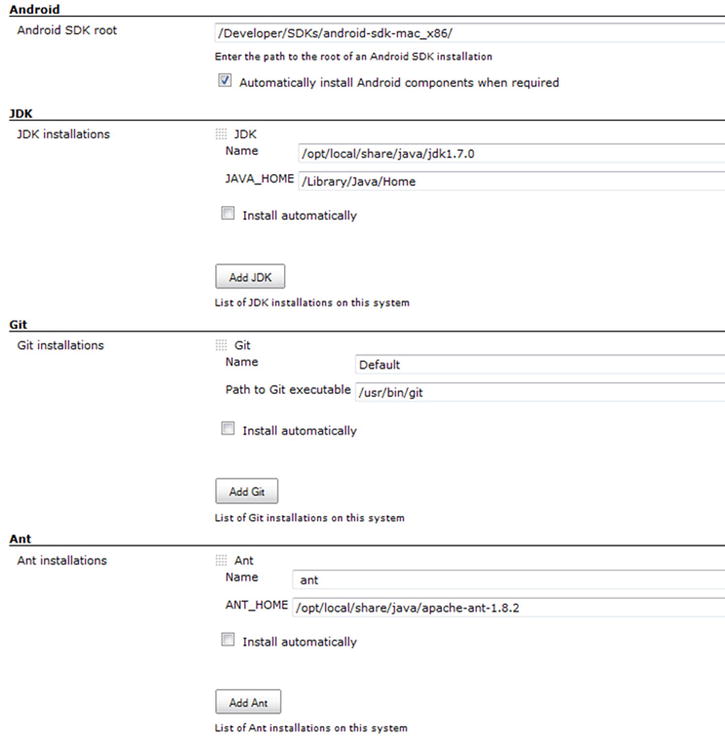
Figure 4-9. Use the Configure System page to add plugins in Jenkins
Jenkins on its own it pretty useless; we need to get it to do something, and the first thing we want it to do is to build the code from GitHub.
- Create a new job called ToDoList and make it a free-style software project.
- Click on Configure and enter a GitHub project, for example https://github.com/godfreynolan/ToDoList.
- Under Source Code Management, enter the Repository URL such as [email protected]:godfreynolan/ToDoList.git.
- Under Build Triggers, choose “Build when a change is pushed to GitHub.”
Next we need to tell Jenkins how to build the project. In this case we need two commands as follows. We’re creating a debug build, using the Configure Project settings shown in Figure 4-10.
android update project –name "ToDoList"
ant –Dadb.device.arg='-s $ANDROID_AVD_DEVICE' debug
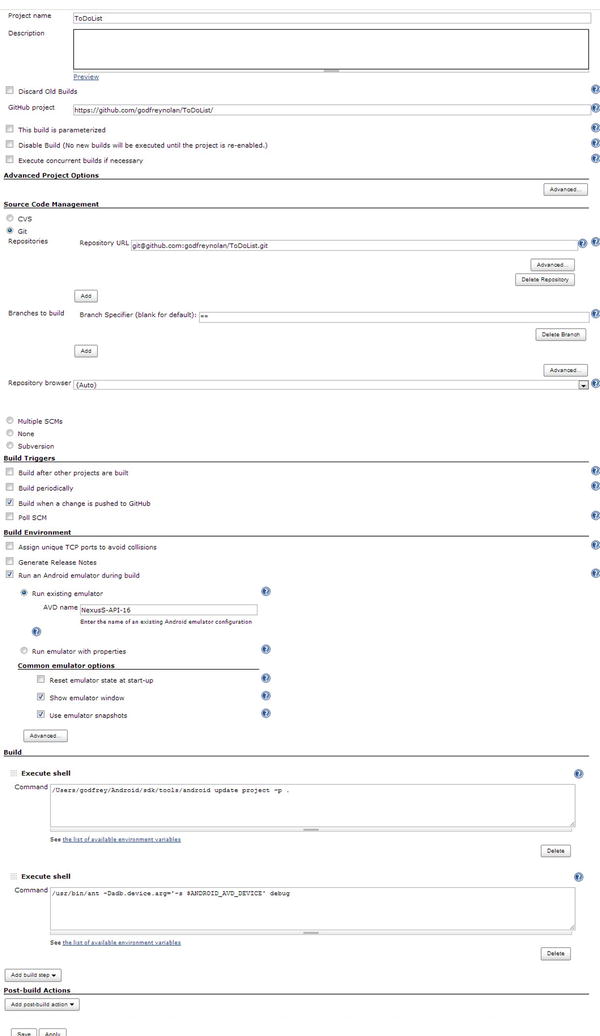
Figure 4-10. Jenkins Configure Project settings for ToDoList
Hit Save and run the build by clicking on the new project, which should now be in the Jenkins Dashboard, as shown in Figure 4-11.
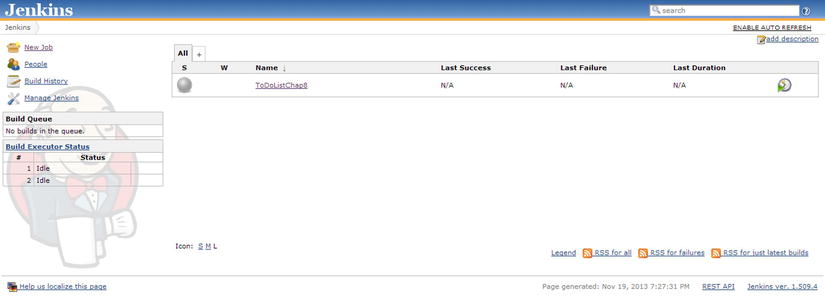
Figure 4-11. The Jenkins dashboard showing the new project added
Now we’re going to add some TDD to the process using a version of jUnit. As described earlier, test-driven development is the process of writing tests before writing any code and then writing code that will satisfy that test, repeating the process until the features are completed.
Typically when we run the unit tests, the first time around they’ll fail—because you have no code—and then when you write the code that satisfies the test they should go green. Also, all TDD classes have a setup and teardown along with the unit test.
Google’s recommended unit testing suffers from a number of issues. First, it’s jUnit3, which is cumbersome to use, and not jUnit4. It also has no good code coverage tool for unit testing. I’m not usually someone who asks a client, “Can you tell me what your code coverage is?” or argues about how to get code coverage up from 83% to 90%. Code coverage is good enough when you come up with a number that’s right for you. Usually when I hear someone say “reflection” and “code coverage” in the same sentence, I know they’ve gone too far. However, there is also a point where you’ve gone too far in the other direction and there simply isn’t enough unit testing. Android’s jUnit3 makes it easier to fall into that trap.
Adopting Robolectric implicitly lets you use jUnit4, including its code coverage smarts. Robolectric also has some other nice features, and as a bonus, your entire toolchain for TDD, BDD and CI is using the highest quality contemporary components.
In the following example we created five simple tests for our ToDoList application:
- should_create_activity fails if an activity isn’t created. This is the most basic Robolectric test possible and can be used in any Android app.
- should_find_tasks adds three tasks and fails if the newly created tasks are not found.
- should_add_new_task adds a task via a ToDoProvider method and fails if the task is not found.
- should_add_task_using_ux adds a task via the GUI and fails if the task is not found.
- should_remove_tasks adds a task and deletes a task and fails if it finds the newly created task.
Listing 4-1 shows the ToDoActvityTest class, which includes these five tests, and the Robolectric/jUnit4 decorators @RunWith and @Test that are the hallmarks of writing such tests.
Listing 4-1. ToDoActivityTest.java
import java.util.List;
import org.junit.Assert;
import org.junit.Test;
import org.junit.runner.RunWith;
import org.robolectric.Robolectric;
import org.robolectric.RobolectricTestRunner;

import android.app.Activity;

@RunWith(RobolectricTestRunner.class)
public class TodoActivityTest
{
        @Test
        public void should_add_new_task() throws Exception
        {
                final TodoActivity activity = Robolectric.buildActivity(TodoActivity.class).create().get();

                activity.getProvider().addTask("Some task");
                final List<String> tasks = activity.getProvider().findAll();
                Assert.assertEquals(tasks.size(), 1);
        }

        @Test
        public void should_add_task_using_ux() throws Exception
        {
                final TodoActivity activity = Robolectric.buildActivity(TodoActivity.class).create().get();

                activity.getEditableTextbox().setText("My task");
                activity.getSaveTaskButton().performClick();

                final int tasks = activity.getTaskListView().getCount();
                Assert.assertEquals(tasks, 1);
        }

        @Test
        public void should_create_activity() throws Exception
        {
                final Activity activity = Robolectric.buildActivity(TodoActivity.class).create().get();
                Assert.assertTrue(activity != null);
        }

        @Test
        public void should_find_tasks() throws Exception
        {
                final TodoActivity activity = Robolectric.buildActivity(TodoActivity.class).create().get();

                activity.getProvider().addTask("Some task 1");
                activity.getProvider().addTask("Some task 2");
                activity.getProvider().addTask("Some task 3");
                final List<String> tasks = activity.getProvider().findAll();
                Assert.assertEquals(tasks.size(), 3);
        }

        @Test
        public void should_remove_task() throws Exception
        {
                final TodoActivity activity = Robolectric.buildActivity(TodoActivity.class).create().get();

                activity.getProvider().addTask("Some task");
                activity.getProvider().deleteTask("Some task");
                final List<String> tasks = activity.getProvider().findAll();
                Assert.assertEquals(tasks.size(), 0);
        }
}
Robolectric works best with the Maven build tool instead of Ant. To Mavenize your project, take the steps in Listing 4-2.
Listing 4-2. Mavenizing ToDoList
git clone https://github.com/mosabua/maven-android-sdk-deployer.git
cd maven-android-sdk-deployer
mvn install -P 4.3
cd ToDoList
mvn clean test
The first time you run Maven or mvn it will install all the missing jars, which can take some time. If the project has been Mavenized correctly, the test output should be similar to Listing 4-3.
Listing 4-3. Test Results
-------------------------------------------------------
 T E S T S
-------------------------------------------------------
Running com.example.TodoActivityTest
WARNING: no system properties value for ro.build.date.utc
DEBUG: Loading resources for android from jar:/Users/godfrey/.m2/repository/org/ToDoList/android-res/4.1.2_r1_rc/android-res-4.1.2_r1_rc-real.jar!/res...
DEBUG: Loading resources for com.example from ./res...
Tests run: 5, Failures: 0, Errors: 0, Skipped: 0, Time elapsed: 12.168 sec

Results :

Tests run: 5, Failures: 0, Errors: 0, Skipped: 0

[INFO] ------------------------------------------------------------------------
[INFO] BUILD SUCCESS
[INFO] ------------------------------------------------------------------------
[INFO] Total time: 19.018s
[INFO] Finished at: Tue Nov 19 20:03:48 EST 2013
[INFO] Final Memory: 18M/81M
[INFO] ------------------------------------------------------------------------
Adding this to the CI server as unit tests requires being able to run the Robolectric code from the command line, which simply means running the Maven tests:
mvn clean test
in Chapter 2 we used Dagger to show an example of a Dependency Injection framework we first met. Dagger allows you to create mocking frameworks so that we’re testing our code and not any network connections to a web service or in the given example the SQLite database. In the example we mocked out the data provider in our ToDoList application. Listing 2-1 showed how to wire in the two database providers; the first is the real database and the second was a stub function.
The penultimate step is to now add the executable requirements code using Calabash. We’re using Calabash to provide BDD or behavior-driven design, in this case in the form of executable requirements. Apologies to the Calabash folks as they don’t really have an icon so I had to make one up.
When we started trying to adopt Agile practices to our Android work, options for using executable requirements simply weren’t there, but now there is plenty of scope to allow you to use Cucumber-style given/when/then programming using Calabash and other tools.
BDD extends TDD by adding another layer, what are called acceptance tests here. So now you write your executable requirement as well as your unit test and then make them both pass by writing code that satisfies the tests before releasing the executable to the business stakeholder.
Listing 4-4 has a simple example of an executable requirement. It doesn’t matter if this is for an Android game or something on the web; the description of the requirement is still the same. It’s not a huge stretch to see how you would convert your old-style user stories into this format.
Listing 4-4. Implementing Given/When/Then Development
Feature:
     As a user I want to see my To Do List and individual reminders

Scenario: Display an individual reminder

  Given I wait for the "ToDoListActivity" screen to appear
  When I touch the "Get The Milk" text
  Then I wait up to 3 seconds for the "ReminderActivity" screen to appear
  Then I see the text "Remember to Get The Milk"
As described earlier, executable requirements are written in feature files, which are made up of one or more scenarios, often with a small table of data to drive the scenarios, which are then matched up step definition files.
In Cucumber the feature files define the requirement and the step definitions execute the code. In Calabash you can mostly get away with feature files, as the nice Calabash folks have written a library of step definitions that will cover most of the scenarios you are trying to test, or in other words they have already done the hard work for you.
To run Calabash you first need to install the Calabash Gem. Then create your feature files in the calabash folder in your test APK and call the calabash-android command. Use the following syntax to call Calabash from the command line; it can be added as another execute shell in Jenkins.
calabash-android run ToDoListApplication.apk
Calabash works by disassembling your test APK, injecting the calabash server, and then reassembling your APK so that you can run your tests.
Finally, once the unit testing and executable requirements have all passed, you need to email the APK out to your business stakeholders. There are other options you might want to consider, such as using an over-the-air deployment model such as TestFlightApp; however, on the Android platform that’s probably overkill, so we’ll just email out the APK. Thankfully Jenkins has an email plugin that allows you to simply add a list of email recipients to send the APK.
Summary
What is the goal behind adding Agile practices to your Android projects? You’ll get faster feedback from the customer, with repeatable and reliable development and all the time making sure that you’re producing something useful to help them perform their basic business needs. In a nutshell, if you’re using Agile in mobile development, it makes the customer happy as they see fewer defects because you are doing unit testing and implementing executable requirements.
You’ll find that mobile apps also have great visibility. Although the overall expense to complete an app is probably less than for web work, the visibility is very high and usually means seeing and talking to C-level execs. Making a positive impression usually leads to more work. So even if you start off in small steps using just TDD or even something as simple as recording your scripts using Monkey Runner, it will help you in the long run keeping the customer happy.
The Agile Manifesto (http://www.agilemanifesto.org/principles.html) states as its first principle.
Our highest priority is to satisfy the customer through early and continuous delivery of valuable software.
Applying the principles of Agile Android gets us there.
Finally, feel free to add more plugins to your Jenkins server, for features such as code coverage, performance testing, and security vulnerability testing. This is not a complete list of tasks; it’s meant to get you started on the Agile road. Look for areas of improvement and gradually apply them—whatever works for you and your team to help create better software is the best Agile process.
