
Chapter 3: User Interface
In Soviet Google, the Interface Renders You
In the scrum of mobile UI development architectures, Android's rises to the top. If you have some mobile experience, you'll find it to be a happy union of Java ME's Canvas/Screen object and the BREW widget hierarchy, with some XML layout tools to boot. Each activity, as it's launched from within your application, is placed on a screen stack. Android is already configured to handle closing down the top activity and activating the one under it when you ask or when the user presses Back. This setup allows you to think of every activity as the base for a single screen.
Each activity may contain different views and view groups in a hierarchical tree. You can visualize this tree with the view groups and layout objects as the trunk and branches (because view group objects can be cast into views) and with the views or widgets as the leaves. A single view, in its most basic format, is a drawable rectangle. A view group, in its most basic format, is an object containing one or more views. This object hierarchy allows you to lay out complex user interfaces without having to go through the error-prone process of calculating view rectangles and widget overlap maps. If, on the other hand, that sort of thing is your bag, Android will stay out of the way and let you render in the style of Java ME's hand-drawn game canvas.
In this chapter, you'll start with basic XML-based screen layouts and move toward the more complex custom canvas drawing. For the sake of this book, I'll break down and discuss views as three major food groups:
- XML-defined widgets/views and view groups: Good for basic information display and menus
- Android native views:
TextViews,LayoutGroups,ScrollBars, and text entry - Custom views: The game programmer's best friend
You'll start with a sample login screen, move into manipulating and laying out widgets and views in code, and finally render an interactive animation with a custom view.
Easy and Fast, the XML Layout
Getting started with XML layouts might seem simple at first, but it's going to get complicated really quickly. You'll start with the layouts and work your way down to the individual elements.
Laying Out
Most XML screens will be wrapped in a layout object. Layout objects come in many different flavors, each of which you'll look at really quickly and then check out with a simple example in the following sections.
Caution At compile time, these XML layout files are parsed and packed by Android into a tight binary format. This saves monstrous amounts of parsing time on startup. However, it means that the XML files cannot be changed by your code during runtime. More specifically, you may be able to change these XML files during execution, but it will do absolutely nothing to the layout of your application. Additionally, you have to pay a small performance price for inflating a view or view group from XML. Your mileage may vary depending on CPU load and UI complexity.
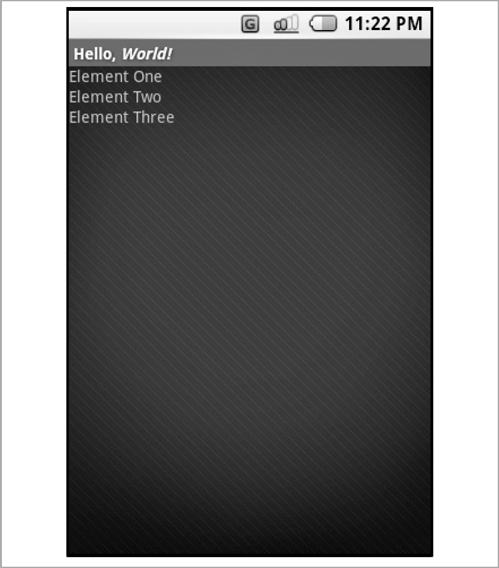
All elements are arranged in a descending column from top to bottom or left to right. Each element can have gravity and weight properties that denote how they dynamically grow and shrink to fill space. Elements arrange themselves in a row or column notation based on the android:orientation parameter. For example (see Figure 3-1):
<LinearLayout xmlns:android=

    "http://schemas.android.com/apk/res/android"

    android:orientation="vertical"

    android:layout_width="fill_parent"

    android:layout_height="fill_parent"

>

<TextView

    android:layout_width="wrap_content"

    android:layout_height="wrap_content"

    android:text="Element One"

    />

<TextView

    android:layout_width="wrap_content"

    android:layout_height="wrap_content"

    android:text="Element Two"

    />

<TextView

    android:layout_width="wrap_content"

    android:layout_height="wrap_content"

    android:text="Element Three"

    />

</LinearLayout>
Each child element is laid out in relation to other child elements. Relationships can be established so that children will start themselves where a previous child ends. Children can relate only to elements that are listed before them. So, build your dependency from the beginning of the XML file to the end. Note that IDs are required so that widgets can reference each other. For example (see Figure 3-2):
<RelativeLayout xmlns:android=

    "http://schemas.android.com/apk/res/android"

android:layout_width="fill_parent"

    android:layout_height="fill_parent"

>

<TextView

    android:id="@+id/EL01"

    android:layout_width="wrap_content"

    android:layout_height="wrap_content"

    android:text="Element One"

    />

<TextView

    android:id="@+id/EL02"

    android:layout_width="wrap_content"

    android:layout_height="wrap_content"

    android:text="Element Two"

    android:layout_below="@id/EL01"

    />

<TextView

       android:layout_width="wrap_content"

    android:layout_height="wrap_content"

    android:text="Element Three"

    android:layout_toRight="@id/EL02"

    />

</RelativeLayout>

Each child must be given a specific location within the bounds of the parent layout object. The AbsoluteLayout object is probably the easiest to build and visualize but the hardest to migrate to a new device or screen size. For example (see Figure 3-3):
<AbsoluteLayout xmlns:android=

    "http://schemas.android.com/apk/res/android"

    android:layout_width="fill_parent"

    android:layout_height="fill_parent"

>

<TextView

    android:layout_width="wrap_content"

    android:layout_height="wrap_content"

    android:text="Element One"

    />

<TextView

    android:layout_width="wrap_content"

    android:layout_height="wrap_content"

    android:text="Element Two"

    android:layout_x="30px"

    android:layout_y="30px"

    />

<TextView

    android:layout_width="wrap_content"

    android:layout_height="wrap_content"

    android:text="Element Three"

    android:layout_x="50px"

    android:layout_y="50px"

    />

</AbsoluteLayout>

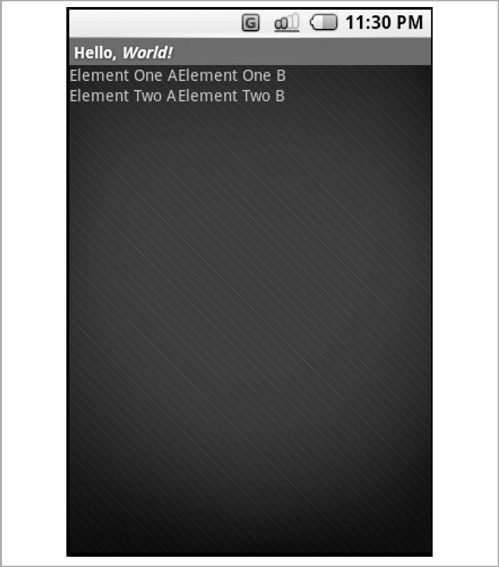
TableLayout is a layout object that allows you to specify table rows. Android tries to arrange each of the child elements into the correct row and columns. For example (see Figure 3-4):
<TableLayout xmlns:android=

    "http://schemas.android.com/apk/res/android"

    android:layout_width="fill_parent"

    android:layout_height="fill_parent">


<TableRow>

    <TextView

    android:layout_width="wrap_content"

    android:layout_height="wrap_content"

    android:text="Element One A"

    />

    <TextView

    android:layout_width="wrap_content"

    android:layout_height="wrap_content"

    android:text="Element One B"

    />

    </TableRow>

    <TableRow>

    <TextView

    android:layout_width="wrap_content"

    android:layout_height="wrap_content"

    android:text="Element Two A"

    />

    <TextView

    android:layout_width="wrap_content"

    android:layout_height="wrap_content"

    android:text="Element Two B"

    />

    </TableRow>

</TableLayout>
These are the major layout objects you'll be using as you go forward. Each example has a few simple TextView elements to demonstrate how the layout shakes down for each layout type and a screen capture depicting how each XML file will render. You can find more thorough examples in the Android documentation at http://code.google.com/android/samples/ApiDemos/src/com/google/android/samples/view/.
Note If you're new to mobile development, when deciding how to lay out your application, you must repeat one motto in your head: "porting, porting, porting." Ideally, one layout could be set up that would work for all possible devices. In reality, this never works. If you plan on running your application on more than one phone (as most carriers require that you do), put an emphasis on dynamic and relative layout structures. I promise, your screen size will change in a dramatic way later. Minimize the number of absolute X/Y values, and keep the ones you do use in easy-to-find locations.
The next task is finding a list of all the relevant child elements that can be placed inside a layout. This resource is available in confusing documentation form at http://code.google.com/android/reference/android/R.styleable.html#Menu.
From there, you can move on to the first UI task: making a login screen for the "socially awkward" application. This login screen will become part of the getSplashy example application.
Scrolling, Text Entry, Buttons, and All the Simple Things in Life
It's now time to put one of the layout classes to use. XML layouts are perfect for user input, information relay, and nearly anything where the contents of the screen are relatively static. You'll add a simple login screen to the aforementioned "socially awkward" application (see Code Listing 3-1). The first task is to describe what the screen will look like in a new view. You'll use a linear layout so you can just add widgets vertically. (Note that this XML requires a general_bg image and the disclaimer string to be defined in the res folder. Download the project for this chapter from the Apress web site for more information.)
Code Listing 3-1. /res/layout/login.xml
<ScrollView xmlns:android=

    "http://schemas.android.com/apk/res/android"

    android:layout_width="fill_parent"

    android:layout_height="wrap_content"

    android:scrollbars="vertical">


<LinearLayout

    android:orientation="vertical"

    android:layout_width="fill_parent"

    android:layout_height="fill_parent"

    android:background="@drawable/general_bg"

>


    <TextView

    android:text="Login Screen"

    android:layout_width="fill_parent"

    android:layout_height="wrap_content"

    android:textAlign="center"

    />

    <TextView

    android:text="Username:"

    android:layout_width="wrap_content"

    android:layout_height="wrap_content"

    />

    <EditText

    android:id="@+id/username"

     android:layout_width="fill_parent"

android:layout_height="wrap_content"

/>

<TextView

    android:text="Password:"

    android:layout_width="wrap_content"

    android:layout_height="wrap_content"

/>

<EditText

    android:id="@+id/password"

    android:layout_width="fill_parent"

    android:layout_height="wrap_content"

    />

<Button

    android:id="@+id/loginbutton"

    android:layout_width="wrap_content"

android:layout_height="wrap_content"

android:text="Login"

/>

<TextView

    android:id="@+id/status"

    android:layout_width="fill_parent"

    android:layout_height="wrap_content"

    android:textAlign="center"

    android:text="Enter Username and Password"

    />

    <TextView

    android:layout_width="fill_parent"

    android:layout_height="wrap_content"

    android:text="@string/disclaimer"

    />


</LinearLayout>

</ScrollView>
I'll pull a few specific lines from the previous listing and explain what they do in the following sections. Remember, you haven't defined any locations for the elements that make up this screen. However, because you're using the LinearLayout object, each successive element is attached to the bottom of the previous element.
To scroll through a view that's grown larger than the size of your device's screen, simply wrap your layout object in a ScrollView. To enable scroll bars vertically, your ScrollView must set the parameter android:scrollbars="vertical", which will display a scroll bar only as you page down the screen. To make the view long enough to demonstrate this object, I've added a TextView with a phony disclaimer to the end of the linear layout. You'll notice that if you set the previous XML as the active view, that focus will shift down the objects until you reach the button, at which point the scroll bar will handle the down key and move the user to the bottom of the text.
Prying Open the TextView
Two major "widgets" are at work in the previous XML.
Note A widget in Android refers to any self-contained subclass of the View object.
For the titles and text-entry labels, you use the TextView object. For user-controlled text entry, you use the EditText object. Most notable, and therefore the one worth going over in more detail, is the final "status" text:
<TextView

    android:id="@+id/status"

    android:layout_width="fill_parent"

    android:layout_height="wrap_content"

    android:textAlign="center"

    android:text="Enter Username and Password"

    />
First, because this text element is going to be modified at some point by your source code at runtime, you need to give it an ID. This allows you to use the findViewById method later to get a handler for it.
The @+id/status will add the ID status to your R.java file if it doesn't exist already. This might bug out your IDE when you reference it in your code for the first time. Never fear, though, because the first time you compile, all will be sorted out.
Next, you tell the TextView to set its width to the width of its parent, in this case, the LinearLayout object. You tell it to let its height be bounded by the size of the text by using wrap_content for the layout_height parameter. You want the text to reside in the center of the screen, so you'll use textAlign because you've set its width to be the entire screen. Lastly, you'll give it some simple text to display when the activity starts up. Later, you'll change this text to reflect the current status.
To see the results of this handiwork, simply create an activity, and set this XML layout to be the main content view. You should be able to see the screen, type in the text entry field, and select the box. These actions, however, will have no results. To tie them into the program and make them interactive, you'll have to keep reading.
XML Layout
The take-home message here is that the XML layout scheme is both simple and powerful. It provides a nonprogrammer interface for mobile screen layout and design. It also gives developers the tools to crack open and modify these values on the fly during runtime, as you'll do now by exploring how to interact with Android's built-in widgets.
Waking Up the Widgets
I've already demonstrated how to use Android's TextView, Button, and EditText widgets. But how useful is a text-entry field if you can't ingest what your users have entered? That's a rhetorical question; don't answer it—I won't be able to hear you (I hope). The answer is obvious: text entry with no purpose or result is not useful at all. To access the contents of the EditText widgets you defined earlier, you'll have to do two things:
- Get an object handle to the widget you defined in the XML.
- Listen for clicks or select events on the
Loginbutton widget.
Getting a Handle on Things
The first task is to get a pointer to elements you've defined in your XML layout files. To do this, you'll make sure that each XML widget you want to access has an android:id parameter. As briefly mentioned earlier, using the notation @+id/-id_name_here- will make sure your R.java file has the ID you need. The following is an example of how to get a pointer to the View object when your application starts up. This is the onCreate method in your new login activity added to the GetSplashy example application:
Button btn = null;

public void onCreate(Bundle args)

{

    super.onCreate(args);

    setContentView(R.layout.login);


    btn = (Button) findViewById(R.id.loginbutton);

}
Here you've acquired a pointer to the login button by calling findViewById. This allows you to add a click listener so that you'll be notified when the button is selected (on a touch screen with a stylus) or selected by the center softkey. You'll extend the ClickListener class inline as follows:
public class loginScreen extends Activity
{


    private OnClickListener buttonListener =

        new OnClickListener()

    {

        public void onClick(View v)

        {

            grabEnteredText();

        }

    };

    ...

  }
The previous inline definition, when notified that a selection has occurred, calls the grabEnteredText method. Now that you've defined the click listener, you can use the btn reference in the onCreate method:
public void onCreate(Bundle args)

{

    //...


    btn = (Button) findViewById(R.id.loginbutton);

    btn.setOnClickListener(buttonListener);

}
If you place a breakpoint in your button listener's onClick method, it should fire both when you move focus to and select the login button and when you click it with your mouse while running the emulator.
Reeling in the Text
All that's left to do is to define grabEnteredText to do exactly as its name implies. In the final production version of a login screen, you want to extract the entered text, begin a network login call, and fire up a loading dialog box. For now, you'll just show a dialog box containing what's been entered in the login and password fields. Here's what grabEnteredText looks like in the updated login activity:
public void grabEnteredText()

    {

        //Get a pointer to the status text

        TextView status =

           (TextView) findViewById(R.id.status);

        //Grab handles to both text-entry fields

        EditText username =

         (EditText) findViewById(R.id.username);

        EditText pwd =

         (EditText) findViewById(R.id.password);


        //Extract Strings from the EditText objects

        // and format them in strings

        String usrTxt = username.getText().toString();

        String pwdTxt = pwd.getText().toString();


        //HTTP transaction would spin up a

        //new thread here

        status.setText("Login" + usrTxt + " : " + pwdTxt);


        //Show dialog box that would eventually turn into

        this.showAlert("Login Data", 0, "Login"

            + usrTxt + " : " + pwdTxt, "ok!", false);

}
First, using findViewById, you retrieve TextView and EditText pointers for the status, username, and password widgets. Next, you extract the contents of the text-entry widgets by retrieving the TextEntry object and converting it into a String class. Last, you put the contents of the two fields together, add both of them to the status text object, and pop up a dialog box also containing the two strings.
That's it—you've now allowed a user to enter text, and you've grabbed, manipulated, and even displayed a dialog box containing that information. Well done! Take a second to pat yourself, or anyone who might happen to be within arms reach, on the back.
So far, you've explored how to do screen layout in XML alone with the "socially awkward" splash screen. You've learned how to use a hybrid of the two just now with your login screen. The last stop on the Android widget express will require building onscreen layouts using code alone.
Widgets in Java
When you see the amount of code I've written to produce even a small selectable menu, you'll probably be, like I was, somewhat aghast. After getting the hang of screen layout in XML, trying to do it all by hand in Java will feel like playing classical music on the piano with a pair of scuffed-up bowling balls. Be warned—it involves a lot of typing and probably more than a little frustration.
On the other hand, there may be some specific elements of a UI layout you want to adjust dynamically at runtime. Since, as I've mentioned earlier, you cannot edit the layout XML files when the application is run, it's essential to have the tools required to modify every possible piece of the user interface in code at runtime. Android gives you that power, provided you're comfortable typing at blazing speeds.
Getting Under the Hood
You'll now tinker under the hood and kick the tires of Android's widgets. You'll take a basic look at some of the core pieces, many of which you've explored in XML form. As in previous examples, for the sake of explanation, I'll keep it basic. It should be easy to apply what I've discussed here to the more complicated aspects of UI layout. In later, more advanced examples, you'll get more into other Android widgets. In the following example, I've taken pains to make sure you use little to none of the XML elements you relied on previously. It should give you a chance to get a good handle on non-XML layout, but keep in mind, practically, you'd have to be crazy to do all your user interface screens this way.
The Main Menu
Nearly all mobile applications, at least at the time of publication, begin with a graphical main menu. This graphical screen directs users to the various functionality of the mobile application. Because the concept of a "main menu" is so universal to the mobile application experience, it makes for an excellent and practical case study. Your objective, in this example, is to put together a simple and functional main menu. For the sake of comparison, you'll use another linear layout to put everything together. The example will be built in three major stages:
- Layout: You'll arrange all the entries of your main menu correctly on the screen. Granted, this will use only a fraction of Android's massive screen real estate. But most application menus will use large graphics and take up significantly more space.
- Focus: You'll need to set up a focus structure so that users can move through the elements. As the focus shifts, you'll have to adjust the colors of each menu element.
- Select events: Finally, you'll need to set up a listener so that when an element is selected or clicked, you're informed and can take the appropriate action based on the item selected.
When you've finished all three of these tasks, you should have the framework to build the primary entry screen of about 80 percent of all mobile applications. Although not entirely practical (being that I've used exactly zero XML), it is an excellent demonstration of how to get things done in a custom runtime-driven way. As you add more functionality to your "socially awkward" application, you'll fill out this main menu more completely.
Laying Out, Java-Style
The first step in the simple main menu is getting all your menu elements on the screen. As I mentioned earlier, you'll be using a linear layout to accomplish it. You'll need to do all this before the application draws for the first time, so it'll have to be in the onCreate method of the new MainMenu activity. (Refer to Chapter 1 if you've lost track of how to create and plug in a new activity.) Code Listing 3-2 shows what its instantiation and configuration looks like.
Code Listing 3-2. Creating a Layout Object in the onCreate Method
LinearLayout layout = new LinearLayout(this);

layout.setBackground(R.drawable.general_bg);

layout.setOrientation(LinearLayout.VERTICAL);

layout.setLayoutParams(

    new LayoutParams(LayoutParams.FILL_PARENT,

        LayoutParams.FILL_PARENT));

setContentView(layout);
After what you've been through thus far, this, conceptually, should seem familiar. You'll set the background using an image in the /res/drawable/ folder, set the linear layout orientation to vertical, and set the LayoutParams to fill the parent. (The parent, in this case, is the activity, which controls the full screen.) Layout parameters, at their base, must define the height and width of a given widget. As you'll probably find out later, trying to place a widget into a ViewGroup before its layout parameters are set will throw an exception. However, now that you have a layout object to fill, you can start building out the screen.
Adding a Title
Next, add a simple title, which will be centered, at the top of your main menu screen. Code Listing 3-3 shows the block of code you'll need for it.
Code Listing 3-3. Adding the Title
TextView title = new TextView(this);

title.setText(R.string.man_menu_title);

title.setLayoutParams(

        new LinearLayout.LayoutParams(

        LinearLayout.LayoutParams.FILL_PARENT,

        LayoutParams.WRAP_CONTENT));

title.setAlignment(Alignment.ALIGN_CENTER);


layout.addView(title);
Create the text object, and set the text from the /res/values/strings.xml. I know I said I wouldn't use any XML, but I'm afraid I may have fibbed about that bit. In production, you'll want to move all your strings to this location rather than defining them in code. If your clients are like mine, you won't want to pull out your source editor and recompile every time they want to change the wording on one of the screens.
Now that you have a title, it's time to add the more interesting and active menu elements.
Laying Out Menu Entries
Now you'll add the individual menu elements. Because this is going to be fairly repetitive after the first one, I'll insert and explain the first element but leave you to your own devices for the rest. Feel free to grab the full project at the Apress site to see the rest of the menu items. Again, you'll fill in more of them as you progress through the rest of the Android essentials. Code Listing 3-4 shows the code to add an individual menu item.
Gosh, you probably think after reading the code carefully, this looks almost like the title you've already added. You're exactly right, how clever of you. The heavy lifting of denoting when an object is in focus and when it's been selected has yet to come, so don't get too cocky yet. Here are the two differences between the previous menu item and previously listed title text:
- You need to tell the
TextViewthat it can accept focus by calling thesetFocusablemethod. - The menu listing item will need an ID so you can distinguish it from the rest of the menu elements in your selection handler.
As I mentioned briefly, whenever adding a widget to a ViewGroup, the LayoutParams object must specifically be the object defined within that view group. For example, in the previous setLayoutParams method call, you must pass in a LinearLayout.LayoutParams object. You must pass in the correct subclassed layout parameter, or Android will throw an exception at you during runtime.
As I said before, to make the menu, I'll add two more text elements almost exactly like the previous listing. For the sake of expediency, I won't list them here. Be sure to refer to the full project to satisfy your curiosity. Now that you have all your menu items in place, it's time to modify them when they receive or lose focus.
Focus Young Grasshopper....
To handle focus change events, you have to create an implementation of the OnFocusChangeListener abstract class. The example's version, defined locally within the MainMenu activity class, will look like Code Listing 3-5.
Code Listing 3-5. Creating a Focus Listener
OnFocusChangeListener focusListener =

    new OnFocusChangeListener()

{

    public void onFocusChanged(View v, boolean hasFocus)

    {

        adjustTextColor(v, hasFocus);

    }

};

private void adjustTextColor(View v, boolean hasFocus)

{

    //Dangerous cast.  Be sure you are

    //listening only to TextView focus changes

    // or this could go horribly wrong.

    TextView t = (TextView)v;

    if(hasFocus)

        t.setTextColor(Color.RED);

    else

        t.setTextColor(Color.WHITE);

}
In addition, you have to add the following line corresponding to each selectable element in the menu to attach the focus change listener object:
ItemOne.setOnFocusChangeListener(focusListener);
With the listener in place, you'll now be notified each time one of your menu elements gains or loses focus. In more advanced main menus, this method would be the place to add image shifts, animations, 3D explosions, or other whiz-bang graphical effects. In this example, you'll have to settle for just changing the text color. Now that the user can tell, through the color change, which menu item is highlighted, you'll need to react when they press the center key to select an item.
Tip It's possible to set the focused, unfocused, and selected color of a TextView by using the setTextColor(ColorStateList colors) method, which is a simpler way of implementing a text-based main menu. There are always many ways to accomplish a goal in a good IDE; I've simply selected the more versatile (because I hope your applications move beyond text menus). For more information on using setTextColor, see the Android documentation at http://code.google.com/android/reference/android/widget/TextView.html#setTextColor(int).
You've already seen how to register for onClick events in the login screen, so you should be able to breeze through this section without trouble. Code Listing 3-6 shows the example code to grab select events.
Code Listing 3-6. Adding a Selection Listener
OnClickListener clickListener = new OnClickListener()

{

    public void onClick(View v)

    {

        String text = "You selected Item: ";

        switch(v.getId())

        {

        caseIdOne:

            text += "1";

            startActivity(

             new Intent(MainMenu.this, Login.class));

            break;

        caseIdTwo:

            text += "2";

            startActivity(

               new Intent(

               "com.apress.example.CUSTOM_VIEW"));

            break;

        caseIdThree:

            text += "3";

            break;

        }

        //We'll get to the following line in a bit

        status.setText(text);

    }

};
The previous switch statement is the reason for calling setID back when you were originally creating and laying out the TextView widgets. When a menu item is selected or clicked by the pointer, the onClick function is called, and the corresponding view is passed in as a parameter. You will examine the ID of the view passed in to determine which menu item was selected. This allows you to take the appropriate action for the menu selected. In this way, you can switch to the previously defined login screen and your soon-to-be-written custom view with the startActivity method call.
There's still one small step left, and if you look at the bottom of the onCreatefuction in the sample code, you'll spot it. You need to add a click listener to the view. Here's the line that should be run while you build up the widget list:
ItemOne.setOnClickListener(clickListener);
Looking Back
Reviewing the Java-driven main menu, you've accomplished several important things.
First, you performed the layout functionally previously only through XML files. Although not entirely practical to do by hand, it does give you the tools to change and customize the XML views while your application is running.
Second, you registered for focus change events for all your menu items. When the focus change listener was called, you changed the color of the focused item to highlight it. In practical use, there are more efficient ways of accomplishing the same thing, but I'm assuming you'd want to substitute changing text colors for something more, shall we say, extravagant.
Third, you learned how to listen for and react to select events, discern which item was selected, and take the appropriate action based on that selection.
Again, looking over all the code required to lay widgets out on the screen by hand is fairly prohibitive, but using the tools you've just learned, you could modify, enhance, and customize how a menu or list works based on data and user preference while the app is running. If, however, you need to get even more specialized with how you draw to the screen, you'll need a less subtle and more code-heavy approach.
Custom UI Rendering with the Canvas
This is the section all you budding game developers have been waiting for. Android allows you to define a custom View object simply by extending the View class and implementing the onDraw method. To demonstrate a custom view running in an animation loop, I've taken some inspiration from a San Francisco Exploratorium exhibit about how we perceive motion and sound. You can find more information on the museum and the relevant exhibit at http://www.exploratorium.edu/listen/index.php. You can purchase the scientific white paper at http://www.nature.com/neuro/journal/v7/n7/full/nn1268.html.
The example will animate two balls traveling toward each other and then either passing by or bouncing and moving away. The example is meant to show that the sound of a bounce can make the difference between a person seeing the objects pass and seeing them bounce off each other. Code-wise, I'll demonstrate a few essential aspects of a custom view:
- Implementing an Android view
- Drawing to the screen using the
Canvasobject - Creating an animation loop
- Modifying and interacting with your custom view from the activity
Customizing the View
You can customize view windows in two ways. The first is to extend the View class. This allows you to roll your own "widget" by creating a viable child class of android.View. The other method, which you'll have to explore on your own, is to subclass an existing widget such as TextView, ProgressBar, or ImageView and modify its behavior using protected methods. This example shows the first option because its scope is broad and a little easier to understand.
At its most basic level, a custom widget overrides the protected onDraw method. Code Listing 3-7 shows an example of just such a method.
Code Listing 3-7. Simple Custom View Declared in the CanvasExample Activity
protected class CustomView extends View

{

    public void onDraw(Canvas canvas)

    {

        Paint p = new Paint();

        p.setColor(Color.WHITE);

        canvas.drawText("Yo!", 0, 25, p);

    }

}
Congratulations! By typing these few lines of text, you're now the proud owner of your own custom widget. Granted, all it does is say hello like my 17-year-old punk cousin, but I suppose you have to start somewhere. For those of you with experience in dealing with the GameCanvas object in Java ME, this should look familiar. To receive onDraw calls, you'll need to set it as the main content view for the sample activity. You'll have to write code that will instantiate it and make it the current view. Code Listing 3-8 shows what the CanvasExample activity will look like.
Code Listing 3-8. Activating a Custom View
CustomView vw = null;

public void onCreate(Bundle args)

{

    super.onCreate(args);

    vw = new CustomView(this);

    setTitle("Bounce or Pass, sounds changes everything");

    setContentView(vw);

}
You set the title for your sample activity because you haven't given it an application name. Then it's just a matter of creating a new CustomView object and setting it to be the current content view. This will call the onDraw method within your custom widget and display your somewhat unconventional greeting. You now have a handle on drawing to the screen in a very basic way. You should now be able to get into more complicated rendering and starting your animation loop.
Creating the Game Loop
As all game programmers will tell you, most games, at their core, consist of a constant loop. The loop checks for user input and, based on that input and any other game actions, will then draw the new frame/frames to the screen. The loop in your sample application will not win any awards for complexity or ingenuity, but it will get your started on your own game-rendering loop.
Note If you want to implement your own animation loop outside the View/ViewGroup hierarchy, look into building a loop with the SurfaceView object. You can find documentation for this object at http://code.google.com/android/reference/android/view/SurfaceView.html.
Loading Audio and Images
Before you get into drawing the CustomView, you'll need to load a few resources on initialization that will be used later. Code Listing 3-9 shows the new constructor for CustomView including local class variable declarations.
Code Listing 3-9. Initializing the CustomView
protected class CustomView extends View

{

    Context ctx;

    Paint lPaint = new Paint();

    int x_1=0,y_1=0;

    MediaPlayer player = null;

    Bitmap ball = null;

    boolean running = true;


    CustomView(Context c)

    {

        super(c);

        player = MediaPlayer.create(c, R.raw.bounce);

        BitmapDrawable d = (BitmapDrawable)

        getResources().getDrawable(R.drawable.theball);

        ball = d.getBitmap();

        ctx = c;

    }

    ...

}
In the constructor, you're loading the bounce media resource from its /res/raw location through the R.java constants file. Because you've done this before with several other resource types, you should be an old hand at it. You also need to load in an image that will be drawn as the "ball." You do this using the resources manager object, which is retrieved from the Context object. Although you haven't explicitly loaded an image in code from a resource location before, it should look like almost any other resource load.
Implementing the Loop, Implementing the Loop, Implementing the...
Without further ado, Code Listing 3-10 shows what the CustomView object's onDraw method looks like.
Code Listing 3-10. The Core of the Animation Loop
public void onDraw(Canvas canvas)

{

    //Draw the white background

    Rect rct = new Rect();

    rct.set(0, 0,

        canvas.getBitmapWidth(),

        canvas.getBitmapHeight());

    Paint pnt = new Paint();

    pnt.setStyle(Paint.Style.FILL);

    pnt.setColor(Color.WHITE);

    canvas.drawRect(rct, pnt);


    //Increment the X and Y value for the sprites

    x_1+=2;

    y_1+=2;


    //Reset the loop when the balls drift offscreen.

    if(x_1 >= canvas.getBitmapWidth())

    {

        x_1 = 0;

        y_1 = 0;

    }


    //Draw ball 1

    drawSprint(x_1, y_1, canvas);

    //Draw ball 2

    drawSprint(canvas.getBitmapWidth() - x_1, y_1, canvas);


    if(running)

        invalidate();

}
Starting from the top, you'll first white out the background using a paint-style object and a call to canvas.drawRect. The paint object, in combination with the Rectangle object, will tell the canvas to draw a white box that covers the entire screen. Next, you'll increment the x and y values for your ball sprites. You'll then need to reset them if they've drifted past the bounds of the screen and, finally, draw them with your own drawSprite call. Code Listing 3-11 shows the contents of that function.
Code Listing 3-11. Drawing a Bitmap
protected void drawSprint(int x, int y, Canvas canvas)

{

    canvas.drawBitmap(ball, x, y, lPaint);

}
This function, right now, is simply a straightforward call to the drawBitmap method. I've separated out this method only because drawing the sprite in another context might require more functionality than in this simple example. Finally, returning to the onDraw function, you'll call invalidate only if your running flag is true. Calling invalidate on a view is Android's preferred way of forcing a redraw. In this case, you'll invalidate yourself, which will call onDraw, and the whole process starts over once again. If you simply set the running flag to false on pause or exit and invalidate it again when resuming, the animation should stay in step with the focus of its parent activity.
Adding and Controlling Sound
Since the auditory illusion requires the ability to turn on and off the sound of the two objects bouncing off each other, you'll need to set up the audio to play as they hit and then build a mechanism for the user to turn that audio on and off.
To play the audio, add the code in Code Listing 3-12 to the previous onDraw function since it is also, in effect, the game control loop. When I say "game loop," I'm referring to the invalidate call at the end of onDraw, which will place a redraw in Android's UI event loop. Keep in mind that playSound is a boolean declared just inside the custom view.
Code Listing 3-12. Playing and Reloading Audio
if(playSound &&

   canvas.getBitmapWidth() - x_1 −16 == x_1 + 16)

player.start();


if(x_1 >= canvas.getBitmapWidth())

{

    x_1 = 0;

    y_1 = 0;

    player.stop();

    player.release();

    player = MediaPlayer.create(ctx, R.raw.bounce);

}
As you might have noticed, you're starting the audio playback when the sprites are 16 pixels away from each other. This is a little slush time to let the audio get started. I should note that it speaks more to my inability to edit audio files than it does to a lack of efficiency in audio load and playback times in Android. You also must be sure to play the audio only if the playSound boolean is true. This variable is a member of the Activity class in which the custom view is defined. Using this boolean, you'll get control over the custom view class from within the screen activity. To turn on and off the audio, you now simply implement the method in Code Listing 3-13 in the activity.
Code Listing 3-13. Reacting to Key Events
public boolean onKeyDown(int key, KeyEvent kc)

{

    if(key == KeyEvent.KEYCODE_DPAD_CENTER)

    {

        playSound = !playSound;

        return true;

    }


    return super.onKeyDown(key, kc);

}
This code should look similar to how you dismissed the prank application in Chapter 2.
Bringing It All Together
If you've followed along closely (or cheated and simply downloaded the finished project), you should be able to run the application and watch the illusion. Press the center directional key to turn on and off the audio. With the audio off, it should look like they pass each other; with it on, it looks like they bounce off and go their separate ways.
In this example, I've demonstrated how to create your own View subclass, how use it to draw on the screen, how to set up a game-rendering loop, and how to control that simple loop using key events.
Using the User Interface
In this chapter, you've learned, in detail, how to lay out screens using Android's XML schema and how to interact and modify that schema at runtime with some Java code.
Next, you learned how lay out UI widgets and view groups using source code alone. It's a not-so-practical application of Android user interface tools, but it's important to go through for the sake of understanding nonetheless. Last, you explored the essential tools for building a game-rendering loop. You added some simple multimedia and user control into the mix and created a simple auditory illusion that should impress your very nerdy friends.
Tip Using all that you've learned in this chapter, build a frame for this illusion that contains some explanatory text and a border using XML. When the activity starts up, render the XML but insert the custom view into the proper place. For this task, I suggest using a relative layout, a TextView for the explanation, and a Rectangle for the border.