Chapter 14
Your Digital Photo Album
IN THIS CHAPTER
![]() Browsing your photos and videos
Browsing your photos and videos
![]() Adding a new album
Adding a new album
![]() Finding an image’s location
Finding an image’s location
![]() Checking out your pictures online
Checking out your pictures online
![]() Editing images
Editing images
![]() Cropping and rotating pictures
Cropping and rotating pictures
![]() Publishing a video on YouTube
Publishing a video on YouTube
![]() Sharing images and videos
Sharing images and videos
Those photos you snap on your Android must go somewhere. The nerds know about folders and files, so they’re happy. But how can mere mortal users access their wealth of images and videos? The answer is to open the digital photo album app. It lets you review, manage, edit, and share your visual treasures.
The Photos App
The stock Android app for viewing pictures and videos is called Photos. It’s the natural companion to the Camera app, covered in Chapter 13. To start the app, tap its launcher, which may be lurking on the Home screen in the Google folder or, like all apps, found on the apps drawer.
- Not only does the Photos app let you look at pictures and watch videos, but you can also manage that media, edit, and share your visual creations online.
 The traditional Android photo-management/album app is Gallery. You may still find the Gallery app on your device, though this chapter is specific to the Photos app.
Viewing pics and vids
The Photos app organizes your photos and videos in multiple and confusing ways. The app’s main screen, shown in the center of Figure 14-1, lists items by date. Tap the Photos icon at the bottom of the screen to ensure that this view is active.

FIGURE 14-1: Image organization in the Photos app
To see any photo albums, tap the Albums icon at the bottom of the screen. Albums are closely associated with your online photos accessed from your Google account, covered elsewhere in this chapter, so these could be albums created on another device that uses your same Google account.
To view an image, tap its thumbnail. You see the image appear full-screen, as shown on the right in Figure 14-1. Swipe the screen left or right to browse your images.
![]() Video thumbnails feature the Play icon, shown in the margin. Tap that icon to view the video. As the video is playing, tap the screen again to view onscreen controls.
Video thumbnails feature the Play icon, shown in the margin. Tap that icon to view the video. As the video is playing, tap the screen again to view onscreen controls.
- While you’re viewing an image or a video full-screen, the navigation icons may disappear. Tap the screen to view them.
- Use the Back navigation icon to return to an album after viewing an image or a video. This icon appears in the upper left corner of the screen when viewing a photo, as illustrated in Figure 14-1. (Alas, getting the Back gesture to work in the Photos app is problematic.)
Creating an album
If you prefer to organize your images by album instead of by date, follow these steps in the Photos app:
View an image that you want to add to an album.
Ensure that the image is shown full-screen, as shown on the far right in Figure 14-1.
- Tap Action Overflow.
- Choose Add to Album.
Choose an existing album from the list or tap New Album.
If you choose an existing album, the image is added to it. Otherwise, continue with Step 5.
- Type a name for the album.
 Tap the Done icon to create the album and add the first image.
- Use the Back gesture or tap the Back navigation icon to return to your photo library.
To add more images to the album, repeat these steps, but choose the specific album in Step 4.
 To add a swath of images to an album, long-press the first one. Continue tapping images to build up a group. Tap the Add (plus) icon, and choose the album from the list.
 To switch between Album and Photos mode, tap the proper icon at the bottom of the Photos app’s main screen, as shown in the center in Figure 14-1.
Starting a slideshow
The Photos app can display a slideshow of your images, but without the darkened room and sheet hanging over the mantle. To view a slideshow, follow these steps:
- View an image full-screen.
- Tap the Action Overflow icon.
Choose Slideshow from the scrolling list atop the picture’s detail screen.
Images from that particular album or date appear one after the other on the screen.
Use the Back gesture or tap the Back navigation icon to exit the slideshow.
![]() Slideshows don’t have to remain on your Android. If a nearby HDMI TV or monitor features a Chromecast dongle, tap the Chromecast icon, as shown in the margin. Choose a specific Chromecast gizmo from the list to view the slideshow on a larger screen. See Chapter 19 for more details on using Chromecast to stream media.
Slideshows don’t have to remain on your Android. If a nearby HDMI TV or monitor features a Chromecast dongle, tap the Chromecast icon, as shown in the margin. Choose a specific Chromecast gizmo from the list to view the slideshow on a larger screen. See Chapter 19 for more details on using Chromecast to stream media.
Finding a picture’s location
In addition to snapping a picture, your Android’s camera records the specific spot on Planet Earth where the photo was taken. This feature, often called a location tag, is covered in Chapter 13. To exploit its efforts and view the map information, view an image in the Photos app and then tap the Action Overflow to view image details. The screen that appears lists details about the image, a date/time stamp, and a map thumbnail showing the location.
Refer to Chapter 13 for directions on disabling the location tag feature.
Edit and Manage Images
The best tool for image editing is a computer amply equipped with photo editing software, such as Photoshop or a similar program that’s also referred to as “Photoshop” because the term is pretty much generic. Regardless, you can use the Photos app to perform some minor image surgery.
Editing an image
![]() To enter Image Editing mode in the Photos app, view the image you want to modify and tap the Controls icon, shown in the margin. (This icon is actually the old Settings icon from the 1954 version of the Android operating system, Apple Pie.) If you don’t see the editing icon, tap the screen and it shows up.
To enter Image Editing mode in the Photos app, view the image you want to modify and tap the Controls icon, shown in the margin. (This icon is actually the old Settings icon from the 1954 version of the Android operating system, Apple Pie.) If you don’t see the editing icon, tap the screen and it shows up.
Editing tools are presented in three categories, shown at the bottom of the screen and illustrated in Figure 14-2: preset effects, image settings, crop/rotate, draw, and extensions.
- The Preset Effects item presents a scrolling palette (swipe left to right) of options, each of which adjusts the image’s tonal qualities.
- The Image Settings control lets you adjust specific aspects of an image: light, color, and blur. A chevron by the Light and Color items provides more detailed image control.

FIGURE 14-2: Image editing in the Photos app
- The crop and rotate functions are covered in the later sections “Cropping an image” and “Rotating a picture.”
- The draw option lets you scribble on the image using different pen styles and colors.
- The final item, Extensions, may show one item, Crop, which lets you snip the image in a nonrectilinear fashion.
Tap the Save or Save Copy button when you’re done editing. This action replaces the image with your edited copy.
![]() Tap the Close button to discard your edits. Tap the Discard button to confirm.
Tap the Close button to discard your edits. Tap the Discard button to confirm.
Un-editing an image
The changes you make are directly applied to the image; an original copy isn’t retained. To remove any previously applied edits, crops, or rotation effects, view the image in the Photos app and follow these steps:
- Tap the Edit icon to edit the image.
- Tap the Action Overflow.
- Choose Undo Edits.
- Tap the Save button.
The original image is restored.
Cropping an image
To crop an image is to snip away parts you don’t want or need, similar to taking a pair of scissors to a photograph of you and your old girlfriend, though the process is far less cathartic. To crop an image, obey these steps:
- View the image in the Photos app.
- Tap the Edit icon.
 Tap the Crop / Rotate icon.
The icon is shown in the margin. The screen changes as illustrated in Figure 14-3. The tools that are presented crop and rotate the image.
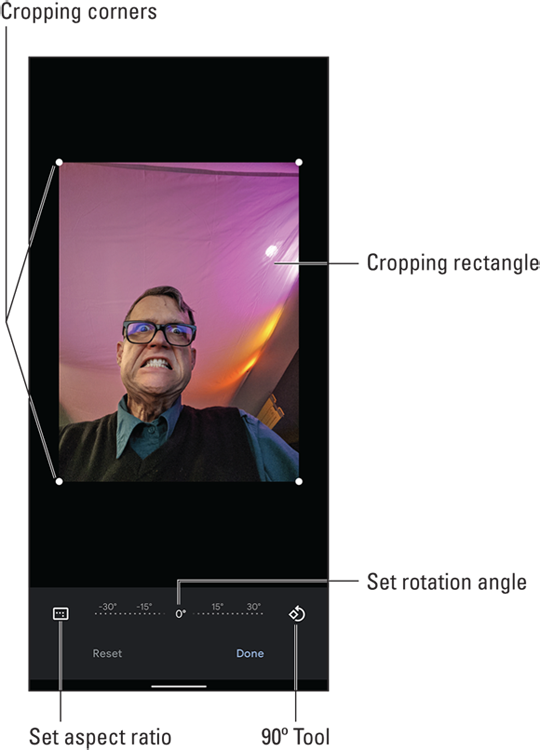
FIGURE 14-3: Rotating and cropping an image
Drag any of the four corners to crop the image.
As you drag, portions of the image are removed.
You can also drag the image within the cropping rectangle to modify the crop action.Tap the Done button.
The image is cropped. You can continue to edit, or tap the Save button to make the changes permanent.
If you’re unhappy with the changes after tapping the Done button, tap the Action Overflow and choose Undo Edits.
Use the Aspect Ratio icon (refer to Figure 14-3) to adjust the cropping box for the image to a new presentation, such as square, or widescreen.
Rotating a picture
Showing someone else an image on a mobile device can be frustrating, especially when the image is a vertical picture that refuses to fill the screen when the Android is in vertical orientation. To fix this issue, rotate the image in the Photos app. Follow these steps:
- Display the cockeyed image.
- Tap the Edit icon.
- Choose the Crop / Rotate tool.
Tap the 90° icon to rotate the image in 90-degree increments, or drag the rotation angle slider to set a specific angle.
Refer to Figure 14-3 for the location of these controls on the editing screen.
Tap the Done button to save the changes.
You can continue editing.
- Tap the Save button to make the changes permanent.
Rotating an image to a specific angle also crops the image. This step is necessary to maintain the image’s aspect ratio.
Deleting images and videos
It’s entirely possible, and often desirable, to remove unwanted, embarrassing, or questionably legal images and videos from the Photos app.
![]() To banish something to the bit dumpster, tap the Delete (trash) icon on the screen when viewing an image or a video. Tap the Move to Trash button to confirm.
To banish something to the bit dumpster, tap the Delete (trash) icon on the screen when viewing an image or a video. Tap the Move to Trash button to confirm.
- If you don’t see the Delete icon, the item cannot be deleted. It’s most likely a copy pulled in from a web photo-sharing service or a social networking site.
- To view the Trash album, tap the Side Menu icon and choose Trash from the navigation drawer.
- Items held in the Trash album are automatically deleted after 60 days. To hasten their departure, long-press items in the Trash album and then tap the Delete icon atop the screen.
Set Your Pictures and Videos Free
Keeping your precious moments and memories in your phone or tablet is an elegant solution to the problem of lugging around photo albums. But when you want to show your pictures to the widest possible audience, you need a bigger stage. That stage is the Internet, and you have many ways to send and save your pictures.
Visiting Google Photos online
The Photos app is linked with your Android account, and your device’s photos have a home on the Internet, called Google Photos. To visit that site on a computer, go to photos.google.com and sign in to your Google account.
Your Android automatically synchronizes your photos and videos with Google Photos, so don’t be surprised when you see them online. The process is called image backup, and you can check its status by following these steps:
 In the Photos app, tap the Side Menu icon.
- On the navigation drawer, choose Settings.
- Choose Back Up & Sync.
Check the master control by the Back Up & Sync item.
If the master control is off, turn it on to enable photo backup.
Disabling this setting doesn’t affect any images already backed up to Google Photos, though any new images you snap or videos you record are no longer shared online and you won’t be able to access those images from other Android devices.
Posting a video to YouTube
The best way to share a video is to upload it to YouTube. As a Google account holder, you also have a YouTube channel. It’s like Channel 6 on the TV when you grew up, but far fewer people watch it. That’s because you’ve not yet populated your channel with exciting videos. Start now:
Ensure that the Wi-Fi connection is activated.
The best way to upload a video is to turn on the Wi-Fi connection, which (unlike the mobile cellular network) doesn’t incur data surcharges.
- Open the Photos app.
View the video you want to upload.
You do not need to play the video; just have it on the screen.
 Tap the Share icon.
If you don’t see the Share icon, tap the screen and it shows up.
Choose YouTube from the list of sharing apps.
The Add Details card appears. You may first see a tutorial on trimming the video, which is the next step.
Trim the video, if necessary, resetting the starting and ending points.
If you opt to trim, drag the starting and ending points for the video left or right. As you drag, the video is scrubbed, allowing you to preview the start and end points.
- Type the video’s title.
Set other options.
Type a description, set the privacy level, add descriptive tags, and so on.
Tap the UPLOAD button.
You return to the Photos app, and the video is uploaded. It continues to upload even if the screen locks itself out of boredom or you do other things on the Android.
When the upload has completed, a YouTube notification appears. After the video has finished processing on the Internet and is available for viewing, you receive a Gmail message, announcing your video’s publication.
To view your video, open the YouTube app. See Chapter 16 for details.
Sharing images with other apps
![]() Just about every app wants to get in on the sharing bit, especially when it comes to pictures and videos. The key is to view an item full-screen in the Photos app and then tap the Share icon, as shown in the margin. Choose an app to share the image or video, and that item is instantly sent to that app.
Just about every app wants to get in on the sharing bit, especially when it comes to pictures and videos. The key is to view an item full-screen in the Photos app and then tap the Share icon, as shown in the margin. Choose an app to share the image or video, and that item is instantly sent to that app.
What happens next?
That depends on the app. For Facebook, Twitter, and other social networking apps, the item is attached to a new post. For Gmail, the item becomes an attachment. Other apps treat images and videos in a similar manner, somehow incorporating the item(s) into whatever wonderful thing that app does. The key is to look for that Share icon.