With Android Studio in place on your computer, you are ready to begin creating your very first Android application. Yes, right now! For those readers who are not familiar with Java code development, do not panic. We will start our examples in this chapter with no assumed Java knowledge or know-how. For those readers who do know Java, read on in any case as we will cover the important first step of creating an Android Virtual Device, or AVD, on which to run the example in this chapter, as well as the examples in future chapters.
Creating Your First Android Virtual Device
One of the most useful features provided in the wider Android Studio integrated environment is the ability to create Android Virtual Devices, or AVDs. With an AVD, you get the ability to emulate a real Android device, controlling a range of its capabilities and features, without having to have an actual physical device.
The AVD approach isn’t meant to prohibit you from using a real device on which to test and use your applications, but if you think about the plethora of Android devices, versions, and form factors that we’ve touched on in the first two chapters, you can see how it would be impractical for you as a developer to own even a fraction of the number of devices found in the wild running Android. AVDs help you bridge the gap between what you have (and can afford) and what your user base will actually be using.
The Configuration menu from the Welcome to Android Studio screen

The Android Virtual Device Manager welcome screen

The Select Hardware option for new AVD creation
There is a lot going on in the hardware selection screen, but don’t feel overwhelmed. The multitude of options here convey the variables you will find in devices in the real world, so it really isn’t surprising. Let’s step through the areas one by one so you begin to feel at home with the AVD Manager and creating and using AVDs.
Starting on the left-hand side of the hardware selection screen, the Category list provides a grouping of device emulators based on form factor and usage pattern. You should see at least the five normal options shown in Figure 3-3, TV, Phone, Wear OS (formerly Android Wear), Tablet, and Automotive. Feel free to click through each of these to see how the device list (middle of the screen) and dimension detail window change, but when you’re done, choose Phone as the Category. With Phone selected, you should then see the original list of prepackaged emulated devices originally shown in Figure 3-3.
At this point, we won’t just race ahead to choose one of the first devices shown as the basis for our AVD. Instead, spend a moment to scroll through the list, and take note of a few data points that will resurface later in the book and will gradually make more sense and have more impact on your application design.
From the upper end of the list of device definitions, you will see makes and models of smartphones and brands, some of which might be very familiar. The various Pixel options, like Pixel 3, Pixel 2, and so on, and AVD images emulate as near as possible the real, physical devices that bear those names. Similarly, Nexus 6, Nexus 5, and so on are virtual devices that mimic the physical characteristics of their namesakes, whether it is on-board storage, working memory, screen resolution, or other capabilities. Before you scroll to see the rest of the list, take a look at the values shown in the Resolution and Density columns. You’ll see measurements for both, expressed in pixel layout for Resolution (e.g., 1080 × 1920 for the Pixel 2 AVD) and dots per inch, or dpi, for Density (again, 420 dpi for Pixel 2). You might be familiar with resolution and density measures for laptop or desktop screens and not give a second thought to the values you see here. But it is worth comparing these to the other AVDs in the list.

Further AVD templates available to you
These devices don’t have any brand names associated with them, but they do possess some indicators of what they offer, through using the abbreviations commonly associated with various screen sizes and resolutions. We will encounter these terms throughout this book, so for now you can bookmark names like QVGA, WQVGA, mdpi, hdpi, and so on and not labor over their meaning.
As if all of those current and historic options weren’t enough, you’ll see two buttons below the device definition list that allow for specifying your own custom virtual device profile and for importing a profile from another source. For our purposes, these options won’t be needed, but you can appreciate the value they offer – in particular for those of you who might eventually want to design applications targeting very specific, atypical devices.
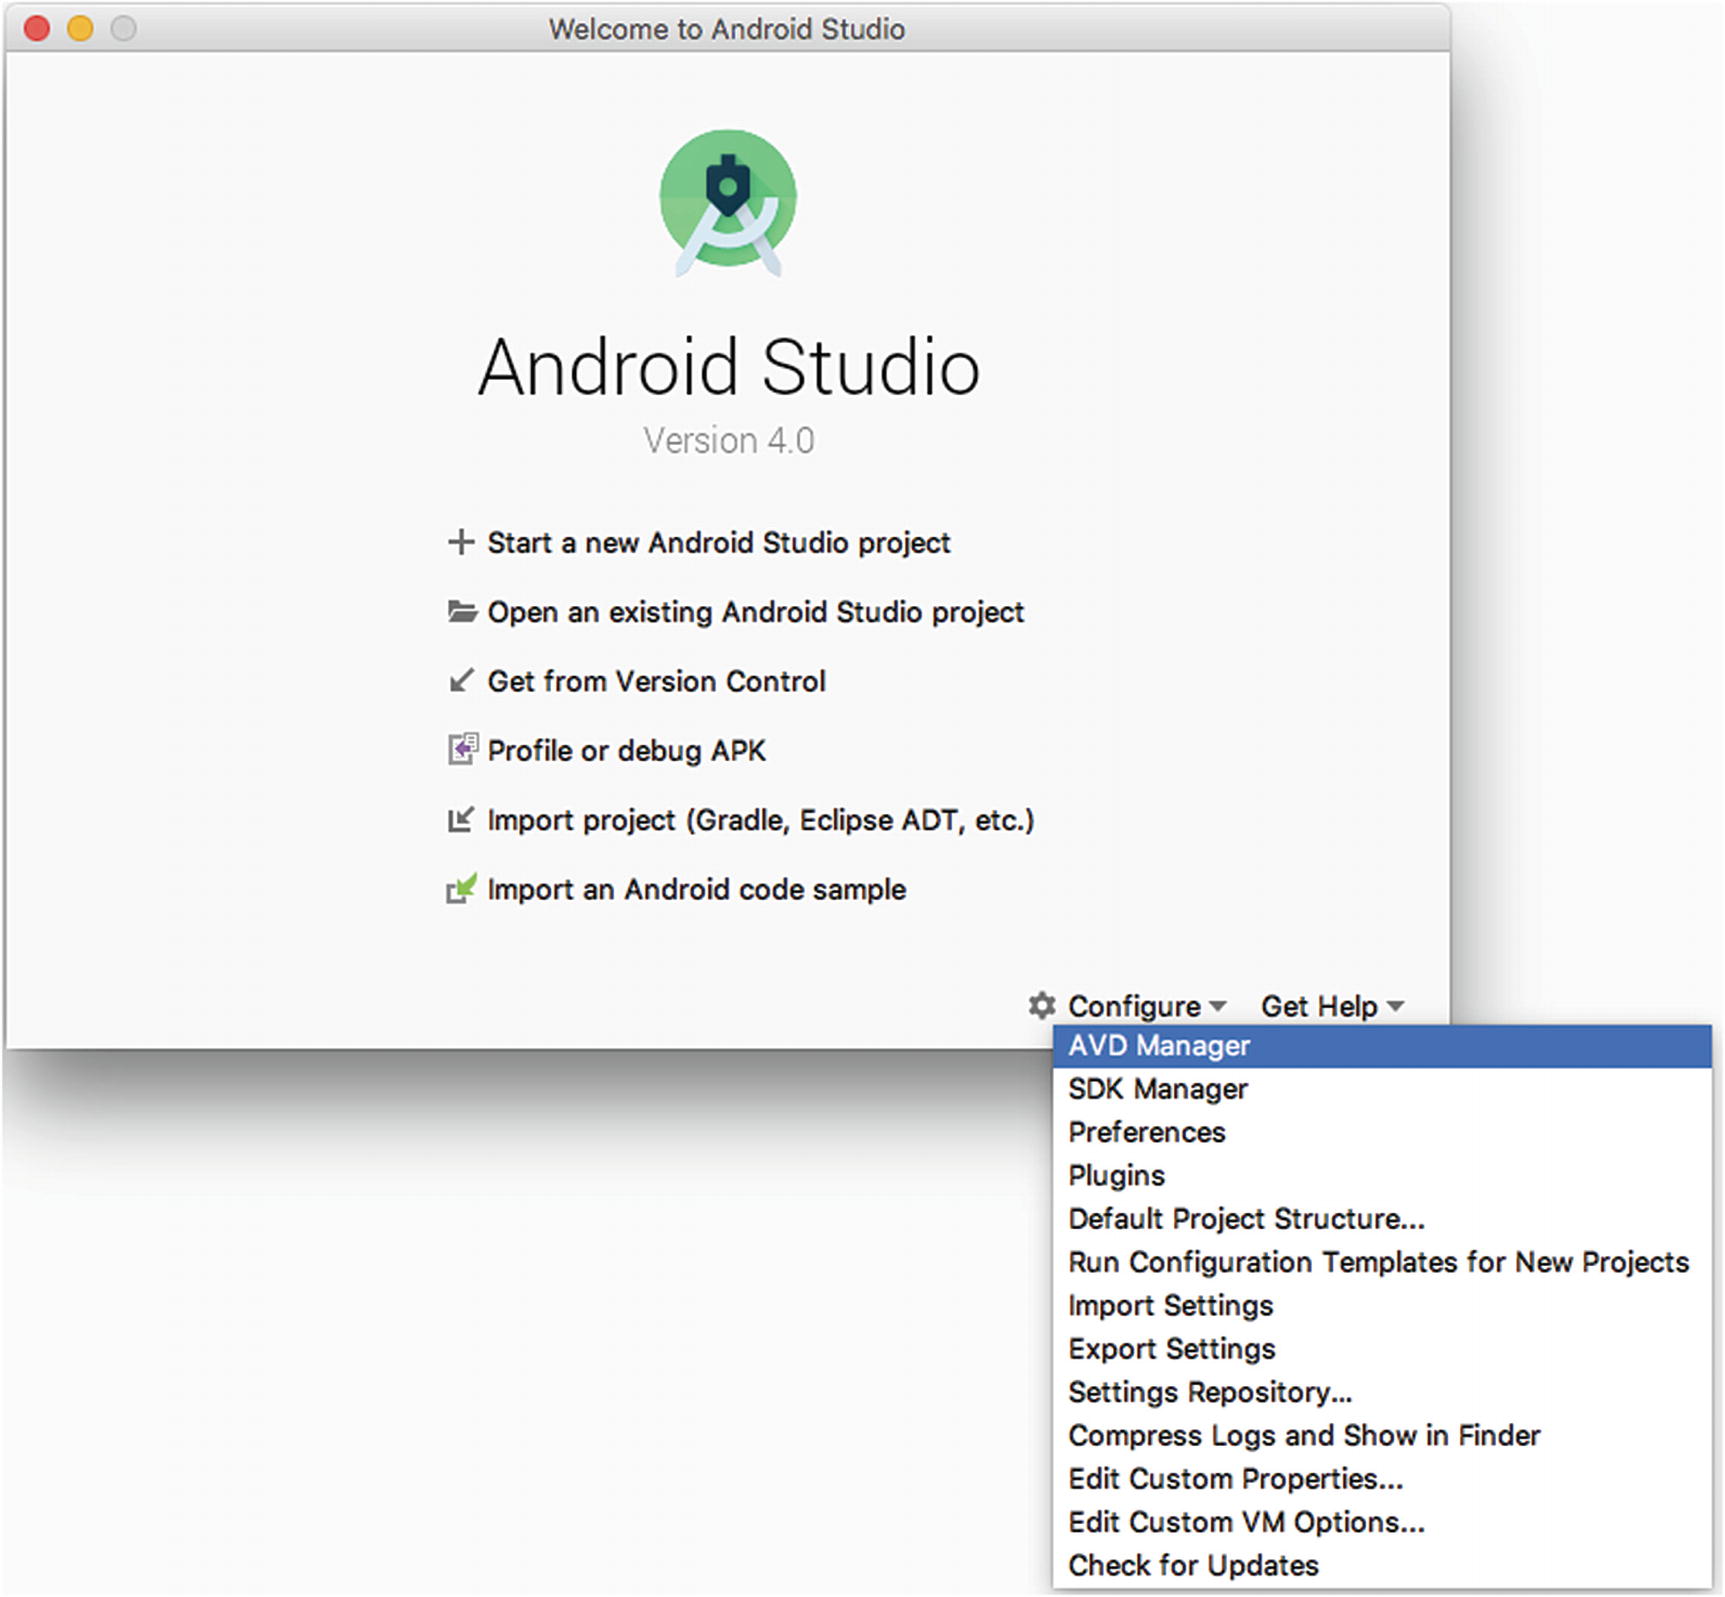
The AVD System Image selection screen in AVD Manager
Choosing a system image can be considered the complementary step to your earlier choice of device definition. Whereas your device choice selected the hardware aspects of your AVD, the system image determines the key software aspects: Android API/SDK level and ABI, which is basically a decision of which chip architecture to emulate in software, Intel’s x86 or one of the Arm-based architectures, and which release of Android these pieces most closely match.
In Chapter 2 I introduced the term SDK, or Software Development Kit. While it’s easy to parse that phrase and think “Great, a kit to help me develop software,” it’s worth reviewing what the Android SDK really offers. First and foremost, the Android SDK is a set of software libraries, which are the fundamental tools needed to access the capabilities and power of any Android smartphone and its operating system. You can think of the SDK as the lever that lets you bring all of the power and capabilities Google has built into Android to bear in your own application, without needing to build everything from the ground up.
The Android SDKs – and there are successive versions released for every version of Android – provide the connection to Android Studio that lets you easily invoke Android behavior; build tools that let you turn your code into a working Android program; platform tools that let you manage applications that are still in development and running in “draft” form, including “adb,” the Android Debug Bridge, for controlling behavior on an emulator or real device from still-in-development code; and more. Oh, and the SDK provides the emulator framework and device emulation itself!
Depending on whether you have ever previously used a version of Android Studio on the computer you’ve chosen to use or have stepped through this wizard before, you will see the listed release names like “R” or “Oreo” with or without a download link next to the name. In short, if the system image is already available on your machine, it won’t show a download link. If it is yet to be used on your machine, the download link will show, and you can click it straight from the system image stage to fetch the relevant system image.

An example license acceptance screen for AVD system images

The Android Virtual Device (AVD) configuration verification screen

The populated AVD Manager home screen
You should now see your newly created AVD in the list of available emulated devices. That’s it for creating your first Android Virtual Device – you are now ready to get your own application written and running on it!
Creating Your First Android Application, Already!
You have all the prerequisites in place to get started with your first Android application. There is still a great deal to learn, but you already have the key pieces at hand, including Android Studio and a newly created Android Virtual Device ready to try out whatever you write. Hopefully this ready-to-go status isn’t surprising to you. I outlined some of the benefits of IDEs in Chapter 2, and you’re about to experience this directly in the area of setting up the scaffolding and framework of a new application.
Without any further suspense, let’s get started. If you have followed along with the earlier steps in this chapter, completing the creation of an AVD, you will likely be back at the Android Studio home screen you saw earlier in the chapter, in Figure 3-1. From that home screen, choose the Start a new Android Studio project option at the top of the screen, and you will shortly see the first screen of the Create New Project wizard.

Android Studio as it appears when the home screen disappears

The Create New Project wizard in Android Studio
The first page of the wizard is already prompting you to make some choices about what kind of application you would like to build. Across the top of the screen, you will see device categories, such as Phone and Tablet, Wear OS, TV, and so on. At this moment, we will stick with the Phone and Tablet wizard option. Looking at the icons displayed beneath Phone and Tablet, you are likely scratching your head, perplexed as to what terms like activity, fragment, and so forth mean. Fear not. You’ll soon master these. At this stage, you can treat this screen as Android Studio asking you exactly how much bootstrapping you want for your new application and what ready-made pieces you would like it to put in place on your behalf. For instance, if you anticipate making an application reliant on maps and navigation capabilities, the Google Maps Activity template adds in a bunch of mapping, GPS, and location support options ready-made for developers. Other options on this screen similarly pull in other goodies, such as Ad library support for the Google AdMob Ads Activity.
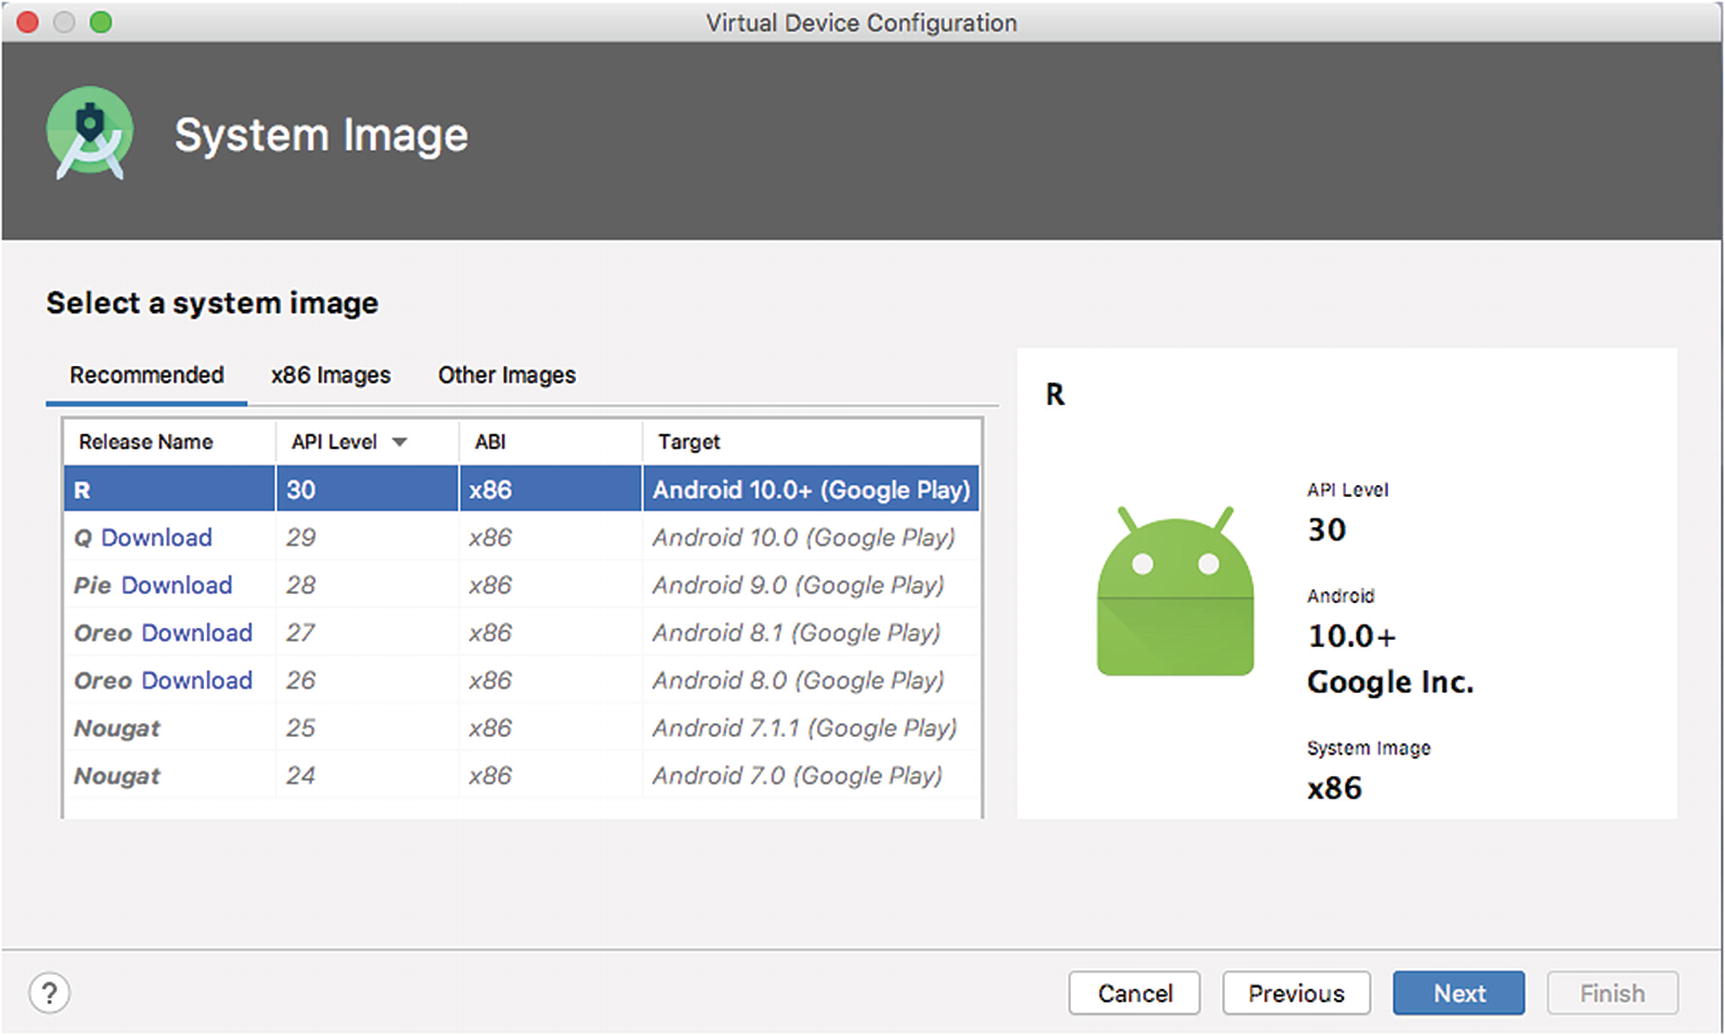
The Configure Your Project screen in Android Studio
The options shown on this screen are all that stand between you and adding your own code and touches to your application. For your current MyFirstApp project, you will want to specify the following settings:
Name: This should be a meaningful name for your application. It’s the title that will appear on-screen when running the app, it’s the caption that will appear under the app’s icon from Android launcher screens, and should you even publish this app in the Google Play store or elsewhere, it’s the name that will appear there. For our purposes, enter MyFirstApp as the name.
Package name: In a world with tens of thousands of developers creating hundreds of thousands of applications for Android, how do you ensure no two apps conflict when it comes to naming? Rather than enforce unique names (though places like Google Play do have some restrictions in this regard), Android leverages the fundamental mechanism of package names derived from the Java standard. We will talk more about Java package naming in Chapter 7, so for now you can use a package name derived from one of my own domain names – org.beginningandroid.myfirstapp.
Save location: The save location is the folder on disk where the entire hierarchy of code for this application will be stored. This will include menu subfolders, holding contents like source code, configuration files, images, video, and more, depending on how sophisticated we make this application. To begin with, the space used by a new project will be under 1 MB. But this can grow quickly, so it’s best to choose a location on disk that you know has ample spare space. If you’re happy with the default, you can accept it – a directory named AndroidStudioProject/MyFirstApp under your user’s home directory on your operating system.
Language: Open the pick list you see, and you are presented with two options: Kotlin or Java. Kotlin is a newer addition to the family of languages that Android supports for authoring applications. Java is the first and still by a massive margin the largest used and most popular language for Android development. Choose Java as the language for MyFirstApp.
Minimum SDK: Here is where our discussion of Android versions, Android Studio versions, and Android SDK versions from Chapter 2 and this chapter starts to pay off. Your selection here will dictate what version of the SDK is used for this application and therefore to a large degree what devices it will be compatible with from the history of Android devices. Newer releases of the Android SDK provide support for newer features, whereas older releases are more likely to be supported on older – and therefore more – devices. You will see the additional text next to your selection that indicates what percentage of activated Google devices in use throughout the world would support the SDK version of your choice. There is no perfect answer to the best trade-off between new features and broad support. For now, our initial application is not going to use any cutting-edge features from the latest release of the Android SDK, so you can go with the default, choosing API 16, which was first released to coincide with the Android 4.1 Jelly Bean release from several years ago. You can scroll through the list to choose another SDK release if you wish. If your chosen SDK version is not currently installed on your computer, it will be downloaded along with the steps taken to complete setting up this initial application – be sure to account for the 100+ MB of disk space used for each SDK version.
Use legacy android.support libraries: Over the years, Google has tried a number of approaches to deal with the version fragmentation seen in use by active Android devices. One approach was (and still is) to use an additional support library not tied to any one particular SDK version and have applications utilize this support library. The subtlety was that Google was much more able to push updates for the support library, as compared to the Android installation of any particular device. We will talk more about this in coming chapters when we discuss androidx and Jetpack. For now, you can leave this setting at the default of unchecked, meaning we won’t pull in support for these libraries.

Android Studio showing the MyFirstApp project open for editing
Getting Your First Code Written
If you review the layout of your new project as shown in Figure 3-12, you will see a folder/directory hierarchy with all manner of names, such as manifests, java , res, and more. We are going to explore the full project layout, the directories you see, the starter files that populate them, and the pieces you build in the very next chapter.

Opening your first source file in Android Studio
The contents of the activity_main.xml file in a new Android Studio project
Go ahead and edit the string within the double quotes, so instead of reading "Hello World!", it reads something like "Hello Android!" or whatever takes your fancy. Once you are done editing this file, save your changes. You’ve just made your first custom edit to an Android application!
Getting Ready to Run Your Application
You are now ready to have Android Studio run your new application inside the AVD emulator you created earlier in the chapter. In order for Android Studio to do this, it needs to know what your particular preferences are when you ask it to run the application. For example, do you just want it to run normally, so you can interact with it, or do you want it to run in a debugging mode or some other way that lets you carefully examine what is happening in the code or to the interactions between your application and the Android host device, other APIs you may be calling, or external services such as cloud-based APIs?
Android Studio controls these alternative approaches to running your applications through what are known as run configurations. These are preset instructions on exactly what you mean by “run” when running an application.

The prompt to edit your first run configuration
You can always directly edit run configurations without forcibly running an application, by choosing the Edit Configurations… option from the Run menu.

Selecting a new base run configuration

Detailed configuration for a new run configuration
There are two settings you will need to make. The first setting is to provide your run configuration with a memorable name. I am going to suggest you use the name Run Config 1. Next, you need to nominate which module of code the run configuration should initiate when running your application. The only option in the list is app, which is fortunate, as that’s the option you want. You can see both of these settings in Figure 3-16.
Click the Apply and OK buttons to save away your configuration.
Installing (Additional) SDK Packages
Depending on how you choose your application’s minimum SDK setting earlier in this chapter and the options you selected when first installing Android Studio, you might not have the relevant SDK bundle installed on your machine for Android Studio to use in building your application. You can spot this easily, as you’re default view in Android Studio includes the current build status in the lower left of the screen.
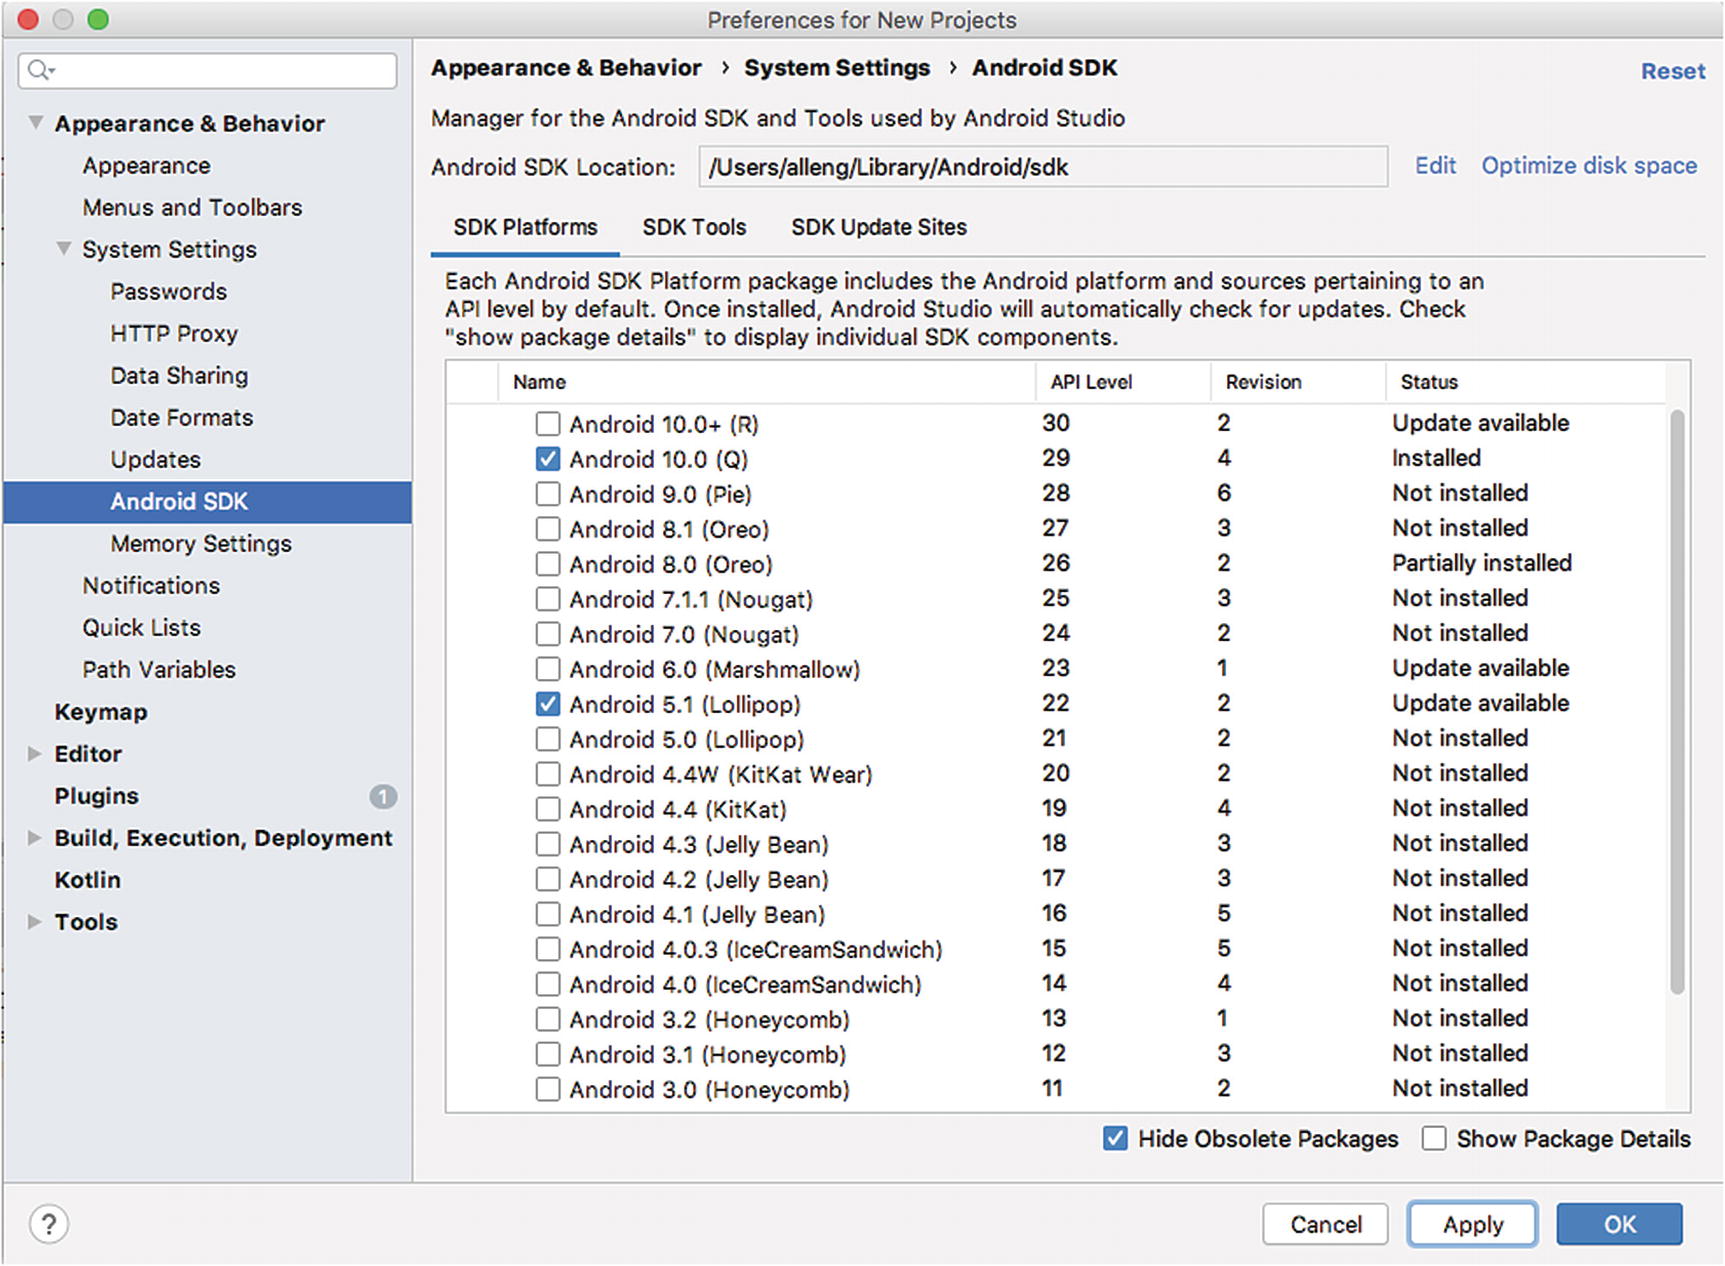
The Android SDK Manager
To add the SDK needed for your project, simply check the box next to the relevant version – in my case, that is “Android 10.0 (Q),” which equates to API level 29 or, in other words, version 29 of the Android SDK. Click the Apply button, and the SDK Manager will then trigger the download of this version of the SDK. If you sit back and think about it for a moment, you will realize that as you build more and more applications and potentially choose different target SDK versions for them, you will likely end up with quite a few different versions of the Android SDK installed on your machine, and together, these will take a considerable amount of disk space. We’ll revisit this topic in Chapter 6, when we look in depth at your overall developer system setup.
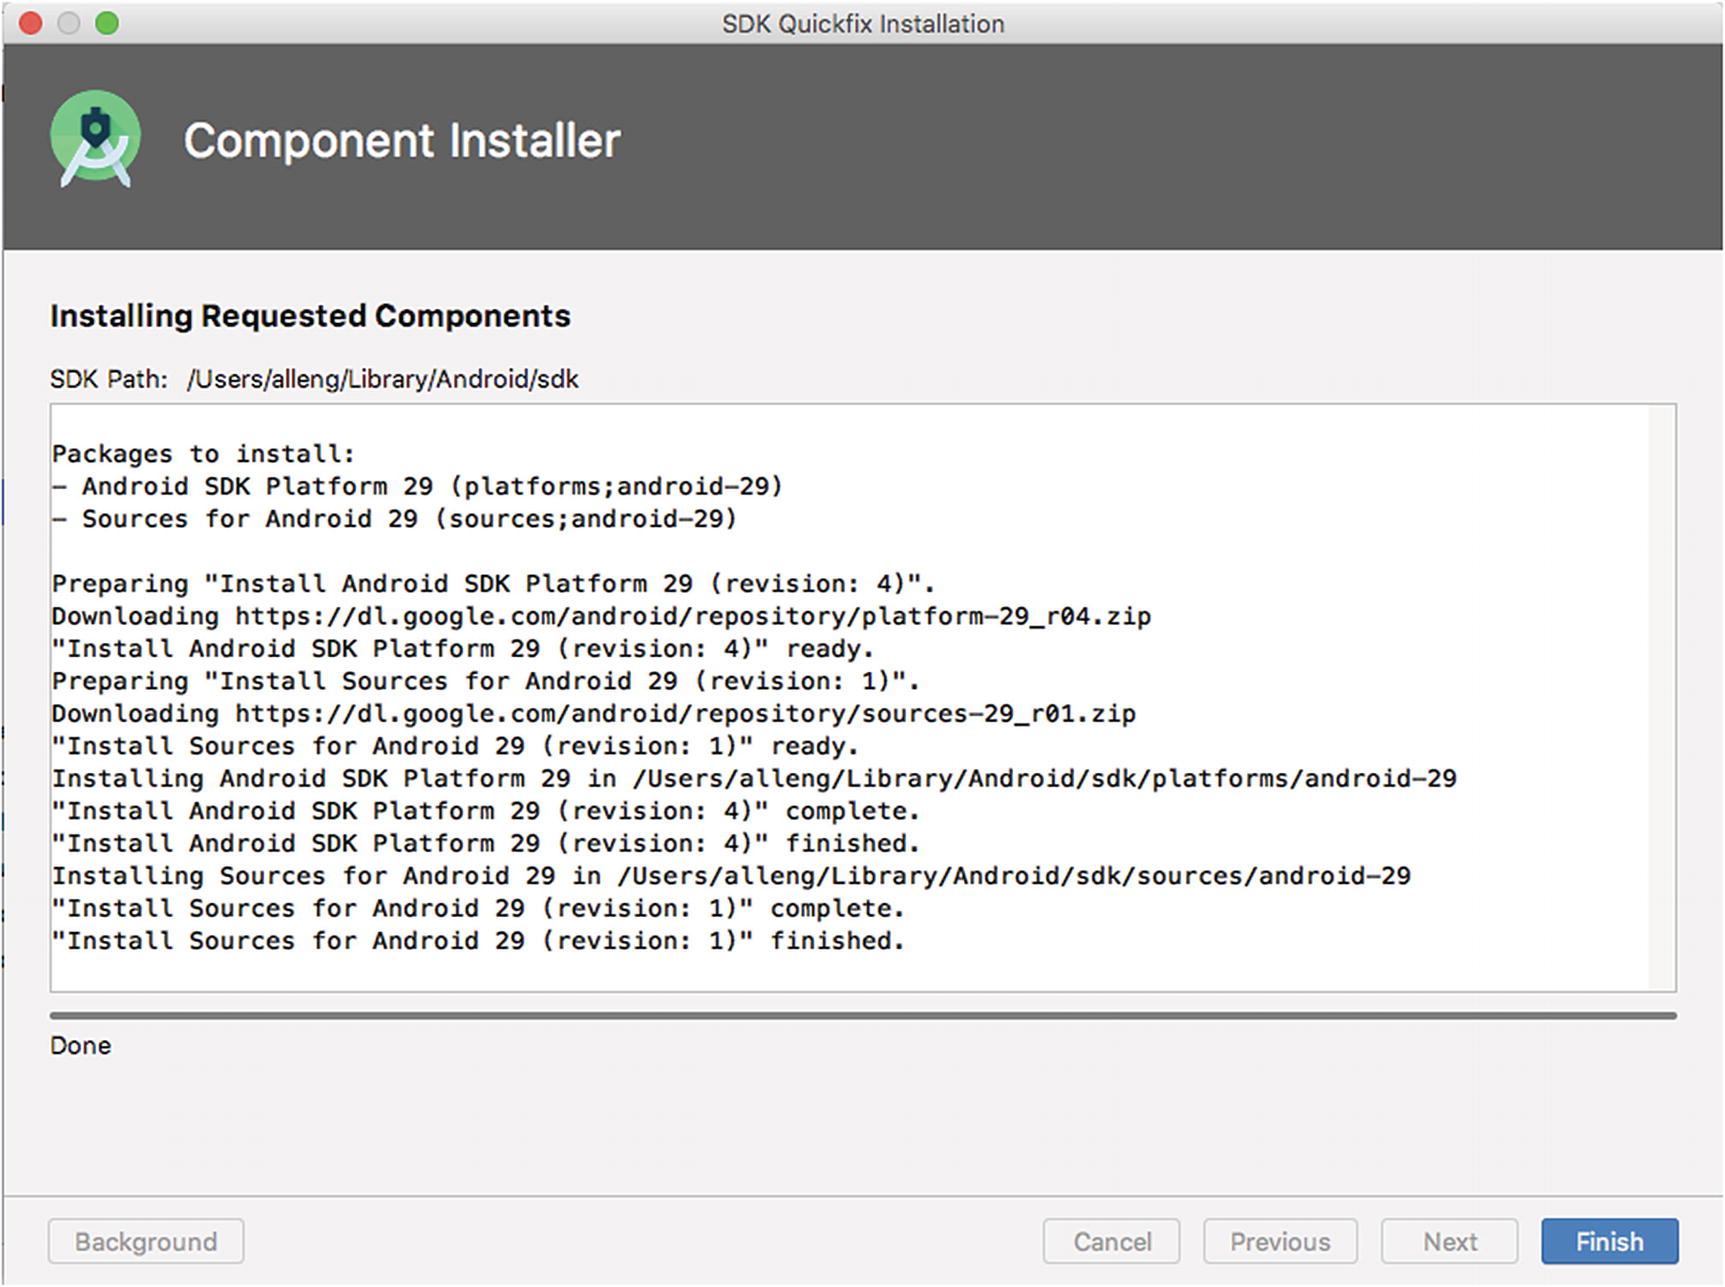
The Android SDK Manager indicating successful download and install of a new SDK version
At this point, you will need to have Android Studio refresh the configuration for the integrated Gradle build tool so it realizes the new SDK is in place. Android Studio can take all the necessary steps to do this – so don’t panic at this point if you know nothing about Gradle as a build tool. Simply open the File menu, and select the option that reads Sync Project with Gradle Files.
When this sync activity completes, in the Build window in the lower left of the screen, you should see the previous warnings and errors are now gone, and the only message present should read MyFirstApp successful at some-date-and-time.
Running Your Application
With a completed setup in Android Studio matching the needs of your application and Gradle in sync and ready to build your application, your run configuration should now be able to actually run your new application. Go ahead and choose Run from the Run menu, or directly choose Run 'Run Config 1' to skip the run configuration selection step.
A bunch of actions will now happen automatically, but they can take a little time – up to a few minutes depending on the capabilities of your computer. First, Gradle will be invoked to build your application. We will cover this process in more detail in later chapters, but for now what you need to know is that Gradle is pulling together all of the code you wrote, the libraries referenced by your application, the relevant Android SDK, and other plumbing and generating a bundle ready to deploy as your application. This is known as an Android Package, or APK.
Next, Android Studio invokes your AVD, and after the time it takes for that emulator to start, it copies over the APK built by Gradle. Based on your run configuration, Android Studio knows that you want to run the app module, in effect triggering your new MyFirstApp application to run in the AVD, just as if you’d pressed its icon in the Android launcher window.

Your running MyFirstApp Android application within your AVD
That’s it! You have written and run your first Android application. Well done. Take a deep breath, because in Chapter 4 we are going to dive under the hood and examine everything that Android Studio has just built for you in great detail.