
In Chapter 3, I introduced you to setting up everything you needed to get your first Android application written and running on an AVD, with the goal of very quickly getting you immersed in Android Studio, emulators, and your first part of coding. We got results fast! But you almost certainly have a whole bunch of unanswered questions that cropped up as we zoomed through. In this chapter, we’ll start a deeper dive into many of the topics, starting with the structure and features of your new Android project. This should start to answer those questions and build your knowledge.
Viewing the Whole Android Project Structure
To get familiar with the structure and purpose of the various parts of an Android project, it can help to start with the view from 30000 feet up (or 10000 meters, for the metric-minded). Looking at the entire layout of your project from the previous chapter, it turns out to be surprisingly large. While you only edited one file, many others were created for you by the new project wizard, and other files like Java libraries, the Android SDK, and so on were copied or had references added as your project was created.
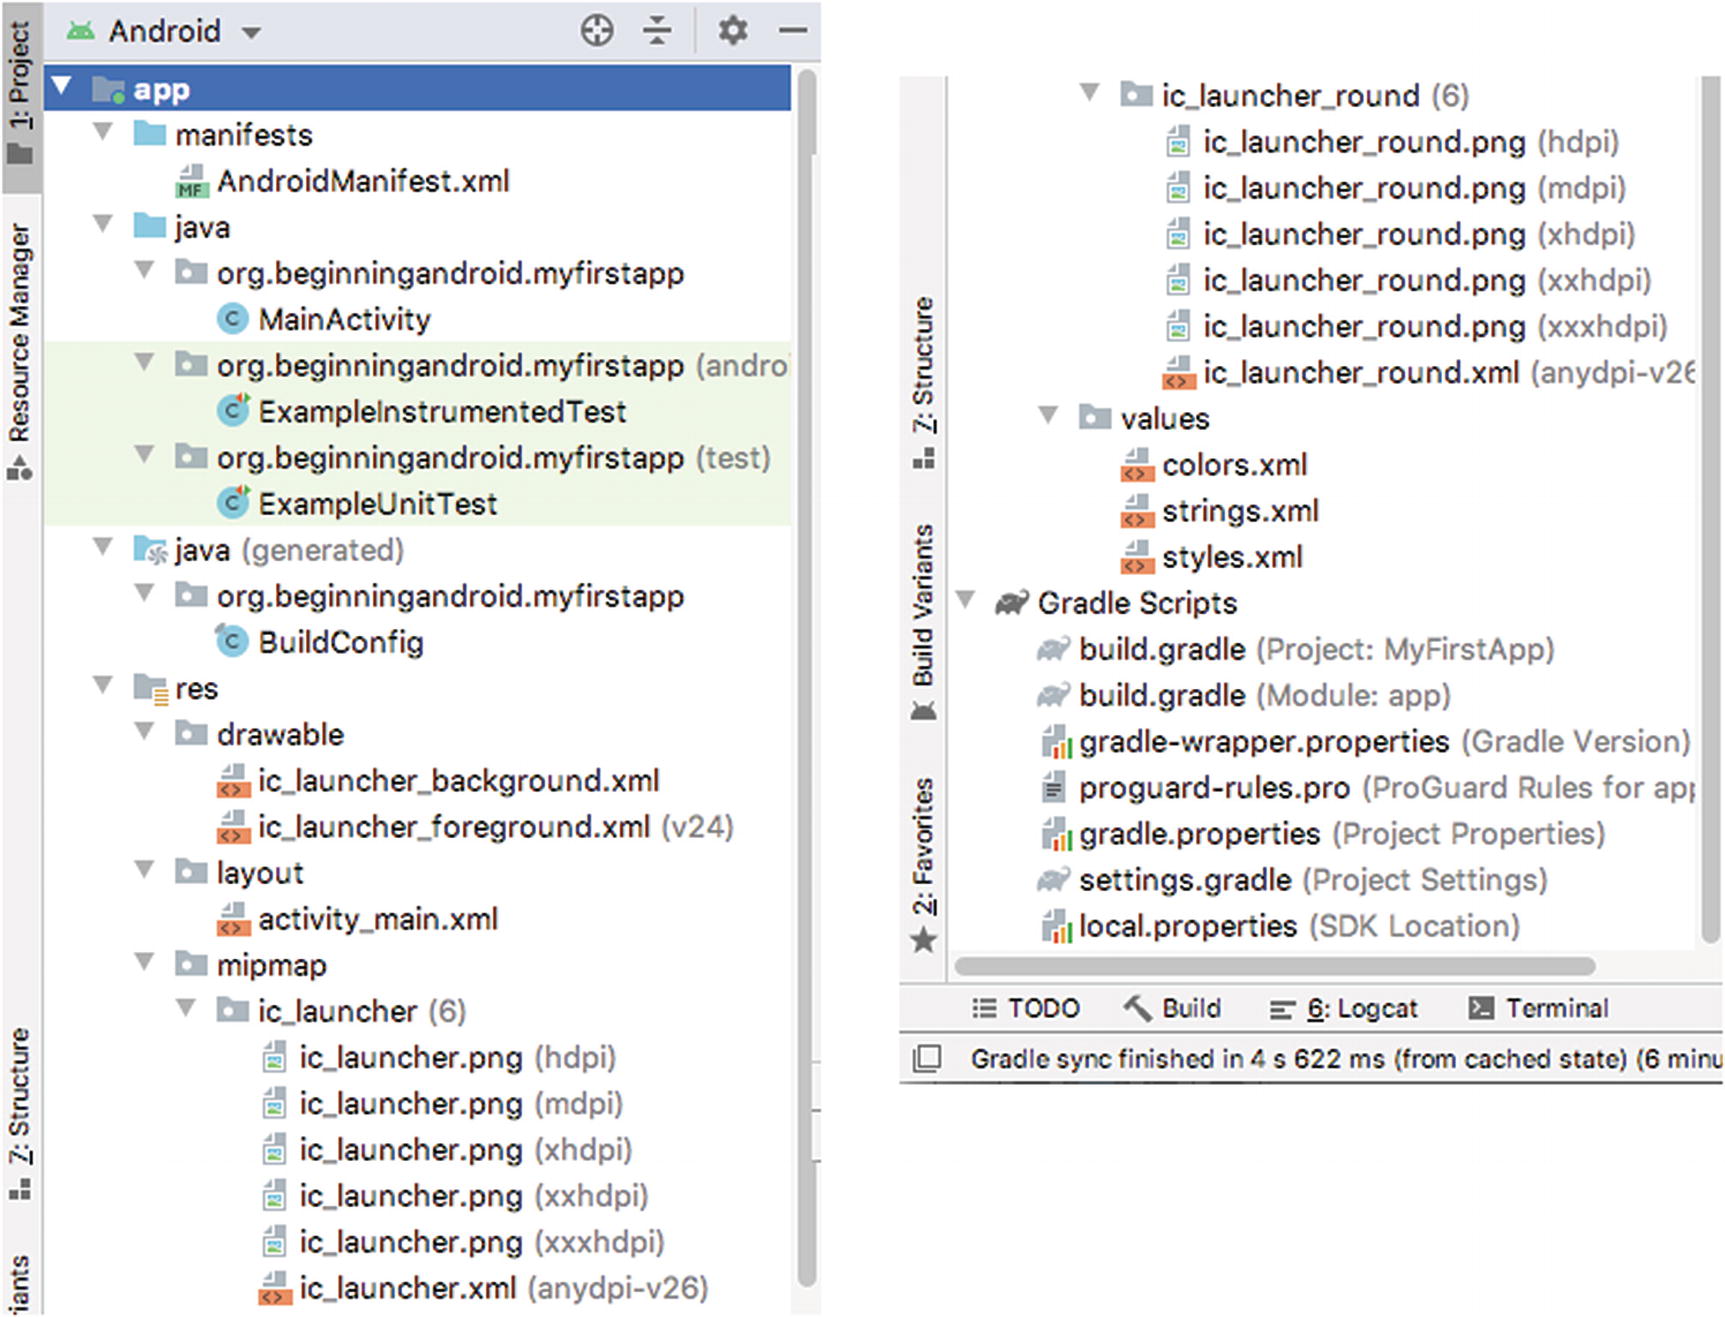
The logical Android view of your project in the Project Explorer
The default view you see is known as the Android view and is designed to simplify the way all of your project’s constituent parts are displayed to you. The goal with this simplification is to let you focus on the parts you, the developer, write or edit and to keep much of the rest of the supporting files out of the way.
From this whole-of-project Android view, you can see that the project is broken down into five major groups of files that represent different parts of your project.
Working with Manifests
The first group of files shown in the Android view in Project Explorer are your manifest files. With a new project such as MyFirstApp, there is only one manifest file that will concern you, which is the one named AndroidManifest.xml .
This is your Android Manifest file and acts almost like a master control file for your Android application. Within the Android Manifest file, you are able to control many major parameters and behaviors of your application, including declaring what permissions your application will require to operate, what services it may interact with, the activities that comprise the application, and the Android SDK levels that the application both needs and supports.
The contents of your new AndroidManifest.xml file
As you might have guessed from the filename, the contents are in XML format. For those of you encountering XML for the first time, Chapter 8 provides a full introduction to XML for Android development. It’s fine to jump ahead and cover that topic and return to this point once you are comfortable with the basics of XML.
Android uses the root element <manifest> for the XML document and then introduces two key attributes: a namespace declaration and a package declaration. Where namespaces are concerned, the Android convention is to use them only at the attribute level, rather than also using them for elements. The package name org.beginningandroid.myfirstapp should look familiar to you, as this was the package name we provided in the project setup wizard in Chapter 3. As well as providing this essential mapping to ensure uniqueness for your application’s fully qualified package name, this technique allows us to then use shorthand in the future when wanting to refer to aspects of the application with itself.
You can see this in action a little further down the manifest, where the first <activity> element is introduced, in the form <activity android:name=".MainActivity"> . Here, the leading dot is shorthand for the full package name referenced in the <manifest> package attribute. In practice, it means much shorter names for internal references, so in this example, .MainActivity instead of org.beginningandroid.myfirstapp.MainActivity. I know which one I’d prefer to type.
The manifest file also includes other key features. For instance, the android:icon and android:roundIcon attributes reference two resource files that provide the square and round icon versions for your application in an Android device’s launcher screen and widget screen. The android:label attribute holds the name of your application.
One further important entry is the <activity android:name=".MainActivity"> mentioned earlier. This entry, including the child element <intent-filter>, indicates to Android which activity it should respond with when the application launches and the key intent android.intent.action.MAIN is triggered. We’ll cover exactly what these concepts are shortly in this chapter, but for now you can think of this as an Android way of flagging what your application first shows a user when it starts.
Jiving with Java
The second and third main areas of your Android Project Explorer view are for your Java source files. These are the text files in which Java code is written to bring your application to life and have it perform the actions, features, and behaviors you intend for your app to have.
You will see two high-level folders, one for Java and one for Java (generated). In fact at this stage, all of the files in both areas have been generated for you, but in general as you develop your application, you will change the files in the Java tree, add new ones, and so on and leave Android Studio and its integrated tools to automatically handle the Java (generated) files.
There is one file in particular to spot right now, and that is the MainActivity file under the Java ➤ org.beginningandroid.myfirstapp folder. The file on disk is actually called MainActivity.java, and the Android view in Project Explorer is hiding the file extension. This MainActivity file is the code that will run when your application starts, based on the configuration mentioned earlier in the Android Manifest file.
We will look at what is meant by activity both later in this chapter and in depth in many future sections of the book.
Getting Resourceful with Resources
The fourth main area of files within your new project are the resource files, found in the res folder and its subfolders. There are quite a number of items generated for you to begin with, in different categories of resources.
Drawables
Drawables are those things that Android will draw, or render, on-screen as part of your application. This means both normal images, such as artwork, diagrams, and other static images, and images it will have to generate at runtime based on instructions given to it.
The first kind of drawables are represented in typical image files that you might be familiar with, such as GIF, JPEG, and PNG files. Android has mechanisms to scale images up and down to suit various density screens/displays and also lets you store different resolution versions of the same image so as to avoid scaling. We will delve into the world of image, photo, and artwork creation and techniques for Android applications in Chapter 14.
The second kind of drawables Android supports are vector images that it creates at runtime, based on specifications provided in XML files. You can see two examples of XML files providing vector graphics instructions in your new project – ic_launcher_background.xml and ic_launcher_foreground.xml.
Layouts
In Chapters 9 and 10, we will explore layouts and designing the UI of your application in detail, covering a range of options and styles. When you created your new project in Chapter 3, you will remember choosing the “Empty Activity” option for your project. This choice was used by Android Studio to put in place a default layout, which appears in the file activity_main.xml under the layout subfolder.
Once again, this is an XML file, and Android makes extensive use of XML in defining the initial layout and behavioral characteristics of activities. If you think of an activity as a screen or window in your Android application, which is then used by users, it is the XML layout that provides the description of how to create and render the interface. This activity_main.xml layout is used by your MainActivity Java code when it wants to draw the activity on-screen. This process is known as “inflation” in the Android world and applies to the process for laying out an entire activities interface, as well as any subset of it such as creating a menu or dynamically adding one layout inside another. As your application grows, so too will the number of activity layout XML files in this folder.
Mipmaps
You can think of the mipmap folder as a special case of the drawable folder. Where drawables are images or artwork for any purpose, the mipmap entries are specifically for the icon files used for your application and an Android device’s launcher screen(s). The ic_launcher folder holds square versions of the icons, and the ic_launcher_round holds rounded versions of the same icons. Multiple instances of each file are stored at different resolutions (display densities), and Android will automatically determine which density version to use based on display characteristics of a device and any explicit configuration overrides an application or device might use.
We will talk more about display densities and their implications in later chapters.
Finding Value in Values
Within the values folder , you will find files dedicated to holding data about strings, dimensions, styles, and other reference information. This approach embodies the simple abstraction technique you will find in almost all programming languages and environments. Rather than peppering your application code and configuration files with hard-coded values that might often be repeated in many places, using an abstraction to reference a single definition of a value away from the code makes for cleaner, less error-prone code. This helps in many ways, such as providing a well-managed mechanism for creating and using value resources for many different screen sizes and resolutions.
In your current project, you can see the application name is present in the strings.xml file. Rather than embed our "MyFirstApp" as a literal string everywhere it is needed through the project, a reference to this entry in the strings.xml file can be used. If we ever need to change this value, we can do it in one place, and know that all references will be updated automatically and correctly. While we won’t be doing this ourselves, this has concrete benefits in areas such as internationalization and localization of your application into other languages.
Building Everything with Gradle Files
By now, your tally of the number of separate files of various types that make up even your first Android application is growing, well into double digits. Bringing all these files together to create a final, working Android application is the job of the build system, and Android Studio by default relies on a build toolset known as Gradle.
The Gradle Scripts folder shows you the various scripts that exist to do the work of building a complete application from its constituent components. The two most notable files right now are the identically named build.gradle files . You’ll notice the first one flagged as being for the project – in this case, Project: MyFirstApp. The second is labeled as Module: app.
“Why two build.gradle files?” you might ask. The long answer is that you could in fact have more than two. What you are seeing is the project-level build.gradle file that all Android projects have one of. Then you are seeing one additional build.gradle file for each module your project defines, allowing each module to handle any module-specific build activities and parameters. As your project only defines a single "app" module, you only see one more build.gradle file, giving you a total of two. As we progress through the book, we’ll work with examples that have multiple modules incorporated into a given project, and thus you’ll see additional build.gradle files in the relevant projects.
The project-level build.gradle file
You have a variety of configuration settings that control how your application is built, which fall into a few key areas. These are SDK versioning and application versioning, the type of application build being targeted, and the inclusion of dependencies, plugins, and libraries that are required as the foundation for your project.
Understanding SDK Version Parameters
There are several parameters you’ll observe that mention SDK versions, including compileSdkVersion, minSdkVersion, and targetSdkVersion. These serve different but complementary purposes:
- ■
compileSdkVersion: Instructs Android Studio what version of the SDK – from the potentially many versions you have installed – to use when actually compiling and building your application. Normally you will choose the latest version of the Android SDK you have available.
- ■
minSdkVersion: Sets the threshold for native API feature use in your application and, by implication, determines the oldest versions of Android and Android SDK that would support your application. This in turn sets the oldest devices that could use your application. Features introduced in newer API levels will be handled by Support Libraries or Android Jetpack (discussed in a moment), where possible.
- ■
targetSdkVersion : Controls the newest API features your application will attempt to use, even if the compileSdkVersion is a later release than this. This means that you can benefit from efficiencies at compile time offered by newer SDKs, but not be forced to adopt sometimes significant changes to your application’s behavior until you explicitly advance the targetSdkVersion.
Understanding Application Versioning
When releasing Android applications, just as with almost all other software, the concept of versioning is used to indicate later releases that fix bugs, add new features, improve existing behavior, and so on.
Android uses two parameters that you’ll find in the build.gradle file. The most important is the versionCode parameter, which traditionally has been the parameter that tracks the version number for a given build/release of your application. The versionCode parameter is an integer that should only ever increase as you release new values.
Internally, since SDK version 28, Android has also offered the newer versionCodeMajor parameter . This is a long value, rather than an integer, so can hold much higher values. This can currently only be successfully set by incorporating versionCodeMajor="n" notation in your Android Manifest XML file. Gradle build files don’t currently support this parameter.
Android provides a mechanism to show some kind of meaningful human-readable version to your users as well, sourced from the versionName string value. This helps you as a developer if you want to try to signal things like major and minor releases to your users, which is a traditional (though not essential) habit for software development.
Including Libraries for Forward and Backward Version Support
The last aspect of your Gradle build files to note for now is the dependencies section. I won’t go into each dependency that is being declared at this stage, as we’ll return to each one when we discuss their particulars in later sections on testing, handset/version compatibility, and more. The one common aspect I will highlight is the namespace for many of the dependencies. You will note the leading component name is androidx. The name androidx refers to Android Jetpack, which was a recent update and refresh of the way Android allows you as a developer to target many different versions of SDK without needing to know of them in advance – in effect, future-proofing your application against some of the changes that get incorporated into later SDK releases while also allowing you to build applications with the capabilities of contemporary SDK releases and letting Android and Jetpack worry about how to mimic such newer behavior when running on devices with older versions of Android that don’t support your SDK version explicitly. Jetpack also helps reduce some of the verbosity of writing software in Java, by reducing boilerplate code and helping you follow good practices that have been learned by the Android developer community over time.
Jetpack is replacing an older approach, known as the Android Support Libraries, but you will still see Support Libraries in many references and discussions, and the two will live side by side for some time to come.
Explaining the Key Android Application Logical Building Blocks
You now have some view of the project structure and layout within Android Studio. But at several points in this chapter, I have mentioned some of the fundamental logical building blocks of an Android application, such as activities and services. Now’s the time to get a little more understanding of what these building blocks are and how they fit together to bring your application to life.
Activities
If you have used any existing Android application, you would have experienced that it has some themes in common with most software that comes with a user interface. Like other software with UIs, Android uses the concept of a “screen” or “view” where users actually interact with your program. Android calls these activities, and whether you want your users to read text, watch a video, enter data, make a phone call, play a game, or what have you, your users will do this by interacting with one or many activity screens or layouts that you design.
Activities are one of the easiest, and computationally cheapest, parts of Android to develop, and you should be generous with your creation and use of them in your application. Not only will this help your users get a great experience from your application but the Android operating system is designed with the proliferation of activities in mind and provides lots of help in managing them.
Intents
Intents are the internal messaging system of Android, allowing pieces of information to be passed between applications and to and from the Android environment. In this way, your application can trigger actions and share data with Android and other applications, and it can also listen out for events that are happening and take action when appropriate.
The Android operating system already has a very wide range of intents that your application can interact with, and as a developer you can also define and develop your own intents for your own uses.
Services
Services are a common concept in much of the computing world, and while there are slight differences when dealing with them in Android, many of the common concepts still apply. Services are applications that typically have no user interface and instead run in the background. Services offer up a range of features, capabilities, or behaviors that are typically in demand by multiple applications. Services typically are long-lived, humming along in the background helping out your application and others as demanded.
Content Providers
There are many types and derivations of data that your application might want to use that you yourself don’t control. Lots of other applications have similar data demands, and so Android ships with the concept of Content Providers, which are a way of abstracting datasets and data sources. This abstraction tries to simplify interacting with lots of varied data sources, including files, databases, streaming protocols, and other ways of accessing data, bringing some logical consistency to you as the developer. Rather than having to learn a different custom way of working with data for every set or type of data you want to use, you learn the Content Provider approach once and can use it repeatedly across many different Content Provider data sources.
You can also build and share your own Content Providers, facilitating data sharing and interaction with other applications.
Summary
You now have a feel for how a typical Android development project is structured and how some of the major building blocks of an Android application are brought together both logically and during building the application, to create a single finished application. We will continue building on the pieces described in this chapter, expanding our exploration of many of them so that you appreciate how more and more sophisticated applications are built.