This Lesson will cover the proper way of building your first Express application. You'll begin by installing and configuring the Express module, and then learn about Express' main APIs. We'll discuss Express request, response, and application objects and learn how to use them. We'll then cover the Express routing mechanism and learn how to properly use it. We'll also discuss the structure of the application folder and how you can utilize different structures for different project types. By the end of this Lesson, you'll learn how to build a full Express application. In this Lesson, we'll cover the following topics:
- Installing Express and creating a new Express application
- Organizing your project's structure
- Configuring your Express application
- Using the Express routing mechanism
- Rendering EJS views
- Serving static files
- Configuring an Express session
To say that TJ Holowaychuk is a productive developer would be a huge understatement. TJ's involvement in the Node.js community is almost unmatched by any other developer, and with more than 500 open source projects, he's responsible for some of the most popular frameworks in the JavaScript ecosystem.
One of his greatest projects is the Express web framework. The Express framework is a small set of common web application features, kept to a minimum in order to maintain the Node.js style. It is built on top of Connect and makes use of its middleware architecture. Its features extend Connect to allow a variety of common web applications' use cases, such as the inclusion of modular HTML template engines, extending the response object to support various data format outputs, a routing system, and much more.
So far, we have used a single server.js file to create our application. However, when using Express you'll learn more about better project structure, properly configuring your application, and breaking your application logic into different modules. You'll also learn how to use the EJS template engine, managing sessions, and adding a routing scheme. By the end of this section, you'll have a working application skeleton that you'll use for the rest of the book. Let's begin our journey of creating your first Express application.
Up until now, we used npm to directly install external modules for our Node application. You could, of course, use this approach and install Express by typing the following command:
$ npm install express
But, directly installing modules isn't really scalable. Think about it for a second: you're going to use many Node modules in your application, transfer it between working environments, and probably share it with other developers. So, installing the project modules this way will soon become a dreadful task. Instead, you should start using the package.json file that organizes your project metadata and helps you manage your application dependencies. Begin by creating a new working folder and a new package.json file inside it, which contains the following code snippet:
{
  "name" : "MEAN",
  "version" : "0.0.3",
  "dependencies" : {
    "express" : "~4.8.8"
  }
}
In the package.json file, note that you included three properties, the name and version of your application and the dependencies property that defines what modules should be installed before your application can run. To install your application dependencies, use your command-line tool, and navigate to your application folder, and then issue the following command:
$ npm install
NPM will then install the Express module because it is currently the only dependency defined in your package.json file.
After creating your package.json file and installing your dependencies, you can now create your first Express application by adding your already familiar server.js file with the following lines of code:
var express = require('express');
var app = express();

app.use('/', function(req, res) {
  res.send('Hello World');
});

app.listen(3000);
console.log('Server running at http://localhost:3000/');

module.exports = app;
You should already recognize most of the code. The first two lines require the Express module and create a new Express application object. Then, we use the app.use() method to mount a middleware function with a specific path, and the app.listen() method to tell the Express application to listen to the port 3000. Notice how the module.exports object is used to return the application object. This will later help us load and test our Express application.
This new code should also be familiar to you because it resembles the code you used in the previous Connect example. This is because Express wraps the Connect module in several ways. The app.use() method is used to mount a middleware function, which will respond to any HTTP request made to the root path. Inside the middleware function, the res.send() method is then used to send the response back. The res.send() method is basically an Express wrapper that sets the Content-Type header according to the response object type and then sends a response back using the Connect res.end() method.
To run your application, simply execute the following command in your command-line tool:
$ node server
Congratulations! You have just created your first Express application. You can test it by visiting http://localhost:3000 in your browser.
Express presents three major objects that you'll frequently use. The application object is the instance of an Express application you created in the first example and is usually used to configure your application. The request object is a wrapper of Node's HTTP request object and is used to extract information about the currently handled HTTP request. The response object is a wrapper of Node's HTTP response object and is used to set the response data and headers.
The application object contains the following methods to help you configure your application:
app.set(name, value): This is used to set environment variables that Express will use in its configuration.app.get(name): This is used to get environment variables that Express is using in its configuration.app.engine(ext, callback): This is used to define a given template engine to render certain file types, for example, you can tell the EJS template engine to use HTML files as templates like this:app.engine('html', require('ejs').renderFile).app.locals: This is used to send application-level variables to all rendered templates.app.use([path], callback): This is used to create an Express middleware to handle HTTP requests sent to the server. Optionally, you'll be able to mount middleware to respond to certain paths.app.VERB(path, [callback...], callback): This is used to define one or more middleware functions to respond to HTTP requests made to a certain path in conjunction with the HTTP verb declared. For instance, when you want to respond to requests that are using theGETverb, then you can just assign the middleware using theapp.get()method. ForPOSTrequests you'll useapp.post(), and so on.app.route(path).VERB([callback...], callback): This is used to define one or more middleware functions to respond to HTTP requests made to a certain unified path in conjunction with multiple HTTP verbs. For instance, when you want to respond to requests that are using theGETandPOSTverbs, you can just assign the appropriate middleware functions usingapp.route(path).get(callback).post(callback).app.param([name], callback): This is used to attach a certain functionality to any request made to a path that includes a certain routing parameter. For instance, you can map logic to any request that includes theuserIdparameter usingapp.param('userId', callback).
There are many more application methods and properties you can use, but using these common basic methods enables developers to extend Express in whatever way they find reasonable.
The request object also provides a handful of helping methods that contain the information you need about the current HTTP request. The key properties and methods of the request object are as follows:
req.query: This is an object containing the parsed query-string parameters.req.params: This is an object containing the parsed routing parameters.req.body: This is an object used to retrieve the parsed request body. This property is included in thebodyParser()middleware.req.param(name): This is used to retrieve a value of a request parameter. Note that the parameter can be a query-string parameter, a routing parameter, or a property from a JSON request body.req.path,req.host, andreq.ip: These are used to retrieve the current request path, host name, and remote IP.req.cookies: This is used in conjunction with thecookieParser()middleware to retrieve the cookies sent by the user-agent.
The request object contains many more methods and properties that we'll discuss later in this book, but these methods are what you'll usually use in a common web application.
The response object is frequently used when developing an Express application because any request sent to the server will be handled and responded using the response object methods. It has several key methods, which are as follows:
res.status(code): This is used to set the response HTTP status code.res.set(field, [value]): This is used to set the response HTTP header.res.cookie(name, value, [options]): This is used to set a response cookie. Theoptionsargument is used to pass an object defining common cookie configuration, such as themaxAgeproperty.res.redirect([status], url): This is used to redirect the request to a given URL. Note that you can add an HTTP status code to the response. When not passing a status code, it will be defaulted to 302 Found.res.send([body|status], [body]): This is used for non-streaming responses. This method does a lot of background work, such as setting theContent-TypeandContent-Lengthheaders, and responding with the proper cache headers.res.json([status|body], [body]): This is identical to theres.send()method when sending an object or array. Most of the times, it is used as syntactic sugar, but sometimes you may need to use it to force a JSON response to non-objects, such as null or undefined.res.render(view, [locals], callback): This is used to render a view and send an HTML response.
The response object also contains many more methods and properties to handle different response scenarios, which you'll learn about later in this book.
The Express core is minimal, yet the team behind it provides various predefined middleware to handle common web development features. These types of middleware vary in size and functionality and extend Express to provide a better framework support. The popular Express middleware are as follows:
morgan: This is an HTTP request logger middleware.body-parser: This is a body-parsing middleware that is used to parse the request body, and it supports various request types.method-override: This is a middleware that provides HTTP verb support such asPUTorDELETEin places where the client doesn't support it.compression: This is a compression middleware that is used to compress the response data usinggzip/deflate.express.static: This middleware used to serve static files.cookie-parser: This is a cookie-parsing middleware that populates thereq.cookiesobject.session: This is a session middleware used to support persistent sessions.
There are many more types of Express middleware that enable you to shorten your development time, and even a larger number of third-party middleware.
Note
To learn more about the Connect and Express middleware, visit the Connect module's official repository page at https://github.com/senchalabs/connect#middleware. If you'd like to browse the third-party middleware collection, visit Connect's wiki page at https://github.com/senchalabs/connect/wiki.
The Express framework is pattern agnostic, which means it doesn't support any predefined syntax or structure as do some other web frameworks. Applying the MVC pattern to your Express application means that you can create specific folders where you place your JavaScript files in a certain logical order. All those files are basically CommonJS modules that function as logical units. For instance, models will be CommonJS modules containing a definition of Mongoose models placed in the models folder, views will be HTML or other template files placed in the views folder, and controllers will be CommonJS modules with functional methods placed in the controllers folder. To illustrate this better, it's time to discuss the different types of an application structure.
We previously discussed better practices while developing a real application, where we recommended the use of the package.json file over directly installing your modules. However, this was only the beginning; once you continue developing your application, you'll soon find yourself wondering how you should arrange your project files and break them into logical units of code. JavaScript, in general, and consequently the Express framework, are agnostic about the structure of your application as you can easily place your entire application in a single JavaScript file. This is because no one expected JavaScript to be a full-stack programming language, but it doesn't mean you shouldn't dedicate special attention to organizing your project. Since the MEAN stack can be used to build all sorts of applications that vary in size and complexity, it is also possible to handle the project structure in various ways. The decision is often directly related to the estimated complexity of your application. For instance, simple projects may require a leaner folder structure, which has the advantage of being clearer and easier to manage, while complex projects will often require a more complex structure and a better breakdown of the logic since it will include many features and a bigger team working on the project. To simplify this discussion, it would be reasonable to divide it into two major approaches: a horizontal structure for smaller projects and a vertical structure for feature-rich applications. Let's begin with a simple horizontal structure.
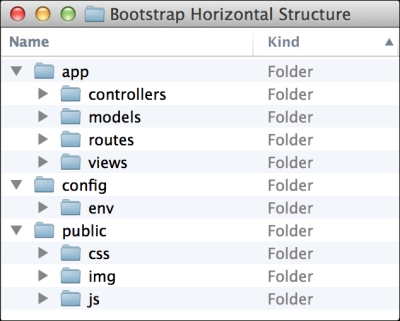
A horizontal project structure is based on the division of folders and files by their functional role rather than by the feature they implement, which means that all the application files are placed inside a main application folder that contains an MVC folder structure. This also means that there is a single controllers folder that contains all of the application controllers, a single models folder that contains all of the application models, and so on. An example of the horizontal application structure is as follows:
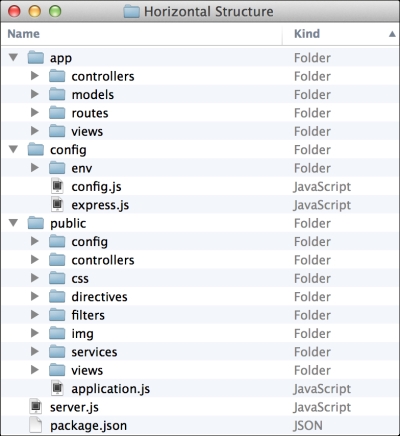
Let's review the folder structure:
- The
appfolder is where you keep your Express application logic and is divided into the following folders that represent a separation of functionality to comply with the MVC pattern: - The
configfolder is where you keep your Express application configuration files. In time you'll add more modules to your application and each module will be configured in a dedicated JavaScript file, which is placed inside this folder. Currently, it contains several files and folders, which are as follows: - The
publicfolder is where you keep your static client-side files and is divided into the following folders that represent a separation of functionality to comply with the MVC pattern:- The
configfolder is where you keep your AngularJS application configuration files - The
controllersfolder is where you keep your AngularJS application controllers - The
cssfolder is where you keep your CSS files - The
directivesfolder is where you keep your AngularJS application directives - The
filtersfolder is where you keep your AngularJS application filters - The
imgfolder is where you keep your image files - The
viewsfolder is where you keep your AngularJS application views - The
application.jsfile is where you initialize your AngularJS application
- The
- The
package.jsonfile is the metadata file that helps you to organize your application dependencies. - The
server.jsfile is the main file of your Node.js application, and it will load theexpress.jsfile as a module to bootstrap your Express application.
As you can see, the horizontal folder structure is very useful for small projects where the number of features is limited, and so files can be conveniently placed inside folders that represent their general roles. Nevertheless, to handle large projects, where you'll have many files that handle certain features, it might be too simplistic. In that case, each folder could be overloaded with too many files, and you'll get lost in the chaos. A better approach would be to use a vertical folder structure.
A vertical project structure is based on the division of folders and files by the feature they implement, which means each feature has its own autonomous folder that contains an MVC folder structure. An example of the vertical application structure is as follows:
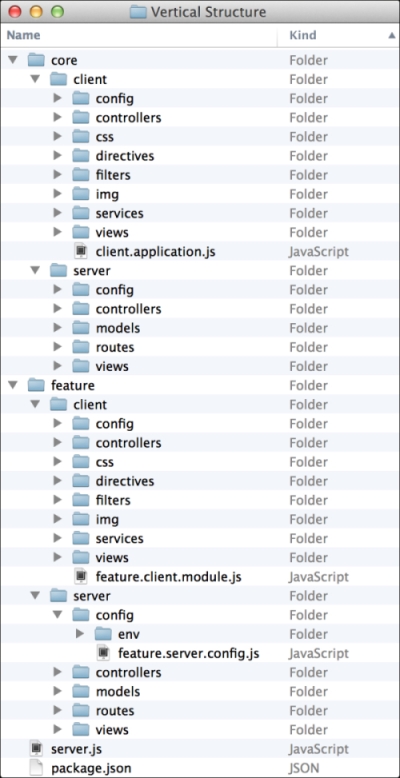
As you can see, each feature has its own application-like folder structure. In this example, we have the core feature folder that contains the main application files and the feature folder that include the feature's files. An example feature would be a user management feature that includes the authentication and authorization logic. To understand this better, let's review a single feature's folder structure:
- The
serverfolder is where you keep your feature's server logic and is divided into the following folders that represent a separation of functionality to comply with the MVC pattern:- The
controllersfolder is where you keep your feature's Express controllers - The
modelsfolder is where you keep your feature's Express models - The
routesfolder is where you keep your feature's Express routing middleware - The
viewsfolder is where you keep your feature's Express views - The
configfolder is where you keep your feature's server configuration files- The
envfolder is where you keep your feature's environment server configuration files - The
feature.server.config.jsfile is where you configure your feature
- The
- The
- The
clientfolder is where you keep your feature client-side files and is divided into the following folders that represent a separation of functionality to comply with the MVC pattern:- The
configfolder is where you keep your feature's AngularJS configuration files - The
controllersfolder is where you keep your feature's AngularJS controllers - The
cssfolder is where you keep your feature's CSS files - The
directivesfolder is where you keep your feature's AngularJS directives - The
filtersfolder is where you keep your feature's AngularJS filters - The
imgfolder is where you keep your feature's image files - The
viewsfolder is where you keep your feature's AngularJS views - The
feature1.client.module.jsfile is where you initialize your feature's AngularJS module
- The
As you can see, the vertical folder structure is very useful for large projects where the number of features is unlimited and each feature includes a substantial amount of files. It will allow large teams to work together and maintain each feature separately, and it can also be useful to share features between different applications.
Although these are two distinctive types of most application structures, the reality is that the MEAN stack can be assembled in many different ways. It's even likely for a team to structure their project in a way that combines these two approaches, so essentially it is up to the project leader to decide which structure to use. In this book, we'll use the horizontal approach for reasons of simplicity, but we'll incorporate the AngularJS part of our application in a vertical manner to demonstrate the flexibility of the MEAN stack's structure. Keep in mind that everything presented in this book can be easily restructured to accommodate your project's specifications.
While developing your application, you'll soon notice that you end up with many files with the same name. The reason is that MEAN applications often have a parallel MVC structure for both the Express and AngularJS components. To understand this issue, take a look at a common vertical feature's folder structure:
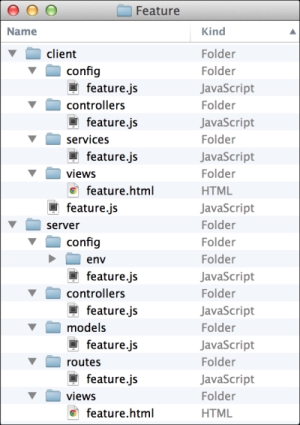
As you can see, enforcing the folder structure helps you understand each file's functionality, but it will also cause several files to have the same name. This is because an application's feature is usually implemented using several JavaScript files, each having a different role. This issue can cause some confusion for the development team, so to solve this, you'll need to use some sort of a naming convention.
The simplest solution would be to add each file's functional role to the file name, so a feature controller file will be named feature.controller.js, a feature model file will be named feature.model.js, and so on. However, things get even more complicated when you consider the fact that MEAN applications use JavaScript MVC files for both the Express and AngularJS applications. This means that you'll often have two files with the same name; for instance, a feature.controller.js file might be an Express controller or an AngularJS controller. To solve this issue, it is also recommended that you extend files names with their execution destination. A simple approach would be to name our Express controller feature.server.controller.js and our AngularJS controller feature.client.controller.js. This might seem like overkill at first, but you'll soon discover that it's quite helpful to quickly identify the role and execution destination of your application files.
To begin structuring your first MEAN project, create a new project folder with the following folders inside it:
Once you created all the preceding folders, go back to the application's root folder, and create a package.json file that contains the following code snippet:
{
  "name" : "MEAN",
  "version" : "0.0.3",
  "dependencies" : {
    "express" : "~4.8.8"
  }
}
Now, in the app/controllers folder, create a file named index.server.controller.js with the following lines of code:
exports.render = function(req, res) {
  res.send('Hello World');
};
Congratulations! You just created your first Express controller. This code is probably looking very familiar; that's because it's a copy of the middleware you created in the previous examples. What you do here is using the CommonJS module pattern to define a function named render(). Later on, you'll be able to require this module and use this function. Once you've created a controller, you'll need to use Express routing functionality to utilize the controller.
Express supports the routing of requests using either the app.route(path).VERB(callback) method or the app.VERB(path, callback) method, where VERB should be replaced with a lowercase HTTP verb. Take a look at the following example:
app.get('/', function(req, res) {
  res.send('This is a GET request');
});
This tells Express to execute the middleware function for any HTTP request using the GET verb and directed to the root path. If you'd like to deal with POST requests, your code should be as follows:
app.post('/', function(req, res) {
  res.send('This is a POST request');
});
However, Express also enables you to define a single route and then chain several middleware to handle different HTTP requests. This means the preceding code example could also be written as follows:
app.route('/').get(function(req, res) {
  res.send('This is a GET request');
}).post(function(req, res) {
  res.send('This is a POST request');
});
Another cool feature of Express is the ability to chain several middleware in a single routing definition. This means middleware functions will be called in order, passing them to the next middleware so you could determine how to proceed with middleware execution. This is usually used to validate requests before executing the response logic. To understand this better, take a look at the following code:
var express = require('express');

var hasName = function(req, res, next) {
  if (req.param('name')) {
    next();
  } else {
    res.send('What is your name?');
  }
};

var sayHello = function(req, res, next) {
  res.send('Hello ' + req.param('name'));
};

var app = express();
app.get('/', hasName, sayHello);

app.listen(3000);
console.log('Server running at http://localhost:3000/');
In the preceding code, there are two middleware functions named hasName() and sayHello(). The hasName() middleware is looking for the name parameter; if it finds a defined name parameter, it will call the next middleware function using the next argument. Otherwise, the hasName() middleware will handle the response by itself. In this case, the next middleware function would be the sayHello() middleware function. This is possible because we've added the middleware function in a row using the app.get() method. It is also worth noticing the order of the middleware functions because it determines which middleware function is executed first.
This example demonstrates well how routing middleware can be used to perform different validations when determining what the response should be. You can of course leverage this functionality to perform other tasks, such as validating user authentication and resources' authorization. For now though, let's just continue with our example.
The next file you're going to create is your first routing file. In the app/routes folder, create a file named index.server.routes.js with the following code snippet:
module.exports = function(app) {
    var index = require('../controllers/index.server.controller');
    app.get('/', index.render);
};
Here you did a few things: first, you used the CommonJS module pattern again. As you may recall the CommonJS module pattern supports both the exporting of several functions like you did with your controller and the use of a single module function like you did here. Next, you required your index controller and used its render() method as a middleware to GET requests made to the root path.
All that you have left to do is to create the Express application object and bootstrap it using the controller and routing modules you just created. To do so, go to the config folder and create a file named express.js with the following code snippet:
var express = require('express');

module.exports = function() {
  var app = express();
  require('../app/routes/index.server.routes.js')(app);
  return app;
};
In the preceding code snippet, you required the Express module then used the CommonJS module pattern to define a module function that initializes the Express application. First, it creates a new instance of an Express application, and then it requires your routing file and calls it as a function passing it the application instance as an argument. The routing file will use the application instance to create a new routing configuration and will call the controller's render() method. The module function ends by returning the application instance.
To finalize your application, you'll need to create a file named server.js in the root folder and copy the following code:
var express = require('./config/express');

var app = express();
app.listen(3000);
module.exports = app;

console.log('Server running at http://localhost:3000/');
This is it! In the main application file, you connected all the loose ends by requiring the Express configuration module and then using it to retrieve your application object instance, and listen to the 3000 port.
To start your application, navigate to your application's root folder using your command-line tool, and install your application dependencies using npm, as follows:
$ npm install
Once the installation process is over, all you have to do is start your application using Node's command-line tool:
$ node server
Your Express application should now run! To test it, navigate to http://localhost:3000.
In this example, you learned how to properly build your Express application. It is important that you notice the different ways you used the CommonJS module pattern to create your files and require them across the application. This pattern will often repeat itself in this book.
Express comes with a pretty simple configuration system, which enables you to add certain functionality to your Express application. Although there are predefined configuration options that you can change to manipulate the way it works, you can also add your own key/value configuration options for any other usage. Another robust feature of Express is the ability to configure your application based on the environment it's running on. For instance, you may want to use the Express logger in your development environment and not in production, while compressing your responses body might seem like a good idea when running in a production environment.
To achieve this, you will need to use the process.env property. The process.env is a global variable that allows you to access predefined environment variables, and the most common one is the NODE_ENV environment variable. The NODE_ENV environment variable is often used for environment-specific configurations. To understand this better, let's go back to the previous example and add some external middleware. To use these middleware, you will first need to download and install them as your project dependencies.
To do so, edit your package.json file to look like the following code snippet:
{
  "name": "MEAN",
  "version": "0.0.3",
  "dependencies": {
    "express": "~4.8.8",
    "morgan": "~1.3.0",
    "compression": "~1.0.11",
    "body-parser": "~1.8.0",
    "method-override": "~2.2.0"
  }
}
As we previously stated, the morgan module provides a simple logger middleware, the compression module provides response compression, the body-parser module provides several middleware to handle request data, and the method-override module provides DELETE and PUT HTTP verbs legacy support. To use these modules, you will need to modify your config/express.js file to look like the following code snippet:
var	 express = require('express'),
  morgan = require('morgan'),
  compress = require('compression'),
  bodyParser = require('body-parser'),
  methodOverride = require('method-override');

module.exports = function() {
  var app = express();

  if (process.env.NODE_ENV === 'development') {
    app.use(morgan('dev'));
  } else if (process.env.NODE_ENV === 'production') {
    app.use(compress());
  }

  app.use(bodyParser.urlencoded({
    extended: true
  }));
  app.use(bodyParser.json());
  app.use(methodOverride());

  require('../app/routes/index.server.routes.js')(app);

  return app;
};
As you can see, we just used the process.env.NODE_ENV variable to determine our environment and configure the Express application accordingly. We simply used the app.use() method to load the morgan() middleware in a development environment and the compress() middleware in a production environment. The bodyParser.urlencoded(), bodyParser.json(), and methodOverride() middleware will always load, regardless of the environment.
To finalize your configuration, you'll need to change your server.js file to look like the following code snippet:
process.env.NODE_ENV = process.env.NODE_ENV || 'development';

var express = require('./config/express');

var app = express();
app.listen(3000);
module.exports = app;

console.log('Server running at http://localhost:3000/');
Notice how the process.env.NODE_ENV variable is set to the default 'development' value if it doesn't exist. This is because, often, the NODE_ENV environment variable is not properly set.
Note
It is recommended that you set the NODE_ENV environment variable in your operating system prior to running your application.
In a Windows environment, this can be done by executing the following command in your command prompt:
> set NODE_ENV=development
While in a Unix-based environment, you should simply use the following export command:
$ export NODE_ENV=development
To test your changes, navigate to your application's root folder using your command-line tool and install your application dependencies using npm, as follows:
$ npm install
Once the installation process is over, all you have to do is start your application using Node's command-line tool:
$ node server
Your Express application should now run! To test it, navigate to http://localhost:3000, and you'll be able to see the logger in action in your command-line output. However, the process.env.NODE_ENV environment variable can be used even more sophisticatedly when dealing with more complex configuration options.
During your application development, you will often need to configure third-party modules to run differently in various environments. For instance, when you connect to your MongoDB server, you'll probably use different connection strings in your development and production environments. Doing so in the current setting will probably cause your code to be filled with endless if statements, which will generally be harder to maintain. To solve this issue, you can manage a set of environment configuration files that holds these properties. You will then be able to use the process.env.NODE_ENV environment variable to determine which configuration file to load, thus keeping your code shorter and easier to maintain. Let's begin by creating a configuration file for our default development environment. To do so, create a new file inside your config/env folder and call it development.js. Inside your new file, paste the following lines of code:
module.exports = {
  // Development configuration options
};
As you can see, your configuration file is currently just an empty CommonJS module initialization; don't worry about it, we'll soon add the first configuration option, but first, we'll need to manage the configuration files loading. To do so, go to your application config folder and create a new file named config.js. Inside your new file, paste the following lines of code:
module.exports = require('./env/' + process.env.NODE_ENV + '.js');As you can see, this file simply loads the correct configuration file according to the process.env.NODE_ENV environment variable. In the upcoming Lessons, we'll use this file, which will load the correct environment configuration file for us. To manage other environment configurations, you'll just need to add a dedicated environment configuration file and properly set the NODE_ENV environment variable.
A very common feature of web frameworks is the ability to render views. The basic concept is passing your data to a template engine that will render the final view usually in HTML. In the MVC pattern, your controller uses the model to retrieve the data portion and the view template to render the HTML output as described in the next diagram. The Express extendable approach allows the usage of many Node.js template engines to achieve this functionality. In this section, we'll use the EJS template engine, but you can later replace it with other template engines. The following diagram shows the MVC pattern in rendering application views:
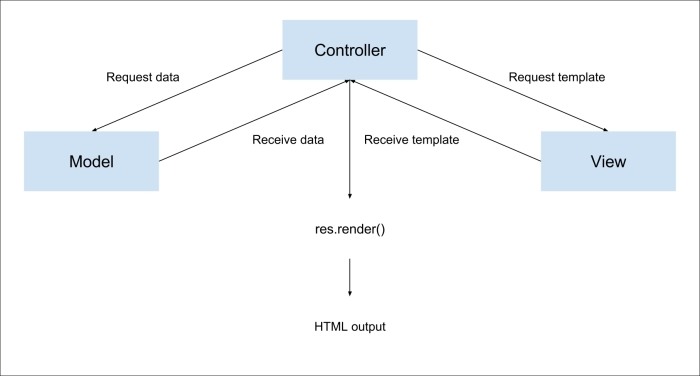
Express has two methods for rendering views: app.render(), which is used to render the view and then pass the HTML to a callback function, and the more common res.render(), which renders the view locally and sends the HTML as a response. You'll use res.render() more frequently because you usually want to output the HTML as a response. However, if, for an instance, you'd like your application to send HTML e-mails, you will probably use app.render(). Before we begin exploring the res.render() method, let's first configure our view system.
In order to configure the Express view system, you will need to use the EJS template engine. Let's get back to our example and install the EJS module. You should begin by changing your package.json file to look like the following code snippet:
{
  "name": "MEAN",
  "version": "0.0.3",
  "dependencies": {
    "express": "~4.8.8",
    "morgan": "~1.3.0",
    "compression": "~1.0.11",
    "body-parser": "~1.8.0",
    "method-override": "~2.2.0",
    "ejs": "~1.0.0"
  }
}
Now install the EJS module by navigating in the command line to your project's root folder and issue the following command:
$ npm update
After NPM finishes installing the EJS module, you'll be able to configure Express to use it as the default template engine. To configure your Express application, go back to the config/express.js file and change it to look like the following lines of code:
var express = require('express'),
  morgan = require('morgan'),
  compress = require('compression'),
  bodyParser = require('body-parser'),
  methodOverride = require('method-override');

module.exports = function() {
  var app = express();
  if (process.env.NODE_ENV === 'development') {
    app.use(morgan('dev'));
  } else if (process.env.NODE_ENV === 'production') {
    app.use(compress());
  }

  app.use(bodyParser.urlencoded({
    extended: true
  }));
  app.use(bodyParser.json());
  app.use(methodOverride());

  app.set('views', './app/views');
  app.set('view engine', 'ejs');

  require('../app/routes/index.server.routes.js')(app);

  return app;
};
Notice how we use the app.set() method to configure the Express application views folder and template engine. Let's create your first view.
EJS views basically consist of HTML code mixed with EJS tags. EJS templates will reside in the app/views folder and will have the .ejs extension. When you'll use the res.render() method, the EJS engine will look for the template in the views folder, and if it finds a complying template, it will render the HTML output. To create your first EJS view, go to your app/views folder, and create a new file named index.ejs that contains the following HTML code snippet:
<!DOCTYPE html>
<html>
  <head>
    <title><%= title %></title>
  </head>
  <body>
    <h1><%= title %></h1>
  </body>
</html>
This code should be mostly familiar to you except for the <%= %> tag. These tags are the way to tell the EJS template engine where to render the template variables—in this case, the title variable. All you have left to do is configure your controller to render this template and automatically output it as an HTML response. To do so, go back to your app/controllers/index.server.controller.js file, and change it to look like the following code snippet:
exports.render = function(req, res) {
  res.render('index', {
    title: 'Hello World'
  })
};
Notice the way the res.render() method is used. The first argument is the name of your EJS template without the .ejs extension, and the second argument is an object containing your template variables. The res.render() method will use the EJS template engine to look for the file in the views folder that we set in the config/express.js file and will then render the view using the template variables. To test your changes, use your command-line tool and issue the following command:
$ node server
Well done, you have just created your first EJS view! Test your application by visiting http://localhost:3000 where you'll be able to see the rendered HTML.
EJS views are simple to maintain and provides an easy way to create your application views. We'll elaborate a bit more on EJS templates later in this book; however, not as much as you would expect because in MEAN applications, most of the HTML rendering is done in the client side using AngularJS.
In any web application, there is always a need to serve static files. Fortunately, Express comes prebundled with the express.static() middleware, which provides this feature. To add static file support to the previous example, just make the following changes in your config/express.js file:
var express = require('express'),
  morgan = require('morgan'),
  compress = require('compression'),
  bodyParser = require('body-parser'),
  methodOverride = require('method-override');
module.exports = function() {
  var app = express();

  if (process.env.NODE_ENV === 'development') {
    app.use(morgan('dev'));
  } else if (process.env.NODE_ENV === 'production') {
    app.use(compress());
  }

  app.use(bodyParser.urlencoded({
    extended: true
  }));
  app.use(bodyParser.json());
  app.use(methodOverride());

  app.set('views', './app/views');
  app.set('view engine', 'ejs');

  require('../app/routes/index.server.routes.js')(app);

  app.use(express.static('./public'));

  return app;
};
The express.static() middleware takes one argument to determine the location of the static folder. Notice how the express.static() middleware is placed below the call for the routing file. This order matters because if it were above it, Express would first try to look for HTTP request paths in the static files folder. This would make the response a lot slower as it would have to wait for a filesystem I/O operation.
To test your static middleware, add an image named logo.png to the public/img folder and then make the following changes in your app/views/index.ejs file:
<!DOCTYPE html>
<html>
  <head>
    <title><%= title %></title>
  </head>
  <body>
    <img src="img/logo.png" alt="Logo">
    <h1><%= title %></h1>
  </body>
</html>
Now run your application using node's command-line tool:
$ node server
To test the result, visit http://localhost:3000 in your browser and watch how Express is serving your image as a static file.
Sessions are a common web application pattern that allows you to keep track of the user's behavior when they visit your application. To add this functionality, you will need to install and configure the express-session middleware. To do so, start by modifying your package.json file like this:
{
  "name": "MEAN",
  "version": "0.0.3",
  "dependencies": {
    "express": "~4.8.8",
    "morgan": "~1.3.0",
    "compression": "~1.0.11",
    "body-parser": "~1.8.0",
    "method-override": "~2.2.0",
    "express-session": "~1.7.6",
    "ejs": "~1.0.0"
  }
}
Then, install the express-session module by navigating to your project's root folder in the command line and issuing the following command:
$ npm update
Once the installation process is finished, you'll be able to configure your Express application to use the express-session module. The express-session module will use a cookie-stored, signed identifier to identify the current user. To sign the session identifier, it will use a secret string, which will help prevent malicious session tampering. For security reasons, it is recommended that the cookie secret be different for each environment, which means this would be an appropriate place to use our environment configuration file. To do so, change the config/env/development.js file to look like the following code snippet:
module.exports = {
  sessionSecret: 'developmentSessionSecret'
};
Since it is just an example, feel free to change the secret string. For other environments, just add the sessionSecret property in their environment configuration files. To use the configuration file and configure your Express application, go back to your config/express.js file and change it to look like the following code snippet:
var config = require('./config'),
  express = require('express'),
  morgan = require('morgan'),
  compress = require('compression'),
  bodyParser = require('body-parser'),
  methodOverride = require('method-override'),
  session = require('express-session');

module.exports = function() {
  var app = express();

  if (process.env.NODE_ENV === 'development') {
    app.use(morgan('dev'));
  } else if (process.env.NODE_ENV === 'production') {
    app.use(compress());
  }

  app.use(bodyParser.urlencoded({
    extended: true
  }));
  app.use(bodyParser.json());
  app.use(methodOverride());

  app.use(session({
    saveUninitialized: true,
    resave: true,
    secret: config.sessionSecret
  }));

  app.set('views', './app/views');
  app.set('view engine', 'ejs');

  require('../app/routes/index.server.routes.js')(app);

  app.use(express.static('./public'));

  return app;
};
Notice how the configuration object is passed to the express.session() middleware. In this configuration object, the secret property is defined using the configuration file you previously modified. The session middleware adds a session object to all request objects in your application. Using this session object, you can set or get any property that you wish to use in the current session. To test the session, change the app/controller/index.server.controller.js file as follows:
exports.render = function(req, res) {
  if (req.session.lastVisit) {
    console.log(req.session.lastVisit);
  }

  req.session.lastVisit = new Date();

  res.render('index', {
    title: 'Hello World'
  });
};
What you did here is basically record the time of the last user request. The controller checks whether the lastVisit property was set in the session object, and if so, outputs the last visit date to the console. It then sets the lastVisit property to the current time. To test your changes, use node's command-line tool to run your application, as follows:
$ node server
Now test your application by visiting http://localhost:3000 in your browser and watching the command-line output.