If the previous Lesson was about building our first useful app in AngularJS, then this Lesson is about adding a whole lot of AngularJS goodness to it. The 7 Minute Workout app still has some rough edges/limitations that we can fix and make the overall app experience better. This Lesson is all about adding those enhancements and features. As always, this app building process should provide us with enough opportunities to foster our understanding of the framework and learn new things about it.
The topics we will cover in this Lesson include:
- Exercise steps formatting: We try to fix data of exercise procedure steps by formatting the step text as HTML.
- Audio support: We add audio support to the workout. Audio clues are used to track the progress of the current exercise. This helps the user to use the app without constantly staring at the display screen.
- Pause/resume exercises: Pause/resume is another important feature that the app lacks. We add workout pausing and resuming capabilities to the app. In the process, we learn about the keyboard and mouse events supported by Angular. We also cover one of the most useful directives in Angular that is
ng-class. - Enhancing the Workout Video panel: We redo the apps video panel for a better user experience. We learn about a popular AngularJS library
ui.bootstrapand use its modal dialog directive for viewing videos in the popup. - AngularJS animation: Angular has a set of directives that make adding animation easy. We explore how modern browsers do animation using CSS transitions and keyframe animation constructs. We enable CSS-based animation on some of our app directives. Finally, we also touch upon JavaScript-based animation.
- Workout history tracking: One of the building blocks of AngularJS, Services, is covered in more detail in this Lesson. We implement a history tracking service that tracks workout history for the last 20 workouts. We cover all recipes of service creation from value, constant, to service, factory, and provider. We also add a history view. We discover a bit more about the
ng-repeatdirective and two super useful filters:filterandorderBy.
Note
In case you have not read Lesson 1, Building Our First App – 7 Minute Workout, I would recommend you check out the Summary section at the end of the last Lesson to understand what has been accomplished.
Note
We are starting from where we left off in Lesson 1, Building Our First App – 7 Minute Workout. The checkpoint7 code can serve as the base for this Lesson. Copy the code from Lesson01checkpoint7 before we start to work on app updates.
One of the sore points in the current app is the formatting of the exercise steps. It is plain difficult to read these steps.
The steps should either have a line break (<br/>), or formatted as an HTML list for easy readability. This seems to be a straightforward task and we can just go ahead and change the data that is bounded to the currentExercise.details.procedure interpolation or write a filter than can add some HTML formatting using the line delimiting convention (.).
For quick verification, let's update the first exercise steps in workout.js by adding break (<br/>) after each line:
procedure: "Assume an erect position, with feet …
   <br/>Slightly bend your knees, and propel yourself …
   <br/>While in air, bring your legs out to the side about …
Now refresh the workout page. The output does not match our expectation
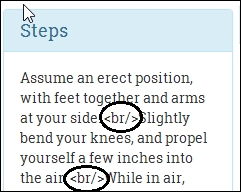
The break tags were literally rendered in the browser. Angular did not render the interpolation as HTML; instead it escaped the HTML characters.
The reason behind this behavior is strict contextual escaping (SCE) again! Do you remember the YouTube video rendering issues? In the last Lesson, we had to configure the behavior of SCE using $sceDelegateProvider so that the YouTube videos are rendered in the workout page.
Well, as it turns out in Angular, SCE does not allow us to render arbitrary HTML content using interpolation. This is done to save us from all sort of attacks that are possible with arbitrary HTML injection in a page such as cross-site scripting (XSS) and clickjacking. AngularJS is configured to be secure by default.
If we cannot use interpolation to bind HTML model data, there must a directive that we can use. The ng-bind-html directive is what we are looking for.
As the name suggests, the ng-bind-html directive is used to bind model data as HTML. If data contains HTML fragments, the AngularJS templating engine will honor them and render the content as HTML.
Behind the scenes, ng-bind-html uses the $sanitize service to sanitize the HTML content. The $sanitize service parses the HTML tokens and only allows whitelisted tokens to be rendered and removes the others. This includes removal of embedded script content such as onclick="this.doSomethingEvil()" from the rendered HTML.
We can override this behavior if we trust the HTML source and want to add the HTML as it is to the document element. We do this by calling the $sce.trustAsHtml function in the controller and assigning the return value to a scope variable:
$scope.trustedHtml=$sce.trustAsHtml('<div onclick="this.doSomethingGood() />');And then bind it using ng-bind-html:
<div ng-bind-html="trustedHtml"></div>A working example of this process is available in the AngularJS documentation for the $sanitize service (https://docs.angularjs.org/api/ngSanitize/service/$sanitize). I have also forked the example Plunker (http://plnkr.co/edit/IRNK3peirZaK6FqCynGo?p=preview) so that we can play with it and get a better understanding of how input sanitization works.
Some of the key takeaways from the previous discussion are as follows:
- When it comes to rendering random HTML, AngularJS is secure by default. It escapes HTML content by default.
- If we want to include model content as HTML, we need to use the
ng-bind-htmldirective. The directive too is restrictive in terms of how the HTML content is rendered and what is considered safe HTML. - If we trust the source of the HTML content completely, we can use the
$sceservice to establish explicit trust using thetrustAsHtmlfunction.
Let's return to our app implementation, as we have realized we need to use ng-bind-html to render our exercise steps.
Here is how we are going to enable exercise step formatting:
- Open the
description-panel.htmlfile and change the lastdivelement with thepanel-bodyclass from:<div class="panel-body"> {{currentExercise.details.procedure}} </div>To
<div class="panel-body" ng-bind-html="currentExercise.details.procedure">
</div>
Since
ng-bind-htmluses the$sanitizeservice that is not part of the core Angular module but is part of thengSanitizemodule, we need to include the new module dependency.The process is similar to what we did when we included the
ngRoutedependency in Lesson 1, Building Our First App – 7 Minute Workout. - Open
index.htmland add reference to the script fileangular-sanitize.jsafterangular-route.js, as follows:<script src="http://ajax.googleapis.com/ajax/libs/angularjs/1.3.3/angular-sanitize.js"></script>
- Update the module dependency in
app.jsas follows:angular.module('app', ['ngRoute', 'ngSanitize', '7minWorkout']).
That's it. Since we are not using the $sanitize service directly, we do not need to update our controller.
Refresh the page and the steps will have line breaks:

In the preceding implementation, we added HTML line breaks (<br>) to the model content (Exercise.procedure) itself. Another approach could be to keep the content intact and instead use a filter to format the content. We can create a filter that converts a bunch of sentences delimited by a dot (.) or a newline (
) into HTML content with either a line break or list.
I leave it up to you to try the filter-based approach. The filter usage should look something like this:
<div class="panel-body" ng-bind-html="currentExercise.details.procedure | myLineBreakFilter">
That pretty much covers how to bind HTML content from a model in AngularJS. It's time now to add an essential and handy feature to our app, audio support.
For our 7 Minute Workout app, adding sound support is vital. One cannot exercise while constantly staring at the screen. Audio clues will help the user to perform the workout effectively as he/she can just follow the audio instructions.
Here is how we are going to support exercise tracking using audio clues:
- A ticking clock sound tracks the progress during the exercise
- A half-way indicator sounds, indicating that the exercise is halfway through
- An exercise-completion audio clip plays when the exercise is about to end
- An audio clip plays during the rest phase and informs users about the next exercise
Modern browsers have good support for audio. The <audio> tag of HTML5 provides a mechanism to embed audio into our HTML content. We will use it to embed and play our audio clips during different times in the app.
AngularJS does not have any inherent support to play/manage audio content. We may be tempted to think that we can just go ahead and directly access the HTML audio element in our controller and implement the desired behavior. Yes, we can do that. In fact, this would have been a perfectly acceptable solution if we had been using plain JavaScript or jQuery. However, remember there is a sacrosanct rule in Angular: "Thou shalt not manipulate DOM in the AngularJS controller" and we should never break it. So let's back off and think about what else can be done.
Since the base framework does not have a directive to support audio, the options we are left with are: writing our own directive or using a third-party directive that wraps HTML5 audio. We will take the easier route and use a third-party directive angular-media-player (https://github.com/mrgamer/angular-media-player). Another reason we do not plan to create our own directive is that the topic of directive creation is a non-trivial pursuit and will require us to get into the intricacies of how directives work. We will cover more about directives in the Lesson that we have dedicated exclusively for them.
Note
The popularity of AngularJS has benefitted everyone using it. No framework can cater to the ever-evolving needs of the developer community. This void is filled by the numerous directives, services, and filters created by the community and open-sourced for everyone to use. We use one such directive angular-media-player. It is always advisable to look for such readymade components first before implementing our own.
Additionally, we should pledge to give back to the community by making public any reusable components that we create in Angular.
Let's get started with the implementation.
We have already detailed when a specific audio clip is played in the last section. If we look at the current implementation for the controller, the currentExercise and currentExerciseDuration controller properties and the startWorkout and startExercise functions are the elements of interest to us.
Note
The workout exercises created inside createWorkout at the moment do not reference the exercise name pronunciation audio clips (nameSound). Update the createWorkout function with the updated version of code from Lesson02checkpoint2js7MinWorkoutworkout.js before proceeding.
After the update, each exercise would have a property as follows:
nameSound: "content/jumpingjacks.wav"
We can use the startWorkout method to start the overall time ticker sound. Then, we can alter the startExercise method and fix the $interval call that increments currentExerciseDuration to include logic to play audio when we reach half way.
Not very elegant! We will have to alter the core workout logic just to add support for audio. There is a better way. Why don't we create a separate controller for audio and workout synchronization? The new controller will be responsible for tracking exercise progress and will play the appropriate audio clip during the exercise. Things will be clearer once we start the implementation.
To start with, download and reference the angular-media-player directive. The steps involved are:
- Download
angular-media-player.jsfrom https://github.com/mrgamer/angular-media-player/tree/master/dist. - Create a folder vendor inside the
jsfolder and copy the previous file. - Add a reference to the preceding script file in
index.htmlafter the framework script declarations:<script src="js/vendor/angular-media-player.js"></script>
- Lastly, inject the
mediaPlayermodule with the existing module dependencies inapp.js:angular.module('app', [..., '7minWorkout', 'mediaPlayer']).
Open workout.html and add this HTML fragment inside exercise div (id="exercise-pane") at the very top:
<span ng-controller="WorkoutAudioController">
  <audio media-player="ticksAudio" loop autoplay src="content/tick10s.mp3"></audio>
  <audio media-player="nextUpAudio" src="content/nextup.mp3"></audio>
  <audio media-player="nextUpExerciseAudio" playlist="exercisesAudio"></audio>
  <audio media-player="halfWayAudio" src="content/15seconds.wav"></audio>
  <audio media-player="aboutToCompleteAudio" src="content/321.wav"></audio>
</span>
In the preceding HTML, there is one audio element for each of the scenarios we need to support:
ticksAudio: This is used for the ticking clock soundnextUpAudio: This is used for the next audio soundnextUpExerciseAudio: This is the exercise name audiohalfWayAudio: This gets played half-way through the exerciseaboutToCompleteAudio: This gets played when the exercise is about to end
The media-player directive is added to each audio tag. This directive then adds a property with the same name as the one assigned to the media-player attribute on the current scope. So the media-player = "aboutToCompleteAudio" declaration adds a scope property aboutToCompleteAudio.
We use these properties to manage the audio player in WorkoutAudioController.
Other than the audio directives, there is also an ng-controller declaration for WorkoutAudioController on the span container.
With the view in place, we need to implement the controller.
There is something different that we have done in the previous view. We have an ng-controller declaration for WorkoutAudioController inside the existing parent controller context WorkoutController.
Note
WorkoutController gets instantiated as part of route resolution as we saw in Lesson 1, Building Our First App – 7 Minute Workout, where we defined a route, as follows:
$routeProvider.when('/workout', { templateUrl: 'partials/workout.html', controller: 'WorkoutController' });
Since WorkoutController is linked to ng-view, we have effectively nested WorkoutAudioController inside WorkoutController.
This effectively creates a child MVC component within the parent MVC component. Also, since the ng-controller directive creates a new scope, the child MVC component has its own scope to play with. The following screenshot highlights this hierarchy:
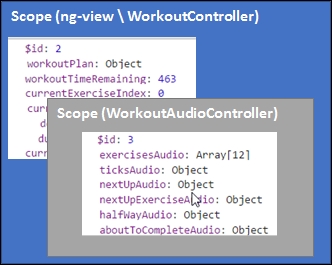
This new scope inherits (prototypal inheritance) from the parent scope, and has access to the model state defined on parent $scope. Such segregation of functionality helps in better organization of code and makes implementation simple. As views and controllers start to become complex, there are always opportunities to split a large view into smaller manageable subviews that can have their own model and controller as we are doing with our workout audio view and controller.
We could have moved the view template (the span container) for audio into a separate file and included it in the workout.html file using ng-include (as done for description-panel.html), hence achieving a true separation of components. However, for now we are just decorating the span with the ng-controller attribute.
Let's add the WorkoutAudioController function to the workout.js file itself. Open workout.js and start with adding the WorkoutAudioController declaration and some customary code after the WorkoutController implementation:
angular.module('7minWorkout')
  .controller('WorkoutAudioController', ['$scope', '$timeout', function ($scope, $timeout)    {
   $scope.exercisesAudio = [];
   var init = function () {
   }
   init();
}]);
The standard controller declaration has a skeleton init method and the exercisesAudio property, which will store all audio clips for each exercise defined in Exercise.nameSound.
When should this array be filled? Well, when the workout (workoutPlan) data is loaded. When does that happen? WorkoutAudioController does not know when it happens, but it can use the AngularJS watch infrastructure to find out. Since the WorkoutAudioController scope has access to the workoutPlan property defined on the parent controller scope, it can watch the property for changes. This is what we are going to do. Add this code after the declaration of the exercisesAudio array in WorkoutAudioController:
var workoutPlanwatch = $scope.$watch('workoutPlan', function (newValue, oldValue) {
    if (newValue) {  // newValue==workoutPlan
        angular.forEach( $scope.workoutPlan.exercises,
        function (exercise) {
            $scope.exercisesAudio.push({
                src: exercise.details.nameSound,
                type: "audio/wav"
            });
        });
        workoutPlanwatch(); //unbind the watch.
    }
});
This watch loads all the exercise name audio clips into the exercisesAudio array once workoutPlan is loaded.
One interesting statement here is:
workoutPlanwatch();
As the comment suggests, it is a mechanism to remove the watch from an already watched scope property. We do it by storing the return value of the $scope.$watch function call, which is a function reference. We then can call this function whenever we want to remove the watch, which is the case after the first loading of workoutPlan data. Remember the workout data is not going to change during the workout.
Similarly, to track the progress of the exercise, we need to watch for the currentExercise and currentExerciseDuration properties. Add these two watches following the previous watch:
$scope.$watch('currentExercise', function (newValue, oldValue) {
  if (newValue && newValue !== oldValue) {
    if ($scope.currentExercise.details.name == 'rest') {
      $timeout(function () { $scope.nextUpAudio.play();}
, 2000);
      $timeout(function () { $scope.nextUpExerciseAudio.play($scope.currentExerciseIndex + 1, true);}
, 3000);
}
    }
});

$scope.$watch('currentExerciseDuration', function (newValue, oldValue) {
if (newValue) {
if (newValue == Math.floor($scope.currentExercise.duration / 2) && $scope.currentExercise.details.name !== 'rest') {
         $scope.halfWayAudio.play();
        }
   else if (newValue == $scope.currentExercise.duration - 3) {
            $scope.aboutToCompleteAudio.play();
        }
    }
});
The first watch on currentExercise is used to play the audio of the next exercise in line during the rest periods. Since the audio for the next exercise is a combination of two audio clips, one that echoes next-up and another that echoes the exercise name (from the array that we have built previously using the workoutPlan watch), we play them one after another. This is how the audio declaration for the the next-up audio looks:
<audio media-player="nextUpAudio" src="content/nextup.mp3"></audio>
<audio media-player="nextUpExerciseAudio" playlist="exercisesAudio"></audio>
The first one is like other audio elements that take the audio using the src attribute. However, the nextUpExerciseAudio value takes playlist, which is an array of audio sources. During every rest period, we play the audio from one of the array elements by calling:
$scope.nextUpExerciseAudio.play($scope.currentExerciseIndex + 1, true);}
To play the audio content in succession, we use $timeout to control the audio playback order. One plays after 2 seconds and the next after 3 seconds.
The second watch on currentExerciseDuration gets invoked every second and plays specific audio elements at mid-time and before the exercise ends.
Now is the time to verify the implementation, but before we do that we need to include the audio clips that we have referenced in the code. The audio files are located in the audio folder of the app inside Lesson02/checkpoint2/app/content.
Copy the audio clips and refresh the workout page. Now we have full-fledged audio support in 7 Minute Workout. Wait a minute, there is a small issue! The next up exercise audio is off by one. To verify this, wait for the first exercise to complete and the rest period to start. The next up exercise audio does not match with the exercise that is coming up next, it is one step ahead. Let's fix it.
To fix the audio synchronization issue, let's first debug and identify what is causing the problem.
Put a breakpoint inside workoutPlan watch (inside the if condition) and start the workout. Wait for the breakpoint to hit. When it hits, check the value of workoutPlan.exercises:

The first time this watch is triggered (newValue is not null), the workoutPlan.exercises array has 11 elements as seen in the previous screenshot. Nonetheless, we added 12 exercises when we loaded the plan for the first time in startWorkout. This is causing the synchronization issue between the next-up audio and the exercise order. However, why do we have one element fewer?
The first line inside the startWorkout function does the necessary assignment to workoutPlan:
$scope.workoutPlan = createWorkout();
If our understanding of watches is correct, then the watch should get triggered as soon as we assign $scope.workoutPlan a value—in other words, whenever $scope.workoutPlan changes.
This is not the case, and it can be confirmed by debugging the startWorkout function. The watch does not trigger while we are inside startWorkout and well beyond that. The last line of startWorkout is:
startExercise($scope.workoutPlan.exercises.shift());
By removing an item from the exercises array, we are one item short when the watch actually triggers.
As it turns out, change detection/tracking does not work in real-time. Clearly, our understanding of watches is not 100 percent correct!
To fix this innocuous looking problem, we will have to dig deeper into the inner working of Angular and then fix parts of our workout implementation.
Note
The next section (AngularJS dirty checking and digest cycles) explores the internal workings of the Angular framework that can become a bit overwhelming if we have just started learning this framework. Feel free to skip this section and revisit it in the future. We will summarize our understanding of Angular dirty checking and digest cycle execution at the end of the section, before we actually fix the audio synchronization issue.
Let's step back and try to understand how the AngularJS watch infrastructure works. How is it able to update HTML DOM on model data changes? Remember HTML directives and interpolations too use the same watch infrastructure.
The properties that we watch in Angular are standard JavaScript objects/values and since JavaScript properties (at least till now) are not observable, there is no way for Angular to know when the model data changed.
This raises the fundamental question: how does AngularJS detect these changes?
Well, AngularJS detects changes only when the $scope.$apply(exp) function is invoked. This function can take an argument exp that it evaluates in the current scope context. Internally, $apply evaluates exp and then calls the $rootScope.$digest() function.
The call to $digest() triggers the model change detection process. The immediate question that comes to mind is: "when is $apply called and who calls it?" Before we can answer this question, it would be good to know what happens in the digest cycle.
The invoking of the $digest() function on $rootScope in the Angular world is called the digest cycle. It is termed as cycle because it is a repeating process. What happens during the digest loop is that Angular internally starts two smaller loops as follows:
- The $evalAsync loop:
$evalAsyncis a method on the$scopeobject that allows us to evaluate an expression in an asynchronous manner before the next digest loop runs. Whenever we register some work with$evalAsync, it goes into a list. During the$evalAsyncloop, items in this list are evaluated till the list is empty and this ends the loop. We seldom need it; in fact I have never used it. - The $watch list loop. All the watches that we register, or are registered by the framework directives and interpolations, are evaluated in this loop.
To detect the model changes, Angular does something called as dirty checking. This involves comparing the old value of the model property with the current value to detect any changes. For this comparison to work, Angular needs to do some book keeping that involves keeping track of the model value during the last digest cycle.
If the framework detects any model changes from the last digest cycle, the corresponding model watch is triggered. Interestingly, this watch triggering can lead to a change in model data again, hence triggering another watch.
For example, if the
$watchcallback updates some model data on the scope that is being watched by another watch expression, another watch will get triggered.Angular keeps reevaluating the watch expression until no watch gets triggered or, in other words, the model becomes stable. At this moment, the watch list loop ends.
Note
To safeguard against an infinite loop, the watch list loop runs only 10 times after which an error is thrown and this loop is terminated. We will see an error like this in the developer console:
Uncaught Error: 10 $digest() iterations reached. Aborting!
We should be careful when updating the scope data in a watch. The update should not result in an infinite cycle. For example, if we update the same property that is being watched inside the watch callback, we will get an error.
When both the $evalAsync and $watch loops are complete, AngularJS updates the HTML DOM and the digest cycle itself ends.
An important thing that needs to be highlighted here is that the digest cycle evaluates every model property being watched in any scope across the application. This may seem inefficient at first as on each digest cycle we evaluate each and every property being watched irrespective of where the changes are made, but this works very well in real life.
Note
See the answer at http://stackoverflow.com/questions/9682092/databinding-in-angularjs/9693933#9693933 by Misko (creator of Angular!) to know why it is not such a bad idea to implement dirty checking in this manner.
The only missing piece of the model change tracking jigsaw is: when is $scope.$apply called or when does the digest cycle run? Till now we have never invoked the $scope.$apply method anywhere.
Angular made a very plausible assumption about when the model can change. It assumes model data can get updated on events such as user interaction (via the mouse and keyboard), form field updates, Ajax calls, or timer functions such as setTimeout and setInteval. It then provided a set of directives and services that wrap these events and internally call $scope.$apply when such events occur.
Here is a source code snippet (simplified) from the ng-click directive in AngularJS:
element.on("click", function(event) {
  scope.$apply(function() {
    fn(scope, {$event:event});
   });
 });
The element.on method is a jQuery- (or jqlite)-based method that adds an event handler for click events. When the mouse click event occurs, the event handler calls scope.$apply, hence triggering the digest cycle. It is precisely for this reason that we do not litter our implementation with calls to $scope.$apply() everywhere.
To recap:
- An Angular watch does not trigger as soon as a model being watched changes.
- A watch is only triggered during a digest cycle. A digest cycle is in an iterative process during which Angular compares the old and new values of the watched expression for changes. If the value changes, the watch is triggered. Angular does this for all watches that we create and the ones created by the framework to support data binding.
- A digest cycle is triggered by calling
$scope.$apply. The framework calls$scope.$applyat various times during the app execution. For example, when a button is clicked, or when$intervallapses.
The concept of the digest cycle is very important to understand once we get into serious AngularJS development. This can save us countless hours of debugging and frustration that accompanies it. In the next section, we will make use of this newfound understanding of the digest cycle to fix the audio synchronization issue.
Now that we know what the digest cycle is, and that change detection is not real-time, things start to make sense. The workoutPlan watch did not trigger between these two calls in startWorkout:
var startWorkout = function () {
   $scope.workoutPlan = createWorkout();
   // Existing code
   startExercise($scope.workoutPlan.exercises.shift());
 }
Here, the exercise and exercise audio arrays went out of sync. Let's fix it.
Removing elements from the exercise array after each exercise is a suboptimal implementation as we have to build this array every time the workout starts. It will be better if we do not alter the array once the exercise starts and instead use the currentExerciseIndex property with the exercises array to always locate the current exercise in progress.
Go ahead and copy the updated WorkoutController functions: startWorkout, startExercise, and getNextExercise from workout.js located in Lesson02/checkpoint2/app/js/7MinWorkout.
The updated functions now are using the currentExerciseIndex instead of removing items from the exercises array.
There is a fix required in workout.html too. Update the highlighted code:
<h3 class="col-sm-6 text-right" ng-if="currentExercise.details.name=='rest'">Next up: <strong>{{workoutPlan.exercises[currentExerciseIndex + 1].details.title}}</strong></h3>Now, the upcoming audio should be in sync with the next exercise. We can verify it by running the workout again and listening to the upcoming exercise audio during the rest period.
Other than learning about dirty checking and digest cycles, we have learned other important things in this section too. Let's summarize them as follows:
- We have extended the workout functionality without altering the main
WorkoutControllerfunction in any way. - Nested controllers allow us to manage subviews independently of each other and such views are only dependent on their parent view for scope data.
This means that changes to scope properties/schemas on the parent can affect these child views. For example, our
WorkoutAudioControllerfunction is dependent on properties with these names:currentExerciseandcurrentExerciseDurationand if we decide to rename/remove any of them, we need to fix the audio view and the controller.This also implies that we cannot move the workout audio-related view outside the parent view due to the dependency on model data. If we want something truly reusable, we will have to look at creating our own directive.
- DOM manipulation should be restricted to directives and we should never do DOM manipulation in a controller.
With audio support out of the way, we are one step closer to a fully functional app. One of the missing features that will be an essential addition to our app is the exercise pause feature.

If you have used the app and done some physical workout along with it, you will be missing the exercise pause functionality badly. The workout just does not stop till it reaches the end. We need to fix this behavior.
To pause the exercise, we need to stop the timer and stop all the sound components. Also, we need to add a button somewhere in the view that allows us to pause and resume the workout. We plan to do this by drawing a button overlay over the exercise area in the center of the page. When clicked, it will toggle the exercise state between paused and running. We will also add keyboard support to pause and resume the workout using the key binding p or P. Let's start with fixing our controller.
To pause a running exercise, we need to stop the interval callbacks that are occurring after every second. The $interval service provides a mechanism to cancel the $interval using the promise returned (remember, as discussed in the previous Lesson, the $interval service call returns a promise).
Therefore, our goal will be to cancel the $interval service when we pause and set up this again when we resume. Perform the following steps:
- Open the
workout.jsfile and declare anexerciseIntervalPromisevariable insideWorkoutControllerthat will track the$intervalpromise. - Remove the
$intervalcall that is used to decrement$scope.workoutTimeRemaining. We will be using a single timer to track the overall workout progress and individual exercise progress. - Refactor the
startExercisemethod, remove the$intervalcall (including thethencallback implementation) completely, and replace it with a single line:var startExercise = function (exercisePlan) { // existing code exerciseIntervalPromise = startExerciseTimeTracking(); }; - Add the
startExerciseTimeTracking()method:var startExerciseTimeTracking = function () { var promise = $interval(function () { ++$scope.currentExerciseDuration; --$scope.workoutTimeRemaining; }, 1000, $scope.currentExercise.duration - $scope.currentExerciseDuration); promise.then(function () { var next = getNextExercise($scope.currentExercise); if (next) { startExercise(next); } else { $location.path('/finish'); }}); return promise; }
All the logic to support starting/resuming an exercise has now been moved into this method. The code looks similar to what was there in the startExercise function, except the $interval promise is returned from the function in this case.
Also, instead of having a separate $interval service for tracking the overall workout time remaining, we are now using a single $interval to increment currentExerciseDuration and decrement workoutTimeRemaining. This refactoring helps us to simplify the pause logic as we do not need to cancel and start two $interval services. The number of times the $interval callback will be triggered also has a different expression now:
$scope.currentExercise.duration - $scope.currentExerciseDuration
The currentExercise.duration is the total duration of the exercise, and currentExerciseDuration signifies how long we have been doing the exercise. The difference is the time remaining.
Lastly, add methods for pausing and resuming after the startExerciseTimeTracking function:
$scope.pauseWorkout = function () {
    $interval.cancel(exerciseIntervalPromise);
    $scope.workoutPaused = true;
};
$scope.resumeWorkout = function () {
    exerciseIntervalPromise = startExerciseTimeTracking();
    $scope.workoutPaused = false;
};
$scope.pauseResumeToggle = function () {
    if ($scope.workoutPaused) {
        $scope.resumeWorkout();
    } else {
        $scope.pauseWorkout();
    }
}
The pauseWorkout function pauses the workout by cancelling the existing interval by calling the $interval.cancel function. The cancel method takes the exerciseIntervalPromise object (set in the startExercise function) that is the interval promise to cancel.
The resumeWorkout method sets up the interval again by calling the startExerciseTimeTracking() function again. Both these methods set the state of the workout by setting the wokoutPaused variable.
The pauseResumeToggle function acts as a toggle switch that can pause and resume the workout alternately. We will be using this method in our view binding. So let's shift our focus to the view implementation.
We need to show a pause/resume overlay div when the mouse hovers over the central exercise area. A naïve way to add this feature would be to use the ng-mouse* directives. However, let's do it this way and learn a bit or two about the ng-mouse* directives.
Open workout.html and update the exercise div with this:
<div id="exercise-pane" class="col-sm-7" ng-mouseenter = "showPauseOverlay=true" ng-mouseleave="showPauseOverlay=false">Inside the preceding div element and just before the WorkoutAudioController span, add this:
<div id="pause-overlay" ng-click="pauseResumeToggle()" ng-show="showPauseOverlay" >
  <span class="glyphicon glyphicon-pause pause absolute-center"
     ng-class="{'glyphicon-pause' : !workoutPaused, 'glyphicon-play' : workoutPaused}"></span>
</div>
Also, go ahead and update the app.css file in the CSS folder with the updated file available in Lesson02/checkpoint3/app/css. We have updated app.css with styles related to pause the overlay div element.
Now open the app.css file and comment the CSS property opacity for style #pause-overlay. Additionally, comment the style defined for #pause-overlay:hover.
In the first div (id=exercise-pane) function, we have used some new ng-mouse* directives available in AngularJS. These directives wrap the standard JavaScript mouse event. As the name suggests, the ng-mouseenter directives evaluate the expression when the mouse enters the element on which the directive is defined. The ng-mouseleave directive is just the reverse. We use these directives to set the scope property showPauseOverlay true or false based on the location of the mouse. Based on the showPauseOverlay value, the ng-show="showPauseOverlay" shows/hides the pause overlay.
Refresh the workout page and we should see a pause button overlay over the exercise area. We can click on it to pause and resume the workout.

Other directives such as ng-mousedown, ng-mousemove, and ng-mouseover are there to support the corresponding mouse events.
Note
Be very careful with directives such as mouseover and mousemove. Depending upon how the HTML is set up, these directives can have a severe impact on the performance of the page as these events are rapidly raised on mouse movements that cause repeated evaluation of the attached directive expression.
We seldom require using the ng-mouse* directives. Even the preceding implementation can be done in a far better way without using ng-mouseenter or ng-mouseleave directives.
If you are a CSS ninja, you must be shaking your head in disgust after looking at the earlier implementation. We don't need the mouse events to show/hide an overlay. CSS has an inbuilt pseudo selector :hover for it, a far superior mechanism for showing overlays as compared to mouse-event bindings.
Let's get rid of all the ng-mouse* directive that we used and the showPauseOverlay variable. Remove the mouse-related directive declarations from the exercise-pane portion of div and ng-show directive from pause-overlay div. Also uncomment the styles that we commented in app.css in the last section. We will achieve the same effect but this time with plain CSS.
Let's talk about other elements of the pause/resume div (id="pause-overlay") overlay, which we have not touched on till now. On clicking on this div element, we call the pauseResumeToggle function that changes the state of the exercise. We have also used the ng-class directive to dynamically add/remove CSS classes based on the state of the exercise. The ng-class directive is a pretty useful directive that is used quite frequently, so why not learn a little more about it?
The ng-class directive allows us to dynamically set the class on an element based on some condition. The ng-class directive takes an expression that can be in one of the three formats:
- A string: Classes get applied on the base on the string tokens. Each space-delimited token is treated as a class. The following is an example:
$scope.cls="class1 class2 class3"
ng-class="cls" // Will apply the above three classes.
- An array: Each element in an array should be a string. The following is an example:
$scope.cls=["class1", "class2", "class3"]
ng-class="cls" // Will apply the above three classes.
- An object: Since objects in JavaScript are just a bunch of key-value maps, when we use the object expression, the key gets applied as a class if the value part evaluates to true. We use this syntax in our implementation:
ng-class="{'glyphicon-pause' : !workoutPaused, 'glyphicon-play' : workoutPaused}"In this case, the
glyphicon-pause(the pause icon) class is added whenworkoutPausedisfalse, andglyphicon-play(the play icon) is added whenworkoutPausedistrue. Here,glyphicon-pause/glyphicon-playis the CSS name for Bootstrap font glyphs. Check the Bootstrap site for these glyphs http://getbootstrap.com/components/. The end result is based on the workout state, the appropriate icon is shown.
The ng-class directive is a super useful directive, and anytime we want to support dynamic behavior with CSS, this is the directive to use.
Let's re-verify that the pause functionality is working fine after the changes. Reload the workout page and try to pause the workout. Everything seems to be working fine except… the audio did not stop. Well, we did not tell it to stop so it did not! Let's fix this behavior too.
We need to extend our WorkoutAudioController function so that it can react to the exercise being paused. The approach here again will be to add a watch on the parent scope property workoutPaused. Open workout.js and inside the WorkoutAudioController, add this watch code before the init function declaration:
$scope.$watch('workoutPaused', function (newValue, oldValue) {
    if (newValue) {
        $scope.ticksAudio.pause();
        $scope.nextUpAudio.pause();
        $scope.nextUpExerciseAudio.pause();
        $scope.halfWayAudio.pause();
        $scope.aboutToCompleteAudio.pause();
    } else {
        $scope.ticksAudio.play();
        if ($scope.halfWayAudio.currentTime > 0 &&
        	$scope.halfWayAudio.currentTime <
            $scope.halfWayAudio.duration)
   	  $scope.halfWayAudio.play();
   	  if ($scope.aboutToCompleteAudio.currentTime > 0 &&
        $scope.aboutToCompleteAudio.currentTime <
          $scope.aboutToCompleteAudio.duration)
        $scope.aboutToCompleteAudio.play();
    }
});
When the workout pauses, we pause all the audio elements irrespective of whether they are playing or not. Resuming is a tricky affair. Only if the halfway audio and about to complete audio are playing at the time of the pause do need to continue them. The conditional statements perform the same check. For the time being, we do not bother with the upcoming exercise audio.
Go ahead and refresh the workout page and try to pause the workout now. This time the audio should also pause.
Our decision to create a WorkoutAudioController object is serving us well. We have been able to react to a pause/resume state change in the audio controller instead of littering the main workout controller with extra code.
Let's add some more goodness to the pause/resume functionality by adding keyboard support.
We plan to use the p or P key to toggle between the pause and resume state. If AngularJS has mouse-event support, then it will definitely have support for keyboard events too. Yes indeed and we are going to use the ng-keypress directive for this.
Go ahead and change the app container div (class="workout-app-container") to:
<div class="row workout-app-container" tabindex="1" ng-keypress="onKeyPressed($event)">The first thing that we have done here is add the tabindex attribute to the div element. This is required as keyboard events are captured by elements that can have focus. Focus for HTML input elements makes sense but for read-only elements such as div having keyboard focus requires tabindex to be set.
Note
The previous code captures the keypress event at the div level. If we have to capture such an event at a global level (the document level), we need to have a mechanism to propagate the captured event to child controllers such as WorkoutController.
We will not be covering how to actually capture keyboard events at the document level, but point you to these excellent resources for more information:
These libraries work by creating services/directives to capture keyboard events.
Secondly, we add the ng-keypress directive and in the expression, call the onKeyPress function, passing in a special object $event.
$event is the native JavaScript event object that contains a number of details about the cause and source of the event. All directives that react to events can pass this $event object around. This includes all ng-mouse*, ng-key*, ng-click, and ng-dblclick directives and some other directives.
Open the workout.js file and add the method implementation for onKeyPressed:
$scope.onKeyPressed = function (event) {
   if (event.which == 80 || event.which == 112) { // 'p' or 'P'
     $scope.pauseResumeToggle();
   }
};
The code is quite self-explanatory; we check for the keycode value in event.which and if it is p or P, we toggle the workout state by calling pauseResumeToggle().
There are two other directives available for keyboard-related events namely, ng-keydown and ng-keyup. As the name suggests, these directives evaluate the assigned expression on keydown and keyup events.
The 7 Minute Workout app is getting into better shape. Let's add another enhancement to this series by improving the video panel loading and playback support.

The current video panel implementation can at best be termed as amateurish. The size of the default player is small. When we play the video, the workout does not pause. The video playback is interrupted on exercise transitions. Also, the overall video load experience adds a noticeable lag at the start of every exercise routine which we all would have noticed. This is a clear indication that this approach to video playback needs some fixing.
Since we can now pause the workout, pausing the workout on video playback can be implemented. Regarding the size of the player and the general lag at the start of every exercise, we can fix it by showing the image thumbnail for the exercise video instead of loading the video player itself. When the user clicks on the thumbnail, we load a pop up/dialog that has a bigger size video player that plays the selected video. Sounds like a plan! Let's implement it.
To start with, let's refactor out the view template for the video panel into a separate file as we did for the description panel. Open the workout.html file and remove the script declaration for the video panel template (<script type="text/ng-template" id="video-panel.html">…</script>).
Change the ng-include directive to point to the new video template:
<div id="video-panel" class="col-sm-3" ng-include="'partials/video-panel.html'">Make note of the path change for the ng-include attribute; the template file will now reside in the partials folder similar to description-panel.html.
Next, we add the video-panel.html file from partial to our app. Go ahead and copy this file from the companion codebase Lesson02/checkpoint4/app/partials.
Other than some style fixes, there are two notable changes done to the video panel template in video-panel.html. The first one is a declaration of the new controller:
<div class="panel panel-info" ng-controller="WorkoutVideosController">As we refactor out the video functionality, we are going to create a new controller, WorkoutVideosController.
The second change is as follows:
<img height="220" ng-src="https://i.ytimg.com/vi/{{video}}/hqdefault.jpg" />The earlier version of the template used iframe to load the video with the src attribute set to interpolation {{video}} with the complete video URL. With the preceding change, the video property does not point directly to a YouTube video; instead it just contains the identifier for the video (such as dmYwZH_BNd0).
Note
We have referenced this Stack Overflow post http://stackoverflow.com/questions/2068344/how-do-i-get-a-youtube-video-thumbnail-from-the-youtube-api, to determine the thumbnail image URL for our videos.
video-panel.html also contains a view template embedded in script tag:
<script type="text/ng-template" id="youtube-modal">…<script>
We will be using this template to show the video in a pop-up dialog later.
Since we plan to use the video identifier instead of the absolute URL, workout data needs to be fixed in workout.js. Rather than doing it manually, copy the updated workout data from the workout.js file in Lesson02checkpoint4appjs7MinWorkout. The only major change here is the videos array that earlier contained absolute URLs but now has video IDs like this:
videos: ["dmYwZH_BNd0", "BABOdJ-2Z6o", "c4DAnQ6DtF8"],
If we comment out the ng-controller="WorkoutVideosController" attribute in the video-panel.html file and refresh the workout page, we should have a better page load experience, devoid of any noticeable lags. Instead of videos, we now render images.
However, we have lost the video replay functionality! Let's fix this too.
The plan here is to open a dialog when the user clicks on the video image and plays the video in the dialog. Once again, we are going to look at a third-party control/component that can help us here. Well, we have a very able and popular library to support modal pop-up dialogs in Angular, the ui.bootstrap dialog (http://angular-ui.github.io/bootstrap/). This library consists of a set of directives that are part of Bootstrap JavaScript components. If you are a fan of Twitter Bootstrap, then this library is a perfect drop-in replacement that we can use.
Note
The ui.bootstrap dialog is part of a larger package angular-ui (http://angular-ui.github.io/) that contains a number of AngularJS components ready to be used within our projects.
Similar to the Bootstrap modal popup, ui.bootstrap too has a modal dialog and we are going to use it.
To start with, we need to reference the ui.bootstrap library in our app. Go ahead and add the reference to ui.bootstrap in the index.html script section after the framework script declarations:
<script src="//cdnjs.cloudflare.com/ajax/libs/angular-ui-bootstrap/0.10.0/ui-bootstrap-tpls.js"></script>
Import the ui.bootstrap module in app.js:
angular.module('app', ['ngRoute', 'ngSanitize', '7minWorkout', 'mediaPlayer', 'ui.bootstrap']).The ui.bootstrap module is now ready for consumption.
Now we need to add a new JavaScript file to implement the video popup. Copy the workoutvideos.js file from Lesson02checkpoint4appjs7MinWorkout. Also, add a reference to the file in index.html after the workout.js reference:
<script src="js/7MinWorkout/workoutvideos.js"></script>
Let's try to understand the important parts of workoutvideos.js.
We start with declaring the controller. Nothing new here, we are already familiar with how to create a controller using the Module API. The only point of interest here is the injection of the $modal service:
angular.module('7minWorkout')
  .controller('WorkoutVideosController', ['$scope', '$modal', function ($scope, $modal) {
The ui.bootstrap modal dialog is controlled by the $modal service. We were expecting a directive for the modal dialog that we could manage through the controller. As it turns out, the same role here is played by the $modal service. When invoked, it dynamically injects a directive (<div modal-window></div>) into the view HTML which finally shows up as popup.
In WorkoutVideosController, we define the playVideo method that uses the $modal service to load the video in the popup. The first thing we do in the playVideo method is to pause the workout. Then, we call the $modal.open method to open the popup.
The $modal.open function takes a number of arguments that affect the content and behavior of the modal popup. Here is our implementation:
var dailog = $modal.open({
    templateUrl: 'youtube-modal',
    controller: VideoPlayerController,
    scope:$scope.$new(true),
    resolve: {
        video: function () {
            return '//www.youtube.com/embed/' + videoId;
        }
    },
    size: 'lg'
}).result['finally'](function () {
      $scope.resumeWorkout();
    });
Here is a rundown of the arguments:
templateUrl: This is the path to the template content. In our case, we have embedded the modal template in thescripttag of thevideo-panel.htmlfile:<script type="text/ng-template" id="youtube-modal">
Instead of the template URL, we can provide inline HTML content to the dialog service by using a different argument template. Not a very useful option as readability of the template HTML is severely affected.
controller: Like a true MVC component, this dialog allows us to attach a controller to the dialog scope. We reference theVideoPlayControllercontroller function that we have declared inline. Every time the modal dialog is opened, a newVideoPlayControllerobject is instantiated and linked to the modal dialog view (defined using thetemplateUrlpath just mentioned).scope: This parameter can be used to provide a specific scope to the modal dialog view. By default, the modal dialog creates a new scope that inherits from$rootScope. By assigning thescopeconfiguration to$scope.$new(true), we are creating a new isolated scope. This scope will be available inside the dialog context when it opens.Note
The
$newfunction on the scope object allows us to create a new scope in code. We rarely need to create our own scope objects as they are mostly created as part of directive execution, but at times the$newfunction can come in handy, as in this case.Calling
$newwithout an argument creates a new scope that inherits (prototypal inheritance) from the scope on which the function is invoked.Having the
trueparameter in$newinstructs the scope API to create an isolated scope.In AngularJS, isolated scopes are scopes that do not inherit from their parent scope and hence do not have access to parent scope properties. Isolated scopes help in keeping the parent and child scopes independent of each other, hence making the child component more reusable across the app. The video player dialog is a simple example of this. The dialog is only dependent upon the resolved YouTube video URL and can be used anywhere in the application where there is a requirement to play a specific video.
resolve: Since we have declared our modal scope to be an isolated scope, we need a mechanism to pass the selected video from the parent scope to the isolated modal dialog scope. Theresolveargument solves this parameter passing problem.The
resolveargument is an interesting parameter. It takes an object where each property is a function and when injected with the key name (property name) into the dialog controller, it is resolved to the function's return value.For example, the
resolveobject has one property video that returns the concatenated value of the YouTube video URL with the video ID (passed to theplayVideofunction asvideoId). We use the property namevideoand inject it intoVideoPlayerController. Whenever the dialog is loaded, thevideofunction is invoked and the return value is injected in theVideoPlayerControlleras the property namevideoitself.The
resolveobject hash is a good mechanism for passing specific data to the modal dialog keeping the dialog reusable as long as the correct parameters are passed.size: Used to specify the size of the dialog. We uselarge(lg), the other option issmall(sm).
There are a few more options available for the $modal.open function. Refer to the documentation for ui.bootstrap.modal (http://angular-ui.github.io/bootstrap/#/modal) for more details.
The return value of the $modal.open function also interests us and this is how we use it:
.result['finally'](function () {
  $scope.resumeWorkout();
});
The result property on the returned object is a promise that gets resolved when the dialog closes. The finally function callback is invoked irrespective of whether the result promise is resolved or rejected and in the callback we just resume the workout.
The result property is not the only property on the object returned by $modal.open. Let's understand the use of these properties:
close(data): This function can close the dialog. The data argument is optional and can be used to pass a value from the modal dialog to the parent components that invoked it.dismiss(reason): This is similar to theclosefunction, but it allows us to cancel the dialog.result: As detailed previously, this is a promise that gets resolved when we close the dialog. If the dialog is closed using theclose(data)method, the value is resolved to thedatavalue. Ifdismiss(reason)is called, the promise is rejected with thereasonvalue. Remember, these callbacks are available on thethenmethod of thepromiseobject and look something like this:result.then(function(result){…}, function(reason){…});If we had resumed the workout using
theninstead offinally, the code would have looked like this:.result.then(function (result) { $scope.resumeWorkout(); // on success }, function (reason) { $scope.resumeWorkout(); // on failure });Since
finallygets called irrespective of whether the promise is resolved or rejected, we save some code duplication.opened: This is also a promise that is resolved when the modal dialog is opened and the dialog template has been downloaded and rendered. This promise can be used to perform some activity once the dialog is fully loaded.
The return value of $modal.open comes in handy when we desire to control the modal dialog from outside the dialog itself. For example, we can call dialog.close() to forcefully close the dialog popup from WorkoutVideosController.
The implementation of VideoPlayerController is simple:
var VideoPlayerController = function ($scope, $modalInstance, video) {
    $scope.video = video;
    $scope.ok = function () {
        $modalInstance.close();
    };
};
We inject three dependencies: the standard $scope, $modalInstance, and video.
The $modalInstance service is used to control the opened instance of the dialog as we can see in the $scope.ok function. This is the same object that is returned when the $modal.open method is called. The method and properties for $modalInstance have already been detailed earlier in the section. We just use the close method to close the dialog.
The video object is the YouTube link that we have injected using the video property of the resolve object while calling $modal.open. We assign the video link received to the modal scope and then the view template (youtube-modal) binds to this video link:
<iframe width="100%" height="480" src="{{video}}" frameborder="0" allowfullscreen></iframe>Before we forget, since we have defined the VideoPlayController as a normal function, we need to make sure it is minification-safe. Hence, we add a $inject property on the VideoPlayController object with the required dependencies:
VideoPlayerController["$inject"] = ['$scope', '$modalInstance', 'video'];
Remember we covered the $inject annotation syntaxes in Lesson 1, Building Our First App – 7 Minute Workout.
Let's try out our implementation. Load the workout page and click on the video image. The video should load into a modal popup:

The app is definitely looking better now. Next, let's add some razzmatazz to our app by adding a pinch of animation to it!

HTML animations can either be done using css, or by using some JavaScript library such as jQuery. Given that CSS3 has inherited support for animation, using CSS is a preferred way of implementing animation in our apps. With the use of CSS3 transitions and animation constructs, we can achieve some impressive animation effects.
In AngularJS, a set of directives has been built in such a way that adding animation to these directives is easy. Directives such as ng-repeat, ng-include, ng-view, ng-if, ng-switch, ng-class, and ng-show/ng-hide have build-in support for animation.
What does it mean when we say the directive supports animation?
Well, from the CSS perspective, it implies that the previous directive dynamically adds and removes classes to the HTML element on which they are defined at specific times during directive execution. How this helps in CSS animation will be clear when we discuss CSS animation in our next section.
From a script-based animation perspective, we can use the module animate function to animate the previous directives using libraries such as jQuery.
Let's look at both CSS and script-based animation and then understand what Angular has to offer.
CSS animation is all about animating from one style configuration to another using some animation effect. The animation effect can be achieved by using any of the following two mechanisms:
- Transition: This is where we define a start CSS state, the end CSS state, and the transition effect (animation) to use. The effect is defined using the style property
transition. The following CSS style is an example:.my-class { -webkit-transition:0.5s linear all; transition:0.5s linear all; background:black; } .my-class:hover { background:blue; }When the preceding styles are applied to an HTML element, it changes the background color of the element from black to blue on hover with a transition effect defined by the
transitionproperty.Such animations are not just limited to pseudo selector such as hover. Let's add this style:
.my-class.animate {
   background:blue;
}
When this style is added, a similar effect as demonstrated previously can be achieved by dynamically adding the
animateclass to an HTML element which already hasmy-classapplied. - Animation: This is where we define the start CSS state, the keyframe configuration that defines the time duration of the animation, and other details about how the animation should progress. For example, these CSS styles have the same effect as a CSS transition:
.my-class {
  background:black;
}
.my-class:hover {
   background:blue;
   animation: color 1s linear;
  -webkit-animation: color 1s linear;
}
@keyframes color {
  from {
    background: black;
  }
  to {
    background: blue;
  }
}
The basic difference between transition and animation is that we do not need two CSS states defined in the case of animation. In the first example, transition happens when the CSS on the element changes from .my-class to .my-class:hover, whereas in the second example, animation starts when the CSS state is .my-class:hover, so there is no end CSS concept with animation.
The animation property on .my-class:hover allows us to configure the timing and duration of the animation but not the actual appearance. The appearance is controlled by @keyframes. In the preceding code, color is the name of the animation and @keyframes color defines the appearance.
Note
We will not be covering CSS-based animation in detail here. There are many good articles and blog posts that cover these topics in depth. To start with, we can refer to MDN documentation for transition (https://developer.mozilla.org/en-US/docs/Web/Guide/CSS/Using_CSS_transitions) and for animation (https://developer.mozilla.org/en-US/docs/Web/Guide/CSS/Using_CSS_animations).
To facilitate animations, AngularJS directives add some specific classes to the HTML element.
Directives that add, remove, and move DOM elements, including ng-repeat, ng-include, ng-view, ng-if, and ng-switch, add one of the three sets of classes during different times:
ng-enterandng-enter-active: These are added when directive adds HTML elements to the DOM.ng-leaveandng-leave-active: These are added before an HTML element is removed from the DOM.ng-moveandng-move-active: These are added when an element is moved in the DOM. This is applicable to theng-repeatdirective only.
The ng-<event> directive signifies the start and ng-<event>-active signifies the end of CSS states. We can use this ng-<event>
g-<event>-active pair for transition-based animation and ng-<event> only for keyframe-based animation.
Directives such as ng-class, ng-show, and ng-hide work a little differently. The starting and ending class names are a bit different. The following table details the different class names that get applied for these directives:
|
Event |
Start CSS |
End CSS |
Directive |
|---|---|---|---|
|
Hiding an element |
|
|
|
|
Showing an element |
|
|
|
|
Adding a class to an element |
|
|
|
|
Removing a class from an element |
|
|
|
Make note that even interpolation-based class changes (class="{{expression}}") are included for animation support.
Another important aspect of animation that we should be aware of is that the start and end classes added are not permanent. These classes are added for the duration of the animation and removed thereafter. AngularJS respects the transition duration and removes the classes only after the animation is over.
Let's now look at JavaScript-based animation before we begin implementing animation for our app.
The idea here too remains the same but instead of using CSS-based animation, we use JavaScript to do animation. This is the CSS:
.my-class {
  background:black;
}
.my-class:hover {
   background:blue;
}
We can do something that resembles JavaScript-based animation when we use jQuery (it requires a plugin such as http://www.bitstorm.org/jquery/color-animation/):
$(".my-class").hover( function() {$(this).animate({backgroundColor:blue},1000,"linear");To integrate script-based animation with Angular, the framework provides the Module API method animation:
animation(name, animationFactory);
The first argument is the name of the animation and the second parameter, animationFactory, is an object with the callback function that gets called when Angular adds or removes classes (such as ng-enter and ng-leave) as explained in the CSS section earlier in the Lesson.
It works something like this. Given here is an AngularJS construct that supports animation such as ng-repeat:
<div ng-repeat="item in items" class='repeat-animation'>
We can enable animation by using the Module API animation method:
myApp.animation('.repeat-animation', function() {
  return {
    enter : function(element, done) { //ng-enter or element added
    //Called when ng-enter is applied
    jQuery(element).css({
            opacity:0
      });
      jQuery(element).animate({
  opacity:1
      }, done);
    }
  }
});
Here, we animate when ng-enter is applied from the opacity value from 0 to 1. This happens when an element is added to the ng-repeat directive. Also, Angular uses the class name of the HTML element to match and run the animation. In the preceding example, any HTML element with the .repeat-animation class will trigger the previous animation when it is created.
For the enter function, the element parameter contains the element on which the directive has been applied and done is a function that should be called to tell Angular that the animation is complete. Always remember to call this done function. The preceding jQuery animate function takes done as a parameter and calls it when the animation is complete.
Note
Other than the enter function, we can add callbacks for leave, move, beforeAddClass, addClass, beforeRemoveClass, and removeClass. Check the AngularJS documentation on the ngAnimate module at https://code.angularjs.org/1.2.15/docs/api/ngAnimate for more details. Also, a more comprehensive treatment for AngularJS animation is available on the blog post at http://www.yearofmoo.com/2013/08/remastered-animation-in-angularjs-1-2.html.
Armed with an understanding of animation now, let's get back to our app and add some animation to it.
Time to add some animation support for our app! The AngularJS ngAnimate module contains the support for Angular animation. Since it is not a core module, we need to inject this module and include its script.
Add this reference to the angular animate script in index.html:
<script src="http://ajax.googleapis.com/ajax/libs/angularjs/1.3.3/angular-animate.js"></script>
Add module dependency for the ngAnimate module in app.js:
angular.module('app', ['ngRoute', 'ngSanitize', '7minWorkout', 'mediaPlayer', 'ui.bootstrap', 'ngAnimate']).We are all set to go.
The first animation we are going to enable is the ng-view transition, sliding in from the right. Adding this animation is all about adding the appropriate CSS in our app.css file. Open it and add:
div[ng-view] {
    position: absolute;
    width: 100%;
    height: 100%;
}
div[ng-view].ng-enter,
div[ng-view].ng-leave {
    -webkit-transition: all 1s ease;
    -moz-transition: all 1s ease;
    -o-transition: all 1s ease;
    transition: all 1s ease;
}
div[ng-view].ng-enter {
    left: 100%;     /*initial css for view transition in*/
}
div[ng-view].ng-leave {
    left: 0;        /*initial css for view transition out*/
}
div[ng-view].ng-enter-active {
    left: 0;        /*final css for view transition in*/
}
div[ng-view].ng-leave-active {
    left: -100%;    /*final css for view transition out*/
}
This basically is transition-based animation. We first define the common styles and then specific styles for the initial and final CSS states. It is important to realize that the div[ng-view].ng-enter class is applied for the new view being loaded and div[ng-view].ng-leave for the view being destroyed.
For the loading view, we transition from 100% to 0% for the left parameter.
For the view that is being removed, we start from left 0% and transition to left -100%
Try out the new changes by loading the start page and navigate to the workout or finish page. We get a nice right-to-left animation effect!
Let's add a keyframe-based animation for videos as it is using ng-repeat, which supports animation. This time we are going to use an excellent third-party CSS library animate.css (http://daneden.github.io/animate.css/) that defines some common CSS keyframe animations. Execute the following steps:
- Add the reference to the library in
index.htmlafter thebootstrap.min.cssdeclaration:<link href="//cdnjs.cloudflare.com/ajax/libs/animate.css/3.1.0/animate.min.css" rel="stylesheet" />
- Update the
video-panel.htmlfile and add a custom classvideo-imageto theng-repeatelement:<div ng-repeat="video in currentExercise.details.related.videos" ng-click="playVideo(video)" class="row video-image"> - Update the
app.cssfile to animate theng-repeatdirective:.video-image.ng-enter, .video-image.ng-move { -webkit-animation: bounceIn 1s; -moz-animation: bounceIn 1s; -ms-animation: bounceIn 1s; animation: bounceIn 1s; } .video-image.ng-leave { -webkit-animation: bounceOut 1s; -moz-animation: bounceOut 1s; -ms-animation: bounceOut 1s; animation: bounceOut 1s; }
The setup here is far simpler as compared to transition-based animation. Most of the code is around vendor-specific prefixes.
We define animation effect bounceIn for the ng-enter and ng-move states and bounceOut for the ng-leave state. Much cleaner and simpler!
To verify the implementation, open the workout and wait for the first exercise to complete to see the bounce-out effect and the next exercise to load for the bounce-in effect.
While using animation, we should not go overboard and add too much of it as it makes the app look amateurish. We have added enough animation to our app and now it's time to move to our next topic.
One area that we still have not explored is Angular services. We have used some Angular services, but we have little understanding of how services work and what it takes to create a service. The next section is dedicated to this very topic.
What if we can track the workout history? When did we last exercise? Did we complete it? How much time did we spend?
Tracing workout history requires us to track workout progress. Somehow, we need to track when the workout starts and stops. This tracking data then needs to be persisted somewhere.
One way to implement this history tracking is to extend our WorkoutController function with the desired functionality. This approach is less than ideal, and we have already seen how to make use of another controller (such as WorkoutAudioController) and delegate all the related features to it.
In this case, historical data tracking does not require a controller, so instead we will be using a service to track historical data and share it across all app controllers. Before we start our journey of implementing the workout tracking service, let's learn a bit more about AngularJS services.
Services are one of the fundamental constructs available in AngularJS. As described earlier, services in Angular are reusable (mostly non-UI) components that can be shared across controllers, directives, filters, and other services. We have already used a number of inbuilt Angular services such as $interval, $location, and $timeout.
A service in AngularJS is:
- A reusable piece of code that is used across AngularJS constructs: For example, services such as
$location,$interval,$timeout, and$modalare components that perform a specific type of work and can be injected anywhere. Services normally do not interact with DOM. - Singleton in nature: The singleton nature of the service means that the service object injected by the DI framework is the same across all AngularJS constructs. Once the AngularJS DI framework creates the service for the first time, it caches the service for future use and never recreates it. For example, wherever we inject the
$locationservice, we always get the same$locationobject. - Created on demand: The DI framework only creates the service when it is requested for the first time. This implies that if we create a service and never inject it in any controller, directive, filter, or service, then the service will never be instantiated.
- Can be used to share state across the application: Due to the singleton nature of the service, services are a mechanism to share data across all AngularJS constructs. For example, if we inject a service into multiple controllers, and update the service state in one of the controllers, other controllers will get the updated state as well. This happens because service objects are singleton, and hence everyone gets the same service reference to play with.
Let's learn how to create a service.
AngularJS provides five recipes (ways) to create a service. These recipes are named constant, value, service, factory, and provider. The end result is still a service object that is consumable across the application. We can create these service objects by either using the Module API or the $provide service (which itself is a service!).
The Module API itself internally uses the $provide service. We will be using the Module API for our sample code.
Let's try to understand each of the five ways of creating a service. The first ones that are constant and value are somewhat similar.
Both the constant and value services are used to create values/objects in Angular. With the Module API, we can use the constant and value functions respectively to create a constant and value service. For example, here are the syntaxes:
angular.module('app').constant('myObject', {prop1:"val1", prop2:"val2"});
or
angular.module('app').value('myObject', {prop1:"val1", prop2:"val2"});
The preceding code creates a service with the name myObject. To use this service, we just need to inject it:
angular.module('app').controller('MyCtrl',['$scope','myObject',  function($scope, myObject) {
   $scope.data=myObject.prop1; //Will assign "val1" to data
});The one difference between the constant and value service is that the constant service can be injected at the configuration stage of the app whereas the value service cannot.
In the previous Lesson, we talked about the configration and run stage of every AngularJS module. The configuration stage is used for the initialization of our service components before they can be used. During the configuration stage, the standard DI does not work as at this point services and other components are still being configured before they become injectable. The constant service is something that we can still inject even during the configuration stage. We can simply inject the myObject service in the config function:
angular.module('app').config(function(myObject){Another thing to keep in mind is that the constant and value services do not take any dependencies so we cannot inject any.
These are services created using the module service method and look something like this:
angular.module('app').service('MyService1',['dep1',function(dep1) {
      this.prop1="val1";
      this.prop2="val2";
      this.prop3=dep1.doWork();
  }]);
The previous service is invoked like a constructor function by the framework and cached for the lifetime of the app. As explained earlier, the service is created on demand when requested for the first time. To contrast it with plain JavaScript, creating a service using the service function is equivalent to creating an object using the constructor function:
new MyService(dep1);
Services created using the service recipe can take dependencies (dep1). The next way to create a service is to use factory.
This mechanism of service creation uses a factory function. This function is responsible for creating the service and returning it. Angular invokes this factory function and caches the return value of this function as a service object: factory implementation looks like this:
angular.module('app').factory('MyService2', ['dep1', function (dep1) {
    var service = {
        prop1: "val1",
        prop2: "val2",
        prop3: dep1.doWork()
    };
    return service;
});
In the previous code, the factory function creates a service object, configures it, and then returns the object. The difference between the service and factory function is that, in the first case, Angular creates the service object treating the service as the constructor function, whereas the case of the factory service, we create the object and provide it to the framework to cache.
The factory way of creating a service is the most commonly used method as it provides a little more control over how the service object is constructed.
The last and the most sophisticated recipe of creating a service is provider.
The provider recipe gives us the maximum control over how a service is created and configured. All the previous ways of creating a service are basically pre-configured provider recipes to keep the syntax simple to understand. The provider mechanism of creating a service is seldom used, as we already have easier and more intuitive ways to create these sharable services.
In this method, the framework first creates a custom object that we define. This object should have a property $get (which itself is injectable) that should be the factory function as mentioned earlier. The return value of the $get function is the service instance of the desired service. If it all sounds gibberish, this example will help us understand the provider syntax:
angular.module('app').provider('myService3', function () {
    var prop1;
    this.setIntialProp1Value = function (value) {
        prop1 = value; // some initialization if required
    };
    this.$get = function (dep1) {
        var service = {
            prop1: prop1,
            prop2: dep1.doWork(),
            prop3: function () {}
        };
        return service;
    };
});
We define this piece of code as a provider service, myService3. Angular will create an object of this provider and call the $get factory function on it to create the actual service object. Note that we are injecting dependencies in the $get method, and not in the provider service declaration.
The final outcome is the same as myService1 and myService2 except that the provider allows us to configure the service creation at the configuration stage. The following code shows how we can configure the initial value of the prop1 property of the myService3 service:
angular.module('app').config(function (myService3Provider) {
    myService3Provider.setIntialProp1Value("providerVal");
});
Here, we call the initial setIntialProp1Value method on the provider, which affects the value of prop1 (it sets it to providerVal) when the service is actually created. Also, make a note of the name of the dependency we have passed; it is myService3Provider and not myService3. Remember this convention or the configuration dependency injection will not work.
Note
I have created a fiddle to show how each of the constant, value, service, factory, and provider services are created. You can experiment with these service constructs here at http://jsfiddle.net/cmyworld/k3jjk/.
When should we use the provider recipe? Well, the provider syntax is useful only if we need to set up/initialize parts of the service before the service can be consumed. The $route service is a good example of it. We use the underlying $routeProvider to configure the routes before they can be used in the app.
With this understanding of AngularJS services, it is time for us to implement workout history tracking.
The first task here is to define the service for tracking data. The service will provide a mechanism to start tracking when the workout starts and end tracking when the workout ends.
We start with defining the service. Open the services.js file and add the initial service declaration as follows:
angular.module('7minWorkout')
    .factory('workoutHistoryTracker', ['$rootScope', function ($rootScope) {
      var maxHistoryItems = 20;   //Track for last 20 exercise
      var workoutHistory = [];
      var currentWorkoutLog = null;
      var service = {};
      return service;
}]);
We use the factory recipe to create our service and the dependency that we inject is $rootScope. Let's quickly go through some guidelines around using scope in the service.
From a scope perspective, services have no association with scopes. Services are reusable pieces of components which are mostly non-UI centric and hence do not interact with DOM. Since a scope is always contextually bound to the view, passing $scope as a dependency to a service neither makes sense, nor is it allowed. Also, a scope's lifetime is linked to the associated DOM element. When the DOM is removed, the linked scope is also destroyed whereas services being singleton are only destroyed when the app is refreshed. Therefore, the only dependency injection allowed in a service from a scope perspective is $rootScope, which has a lifetime similar to the service lifetime.
We now understand that injecting current scope ($scope) in a service is not allowed. Even calling a service method by passing the current $scope value as a parameter is a bad idea. Calls such as the following in controller should be avoided:
myService.updateUser($scope);
Instead, pass data explicitly, which conveys the intent better.
myService.updateUser({first:$scope.first, last:$scope.last, age:$scope.age});If we pass the current controller scope to the service, there is always a possibility that the service keeps the reference to this scope. Since services are singleton, this can lead to memory leaks as a scope does not get disposed of due to its reference inside the service.
Continuing with the implementation, we will track the last 20 workouts done. The workoutHistory array will store the workout history. The currentWorkoutLog array tracks the current workout in progress.
Add two methods: startTracking and endTracking on the service object, as follows:
service.startTracking = function () {
    currentWorkoutLog = { startedOn: new Date().toISOString(),
completed: false,
exercisesDone: 0 };
if (workoutHistory.length >= maxHistoryItems) {
        workoutHistory.shift();
    }
    workoutHistory.push(currentWorkoutLog);
};

service.endTracking = function (completed) {
    currentWorkoutLog.completed = completed;
    currentWorkoutLog.endedOn = new Date().toISOString();
    currentWorkoutLog = null;
};
The controller will call these methods to start and stop tracking of the exercise.
In the startTracking function, we start with creating a new workout log with the current time set. If the workoutHistory array has reached its limits, we delete the oldest entry before adding the new workout entry to workoutHistory.
The endTracking function marks the workout as completed based on the input variable. It also sets the end date of the workout and clears the currentWorkoutLog variable.
Add another service function getHistory that returns the workoutHistory array:
service.getHistory = function () {
  return workoutHistory;
}
Lastly, add an event subscriber:
$rootScope.$on("$routeChangeSuccess", function (e, args) {
    if (currentWorkoutLog) {
        service.endTracking(false); // End the current tracking if in progress the route changes.
    }
});
Events in Angular are a new concept that we will touch upon later during the implementation. For now, it will be enough to say that this piece of code is used to end exercise tracking when the application route changes.
Passing a false value to the endTracking function marks the workout as incomplete.
Lastly, include the services.js reference in index.html after the filters.js reference.
<script src="js/7MinWorkout/services.js"></script>
We are now ready to integrate the service with our WorkoutController function.
Open workout.js and inject the workoutHistoryTracker service dependency into the controller declaration:
.controller('WorkoutController', ['$scope', '$interval', '$location', '$timeout', 'workoutHistoryTracker', function ($scope, $interval, $location, $timeout, workoutHistoryTracker) {The preceding injections are no different from the other services that we have injected so far.
Now add this line inside the startWorkout function just before the call to startExercise:
workoutHistoryTracker.startTracking();
$scope.currentExerciseIndex = -1;
startExercise($scope.workoutPlan.exercises[0]);
We simply start workout tracking when the workout starts.
We now need to stop tracking at some point. Find the function startExerciseTimeTracking and replace $location.path('/finish'); with workoutComplete();. Then, go ahead and add the workoutComplete method:
var workoutComplete = function () {
workoutHistoryTracker.endTracking(true);
$location.path('/finish');
}
When the workout is complete, the workoutComplete function is invoked and calls the workoutHistoryTracker.endTracking(); function to end tracking before navigating to the finish page.
With this, we have now integrated some basic workout tracking in our app. To verify tracking works as expected, let's add a view that shows the tracking history in a table/grid.
We are going to implement the history page as a pop-up dialog. The link to the dialog will be available on the top nav object of the application, aligned to the right edge of the browser. Since we are adding the link to the top nav object, it can be accessed across pages.
Copy the updated index.html file from the companion code in Lesson02/checkpoint6/app. Other than some style fixes, the two major changes to the index.html file are the addition of a new controller:
<body ng-app="app" ng-controller="RootController">
Add the history link:
<ul class="nav navbar-nav navbar-right"> <li>
  <a ng-click="showWorkoutHistory()" title="Workout History">History</a>
</li></ul>
As the previous declaration suggests, we need to add a new controller RootController to the app. Since it is declared alongside the ng-app directive, this controller will act as a parent controller for all the controllers in the app. The current implementation of RootController opens the modal dialog to show the workout history.
Copy the root.js file from Lesson02checkpoint6appjs and place it in the same folder where the app.js file resides.
RootController implementation is similar to WorkoutVideosController. The only point of interest in the current RootController implementation is the use of the workoutHistoryTracker service to load and show workout history:
var WorkoutHistoryController = function ($scope, $modalInstance, workoutHistoryTracker) {
  $scope.search = {};
$scope.search.completed = '';
    $scope.history = workoutHistoryTracker.getHistory();
    $scope.ok = function () {
        $modalInstance.close();
    };
};
Remember, we get the same service instance for workoutHistoryTracker as the one passed in to WorkoutController (because services are singleton), and hence the getHistory method will return the same data that was created/updated during workout execution.
Add a reference to the root.js file in index.html after the app.js reference (if not already added):
<script src="js/root.js"></script>
Next we need to add the view. Copy the view HTML from Lesson02checkpoint6apppartialsworkout-history.html into the partial folder.
We will not delve deeply into workout history view implementation yet. It basically has a table to show workout history and a radio button filter to filter content based on whether the exercise was completed or not.
Run the app and we should see the History link in the top navigation bar. If we click on it, a popup should open that looks something like this:
Since there is no workout data, there is no history. Start the workout and click on the link again and we will see some data in the grid, as seen in the following screenshot:

If we now navigate to the start or finish page by changing the URL or wait for the workout to finish and then check the history, we will see the end time for the exercise too.
We now have some rudimentary history tracking enabled that logs the start and end time of a workout. The WorkoutController function starts the tracking when the workout starts and ends it when the workout ends. Also, if we manually navigate away from the workout page, then the workoutHistoryTracker service itself stops tracking the running workout and marks it as incomplete. The service makes use of the eventing infrastructure to detect whether the route has changed. The implementation looks like this:
$rootScope.$on("$routeChangeSuccess", function (e, args) {
if (currentWorkoutLog) {
         service.endTracking(false);
}});
To understand the preceding piece of code, we will need to understand the AngularJS eventing primitives.
Events are implementation of the observer design pattern. They allow us to decouple publishing and subscribing components. Events are common in every framework and language. JavaScript too has support for events where we can subscribe to events raised by DOM elements such as a button click, input focus, and many others. We can even create custom events in JavaScript using the native Event object.
AngularJS too supports a mechanism to raise and consume events using the scope object. These events might sound similar to DOM element events but these custom events have a very specific purpose/meaning within our app. For example, we can raise events for the start of an exercise, start of a workout, workout completion, or workout aborted. In fact, a number of Angular services themselves raise events signifying something relevant has occurred, allowing the subscribers of the event to react to the change.
This eventing infrastructure is completely built over the scope object. The API consists of three functions:
$scope.$emit(eventName, args)$scope.$broadcast(eventName, args)$scope.$on(eventName, listener(e, args))
$scope.$emit and $scope.$broadcast are functions to publish events. The first argument that these functions take is the name of the event. We are free to use any string value for the name. It is always advisable to use strings that signify what happened, such as workoutCompleted. The second argument is used to pass any custom data to the event handler.
$scope.$on is used to subscribe to events raised either using either $scope.$emit or $scope.$broadcast. The match between the event publisher and subscriber is done using the eventName argument. The second argument is the listener that gets invoked when the event occurs.
The listener function is called by the framework with two arguments, the event and the arguments passed when the event was raised. Since we have already used the $on function in our service, let's try to dissect how it works. In this line:
$rootScope.$on("$routeChangeSuccess", function (e, args) {
We define the event handler on $rootScope as we can only inject $rootScope in a service and since $rootScope too is a scope, subscription works. We subscribe to an event $routeChangeSuccess. However, who raises this event?
One thing is pretty evident from the event name: that this event is raised when the app route changes. Also, who is responsible for managing routes, the $route service? The $route services raises this event when the route change is complete. The service also raises two other events: $routeChangeError and $routeUpdate. Refer to the $route documentation for more details about the events.
Since $route is a service, it also has access to $rootScope only, so it calls:
$rootScope.$broadcast('$routeChangeSuccess', next, last);The next and last parameters are the old and the new route definitions. The $routeChangeSuccess event signifies successful transition from the last to next route. The last/next objects are route objects that we added when defining the route using $routeProvider.
The $route service previously mentioned uses the $broadcast method, but why $broadcast and why not $emit? The difference lies in the way $broadcast and $emit propagate events.
To understand the subtle difference between these methods, let's look at this diagram which shows a random scope hierarchy that can exist in any AngularJS app and how events travel:

$rootScope is the overall parent of all scopes. Other scopes come into existence when a directive asks for a new scope. Directives such as ng-include, ng-view, ng-controller, and many other directives cause new scopes to be rendered. For the previous scope hierarchy, this occurs:
- The
$emitfunction sends the event or message up the scope hierarchy, from the source of the event or scope on which the event is raised to the parent scope related to the parent DOM element. This mechanism is useful when a child component wants to interact with its parent component without creating any dependency. Based on the previous diagram, if we do a$scope.$emitimplemention on scopes4, then scopes2and$rootScopecan catch the event with$scope.$on, but scopes5,s3, ors1cannot. For emitted events, we have the ability to stop propagation of the event. $broadcastis just the opposite of$emit. As shown in the image,$broadcasthappens down the scope hierarchy from the parent to all its child scopes and its child scopes and so on. Unlike$emit, a$broadcastevent cannot be cancelled. If scopes2does a broadcast, scopes4ands5can catch it but scopes1,s5, and$rootScopecannot.Since
$rootScopeis the parent of all scopes, any broadcast done from$rootScopecan be received by each and every scope of the application. A number of services such as$routeuse$rootScope.$broadcastto publish event messages. This way any scope can subscribe to the event message and react to it. The$routeChangeSuccessevent in the$routeservice is a good example of such an event.For obvious reasons,
$emitfrom$rootScopedoes not work for global event propagation (like$routeChangeSuccess) as$emitpropagates the events up the hierarchy, but, since$rootScopeis at the top of the hierarchy, the propagation stops there itself.
Note
Since $rootScope.$broadcast is received by each and every scope within the app, too many of these broadcasts on the root scope can have a detrimental effect on the application's performance. Look at this jsPerf (http://jsperf.com/rootscope-emit-vs-rootscope-broadcast) test case to understand the impact.
We can summarize the different $broadcast and $emit functions in two sentences:
$emitis what goes up$broadcastis what propagates down
Eventing is yet another mechanism to share data across controllers, services, and directives but its primary intent is not data sharing. Events as the name suggests signify something relevant happened in the app and let other components react to it.
That sums up the eventing infrastructure of AngularJS. Let's turn our focus back to our app where we plan to utilize our newfound understanding of the eventing.
The $routeChangeSuccess event implementation in workoutHistoryTracker makes more sense now. We just want to stop workout tracking as the user has moved away from the workout page.
The missing pieces on our history tracking interface are two columns, one detailing the last exercise in progress and the other providing information about the total number of exercises done.
This information is available inside WorkoutController when the workout is in progress and it needs to be shared with the workoutHistoryTracker service somehow.
One way to do it would be to add another function to the service such as trackWorkoutUpdate(exercise) and call it whenever the exercise changes, passing in the exercise information for the new exercise.
Or we can raise an event from WorkoutController whenever the exercise changes, catch that event on the $rootScope object in the service, and update the tracking data. The advantage of an event-based approach is that in the future, if we add new components to our app that require exercise change tracking, no change in the WorkoutController implementation will be required.
We will be taking the eventing approach here. Open workout.js and inside the startExercise function, update the if condition to this:
if (exercisePlan.details.name != 'rest') {
  $scope.currentExerciseIndex++;
  $scope.$emit("event:workout:exerciseStarted", exercisePlan.details);
}
Here, we emit an event (that moves up) with the name event:workout:exerciseStarted. It is always a good idea to add some context around the source of the event in the event name. We pass in the current exercise data to the event.
In services.js, add the corresponding event handler to the service implementation:
$rootScope.$on("event:workout:exerciseStarted", function (e, args) {
currentWorkoutLog.lastExercise = args.title;
   ++currentWorkoutLog.exercisesDone;
});
The code is self-explanatory as we subscribe to the same event and update workout history data with the last exercise done and the number of total exercises completed. The args argument points to the exercisePlan.details object that is passed when the event is raised with $emit.
One small improvement we can do here is that, rather than using a string value in an event name, which can lead to typos or copy paste issues, we can get these names from a constant or value service, something like this:
angular.module('7minWorkout').value("appEvents", {
   workout: { exerciseStarted: "event:workout:exerciseStarted" }
});
Add the preceding code to the end of services.js.
Inject this value service in the workoutHistoryTracker service and WorkoutController and use it in event publishing and subscription:
$scope.$emit(appEvents.workout.exerciseStarted, exercisePlan.details); // in WorkoutController

$rootScope.$on(appEvents.workout.exerciseStarted, function (e, args) {// in workoutHistoryTracker service
The value service appEvents acts as a single source of reference for all events published and subscribed throughout the app.
We can now verify our implementation after starting a new workout and checking the history table. We should see data in the two columns: Last Exercise and Exercises Done:

It might seem that we are done with workout history tracking but there is still a minor issue. If we refresh the browser window, the complete workout data is lost. We can confirm this by refreshing the browser and looking at the history grid; it will be empty!
Well, the data got lost because we are not persisting it. It is just in memory as a JavaScript array. What options do we have for persistence?
We can do persistence on a server. This is a viable option but, since we have not touched on the client-server interaction part in Angular, let's skip this option for now.
The other option is to use the browser's local storage. All modern browsers have support for the persisting user data in browser storage.
The advantage of this storage mechanism is that data is persisted even if we close the browser. The disadvantage is that the store is not shared across the browser; each browser has its own store. For now, we can live with this limitation and use browser storage to store our workout history data.
To implement browser storage integration with our service, we will again look for a community solution and the one that we plan to use is AngularJS-local-storage (https://github.com/grevory/angular-local-storage). This is a simple module that has a service wrapper over the browser local storage API.
I hope now we are quite used to adding module dependencies and dependency injection at service, filter, and controller level.
Go ahead and add the LocalStorageModule dependency to our app module in app.js.
Then open services.js and inject the dependency localStorageService into workoutHistoryTracker.
Add two declarations at the top of our workoutHistoryTracker service with other declarations:
var maxHistoryItems = 20
, storageKey = "workouthistory"
, workoutHistory = localStorageService.get(storageKey) || []
Add this line at the end of the startTracking function:
localStorageService.add(storageKey, workoutHistory);
Add this line at the end of the event handler for event appEvents.workout.exerciseStarted:
localStorageService.add(storageKey, workoutHistory);
Finally, add this line to the end of the endTracking function:
localStorageService.add(storageKey, workoutHistory);
Again pretty simple stuff! When the service is instantiated, we check if there is some workout history available by calling the get method of localStorageService passing in the key to our entry. If there is no historical data, we just assign an empty array to workoutHistory.
Thereafter, in each relevant function implementation, we update the historical data by calling an add function on localStorageService. Since the local storage does not have the concept of updates, adding the same data with the same key again overwrites the original data, which is similar to an update. Also, note that we update the complete array, not a specific row in the local storage.
The historical data is now being persisted and we can verify this by generating some workout history and refreshing the page. If our implementation was spot on, the data will not be lost.
The workout history view (workout-history.html) has some new constructs that we have not touched so far. With the history tracking implementation out of the way, it is a good time to look at these new view constructs.
The first in line are the radio inputs that we have added to filter exercises.
The snippet for showing radio button filters looks like this:
<label><input type="radio" name="searchFilter" ng-model="search.completed" value="">All</label>
<label><input type="radio" name="searchFilter" ng-model="search.completed" value="true">Completed</label>
<label><input type="radio" name="searchFilter" ng-model="search.completed" value="false">Incomplete</label>
We use the ng-model directive to bind the input value attribute to the model property search.completed. This implies that, if we select a radio button with text All, the model property search.completed will be empty. The search.completed property will be true for the second radio and false for the third radio selection.
The idea here is to use the radio buttons to set the $scope.search.completed property. Now to understand how we use the search.completed property, we need to dissect the new avatar of ng-repeat.
The ng-repeat expression that we have used here seems to be more complex than the one that was used for showing video list. It looks like this:
<tr ng-repeat="historyItem in history | filter:search | orderBy:'-startedOn'">As we know, the symbol | is used to represent a filter in an expression. In the preceding ng-repeat expression, we have added two filters one after another and this is how we interpret the complete filter expression.
Take the history array and apply the filter filter with a search expression that contains data to search for. On the resultant (filtered) array, again apply a filter to reorder the array elements based on the model property startedOn.
From the previous expression, we can see how the result of one filter acts as an input for another filter and what we finally get is a filtered data set that has passed through both the filters. The filter search filter alters the count of the source array whereas the orderBy filter reorders the elements.
Let's explore these filters in more detail and understand how to use them
We touched upon filter in the last Lesson. The filter object is a very versatile and powerful filter and provides a number of options to search and filter an array. The general filter syntax is:
{{ filter_expression | filter : expression : comparator}}The filter object can take three types of expressions (the first filter parameter expression), as follows:
- Strings: The array searches for this string value. If it is an array of objects, each property in the array that is of the string type is searched. If we prefix it with
!(!string)then the condition is reversed. - Objects: This syntax is used for more advanced searches. In the preceding
ng-repeat, we use object search syntax. The value of oursearchobject is{completed:''},{completed:true}, or{completed:false}based on the radio options selected. When we apply this search expression to the filter, it tries to find all the objects in the history wherehistoryItem.completed = search.completed.Using the object notation, we restrict our search to specific properties on the target array elements, unlike the
stringexpression that only cares about the property value and not the name of the property.We can search based on multiple properties too. For example, a search expression such as
{completed:true, lastExercise:"Plank"}, will filter all exercises that were completed where the last exercise wasPlank. Remember that in a multi-condition filter, every condition must be satisfied for an item to be filtered. function(value): We can pass a predicate function, which is called for each array element and the element is passed in as value parameter. If the function returns true, it's a match else a mismatch.
The comparator parameter defined in the previous filter syntax is used to control how comparison is done for a search.
function(actual, expected): Theactualvalue is the original array value andexpectedis the filter expression. For example, in our case, we have this:<tr ng-repeat="historyItem in history | filter:search | orderBy:'-startedOn'">
Each
historyItemis passed intoactualand thesearchvalue intoexpected. The function should returntruefor the item to be included in the filtered results.true: A strict match is done usingangular.equals(actual, expected).false|undefined: This does a case-insensitive match. By default, comparison is case-insensitive.
The other filter that we have used is an orderBy filter.
The orderBy filter is used to sort the array elements before they are rendered in the view. Remember, the order in the original array remains intact. We use the orderBy filter to sort the workout history array using the startedOn property.
The general syntax of order by looks like this:
{{ orderBy_expression | orderBy : expression : reverse}}The expression parameter can take these:
- Strings: This is used to sort an array based on its element property name. We can prefix
+or-to the string expression, which affects the sort order. We use the expression-startedOnto sort the workout history array in decreasing order of thestartedOndate.Since we are using a constant expression for search, we have added quotes (') around
–startedOn. If we don't quote the expression and use:<tr ng-repeat="historyItem in history | filter:search | orderBy:-startedOn">AngularJS would look for a property name
startedOnon the scope object. function(element): This sorts the return value of the function. Such expression can be used to perform custom sorting. Theelementparameter is the item within the original array. To understand this, consider an example array:$scope.students = [ {name: "Alex", subject1: '60', subject2: "80"}, {name: "Tim", subject1: '75', subject2: "30"}, {name: "Jim", subject1: '50', subject2: "90"}];If we want to sort this array based on the total score of a student, we will use a function:
$scope.total = function(student){
  return student.subject1 + student.subject2;
}
Then, use it in the filter:
ng-repeat="student in students | orderBy:total"- Arrays: This can be an array of string or functions. This is equivalent to n-level sorting. For example, if the
orderByexpression is["startedOn", "exercisesDone"], the sorting is first done on thestartedOnproperty. If two values match the next level, sorting is done onexerciseDone. Here too, we can again prefix-or+to affect the sort order.
Rendering a list of items with support for sorting and filtering is a very common requirement across all business apps. These are feature-rich filters that are flexible enough to suit most sorting and filtering needs and are extensively used across Angular apps.
There is another interesting interpolation that has been used inside the ng-repeat directive:
<td>{{$index+1}}</td>The ng-repeat directive adds some special properties on the scope object of current iteration. Remember, ng-repeat creates a new scope on each iteration! These are as follows:
These special properties can come in handy in some scenarios. For example, we used the $index property to show the serial number in the first column of the history grid.
Another example could be this:
ng-class="{'even-class':$even, 'odd-class':$odd}"This expression applies even-class to the HTML element for even rows and odd-class for odd rows.
With this, we have reached the end of another Lesson. We have added a number of small and large enhancements to the app and learned a lot. It's time now to wrap up the Lesson.