
Keeping up with the theme of this part, we will be building a new app in AngularJS and in the process, developing a better understanding of the framework. This app will also help us to explore capabilities of the framework that we have not touched on until now.
The topics we will cover in this Lesson include:
- The 7 Minute Workout problem description: We detail the functionality of the app that we will build in this Lesson.
- Code organization: For our first real app, we try to understand how to organize code, specifically AngularJS code.
- Designing the model: One of the building blocks for our app is its model. We design the app model based on the app requirements we define.
- Understanding dependency injection: One of the core components of AngularJS, DI helps us to keep app elements loosely coupled and testable. We learn about the DI capabilities of the framework in this Lesson.
- Implementing the controller: We implement the core workout logic using the model created earlier. In the process we also cover some new Angular constructs such as watches and promises.
- Designing the view: We create the view for the 7 minute app and integrate it with the controller. We also cover directives such as
ng-srcandng-stylethat are part of our app view.
- Creating a single-page app: AngularJS is all about single-page apps (SPA). We explore the SPA capabilities of the framework by adding a start, workout, and finish page to the app. We also cover route configuration using
$routeProviderand the routing directiveng-view. - Working with partial views: To make the app more professional, we add some additional features. We start with adding exercise details such as a description, steps, and videos to the exercise page. This helps us understand the framework's ability to include partial views using the directive
ng-include. - Implementing a "workout time remaining" filter: We learn about AngularJS filters by creating one of our own that tracks the overall workout time. We also go through some framework filters such as date, number, uppercase, and lowercase.
- Adding the next exercise indicator using ng-if: We explore the
ng-ifdirective and implement a next exercise indicator usingng-if.
Let's get started. The first thing we will do is define the scope of our 7 Minute Workout app.
I want everyone reading this book to be physically fit. Therefore, this book should serve a dual purpose; not only should it simulate your gray matter, but it should also urge you to look at your physical fitness. What better way to do it than to build an app that targets physical fitness!
7 Minute Workout is an exercise/workout plan that requires us to perform a set of twelve exercises in quick succession within the seven minute time span. 7 Minute Workout has become quite popular due to its benefits and the short duration of the workout. I cannot confirm or refute the claims but doing any form of strenuous physical activity is better than doing nothing at all. If you are interested in knowing more about the workout, then check on this link: http://well.blogs.nytimes.com/2013/05/09/the-scientific-7-minute-workout/.
The technicalities of the app are as follows: we perform a set of twelve exercises, dedicating 30 seconds for each exercise. This is followed by a brief rest period before starting the next exercise. For the app we are building, we will be taking rest periods of 10 seconds each. So the total duration comes out to be a little more than seven minutes.
At the end of the Lesson, we will have the 7 Minute Workout app that will look something like this:
The code for this app is available in the companion code package folder of this book under Lesson01. Since we are building the app incrementally, I have created multiple checkpoints that map to folders such as Lesson01/checkpoint1, Lesson01/checkpoint2, and so on. During the narration, I will highlight the checkpoint folder for reference. These folders will contain the work done on the app up to that point in time.
Note
The code files for all the four parts of the course are available at https://github.com/shinypoojary09/AngularJS_Course.git.
So let's get started!
Since we are going to build a decent-size app in AngularJS, it becomes imperative that we define how the code will be structured. For obvious reasons, we cannot take the approach of putting everything into a single file.
The basic folder structure for our web app will look like this:

The css, img, and js folders are self-explanatory. The partials folder will contain HTML views that we will use in the app. The index.html file is the start page for the app. Go ahead and create this folder hierarchy for the app.
Let's now understand how we should organize our JavaScript code.
To effectively organize the script code for our app, we need to be aware of the different AngularJS constructs at our disposal. The following diagram highlights the top-level AngularJS constructs:

Everything in AngularJS can be categorized into four buckets namely: controllers, directives, filters, and services. These constructs are neatly organized using AngularJS modules. We have already talked about controllers and directives, the other two are services and filters.
Services are reusable pieces of code that can be shared across controllers, directives, filters, and services itself. Services are singleton in nature so they also provide a mechanism for sharing data across these constructs.
Filters are a simple concept. Filters in Angular are used to transform model data from one format to another. Filters are mostly used in combination with views. For example, Angular filters such as date and number are used to format date and numeric data that get rendered in the view.
This classification drives our code organization too. We need to organize our own code by segregating components into controllers, directives, filters, and services. Even after this grouping, what options do we have for organizing content at a file and folder level? There are different ways to organize our Angular code in files. The following screenshot depicts three such ways to organize any app code:

Here are the approaches in detail:
- File per component: In this approach, one file for each component type is created. All our controllers go in
controllers.js, directives indirectives.js, and so on. This approach works only for small applications where there are a handful of controllers, directives, services, and filters. However, for any decent-size application, maintaining this structure becomes unfeasible. - Folder per component: In this approach, one folder for each component type is created. Here controllers, directives, filters, and services have designated folders. This approach, though far superior to the first approach, has its challenges. Navigating a codebase can become cumbersome as the size of the project grows. Imagine navigating through tens of controllers or services to find a relevant piece of code. Still, this organization can work well with small projects.
- Folder per feature: This is a hybrid approach that derives from the first two code organization approaches. In this case, we divide our JavaScript code based on major functional areas or app features. The granularity of these functional areas can vary based on the size of the project and how modular the functional area is. For example, for a Human Resource (HR) product, some of the functional areas could be Employees, Timesheet, Attendance, Payroll, and Employee On-Boarding. The advantages of this approach are self-evident. The code becomes more organized, easy to navigate and manageable. Quite frequently, developers or development teams work on specific features and all their activities are limited to a specific feature. The folder per feature organization is ideally suited for such a setup.
Note
Even while using the third approach, we can have common directives, services, and filters that can potentially be used across features. Common reusable code can be organized in some kind of common folder.
Also keep in mind that this separation of code is logical; we can still access components across the feature set.
For our 7 Minute Workout app, we are going to take the third approach. This might be too much for this size of app, but it will keep the code well organized. So the folder hierarchy of our JavaScript will look like this:
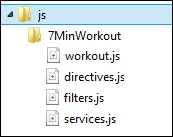
You might have noticed that there is no controllers.js file; instead there is a file named workout.js. The workout.js file will contain the controller code. The convention we are going to follow is to use one controller file per page/view. A feature may have multiple pages/views and hence multiple controller files. Controller separation also makes sense due to the fact that controllers are tightly coupled with the view whereas directives, filters, and services are shared.
There is currently only one major feature/functional area for our app and we will name it 7MinWorkout. In later Lessons, as we extend this app, we will add more subfolders (functional areas) to the root js folder for all the new features we add. Go ahead and create the js and 7MinWorkout folders if you have not done so already.
With the folder structure in place, we can now start designing the app. The first thing that requires our focus is the app model.
Designing the model for this app will require us to first detail the functional aspects of the 7 Minute Workout app and then derive a model that can satisfy those requirements. Based on the problem statement defined earlier, some of the obvious requirements are:
- Being able to start the workout.
- Providing a visual clue about the current exercise and its progress. This includes:
- Providing screenshots of the current exercise
- Providing step-by-step instructions to the user on how to do a specific exercise
- The time left for the current exercise
- Notifying the user when the workout is completed.
Some valuable requirements that we will add to this app are:
- The ability to pause the current workout.
- Providing information about the next exercise to follow.
- Providing audio clues so that the user can perform the workout without constantly looking at the screen. This includes:
- A timer click sound
- Details about the next exercise
- Signaling that the exercise is about to start
- Showing related videos for the exercise in progress, and the ability to play them.
As we can see, the central theme for this app is workout and exercise. Here, a workout is a set of exercises performed in a specific order for a particular duration. So let's go ahead and define the model for our workout and exercise.
Based on the requirements just mentioned, we will need the following details about an exercise:
- Name: This should be unique
- Title: This is shown to the user
- A description of the exercise
- Instructions on how to perform the exercise
- Images for the exercise
- The name of the audio clip for the exercise
- Related videos
Based on the preceding description, the exercise model will look something like this:
function Exercise(args) {
    this.name = args.name;
    this.title = args.title;
    this.description = args.description;
    this.image = args.image;
    this.related = {};
    this.related.videos = args.videos;
    this.nameSound = args.nameSound;
    this.procedure=args.procedure;
}
We use a JavaScript constructor function to define our model class. The args parameter can be used to pass initial data when creating new objects for Exercise.
For the workout, we need to track:
- Name: This should be unique
- Title: This is shown to the user
- Exercises that are part of the workout
- The duration for each exercise
- The rest duration between two exercises
So the model class looks like this:
function WorkoutPlan(args) {
    this.exercises = [];
    this.name = args.name;
    this.title = args.title;
    this.restBetweenExercise = args.restBetweenExercise;
};
The exercises array will contain objects in the format {exercise: new Exercise({}), duration:30}.
These two classes constitute our model, and we will decide in the future if we need to extend this model as we start implementing the app functionality.
We need to place the preceding model declarations somewhere and the controller seems to be a good fit for it.
Modules are containers for components that are part of the framework and for components that we create. Modules allow logical separation of components and also permit them to reference each other.
For our 7 Minute Workout app, all the controllers, directives, services, and filters that we create will be partitioned into multiple AngularJS modules.
To start with, we will add a root module for our app. As a convention, we add all our module declarations in a separate file app.js, which is created in the app's js folder. We make use of the AngularJS Module API to create a new module. Let's add the app.js file in the js folder and add this line at the top:
angular.module('app', []);The previous statement creates a module named app (first argument). The second argument is an array of other module dependencies that the app module has. This is empty for the moment as we are only dependent on the framework module. We will talk about dependencies later in this Lesson when we discuss the dependency injection (DI) framework of AngularJS.
We treat our 7 Minute Workout app as a feature and hence we will add a module for that too. In the same app.js file, add another module declaration, as follows:
angular.module('7minWorkout', []);It's time now to add the controller.
To implement the controller, we need to outline the behavior of the application. What we are going to do in 7 Minute Workout app is:
- Start the workout.
- Show the workout in progress and show the progress indicator.
- After the time elapses for an exercise, show the next exercise.
- Repeat this process till all exercises are over.
This gives us a fair idea about the controller behavior, so let's start with the implementation.
Add a new JavaScript file workout.js to the 7MinWorkout folder. All code detailed in the line later goes into this file until stated otherwise.
We are going to use the Module API to declare our controller and this is how it looks:
angular.module('7minWorkout').controller('WorkoutController', function($scope){
});
Here, we retrieve the 7minWorkout module that we created earlier in app.js (see the Adding app modules section) using the angular.module('7minWorkout') method and then we call the controller method on the module to register our 7minWorkout controller.
The controller method takes two arguments, first being the controller name and the second a constructor function for the controller. We will add our implementation in this function.
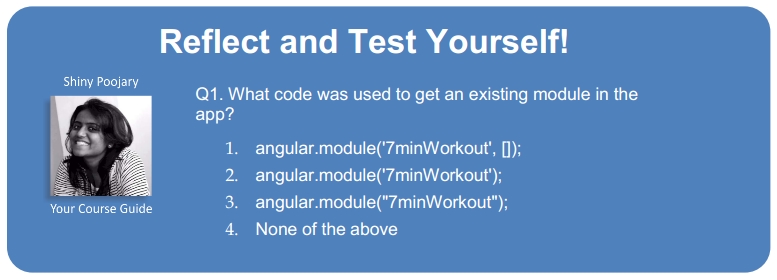
Note
Make a note of the subtleties between creating a module and getting a module.
The following is the code to create a new module:
angular.module('7minWorkout', []); // creates a new module
This is how you get an existing module:
angular.module('7minWorkout'); //get an existing module
The difference is just the extra parameter []. If we use the first syntax multiple times for the same module, it will create the module again and override all existing module dependencies that we may have already configured. This may result in errors like this:
Argument 'ControllerName' is not a function, got undefined.
The function declaration for the preceding controller takes an argument $scope. When the controller is instantiated, AngularJS injects a scope object into this argument. The mechanism that AngularJS uses to achieve this is the topic of our next discussion.
Modules provide a way to organize code and act as containers for most of the AngularJS constructs such as controllers, services, directives, and filters. In spite of this segregation, these constructs might make them depend on each other, either inside the same module or across modules.
AngularJS provides a mechanism to manage dependencies between AngularJS constructs in a declarative manner using dependency injection (DI). The DI pattern is popular in many programming languages as DI allows us to manage dependencies between components in a loosely coupled manner. With such a framework in place, dependent objects are managed by a DI container. This makes dependencies swappable and the overall code more decoupled and testable.
The idea behind DI is that an object does not create/manage its own dependencies; instead the dependencies are provided from the outside. These dependencies are made available either through a constructor, called constructor injection (as with Angular), or by directly setting the object properties, called property injection.
Here is a rudimentary example of DI in action. Consider a class Component that requires a Logger object for some logging operation.
function Component() {
  var logger = new Logger(); //Logger is now ready to be used.
}
The dependency of the Logger class is hardwired inside the component. What if we externalize this dependency? So the class becomes:
function Component(l) {
  var logger=l;
}
This innocuous-looking change has a major impact. By adding the ability to provide the dependency from an external source, we now have the capability to alter the logging behavior of the Component class without touching it. For example, we have the following lines of code:
var c1WithDBLog=new Component(new DBLogger());
var c1WithFileLog=new Component(new FileLogger());
We create two Component objects with different logging capabilities without altering the Component class implementation. The c1WithDBLog object logs to a DB and c1WithFileLog to a file (assuming both DBLogger and FileLogger are derived from the Logger class). We can now understand how powerful DI is, in allowing us to change the behavior of a component just by manipulating its dependencies.
Once DI is in place, the responsibility for resolving the dependencies falls on the calling code or client/consumer code that wants to use the Component class.
To make this process less cumbersome for the calling code, we have DI containers/frameworks. These containers are responsible for constructing the dependencies and providing them to our client/consumer code. The AngularJS DI framework does the same for our controllers, directives, filters, and services.
We have already seen an example of DI where the $scope object is magically injected into the controller function:
angular.module('7minWorkout').controller('WorkoutController', function($scope){Here, we instruct AngularJS that whenever it instantiates the controller, it should inject the scope that was created as part of the ng-controller directive declaration. The preceding line is an implicit DI. As AngularJS is creating the controller and injecting the dependency, everything is transparent to us. We just use the injected dependencies.
To resolve dependencies, AngularJS uses name matching. For each dependency (a parameter such as $scope) defined on the function, Angular tries to locate the dependency from a list of components that have already been registered.
This search is done based on the name of the parameter. In the preceding controller function declaration, we need to provide the $scope string verbatim for DI to work. We can try this out by changing the function parameter $scope in function($scope) to $scope1 and refreshing the browser. The developer console will show the following error:
Error: [$injector:unpr] Unknown provider: $scope1Provider <- $scope1
The approach of using names for dependency resolution has its downsides. One of them is that the previous code breaks when minified.
Minification in JavaScript is the process of removing extra characters for the source code with the aim to reduce the overall size of the codebase. This can lead to the removal of whitespaces/comments, shortening functions/variables, and other such changes. There is a plethora of tools available across all development platforms to minify script files.
A minifier will minify the input parameter names, rendering the AngularJS DI framework useless. Also, since most of the JavaScript code that we use in our production environment is minified, the preceding syntax for injecting dependencies is not very popular. This requires us to explore some other options/syntaxes for injection dependencies.
There are two other ways to declare dependencies so that DI does not break after minification.
- The $inject annotation: When using the controller function, we can use the
$injectannotation in the following way:function WorkoutController($scope) { // Controller implementation } WorkoutController['$inject'] = ['$scope']; angular.module('app') .controller('WorkoutController', WorkoutController);We added a static property
$injectto the constructor functionWorkoutController. This property points to an array that contains all the dependencies annotated as string values. In our case, there is only one$scopeobject. Note that the dependencies are injected in the controller function based on the order they are declared within$injectarray. - The inline annotation: An alternate way of dependency declaration is to use inline annotations in the following way:
angular.module('7minWorkout')
  .controller('WorkoutController', ['$scope', function($scope) {
    }]);
The second argument to the controller function is now an array instead of a function. This array contains a list of dependencies annotated using string literals. The last element in the array is the actual controller function (
function($scope)) with the injected dependencies. Like the$injectinjection, this too happens based on the annotation order.
Both $inject and inline annotations are a bit verbose and at times are prone to mistakes. Be careful and always make sure that the order of annotations matches the order of parameter declaration when used with any Angular construct.
Note
If, on the NodeJS platform, we can use tools such as ng-annotate (https://github.com/olov/ng-annotate), allowing us to convert the standard declaration syntax to an inline annotation format. The tool takes the following code:
.controller('WorkoutController', function($scope){
Then, it is changed to the following:
.controller('WorkoutController', ['$scope', function($scope) {
Once ng-annotate is plugged into a build system, this process can be automated allowing us to use the less verbose syntax during development.
Henceforth, we will be using the inline annotation to declare our controller, therefore let's change our existing controller declaration inside workout.js to the previous format.
With this, we have covered the basics of DI in AngularJS. As we build our app, we will be adding multiple controllers, services, and filters and will use the AngularJS DI framework to wire them together. For now, let's continue our implementation of the controller.
Inside the controller function (function($scope){), add the declaration for the model classes (WorkoutPlan and Exercise) that we detailed in The 7 Minute Workout model section.
Then, add declarations of two local variables, as follows:
var restExercise;
var workoutPlan;
We will see later what they are used for.
Now add some initialization code such as this:
var init = function () {
startWorkout();
};
init();
We declare the init method and immediately call it. This is just a convention that we will use to signify where the controller execution starts. Inside the init method, we call the startWorkout method that will start the workout. Let's see how to implement this method.
The startWorkout method should load the workout data and start the first exercise. The overall method implementation looks like this:
var startWorkout = function () {
    workoutPlan = createWorkout();
    restExercise = {
        details: new Exercise({
            name: "rest",
            title: " Relax!",
            description: " Relax a bit!",
          image: "img/rest.png",

        }),
        duration: workoutPlan.restBetweenExercise
    };
    startExercise(workoutPlan.exercises.shift());
};
We start by calling the createWorkout() function that loads the overall workout plan. Then, we create a new restExercise exercise object that is not part of the original workout plan to signify the rest period between two exercises. By treating the rest period also as an exercise, we can have uniformity in implementation where we don't have to differentiate between a rest period and an exercise in progress.
The last line starts the first exercise by calling the startExercise method with a parameter signifying the exercise is to start. While doing so, we remove the first exercise from the exercises array and pass it to the function.
We are still missing implementation details for the two functions that are called in the startWorkout function namely: createWorkout and startExercise.
The call to the createWorkout method sets up the initial 7 Minute Workout data. In this function, we first create a WorkoutPlan object and then push exercise-related data into its exercises array. The method looks something like this:
var createWorkout = function () {
     var workout = new WorkoutPlan({
         name: "7minWorkout",
         title: "7 Minute Workout",
         restBetweenExercise: 10
     });

     workout.exercises.push({
         details: new Exercise({
             name: "jumpingJacks",
             title: "Jumping Jacks",
             description: "Jumping Jacks.",
             image: "img/JumpingJacks.png",
             videos: [],
             variations: [],
             procedure: ""
         }),
         duration: 30
     });
    // (TRUNCATED) Other 11 workout exercise data.
     return workout;
}Make note that we are not adding the Exercise object directly to the exercises array, but a custom object with one property called details and the other named duration.
The other function startExercise looks like this:
var startExercise = function (exercisePlan) {
    $scope.currentExercise = exercisePlan;
    $scope.currentExerciseDuration = 0;
    $interval(function () {
            ++$scope.currentExerciseDuration;
        }
, 1000
, $scope.currentExercise.duration);
};Only properties and functions that are required to be referenced in the view should be attached to the scope object. We have tried to adhere to this principle in our controller implementation too. All the three functions that we have declared previously (startWorkout, createWorkout, and startExercise respectively) are not added to the $scope object; instead they are declared as normal functions within the controller.
Coming back to the startExercise implementation, let's try to understand what this function is doing.
We start by initializing currentExercise and currentExerciseDuration on the scope. The currentExercise function will track the exercise in progress and currentExerciseDuration will track its duration.
To track the progress of the current exercise, we use the $interval service of AngularJS.
The $interval service is a wrapper over the window.setInterval method. The primary purpose of this service is to call a specific function continuously, at specific intervals.
While invoking $interval, we set up a callback function (the first argument) that gets invoked at specific intervals (the second argument) for a specific number of times (the third argument). In our case, we set up an anonymous function that decrements the currentExerciseDuration property after every one second (1000 ms) for the number of times defined in currentExercise.duration (configured to 30 in each exercise).
We have now used our first AngularJS service $interval. Additionally, as explained in the Dependency injection section, this service needs to be injected in the controller before we can use it. So let's do it by changing the controller definition to the following:
angular.module('7minWorkout')
  .controller('WorkoutController', ['$scope', '$interval', function ($scope, $interval) {
Well, injecting dependency was easy!
Note
All names starting with $ such as $scope and $interval are constructs exposed by the framework. Using this convention, we can distinguish between dependencies that are provided by the framework and any custom dependencies that we use or create.
As a good practice, we should not use the $ prefix in any of our service names.
Time to check how things are looking! We are going to create a makeshift HTML view and test out our implementation.
The code that we have implemented until now is available in the companion source code provided with this book. We will use the code located in the checkpoint1 folder under Lesson01.
Note
If you have been developing along with the text, your code should be in sync with the checkpoint1 folder code for these files:
app.jsunder thejsfolderworkout.jsunderjs/7minworkout
If it is not, update your code. Once the JavaScript files match, you can copy the index.html file from the app folder under checkpoint1 into your app folder.
Copy the index.html file from the source code package and paste it inside the app folder.
Before we run the index.html page, let's inspect the file and see what is in there. Other than the boilerplate HTML stuff, the reference to CSS at the start, the reference to script files at the end, and navbar HTML, there are only a few lines of interest.
<body ng-app="app" ng-controller="WorkoutController">
    <pre>Current Exercise: {{currentExercise | json}}</pre>
    <pre>Time Left: {{currentExercise.duration-currentExerciseDuration}}</pre>
In the preceding code, we use the interpolations to show the current exercise model data (currentExercise) and the time left for the exercise (currentExercise.duration-currentExerciseDuration). The pipe symbol | followed by json is an Angular filter used to format the view data. We will cover filters later in the Lesson. Open the index.html file in your browser.
It did not work! Instead, interpolation characters are displayed as it is. If we inspect the browser console log (F12), there is an error (if you don't see it, refresh the page after you open the browser console). The error message is as follows:
Error: [ng:areq] Argument 'WorkoutController' is not a function, got undefined
What happened? Firstly, we need to verify that our root module app loaded correctly and is linked to the view. This link between our root module (angular.module('app', []);) and view is established using the attribute ng-app="app" defined on the HTML <body> tag. Since the match is done based on the module name, the two declarations should match. In our case they do, so this is not the problem and the root module loads perfectly. So what is the issue?
The error message says that Angular is not able to locate the WorkoutController function. If we go back to the controller declaration, we find this:
angular.module('7minWorkout')
  .controller('WorkoutController', ['$scope', '$interval', function ($scope, $interval) {
The controller here is declared in a module 7minWorkout and not in the root module app. Because of this, the DI framework is not able to locate the controller definition as the containers are different. To fix this issue, we need to add a module level dependency between our app's root module app and the 7minWorkout module. We do this by updating the module declaration of app (in app.js) to this:
angular.module('app', ['7minWorkout']);In the updated module declaration now, we provide the dependencies in the second array argument. In this case, there is only one dependency—the 7minWorkout module. Refresh the page after this change and you will see the raw model data as demonstrated in the following screenshot:

The model data will update after every passing second! Now we can understand why interpolations are a great debugging tool.
We are not done yet! Wait for long enough on the index.html page, and you will realize that the timer stops after 30 seconds and the app does not load the next exercise data. Time to fix it!
We still need to implement the logic of transition to the next exercise. Also remember we need to add a rest period between every exercise. We are going to implement a getNextExercise function to determine the next exercise to transition to. Here is how the function looks:
var getNextExercise = function (currentExercisePlan) {
     var nextExercise = null;
     if (currentExercisePlan === restExercise) {
         nextExercise = workoutPlan.exercises.shift();
     } else {
         if (workoutPlan.exercises.length != 0) {
             nextExercise = restExercise;
         }
     }
     return nextExercise;
 };
Since we are flipping between resting and exercising, this piece of code does the same. It takes the current exercise in progress and determines what the next exercise should be. If the current exercise is restExercise (remember we declared it in startExercise), it then pulls the next exercise from the workout exercise array; if not, it then returns restExercise. Then checking if (workoutPlan.exercises.length != 0) ensures that we do not return any exercise (not even restExercise) after the last exercise in the workout is complete. After this, the workout completes its perpetual rest!
Now somebody needs to call this method to get the next exercise and update the currentExercise model property. We can achieve this in two ways and the interesting thing is that I will have to introduce two new concepts for this. Let's start with the first approach that we are not going to take eventually but that still highlights an important feature of AngularJS.
To make a transition to the next exercise, we need a way to monitor the value of currentExerciseDuration. Once this value reaches the planned exercise duration, transition to the next exercise is required.
Working through the two app samples we know that AngularJS is capable of updating the view when the model changes using the data binding infrastructure. The nice thing about the framework is that this change tracking feature can be utilized in JavaScript code too!
The model tracking infrastructure of Angular is exposed over the $scope object. Till now, we have used the scope object just to manage our model properties and nothing else. But this scope object has much more to offer via the scope API functions. One of the functions it provides is $watch. This function allows us to register a listener that gets called when the scope property changes. The $watch method definition looks like this:
$scope.$watch(watchExpression, [listener], [objectEquality]);
The first parameter, watchExpression, can be either a string expression or a function. If the watchExpression value changes, the listener is invoked.
For a string expression, the expression is evaluated in the context of the current scope. This implies that the string expression that we provide should only contain properties/methods that are available on the current scope. If we pass a function as the first argument, AngularJS will call it at predefined times called digest cycles in the AngularJS world. We will learn about digest cycles in the following Lesson.
The second parameter listener takes a function. This function is invoked with three parameters namely newValue, oldValue, and the current scope. This is where we write logic to respond to the changes.
The third parameter is a Boolean argument objectEquality that determines how the inequality or change is detected. To start with, Angular not only allows us to watch primitive types such as strings, numeric, Boolean, and dates, but also objects. When objectEquality is false, strict comparison is done using the !== operator. For objects, this boils down to just reference matching.
However, when objectEquality is set to true, AngularJS uses an angular.equals framework function to compare the old and new values. The documentation for this method at https://docs.angularjs.org/api/ng/function/angular.equals provides details on how the equality is established.
To understand how objects are compared for inequality, it is best to look at some examples.
This gives a watch expression:
$scope.$watch('obj',function(n,o){console.log('Data changed!');});These changes to $scope.obj will trigger the watch listener:
$scope.obj={};  // Logs 'Data changed!'
$scope.obj=obj1; // Logs 'Data changed!'
$scope.obj=null; // Logs 'Data changed!'
Whereas these will not:
$scope.obj.prop1=value; // Does not log 'Data changed!'
$scope.obj.prop2={}; // Does not log 'Data changed!'
$scope.obj=$scope.obj; // Does not log 'Data changed!'
In the preceding scenarios, the framework is not tracking internal object changes.
Instead, let's set the third parameter to true:
$scope.$watch('obj', function(n,o){console.log('Data changed!'},true);All the previous changes will trigger the listener except the last one.
Note
I have created a jsFiddle link (http://jsfiddle.net/cmyworld/WL3GT/) to highlight the differences between the two approaches. jsFiddle uses two objects: obj and obj1. Also, since Angular change detection is not real-time but dependent upon digest cycle execution, I had to wrap model updates in the $timeout service that triggers a digest cycle when time lapses. $timeout like $interval is an Angular service that calls a function after a specific duration but only once.
If we watch an object with objectEquality set to true then keep in mind that the framework does not tell which property in the object has changed. To do this, we need to manually compare the new object (n) and the old object (o).
Do these watches affect performance? Yes, a little. To perform comparison between the new and old values of a model property, Angular needs to track the last value of the model. This extra bookkeeping comes at a cost and each $watch instance that we add or is added by the framework does have a small impact on the overall performance. Add to that the fact that, if objectEquality is set to true, Angular has to now keep a copy of complete objects for the purpose of detecting model changes. This might not be a problem for standard pages, but for large pages containing a multitude of data-bound elements the performance can get affected. Therefore, minimize the use of object equality and keep the number of view bindings under control.
Note
Other than the $watch method that watches an expression on scope, AngularJS also supports watching a collection using the $watchCollection function. The function syntax is:
$watchCollection(expression, listener);
Here, an expression can be an object or array property on scope. For an object, the listener is fired whenever a new property is added or removed (remember JavaScript allows this). For an array, the listener is fired whenever elements are added, removed, and moved in the array. The listener callback function is called with three parameters:
With this basic understanding of $watch in place, let's go ahead and add some controller logic.
In our Workout controller, we need to add a watch that tracks currentExerciseDuration. Add the following code to the WorkoutController function:
$scope.$watch('currentExerciseDuration', function (nVal) {
    if (nVal == $scope.currentExercise.duration) {
        var next = getNextExercise($scope.currentExercise);
        if (next) {
            startExercise(next);
        } else {
            console.log("Workout complete!")
        }
    }
});
We add a watch on currentExerciseDuration and whenever it approaches the total duration of the current exercise (if (nVal == $scope.currentExercise.duration)), we retrieve the next exercise by calling the getNextExercise function and then start that exercise. If the next exercise retrieved is null, then the workout is complete.
With this, we are ready to test our implementation. So, go ahead and refresh the index. Exercises should flip after every 10 or 30 seconds. Great!
But, as we decided earlier, we are not going to use the $watch approach. There is a slightly better way to transition to the next exercise where we do not require setting up any watch. We will be using the AngularJS Promise API to do it.
The concept of promise is not unique to AngularJS. Promise specifications have been implemented by multiple JavaScript libraries. AngularJS uses one such implementation that is inspired by Kris Kowal's Q (https://github.com/kriskowal/q). AngularJS exposes the implementation over the $q service that allows us to create and interact with promises. However, the question is what a promise is and why do we require it?
Browsers execute our JavaScript code on a single thread. This implies that we cannot have any blocking operation as it will freeze the browser and hence counts as a bad user experience. Due to this reason, a number of JavaScript API functions such as functions related to timing events (setTimeout and setInterval) and network operations (XMLHttpRequest) are asynchronous in nature. This asynchronous behavior requires us to use callbacks for every asynchronous call made. Most of us have used the ajax() API of jQuery and provided a function callback for a complete/success variable in the config object.
The problem with callbacks is that they can easily become unmanageable. To understand this, let's look at this example from the Q documentation:
step1(function (value1) {
    step2(value1, function(value2) {
        step3(value2, function(value3) {
            step4(value3, function(value4) {
                // Do something with value4
            });
        });
    });
});
With a promise library, callbacks such as the one just mentioned can be converted into:
Q.fcall(promisedStep1)
.then(promisedStep2)
.then(promisedStep3)
.then(promisedStep4)
.then(function (value4) {
    // Do something with value4
})
.catch(function (error) {
    // Handle any error from all above steps
})
.done();
The power of chaining instead of nesting allows us to keep code more organized.
Technically speaking, a promise is an object that provides a value or exception in the future for an operation that it wraps. The Promise API is used to wrap execution of an asynchronous method. A promise-based asynchronous function hence does not take callbacks but instead returns a promise object. This promise object gets resolved some time in the future when the data or error from the asynchronous operation is received.
To consume a promise, the promise API in AngularJS exposes three methods:
then(successCallback, errorCallback, notifyCallback): This registers callbacks for success, failure, and notification. The following are the parameters:successCallback: This is called when the promise is resolved successfully. The callback function is invoked with the resolved value.errorCallback: This is called when the promise results in an error and contains the reason for the error.notifyCallback: This is called to report the progress of a promise. This is useful for long-running asynchronous methods that can communicate their execution progress.
catch(errorCallback): This is shorthand forthen(null, errorCallback).finally(callback): This gets called irrespective of a promise resulting in success or failure.
We will learn more about promises and how to implement our own promises in the coming Lessons. Nonetheless, for now we just need to consume a promise returned by an $interval service.
The $interval service that we used to decrement the time duration of exercises (currentExerciseDuration) itself returns a promise as shown:
$interval(function () {
        $scope.currentExerciseDuration = $scope.currentExerciseDuration + 1;
    }, 1000, $scope.currentExercise.duration);
This promise is resolved after the $interval service invokes the callback method (the first argument) for $scope.currentExercise.duration (the third argument) and in our case, 30 times is the value for a normal exercise. Therefore, we can use the then method of the Promise API to invoke our exercise transition logic in the promise success callback parameter. Here is the updated startExercise method with promise implementation highlighted:
var startExercise = function (exercisePlan) {
     $scope.currentExercise = exercisePlan;
     $scope.currentExerciseDuration = 0;
     $interval(function () {
         ++$scope.currentExerciseDuration;
     }, 1000, $scope.currentExercise.duration)
     .then(function () {
         var next = getNextExercise(exercisePlan);
         if (next) {
             startExercise(next);
         } else {
             console.log("Workout complete!")
         }
     });
 };
The code inside the then callback function is the same code that we added when using the $watch-based approach in the last section. Comment the existing $watch code and run the app again. We should get the same results. We did it without setting up any watch for the exercise transition.
If everything is set up correctly, our view should transition between exercises during the workout. Let's concentrate our efforts on the view.

Most of the hard work has already been done while the defining the model and implementing the controller phase. Now we just need to skin the HTML using the super-awesome data binding capabilities of AngularJS. It's going to be simple, sweet, and elegant!
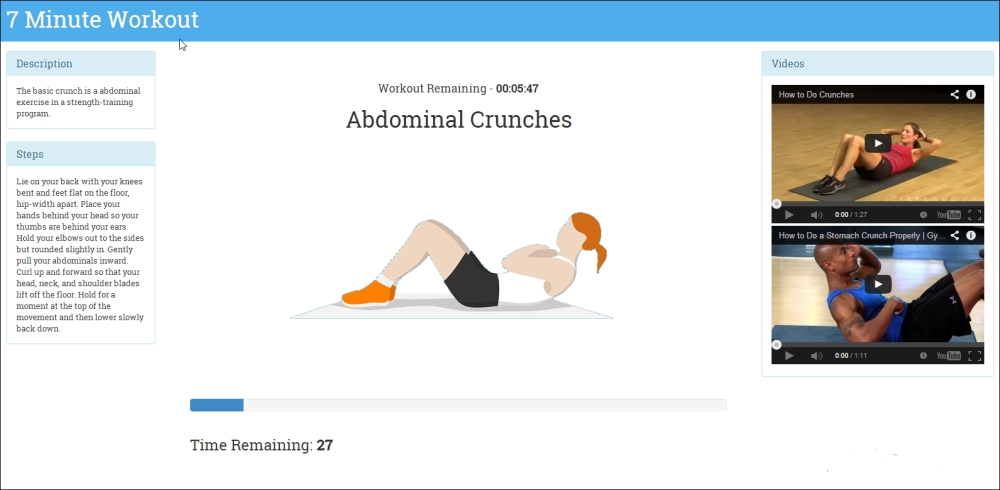
For the 7 Minute Workout view, we need to show the exercise name, exercise image, a progress indicator, and time remaining. Add the following lines to index.html inside the container div.
3</div>
There is some styling done using bootstrap CSS and some custom CSS. Other than that we have highlighted the directives and interpolations that are part of the view. Save index.html but before we refresh the page, open the companion source code package folder checkpoint3 under Lesson01. Make sure your copy of cssapp.css and img folder match. Refresh the page and see the workout app in its full glory!
That was pretty impressive. Again very little code was required to achieve so much. Let's see how this view works and what new elements have been incorporated in our view.
We can see that the workout view is driven by a model and the view itself has very little behavior. Since we have used two new directives ng-src and ng-style, let's discuss them.
The image location comes from the exercise model. We use the exercise image path (currentExercise.details.image) to bind to the img tag using the ng-src directive. However, why do we need this directive? We could very well use the src attribute of the standard HTML for the img tag instead of ng-src:
<img class="img-responsive" src = "{{currentExercise.details.image}}" />And it still works! Except for one small problem! Remember, Angular takes the template HTML and then applies the scope object to activate the binding. Till Angular completes this process and updates the DOM, the browser continues to render the raw template HTML. In the raw template, the previous src attribute points to the {{currentExercise.details.image}} string and since it is an <img> tag, the browser makes a GET request to this URL literally, which results in a 404 error as seen in the screenshot. We can confirm this in the browser's consoles network log.

When we use ng-src, the framework delays the evaluation of the src attribute till the model data is available and hence none of the request fails. Therefore, it is always advisable to use ng-src with the <img> tag if the URL is dynamic and depends upon the model data.
The other directive ng-style is used for progress bar style manipulation.
We use the Bootstrap progress bar (http://getbootstrap.com/components/#progress) to provide visual clues about the exercise progress. The progress effect is achieved by changing the CSS width property of the progress bar like this: style="width: 60%;". AngularJS has a directive to manipulate the style of any HTML element and the directive is aptly named ng-style.
The ng-style directive takes an expression that should evaluate to an object, where the key is the CSS style name and the value is the value assigned to the style. For our progress bar, we use this expression:
"{'width':(currentExerciseDuration/currentExercise.duration) * 100 + '%'}"The width CSS property is set to the percentage time elapsed and converted into a string value by concatenating it with %.
Remember we can achieve the same effect by using the standard style attribute and interpolation.
"{{'width:' + (currentExerciseDuration/currentExercise.duration) * 100 + '%'}}"
Nevertheless, ng-style helps us with its intuitive syntax and if the number of styles to apply is more, the expression used in interpolation can become complex with lots of string concatenation involved.
The ng-style directive is a very powerful directive as it allows us to do all types of CSS manipulation and drive them through model changes, as we saw with the progress bar implementation. We should still minimize its usage as inline styling is frowned upon and less maintainable in the long run.
Note
The preferred way to style HTML elements is by using a class attribute. Additionally, if we need dynamic behavior while applying CSS classes, AngularJS has another supporting directive ng-class. In the coming Lessons, we will see how to use this directive to dynamically alter page element styles.
The basic 7 Minute Workout is now complete, so let's start doing a workout now!
We will now add some bells and whistles to the app to make it look more professional and in the process discover a little more about the framework.
The 7 Minute Workout app starts when we load the page but it ends with the last exercise sticking to the screen permanently. Not a very elegant solution. Why don't we add a start and finish page to the app? This will make the app more professional and allow us to understand the single page nomenclature of AngularJS.
Single page applications (SPAs) are browser-based apps devoid of any full page refresh. In such apps, once the initial HTML is loaded, any future page navigations are retrieved using AJAX as HTML fragments and injected into the already loaded view. Google Mail is a great example of a SPA. SPAs supply a great user experience as the user gets what resembles a desktop app, with no constant post-backs and page refreshes that are typically associated with traditional web apps.
One of the primary intentions of AngularJS was to make SPA development easy. Therefore, it contains a host of features to support the SPA development. Let's explore them and add our app pages too.
To use the SPA capabilities of the framework, the view HTML needs to be augmented with some new constructs. Let's alter the index.html file and make it ready for use as a SPA view template. Add this piece of HTML inside the <body> tag, after the navbar declaration:
<div class="container body-content app-container">
        <div ng-view></div>
</div>
In the preceding HTML, we are setting up a nested div structure. The inner div has a new directive declaration, ng-view. The immediate question is, what does this directive do?
Well, HTML elements with this ng-view directive act as a container that hosts partial HTML templates received from the server. In our case, the content of the start, workout, and finish pages will be added as inner HTML to this div. This will happen when we navigate across these three pages.
For the framework to know which template to load at what time (inside the ng-view div element), it works with an Angular service named $route. This $route service is responsible for providing routing and deep-linking capabilities in AngularJS.
However, before we can use the $route service, we need to configure it. Let's try to configure the service to make things clearer.
The standard Angular $route service is not part of the core Angular module but defined in another module ngRoute. Hence, we need to import it in a similar manner to the way we imported the 7minWorkout module. So go ahead and update the app.js file with the ngRoute module dependency.
angular.module('app', ['ngRoute', '7minWorkout']);We will also need to reference the module's JavaScript file as it is not part of the standard framework file angular.js. Add reference to the angular-route.js file after the reference to angular.js in index.html.
<script src="http://ajax.googleapis.com/ajax/libs/angularjs/1.3.3/angular.js"></script>
<script src="http://ajax.googleapis.com/ajax/libs/angularjs/1.3.3/angular-route.js"></script>
The last part to configure is the actual routes. We need to configure the routes for each of the three pages. Once configured, the routing service will match routes and provide enough information to the ng-view directive to help it render the correct partial view.
In the AngularJS world, any configurations required before the app becomes usable are defined using the module API's config method. Components defined in any module can use this method's callback to do some type of initialization.
Load the app.js file and update the module declaration code for the app module to:
angular.module('app', ['ngRoute', '7minWorkout']).
config(function ($routeProvider) {
    $routeProvider.when('/start', {
        templateUrl: 'partials/start.html'
    });
    $routeProvider.when('/workout', {
        templateUrl: 'partials/workout.html',
        controller: 'WorkoutController'
    });
    $routeProvider.when('/finish', {
        templateUrl: 'partials/finish.html'
    });
    $routeProvider.otherwise({
        redirectTo: '/start'
    });
});
Before we discuss the preceding code, let's understand a bit more about module initialization and the role of the config function in it.
AngularJS does not have a single entry point where it can wire up the complete application. Instead, once the DOM is ready and the framework is loaded, it looks for the ng-app directive and starts module initialization. This module initialization process not only loads the module declared by ng-app but also all its dependent modules and any dependencies that the linked modules have, like a chain. Every module goes through two stages as it becomes available for consumption. It starts with:
- config: Services in modules that require initial setup are configured during this stage.
$routeProvideris a good example of this. Every app will require a different set of routes before it can be used; therefore, these routes are configured at the config stage. Limited DI capabilities are available at this stage. We cannot inject services or filters as dependencies at the present time.$routeProviderinjection works as it is a special class of services called providers. We will learn more about these special service classes such as providers, values, and constants in forth coming Lessons. - run: At this stage, the application is fully configured and ready to be used. The DI framework can be completely utilized at this stage. Similar to the
configfunction, the Module API also provides arunmethod callback. We can use this method to initialize stuff that we need during application execution.
With this basic understanding of module initialization stages and the role of the config stage, let's get back to our route configuration code.
The config function just mentioned takes a callback function that gets called during the config stage. The function is called with the $routeProvider dependency. We define three main routes here and one fall back route using the $routeProvider API.
We call the when function of $routeProvider that takes two arguments:
path: This is a bookmarkable URL to a partial view. In our code, the firstwhenconfigures/startas a route and is accessible in the browser under thehttp://<hostname>/index.html#/startURL.routeConfig: This parameter takes route configurations. There are a number of configuration options available but we have just used two of them.templateUrldefines the remote path from where AngularJS will load the HTML template. Thecontrollerfunction defines the Angular controller that will be instantiated and attached to the HTML view when the browser hits this route. We are not attaching any controller to start and finish routes as they are mere static HTML content.
The other method $routeProvider is otherwise used for a wildcard route match. If the route does not match any of the routes defined (/start, /workout, and /finish), then, by default, it redirects the user to the /start route in the browser; in other words, it loads the start page. We can verify this by providing routes such as http://<hostname>/index.html#/abc.
The following screenshot tries to highlight what role the index.html, ng-view, and $route services play:

Since we have defined three partial HTML files in the route, it's time to add them to the partial folder. Copy the start.html and finish.html files from the Lesson01/checkpoint4/app/partials and create a new file, workout.html.
Move all the code in the div fragment <div class="row"> from index.html into workout.html. Also remove the ng-controller declaration from the body tag. The body tag should now read as follows:
<body ng-app="app">
The ng-controller declaration from the body tag should be removed as we have already directed Angular to inject the WorkoutController controller function when navigating to the #/workout route during our route configuration (see the preceding $routeProvider config route).
Note
This is a common mistake that many newbies make. If we specify the controller to load in the $routeProvider configuration and also apply the ng-controller directive on the related template HTML. Angular will create two controllers and you may experience all types of weird behaviors such as duplicate method calls, Ajax calls, and others.
Go ahead and refresh the index page. If you have followed our guidance, you will land on the page with the URL such as http://<hostname>/index.html#/start. This is our apps start page. Click on the Start button and you will navigate to the workout page (href='#/workout'); the workout will start. To check how the finish page looks, you need to change the URL in the browser. Change the fragment after # character to /finish.
As of now, when the workout finishes, transitioning to the finish page does not happen. We have not implemented this transition. The navigation from the start page to workout was embedded in a tag (href='#/workout'). Transition to the finish page will be done inside the controller.
If you thought we would use the $route service for navigation in our controller, you are a tad wrong. The $route service (https://docs.angularjs.org/api/ngRoute/service/$route) has no method to change the current route. Nonetheless, the $route service has a dependency on another service, $location. We will use the $location service to transition to the finish page.
Here is how the AngularJS documentation (https://docs.angularjs.org/api/ng/service/$location) describes $location service:
The $location service parses the URL in the browser address bar (based on the window.location) and makes the URL available to your application. Changes to the URL in the address bar are reflected into $location service and changes to $location are reflected into the browser address bar.
Open workout.js and replace the console.log("Workout complete!") line with this:
$location.path('/finish');As always, we should add the dependency of the $location service to WorkoutController, as follows:
angular.module('7minWorkout')
  .controller('WorkoutController', ['$scope', '$interval', '$location', function ($scope, $interval, $location) {
Since we have started our discussion on the $location service, let's explore the capabilities of the $location service in more depth.
The $location service is responsible for providing client-side navigation for our app. If routes are configured for an app, the location service intercepts the browser address changes, hence stopping browser postbacks/refreshes.
If we examine the browser addresses for these routes, they contain an extra # character and the address appears in the following manner:
http://<hostname>/index.html#/start (or #/workout or #/finish)
The # character in the URL is something we may have used to bookmark sections within the page, but the $location service is using this bookmark-type URL to provide correct route information. This is called the hashbang mode of addressing.
We can get rid of # if we enable HTML5 mode configuration. This setting change has to be done at the config stage using the html5Mode method of the $locationProvider API. Let's call this method inside the module config function:
$locationProvider.html5Mode(true);
The addresses will now look like:
http://<hostname>/start (or /workout or /finish)
However, there is a caveat. It only works as long as we don't refresh the page and we do not type in the address of our browser directly. To have a true URL, rewrite as shown in the preceding code. We need to add support for it on the server side too. Remember when we are refreshing the page, we are reloading the Angular app from the start too so URLs mentioned previously will give 404 errors as Angular $location cannot intercept page refreshes.
The $location service also enables us to extract and manipulate parts of address fragments. The following diagram describes the various fragments of an address and how to reference and manipulate them.

We have already made use of the path function to navigate to the finish page. That is pretty much all we'll say about the $location service for now.
At the end we have converted our simple 7 Minute Workout into an SPA. Now we can see how easy it was to create an SPA using AngularJS. We get all the benefit of standard web apps: unique bookmarkable URLs for each view (page) and the ability to move back and forward using the browser's back and forward buttons but without those annoying page refreshes. If we show some patience after the last exercise completes, the finish page will indeed load.
The app looks a little better now, so let's continue to improve the app.

For people who are doing this workout for the first time, it will be good to detail each step involved for each exercise. We can also add reference to some YouTube videos for each exercise to help the user understand the exercise better.
We are going to add the exercise description and instructions on the left panel and call it the description panel. We will add a reference to YouTube videos on the right panel, the video panel. To make things more modular and learn some new concepts, we are going to create independent views for each description panel and YouTube video panel.
The model data for this is already available. The description and procedure properties in the Exercise model (see Exercise declaration in workout.js) provide the necessary details about the exercise. The related.videos array contains some related YouTube videos.
Let's start by adding the exercise description panel. Add a new file description-panel.html to the partial folder. Add the following content to the file:
<div>
    <div class="panel panel-default">
        <div class="panel-heading">
            <h3 class="panel-title">Description</h3>
        </div>
        <div class="panel-body">
            {{currentExercise.details.description}}
        </div>
    </div>
    <div class="panel panel-default">
        <div class="panel-heading">
            <h3 class="panel-title">Steps</h3>
        </div>
        <div class="panel-body">
            {{currentExercise.details.procedure}}
        </div>
    </div>
</div>
The previous partial code needs to be referenced in the workout page. Open workout.html and add a new fragment, before the exercise pane div (id='exercise-pane'), and also update the style of exercise pane div. Refer to the following highlighted code:
<div id="description-panel" class="col-sm-2" ng-include = "'partials/description-panel.html'"> </div>
<div id="exercise-pane" class="col-sm-7">
   // Existing html
</div>
To add the video panel content, we will not create a file as we did for the description panel. Instead, we will declare the video panel template inline and include it in the workout.
In the workout.html file, after the exercise pane div, add this declaration:
<div id="exercise-pane" class="col-sm-7">
   // Existing html
</div>
<div id="video-panel" class="col-sm-2" ng-include = "'video-panel.html'"></div>
Lastly, add this script section following the preceding div (id="video-pane"):
<script type="text/ng-template" id="video-panel.html">
 <div class="panel panel-default">
    <div class="panel-heading">
         <h3 class="panel-title">Videos</h3>
    </div>
    <div class="panel-body">
        <div ng-repeat="video in currentExercise.details.related.videos">
            <iframe width="330" height="220" src="{{video}}" frameborder="0" allowfullscreen></iframe>
        </div>
    </div>
 </div>
</script>
This script defines our video panel view template.
Now go ahead and load the workout page (#/workout) and you should see the exercise description and instructions on the left pane.
As you will see, for some reason the videos still do not show up. The browser console log shows the following errors:
Error: [$interpolate:interr] Can't interpolate: {{video}} Error: [$sce:insecurl] Blocked loading resource from url not allowed by $sceDelegate policy. URL: //www.youtube.com/embed/MMV3v4ap4ro
http://errors.angularjs.org/1.2.15/$sce/insecurl?p0=%2F%2Fwww.youtube.com%2Fembed%2FMMV3v4ap4ro
The great thing about AngularJS error reporting is that the Angular error contains a URL that we can navigate to to learn more about the error. In our current setup, the videos do not load due to a security feature of AngularJS called Strict Contextual Escaping (SCE).
This feature restricts the loading of contents/resources into the HTML view from untrusted sources. By default, only data from the same origin is trusted. The same origin is defined as the same domain, protocol, and port as the application document.
To include video content from YouTube, we need to configure explicit trust for the http://www.youtube.com/ domain.
This configuration has to be done at the config stage using $sceDelegateProvider. To do this, open app.js and inject the $sceDelegateProvider dependency into the config function for the app module:
angular.module('app', ['ngRoute', '7minWorkout']).
config(function ($routeProvider, $sceDelegateProvider) {
Add this code inside the config function after the route declarations:
$sceDelegateProvider.resourceUrlWhitelist([
      // Allow same origin resource loads.
      'self',
      'http://*.youtube.com/**']);
});
In the preceding code, we use the resourceUrlWhitelist function to configure the domains we trust. The self parameter refers to the same origin. The second array elements add trust for http://www.youtube.com/ and its subdomains. How * and ** are interpreted has been described in the AngularJS documentation for SCE at https://docs.angularjs.org/api/ng/service/$sce, as follows:
*: matches zero or more occurrences of any character other than one of the following 6 characters: ':', '/', '.', '?', '&' and ';'. It's a useful wildcard for use in a whitelist.
**: matches zero or more occurrences of any character. As such, it's not not appropriate to use in for a scheme, domain, etc. as it would match too much. (e.g. http://**.example.com/ would match http://evil.com/?ignore=.example.com/ and that might not have been the intention.) Its usage at the very end of the path is ok. (e.g. http://foo.example.com/templates/**).
Once $sceDelegateProvider is configured, the videos from YouTube should load. Refresh the workout page to verify that videos show up on the right pane.
What we have done here is define two new views and include them in our workout HTML using a new directive: ng-include.
The ng-include directive, like the ng-view directive, allows us to embed HTML content, but unlike ng-view it is not tied to the current route of the app. Both ng-view and ng-include can load the template HTML from:
- Remote file location: This is a URL. This is the case with our first
ng-includedirective that loads HTML from thedescription-panel.htmlfile under partials. - Embedded scripts: We use this approach with the second
ng-includedirective. The content of the secondng-includedirective is embedded within the page itself, inside ascripttag:<script type="text/ng-template" id="video-panel.html">
The
ng-includedirective references this script HTML using its ID (ng-include = "'video-panel.html'"). We are free to use any ID value and it need not end with.html.
The ng-include directive is a perfect way to split a page into smaller, more manageable chunks of HTML content. By doing this, we can achieve some level of reusability as these chunks can be embedded across views or multiple times within a single view.
Now the question arises of whether we should embed the view as script blocks or load the partial views from a server. Loading partials from the server involves one extra call but, once Angular gets the partial template, it caches it for future use. Therefore, the performance hit is very small. Including templates inline can make the page more bloated, at least while designing the view.
Note
AngularJS uses the $templateCache service to cache the partials that it loads during the lifetime of the application. All partials that we reference in ng-view and ng-include are cached for future use.
The $templateCache service is injectable and we can use $templateCache to cache templates manually, such as $templateCache.put('myTemplate', 'Sample template content'). We can now reference this template in ng-view or ng-include.
In general, if the partial view is small, it is fine to include it in the parent view as a script block (the inline embedded approach). If the partial view code starts to grow, using a separate file makes more sense (the server view).
Note that, in both ng-include directives, we have used quoted string values ('partials/description-panel.html' and 'video-panel.html'). This is required as ng-include expects an expression and as always expressions are evaluated in the context of the current scope. To provide a constant value, we need to quote it.
The use of expressions to specify a path for ng-include makes it a very powerful directive. We can control which HTML fragments are loaded from the controller. We can define a property or function on the scope and bind that to the ng-include value. Now any change to the bound property will change the bound HTML template. For example, consider this include function:
<div ng-include='template'></div>In the controller, we can do something like this:
if(someCondition) {
  $scope.template='view1'  // Loads view1 into the above div
}
else
{
  $scope.template='view2'  // Loads view2 into the above div
}
The ng-include directive creates a new scope that inherits (prototypal inheritance) from its parent scope. This implies that the parent scope properties are visible to the child scope and hence the HTML templates can reference these properties seamlessly. We can verify this as we reference the scope properties defined in WorkoutController in the partials/description-panel.html and video-panel.html partials.
Another interesting directive that we have used in our video panel partials is ng-repeat. The job of the ng-repeat directive is to append a fragment of HTML repeatedly, based on elements in an array or the properties of an object.
The ng-repeat directive is a powerful and a frequently used directive. As the name suggests, it repeats! It duplicates an HTML fragment based on an array or object properties. We use it to generate YouTube video output in the right pane:
<div ng-repeat="video in currentExercise.details.related.videos">
  <iframe width="330" height="220" src="{{video}}" frameborder="0" allowfullscreen></iframe>
</div>
The ng-repeat directive looks a bit different from standard Angular expressions. It supports the following expression formats:
- Items in expression: We use this format for our video panel. The expression should return an array that can be enumerated over. On each iteration of
ng-repeat, the current iterated item is assigned to items as with the video variable mentioned earlier. - (key,value) in expression: This syntax is used when the expression returns an object. In JavaScript, objects are nothing but key/value hash pairs, where we reference the value using the key. This format of
ng-repeatis useful to iterate over properties of an object. - Items in an expression track by tracking_expression:
ng-repeatresponsible for iterating over a collection and repeatedly rendering DOM content. When items are added, removed, or moved in the underlying collection, it does some performance optimization so that it does not have to re-create the entire DOM again based on these model changes. It adds a tracking expression in the form of$$hashKey(a unique key) to every element that we bind tong-repeat. Now, when we add or remove or move elements in the collection,ng-repeatcan add/remove and move only those specific elements. So basically tracking expressions is used to track array element identities.
We can provide our own tracking expression for Angular using the tracking_expression argument. This expression can be a property on the collection object. For example, if we have a task collection returned from a server, we can use its ID property in the following way:
task in tasks track by task.id
With this change, Angular will use the id property of a task to track elements in the array. This also implies that the property must be unique or we will get the following error:
[ngRepeat:dupes] Duplicates in a repeater are not allowed. Use 'track by' expression to specify unique keys. Repeater: task in tasks track by task.id, Duplicate key: 1
Also see jsFiddle http://jsfiddle.net/cmyworld/n972k/ to understand how track is used in AngularJS.
The ng-repeat directive, like ng-include, also creates a new scope. However, unlike ng-include, it creates it every time it renders a new element. So, for an array of n items, n scopes will get created. Just like ng-include, scopes created by ng-repeat also inherit from the parent scope.
It will be interesting to see how many scopes are active on the workout page. Let's use the Batarang chrome plugin for this again. Navigate to the workout page (#/workout), open the Batarang plugin, and enable it. The scope hierarchy for the workout page should look something like this:
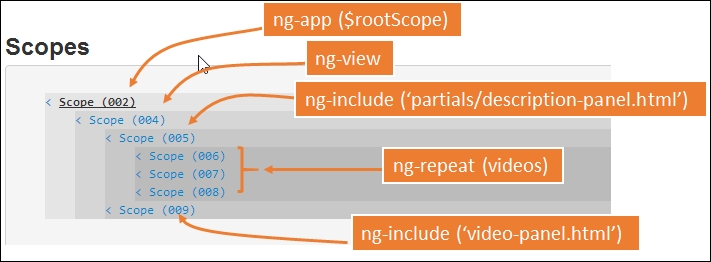
As we can see, ng-view, ng-include, and ng-repeat all create new scopes that inherit from the parent scope. If we wait a bit and let the exercise transition happen, we will see new scopes getting created and old ones getting destroyed (observe their IDs 002,004). This screenshot was taken during the first exercise (jumping jack). We can also look at the model properties attached to each scope in Batarang by clicking on the scope links (such as Scope (006)).
The previous screenshot also highlights what has caused the new scope to be created. Starting from $rootScope, which is the parent of all the scopes, a scope hierarchy has been created. In this scope hierarchy, the properties/functions defined on the parent scope are available to the child scope to consume. We can confirm this by looking at the two ng-include partials. These partials are referring to a property currentExercise that has been defined on the parent scope (004).
This feature is complete. Let's now add another capability to our app and learn about another great feature of AngularJS: filters.
It will be nice if we can tell the user the time left to complete the workout and not just the duration of every exercise. We can add a countdown timer somewhere in the exercise pane that shows the overall time remaining.
The approach that we are going to take here is to define a scope variable workoutTimeRemaining. This variable will be initialized with the total time at the start of the workout and will reduce with every passing second till it reaches zero.
Since workoutTimeRemaining is a numeric value but we want to display a timer in the format (hh:mm:ss), we need to do a conversion between the seconds data and the time format. AngularJS filters are a great option for implementing such features.
Instead of using a filter, we could implement the same logic in a method such as convertToTime(seconds) and bind this method to the UI using something like <h2>{{convertToTime(workoutTimeRemaining)}}</h2>; it would have worked perfectly. However, there is a better way and that is by implementing our own filter. Before that, let's learn a bit more about these filters.
The primary aim of an Angular filter is to format the value of an expression displayed to the user. Filters can be used across views, services, controllers, and directives. The framework comes with multiple predefined filters such as date, number, lowercase, uppercase, and others. This is how we use a filter in a view:
{{ expression | filterName : inputParam1 }}An expression is followed by the pipe symbol |, which is followed by the filter name and then an optional parameter (inputParam1) separated by a colon (:). Here are some examples of the date filter. Given this date 7 August 2014, 10:30:50 in the current time zone:
$scope.myDate=new Date(2014,7,7,10,30,50);

<br>{{myDate}} <!--2014-08-07T05:00:50.000Z-->
<br>{{myDate | date}}  <!--Aug 7, 2014-->
<br>{{myDate | date : 'medium'}}  <!--Aug 7, 2014 10:30:50 AM-->
<br>{{myDate | date : 'short'}}  <!--8/7/14 10:30 AM-->
<br>{{myDate | date : 'd-M-yy EEEE'}} <!--7-8-14 Thursday-->
It is not very often that we use filters inside services, controllers, or directives but if we do need to do it, we have two options. Let's say we want to format the same date inside a controller:
- In the first option, we inject
dateFilter(make a note of the extraFilterstring that we have added to the filter name) into our controller using DI:function MyController($scope, dateFilter)And then use the date filter to format the date:
$scope.myDate1 = dateFilter(new Date(2014,8,7),"MMM d, yyyy"); - The second option is to use an inbuilt
$filterservice. Here we inject the$filterservice:function MyController($scope, $filter)And then use this service to get the date filter and call it:
$scope.myDate2 = $filter("date")(new Date(2014,8,7),"MMM d, yyyy");
The final result is the same.
Angular has a number of inbuilt filters that come in handy during view rendering. Some of the most used filters are:
- date: As we have seen earlier in the Lesson, the date filter is used to format the date in a specific format. This filter supports quite a number of formats and is locale-aware too. Look at the documentation for the date filter for more details: https://docs.angularjs.org/api/ng/filter/date.
- uppercase and lowercase: These two filters, as the name suggests, change the case of the string input.
- number: This filter is used to format string data as numeric. If the input is not a number, nothing is rendered.
- filter: This very confusing filter is used to filter an array based on a predicate expression. It is often used with the
ng-repeatdirective such as:exercise in workout.exercises | filter: 'push'
This code will filter all exercises where any string property on an exercise object contains the word push. Filter supports a number of additional options and more details are available in the official documentation at https://docs.angularjs.org/api/ng/filter/filter.
Filters are an excellent mechanism for transforming the source model into different formats without changing the model data itself. Whenever we have a requirement to present data in a specific format, rather than changing the model data to suit the presentation needs we should use AngularJS filters to achieve this. The next sections provide a great example of this where we implement a filter that converts second into hh:mm:ss format.
Our filter secondsToTime will convert a numeric value into hh:mm:ss format. Open the filters.js file and add the following code to it:
angular.module('7minWorkout').filter('secondsToTime', function () {
    return function (input) {
        var sec = parseInt(input, 10);
        if (isNaN(sec)) return "00:00:00";

        var hours = Math.floor(sec / 3600);
        var minutes = Math.floor((sec - (hours * 3600)) / 60);
        var seconds = sec - (hours * 3600) - (minutes * 60);

        return ("0" + hours).substr(-2) + ':'
                + ("0" + minutes).substr(-2) + ':'
                + ("0" + seconds).substr(-2);
}
});
We again use the Module API to first retrieve the 7minWorkout module. We then invoke the Module API method filter. The function takes two arguments: the name of the filter and a filter function. Our filter function does not take any dependency but we have the capability to add dependencies to this function. The function should return a factory function that is called by the framework with the input value. This function (function (input)) in turn should return the transformed value.
The implementation is quite straightforward as we convert seconds into hours, minutes, and seconds. Then we concatenate the result into a string value and return the value. The 0 addition on the left for each hour, minute, and seconds variable is to format the value with a leading 0 in case the calculated value for hours, minutes, or seconds is less than 10.
Before we use this filter in our view, we need to implement the workout time remaining logic in our controller. Let's do that. Open the workout.js file and update the WorkoutPlan constructor function by adding a new function totalWorkoutDuration:
function WorkoutPlan(args) {
  //existing WorkoutPlan constructor function code
  this.totalWorkoutDuration = function () {
    if (this.exercises.length == 0) return 0;
    var total = 0;
    angular.forEach(this.exercises, function (exercise) {
        total = total + exercise.duration;
    });
    return this.restBetweenExercise * (this.exercises.length - 1) + total;
}
This method calculates the total time of the workout by adding up the time duration for each exercise plus the number of rest durations. We use a new AngularJS library function forEach to iterate over the workout exercise array. The angular.forEach library takes an array as the first argument and a function that gets invoked for every item in the array.
Now locate the startWorkout function and update it by adding these two sections:
var startWorkout = function () {
  workoutPlan = createWorkout();
  $scope.workoutTimeRemaining = workoutPlan.totalWorkoutDuration();

    // Existing code. Removed for clarity

    $interval(function () {
        $scope.workoutTimeRemaining = $scope.workoutTimeRemaining - 1;
    }, 1000, $scope.workoutTimeRemaining);

    startExercise(workoutPlan.exercises.shift());
};
We assign totalWorkoutDuration for the workout plan to $scope.workoutTimeRemaining and at the end of the method before calling startExercise, we add another $interval service to decrement this value after every second, for a total of workoutTimeRemaining times.
That was easy and quick. Now it's time to update the view. Go to workout.html and add the highlighted line in the following code:
<div class="workout-display-div">
  <h4>Workout Remaining - {{workoutTimeRemaining | secondsToTime}}</h4>
  <h1>{{currentExercise.details.title}}</h1>
Now, every time the expression workoutTimeRemaining changes, the filter will execute again and the view will get updated. Save the file and refresh the browser. We should see a countdown timer for the workout!

Wait a minute. The total workout duration shown is 7 minutes 50 seconds not 7 minutes. Well, that's not a problem with our calculation even though the total workout duration indeed is 7:50 minutes. Basically, this is a sub-8 minute workout so we call it 7 Minute Workout!
Before we conclude this Lesson, we are going to add one last enhancement that will add to the usability of the app. We will show the name of the next exercise during the rest periods.
It will be nice for the user to be told what the next exercise is during the short rest period after each exercise. This will help in preparing for the next exercise. So let's add it.
To implement this feature, we would simply output the title of the exercise from the first element in the workoutPlan.exercises array in a label during the rest stage. This is possible because transitioning to the next exercise involves removing the exercise object from the workoutPlan.exercises array and returning it. Therefore, the array is shrinking after each exercise and the first element in the array always points to the exercise that is due. With this basic understanding in place, let's start the implementation.
We will show the next exercise next to the Time Remaining countdown section. Change the workout div (class="workout-display-div") to include the highlighted content.
<div class="workout-display-div">
  <!-- Exiting html -->
  <div class="progress time-progress">
     <!-- Exiting html -->
  </div>
  <div class="row">
     <h3 class="col-sm-6 text-left">Time Remaining: <strong>{{currentExercise.duration-currentExerciseDuration}}</strong></h3>
     <h3 class="col-sm-6 text-right" ng-if="currentExercise.details.name=='rest'">Next up: <strong>{{workoutPlan.exercises[0].details.title}}</strong></h3>
  </div>
</div>
We wrap the existing Time Remaining h1 and add another h3 to show the next exercise inside a new div (class="row") and update some styles. Also, there is a new directive ng-if in the second h3.
The ng-if directive is used to add or remove a specific section of DOM based on whether the expression provided to it returns true or false. The DOM element gets added when the expression evaluates to true. We use this expression with our ng-if declaration:
ng-if="currentExercise.details.name=='rest'"
The condition checks whether we are currently at the rest phase. We are using the rest exercise name property to do the match.
Other than that, in the same h3 we have an interpolation that shows the name of the exercise from the first element of the workoutPlan.exercises array.
The ng-if directive belongs to the same category of directives that show/hide content based on a condition. There is another directive, ng-hide, that does the opposite of what ng-show does. The difference between ng-if and ng-show/ng-hide is that ng-if creates and destroys the DOM element, whereas ng-show/ng-hide achieves the same effect by just changing the display CSS property of the HTML element to none.
With ng-if, whenever the expression changes from false to true, a complete re-initialization of the ng-if content happens. A new scope is created and watches are set up for data binding. If the inner HTML has ng-controller or directives defined, those are recreated and so are child scopes, as requested by these controllers and directives. The reverse happens when the expression changes from true to false. All this is destroyed. Therefore, using ng-if can sometimes become an expensive operation if it wraps a large chunk of content and the expression attached to ng-if changes very often.
There is another directive that belongs to this league: ng-switch. When defined on the parent HTML, it can swap child HTML elements based on the ng-switch expression. Consider this example:
 <div id="parent"  ng-switch on="userType">
      <div ng-switch-when="admin">I am the Admin!</div>
      <div ng-switch-when="powerUser">I am the Power User!</div>
      <div ng-switch-default>I am a normal user!</div>
  </div>
Here, we bind the expression userType to ng-switch. Based on the value of userType (admin, powerUser, or any other), one of the inner div elements will be rendered. The ng-switch-default directive is a wildcard match/fallback match and it gets rendered when userType is neither admin nor powerUser.
We are not done yet as the {{workoutPlan.exercises[0].details.title}} interpolation refers to the workoutPlan object, but this property is not available on the current scope in WorkoutController. To fix this, open the workout.js file and replace all instances of workoutPlan with $scope.workoutPlan. And finally, remove the following line:
var workoutPlan;
Refresh the workout page; during the rest phase, we should see the next workout content. It should look something like the following screenshot:

Well, it's time to conclude the Lesson and summarize our learnings.