Chapter 7. Preparing for the App Store Submission
Your app is nothing more than a pet project until it’s in Apple’s App Store. So, once you are confident about turning that pet project into an app that people around the world can download, you are going to fire up your browser and head over to Apple’s iTunes Connect (http://itunesconnect.apple.com) to submit your application. Before that can happen, though, there are some final development tasks to complete as well as a checklist you’ll want to cover to make submitting to the App Store a painless process.
In this chapter, you’ll explore:
Finishing up development items before submitting your app
A checklist of what you’ll need to submit to Apple in iTunes Connect
Understanding the approval process and checking on the status of the app
Dealing with app rejections and resubmission
Finishing Development
Analytics
If you are familiar with website management or online marketing, chances are you’ve heard the word “analytics” before. As is the case with websites, user activities within apps can be tracked.
Why is this important? Although Apple will provide you with some basic information about your application (mostly sales-focused), it won’t be able to help you understand what your users are doing with your app. Analytics will enable you to see what features your users find most useful, and can help influence what you add or remove from the app later.
A handful of analytics packages are available. Choosing the right one will largely depend on what best fits your needs. For example, you may want to track custom events, such as when a customer touches a particular button in your app. You may also want to have the analytics from your app integrate with your existing web analytics. The last major differentiator that I’ll mention is that some of the analytics platforms offer you the ability to view analytics, sales, and diagnostics information such as crash reports, all in one location. The following list includes some of the more popular options for you to evaluate based on what’s most important for your app:
Flurry, http://www.flurry.com/
Heartbeat, http://www.heartbeatapp.com (a service of Mobclix)
TapMetrics, http://tapmetrics.com/ (a service of Millennial Media)
Google Analytics, http://code.google.com/apis/analytics/docs/tracking/mobileAppsTracking.html
Omniture, http://www.omniture.com/ (through SiteCatalyst)
Note
Apple’s latest policies indicate that analytics are to be used solely for the purposes of measuring advertising. Although Apple does not appear to be strictly enforcing this policy, note that what the analytics providers are able to collect and how they operate depends exclusively on Apple and is subject to change. Additionally, with the release of iOS 4, Apple has suggested that developers begin notifying customers if analytics data is collected and how it is used. Review Section 3.3.9 of the iOS Developer Program License Agreement to learn more about Apple’s restrictions and requirements in this area.
You’ll likely want to discuss these packages with your developer. Be sure to work with him to set up any particular events you want tracked in the application. Of course, it’s critical to verify that the analytics are tracking properly before submitting the app. Even if your developer installed analytics during your QA and testing, have him double-check that they are installed when preparing the App Store version of the app.
Chris Brown, the founder of TapMetrics (now a service of Millennial Media), is interviewed at the end of this chapter. He discusses some details about properly launching an app and testing and installing analytics. Chapter 9 covers how to leverage analytics and events to inform you how customers are using your app.
Other tools for feedback
Other tools are available that let you gain insight into your app. You can also integrate these tools in some of your team’s final development tasks.
- In App Support
In the Finishing touches section in Chapter 5, I discussed providing a guided user experience for your customers. Sometimes, despite all your best efforts, customers will still have questions. To help with this situation, you might consider having a dedicated help or support area in your app. Many developers typically place this in a More tab or Settings area.
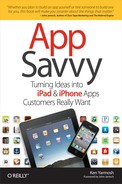
Some items to list in this area can include a help manual (much less interactive and fun than what we covered in Finishing touches), in-app email for customers to send support questions or feature requests, and even surveys (e.g., http://haveasec.com). The emails will be more explicit in communicating what your customers want. However, the help manual can also give you insight into what customers want. The manual is usually served through a web view (i.e., HTML that gets loaded into the app), and if you add web analytics to those pages, you can see what customers are looking at the most (see Figure 7-1). This should clue you in to areas you need to improve or make clearer in your app.
- Prompt for ratings and reviews
Although you will reach out to your most engaged customers to ask for some initial ratings and reviews (detailed in Chapter 8) when your app launches, it’s also a smart strategy to prompt customers to rate your app. Customers who may like your app often will not take the time to give feedback in the App Store simply because they are too busy.
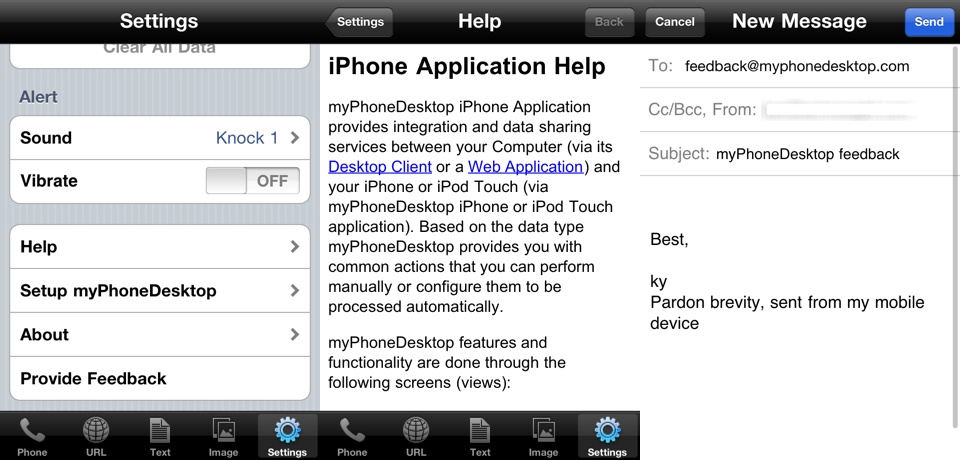
It’s especially easy to include this functionality in your app and prompt customers for ratings, thanks to some handiwork from Arash Payan, who created the open source project Appirater (http://github.com/arashpayan/appirater/, shown in Figure 7-2). By default, Appirater will see if a customer has used your app for 30 days and launched it at least 15 times, and if so, it will ask the customer to rate the app. Using these criteria will ensure that satisfied customers are rating your app. If you want to be a little less conservative and get ratings more quickly, you can change these values (e.g., drop the number of days down to five).
Your App Store App “Binary”
Recall that the app you’ve been using to refine and fix features is not an App Store version of your app; it’s a development version. The final task for your developer to perform before the app can be submitted to the App Store is to prepare an App Store version of it.
An explanation of how to create an App Store build of your app will put you to sleep. It’s unlikely that your developer got you this far and doesn’t know how to create the app for App Store distribution. To be fair, though, many developers struggle with creating the App Store version of their app the first time they try it. Whether your developer is a newbie or a seasoned pro, a good resource for help in this task is Learning iPhone Programming (http://oreilly.com/catalog/9780596806446/) by Alasdair Allan (O’Reilly).
Once the developer has the App Store version of the app ready, you’ll receive either a .zip or an .ipa file (e.g., <AppName>.zip or <AppName>.ipa). These are the only two formats that Apple accepts, and each must be 2 GB or less. This file—what Apple calls the binary—will contain everything Apple needs for someone to install your application on a device, including the actual app and the app icons required for your app. Recall from earlier discussions (see App type in Chapter 1 and Devices and resolutions in Chapter 5) that various sizes of the creative assets are required depending on the devices targeted.
Note
Your next marketing checkup, for the Phase 4 section of Chapter 8, will begin prepping you for the launch of your app. With the approval of your app by the end of this chapter, you’ll move into the final phase of the marketing crescendo. If you have been diligent with your marketing checkups throughout the book, you will have already consumed the majority of Chapter 8.
iTunes Connect
Checklist for App Store Submission
Note
You may have a basic understanding of iTunes Connect if you were the one who registered for the iOS Developer Program. In any case, this section assumes you have an Apple ID that provides you access to iTunes Connect and allows you to add a new application. For related information, see this book’s Appendix.
There is, of course, more to the submission process than just having the App Store binary. Potential users of your application need to be convinced that your app is worthy of being installed on their device (i.e., that they are willing to ante up less than the price of a cup of coffee for your blood, sweat, and tears). You will try to convince them through words and through images, which is what the App Store listing for your app contains. Table 7-1 lists the items you’ll need as you proceed with the submission process.
Although there are other elements to submitting the app (which I’ll cover in a moment), having these sorts of materials queued up will make the process easier and faster.
App Store Submission
Now the big moment...time to get your app submitted to Apple! Browse to iTunes Connect (http://itunesconnect.apple.com) and log in using the appropriate Apple ID. Assuming you have the appropriate permissions, you should see the Manage Your Applications link on the home screen (see Figure 7-3). Click it and then click the Add New Application button on the next screen. At this point, you are officially at the beginning of the submission process. By having your checklist assets close at hand, you should be less than five minutes away from submitting your app.

App Information
Aside from the application name and SKU number (a unique number you assign to your app) the App Information screen focuses on slightly more developer-centric information (see Figure 7-4). In particular, you’ll want to work with your developer to complete all the bundle-related fields.

From your checklist, you should already have your application name and should be able to easily fill that in to the App Name field. The SKU Number field is more for your benefit than anyone else’s. This number, among other uses, will help you differentiate the sales for this app from others. Try to use some logic in creating it, such as incorporating the app name initials and year, but don’t overthink it.
Rights and Pricing
Apple doesn’t allow you to enter a price for an app. Instead, it uses a Price Tier, with Tier 1 representing $0.99 and Tier 85 representing $999.99. The tiers generally increment by $1, but in the upper tiers they increase by $5, $10, $50, and eventually $100. By selecting a different tier, you’ll see the Customer Price in other regions in the Pricing Matrix, as well as Your Proceeds, which is the amount you’ll receive after Apple takes its 30%.
Note
The Rights and Pricing screen looks different and is less functional during an initial submission of your application. For example, you’ll have to click See Pricing Matrix to view the Customer Price and Your Proceeds. More important is that during the initial submission, you will not see the Price Tier Effective Date and Price Tier End Date (described shortly). Come back to the Rights and Pricing screen either after you submit your application or after you submitted it without the binary to edit these options.
The Rights and Pricing screen contains three additional key elements: the Availability Date, price tier change dates, and stores where you want the application available. The Availability Date is deceivingly tricky. It provides you with an opportunity to set a date in the future for your app, but does not guarantee it will be available by that time. So, if you are trying to plan a marketing event around the launch of your app, don’t base it on what you enter in the Availability Date section, unless that date is far enough in the future that you can guarantee it will be approved (usually three or more weeks into the future should suffice).
If you want to be available to support the app once it is launched, you may also want to avoid choosing a weekend date, though there may be some advantage to this approach, in that there would be less competition at that time (but you’d need to be available off normal business hours). There’s also some advantage to launching an app at the end of the week, since sales are normally higher then and it’s the time when Apple refreshes its Featured apps.
If your Availability Date passes and the app is still not approved, it will be made available in the App Store as soon as it is approved—that is, unless you edit the date before this occurs. To have better control of your marketing efforts, you will want to come back to change this date if that’s the situation you find yourself experiencing. Apple provides a somewhat frequently updated App Store Review Status (see Figure 7-5) in the App Store Resource Center of the iOS Dev Center. It provides high-level information regarding how quickly new and updated apps are being approved. You may want to use this information as guidance for influencing your Availability Date (https://developer.apple.com/iphone/appstore/approval.html).

Two items that won’t show on this screen when you first submit your app are the Price Tier Effective Date and Price Tier End Date. They are related and can be used to create periods of time where you either drop or increase the price of your app. Apple included this feature because many developers will offer promotional pricing for an app for a specified period of time. Previously, you would have to log in to iTunes Connect to drop and subsequently increase the price, but that’s no longer the case with Price Tier Effective Date and Price Tier End Date (shown in Figure 7-6). If you don’t have any promotions planned yet, don’t concern yourself with these items. As with everything in iTunes Connect, you can make edits and updates later.

By default, Apple will make your app available to App Stores worldwide to increase the app’s exposure and revenue potential. The distribution of your app can definitely be a strategic decision. There can be issues with how the app functions internationally, such as date formats impacting functionality or language barriers if the app description is not localized. You’ll likely have assessed those issues before coming into iTunes Connect. To change the geographic availability, you’ll need to click the “here” link in the text that reads “Or, you can select specific stores here” at the bottom of the Rights and Pricing screen. Deselect the App Stores where you do not want your app published.
Note
There’s a trend among more sophisticated developers to launch an app into a smaller comparable market before launching it globally. For example, many game developers focused on the U.S. market are first launching in Canada, improving the app, and then releasing it to the rest of the stores. This strategy is addressed more fully in the TapMetrics interview at the end of the chapter.
Version Information
The Version Information screen is arguably the most important of the submission process and is broken down into four sections: Metadata, Rating, EULA, and Images. The first and last sections will mostly be completed by having your App Store checklist assets handy. It’s extremely uncommon to alter the EULA, so I will not be addressing that section at this time.
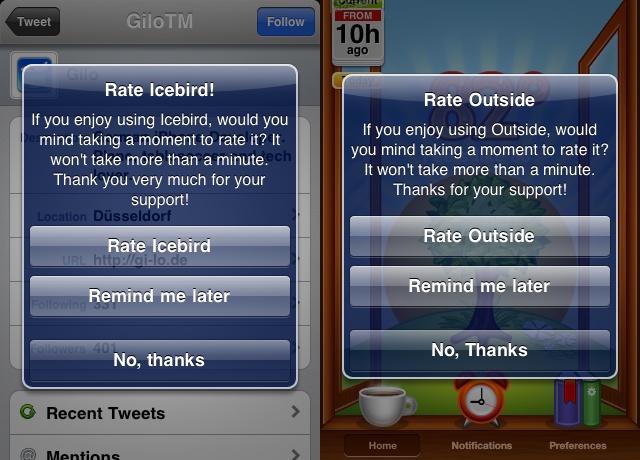
For the Metadata section (see Figure 7-7), you’ll use the text portions of your App Store checklist. You’ll be using your application description and keywords in this section and should be able to just copy and paste them into the relevant fields. You’ll also be assigning your app to its primary and secondary categories (see Chapter 1 and the TapMetrics interview at the end of this chapter for information about choosing your category).
There are two Apple-centric fields in the Metadata section: Version and Copyright. The version number can be whatever you want, but it is exposed to your users and is unique to a specific version of your application. It’s typical to number your first version of the app as “1.0,” and then increment that number with each app update (e.g., “1.1.2” or “2.0”). As described in Chapter 5, most developers use version systems that include three digits (see the Release Numbering sidebar in Chapter 5). For the Copyright entry, add the individual or entity that owns the copyrights to the application. Apple prefers the format to be the year followed by the individual or entity (e.g., 2010 Ken Yarmosh).
Apple has made the Rating section easier for you by creating the app rating through a combination of selections for different categories. The ratings include 4+, 9+, 12+, and 17+. As you toggle the radio buttons for each category, you’ll see the rating update.
Along with the Metadata section, the Images section is another place where you’ll be happy to have all the App Store checklist items ready. You should be able to quickly match your checklist assets with the app icon and screenshots. Although it’s not required, you’ll definitely want to use all the screenshots available to you. As needed, be sure to reorder them to have some logical flow and focus. After completing the image-related fields, you can click the Save Changes button.
App Summary and binary upload
Upon saving the details for your app, you will be taken to the App Summary screen. This screen represents the area you will visit for each of your submitted or approved applications. It will allow you to access and edit the details of your application going forward.
While you are at the App Summary screen, you are still not quite done with submitting your application to Apple. For starters, if you are enabling In App Purchases or iAds for this particular app, you will need to click either the Manage In App Purchases or the Set Up iAd Network button on the App Summary screen. A button for enabling Game Center is also present in the same area. At a more basic level, though, you will need to revisit the Version Information screen to add any desired localizations and submit your application binary.
Access the Version Information screen again by clicking the View Details button under Versions on the App Summary screen. This screen will look different than it did previously. Among other differences, in the top righthand corner, you’ll see two buttons, Ready to Upload Binary and Manage Localizations. I’ll address the second button first.
Most apps are launched worldwide without localizing the App Store content. If you have a specific target market, however, you may want to add a new language through the Manage Localizations button. Once in the localizations area, you can reuse much of the information from the Version Information screen, but you will now have the opportunity to create the metadata content in an alternative language.
Assuming you have completed all other required items, click the Ready to Upload Binary button on the Version Information screen. Provide an answer for the Export Compliance question regarding encryption, which in all likelihood should be “No.” Note that you will need to upload your binary through the Application Loader tool (Mac only, shown in Figure 7-8). Beginning in iOS SDK 3.2, the Application Loader comes bundled with the software (see the iOS SDK section in this book’s Appendix). Apple will surface a direct download of this tool after the Export Compliance question is answered. You can also find a download link at the bottom of the Manage Your Applications page, which reads Download Application Loader.

Once you have completed the binary upload, your application will move into its first phase of the App Store approval process: Waiting for Review. The next section will help you understand the approval process a bit more. Although it’s important to understand this process, it’s vital to use the approval waiting time for other activities that will help you make your app more successful. See Chapter 8 to get started on some of those items, if you haven’t done so already.
App Store Approval Process
In the short existence of the App Store, Apple has taken a tremendous amount of criticism about its approval process. Developers complained about the lack of transparency into and consistency of the process. More broadly, their concerns centered on the fact that approving apps affected their ability to keep their software updated and functioning properly.
Today, Apple has not solved all of these problems, but is has significantly lessened the uproar. The biggest areas of improvement have been providing greater visibility into the approval process and reducing the time it takes to approve an app.
Status and status history
Your app can be in one of 11 statuses at any one time. These statuses vary from your needing to wait for Apple to Apple waiting for you. The most common statuses are as follows:
- Waiting for Upload
This status indicates that Apple is ready to receive your app’s binary through the Application Loader.
- Waiting for Review
As mentioned previously, this state will occur upon your submission of a fully completed app. Once in this state, you will await Apple’s review of your app.
- In Review
This status indicates that Apple has begun reviewing your application.
- Rejected
Not fun; this status indicates that your application has been rejected and requires you to address one or more items and resubmit your app to Apple.
- Ready for Sale
Your app has been approved by Apple; depending on what you selected for your app’s Availability Date, it can be eligible to begin appearing in the App Store shortly.
A full listing of all 11 statuses is available from Apple in the App Store Resource Center of the iOS Dev Center (http://developer.apple.com/ios/appstore/approval.html).
If you have opted to receive notifications (iTunes Connect✓Manage Users✓Edit Profile✓Notifications) you will get an email whenever your app changes status. You can also see the current status and status history of an app by clicking on the Status History link (see Figure 7-9) from the Version Information screen. The Status History page will include an audit trail of when the app was submitted, when it went into review, when it was ready for sale, and any other status changes.

I want to make two final comments regarding statuses. First, remain calm if your app gets rejected. Second, when your app becomes Ready for Sale and you choose for it to start appearing in the App Store (see the Availability Date discussion earlier in this chapter), it will likely take some time—possibly several hours or more—before it begins appearing in the App Store. Although you’ll be eager to see it start showing, use this time wisely. Whether it’s prepping your final marketing push or readying support channels, there are better things to do than constantly look for your app in the App Store (these “better things” are covered in the Launching Your App (Phase 5) section in Chapter 8). Your app will show in the App Store...eventually.
Rejections and resubmissions
Thankfully, you are joining the App Store at a time when rejections are both less common and easier to resolve. Although there was no official change in policy or announcement from Apple, anecdotally the approval process has seemed less stringent and faster since the beginning of 2010.
Rejection emails have also generally been more helpful. Members of the App Review Team from the iOS Developer Program often will give specific scenarios that cause crashes and may even include crash logs your developer can use to identify issues. The bottom line is that unless your application was rejected for more ideological reasons, such as Apple deeming it to have duplicated similar functionality to its own apps (e.g., the iPod app) or due to questionable content, having an app rejected is just part of your App Store journey.
Note
If your app gets rejected more than once, you might consider using one of your Technical Support Incidents (TSIs) by sending an email to [email protected]. Most memberships include two TSIs, but more can be purchased. You can access information about your TSIs from the Technical Support section of the Programs & Add-ons tab, which is part of the Member Center of the Apple Developer program portal (http://developer.apple.com/membercenter/index.action#techSupport).
Once your developer has resolved the issue and you’ve tested it (particularly in relation to why the iOS Developer Program stated it was rejected), use the Application Loader to replace the app’s binary.
Approved and Ready for Sale
If you’ve followed your marketing checkups to this point, once your app has attained the Ready for Sale status, you’ll have the option to launch it into the App Store. Or, if your Availability Date has already lapsed, your app will be published to the App Store shortly. In either case, go directly to the Launching Your App (Phase 5) section of Chapter 8.
Interviews
TapMetrics: Christopher Brown

Position: Engineer
Background: Christopher Brown is the co-founder of TapMetrics, which was acquired by Millennial Media in early 2010. He has also served as the CEO for Bitfire Systems, an iPhone application development and consulting company.
Links: http://www.millennialmedia.com/; http://tapmetrics.com/
Ken: Discuss the importance of choosing the right category for an app. How does Apple use the secondary category, and will an app show up in it?
Christopher: An app will be listed under the primary category in the App Store. The secondary category, however, provides an additional search term, allowing customers to use the search bar to browse for your app. Although the secondary category is optional, it is easy to select and costs nothing, gaining additional ways for your app to be noticed. The difficulty lies in choosing which category “best describes your application,” as Apple says to do. While most people can easily pick two or three categories their app falls into, it is more difficult to pick a primary category for an app that most likely does multiple things. The most ambiguous categories usually fall between the Utilities/Productivity/Travel categories and the Games/Entertainment categories as well. I think the best course is to pick a category that best describes the key “pain point” your app solves.
Ken: During the App Store submission process, many developers don’t think carefully enough about their Availability Date. What sort of lead time is recommended between submitting the app and having it available on the App Store?
Christopher: I recommend submitting an app to the store three to four weeks out. This creates the freedom to do two things. First, it gets you past the review gates of the iTunes Store. By shifting your launch date to the future, you can give Apple sufficient time to review your app, and you will have ample time to fix issues if they reject it. The average approval time has varied from a couple of days to more than two weeks, depending on the review load they have at the time. If you plan events and start telling everyone your app will be in the store in three days, only to find out you violated a rule in the Human Interface Guidelines, you may experience large delays that severely hamper the typical sales bump on initial launch.
Second, this forces you to create a marketing plan. You have time to get the app to bloggers that like to preview apps. You can create an ad campaign that starts a couple days before launch. You can tell the media when your app will be available. It means taking control back from Apple; you control the release, not them.
Ken: Recently, developers (especially of games) seem to be launching their apps exclusively into smaller markets first (like Canada) before distributing them globally. Is that a smart strategy, and does such an approach make sense for all apps or only a particular type of app? How would you caution developers about proceeding this way?
Christopher: I think this could be beneficial if you are releasing into a specific market that is known to appreciate the characteristics of your app(s). Games or entertainment apps come to mind here in particular. Certain applications may be loved in France or Japan but are simply not understood in the U.S. or the UK. Releasing an app in a market that is unfamiliar with the nature or culture of your app may earn you poor reviews. Giving it time to gain momentum in a market that is more likely to accept it may help it catch on later in other countries.
In markets where cultures are similar and popular content tends to spread more quickly, such as Canada and the U.S., it doesn’t make much sense to me to “test” or “delay” the release. Get the app out there, take feedback from users, and make it better.
Ken: What are some of the biggest issues developers have with installing analytics and what can be done to avoid them? How is TapMetrics’ tool being built to address these problems?
Christopher: What we are hearing about now is rejection of apps that use location simply for analytics or advertising and not for any utility within the actual application. The TapMetrics library allows a developer to release an application with or without location-based analytics simply by setting a parameter to “YES” or “NO” in one line of code.
Ken: How can developers test that analytics are installed properly before going into the App Store? Specifically, can or should that be done during ad hoc distribution and beta testing? If so, what are the benefits?
Christopher: We’ve seen success from developers who install analytics and then give the app out to beta testers. In addition to verifying that the analytics are functioning properly before release, they can measure usage and get feedback. This approach reveals problems you might not be aware of after focusing on the app for a long period of time.
PoweryBase: Dominik Balogh
Company: PoweryBase
Position: President
Background: PoweryBase, Inc., was founded in 2009 by Dominik Balogh and his colleague Pavel Serbajlo. They are the creators of, among other software endeavors, the successful iPhone applications NotifyMe and Bills.
Link: http://www.powerybase.com/
Ken: It’s more than a fair statement that PoweryBase is an expert on push notifications, as seen through your NotifyMe application. For a new developer, what are the biggest challenges with push notifications and what advice would you give for getting started with them?
Dominik: PoweryBase was among the first developers to start benefiting from push notifications as soon as Apple provided this technology. Therefore, it’s fair to say that we’ve gained expert skills with it over time. Nowadays, it’s not as difficult to implement push notifications into any application as long as the developer owns a highly reliable server. No special advice is needed if the developers follow Apple’s implementation guidelines. At least in the past, some of the biggest challenges have been automated repeating notifications and support for time zones and daylight saving time.
Ken: NotifyMe seemed to be a pretty successful application. At least from an outsider’s perspective, the second app you launched—Bills—appeared to narrow down the scope of NotifyMe and yet it became even more popular. Describe how your Bills app got started and why you eventually launched it even though an existing app basically already had the same functionality.
Dominik: Bills (full name: Bills ~ On your table) was specially designed to manage bills, bill amounts, and their due dates. Comparatively, NotifyMe is a more versatile to-do reminder. Sure, NotifyMe can also be used to remind you to pay bills on their due dates, but it’s not as convenient. The reason we developed Bills was that we saw a potential and found that we weren’t satisfied with other bill management applications available. Apple really liked our effort and picked Bills as a featured spotlight on the App Store.
Ken: What are some good ways for developers to ensure that they are launching something unique and creative into the App Store?
Dominik: With so many applications on the App Store, it’s really hard to launch something unique. Recently, we’ve started asking ourselves whether the software has to be completely unique in order to gain success. There are many apps already available that can be made much better. Users are picky and mostly know how to determine the best one. If a developer is trying to figure out how to reinvent the wheel, maybe it’s time to start thinking the other way around. Identify what is lacking on the App Store, add your innovations, and make it much better.
You could build a multibillion-dollar business this way. In fact, isn’t that what Apple has been doing with their computers, phones, music players, and tablet device (the iPad)? Sometimes uniqueness and creativity means just making things that are already available better and more focused than your competitors.
Recap
Here’s what you learned in this chapter:
Although your application’s features will be complete when you’re ready to submit to the App Store, there are a handful of final development tasks to complete before the app can be submitted.
Installing analytics in your application will later give you additional insight into how your customers understand and experience your application.
Having the App Store version of your app—the app “binary”—and all of your other text and image content readily available will make submitting to the App Store much easier.
The Availability Date of your application represents the date you want your app to start appearing on the App Store. Selecting a date far enough into the future will provide you the greatest control over when that will actually occur.
A rejected app is no longer a major issue. Apple’s operational improvements will help you better understand the nature of your problem and will give you greater visibility into when your app changes status.