
This chapter is about agents that can run on a Mac. Agents are services, or programs, that run on devices. These agents are specifically designed to give a systems administrator command and control over a Mac and are usually agents that start a listener on the Mac or tell the Mac to log in to a server and pull down management tasks from that server on a routine basis. These give administrators the ability to control various aspects of computers from a centralized server. Commands are sent to the device from the server or pulled from the server and run on devices.
Over the past few years, Apple developers have started to reduce the importance of agents on the Mac. They do this when they remove capabilities from agents and/or make it easier to disable them. Agents are still an important aspect of macOS management, and so it’s important to understand what an agent is, what it does, and when to use one. Device management tools use agents, security software uses agents, and a number of tools use agents to track the licensing of their software on devices. Agents can do less and less with every passing year, but they are still necessary.
One place where “less and less” has been problematic is device management. Just keep in mind that any time a task can be done with an agent or MDM, make sure to use the MDM unless there’s a really good reason to use an agent. The Mac isn’t quite back in the era of Desk Accessories from System 7, but the platform is in an era where user consent is more and more important for tasks that could violate user privacy – even for various tasks that would be performed on devices we can prove the organization owns.
Neither iOS nor tvOS allows for custom agents, but agent-based management is (at least for now) a critical aspect of how to manage macOS devices. In this chapter, we’ll review common agents designed for the Mac and what they do. We’ll cover MDM, which is an agent-based management environment provided by Apple in the next chapter, and provide much more information around how MDM works. MDM has been referred to as “agentless” at times, but that really means it’s just an agent provided by Apple.
Daemons and Agents

A screenshot of the sharing panel. The computer name, Charles's virtual machine is at the top. There are several options below it with toggle buttons next to each. The button for file sharing is switched on.
The Sharing System Setting pane

A screenshot of the activity monitor tab. It has 8 rows for processes. The columns are for, % C P U, C P U time, threads, idle wake-ups, kind, % G P U, G P U time, P I D, and user.
Use Activity Monitor to see what processes are running (and what processes started them)
In the preceding example, note that the /usr/sbin/smbd binary is loaded and the LaunchDaemon controls the binary. LaunchDaemons can run even without a user logged in. LaunchDaemons cannot display information with the graphical interface of a Mac; but they can provide data to apps that have graphical interfaces. The plist files are stored in the /System/Library/LaunchDaemons folder (for those provided by Apple) and /Library/LaunchDaemons (for the rest). There are also LaunchAgents, which run on behalf of a user and therefore need the user to be logged in to run. LaunchAgents can display information through the window server if they are entitled to do so. As with LaunchDaemons, LaunchAgents are controlled by property lists. The configuration plist files are stored in the /System/Library/LaunchAgents and /Library/LaunchAgents, and user launch agents are installed in the ~/Library/LaunchAgents folder.
Next, let’s look at a common graphical interface for managing LaunchDaemons and LaunchAgents, Lingon.
Use Lingon to See and Change Daemons and Agents Easily
Lingon is a tool available on the Mac App Store at https://itunes.apple.com/us/app/lingon-3/id450201424. Install Lingon to be able to quickly and easily manage LaunchDaemons and LaunchAgents. It can also be downloaded through Peter Borg’s site at www.peterborgapps.com/lingon. The version there has more features and control over system-level daemons and agents.

A screenshot of the Lingon agent browser screen. There is a plus button with the text, new job, at the top left of the screen. There are 4 boxes for 4 different processes.
The Lingon agent browser screen
Name: The name of the script. This can be something simple like Pretendco Agent but is usually saved as com.Pretendco.agent.
What: App or even just an arbitrary command like “say hello” if the command is short and simple.
- When: When the script or binary that was selected in the What field will be invoked or should run.
At login and at load.
Keep running (runs all the time and restarts after a crash): Runs all the time. launchctl will watch for the process to terminate and restart it. This is usually something that persistently manages a socket or is always waiting for something to happen on a system.
Whenever a volume is mounted: This is similar to watching for a file to change given that it’s watching /Volumes, but when a volume mounts, the process will run.
Every: Runs the script or process at a regularly scheduled interval, like every 90 seconds or once an hour.
At a specific time: Runs the specified process at a given time on a schedule (this is similar in nature to how cron jobs worked).
This file is changed: Defines a path to a file so that if the LaunchDaemon notices a file has changed, the desired script will run. This is pretty common for scripting automations, such as “if a file gets placed in this directory, run it through an image converter.
Save & Load: Saves the LaunchAgent or LaunchDaemon, provides the correct permissions, and attempts to load.
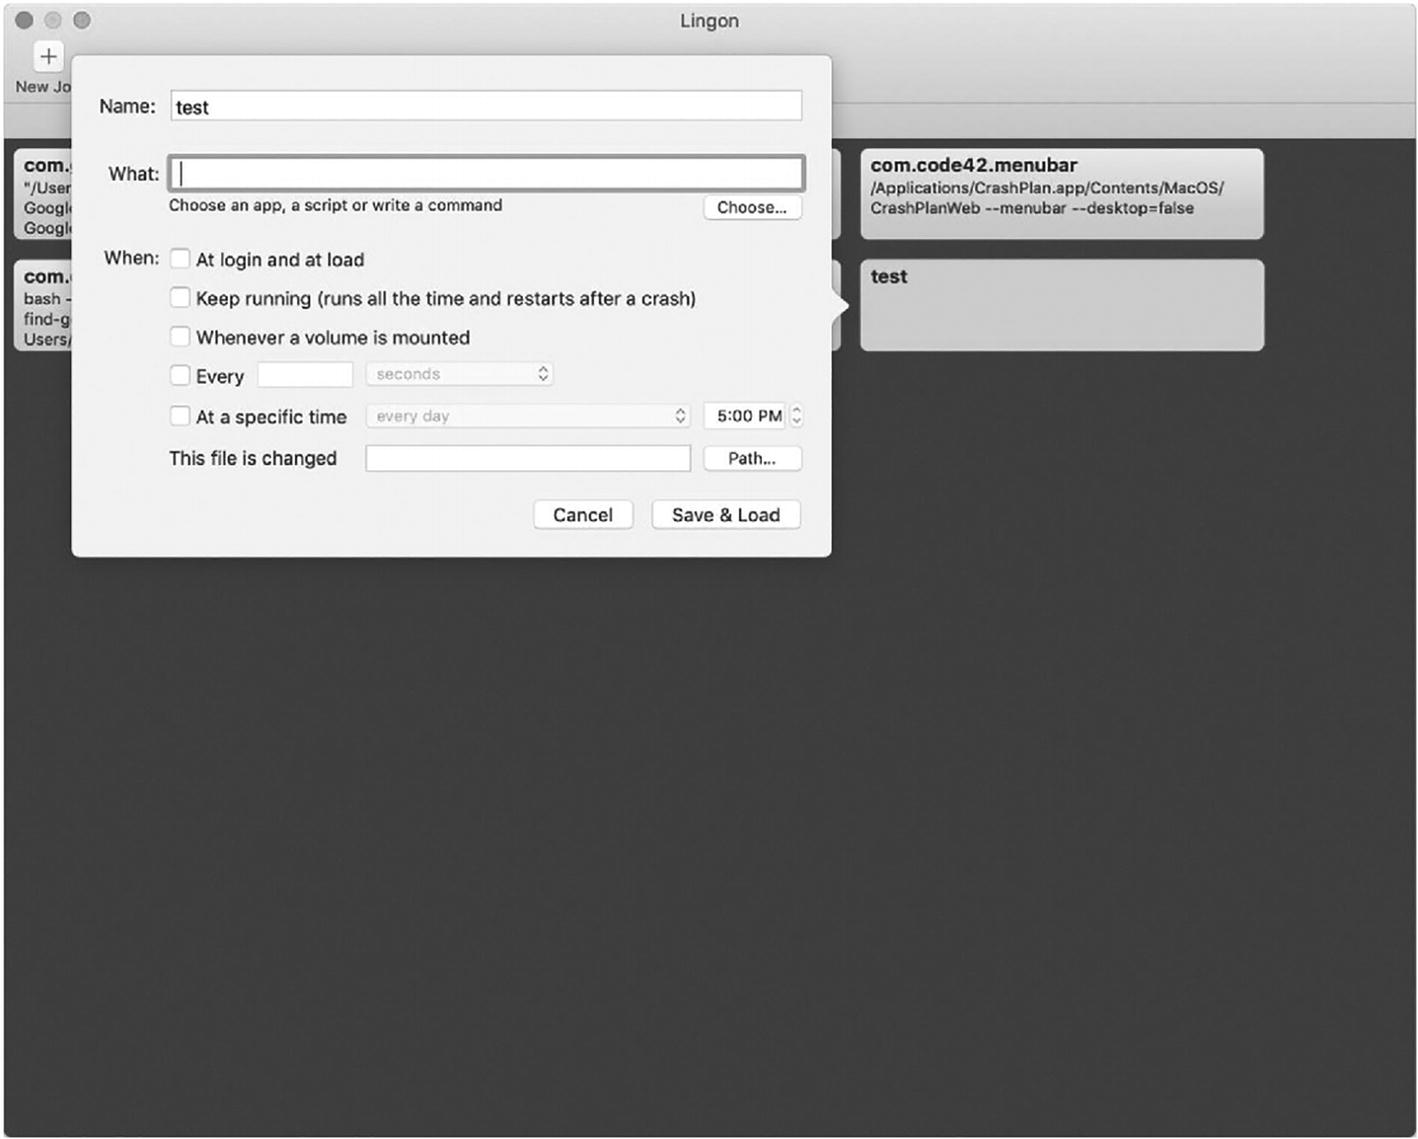
A screenshot of a dialogue box above the Lingon window. The dialogue box has the name, what, and when tabs. There are buttons for cancel, save, and load at the bottom right.
Provide a name and location for a script or app to daemonize it

A screenshot of a dialogue box with options for cancel and continue at the bottom. It has the text, this will save the job to a file, load it and it will continue to run after you have quit the app. Do you want to continue? There is a checkbox with the text, do not show this message again.
Save your new agent or daemon
If you select a job and then select “Copy Job to Clipboard” from the Job menu, then you can open a new document and paste the contents of what would be in a property list in. By default, the new LaunchAgent is saved in ~/Library/LaunchAgents/ so you can also easily just view it with cat once saved.
Now that we can create and delete LaunchAgents and LaunchDaemons, you know how to create an agent if you need to or stop one from processing if it’s running on a host. Now that we’ve described what goes into building a daemon or agent, let’s look at controlling them so we can then show how you interface with those used to send management commands to macOS devices.
Controlling LaunchDaemons with launchctl
For more on LaunchDaemons, see the Apple developer documentation at https://developer.apple.com/library/archive/documentation/MacOSX/Conceptual/BPSystemStartup/Chapters/CreatingLaunchdJobs.html or check launchd.info, a site where you can see additional information.
Now that we’ve looked at LaunchDaemons and LaunchAgents, let’s review what each has access to before we move on to looking at some of the commercial and open source distributions of management agents.
Deeper Inspection: What Does the App Have Access To?
When building and testing sandbox profiles for apps to compile, you may want to test them thoroughly.
Third-Party Management Agents
There are a number of tools that other people or organizations have built that enable you to tap into the power of the macOS command line. Organizations like Addigy, FileWave, Jamf, MobileIron, and VMware all have agents. And Munki has become a popular open source management agent for a number of reasons. We’ll start our look at agents with one of the more recently added, given how it’s built: Addigy.
Addigy

A screenshot of the Addigy window. On the left there are tabs for, dashboards, devices, add devices, policies, catalog, monitoring, and community. The add devices tab has been selected. The screen has the text, add devices with a tab for selecting a policy.
Download the Addigy Agent

A screenshot of install via agent window. It has the tabs, install with package and install with terminal. It also has end-user instructions with an option to email installation instructions.
Scripted or package deployment
/Library/LaunchDaemons/com.addigy.agent.plist: The Addigy agent, responsible for controlling other services running on the system. This calls /Library/Addigy/go-agent with the agent option.
/Library/LaunchDaemons/com.addigy.collector.plist: The Collector, which maintains inventory and reports information back to the server. This calls /Library/Addigy/collector.
/Library/LaunchDaemons/com.addigy.lan-cache.plist: The process responsible for copying files to the local computer to be processed (e.g., to install a package). This loads /Library/Addigy/lan-cache, based on https://github.com/bntjah/lancache.
/Library/LaunchDaemons/com.addigy.policier.plist: The policy engine, calling Ansible to do orchestration and provisioning. After a network check, this runs /Library/Addigy/go-agent with the policier option.
/Library/LaunchDaemons/com.addigy.updater.plist: This is responsible for keeping the agent updated and calls /Library/Addigy/go-agent with the updater option specified.
/Library/LaunchDaemons/com.addigy.auditor.plist: Addigy’s audit tool, which can be used to get custom facts about the state of a host.
/Library/LaunchDaemons/com.addigy.watchdog.plist: Throttles processes if their CPU usage gets too high.
/Library/LaunchDaemons/screenconnect-92fde59311b74250.plist: Addigy’s screen connection agents.
/Library/LaunchAgents/screenconnect-92fde59311b74250-launch-prelogin.plist: Addigy’s screen connection agents.
/Library/LaunchAgents/screenconnect-92fde59311b74250-launch-onlogin.plist: Addigy’s screen connection agents.
In addition, there are a number of supporting files located in /Library/Addigy, including auditor-facts, which has information obtained by the auditor, /Library/Addigy/ansible/status.json which is the main ansible inventory file, and /Library/Addigy/user-job which runs shell scripts on behalf of the user.
One of the reasons we placed the Addigy agent first is that it’s a simple, efficient, and transparent architecture. The other is of course that it alphabetically comes first, and when we list vendors, we try to do so alphabetically. But the main components of the agent and with others will be that there’s a process for connecting to the server and orchestrating events, another process for downloading updates, and a final process for executing and reporting. More daemons just means more logic behind the scenes and more options. But more daemons or agents also means more CPU usually.
The use of LANCache is a really great feature, provided there’s a checksum validation at installation of packages as it improves the experience but also keeps the bandwidth required to host assets for customers low. Caching updates on client devices is not a new concept. FileWave has supported “Boosters” for well over a decade. Notice that the “agent” for every tool we cover isn’t just a single binary or script that runs in the background, but is a collection of a few that do various tasks. In the next section, we’ll look at the FileWave agent in more depth.
FileWave
FileWave is a management solution for iOS, macOS, and Windows. FileWave deploys software to client Macs using what’s known as a fileset, or a set of files. These filesets are referenced using a manifest on a FileWave server, and the FileWave client, or agent, looks to the server manifest for a list of any actions it needs to perform. If a fileset needs to be installed, the FileWave client is provided with a path to access the fileset using the manifest file and retrieves the files necessary for installation using a FileWave booster or distributed repository that hosts those files.
The FileWave client agent is primarily made up of an app, located at /usr/local/sbin/FileWave.app; a preference file, located at /usr/local/etc/fwcld.plist; and a control script, found at /sbin/fwcontrol. These tools log to /var/log/ using log files that begin with the name fwcld. The scripts are started up using /Library/LaunchAgents/com.filewave.fwGUI.plist and /Library/LaunchDaemons/com.filewave.fwcld.plist.
As seen in the earlier example, we’ve sent information about a device back to a server. We can then build automations at the server that send further instructions to the client. For example, if there’s no login hook, install one. The FileWave manual will be a better guide to getting started using the command line and scripts to help manage FileWave. That can be found at www.filewave.com.
The Once Mighty Fleetsmith
Fleetsmith was acquired by Apple, and the team helped build out better APIs for built-in management options. However, it’s still worth mentioning in a book like this as it had features still not replicated by other solutions (but that an enterprising admin could build themselves) and an agent built on open source software in ways enterprising engineers could build another agent (and some third-party tools have been built similarly).

A screenshot of the preferences window. It has 3 types of U R Ls listed under Fleetsmith Agent. Each has a button to copy U R L. There are 4 tabs under installers and U R Ls. They are, download agent uninstaller, invalidate installer U R Ls, revoke agent installers, and invalidate configurator U R L.
Download the Fleetsmith installer
com.fleetsmith.agent.plist: Invoked the /opt/fleetsmith/bin/run-fsagent shell script, which logged to /var/log/fleetsmith and invokes the agent daemon
com.fleetsmith.query.plist: Started /opt/fleetsmith/bin/fsquery, a customized osquery daemon
com.fleetsmith.updater.plist: Started /opt/fleetsmith/bin/fsupdater, a Go daemon that kept software up to date
force-notifier.app: Took over the screen to run updates when needed.
fsagent: The LaunchDaemon that ran in the background.
fsquery: The Fleetsmith fork of osquery.
fsupdater: Was responsible for keeping Fleetsmith up to date.
osqueryi: osquery, which we’ll cover later in this chapter, is distributed in order to provide inventory information for Fleetsmith.
run-fsagent: Started the agent.

A screenshot for managing Google Chrome with Fleetsmith. The options for Google Chrome are, save, cancel, and remove from profile. The right side has the enforced bookmark list with a toggle button. There is a box for managed bookmarks items with name and U R L. The option, add another, is at the bottom right.
Manage Google Chrome with Fleetsmith

A screenshot of a dialog box with the text, Fleetsmith, at the top. There is a settings icon at the top right. The text, all your apps are up to date, is at the center.
The Fleetsmith app in the menu bar
Addigy is (and Fleetsmith was) built on Go-based agents that included components from the open source community. Fleetsmith bolted on a lot of keys and certificates to further secure the communication channel and added a lot of logic on top of osquery. All of this could be done by any company and is likely to be replicated, especially given the open source solutions that can handle the MDM management stack. Perhaps one of the top names in device management is Jamf. Next, we’ll look at the jamf “binary” – which is one of the older agents but also one of the most widely distributed.
Jamf
/usr/local/jamf/bin/jamfagent: The agent for processing user work and report on user data.
/Library/Application Support/JAMF/JAMF.app/Contents/MacOS/JamfDaemon.app: A bundle that contains the Jamf Pro daemon, for more global instructions (the Jamf.app is an app bundle that keeps all this together).
/Library/Application Support/JAMF/JAMF.app/Contents/MacOS/JamfAAD.app: For the Azure Active Directory integration.
/Library/LaunchDaemons/com.jamfsoftware.task.1.plist: Manages checking into Jamf Pro. Additionally, there are some symbolic links for either backward compatibility or to provide paths to files in various locations, according to the file.
Additionally, there are a number of daemons and agents that are not compiled binaries. The daemons are the global processes. /Library/LaunchDaemons/com.jamfsoftware.startupItem.plist launches a check-in script, and the daemon /Library/LaunchDaemons/com.jamfsoftware.jamf.daemon.plist collects application usage, FileVault data, network state changes, and restricted software as well as performs actions from Self Service. To manage check-ins to the servers, /Library/LaunchDaemons/com.jamfsoftware.task.1.plist is run routinely. /Library/LaunchAgents/com.jamf.management.jamfAAD.clean.agent.plist cleans up artifacts from Azure AD IDs, and /Library/Preferences/com.jamf.management.jamfAAD.plist is used to retain preferences of Azure AD information.
All of this is logged to /var/log/jamf.log. So the binary is handling non-MDM communications back to the server but also enables you to script various tasks quickly.
Manage User Accounts with Jamf
More Automation Through the Jamf Framework
In general, most of the agents will provide a few options. The Jamf binary goes a bit deeper than most, which makes Jamf the more advanced third-party Mac management tool available. It does still wrap a lot of shell commands that administrators can send through any management tool, which some admins have chosen to build on their own – either with the assistance of open source tools or as open source tools altogether. The top open source tool for Mac management is another common tool called Munki, which we’ll cover in the next section.
Munki
Munki is an open source device management framework originally developed by Greg Neagle and available via GitHub at https://github.com/munki/munki. Munki was initially designed to be similar to the Apple Software Update Server but for third-party products. The design is elegant in that simplicity. The client downloads one or more manifests and one or more catalogs, and a client computer takes its updates from the manifest(s) and catalog(s). As the project has gained traction and a greater level of maturity, a number of enhancements have been made; but you have to love that core concept that a client picks up a dictionary of information about the state the client should be in and then takes action based on that, including installing profiles, updating default domains, and of course installing software updates.
Munki runs an agent on client computers. As with many “agents” these days, it’s split up between a number of LaunchDaemons and LaunchAgents, each built for a specific task. There are four LaunchDaemons and three LaunchAgents, as well as a number of scripts that do specific tasks. As with a few of the tools we cover, Munki comes with an app that can be used to allow users to perform a number of tasks themselves.
Munki LaunchDaemons
/Library/LaunchDaemons/com.googlecode.munki.managedsoftwareupdate-check.plist causes managedsoftwareupdate to run approximately once an hour in the background to check for and possibly install new updates. This controls background task scheduling with the supervisor (/usr/local/munki/supervisor) to make sure it wasn’t removed and adds a delay to triggered managed softwareupdate events (/usr/local/munki/managedsoftwareupdate). This allows the local agent to process catalog changes and run unattended installations of software.
/Library/LaunchDaemons/com.googlecode.munki.managedsoftwareupdate-install.plist: Runs cached updates when user notification is required. The managedsoftwareupdate-install launchdaemon runs cached updates for Managed Software Center. This involves a sanity check that /private/tmp/.com.googlecode.munki.managedinstall.launchd is present. If so, managedsoftwareupdate runs using the –installwithnologout option when invoked.
/Library/LaunchDaemons/com.googlecode.munki.managedsoftwareupdate-manualcheck.plist: Gives Managed Software Center the ability to scan servers for updates to the Munki manifest file. Requires the /private/tmp/.com.googlecode.munki.updatecheck.launchd trigger file is present.
/Library/LaunchDaemons/com.googlecode.munki.logouthelper.plist: Notify users when the force_install_after_date approaches. This is done by invoking Managed Software Center which can terminate a user session, which uses the /usr/local/munki/logouthelperutility script.
/Library/LaunchAgents/com.googlecode.munki.ManagedSoftwareCenter.plist: Used to open Managed Software Center in the user context when user notification is required.
/Library/LaunchAgents/com.googlecode.munki.MunkiStatus.plist: Calls MunkiStatus in the Contents/Resources directory of the Managed Software Center app bundle and is used for notifications on top of the login window.
/Library/LaunchAgents/com.googlecode.munki.managedsoftwareupdate-loginwindow.plist: Processes user tasks at the login window. Can be triggered by /Users/Shared/.com.googlecode.munki.checkandinstallatstartup, /private/tmp/com.googlecode.munki.installatlogout, or /Users/Shared/.com.googlecode.munki.installatstartup.
The architecture of what processes are used to run what services are pretty telling, not only about how the product works but also how to troubleshoot that product. The fact that each task that will be performed has been pulled off into a separate daemon or agent speaks to preserving the security of managing endpoints using the least amount of privileges available and avoids requiring a kext always be loaded in order to orchestrate all of these tasks. Most, though, are in support of processing the manifest, catalog, and pkginfo plist files, which we’ll cover in the next section.
Customizing a Munki Manifest
The manifest is where the Munki agents take their instruction sets from. Now that we’ve looked at the components of Munki, let’s look at that format, the manifest, catalog, and pkginfo plist files, and the keys in those files that go to each client. Keep in mind that Munki was initially built to replicate what Apple did for Software Update Services where there is a manifest file distributing packages to install on clients. Therefore, Munki has catalogs of all software to be installed.
Over time, the scope of the project grew to include groupings of different client computers that received different manifest files and an app that allowed end users to install their own software, which we’ll cover in more detail in Chapter 11.
managed_installs: Munki will install these items and keep them up to date.
managed_uninstalls: Munki will remove these items.
managed_updates: Munki will update these items, if present, whether or not they were installed by Munki.
optional_installs: Munki will allow users to install these items optionally and keep them up to date once installed (e.g., using Managed Software Center).
featured_items: Items listed at the top of Managed Software Center.
Munki Managed Installs
It’s usually a good practice to deploy software without version numbers or, if there are version numbers, to only use major release numbers. In the preceding example, we’ve actually piped the point release version number for testing. This allows you to keep track of software during testing that’s destined for your production catalog. This catalog isn’t always exclusive for software you installed.
Updating Software That Munki Didn’t Install
There are a number of reasons to patch software that Munki didn’t install. Chief among them are security patches. But also, the general performance of a system can be greatly improved by treating a piece of software Munki didn’t install as you would treat other managed software. This is referred to as a managed update in Munki and defined using a managed_updates option.
The managed_updates array is handled similarly to managed_installs but looks for a software title on the host and runs an updater only if that title is found. For example, if you don’t deploy Firefox, Chrome, or the Microsoft Edge browser, you might still want to keep those patched if you find your users install them. Running an inventory through a tool like osquery (described later in this chapter) will supply you with a list of software on the computers in your deployment and can then be used to find any software you would like to either move into your managed catalog or at least keep updated.
The exception to updating a package would be if it’s been slated to be removed on a computer. If a piece of software is scheduled for removal, it will not be updated. As deployments grow, you need more complicated logic on client systems in order to handle the added burden that additional groups and iterations put on an environment. This has led to nesting manifests.
Nested Manifests
The preceding manifest is similar to the earlier example, defining Quickbooks, Slack, and Office but without listing the catalogs. This simple approach allows administrators to push out small changes, managing universal software and then either aligning a computer with a job function or, as the deployment grows, allowing for more complicated hierarchies. This is similar to Apple allowing for nested Software Update Servers, where you can limit software to be deployed on child servers. While the Apple technique is no longer supported, Munki has filled much of the gap for third parties and continues this tradition.
Removing Software with Munki
The preceding example is mostly used to retire software, plan for major updates, and pull back any software accidentally released.
Optional Software Installation
Optional software are software titles that users can optionally install through Managed Software Center. If a user installs an optional software title, a package is installed as an administrator. Optional software is defined in manifests using an optional_installs array and then a number of packages, by name.
Any software installed using an optional install is stored in a locally stored manifest file that is also reviewed by Munki, located at /Library/Managed Installs/manifests/SelfServeManifest. As you might guess, if a title is listed in optional installs and managed installs, the package will be a required install. Managed Software Center then has the logic not to list that package as an optional install. The beauty of these types of installs is that users don’t need administrative privileges. We’ll get into packaging further in Chapter 6, but because anything can be put in a package, you can also deploy automations using Managed Software Center this way. Therefore, basic support tasks that might otherwise require administrative privileges such as clearing print queues, installing certain printers, and clearing caches can then be deployed without a user being made an administrator or without a remote control session to the computer.
If an item is installed through an optional install, then it is treated as a managed install. Because the software is optional, it can be removed through Managed Software Center. If the optional install is then removed, it is treated as a managed uninstall. A type of optional item is a featured item.
Featured Items
One of our favorite aspects of Munki admins is that most know more than anyone else has ever known about anything; therefore, there will be a lot of disagreement on this explanation of manifest files. That is fine. Now that we’ve created manifests, let’s move on to getting the first catalog created and getting some software imported into it for distribution.
Building a Repository and a Catalog of Software
Munki is a tool designed for installing software. The catalog is a list of software titles available for installation. The catalog is stored locally at /Library/Managed Installs/catalogs but can be downloaded from the server when it’s changed and used to provide catalogs using a web service and items are imported into the catalog using munkiimport, by default installed at /usr/local/munki/munkiimport. The munkiimport script is a python script that acts as an assistant for importing disk images (.dmg files), packages (.pkg files), manual configuration profiles (which have been partially deprecated since macOS 10.15), and application bundles (.app files) into your repo.
When prompted, provide a URL for your repo, which we’re using as /usr/local/var/www/munki_repo in this demonstration. The repo is set such that when the user runs munkiimport, imports will go to that location by default. The preferences set by the --configure option are stored in ~/Library/Preferences/com.googlecode.munki.munkiimport.plist. The repo should be provided as file://usr/local/var/www/munki_repo for our example location, although you could use an afp:// or smb:// mount instead or use one of the file-handler options to store your repo in an AWS or GCS file store.
Next, we’re going to create a PkgInfo property list based on a standard installer package that lists the catalogs an installer is a member of and other metadata about the installer. In this example, we’ll create the Zoom installer we used in the manifest earlier in this chapter: the PkgInfo plist. PkgInfo files are stored in the pkgsinfo directory inside the munki_repo.
All of the preceding options can be added as additional parameters to your installer. This shows the amount of work being done each time you run a munkiimport, even creating an icon. The one important option is to rebuild catalogs. Answering yes to that option will result in a new catalog files being built based on pkginfo files.
The software itself is also then imported into the repo, and if successful, the pkginfo file will open in the editor you defined in the --configure step for your user. Now that we have a repo, a catalog, and manifests, let’s distribute the manifest to client devices that need to install software.
Distributing the Manifest File
We’ve described manifests and catalogs, but how is a device provided with a manifest? Upon installation, the Munki agent will look to a SoftwareRepoURL key for the main repository of manifests. If Munki’s SoftwareRepoURL preference is not defined, the Munki client will attempt to detect a Munki repo based on some common defaults. That web host should have a valid TLS certificate and host the URL via https in order to protect against any man-in-the-middle attacks. Munki is architected such that the administrator points the Munki client to the server and that the host running Munki implicitly trusts that server. Therefore, it’s not recommended to deploy Munki without https in order to ensure the authenticity of catalogs being deployed. Failure to do so could cause résumé-generating events.
https://munki.$domain/repo
https://munki.$domain/munki_repo
http://munki.$domain/repo
http://munki.$domain/munki_repo
http://munki/repo
Once Munki finds a repo, there is usually a manifest for all devices at that URL. This is the site_default manifest, and if a manifest is not found, that uses a better option. The URL for that site_default for a domain name of pretendco.com might then be https://munki.pretendco.com/repo/manifests/site_default. Those better options in order of priority would be a unique identifier for Munki known as the ClientIdentifier, a fully qualified hostname (e.g., the output of scutil --get HostName), a local hostname (e.g., the output of scutil --get LocalHostName), or the serial number. The file for a computer’s hostname using that pretendco.com domain name from earlier but with a hostname of client1234 might then be https://munki.pretendco.com/repo/manifests/client1234.pretendco.com.
The manifest can be created manually or using a device management tool. For example, some organizations use puppet, chef, VMware AirWatch, or Jamf Pro to distribute the Munki manifest files and settings that point to manifest files. While it might seem like these other tools can manage the software on devices natively, it’s worth noting that these other tools are more about state and policy management, where Munki is about managed software. The power of Munki is the fact that it has such a narrow set of duties. For smaller environments, managing software and leveraging some payload-free packages is often all they need. For larger environments with a state management tool, Munki perfectly complements their other tools, and engineers tasked with the management of large fleets of devices are accustomed to scripting middleware for their organization’s specific needs.
Many software packages are updated every couple of weeks. According to how many software titles a given organization is managing, it can be a challenge to maintain an extensive software catalog. Therefore, AutoPkg is often used alongside Munki to automatically build packages and put them in your testing catalog. We cover AutoPkg more in Chapter 7, when we review preparing apps for distribution. Now that we’ve covered Munki, and how Munki keeps devices up to date, let’s move to a tool often used to complement Munki but built more for tracking the state of a device than systems orchestration: osquery.
osquery
Facebook open sourced osquery, a tool they initially used to monitor servers, at https://osquery.readthedocs.io/en/stable/. Since then, a number of developers (including those responsible for each platform internally at Facebook) have built additional capabilities for managing a specific platform. This makes osquery capable of being used as part of the management stack of a variety of platforms, without having to learn the internals for each of those platforms. The point of osquery is to obtain information about a system.
The osquery framework is multiplatform and tracks all the information about a system in a simple SQL database, so that devices can run lookups efficiently on behalf of a process that calls a lookup. This makes otherwise costly (in terms of processing power) processes run quickly, meaning an organization can obtain more data about devices in a central location at a higher frequency, without impacting the performance of the device being monitored. This would include common settings used on a Mac, the daemons running, how a device is configured, and the version of software. But you can get lower level and analyze processes running, view network sockets, compare file hashes, and find any other fact required about a device at a given time.
/private/var/osquery/io.osquery.agent.plist: The configuration preferences for the osquery daemon.
/private/var/osquery/osquery.example.conf: The customized settings for each organization running osquery.
/private/var/log/osquery/: Log files are stored in this directory and written as to the specified parameters in the configuration file.
/private/var/osquery/lenses: A record of a rest call stored in Augeas' tree (thus the .aug files).
/private/var/osquery/packs: A set of queries configured with standard .conf files.
/opt/osquery/lib/osquery.app (moved from /usr/local/lib/osquery/ in version 3): The directory for the command tools for osquery.
/usr/local/bin/osqueryctl: Symlink to a control utility to wrap basic tasks, like starting the LaunchDaemon.
/usr/local/bin/osqueryd: The main osquery daemon, which starts the process.
/usr/local/bin/osqueryi: Provides a SQL interface to test queries. By default, comes with a number of built-in tables populated with more information than most can consume (more data is always a good thing).
Now that we’ve looked at the osquery components, let’s get it installed and check SQL to see what data we now have at our fingertips.
Install osquery
To deploy osquery en masse, edit your own templates, script any additional installation steps as a postflight script, and repackage them for distribution. This can be more work for some environments than a third-party package that is purchased or could be less for some environments based on the scale and complexity requirements. Now that we have osquery running on a system, let’s look at running queries with osquery.
Running osquery
The best way to understand the real value of osquery is to use osqueryi as a stand-alone tool to query facts about a device. Architecturally, anything you report on locally is then available on the server as well or easily piped to a Security Information and Event Management (SIEM). In fact, if you’re threat hunting, doing research to write this book, or just obsessive compulsive about tracking your own personal device performance, you can run osquery locally.
There are way too many attributes that are tracked than we have pages to go through them in this book. See https://link.springer.com/book/10.1007/978-1-4842-1955-3 for a great book on SQL queries.
= Equal
<> or != Not equal to
> Greater than
IN Indicates multiple potential values for a column
< Less than
>= Greater than or equal
<= Less than or equal
BETWEEN Between an inclusive range
LIKE Looks for a provided pattern
In the preceding query, notice that we are running a standard SELECT statement. Most tasks executed against a SQL database are done with SQL statements. Think of statements as a query, an insert, a change, or a delete operation. For example, to see all data in the tables, select all of the records from a database using the SELECT statement.
Now that we’ve looked at queries, let’s move to how the logging and reporting functions work so we understand how drift is tracked.
Logging and Reporting
This information can quickly and easily be picked up as inventory from other tools with agents, such as munki, Jamf Pro, Addigy, or Fleetsmith. As noted previously, Fleetsmith came with the ability to direct osquery information from managed clients into a server. Now that we’ve covered osquery, let’s look at another open source agent called Chef.
Chef
Managing clients is harder than managing servers. Your server isn't likely to get up and walk away, doesn’t have a rouge root user, and will never connect to Starbucks wi-fi.
—Mike Dodge, Client Platform Engineer, Facebook
The most complete list of cookbooks available for the Mac can be obtained through the Facebook Client Platform Engineering team’s GitHub account at https://github.com/facebook/IT-CPE. Reading through these should provide a good understanding of the types of things that Facebook and other IT teams do to automate systems and get up to speed on how to orchestrate various events on the Mac.
Install Chef
We don’t go into detail in this book on how to set up a Chef instance and get client systems to connect to it. That’s an entire book of its own. But we do review the Chef client in this section. To install the client, download the installer from https://downloads.chef.io/chef-client/. When you install the package, chef-apply, chef-client, chef-shell, and chef-solo will be installed in /usr/local/bin.
The logs are written to /Library/Chef/Logs/first_chef_run.log when the script runs. The supporting files for chef will also be at /etc/chef, including certificates that secure communications, a client.rb file that contains the information you supplied the bootstrap.py. Provided it completes, you’ll then have a working quickstart.json file at /Users/Shared/ChefAssets/chef and a working run-list.json file that includes any recipes you want to run. You’ll also have a /var/chef/cache for caches.
Edit a Recipe
Chef then verifies each resource in each included cookbook has been configured as defined and resolves any drift found in the current system. One of the most important things about a tool like chef is how configurable it is. Simply cat the /Users/Shared/ChefAssets/chef/cookbooks/cpe_munki/resources/cpe_munki_local.rb file to see how munki is installed and note that. Now that chef is running, let’s edit a recipe. To do so, edit that /Users/Shared/IT-CPE/chef/cookbooks/cpe_init/recipes/company_init.rb recipe in your favorite text editor to
The social community of Chef administrators and how they share cookbooks makes for a good reason to look into these types of workflows. Chef is open source and there are a lot of different methodologies around its use and deployment. The examples in this chapter have mostly been developed around a model that Apple began back in Software Update Server when they provided us with a manifest URL. Mac admins have been using a similar manifest, init script, etc., to deploy settings, apps, and operating systems ever since. Some organizations have developed integrations with Chef that go beyond this and leverage a chef server.
In the preceding example, we’re providing those certificates and the chef-client to endpoints from a central location, configuring what is required for a client to be able to communicate back to a server. The steps we followed in the previous examples can be strung together into an installer package. But being able to automatically deploy one and keep clients up to date automatically makes for a much simpler experience. This is where an orchestration tool like Puppet can come in handy.
Puppet
The tools covered in the previous sections are just a few in a red ocean that includes a large number of client management tools available for the Mac. We’ve seen Puppet, Vagrant, and other open source projects used to orchestrate events on the Mac in much the same way they would orchestrate events on a large farm of Linux servers.
These need to match with the server entry in the puppet.conf directory. We don’t want to oversimplify a full-blown puppet deployment. Getting a client to connect to a server is pretty straightforward. The real value in any of these tools comes in the form of how much time they save you once deployed. Puppet has nine configuration files, such as auth.conf and puppetdb.conf, for a reason. We won’t go into each of them (especially since our publisher has an entire book on the subject available at www.apress.com/gp/book/9781430230571).
Logs are then saved to /var/log/puppetlabs/puppetserver/puppetserver.log. This walk-through follows the same general standard as Chef and Munki. But each is really built for something specific. Puppet is for immediate orchestration. Munki is for software distribution. Chef is for keeping a device in a known state. Osquery is for keeping inventory of settings and events. There’s overlap between some of the options, but if you squint enough, the basic methodology and management principles across them are, in a very oversimplified way, similar. One such similarity is that most administrators of these tools prefer to check changes in and out using a tool called git.
Use Git to Manage All the Things
Git is a version control system (or tool) that can be used to manage files including code that is then version controlled so you can see changes over time. The main page indicates it’s actually the stupid content tracker. Git is good at tracking changes between files and allowing administrators to check code or files out and then check them back in when finished working. This is well suited to a workflow where you want someone else to review your changes before they get applied to a large fleet of devices. This makes git a common complement to chef, osquery, and munki deployments.
Now that you’ve deployed agents, MDM is a great complement to what agents can do, so we’ll cover the concept of User-Approved MDM in order to have less button mashing happening by our end users.
The Impact of UAMDM and Other Rootless Changes to macOS
Approval of third-party kernel extension loading (less of an issue now that kernel extensions aren’t used, but the same logic now applies to system extensions and other apps that require entitlements)
Approval of application requests to access privacy-protected data and functionality
Autonomous Single App Mode
Enrolling the Mac in Apple’s Automated Device Enrollment, or ADE, formerly called the Device Enrollment Program (DEP). Enrollment of a Mac into ADE means that Apple or an authorized reseller has designated that Mac one that is owned by a company, school, or other institutions. Since this Mac is now explicitly not a personally owned device, it gets UAMDM and other benefits that allow certain binaries to run in privileged ways automatically.
Having a human being click an approval button on the MDM profile issued by an MDM server which supports UAMDM. Notice that this cannot be scripted with graphical scripting tools as Apple blocks “synthetic clicking” on these screens to protect the privacy of end users.
The automatic granting of UAMDM to ADE-enrolled Macs means that ADE (and so MDM) is now almost a requirement for most organizations. The combination of UAMDM’s reserving of management privileges and the necessity of using MDM to employ those privileges means that using an MDM solution to manage Macs has moved from the “useful, but not essential” category to the “essential” category.
The rise of MDM management may signal the diminishment of using agents to manage Macs, but that has been a slow progression, and as seen in this chapter, agents are still quite beneficial. As more MDM management options become available every year, the more an MDM solution can use Apple’s built-in MDM management functionality to manage Macs in place of using a third-party agent to manage the Mac, the more future-proofed a deployment is likely to be. While agents likely won’t disappear overnight, the areas where they provide management value will shrink over time.
Rootless
The degree with which each entry in the rootless.conf file is exempt varies. In addition to the list of SIP exceptions listed others can be found in the rootless.conf file.
Frameworks
Another aspect to be aware of when considering agents is the frameworks used in the agent. Frameworks are also sometimes important to consider as they’re added into apps and have to be approved for use by a user via an extension that loads the framework. A framework is a type of bundle that packages dynamic shared libraries with the resources that the library requires, including files (nibs and images), localized strings, header files, and maybe documentation. The .framework is an Apple structure that contains all of the files that make up a framework.
/Applications/∗contents/Frameworks
/Library/∗/
/Library/Application Support/∗/∗.app/Contents/
/Library/Developer/CommandLineTools/
/Library/Developer/
/Library/Frameworks
/Library/Printers/
/System/iOSSupport/System/Library/PrivateFrameworks
/System/iOSSupport/System/Library/Frameworks
/System/Library/CoreServices
/System/Library/Frameworks
/System/Library/PrivateFrameworks
/usr/local/Frameworks
If you just browse through these directories, you’ll see so many things you can use in apps. You can easily add an import followed by the name in your view controllers in Swift. For example, in /System/Library/Frameworks, you’ll find the Foundation.framework. Foundation is pretty common as it contains a number of APIs such as NSObject (NSDate, NSString, and NSDateFormatter).
As with importing frameworks/modules/whatever (according to the language), you can then consume the methods/variables/etc. in your code (e.g., let url = NSURL(fileURLWithPath: “names.plist”).
Additionally, you can use an open source project called looto to see what is dependent on binaries in order to better understand how tools interact with other tools or with their own various frameworks. This is one of a number of open source tools that many administrators will need to understand at some point in order to have a well-rounded perspective on device management.
For noncompiled apps, dynamic libraries (.dylib) can be dangerous and therefore should no longer be used where possible. Most Swift apps now disable the ability to add a dylib by default due to the number of security flaws they have been used to implement.
Miscellaneous Automation Tools
There are also a number of automation tools that are easily called by agents that make planning and implementing a deployment easier by providing more flexible options to administrators for specific tasks. There are plenty of other tools described throughout the book, but these are specifically designed to help extend what agents can do.
The first tool we’ll cover is outset from Joseph Chilcote and available at https://github.com/chilcote/outset/. Outset processes packages and scripts at first boot and user logins. Outset is comprised of two launchd items that call loose packages or scripts in individual folders either at startup or user login. To add more tasks to the startup and login processes, add new items to the appropriate folders. Outset handles the execution.
If your Macs need to routinely run a series of startup scripts to reset user environments or computer variables, then making launchd plists may be burdensome and difficult to manage. And plists execute asynchronously, which means startup and login processes may not run in the same order every time.
The next tool is dockutil, available at https://github.com/kcrawford/dockutil. Dockutil makes it easier to manage the Dock on a Mac. Users need the right tools to do their jobs, and a thoughtfully crafted dock helps them find those tools. They need access to applications, their home folders, servers, and working directories. Dockutil adds, removes, and reorders dock items for users. The script allows an administrator to adjust dock settings to adjust the view of folders (grid, fan, list, or automatic), adjust the display of folders to show their contents or folder icons, and set folder sort order (name, date, or kind).
The last tool we’ll cover is duti, available at http://duti.org/index.html. Duti makes it easier to set default applications for document types and URL handlers/schemes. Enterprises often incorporate Macs into complex workflows that require consistent behaviors. If a workflow requires using the Firefox browser instead of Safari or using Microsoft Outlook instead of Apple’s Mail application, Andrew Mortensen’s duti can ensure the correct applications respond when opening a URL or new email message.
A much more comprehensive list of these tools can be found in Appendix A.
Duti’s name means “default for UTI” or what Apple calls Uniform Type Identifiers. Every file type such as an HTML page or Microsoft Word document has a UTI, and developers constantly create their own new UTIs. Duti reads and applies UTI settings to pair applications with UTIs.
Summary
There are a number of agent-based solutions on the market that make managing Macs en masse possible. Some of these are proprietary, and others are open source. Most management agents should be paired with a Mobile Device Management (MDM) solution, which we cover further in Chapter 4. The focus here is on the Mac, simply because we cannot install “agents” on iOS, iPadOS, and tvOS devices (without some serious breaking of the devices).
These agents are typically used for device inventory, deploying software, keeping software up to date, managing settings, user notification, and a number of other tasks. The term “agent” is often an oversimplification. Each “agent” usually comes with anywhere between one and five LaunchAgents and LaunchDaemons. This is because each task should be run independently. These tasks usually invoke other tasks, preferably with native Swift frameworks but often by simply “shelling out” a command-line tool built into macOS. As an example, you can install profiles manually using the profiles command, which any agent-only management tool will use for profile management, given that some tasks require a profile. We’ll cover profiles in detail in Chapter 3.
More and more of these settings are now prompting users. Thus, we need to use an MDM solution to limit the number of prompts on behalf of the user and to get our management agents on devices without too much work from line tech support.
Now that we’ve covered agents, we’ll dig into MDM further in Chapter 4. But first, we’ll explore profiles even further in Chapter 3, so you can get more done with both agents and MDM.