Lesson 13. Project Management
Use the Find command and sort capabilities
Trim media from a project
Like Avid, Final Cut Pro has many different ways to manage a project, from render and media file management to dupe detection and find options. Where Avid offers a Media tool and powerful Sort and Sift commands, FCP offers a Media Manager and powerful Find options. The purpose of these functions, whether in Avid or FCP, is the same: to maintain an efficient workflow and to maximize your resources.
FCP’s Media Manager options make it easy to keep your project streamlined and free of unused media files, and the Render Manager helps you avoid getting bogged down with a lot of old precomputes, here called render files. The Media Manager also makes it easy to trim the media in your project so you’re only working with the essential media you need. Consolidation behaves the same way you’d expect in Avid, with some pleasing extras.
Managing a project sometimes happens when you are ready to clear out the old and bring in the new. But there are many times when you’ll need to manage clips or sequences prior to finishing or outputting. It doesn’t matter when you choose to use FCP project management functions. It’s only important to know you have many resources available to get the job done.
Using the Find Command
In Avid, the various Find commands are primarily focused on finding clips, bins, Locator text, text in clips, sequence gaps, or flash frames in a sequence. Finding an Avid master clip or Find Bin command is similar to Final Cut Pro’s Reveal Master Clip command in the View menu.
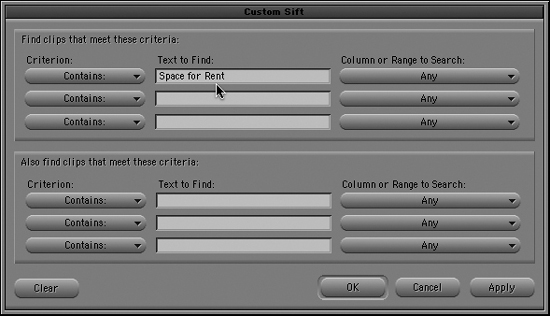
Avid’s Custom Sift dialog
But you can put the FCP Find command to other uses such as searching for a clip within a specific sequence or project. You can search for a clip by name or other fields, such as by timecode or file type. The FCP Find command can also be used for more complex tasks by adding search options to a criteria list. Once you’ve found the items, you can then delete them or make changes to them. This is also a good way to find unused media in your project.
The Find command can search in all open projects or a specific project or even a tab in the Browser. This means you can open a clips bin as a tab and search through it.
To find clips in a sequence
Finding a clip or clips in a sequence is a simple matter of knowing what you want to find and generally where you want to search for it. For example, you may need to find all the clips that are labeled CU (for closeup) so you can make color correction changes to them.
1. Open the sequence you want to search in the Timeline.
2. Choose Edit > Find, or press Cmd-F.
A Find dialog, titled after the current sequence, appears.

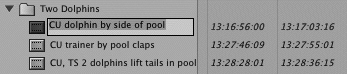
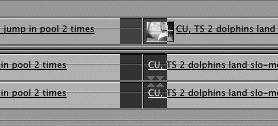
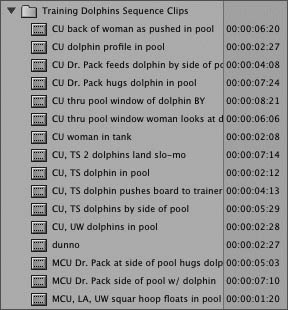
3. In the Find field, enter the name of the clip or a part of a name. In the example shown here, the search is for all the clips in the Training Dolphins sequence that have Dr. Pack in the name or marker.
4. In the Search pop-up menu, make sure Names/Markers is selected.
5. In the Where pop-up menu, choose All Tracks. You can also search just AutoSelected tracks and between In and Out points.
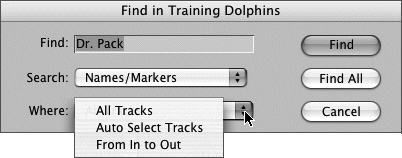
6. Click Find All to find all occurrences of the name you entered in the locations you specified for the current sequence.

Timeline before search was activated
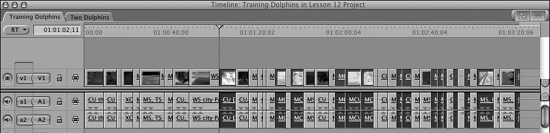
Timeline after Find command
When the search is complete, FCP will highlight all the items it found using the search criteria, and it will move the playhead to the first frame of the first highlighted or found clip.
Being able to highlight desired clips all at once can be a real timesaver when applying effects to a group of clips.
To search within the Browser
Similar to Avid’s Bin Sort and Sift capabilities, FCP’s Find dialog when applied to the Browser opens a different dialog and enables additional search criteria. In fact, all of the Browser column heads can be included in the criteria list. You can search within a project or all open projects, and you can make a bin into a tab in the Browser window and search that bin. The Effects tab can also be targeted for a search.
1. Open any projects you want to include in the search. If you want to search only one specific project, select that project’s tab in the Browser.
2. If you want to search within a specific bin, Option-double-click the bin icon, and it will open as a tab in the Browser window.
If you’re searching a specific bin or project, it must be selected in the Browser before opening the Find dialog.
3. If you want to search through a specific sequence in a project, for example to locate any media that was not used in the sequence so you can delete it, or to find all the media clips that were used, select the sequence icon in the Browser.
4. Choose Edit > Find, or press Cmd-F.
The Find window, when invoked from the Browser, appears with more options than it did when invoked from the Timeline.
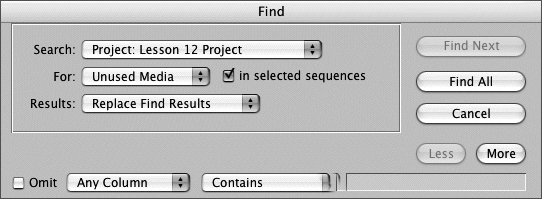
5. Click the Search pop-up menu and choose where you want the search to take place. It can be within a selected tabbed bin, a selected project, all projects, or even within the Effects tab.
6. Click the For pop-up menu to choose whether your search will be for All Media, Unused Media, or Used Media. If you choose Unused or Used Media, a sequence must be selected for reference. Otherwise, you may get a warning that says “Nothing is selected.”

7. Click the Results pop-up menu and choose whether you want FCP to Replace Find Results or Add to Find Results of the last search, if any. Then click Find All.
When you click Find All, a Find Results window opens with the results of your search. When you perform your first search, you will not be replacing anything that already exists in this window. But you can continue to search and replace (or add to) the contents of this window.
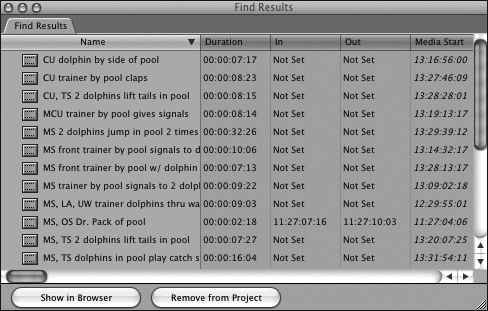
From the Find Results window, you can click one of two buttons: Show in Browser or Remove from Project. When you click the Remove from Project button in the Find Results window, you are only removing the clips from the project, not the media files from your hard drive.
Items in the Find Results window can be copied or moved to a different location in the Browser or edited into a sequence. You can perform additional searches and combine the results, make the clips offline so they can be recaptured at a different resolution, or modify clip information in the Browser columns. The latter two options are discussed in the next exercise.
Once you have your find results, sort them! As with Avid’s bins and Media tool, click any column head to create your primary sort criteria, and Shift-click additional columns to accumulate multiple search criteria.
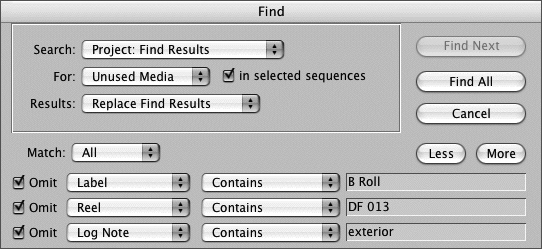
8. To refine the search and weed out clips you don’t need from this list, press Cmd-F again. This time click the More button in the Find window.
Each time you click the More button, an additional criteria line appears in the Find Results window, where you add criteria from Browser column headings to fine-tune your search.
Changing Clip Properties
In Avid, when you need to change properties of a clip in your project, such as name, reel number, or timecode, you access the Modify command. From Final Cut Pro’s Modify menu, you can choose several types of modifications, including changing timecode. While most clip changes are made directly in the Browser or in a bin, you can also change clip properties in the Find Results window, which is also a bin. Making global changes in FCP is very easy, but there may not be as many “are you sure?” dialogs as you are accustomed to in Avid. So enjoy, but be careful.
Avid Modify dialog
When making changes to a clip or group of clips, keep in mind that changes you make to a master clip will also be made to all affiliate clips associated with that master clip.
The following are changes that track the master/affiliate clip relationship:
• Clip Name
• Reel Name
• Timecode
• Media Start
• Media End
• Good
• Log Note
• Label
• Label 2
• Anamorphic
• Capture
• Offline
• Scene
• Shot/Take
• Master Comments 1-4
Modifying Clip Name, Reel Number, or Timecode
There are times when you might want to rename a clip inside a project. Since FCP reconnects clips to media files using a filename, rather than reel and timecode metadata like Avid, it is more difficult to reconnect offline clips if their names differ from their associated media files. To help you maintain this relationship, there are two renaming options in the Modify menu: Rename > Clip to Match File and Rename > File to Match Clip.
There are rare times when you’d like to modify a clip’s reel number or create timecode for a clip that came from a noncontrollable device, and perhaps match that timecode to the rest of the project’s ID scheme. Be aware, when you change the timecode or the reel number of a master clip or one of its affiliates in the Browser, it actually changes that information on the QuickTime media file on your hard drive.
The following Modify actions change your underlying QuickTime media file:
• Reel Number
• Rename > File to Match Clip
• Timecode
• Timecode format (drop frame or nondrop frame)
To change clip name, reel number, or timecode
1. Make sure you’re in View as List in the Browser or bin.
2. To change the name of a clip in the project, select the clip, press Enter to highlight the current name, and type the new name. You can also click in the text area of a clip under the Name column as you would for any Macintosh file.
This changes the clip name but not the media filename on the hard drive. While linking is maintained, it is still a good practice to modify a clip name using one of the two Rename options in the Modify menu.
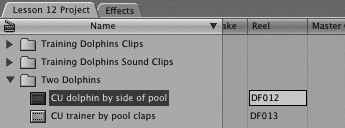
3. To change a reel number, drag the horizontal scroll bar in the Browser to the right until you see the Reel column heading. Click in the appropriate clip field under that heading and enter the new reel number. This will change your underlying QuickTime media file.
If you move forward with a reel change or timecode modification, you will see the following prompt reminding you the media file itself will be modified.

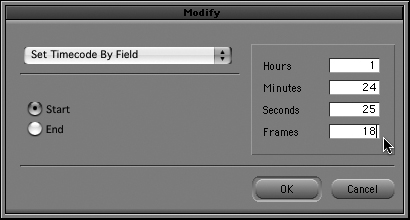
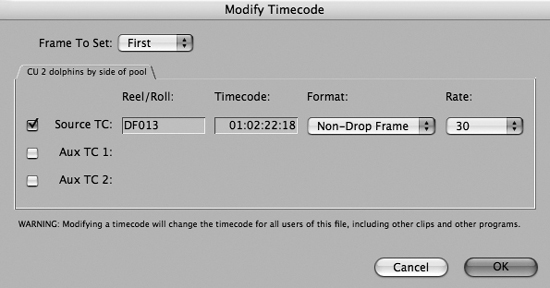
4. To change timecode for a clip, select the clip, then choose Modify > Timecode. The Modify Timecode dialog opens. In the Frame to Set pop-up menu, choose First to assign the new timecode number to the first frame of the clip, or choose Current to assign the new timecode to the current frame. Choose the appropriate timecode format (drop frame or nondrop frame timecode) and frame rate. Click OK. This will change your underlying media file.
You can also change the reel number in this dialog as well. Remember, changing the reel number or timecode will change it on the QuickTime media file itself.
5. To add an additional auxiliary timecode number to a clip, rather than change a clip’s original timecode, click the Aux TC 1 or Aux TC 2 check box and enter the reel and timecode information in those fields.
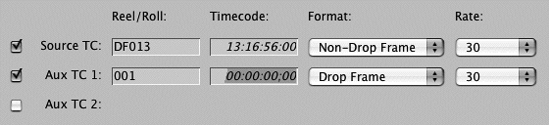
In the Find dialog, you can use Aux TC 1 and Aux TC 2 as search criteria or even sort by those column heads when they are showing in the Browser.
To sync several cameras or reels that were not recorded with the same sync timecode, or to work with multicam material, park the playhead on the frame you want to use as a reference, choose Current from the Frame to Set pop-up menu and then enter a new aux timecode number.
To make global clip changes
Some column properties have options you can select from a pop-up menu. As in Avid bins, to access certain properties, such as reel number, you must enter a change to one clip manually so that the change can then be selected for a group of clips via a pop-up menu.
1. In the Browser, select a clip, then click in the column field for a specific property, such as Reel. You can also double-click a nonselected clip’s property field.
Once a new entry has been made to that column, it becomes available via a field shortcut menu for changing other clips.
2. Either select the group of clips you want to change in the Browser or a bin, or perform a search for the clips you want to isolate to change. The latter will produce a group of clips in the Find Results window.
3. Ctrl-click the column entry field where you want to make the change and choose from one of the available options in the shortcut menu.

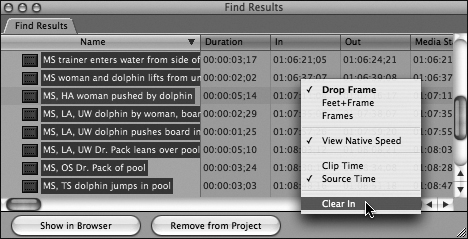
Each column where changes can be made will give you different options in the shortcut menu. For example, Ctrl-clicking the In column allows you to clear all In points for all selected clips.
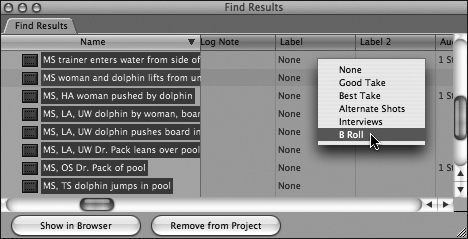
Ctrl-clicking in the Label column brings up different preset options to label selected clips.
You can undo clip changes by pressing Cmd-Z, even if you made the changes globally to several clips at once.
To make clips offline
There may be times during an edit session when you want to unlink one or more clips, disconnecting the clip from its originating media file. FCP refers to this as making a clip “offline.” Perhaps a clip or group of clips needs to be recaptured to improve video or audio levels. You can do this very simply in the Browser. Making an entire sequence offline to recapture at a higher resolution is covered in the “Working with Media Management” section later in this lesson.
Do one of the following:
• To make one or more Browser clips offline, select the clip(s), Ctrl-click in the Browser and choose Make Offline from the shortcut menu.
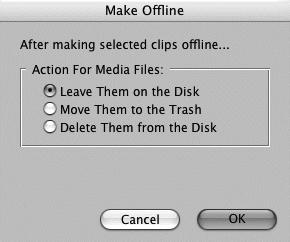
• To make Timeline clips offline, select the clip(s), choose Modify > Make Offline (Shift-D), and check the appropriate box in the Make Offline dialog.
Be careful not to remove or delete any necessary media files by clicking the second or third option in the Make Offline dialog.
You can use the Find command to locate specific clips you want to make offline. You can also use the criteria to refine your search and then apply one of the above make offline actions.
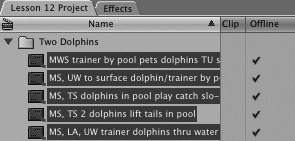
Offline clips in the Browser are displayed with a red diagonal line across them indicating they are offline.
You are now ready to recapture the media for these clips.
One of the Media Manager functions allows you to recompress media files to a different resolution preset. This is discussed later in this lesson.
Detecting Duplicate Frames
If you are working on a project that will be finished on film, you will need to know if and when you are using the same frame twice. The process of identifying those frames is called dupe detection. In Avid systems that have FilmScribe, you can find this option in the Timeline Fast menu. Final Cut Pro also has this option, and like in Avid, you can customize the handle length for your project. You can also use this function for a video project simply to determine if there are multiple uses of material in a sequence.
To find duplicate frames in a sequence
1. Open the sequence in which you want to search for dupes.
2. Click the Timeline Layout pop-up menu and choose Show Duplicate Frames. You can also press Cmd-0 to open the Sequence Settings window, click the Timeline Options tab, and enable Show Duplicate Frames.
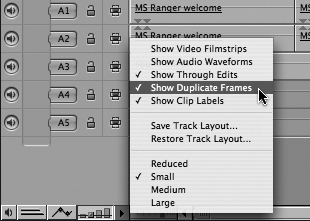
In the Timeline, if any clip frames are being duplicated from their first use, the same colored bar will appear in both the originating clip and the additional uses of that material. The bars are positioned on the sequence clips to indicate where the dupe frames are located.
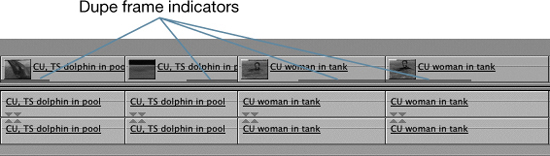
In the screen shot, the duplicate frame bars in the first and second clips indicate that the frames used in the head portion of the first clip were also used in the tail portion of the second clip. The tail of the third clip has frames duplicated at the head of the fourth clip.
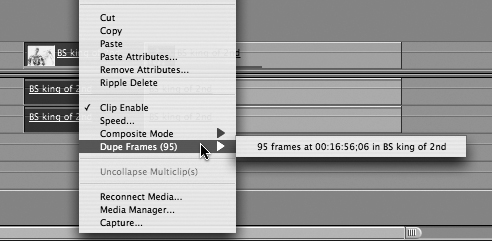
3. To move to where those duplicate frames occur again in your sequence, Ctrl-click one of the duplicate frame clips. From the shortcut menu, choose Dupe Frames and then select a clip from the submenu. This works just like finding a marker in the sequence.
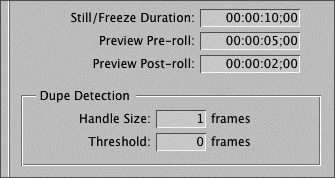
4. To include handles in the frame detection, press Option-Q to open the User Preferences window and enter the desired handle frames in the Dupe Detection area.
Render Management Tips
While Final Cut Pro can play back several streams of real-time effects at once on even a moderately powerful Macintosh, there will be times when you max out your system’s real-time capability or choose a combination of effects that are not real-time. As in Avid, you may feel the need to render an effect immediately to see it and evaluate it. But before you jump in and create a hefty render file, know that there are other ways to view and evaluate your effects before committing to a full render.
Preview Render Effects
Before you render an effect, you should try to preview it by using one of FCP’s effect preview options.
To preview effects, do one of the following:
• Choose Tools > QuickView, or press Option-8, to open the QuickView tool in the Tool Bench. Users of After Effects will understand this RAM preview immediately. Set a range and resolution, and click the Play button. FCP will process the effect and cache it to RAM, then play it back in real time or something close.
• Move the playhead to the beginning of the effect in the Timeline and press Option-P or Option-. This will play every frame of the effect, but not in real time. However, once you have played the effect this way, it is loaded into RAM. Reposition the playhead to the beginning frame of the clip and press Option-P (or Option-) to play from RAM in real time.
• Step through an effect using the left and right arrow keys, or drag the playhead across the clip.
The advantage of the QuickView tool over Option-P, which is also a RAM preview, is that the range in the QuickView window will loop, allowing you to adjust parameters and see their effect without having to reposition the playhead manually or render.
Perform Partial Renders
There may be times when you are creating an effect and are not ready to do a final render because you are still making adjustments to the effect. Oftentimes, the effect tweaking can be performed on one area of the clip. When this is the case, do what you do in Avid. You can isolate and render only that portion of the clip. Once you’ve isolated the portion you want to test, you can keep rendering that smaller portion until you tweak the effect to your liking. Then you can render the entire clip or group of clips.
There are different ways to isolate a smaller portion of unrendered material:
• Set In and Out marks in the clip and choose Sequence > Render Selection.
• Use the Razor Blade tool (B) to add an edit for that section (or Ctrl-V with the desired track’s Auto Select enabled if you’re keybound). Select the add edit clip and choose Sequence > Render Selection.
• Use the Range Selection tool (GGG) to select a specific range of frames within a single clip or between two or more clips on the same track. Choose Sequence > Render Selection.
Preserve Render Files
Preserving files that have already been rendered will help you avoid having to re-create them. There are different ways to preserve render files:
• Pay attention to when you turn track visibility off and on. If you toggle off the visibility of a track, you will lose all render files on that track. In fact, when you turn off track visibility on a track that has rendered clips in it, FCP will show a prompt indicating that you will lose your render files.

• An alternative to toggling the entire track’s visibility is to toggle the visibility of only a single clip on a track; this will preserve all other renders on that track. To turn off the visibility of a single clip, Ctrl-click the clip in the Timeline and choose Clip Enable, or press Ctrl-B.
When you disable a single clip, you also lose the render files for that clip. You will not be warned in this approach, but you will see a render bar appear above the clip’s duration in the Timeline.
• Another way to preserve render files is to export them after they have been rendered. This will create a new media file that will not require rendering. To use the exported effect clip in your project, just import it as a new file.
• You can also step into a nest and render files within that nest. These render files will remain linked to the nest when you edit the nest into another sequence. If you were to render a nest in the parent sequence, the render files would be associated with the parent sequence and not the original nest.
Disable Playing Rendered Files
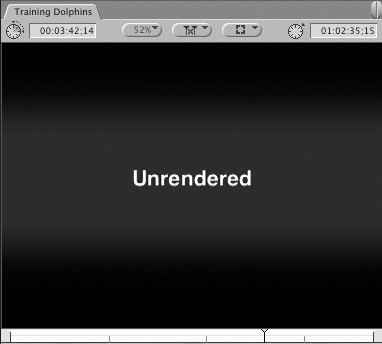
When you move the playhead over an image that has an effect attached to it, FCP displays that single frame of the total effect as though it were rendered. While this is helpful when creating an effect, the simple act of dragging or scrubbing your playhead over a Timeline full of these clips can slow down your editing.
Like Avid’s Render on the fly, FCP performs this automatic frame rendering as a background activity, but it takes additional time and processing power. You can disable background rendering by using the Caps Lock key. With Caps Lock selected, automatic rendering is disabled. If you want FCP to turn the background rendering back on, turn Caps Lock off, which is the default mode.
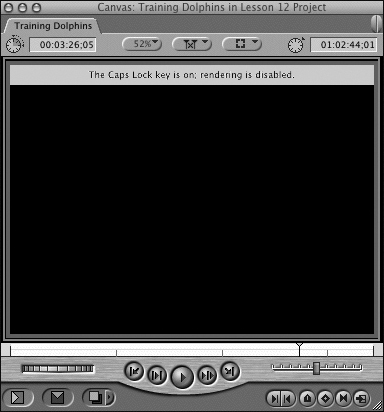
When rendering is disabled using Caps Lock, FCP will play all real-time clips in the sequence but will not play any clips that need rendering. Instead, an Unrendered proxy message appears in the Canvas during those clips that need rendering.
Managing Render Files
In Avid, you use the Media tool to remove unwanted precomputes. In Final Cut Pro, you use the Render Manager tool. FCP handles render management very much like Avid—it finds the render files you direct it to and deletes them. While FCP doesn’t have a specific Reverse Selection or Select Media Relatives sift option, you can use Column view on the Finder level to search for and delete specific render files.

FCP render files are saved to the scratch disk, which can be set in the System Settings window (Shift-Q) or during the capture process. When you assign a scratch disk location, a Render folder is created to store render files. When you render an effect, another folder is created within the Render folder with the project name. The render file itself has the name of the sequence along with a unique FCP number to identify it.
The default location for render files is Macintosh HD > Users > User Name > Documents > Final Cut Pro Documents > Render Files > Project Name. While this is the default location for render files, you will probably want to change this path to a dedicated scratch disk during your initial setup. Render files are bona fide media files, and you may encounter playback issues if they are on your boot drive.

When viewing render files in the Finder in Column view, you can play a file to determine if it’s still relevant to your project.
To view render files in the Render Manager
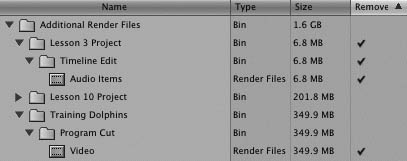
In the Render Manager tool, as in the Desktop Finder, render files are organized and grouped together according to project and sequence. FCP will display all render files from both open and closed projects that have been saved at the current scratch disk location. Unlike the Desktop display, where render files are listed separately, the Render Manager combines and displays all render files for a specific sequence into a group, one group for each sequence.
1. In FCP, choose Tools > Render Manager to display the Render Manager window.
2. Find your project and display the contents of the project folder. Any sequence that has render files associated with it will appear as an individual folder. Display the contents of the sequence folder to see what render file groups have been created within that sequence.

In this example, there are two primary folders: the Additional Render Files folder at the top of the list and a Lesson 12 Project folder at the bottom of the list. The top folder includes all render files from unopened projects that were saved to this location.
3. To sort the items in the Render Manager window, click on one of the column heads.
To delete render files using the Render Manager
All render files from one sequence are grouped together and appear as a separate clip icon in the Render Manager window. Deleting the render file group will delete all render files associated with that sequence. You can delete a single render file group, several render file groups, all render files of one or more sequences, or all render files of an entire project or several projects.
1. In the Render Manager window, do one of the following:
• To delete a render file group, click in the Remove column on the same line as the specific file.
• To delete all render files associated with a specific sequence, click in the Remove column next to the sequence name. The individual render file groups associated with that sequence are selected.
• To delete all of the render file groups associated with a project, click in the Remove column next to the project folder name.
The amount of hard drive space that will be freed after the selected render files are deleted is listed below the project information area.

If you delete a render file, it cannot be restored using the Undo command. You must re-render the affected clip.
2. To complete the deletion, click OK.
If you want to delete a single render file, you can do so at the Desktop level in the Finder. FCP will not be able to track it as it can in the Render Manager, but you will certainly encounter a reconnect dialog as a result of the deletion.
Working with the Media Manager
Like managing your render files, managing media files is an important part of the editing process. You will often begin this process after you have completed your project to free up space on your hard drive, or to recapture your media at a higher resolution.
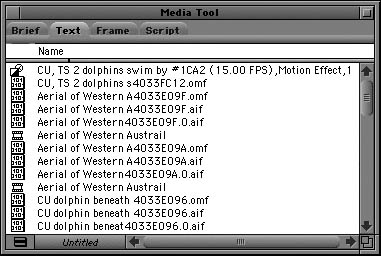
Avid’s Media Tool
While Avid’s Media tool lets you sort and delete media for one or more projects, Final Cut Pro’s Media Manager is a true multitasking machine. It lets you perform many media management functions—such as clip or sequence trimming, consolidating, copying, moving, recompressing sequences, archiving projects, and deleting—all in one place.
Media Manager Window
FCP’s Media Manager window is highly interactive. With every option box you check, the summary at the top of the window is updated to indicate how the Media Manager will handle your media files. Moving over the colored media bars displays additional information about the media location and length. Choosing certain options makes other options available or unavailable.
1. Select the desired clips or sequences in the Browser that you want to manage.
2. To open the Media Manager window, do one of the following:
• Choose File > Media Manager.
• Ctrl-click a selected clip or sequence and select Media Manager from the shortcut menu.

The Media Manager opens and displays the following sections:
Summary Updates what will happen based on all of the selections made within the Media Manager.
Media bars Indicates how much media is involved with the current settings (Original) and how much media will be involved after the modification has been made (Modified). Position cursor over a green (captured media) or blue (rendered media) bar to see media measured in timecode duration.
Media Provides options to copy, move, recompress, use existing, or create offline media, and other details that change according to how the media is processed.
Project Lets you create a new project from the selected settings.
Media Destination Selects the media destination for any new source media files.
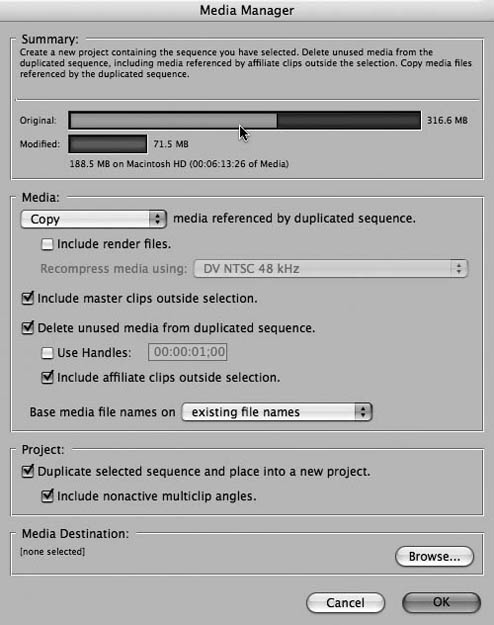
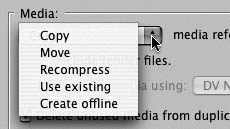
There are five media processing options—Copy, Move, Recompress, Use existing, and Create offline—which tell the Media Manager how to process your media files. Depending on which option is selected from the Media pop-up menu, other options in this area will become available.
Copying and Moving a Project
Many experienced Avid editors use a popular third-party program called Media Mover to copy and group media files for one or more projects and archive them to specific destinations. Final Cut Pro handles this task and others via its internal Media Manager tool.
If you have to copy or move your project from one computer to another, you can use the Media Manager Copy and Move functions to search for and gather all of the media files associated with that project. No matter where they are located, or whether they are graphic files, audio files, or media files, the Media Manager will find them and either copy or move them to the specific destination.
To copy a project
1. To copy your entire project, click in the Browser and press Cmd-A to select all items.
2. Choose File > Media Manager.
3. Click the Media pop-up menu and choose Copy.
4. If you want to copy the render files as well, check the “Include render files” option.
The “Include master clips outside selection” option determines how much media is retained in the master clips of the new project. When this option is selected, the master clips in the new project are based on the original master clips in your current project. When this option is deselected, the master clips in the new project are based only on the media used by the items you selected before opening the Media Manager window.
5. Deselect the “Delete unused media from duplicated items” option.
6. Keep the “Base media file names on” option on the default “existing file names.”
7. Check the “Duplicate selected items and place into a new project” option.
8. In the Media Destination area, click the Browser button and navigate to the external drive where you want the copied media files to be placed. Create a folder for the new files.
9. When the Save dialog appears, enter a name for the new project and a destination. Click Save.
Don’t forget about FCP’s master/affiliate clip relationship. Each affiliate clip in the sequence originated from a master clip. If you have multiple affiliate clips in your sequence that came from the same master clip, a separate master clip will be copied for each and every one of those affiliate clips. If you have multiple affiliates from the same master clip, that means you will capture the whole master clip multiple times.
To move a project
Moving a project can occur on the same computer or on a computer across the world. As with the copy function, the Media Manager will find all the media files associated with your project and collect them into one location. But unlike copying a project and media files, when you use the Move option, you are moving a copy and deleting the original. You will no longer have the original as a backup or reference, so be careful when using the Move or Use Existing operations in the Media Manager.
1. Select everything in your project and then open the Media Manager window.
2. From the Media pop-up menu, choose Move.

Notice that the media bars are exactly the same length because you aren’t changing the media, just moving everything from one place to another.
3. Click the appropriate options for render files and media file names, then choose a media destination and click OK.
Consolidating Media
Once you’ve reviewed your material and are sure which clips you want to use in your project and which you don’t, you may decide it would be nice to consolidate your media files and delete extra material you aren’t using to free up more space on your media drive. In Avid, this is an integral part of a Consolidate operation, which includes trimming the sequence to clip In and Out points plus specified handles, copying all media to the target drive unless it already exists, and optionally deleting original media.
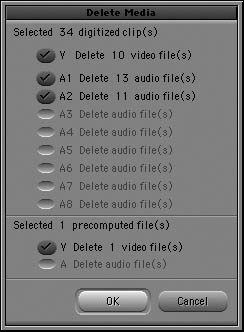
Avid Delete Media dialog
Final Cut Pro handles these procedures in much the same manner. For clarity, this exercise focuses on sequence trimming. Using the Media Manager, you can trim sequence media so that the media files are changed to reflect just what you want and need. You can also apply these steps to trimming clips down to the marked portion only.
To consolidate media in a sequence
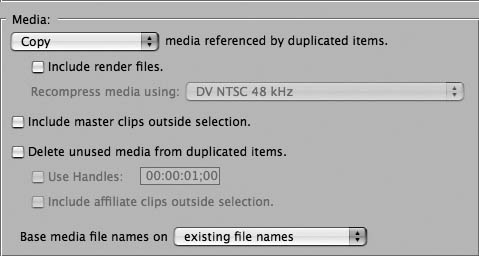
The logical media processing option to trimming clips is to choose the “Use Existing” option from the Media pop-up. This option will delete existing clips or remove any media within these clips that are not currently associated with the selected sequence. Only the trimmed media files that make up the sequence will remain. While this is the logical choice, you may choose to take the safer approach and copy the media that is used in the selected sequences, then delete the original media in a separate step. This allows for any unforeseeable power failures that could disrupt or corrupt the process.
1. Select the sequence or sequences in the Browser for which you want to trim media.
When you use the Use Existing option, you must have enough space for the original amount of your media in order to save the project before making any trims or deletions in FCP.
2. Choose File > Media Manager.
3. From the Media pop-up menu, choose Copy to copy the new media files to a new location or choose Use Existing to trim the current media files.
4. Select the “Delete unused media from duplicated items” option.

Now the Modified media bar is half the size of the Original. Read the new information in the Summary area of the Media Manager to see how the process is being tracked.
5. If you want to add handles to these media files, beyond the In and Out points used in the sequence, click the Use Handles check box and enter the desired amount.

6. If you are using the Copy function, deselect the “Include affiliate clips outside selection” option.

Because of FCP’s master/affiliate relationships, this option will find any master clips affiliated with the sequence clips and, if In and Out points exist, will include that material as part of the copy process. This can seriously undermine the goal of reducing media in your project.
Since the trigger for including master clip material is In and Out marks, you can circumvent this by selecting all master clips in the project, Ctrl-clicking in the Browser In column, and choosing Clear to clear all the In points of selected clips. Then repeat this step in the Out column.
7. From the “Base media file names on” pop-up, choose “existing file names.”
If you rename clips in the Browser and choose “clip names” from this pop-up, the media files on your hard drive will be renamed incrementally with numbers after the clip names in the Browser.
8. Select the “Duplicate selected items and place into a new project” option.
9. Set a destination, then click OK. Name the project file and click Save.
You may get a warning indicating that one or more clips is being used elsewhere in the project. Double-check your clip choices and marks before proceeding. If your new clip marks are all correct, click Continue, not Add.
When this process is complete, check the new project to determine that all the necessary files are intact. If they are, and you don’t need the original media files any longer, you can select the items in the old project and use the Make Offline command to unlink the clips and delete the media files from your disk.
Recompressing and Creating Offline Clips
As in Avid, you can capture clips at a lower resolution to do an offline edit. This lets you store much more media on your media drives as you make your initial editing choices. When you have identified the clips you want in your final sequence, you can recapture those clips at a higher resolution. In FCP, as in Avid, you can use the same clip information to recapture. This can be done by unlinking the clips from their media files and batch capturing new media files at the higher resolution.
If, however, you captured at a high resolution, FCP lets you create a low-resolution version of your current project by recompressing existing higher-resolution media files. This can be helpful if you want to work with the low-res media on your laptop.
To recompress your media files
The Recompress option in the Media Manager will change the resolution of an existing clip or clips using one of the Easy Setup presets you’ve seen before.
While recompressing from a high resolution to a low resolution is a smart way to manage your project, recompressing from a low resolution to a higher resolution is not recommended because your media quality will not be any better than the original source.
1. In the Browser, select the bin of clips you want to recompress and choose File > Media Manager.
2. Click the Media pop-up and choose Recompress from the menu. Then click the Recompress Media Using pop-up and select an appropriate compression format based on your project’s needs.

When changing from DV NTSC to OfflineRT NTSC, as in this image, the Modified media bar becomes much shorter, indicating that the media requires a lot less media drive space than the original media files.
3. If you want to recompress the full length of your media files, deselect the “Delete unused media from duplicated items” option. If you don’t want to recompress media that wasn’t used, click the “Delete unused media from duplicated items” option. You would probably want to add handles with this method.
4. Select “Duplicate selected items and place into a new project” option, choose a destination, and click OK. Enter a name for the new project and click Save. The new project will open in the Browser once the operation is complete.
5. In the new project, create a new sequence and simply begin to edit. If “Auto conform sequence” is enabled in User Preferences > Editing, the sequence will conform to your newly transcoded media.
You are now ready to edit the recompressed clips into the new sequence.
To make clips offline
The Create offline option will create a new project with offline copies of selected clips or sequences, allowingyou to recapture them at a different resolution.
1. In the Browser, select the media files you want to make offline and choose File > Media Manager.
2. Click the Media pop-up and choose Create offline from the menu.
3. Click OK. Name the project and click Save.
In the Browser, a new project tab appears with the offline clips.
The magic of Undo will actually change these clips from their offline status back to being linked to their original media.
Decomposing a Sequence
Avid users are familiar with the process of decomposing a sequence so you have more control over how the clips are organized for recapture. In Final Cut Pro, decomposing can be handled in two ways: by dragging clips from the sequence into a Browser bin, or by using one of the Media options in the Media Manager tool discussed in the previous sections.
If your goal is to decompose a sequence to treat the sequence clips in isolation for the purposes of color correction, making them offline and recapturing, then dragging clips from the sequence to a bin will be an easy and direct approach.
However, if your goal is to consolidate your project, trim the fat, copy and relink to a target drive, then you will want to use the Media Manager for that process. Using the Media Manager to decompose your sequence lets you create a new project, sequence, and bin of trimmed media files. Once the operation is finished, you can work with the decomposed sequence and new master clips in the new project, or tear off the Project tab and drag the sequence icon and media bin back to your original project. The steps for this process were outlined in the “Consolidating Media” section earlier in this lesson.
To decompose a sequence using drag and drop
1. Open the sequence in the Timeline, or make sure it is the active sequence.
2. In the Browser, create a bin and give it an appropriate name.
3. In the Timeline, press Cmd-A to select all the clips in that sequence.

4. Drag the selected clips from the Timeline into the new bin you created in the Browser.

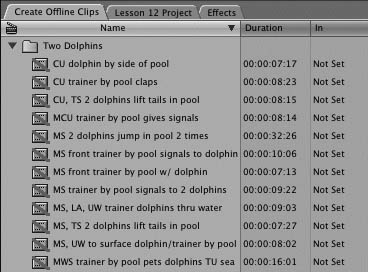
Dragging clips to bin
Sequence clips displayed in Browser
5. To sort the clips, open the clips bin and click the appropriate column heading. Shift-click on a column to add a secondary sort criteria. You can also drag a column left or right to rearrange the columns.
6. To recapture these clips at a different resolution, select them all in the bin. Ctrl-click one of the clips and choose Make Offline from the shortcut menu. You can use the shortcut Shift-D when clips are selected to invoke the Make Offline dialog.
From the Make Offline dialog, you can choose how you want to handle your existing media files, being careful not to remove or delete any unnecessary files. The selected clips in your Browser will now be unlinked from their original media files, and you can batch capture your media at a different resolution.
What You’ve Learned
• You can use the Find command to find a clip or clips in a sequence or in the Browser. When using it in the Browser, you can add criteria to your search that match the Browser column headings, and you can view the results in a Find Results window.
• The Find Results window displays the results of a search. You can refine your search by changing criteria that will cull or add to the results in the Find Results window.
• When you change the reel name or timecode for a clip, it changes that information on the QuickTime media file on your media drive.
• Changing the name and reel number of a master clip changes it in all other affiliate uses of that clip.
• You can use the two Modify > Rename commands to make sure clip names and media filenames match.
• FCP can find and identify duplicate frames used in a sequence.
• Many changes can be made to a group of clips in the Browser by selecting them in List View and Ctrl-clicking in the column where you want to make a change.
• To make a clip or group of clips offline, Ctrl-click the clip and choose Make Offline from the shortcut menu.
• Some render management tips and techniques include previewing render effects as much as possible before rendering, performing partial renders as a test, preserving render files by using Clip Enable on a single clip rather than toggling Visibility for an entire track, rendering inside a nested sequence, and disabling the playing of render files in the Timeline.
• In the Render Manager, you can delete render files located in the current scratch disk, whether or not that project is open.
• The Media Manager can perform several operations that process media files in different ways, such as copy, move, recompress, create offline, and delete unused media files.
• When trimming media files and deleting unused media from duplicated sequences, FCP looks at master clips, and if they have In and Out points, that material will be included in the process.
• You can easily decompose a sequence by dragging the clips from the sequence into a bin in the Browser.
Keyboard Shortcuts