Lesson 1. Projects and Interface
View source clips and sequences
Work with the Tool palette and Audio Meters
Zoom and position the Timeline
Access shortcut menus
This lesson will get you started in Final Cut Pro at the project level, just as you would begin an Avid editing session. Projects and sequences are handled a little differently in Final Cut Pro than they are on an Avid Media Composer system. For example, in FCP you can work with multiple projects and sequences open at the same time. Another difference is that in Avid, you are asked to choose among projects from a Select Project dialog, while in FCP, a project is created and opened for you automatically when you launch the program. However, both programs allow you to set a preference to automatically start the last project on startup. The FCP interface is similar to Avid’s if you compare the functions of each window, although FCP uses different names for some of the same functions.
As in any nonlinear editing (NLE) system, setup configurations are an important part of FCP. In this lesson, you will work with the initial setup window that appears when you launch FCP for the first time. All other settings and preferences are addressed in Lesson 3.
Launching Final Cut Pro
At this point, you should have installed Final Cut Pro on your computer, following the directions that came with the application. You launch FCP in similar ways to Avid Media Composer. On many Avid systems, the program icon is on the Desktop, and you double-click to open it. But it can also be accessed in the OS X Dock.

To launch Final Cut Pro
There are four ways to launch FCP, depending on how you have configured your computer.
Do one of the following:
• Like in Avid, if you have placed an alias icon of FCP on your Desktop, double-click it.
• Double-click the FCP icon in the Applications folder of the Finder window.
• If the FCP icon is in your Dock, single-click it.

Launching Final Cut Pro using any of these methods will open the program with a default project.
• Double-click a saved FCP project file from your hard drive. FCP project files can be aliased to the Dock or saved to the Desktop.
Avid can be set up to require a user name and password for security and preferences. In FCP, individual user settings are saved via the Mac OS X User functions.
First Use
While Avid has dedicated scalable architecture that expands the hardware and software capabilities of the system, Final Cut Pro has scalable software that can be used to capture and edit DV, HDV, and certain HD formats via FireWire. You can use third-party hardware to digitize and edit analog, digital, and other HD formats (see Lesson 5); or edit film or 24P using Apple’s Cinema Tools software (see Lesson 12). The same FCP software can handle all of these situations.
When you launch FCP for the first time, an Easy Setup dialog appears in which you set two options to prepare for editing and capturing:
Easy Setup Choose a setting that represents your hardware and capture setup.
Primary Scratch Disk Choose where you want the media and render files to be saved.
Exploring the FCP Interface
Launching Avid Media Composer takes you to the Select User and Project dialog. Launching FCP takes you directly into the FCP interface. Whatever project settings you chose at startup will be applied to this project, although the settings can be easily changed.
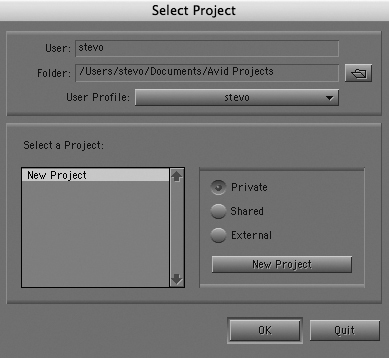
You won’t encounter this dialog when you launch Final Cut Pro.
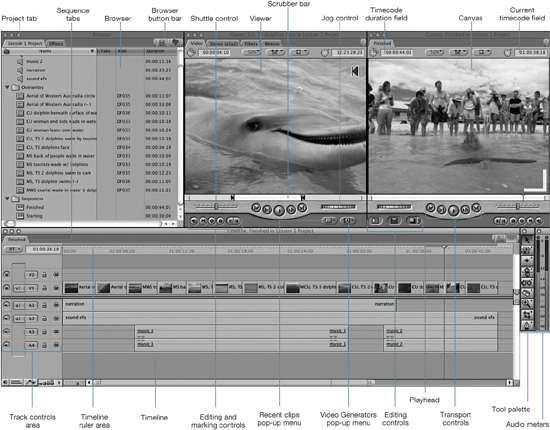
Avid Media Composer often uses a two-monitor display. FCP can display the four primary sections of its interface on a single-monitor (shown on the following spread) or dual-monitor configuration. In a dual-monitor configuration, you can lay out your bin windows more as you would in Avid’s Bin monitor.
Each section of the FCP interface is a separate window that you can open, close, and reposition like any other Mac OS X window. When you click in a window, the window becomes active, and its title bar looks brighter than the other windows in the interface.

Active Browser window
Inactive Viewer window
To explore the interface
1. Click the Browser window in the upper left of the interface.
This is similar to the Project window in Avid. You can think of it as the project Browser.
2. Click the Viewer window to the right of the Browser.
This is like Avid’s Source monitor and can be thought of as a source Viewer.
3. Click the Canvas window to the right of the Viewer.
This is like Avid’s Record monitor and can be thought of as a record Canvas.
4. Click the Timeline beneath the Viewer and Canvas.
Unlike other Mac OS X windows that appear with red, yellow, and green Close, Minimize, and Zoom buttons, windows opened within Final Cut Pro have gray buttons that match the interface.
You can personalize the window configuration of the interface according to your preferences and the type of editing you are doing, such as narrative editing, compositing visual effects, or mixing or designing audio. In Lesson 3, you will learn how to change the interface layout and create custom layouts.
Working with Projects
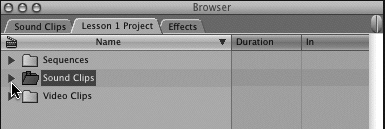
Unlike Avid, where you work on only one project at a time, Final Cut Pro allows you to have multiple projects open simultaneously. To contain a group of projects, FCP has a Browser window in which you can simply browse through your projects and the project elements. The Browser serves a similar purpose to Avid’s Project window: to contain and organize bins, clips, effects, and sequences.
Avid’s project window
FCP’s Browser window
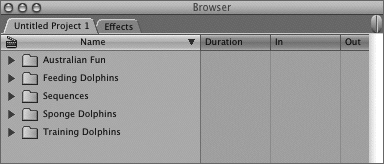
When you launch FCP from its program icon, when no previously saved project was left open, an untitled project will be created automatically with the current settings. FCP uses the default name Untitled Project # for every new project. If you double-click a specific FCP project file from your Desktop, that project will open as the program is launched. The name of any open project appears on a folder tab in the Browser window, and each project has its own tab. A single Effects tab is always present, as discussed in Lesson 9. In the Timeline, open sequences appear as a tab as well.
As with Avid, Final Cut Pro can be set to reopen a project automatically if it was saved and left open prior to quitting.
To create, save, open, and close projects
1. To create a new project, choose File > New Project, or press Shift-Cmd-N.
A tab for that new project appears in the Browser along with any other projects that may already be open.
2. To save a project, do one of the following:
• To name and save an untitled project, choose File > Save Project As, or press Shift-Cmd-S.
When an untitled project is named, the project tab displays the new name.
• To save changes to the current project, press Cmd-S.
• To save changes to all open projects, press Option-Cmd-S.
3. To open a project, choose File > Open, and navigate to the destination on your hard drive. Click Choose to open the project.
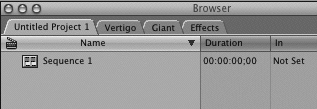
A tab for the project appears in the Browser along with any other projects that may already be open, such as the projects titled Vertigo and Giant in the image below.
When you open a named project, the most recently created untitled project will close automatically.
4. To close a project, do one of the following:
• Select its tab in the Browser and choose File > Close Project.
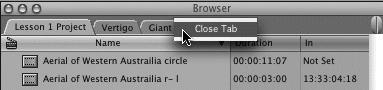
• Ctrl-click the project tab, and choose Close Tab from the shortcut menu.
• Press Cmd-W.
Like Media Composer, FCP uses shortcut menus throughout the program for easy access to functions and options. These menus are accessed by Ctrl-clicking an item or area in the interface, but they can also be accessed by right-clicking with a two-button mouse.
Creating and Organizing Bins
In Avid, a bin is a container for clips, subclips, effects, and sequences. The same is true in Final Cut Pro, but the icons are different.
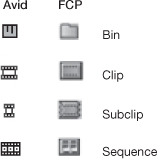
In FCP, the bin container is a folder icon. You organize your bins just as you organize everything else on your Mac: with folders and files. You can drag project elements from the Browser into any bin.
To create a new bin
You can create a new bin in one of three different ways: by choosing a menu selection, using a keyboard shortcut, or using a shortcut menu option. These three methods represent the multiple ways many FCP functions can be accessed.
Do one of the following:
• Choose File > New > Bin.
• Press Cmd-B.
• Ctrl-click in the empty Browser gray area under the Name column and choose New Bin from the shortcut menu.

Before creating a new bin with the keyboard shortcut, make sure either the Browser, Canvas, or Timeline window is active.
Like in Avid, when a new bin is created, the name is highlighted. To enter a new bin name, begin typing in the highlighted area. You can apply Apple drag-and-drop methods to place one or more clips or sequences into a bin.
Opening and Closing Bins
Typically, you have to double-click an Avid bin icon to view its contents in a separate window. But in Final Cut Pro, there is another way to see and work with all of your bin contents inside the Browser window. This approach takes up much less space in the interface and allows you to work effectively on one computer monitor. But you can also open a bin as a separate window.
Avid open bins
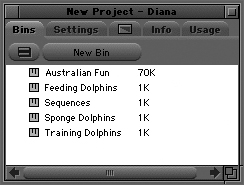
FCP open bins
Like Avid, FCP offers different bin views. The default view is View as List, like Avid’s Text view. See Lesson 3 for more information on changing bin views.
To open a bin
Do one of the following:
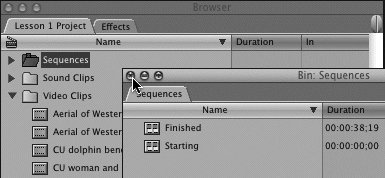
• Double-click a bin to open it as a separate window.
A bin window can be repositioned anywhere in the interface.
• Click the disclosure triangle next to a bin to view its contents.
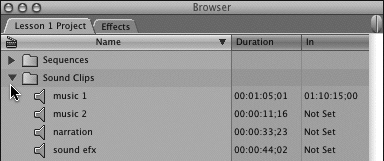
Displaying contents like this is an efficient way to utilize Desktop real estate, especially when working with a single computer monitor.
• Option-double-click a bin to open the bin as a tab in the Browser.
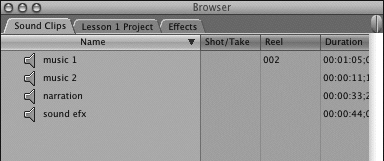
A bin tab appears in the Browser alongside the project tab or tabs. In FCP, you can drag any tab away from the Browser to create a separate window.
To close a bin
• Click the Mac OS X Close button in the upper-left corner of an open bin window, or select the bin and press Cmd-W.
• Ctrl-click an open bin’s tab and choose Close Tab from the shortcut menu.
• In the Browser, click the project tab, and then click the bin’s disclosure triangle.
Viewing Source Clips
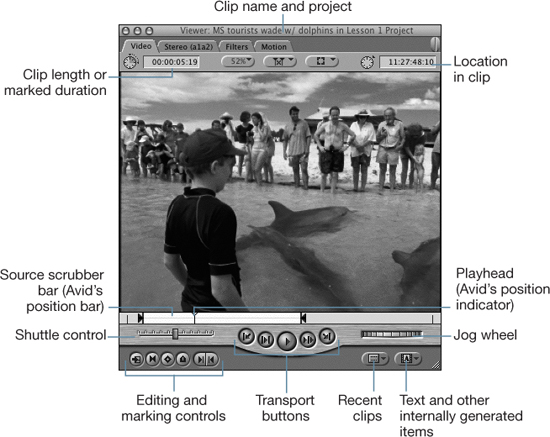
What Avid calls the Source monitor, Final Cut Pro calls the Viewer. Both are designed to let you view source material and select edit points. However, in the FCP Viewer, you can also create, view, or edit Timeline transitions, effects, mattes, and so on—activities that Avid associates with the Effects Editor.
The Viewer has tabs that allow you to access not only the video portion of your clip or material, but also the audio, filters, and motion effects. These tabs and functions will be covered in later lessons, as will playing clips and sequences.
To open a clip in the Viewer
Do one of the following:
• Double-click the clip in the Browser.
• Drag a clip from a project or bin window and drop it into the Viewer.
• Select the clip you want to open, via the mouse or an arrow key, and press Return.
When a clip, bin, or sequence is selected and you press Enter, the name will become highlighted, and you can rename it.
Viewing Sequences
What Avid calls the Record monitor, Final Cut Pro calls the Canvas. The Canvas serves the same purpose as Avid’s Record monitor, letting you view your sequence and make or modify edits. The FCP edit buttons, which in Avid appear between the Source and Record monitors, appear on the bottom-left corner of the Canvas window. FCP lets you have multiple sequences open at the same time. As with projects, each sequence has its own tab in the Canvas and Timeline.
Some of the functions under the image area in the lower part of the Canvas window mirror those in the Viewer.
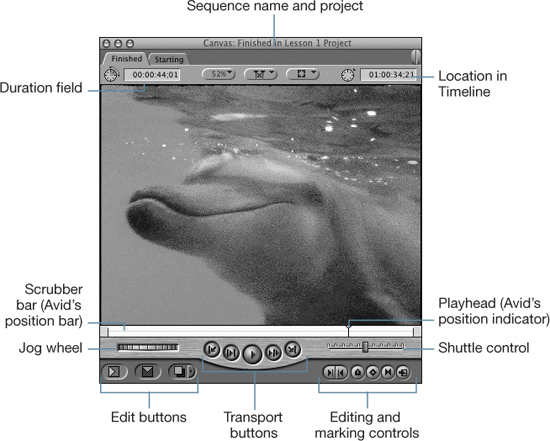
Look closely at FCP’s icons to familiarize yourself with the FCP interface.
Duration icon and field
Current Timecode icon and field
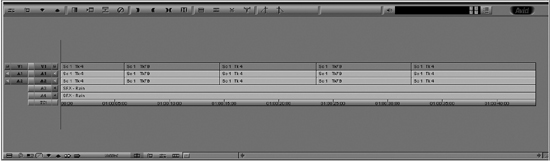
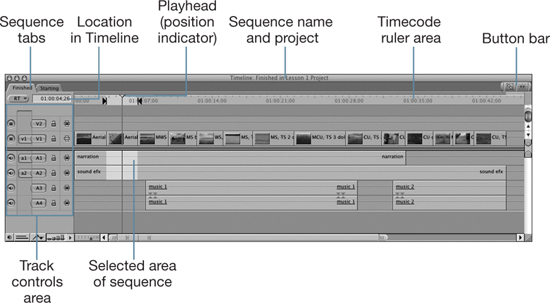
Working with the Timeline
The Timeline windows in Avid and Final Cut Pro are very similar in function and track layout. While you may be more familiar with making an edit to begin a sequence, FCP Timeline tracks appear in any new sequence based upon defaults you set in your User Preferences. In fact, the FCP Timeline window opens with an empty sequence, containing the “factory default” of one video and four audio tracks, whenever you create a new project.
When you create a sequence in Avid, if more than one bin is open, you are prompted to designate the bin in which you will store the sequence. In FCP, you are never prompted to give the sequence a destination. You can organize your sequences in a separate bin or leave them in the Browser where they first appear.
To create a new sequence
You use the same methods to create a new sequence in the Browser as you did to create a new bin. Once a sequence is opened, it appears as a separate tab in the Timeline, just as it appears in the Canvas.
Do one of the following:
• Click in the Browser, Timeline, or Canvas window and choose File > New > Sequence.
• Press Cmd-N.
• Ctrl-click in the empty gray area of the Browser under the Name column and choose New Sequence from the shortcut menu.
• To create a new sequence in a specific bin, Ctrl-click that bin and choose New Sequence from the shortcut menu.
You open a sequence as you would a clip, by double-clicking its icon in the Browser, or by selecting it and pressing Return.
When all sequences are closed, the Canvas and Timeline windows close as well. Their only purpose is to display open sequences.
Working with Tools and Audio Meters
You select Avid tools by using the keyboard, pressing command buttons, or selecting an option from the Fast menu. Final Cut Pro follows the design of certain desktop graphics programs (such as Adobe Photoshop) by placing editing tools in a Tool palette. This is like tearing off the Fast menu of functions in Avid. Although some of the tools’ functions are also found in menus, the FCP Tool palette provides a convenient way to select many editing operations. In addition, each of the four primary FCP interface windows has its own button bar that you can customize with your personal set of command buttons. This is discussed more in Lesson 3.
Tool Palette
When working within FCP, the default tool is the Selection tool, which is a black arrow. Its shortcut key is the letter A. You use this tool to select clips, transitions, and groups of clips; it’s the tool you will work with most of the time. The FCP Tool palette contains editing, selection, and trim tools, as well as other tools, which are covered in upcoming lessons.
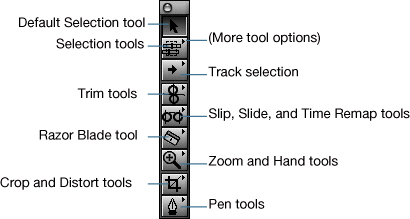
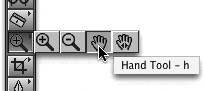
If a tool icon includes a tiny arrow, there are more tools of a similar nature associated with that tool. Click and hold a tool icon to see those options. Some tool icons, such as the Zoom In (magnifying glass), Crop, and Pen tools, may look familiar if you have worked in desktop graphics programs. These tools perform the same functions in FCP.
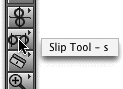
To see what a tool icon represents, hold the cursor over it with your pointer. The name of the tool and the shortcut key will appear as a tooltip. Tooltips with keyboard shortcuts will also appear over most buttons in the interface. While this option is turned on as a default, you can toggle tooltips off or on in the User Preferences window (Option-Q).
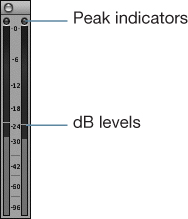
Audio Meters
The FCP Audio Meters do only one thing: display your audio levels. You can choose to keep the Audio Meters open all the time or just when you’re working with audio levels. Unlike in Avid, neither the Audio Meters window nor the Tool palette can be resized. In addition to the Audio Meters, FCP has an Audio Mixing tool that you can use to monitor and control audio levels; it’s covered in Lesson 8.
All FCP interface windows can be closed independently by clicking their Mac OS X Close button. In the Window menu, you will find keyboard shortcuts to close and open individual windows.
Controlling Timeline Tracks
Like Avid, Final Cut Pro gives you certain controls over your Timeline tracks. However, there are some minor differences. For example, Avid lets you assign different colors to each track, whereas FCP lets you assign a color to a clip. You enter timecode numbers and durations in FCP using the same protocol as Avid. Instead of pressing F at the end of a number entry for frames, however, you right-click in the Timeline location field or ruler area to change the display to frames or feet and frames. In FCP, as in Media Composer, controls to lock tracks, patch tracks, turn tracks off or on so they won’t be seen or heard, and change track height all appear in the Timeline track area, in the left side of the Timeline.
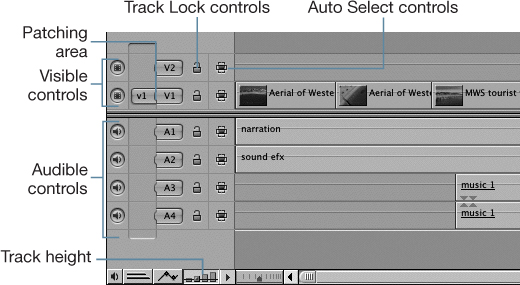
To control Timeline tracks
Most of the Timeline track controls toggle a function off or on, just as they do in Avid.
Do one of the following:
• To lock a track, click the Lock Track control for that track.
• To turn the sound of an entire track off or on, toggle the Audible control for that track.
• To turn video of a track off or on, toggle the Visible control for that track.
• To change track height, click the Track Height control in the Timeline. You can also press Shift-T to toggle the options. (Lesson 3 covers more ways to change Timeline tracks dynamically.)
• To go to a timecode location, click and type the timecode in the Timecode Location field, in the upper left of the Timeline beneath the sequence name tab. If nothing is selected in the Timeline, simply typing a timecode number enters it into this field automatically.
Zooming and Positioning the Timeline
Except for minor differences in terminology, you’ll find many similarities in how Avid and Final Cut Pro let you size and position the Timeline. Both use a combination of sliders and keyboard shortcuts. Although FCP does not have a specific focus button or zoom section function, there are several ways to zoom and position a sequence in the Timeline.

FCP’s zoom slider, which looks a lot like Avid’s position slider, can both zoom and position. Zooming in or out of the FCP Timeline always occurs around the playhead (position indicator) position.
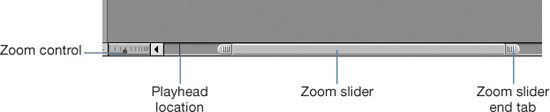
To zoom and position the Timeline
Do any of the following:
• Move the zoom control to the left to zoom in (expand) or to the right to zoom out the sequence view in the Timeline.
• Move the zoom slider left or right to move the sequence left or right, respectively.
• Drag either end tab of the zoom slider to expand or contract the sequence.
• To zoom in where the playhead is parked, press Option-+ (plus sign). To zoom out from where the playhead is parked, press Option-– (minus sign). If a clip is selected, you will zoom into the selected clip or clips, because FCP prioritizes selection over playhead position.
• If the playhead has moved out of view, click the thin purple line in the zoom slider area until the playhead comes back into view. The thin purple line indicates where the playhead is parked in relationship to the entire sequence.
• To magnify an area, select the Zoom In tool from the Tool palette, or press Z. Then either click directly on a clip or drag a marquee across several clips in the sequence (as you would using Cmd-M in Avid). To zoom out, press Option as you click the Zoom In tool.
• In addition to using the zoom slider to move the sequence left or right, you can use a mouse scroll button to scroll through the sequence. You can also use the Hand tool, which shares position in the Tool palette with the Zoom tool.
• To display the entire sequence in the Timeline, press Shift-Z.
• The pointer, or default Selection tool, is the tool you will use for all basic editing functions. To get back to it, press A.
Using Keyboard Shortcuts
Like Avid, Final Cut Pro allows for the keyboard to be mapped to your personal preferences. Keyboard enthusiasts will find that almost every FCP function has an assigned keyboard shortcut. These shortcuts employ the four keyboard modifier keys: Shift, Control, Option, and Command (Apple).
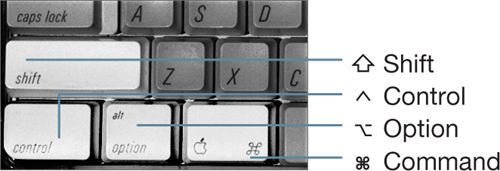
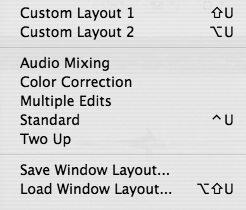
FCP organizes its keyboard shortcuts around specific functions. It may give one function a letter and then use different modifier keys with that same letter to produce similar options. For example, note the different shortcuts for screen layouts (Window > Arrange) that combine the U key with modifier keys.
Another example is the shortcuts for Undo and Redo found in the Edit menu. Undo is Cmd-Z, and Redo is Shift-Cmd-Z. FCP can have up to 99 undo steps or levels. The number of undos in FCP can be changed in the User Preferences window, which you can access via the Final Cut Pro menu. This menu is another example of how you can access several settings using the same key, in this case Q, with one or more modifiers.
What You’ve Learned
• You can launch Final Cut Pro by double-clicking its icon in the Finder window, clicking its icon in the Dock, double-clicking an alias on the Desktop, or double-clicking an FCP project file.
• FCP interface windows can be opened and closed like other OS X windows, and can be repositioned anywhere in the interface.
• Unlike in Avid, you can have multiple projects open in FCP at the same time, and you can also work with multiple sequences from different projects.
• The FCP interface windows are similar to Avid: The Browser is a combination Bin viewer and Project window; the Source monitor is called the Viewer; and the Record monitor is called the Canvas.
• Project and sequence names appear on tabs in appropriate windows.
• Bins appear as folder icons.
• You create a new bin by choosing File > New > Bin, pressing Cmd-B, or Ctrl-clicking to bring up a shortcut menu.
• To view bin contents, you can double-click a bin to open it as a separate window, click the disclosure triangle next to a bin, or Option-double-click a bin to open it as a tab in the Browser.
• In FCP, you can drag any Browser tab to create a separate window.
• In the Viewer, you can view source material; select edit points; or create, view, and edit transitions and effects.
• You can open a clip in the Viewer by double-clicking it in the Browser, dragging it from a bin into the Viewer, or selecting it and pressing Return.
• In FCP, the Timeline window opens with an empty sequence when you create a new project.
• You can create a new sequence in the Browser by choosing File > New > Sequence, pressing Cmd-N, or Ctrl-clicking to bring up a shortcut menu.
• You can open a sequence by double-clicking its icon or selecting it and pressing Return.
• You can reveal the name and keyboard shortcut for any tool or button by moving the pointer over a tool or button to bring up a tooltip.
• The Timeline track area is where you control certain aspects of each track by performing tasks such as locking it, turning the monitoring of sound or image off or on, and so on.
• You can zoom into a Timeline using the zoom scale control, the Zoom In tool, or keyboard shortcuts. You can reposition it using the zoom slider or Hand tool.
• You change the number of undos in the User Preferences window.
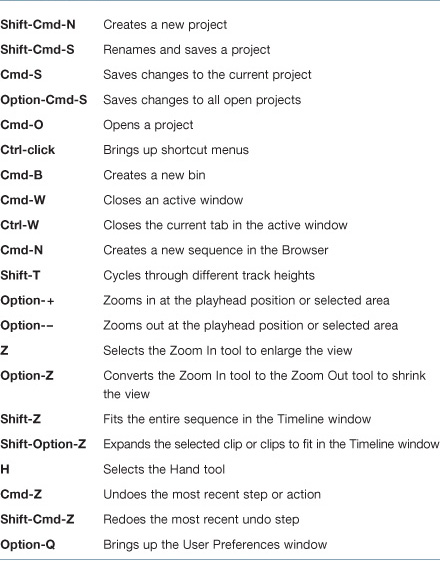
Keyboard Shortcuts