Lesson Files | GarageBand 3 Lessons > Lesson_08 > 8-1 Podcast start; 8-2 Podcast 6min |
Time | This lesson takes approximately 1 hour and 30 minutes to complete. |
Goals | Create a new podcast episode |
Add and adjust the Speech Enhancer effects to voice tracks | |
Import and edit a project within a project | |
Add artwork to the Media Browser and Podcast Track | |
Edit marker regions | |
Build a title sequence in the Podcast Track | |
Crop and resize artwork in the Artwork Editor | |
Add a URL and URL title to a marker region | |
Record sound effects in the Timeline | |
Edit the project’s episode information |
Podcasts are like radio or TV shows that can be downloaded over the Internet, and they are one of the fastest growing forms of multimedia. With GarageBand 3, you can create your podcast episodes and then upload them to the Internet using iWeb or another application.
There are four primary types of podcasts: audio podcasts; enhanced podcasts with markers, artwork, and URLs; video podcasts containing a movie; and enhanced video podcasts containing a movie, markers, artwork, and URLs.
In this lesson, you’ll first learn how to create a new podcast episode and set up the voice tracks for recording. Then you’ll work on a real-world enhanced podcast with multiple voice tracks, markers, artwork, and a URL. Along the way, you’ll also build an opening title sequence, learn how to add a project to another project, edit marker regions and artwork, and record sound effects directly to the Timeline.
Many of the previous projects you’ve worked on were already in progress when you started. Since you’ll be creating your own podcasts from scratch once you finish this book, let’s take a look at the New Podcast Episode template available in the GarageBand welcome screen.
Launch GarageBand. If GarageBand is already open, choose File > New.
In the GarageBand welcome screen, click the New Podcast Episode button.
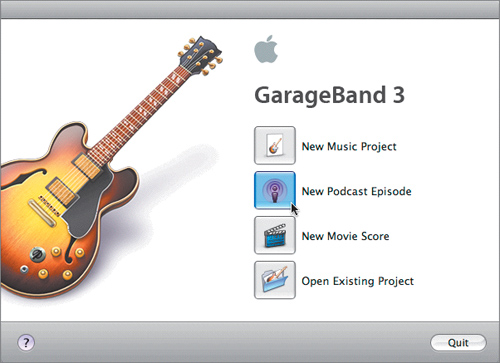
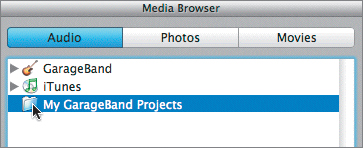
Save the project as Podcast Template to your My GarageBand Projects folder.

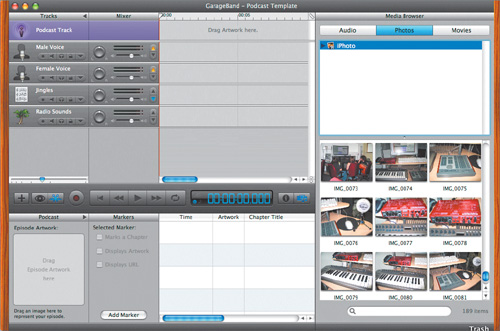
The Podcast Template project opens, with the empty Podcast Track, editor with marker information, and Media Browser already showing. The Media Browser contains buttons for different types of media files (Audio, Photos, Movies), a browser where you can navigate to the media files you want to use, and a media list showing the media files in the current location.
Notice that the Photos button and the iPhoto icon in the Media Browser are selected. If the iPhoto library on your computer includes movie files, they will appear in the lower pane of the Media Browser whenever you select the iPhoto icon. Any files in the Photos pane of the Media Browser can be used as episode artwork for your podcast.
You can also add other folders of still images and photos to the Photos pane so you can access artwork files anywhere on your computer.
Because you created a new podcast episode using the template from the Garage-Band welcome screen, all of the basic tracks and panes are already showing. However, as you work on your own podcast projects, chances are you’ll need to show and hide the different tracks and panes as needed to maximize your Timeline workspace. Many of these elements use the same shortcuts you’d use if you were working on a music project.
Choose Control > Hide Editor, or press Cmd-E, to hide the editor.
Choose Control > Hide Media Browser, or press Cmd-R, to hide the Media Browser.
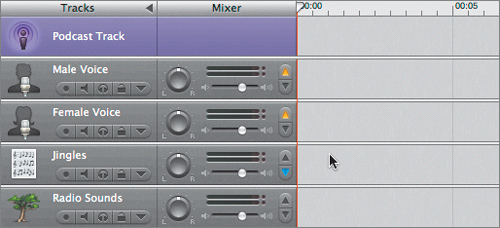
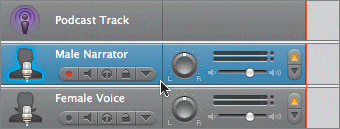
The podcast template includes a Podcast Track and four prebuilt audio tracks, including Male Voice, Female Voice, Jingles, and Radio Sounds. You can always add more tracks or delete unneeded tracks from the Timeline. Also, the ducking controls are on and have the voice tracks set as priority tracks; the Jingles and Radio Sounds tracks are set as backing tracks that will be ducked as needed to favor the voice tracks.
Choose Track > Hide Podcast Track, or press Shift-Cmd-B.
You generally won’t hide the Podcast Track while you’re working. In fact, you’re more likely to want to show the Podcast Track in a project you may not have originally designated as a podcast.
Choose Track > Show Podcast Track, or press Shift-Cmd-B.
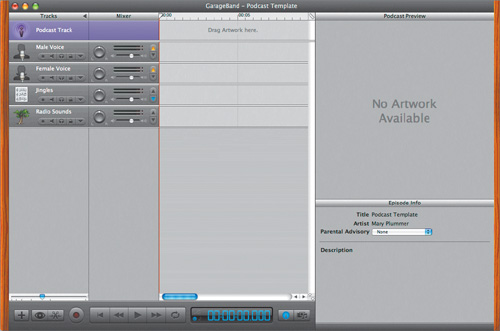
The Podcast Track reappears along with the Track Info pane for the selected track (in the above screen shot, the Podcast Track has been selected). You’ll also see a Podcast Preview pane in the upper-right corner of the window. The Podcast Preview pane—which is similar to the Video Preview pane—allows you to see the podcast’s artwork as you play the project.
Press Cmd-R to show the Media Browser and automatically hide the Track Info pane.
Press Cmd-R again to hide the Media Browser.
Hiding the Media Browser will not make the Track Info pane reappear. When a pane is hidden to make room to show another pane in its place, the previous pane remains hidden until you choose to show it again.
Now that you are comfortable with showing and hiding the various panes you’ll be using during this lesson, let’s move on to setting up your podcast recording equipment.
Recording audio for a podcast in GarageBand 3 can be as easy or complicated as needed for your particular project. For example, if your podcast needs only one voice track, you can record the narration to an enabled Real Instrument track by connecting a microphone to your computer or by using the built-in microphone (if it has one). An iSight camera will also work because it includes a fully functioning microphone that is perfect for recording podcast audio as well as visuals. In fact, you can even record remote interviews with iChat users.
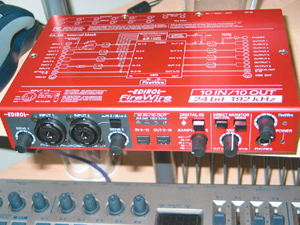
Remember that the voice tracks you record for a podcast are Real Instrument tracks, so they follow the same recording rules you learned in Lesson 6. You can record a maximum of eight Real Instrument tracks and one Software Instrument track simultaneously. To record more than one track at a time, you’ll need to use an external audio interface.
Due to the popularity of GarageBand, a variety of third-party recording equipment is available. When I’m creating projects for these books, I try to find equipment that is both GarageBand-friendly and modestly priced.
The podcast you’ll be working on later in this lesson includes four Real Instrument voice tracks, plus a Software Instrument track used for sound effects. To record all four voice tracks at the same time, I used the Edirol FA-101, which is the same audio interface I used for recording Real Instruments in Lesson 6.
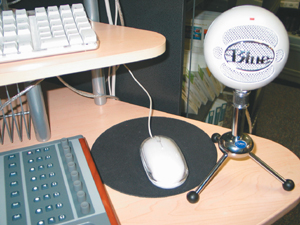
To record my narration, I used the new Blue Snowball USB microphone, which plugs into any USB port. It doesn’t require any additional software or drivers, and it works well for these types of projects.
To trigger sampled MIDI sound effects during the podcast recording, I use the small Edirol PCR-A30 MIDI keyboard/audio interface. This is the same keyboard I used to record Software Instrument parts in Lesson 3.

Finally, I use the M-Audio iControl for GarageBand, which I have to confess I’ve been using throughout the process of writing this book.
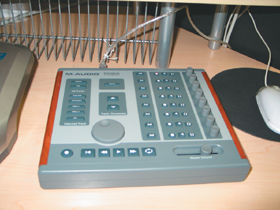
The iControl is a GarageBand-specific USB device that allows you to select, mute, solo, record enable, pan, and adjust volume on tracks, as well as operate the transport controls, add effects, and adjust the master volume.
For me, using the external iControl device to control the tracks and transport controls, and an external MIDI keyboard to trigger sounds, enables me to focus on the live podcast interviews without using the mouse or computer keyboard.
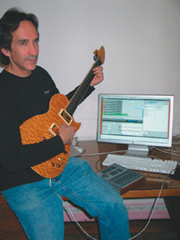
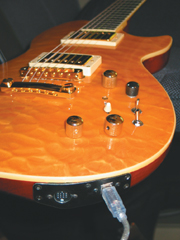
In addition to my various MIDI keyboards, I also keep an iGuitar handy for recording riffs, guitar parts, and song ideas. The iGuitar.USB by Brian Moore Guitars is an exciting development in the world of digital music recording. It is the first guitar to offer on-board, class-compliant USB audio to streamline the guitar-to-computer connection, eliminating the need for an external audio interface. In other words, you can use a standard USB cable to hook the iGuitar to the computer and record real guitar parts into GarageBand without any other equipment.
More Info
You can find more information on GarageBand accessories at www.apple.com/ilife/garageband/accessories.html. You can find out more about the iGuitar at www.brianmooreguitars.com.
Again, let me stress that none of this equipment is necessary to create a podcast, and you can often get along with minimal equipment. I just wanted you to see some of the other options, especially if you plan to create a lot of enhanced podcast episodes or music projects.
Before recording, make sure that your equipment is turned on and properly connected to the computer. For more specifics on the operation of your equipment, refer to the equipment manuals.
GarageBand includes microphone settings and vocal enhancement effects that can be applied to a vocal track before or after recording. These effects—available in the Details area of the Track Info pane—are designed to improve the quality of your vocal recordings.
In the Timeline, double-click the Male Voice track header.

The Track Info pane appears for the selected track. Notice that the Podcasting instrument category has been selected, and Male Radio is the specific preset.
There are five Male Voice presets: iSight Microphone Male, Male Narrator Noisy, Male Narrator, Male Radio Noisy, and Male Radio.
The presets that have Noisy in the title include automatic noise reduction to help eliminate unwanted background noise in the recording.
The iChat and iSight presets are designed specifically for tracks using those methods of recording.
In the Track Info pane, select the Male Narrator preset.
The preset effect changes, and the Track Header’s name changes to reflect the new preset.
In the Track Info pane, click the Details disclosure triangle to reveal the effects details.
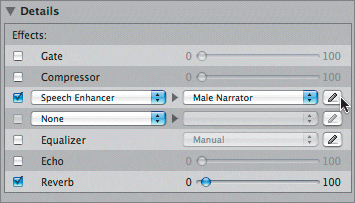
You can see that the preset includes a little bit of Reverb effect and a Speech Enhancer effect set to Male Narrator.
The Manual settings for the Speech Enhancer also let you choose which type of microphone you are using. This is very useful to enhance the quality of recordings if you are using a built-in microphone.
To open the Speech Enhancer controls, click the Edit button (looks like a pencil) for the Male Narrator preset.
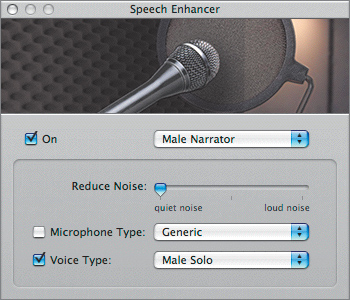
The Speech Enhancer controls include a preset pop-up menu, which will automatically change to Manual if you modify any of the current settings. There is also a Reduce Noise slider, which is currently at the lowest setting. In the Microphone Type menu, you can choose the type of microphone, and in the Voice Type menu, you can select the type of voice.
Select the Microphone Type box, then click the Microphone Type menu to see the different choices, ranging from PowerBook G4 Titanium to iMac G5 with iSight. Choose the microphone type that best fits your recording situation. Use Generic if you are using an external microphone.
Choose a preset from the Preset menu at the top of the Speech Enhancer dialog. Try a preset that best suits the type of recording you might use in a podcast. If you’re unsure, try Male Narrator or Female Narrator.
An alert appears, showing that you’ve made changes to the current instrument settings.
Name the preset My Podcast Voice, and click Save.
In the Speech Enhancer dialog, choose your new preset from the menu. Then close the Speech Enhancer dialog to add your custom settings to the selected track.
If you have a microphone attached to your computer, take a moment and try recording to the track you just set up. Remember the shortcuts R to start recording and spacebar to pause. Also make sure that the track you want to record is selected and the Record Enable button is turned on. Record a little narration about yourself, or your family, or read a few paragraphs from this book. The important thing is the practice, not the content of the recording. When you have finished, save and close the project.
Now that you know how to create a new podcast project and set up your vocal tracks, let’s fast-forward to a podcast project that is a little further along. In this exercise, you’ll apply the Reduce Noise control to some of the tracks. Along the way, you’ll also use many of the skills you’ve learned throughout this book.
Open the project 8-1 Podcast start and save it as Podcast start to your My GarageBand Projects folder.
The project contains a lot of media files and is fairly large, so it may take a few minutes to save.
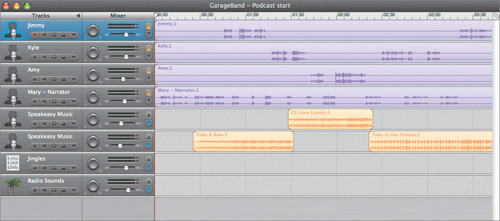
This podcast project-in-progress is an interview with the band Speakeasy, featured in Lesson 6. It includes four recorded Real Instrument voice tracks, two Speakeasy music tracks containing orange (imported) Real Instrument regions, and two empty tracks: Jingles (Real Instrument) and Radio Sounds (Software Instrument). The Podcast Track has been hidden so you can focus on the recorded tracks first.
Notice that the ducking controls are showing, and the recorded voice tracks are the priority tracks; the music and effects tracks are ducking (lowering volume) to favor the priority tracks.
Move the playhead to 00:45 (45 seconds) in the time display. This is right before Jimmy speaks for the first time.
Press C to show the Cycle Region Ruler, and create a yellow cycle region over the first section of waveform in the Jimmy region (from 00:45 to around 01:14).

Double-click the Jimmy track header to open the Track Info pane for the selected track. Then click the Details disclosure triangle to see the track’s details.
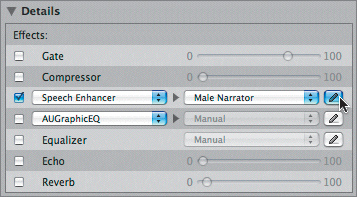
The track has the Speech Enhancer effect applied, with the Male Narrator preset.
Press the spacebar to begin playback of the cycle region.
Press S to solo the selected track.
You can hear a bit of room noise when Jimmy speaks. You may not be able to get rid of all the noise, but you can certainly remove some of it.
Continue playback and drag the Reduce Noise slider from the lowest setting (quiet noise) to the highest setting (loud noise). Feel free to choose a setting in-between that you like better.

Can you hear the difference in the noise while he’s talking? Let’s also change the Voice Type effects preset on his track.
Continue playback and change the Voice Type pop-up menu from Male Solo to Male Voice Over.
Close the Speech Enhancer dialog and pause playback.
Press S to unsolo the Jimmy track, then press C to hide the Cycle Region Ruler.
As you can see, it is easy to apply the Speech Enhancer effects to a track before or after it has been recorded.
Now it’s your turn to apply the same changes to the Kyle track. You can choose whether or not you want to solo the track and use a cycle region. Your main goal is to open the Kyle track’s info and manually adjust the Speech Enhancer effect to add the Reduce Noise feature, as well as change the preset to Male Voice Over. When you are finished, save your progress. Also, be sure to close the cycle region and unsolo all of the tracks.
If you have listened to the beginning of the podcast, you’ll notice that it is pretty darn boring without any music. Not to mention it’s just a voice without any visuals, which you will also fix shortly. First, let’s add a good podcast jingle to the beginning and end of the project. You could choose from one of the many professional jingles included with GarageBand 3. However, since you’ll be using them extensively in the next lesson, let’s instead use one of the projects you built from scratch.
Remember the project SpaceBass from Lesson 4? That musical piece was designed for a podcast, so let’s use it. You could mix and export the finished song, then import it into the podcast project, or simply import the GarageBand project. That’s right, import a project into another project. If you save a project with iLife preview, you can preview and use it in any of the other iLife applications, including GarageBand.
In this exercise, you’ll open the project SpaceBass final from your My Garage-Band Projects folder and save it with iLife preview. If you didn’t complete and save the project in Lesson 4, you can open the project Lesson_04 > 4-4 SpaceBass final. You may also remember at the beginning of the book I had you turn off the alert that asked if you want to save a project with iLife preview. It takes longer to save projects with iLife preview, and the feature is only for the projects you want to share with other iLife applications—or GarageBand itself. So this is the first time you’ve needed that feature.
Save the current project. Then choose File > Open and select either SpaceBass final from your My GarageBand Projects folder or 4-4 Space Bass final from the Lesson_04 folder.
Play the project once for nostalgia’s sake.
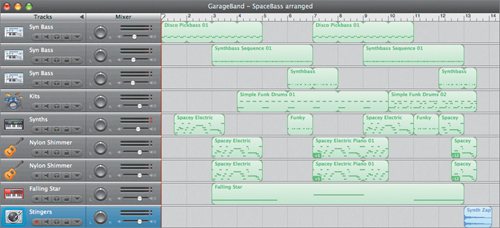
You’ve come a long way since you built this project. Luckily, it still sounds cool and will work well for your podcast project. Feel free to mix the track levels and add effects if you’d like before continuing, or you can always tweak it later.
Choose GarageBand > Preferences. In the Preferences window, click the General button.
At the bottom of the General Preferences dialog, select the iLife Preview option, if it is not already selected.

Now, each time you save this project, a rendered preview of the project will be created so you can preview it in other iLife applications.
Close the Preferences dialog.
Press Cmd-S to save the project with iLife preview. If you see an alert asking if you’d like to save with iLife preview, click Yes.
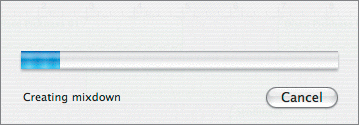
A progress alert appears, showing you that the iLife preview is rendering as you save.
That’s it. The project has been saved with an iLife preview.
Saving the project with iLife preview means that you can add it to your Garage-Band Timeline. First, you’ll need to place it in the Audio pane of the Media Browser. By default, the Media Browser gives you access to your iTunes library in the Audio pane of the Media Browser. You can also add other folders containing audio files, including GarageBand projects. Let’s reopen the Podcast start project and show the Media Browser.
Choose File > Open Recent and choose the Podcast start project you were working on earlier in this lesson.
Press Cmd-R to show the Media Browser. Click the Audio button to show the Audio pane within the browser.
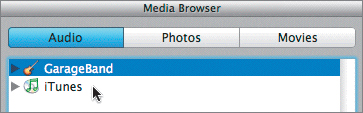
Your iTunes folder and default GarageBand folder are automatically showing in the Audio pane. You’ve been saving your projects to a folder on your computer’s Desktop, so they won’t show in the browser until you add your folder.
In the Dock, click the Finder icon to switch to the Finder.
In the sidebar of a Finder window, select the Desktop.
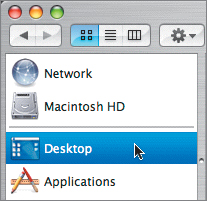
In the Finder, scroll through the Desktop contents and locate your My GarageBand Projects folder.
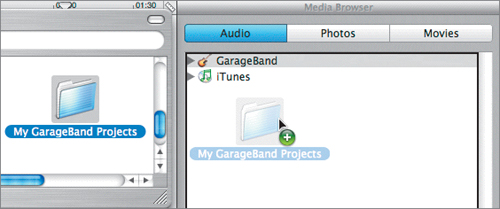
Drag the folder containing the SpaceBass project saved with iLife preview from the Finder to the Audio pane of the Media Browser.
Switch back to GarageBand.
The folder appears in the Audio pane of the Media Browser.
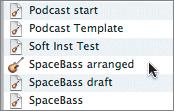
In the Media Browser, click the folder you just added (either My GarageBand Projects or Lesson_04).
Scroll through the folder contents in the lower pane of the Media Browser.
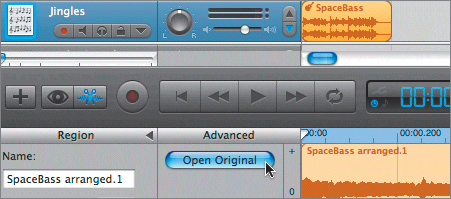
Normal GarageBand project file icons look like a document (paper) with a guitar printed on it. GarageBand project files saved with an iLife preview show only a guitar icon.
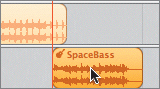
Drag the SpaceBass final (or 4-4 SpaceBass final) project from the Media Browser to the beginning of the Jingles track in the Timeline.

The project file appears in the Timeline as an orange Real Instrument region. The small guitar icon in the upper-left corner of the region shows that it is a GarageBand project instead of a normal audio file.
Play the first part of the project to hear the SpaceBass project as the intro music for the podcast.
Notice that the ducking controls are working as they should and automatically ducking (lowering) the volume level of the Jingles track to give volume priority to the narration track.
Press Cmd-S to save your progress.
You will see an alert asking if you’d like to save the project with iLife preview.
Click No.
There is no reason to save this project with iLife preview at this time.
You’ve successfully added a GarageBand project to the Timeline of another project. Of course, you might wonder what the big deal is about that. You can also export a finished mix of a song and just add the mixed audio file to a project the same way. Well, what if you change your mind? More importantly, what if your clients change their minds? It happens—more often than not, depending on the client. What if someone wants you to make changes to the song in the Timeline? Then what? If it is an audio file, you have to find the original project, or re-create it, then make the changes and export it again, then add the exported mix to the project. On the other hand, if you have a project in the Timeline, you simply open the project in the editor, click the Open Original song button, and voila! You’re working on the original song again. Best of all, when you save the changes, the project automatically updates in the Timeline. It sounds more complicated than it is. Let’s just try it.
To demonstrate editing a project within a project, you’re going to open the SpaceBass project from the Podcast start project, change the panning on several tracks, then save it so it automatically updates in the Podcast start project.
In the Timeline, select the SpaceBass project. Then press Cmd-E to open the editor.
In the editor, click the Open Original button to open the original song project.
A dialog appears, asking if you want to close the current project and open the other.
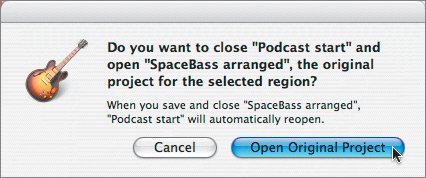
Click Open Original Project.
Note
If another dialog appears, prompting you to save the changes to the Podcast start project, click Save to continue.
The original SpaceBass final, or 4-4 SpaceBass final project opens.
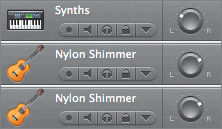
Pan the Elec Piano track two dots to the left (10 o’clock position).
Pan both Nylon Shimmer tracks two dots to the right (2 o’clock position).
Press Cmd-S to save the changes to the project. If prompted with an alert, click Yes to save with iLife preview.
Press Cmd-W to close the current project.
The Podcast start project automatically reopens. An alert appears, asking if you want to update the changes to the SpaceBass final region.
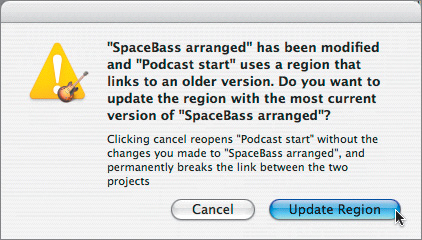
Click Update Region to update the project within the current project.
The project updates, and the Podcast start project automatically saves. You’ve just witnessed a very advanced maneuver, new to GarageBand 3.
Note
If you choose not to apply the changes when you return to the project you started from, the link between it and the imported project is permanently broken. Also, extending the length of the imported project can result in regions being deleted when you apply the changes to the project it is imported into.
There’s just one more thing to do: add the SpaceBass project to the end of the project. No problem. You’ll just copy the file and paste it at the end of the song.
Hide the editor if it is showing. Select the SpaceBass project at the beginning of the Timeline and choose Edit > Copy, or press Cmd-C. Then move the playhead to 00:05:30 in the Timeline.
Make sure the Jingles track is selected, then choose Edit > Paste, or press Cmd-V to paste the project at the playhead position.
Play the end of the project from the playhead position to hear the SpaceBass final song with the rest of the tracks.
Excellent! The song works well at both the beginning and end of the project.
Now that the audio tracks are in place, including a jingle at the beginning and end of the project, it’s time to add some artwork.
The next step in building the podcast is to enhance it with artwork and markers. When you add episode artwork to a podcast, the artwork appears when you play the podcast episode in iTunes and when you work with it in iWeb. Artwork added to the Podcast Track creates a marker region the same length as the artwork in the Podcast Track. Marker regions are used in podcasts to literally mark a specific region in the Timeline to include artwork, a chapter title, or a URL. When you publish your podcast, iWeb or other software will use these marker regions to include the designated information for that region in the project.
You can edit, move, and resize marker regions anytime while creating your podcast project. You can also add and edit chapter title markers and URL markers to the Podcast Track. In addition to the artwork used as marker regions in the Podcast Track, you can also designate the episode artwork in the editor. The episode artwork appears in the Podcast Preview pane whenever there is no artwork for the current marker region.
The artwork you’ll be using for this project is in the Photos for GarageBand folder inside the GarageBand 3 Lessons folder on your Desktop. You can add artwork folders to the Media Browser in the same way you added your projects folder earlier in this lesson. The difference is that you need to place podcast artwork in the Photos pane of the Media Browser.
In the Media Browser, click the Photos button to show the Photos pane.
If you recall, this is the default Media Browser pane when you create a new podcast episode in GarageBand.
In the Dock, click the Finder icon to open the Finder window. Locate the GarageBand 3 Lessons folder on your computer’s Desktop.
In the Finder, open the GarageBand 3 Lessons folder and select the Photos for GarageBand folder. Drag it to the Photos pane of the Media Browser. Return to GarageBand.
The Photos for GarageBand folder appears in the browser.
Click the disclosure triangle at the left of the Photos for GarageBand folder to view the folder’s contents, if they are not already showing
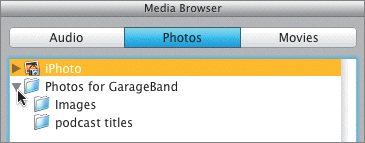
You’ll see that it contains two folders: Images and podcast titles.
Press Return to move the playhead to the beginning of the project.
Choose Track > Show Podcast Track to show the Podcast Track in the Timeline.
The Podcast Track appears at the top of the Timeline, above the other tracks.
Select the Podcast Track to see it in the Track Info pane.
The Podcast Track is where you can view and edit marker regions for a podcast episode.
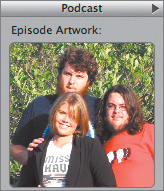
Episode artwork represents the entire project—like a movie poster or CD cover. People will see it when they choose your podcast to download or preview. The project can only have one piece of episode artwork. Let’s take a moment and assign a file as the episode artwork for this podcast.
Press Cmd-E to show the editor.
The editor appears for the Podcast Track. The Episode Artwork well on the side of the editor is currently empty. The marker area of the editor shows the marker regions and artwork already added to the Podcast Track.
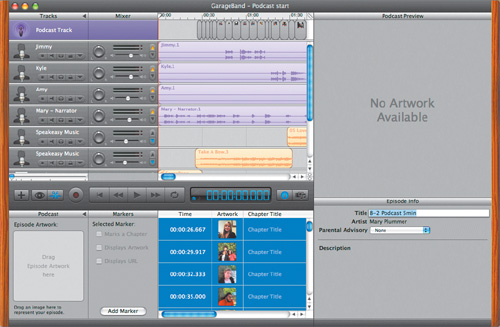
The Podcast Preview pane shows that no artwork is available, because the playhead is at the beginning of the project where there is no artwork in the Podcast Track.
Press Cmd-R to show the Media Browser.
In the upper pane of the Media Browser, select the podcast titles folder located inside the Photos for GarageBand folder.
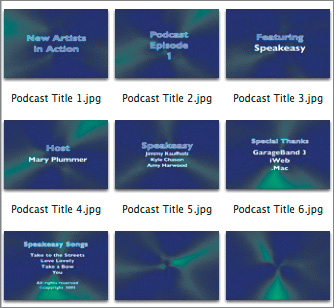
These titles were created in Motion. You can create title stills in virtually any graphics program, such as the iWorks applications. As long as the files are QuickTime-compatible, you’ll be able to include them as podcast artwork.
Select the file Podcast Title 1.jpg and drag it to the Episode Artwork well in the editor.
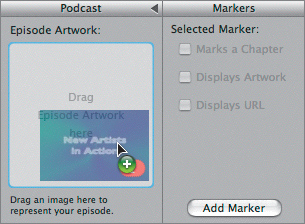
The episode artwork appears in the editor.
Press Cmd-I to show the Track Info pane.

The episode artwork appears in the Podcast Preview pane because there is no other artwork in the playhead position of the Podcast Track.
What if you change your mind after you’ve added episode artwork? You can drag the artwork from the well, and it will vanish in a puff of smoke—really. Or just add another piece of artwork to the well to replace the original.
Drag the episode artwork out of the well and release the mouse.
Poof—the well is empty again. You’ll add another piece of artwork later in the lesson.
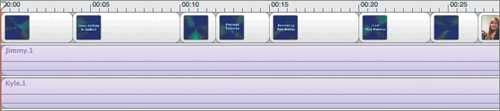
Since you already have the titles showing in the Media Browser, let’s go ahead and build the opening title sequence and create marker regions as we go. The opening title sequence will include images that go with the SpaceBass theme song for the podcast. Let’s zoom in to the Timeline for a larger view of the Podcast Track as you add the artwork.
Press Cmd-E to hide the editor.
Notice the empty space in the first 26 seconds of the Podcast Track. You’ll fill that space momentarily with a marker region.
Press Ctrl-right arrow several times until the ruler shows 10-second increments instead of 30-second increments.

Click the empty space at the beginning of the Podcast Track to deselect all of the marker regions within that track.
If marker regions are selected when you add new artwork to the Podcast Track, the new artwork may replace the first selected marker region, instead of creating a new marker region.
Press Cmd-R, or click the Media Browser button, to show the Media Browser.
If you add artwork to the beginning of an empty space in the Podcast Track, it will automatically fill the space.
Drag one of the Podcast Title blank files from the Media Browser to the beginning of the Podcast Track in the Timeline and release the mouse.

A marker region appears and fills the empty space at the beginning of the Podcast Track. The new marker region shows Podcast Title blank as the artwork for the region.
Press Cmd-I to see the artwork for the current playhead position in the Podcast Preview pane.
Play the project from the beginning to see the artwork in the Podcast Preview pane.
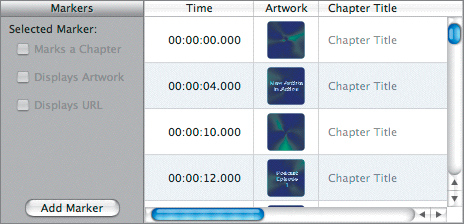
What do you think of the title sequence so far? It’s a start but still a little boring. Some art is better than no art, but it could use more titles and a little something to lead into the first title. Keep in mind, there is nothing wrong with having one long piece of artwork at the beginning of a pod-cast. However, in this case, since there is more artwork available, we’ll use it. Let’s add Podcast Title 1 to the Podcast Track. When you add a new piece of artwork, it won’t replace the entire existing artwork. Instead, it will split the original and replace the marker region from the position you release the artwork to the next marker region.
Select the first marker region in the Podcast Track, if it is not already selected. Press Return to move the playhead to the beginning of the Timeline.
Press Ctrl-left arrow to zoom out of the Timeline one level until you can see the entire first marker region in the Podcast Track.
Press Cmd-R to show the Media Browser. Then select the Podcast Title 1 file and drag it to the middle of the first marker in the Podcast Track.

The marker region splits in two, with the Podcast Title blank region first and the Podcast Title 1 region second.
Press Cmd-I to show the Track Info pane and Podcast Preview pane.
Watch the beginning of the project and listen to the audio.
Any thoughts? I think it would be much better if the “New Artists in Action” title actually appeared when the narrator says, “Welcome to New Artists in Action.” No problem.
Your goal in this exercise is to change the timing of the second marker region to match the narration. The first thing you need to do is find the narrator’s waveform and visually identify where the first line of narration begins.
Locate the Mary – Narrator region in the Mary – Narrator track. (Yes, it’s me. I couldn’t find anyone else to narrate this project in time.)
Press Ctrl-right arrow to zoom in one level for a closer view of the waveform and Timeline.

Move the playhead to the beginning of the waveform in the Mary – Narrator region (00:00:04).
In the Podcast Track, drag the beginning of the second marker region left to the playhead position.

When you release the mouse, the second marker region begins at four seconds, and the first marker region with the blank title artwork fills the first four seconds of the project, before the narrator speaks.
Now that you understand how to add artwork and edit the marker regions, let’s finish the title sequence. You’ll use the narrator’s voice and the SpaceBass music as a guide for placing the remaining artwork. Once you have the artwork in place, you can always trim or adjust the marker regions to improve the timing.
Move the playhead to 00:00:10 in the Timeline, around the beginning of the first pause in narration.
Drag one of the Podcast Title blank images from the Media Browser to the playhead position in the Podcast Track.
Press Cmd-I to see the Podcast Preview pane. Play the first part of the project to see and hear the timing of the artwork to the audio.
The music plays a little synth riff during the pause in the narration that works well with the blank title background.
Press Cmd-R to show the Media Browser. Then move the playhead to
00:00:12 in the Timeline and drag Podcast Title 2 from the Media Browser to the playhead position in the Podcast Track.
Move the playhead to 00:00:15 and add Podcast Title 3 to the playhead position.
Move the playhead to 00:00:20 and add Podcast Title 4 to the playhead position.
Move the playhead to 00:00:24 and add one of the Podcast Title blank images to the playhead position.
Press Cmd-I to see the Podcast Preview pane, then play the title sequence.
Save your progress.
Good job. You’ve completed the title sequence.
You can see more information about a project’s markers, artwork, and marker regions in the editor. You can also select markers and change or update their information.
Press Cmd-E to open the editor.
The marker regions are listed in chronological order from the beginning of the project. The editor includes columns that show Time, Artwork, Chapter Title, URL Title, and URL for each marker.
Drag the vertical scroller to scroll down through all of the project’s markers.
As you can see, there is a title sequence at the end of the project similar to the one at the beginning.
The checkboxes in the Markers area of the editor show how the marker will be designated. Adding artwork to a marker region automatically selects the Displays Artwork checkbox for that marker. You’ll work with chapter title markers in the next lesson.
You can add a URL (Web site address) to a marker region in a podcast or a marker in a movie and view the URL when you play the movie or podcast in iTunes. Not only will viewers see the URL when they play the finished project, but they can also click the URL onscreen to open the Web page in their browsers.
If you add a URL title, the title appears in the Album Artwork window of iTunes (in a published podcast) and clicking it opens the Web page for the URL. An example of a URL title might be “For More Information,” or “Check out our Web site.”
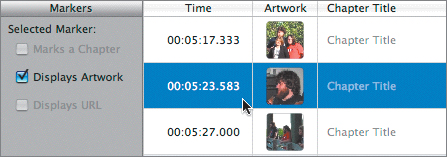
Let’s add a URL title and link to the end of the project. You’ll add the URL to an existing marker region. To get there, you could navigate in the Timeline or simply double-click the marker in the editor.
In the editor, locate the marker that begins at 00:05:23.583. Then double-click any blank area on the marker’s row in the marker list to jump to the marker’s location in the Timeline.
The playhead jumps to the marker’s location in the Timeline.
Press the spacebar to play the project from the playhead position.
The dialog content includes Jimmy saying the band’s URL address.
Press Cmd-I to hide the Track Info pane so you can see all of the marker info columns in the editor.
For the selected marker, click the URL Title field. Type speakeasyhome.com and press Return.

For the selected marker, click the URL field. Type www.speakeasyhome.com and press Return.
GarageBand will automatically add the http:// to the address.
Notice the checkmark for the Displays URL option after you add a URL to the marker.

URL also appears on the marker region in the Podcast Track to show that the marker includes a URL.

Press Cmd-I to show the Track Info pane. Play the marker to see the URL title appear in the Podcast Preview pane.

Feel free to click the URL title in the Podcast Preview pane to open the Web page. If your computer is not currently connected to the Internet, your browser will try to open the page and then tell you that you’re not connected.
The URL title and link you added works great. But it’s not onscreen very long. To give viewers enough time to see and click the URL, let’s add the same information to the next marker as well. Select the marker region that starts at 00:05:27.000 and add the same URL title and URL as you did in the previous marker. You can retype the information in each field, or copy and paste the information from a field in one marker to the same field in another. When you are finished, save your progress.
While you are in the editor, this is a good time to pick a new image for the episode artwork. Earlier you used the title of the show, but it didn’t really say much about the content. Instead, let’s choose one of the pictures of the band to use as the episode artwork. You could look through all of the images in the Media Browser or simply drag one of the images from the Artwork column in the editor to the Episode Artwork well.
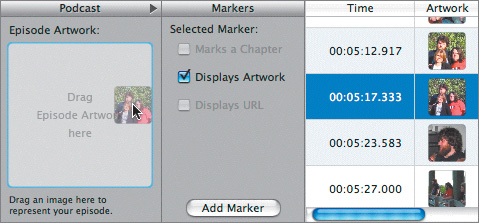
GarageBand includes a handy Artwork Editor you can use to resize and crop your artwork to show all or part of the original image. To access the Artwork Editor, double-click the artwork in the project.
Double-click the artwork in the Episode Artwork well.
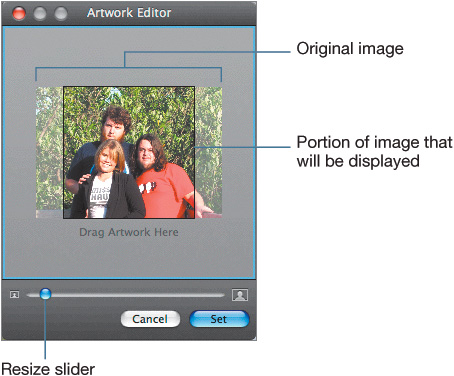
The Artwork Editor opens with the artwork. The square frame represents what will be displayed in your podcast.
Drag the Resize slider toward the right to zoom in on the image until all three heads and shoulders just fit within the black square frame.
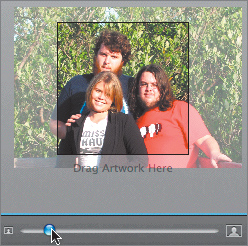
Drag the image left or right within the editor until you’re happy with the framing of the image.
Click the Set button to set the changes to the image. Close the Artwork Editor.
The episode artwork updates according to the changes you made in the Artwork Editor.
Now it’s your turn to use the Artwork Editor to fix an artwork image in the podcast. Play the first minute or so of the podcast. The image at 00:00:40:0000 shows Amy’s back, but it doesn’t include the other two band members. In the Timeline, click the marker region to open it in the editor (double-click if the editor is not already open). In the editor, double-click the artwork for the selected marker to open the Artwork Editor and resize the image until you can see all three members of the band in the image. When you’re finished, save your progress.
Now that the main podcast sound and artwork is in place, you can add a few extra audio touches to enhance the overall project. In the next series of exercises, you’ll add several loops from the Loop Browser to emphasize the content of the interview. Then you’ll add some applause to the beginning and end of the project to give it more of a radio-show feel.
Close the editor, if it is still open.
Play the project from around 00:01:06 to 00:02:00 (about a minute) and listen to the content of the interview as you watch the artwork in the Podcast Preview pane.
What do you think? The project works fine as is, but I thought it would be even better to add a few instrument loops to go with their comments. When Kyle says he played tuba, it would be fun to hear a little tuba. When he says he went from tuba to bass guitar, you could add a little bass riff. Also, when Amy says she was a hip-hop girl, I’d really like to hear a cool hip-hop beat under that section. Sure, these parts won’t go with the Speakeasy song that is playing in the background, but it will enhance the content of the interview.
We could break out our favorite tuba from the closet and record a riff, or we could simply use one of the loops that come with GarageBand. I vote for the latter. There isn’t a specific tuba loop, but there’s an orchestral brass loop that will work perfectly.
Press Cmd-L to open the Loop Browser.
Change the browser to Button view, if it’s not already.
In the Loop Browser, type horn in the search text field and press Return. Then scroll down through the results list and locate the Orchestra Brass 03 loop.
Select the Orchestra Brass 03 loop to preview it.
Sounds good enough. Plus you can always transpose it an octave lower once you’ve added it to the Timeline.
Move the playhead to 00:01:26.000 in the Timeline. This is where Kyle is talking about the tuba as the first instrument he played.
Drag the Orchestra Brass 03 loop from the browser to the empty space below the Radio Sounds track and release it at the playhead position.
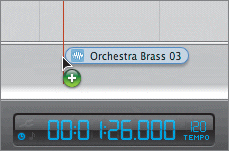
A Trombone track appears at the bottom of the Timeline with the Orchestra Brass region in the track starting at 01:26.
Change the name of the Trombone track to Music Loops.
Play the loop in the project to hear it with the other tracks.
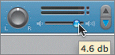
Good stuff. The only problem is that the ducking is lowering the sound of the music loop too much when Kyle talks. You can either turn off ducking on the track or raise the track’s volume level.
More Info
For more information about ducking, read the “Ducking Background Tracks” section at the end of Lesson 7.
On the Music Loops Track Mixer, drag the Volume slider a bit to the right to 4.6 to raise the track’s volume by 4.6 dB.
In the Timeline, double-click the Orchestra Brass region to open it in the editor.
In the editor, change the Region Pitch value to –12 to lower it by one full octave.
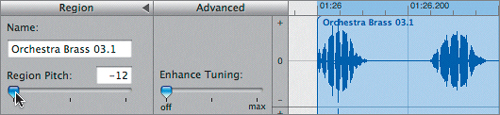
Hide the editor and play the transposed loop in the Timeline.
It sounds great and will pass for a tuba, no problem.
It’s your turn to add two more loops to the Music Loops track. Find a cool electric bass loop in the Loop Browser and add it to the Timeline when Kyle says “My brother goes, hey, why don’t you play bass guitar….”
Feel free to extend the Orchestral Brass loop so it continues to play until the bass loop starts.
Then find a hip-hop beat drum part in the Loop Browser and add it to the track when Amy says “I was definitely a hip-hop girl….” Resize the loop to last as long or short as you’d like. Save your progress when you’re finished.
The last audio element to add to the project is the applause at the beginning and end of the show. It doesn’t have to be roaring stadium applause, but a little applause can go a long way in making a show feel authentic. In some of the previous lessons, you’ve added sound effects to the Timeline by finding them in the Podcast Sounds view of the Loop Browser and dragging them to the Timeline. In this case, you’ll play them in the Musical Typing window and record them to the Timeline.
Double-click the Radio Sounds track header to open it in the Track Info pane.
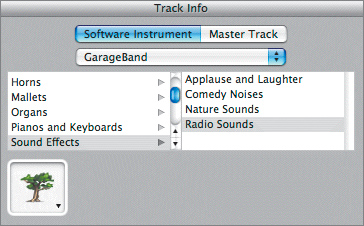
GarageBand 3 includes four different Software Instrument sound effects instruments with preassigned effects for different MIDI keys. Using this feature, you can play the MIDI sounds live during your podcast recording, or you can record them later into the Timeline.
Choose Window > Musical Typing, or press Shift-Cmd-K, to open the Musical Typing keyboard.
Click the different keys on the Musical Typing keyboard (or the corresponding keys on your computer keyboard) to trigger the preassigned Radio Sounds effects.
In the Track Info pane, select the Applause and Laughter instrument for the Sound Effects to change the instrument and preassigned sounds.
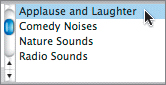
The Radio Sounds track name changes to Applause and Laughter.
Play the different keys to hear the variety of applause and laughter sounds.
There are several different light applause sounds that would work for this podcast. If you hover the pointer over a key on the Musical Typing window, a tooltip will appear, showing you the name of the sound effect assigned to that key.
Press D on your computer’s keyboard to trigger the light Clapping Crowd Studio 03 sound effect. Hold the D key to play the entire effect until it fades out.
This is the effect you’ll record at the beginning of the podcast.
Move the playhead to 00:00:32.000 in the Timeline. This is where the narrator says “Speakeasy…” and welcomes the band members to the show.
Choose Control > Count In, or press Shift-Cmd-U, to turn on the Count In feature, if it isn’t already on.
When the Count In feature is turned on, the playhead will back up one full measure before reaching the record position so you’ll have time to prepare before recording. When you click Record, a red line appears at the recording position so that you can see the playhead approach the recording start point during the count-in process.
Make sure that the Applause and Laughter track is selected, the Record Enable button is turned on for that track, and the playhead is in the starting position (00:00:32.000). Also move the Musical Typing window upward onscreen so that you can clearly see the Applause and Laughter track in the Timeline.
Click the Record button to start the count-in and recording. Watch the playhead approach the red line. Press and hold the D key on your computer’s keyboard until the sound ends. Release the key and press the spacebar to stop recording.

Nice applause.
Close the Musical Typing window and save your progress.
There’s one last applause sound to record. Move toward the end of the project (around 00:05:32.000) and record another applause region to the Applause and Laughter track. Choose any of the applause sounds you like. Try mixing several effects by pressing more than one key at a time, or simply record the same applause sound effect you recorded at the beginning. When you are finished, close the Musical Typing window and save your project.
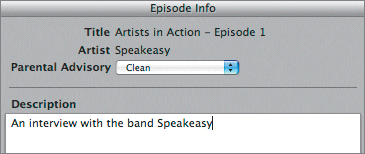
The last step needed to complete your podcast episode is to add the episode information, which includes the title, artist information, a description of the episode, and a parental advisory. The episode information is available when you work on the podcast in iWeb and when you view the podcast in iTunes.
Select the Podcast Track in the Timeline.
Show the Track Info pane, if it is not already showing.
Click the Description area and type An interview with the band speakeasy.
From the Parental Advisory menu, choose Clean.
Change the Artist name field to Speakeasy.
Change the Title field to New Artists in Action – Episode 1.
The description could be more in-depth if you’d like. You might include the names of the band members, list the songs included in the podcast, and provide other information.
Press Cmd-S to save the finished podcast.
Play the podcast from start to finish to see the completed project.
All of the artwork images are included in the Images folder in the Media Browser if you want to change or edit some of the images.
Applause! You added many of the advanced podcast features to this project and have a good working knowledge of how to build your own podcasts. Once you have created a podcast episode, you can send it to iWeb to publish it to the Internet. You’ll learn more specifics on exporting and sharing your finished podcast in Lesson 10.