
Multitasks and Files
One of the most common uses for multitasks is in creating distribution packages for JavaScript libraries. To demonstrate, let’s take the AngularJS library and create our own custom versions. We’ll create one version that includes just AngularJS and the angular-resource library, and then a second version that also includes the jQuery library.
First, create a new folder called angular and then create a new package.json file in that folder using npm init:
| | $ mkdir angular |
| | $ cd angular |
| | $ npm init |
For the settings, use the defaults. Or you could create your own package.json file that looks like this:
| | { |
| | "name": "AngularCustom", |
| | "version": "0.0.1", |
| | "description": "", |
| | "devDependencies": { |
| | "grunt": "~0.4.4" |
| | } |
| | } |
Then install Grunt as a project dependency with npm like we’ve done previously:
| | $ npm install grunt --save-dev |
Then we need to create the Gruntfile itself, using the same skeleton we’ve used before:
| multitasks/angular/Gruntfile.js | |
| | module.exports = function(grunt){ |
| | } |
Next we need AngularJS and jQuery. We could download those from the Web, but there’s a quicker way.
Fetching Client-Side Libraries with Bower
Bower is a package manager for client-side libraries, and it’s a great way to quickly grab the libraries our project needs. Bower downloads any libraries we specify into a bower_components folder in our project. First, we’ll install Bower globally:
| | $ npm install -g bower |
Bower uses the Git version-control system to fetch libraries, so you’ll need to install the Git command-line client on your computer. You can get installers for your operating system at the Git website.[5] And if you’re on Windows, you’ll need to install Git so that it runs from your Windows Command Prompt, not the default “Bash shell” option. See the Bower website for instructions on this.[6]
In addition, if you just installed Git, you may need to close and reopen your Terminal window before you can use it.
But once Bower’s all set up, we can use it to fetch Angular and the other libraries, like this:
| | $ bower install angular |
| | $ bower install angular-resource |
| | $ bower install jquery |
Now, if you look under the bower_components folder, you’ll see folders for angular, angular-resource, and jquery, with the appropriate JavaScript libraries in each folder. That’s a lot easier than finding, downloading, unzipping, and moving a bunch of files around, isn’t it?
Because we didn’t specify any version info, Bower just grabs the latest version it knows about, and that’s good enough for this demonstration.
One last thing before we move on; Bower is great about fetching remote libraries, but the authors of these libraries don’t always use the same folder structure or naming scheme. For example, jQuery puts the library we need in a dist folder, while other libraries might place the files in a lib folder. Other libraries might require us to do some manual steps to produce a library we can include in our web application. So, when you use Bower inspect the files it downloads carefully to find what you’re looking for.
Configuring Targets
We’re going to have one task with two targets. Our first target will include only AngularJS and the angular-resource library. Our other target, which we’ll call angularWithJquery, will also include jQuery. The following diagram illustrates exactly how this will work.
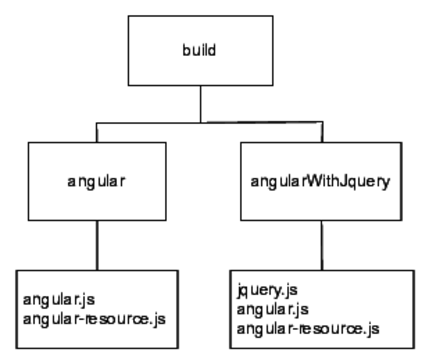
Figure 1. Our build task and its targets
When we run the build task, the individual targets will be created using the source files we specify.
So, using grunt.initConfig, let’s create the configuration for our build task. We specify the targets and their respective sources and destinations:
| multitasks/angular/Gruntfile.js | |
| | grunt.config.init({ |
| | build: { |
| | angular: { |
| | src: ['bower_components/angular/angular.js', |
| | 'bower_components/angular-resource/angular-resource.js'], |
| | dest: 'dist/angular.js' |
| | }, |
| | angularWithjQuery: { |
| | src: ['bower_components/jquery/dist/jquery.js', |
| | 'bower_components/angular/angular.js', |
| | 'bower_components/angular-resource/angular-resource.js'], |
| | dest: 'dist/jquery-angular.js' |
| | } |
| | } |
| | }); |
We’re specifying the source as an array of files, and the destination as a string. To write the task, we’ll just have to iterate over the source files, join them together, and write out the destination file. Many common Grunt plug-ins use this approach, as Grunt favors configuration over coding.
But since we’re writing our own multitask, we’ll have to do some coding. Let’s see how Grunt makes it easy for us to work with multiple targets and files.
Writing the Task
You’ve already seen how a multitask works. We can access the targets as an array. We iterate over the targets and grab the sources, read the contents of each file, and create a new file using the destination. The whole thing looks like this:
| multitasks/angular/Gruntfile.js | |
| Line 1 | grunt.registerMultiTask('build', 'Concatenate files.', function() { |
| 2 | var output = ''; |
| 3 | this.files.forEach(function(filegroup) { |
| 4 | sources = filegroup.src.map(function(file){ |
| 5 | return(grunt.file.read(file)); |
| 6 | }); |
| 7 | output = sources.join(';'); |
| 8 | grunt.file.write(filegroup.dest, output); |
| 9 | }); |
| 10 | }); |
On line 3 we iterate over the various targets. In a multitask, we use the files property to access the configured targets and their associated source and destination paths. This is cool because we don’t have to worry about how the task was configured, as Grunt allows for several methods of configuring targets and destinations. All we have to do is iterate over the files array in our task.
On line 4 we use JavaScript’s map function on the source files, using the src property. This is a quick way to iterate over all of the source files, read their contents, and store them in a new array, and is a lot more appropriate than using a standard for loop and concatenating strings.
Since we’ve stored all the file contents in an array, we can join them together using join and then write the output file to disk.
This code is very similar to the code used by the more “official” grunt-contrib-concat plug-in, but our version doesn’t handle missing source files gracefully. So why did we build our own? Because now you have a good understanding of how Grunt can work with groups of files. When the next new JavaScript or CSS preprocessor comes out, you’ll be able to write your own tasks to process your files. However, you can use Grunt’s grunt.file.exists to check for a file before reading it in.
At this point, we can run
| | $ grunt build |
and we’ll have a new dist folder with the two versions of our library. Best of all, we can run the targets independently by specifying them directly with grunt build:angular or grunt build:angularWithJquery.