
Creating a Custom Template
Let’s create a template that sets up a basic HTML5 website with a single JavaScript file and a single stylesheet. We’ll also add in a couple of additional prompts that let users decide if they’d like a Gruntfile, and if they’d like some default content added to the stylesheet. Our project will utilize the values the users provide in the JavaScript and the HTML content, too.
A template consists of a file called template.js that contains the main script executed by grunt-init, and a folder called root that contains the files that will make up the project. This root folder can have HTML files, JavaScript files, images, and pretty much anything else you think you might find useful. The following figure shows how the process will work:
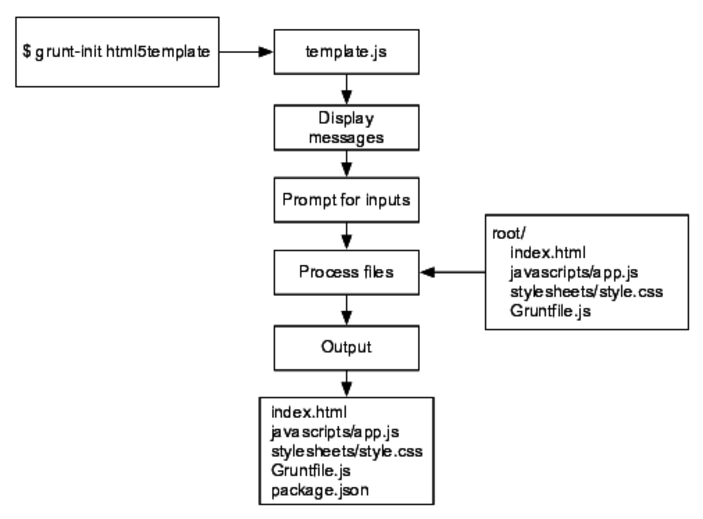
Figure 3. How our template works
Navigate to the .grunt-init folder in your home folder. Create a new folder called html5template within the .grunt-init. Then, inside this new folder, create a folder called root, which will contain all of the source files for our template:
| | $ cd .grunt-init |
| | $ mkdir html5template |
| | $ cd html5template |
| | $ mkdir root |
Next, create the template.js file. This is where the logic for our script will go. We’ll use this file to define the questions we’ll ask the user, along with the default answers, and we’ll determine exactly how to process the template. We’ll start out by defining a description of the template on the screen, along with some notes.
| scaffolding/html5template/template.js | |
| | exports.description = 'Creates an HTML5 template with CSS and ' + |
| | 'JavaScript files.'; |
| | |
| | exports.notes = 'This project includes a default JavaScript and CSS file' + |
| | 'In addition, you can choose to include an optional ' + |
| | 'Gruntfile and some default CSS styles'; |
The description is displayed when you type the command grunt-init without any arguments. This command lists all the installed templates and their descriptions. The notes get displayed when you actually run the template.
The template itself is a basic function that takes in a grunt object, plus an init object and the done object that is used for asynchronous processing. We’ll talk about how that works in Chapter 3, One Task, Many Outputs.
| | exports.template = function(grunt, init, done) { |
| | }; |
Inside of that function, we execute the init.process method, which takes an options object, an array of input prompts, and a callback function that does the actual processing. Our template is very basic, so we’ll pass in a blank options object. We’ll also define an empty array of prompts, which we’ll fill in shortly.
| | init.process({}, [ |
| | // input prompts go here |
| | |
| | ], function(err, props) { |
| | // processing section |
| | }); |
Now, let’s look at how we can ask the user for input.
Prompting for Input
The input object has a prompt function that defines a request for information from the user. There are many built-in ones, including the project’s name, the project’s author, the main starting point of the app, and even an open source library.
Inside of the empty array we created when we defined the init.process function, add these lines:
| | // input prompts go here |
| | |
| | // Prompt for these values. |
| | init.prompt('name' , 'AwesomeCo'), |
| | init.prompt('author', 'Max Power'), |
We’re prompting for the name, the author, and the main file for the project. We can specify the default values for each of these as well.
Using Variables in Templates
The variables for the name and author are available in every file in the root folder. All we have to do is embed the values like this:
| | {%= name %} |
So, let’s create the template for the HTML page. In the root/index.html file, add this content:
| scaffolding/html5template/root/index.html | |
| | <!DOCTYPE html> |
| | <html lang="en-US"> |
| | <head> |
| | <meta charset="utf-8"> |
* | <title>{%= name %}</title> |
| | <link rel="stylesheet" href="stylesheets/app.css"> |
| | </head> |
| | <body> |
| | <header> |
* | <h1>{%= name %}</h1> |
| | </header> |
| | <section> |
| | <p>Your content goes here.</p> |
| | </section> |
| | <footer> |
* | <small>Copyright {%= grunt.template.today('yyyy') %} {%= author %}</small> |
| | </footer> |
| | <script src="javascripts/app.js"></script> |
| | </body> |
| | </html> |
The highlighted sections show how we’re using the name and author data we’ll prompt users for when they run this template.
Look at this line:
| scaffolding/html5template/root/index.html | |
| | <small>Copyright {%= grunt.template.today('yyyy') %} {%= author %}</small> |
Grunt provides some special methods designed for use in templates. We can easily inject the current year into our template with grunt.template.date. Passing in "yyyy" gives us the four-digit year.
Let’s do something similar with our JavaScript file. Create a root/javascripts/app.js file with this content:
| scaffolding/html5template/root/javascripts/app.js | |
| | /* |
| | * {%= name %} |
| | */ |
| | var app = {}; |
| | app.name = '{%= name %}'; |
We can use the input data in JavaScript code, too. Here we embed the name of the project as a name property of an app object.
No web project would be complete without a stylesheet, so let’s add one. Create a stylesheets folder inside of the root folder:
| | $ mkdir root/stylesheets |
Then create a stylesheet called app.css in that folder. We’ll put in a simple rule that removes the default margin and padding from the body element:
| scaffolding/html5template/root/stylesheets/app.css | |
| | body{ |
| | margin: 0; |
| | padding: 0; |
| | } |
Any file or folder we put inside our template’s root folder will get copied into the destination location, and so we could add more default stylesheets or scripts, like the Bootstrap framework, jQuery Mobile, or even something custom built.
Processing the Template
With the template files in place, we can turn our attention to the callback function in template.js. Add these lines to the body of the callback function of init.process:
| | var files = init.filesToCopy(props); |
| | init.copyAndProcess(files, props); |
| | |
| | init.writePackageJSON('package.json', props); |
| | |
| | done(); |
First, we get the list of files we’re going to process. This puts into an array the paths of all the files in the root folder and its child folders. Then we use the init.copyAndProcess function to copy all the files and process their contents. The properties we set get passed along to this function and get used in the views.
Finally, the package.json file gets written, using the properties we prompted for.
Let’s run this and see how it works. In a new Terminal, create a new folder called test, navigate into that folder, and run the grunt-init command with our template’s name:
| | $ mkdir test |
| | $ cd test |
| | $ grunt-init html5template |
| | Running "init:html5template/" (init) task |
| | This task will create one or more files in the current directory, |
| | based on the environment and the answers to a few questions. Note |
| | that answering "?" to any question will show question-specific |
| | help and answering "none" to most questions will leave their values |
| | blank. |
| | |
| | "html5template" template notes: |
| | This project includes a default JavaScript and CSS file. In |
| | addition, you can choose to include an optional Gruntfile and some |
| | default CSS styles. |
| | |
| | Please answer the following: |
| | [?] Project name (AwesomeCo) |
| | [?] author (Max Power) |
| | [?] Main module/entry point (index.html) |
| | [?] Do you need to make any changes to the above before |
| | continuing? (y/N) |
| | |
| | Writing index.html...OK |
| | Writing javascripts/app.js...OK |
| | Writing stylesheets/app.css...OK |
| | Writing package.json...OK |
| | |
| | Initialized from template "html5template". |
| | |
| | Done, without errors. |
And now when you look at the contents of the current folder, you’ll see the generated files. The HTML file will contain values where the variables were. Let’s take this a step further and see how we can skip files based on user input.