CHAPTER 6
Setting Up Automated
Installation
It is critically important that you use unattended operating-system installation tools for every system you deploy. If you were to load the OS manually, you would rarely (if ever) get the same configuration on all your systems. It would be nearly impossible to configure your systems properly from that point forward.
Automated installation systems offer several key benefits:
- When all systems are initially configured in an identical manner, automated system-configuration tools such as cfengine don't have to account for varying initial system state. This minimizes the complexity of the automation system itself.
- Many systems can be installed and deployed at once, even by a junior SA or datacenter technician. Once the automated installation system is configured, very little work is required to add new installation clients.
- An automated procedure for OS installation can be considered a form of documentation. A manual OS installation process might be documented, but you have no proof that the final system state is really the result of the documented steps.
- You can use a backup of the automation system to deploy many systems in a new location with confidence that the resulting systems are properly installed.
We hope this chapter removes any fear you might have around setting up automated installation systems. We're well aware that vendor documentation for systems such as Sun's Custom JumpStart can be intimidating. We firmly believe that even sites with a very small number of UNIX or Linux systems need to use automated OS installation techniques for every new host.
We aren't going to explain how such automated installation systems could work; we're going to show you how they really work. We're going to set up automated installation systems to deploy real systems, and document the procedure from start to finish.
Introducing the Example Environment
We're going to deploy systems into a completely new environment for the fictional startup company we described in Chapter 5. We'll be running x86-based Red Hat Enterprise Linux 5.2 systems hosting a web application, with UltraSPARC-based Solaris 10 systems sharing application data over NFS. In addition, we'll deploy x86-based Debian GNU/Linux 4.0 systems to provide infrastructure services (e.g., cfengine, DNS, Network Time Protocol, etc.).
We made the decision to run two different Linux distributions:
- We find Debian GNU/Linux to be easy to administer, making it a good fit for infrastructure roles.
- The (fictional) business decided to use Red Hat for support reasons, so we'll use Red Hat on systems where vendor support is important (e.g., our web servers).
The network in our new environment is flat: a single subnet utilizing a private (RFC1918) IP range. We'll initially use this single subnet for imaging as well as production service. We won't discuss network-administration details such as routing and switching.
To deploy our three different OS platforms, we'll create three different system-imaging servers:
- To image our Debian systems, we'll use FAI, or Fully Automatic Installation (see http://www.informatik.uni-koeln.de/fai/).
- We'll use Sun's Custom JumpStart to image our Solaris machines (see http://docs.sun.com/app/docs/doc/817-5506/jumpstartoverview-4?a=view).
- We'll use Kickstart to image our Red Hat systems (see http://www.redhat.com/docs/en-US/Red_Hat_Enterprise_Linux/5.2/html/Installation_Guide/ch-kickstart2.html).
Each of our imaging systems will utilize postinstallation scripts that we develop. These scripts will cause the system to utilize our new campin.net cfengine infrastructure from Chapter 5. All our new systems will be booted from the network, and during the imaging process they will have cfengine installed and configured to use our cfengine master system. Cfengine will handle all system configuration from the very first bootup of our hosts.
FAI for Debian
FAI is an unattended imaging system built for Debian Linux. Here's a definition from the FAI Guide at http://www.informatik.uni-koeln.de/fai/fai-guide/ch-intro.html:
FAI is a noninteractive system to install a Debian GNU/Linux operating system on a single computer or a whole cluster. You can take one or more virgin PCs, turn on the power and after a few minutes Linux is installed, configured, and running on the whole cluster, without any interaction necessary. Thus, it's a scalable method for installing and updating a cluster unattended with little effort involved. FAI uses the Debian GNU/Linux distribution and a collection of shell and Perl scripts for the installation process. Changes to the configuration files of the operating system can be made by cfengine, shell, Perl, and Expect scripts.
Note the mention of cfengine scripts used during the installation process. Those familiar with cfengine can easily understand FAI configuration and usage. FAI also has the concept of classes at its core, and uses assignment to classes and the definitions assigned to those classes to determine how a host is installed and configured.
Here are the steps required to set up FAI from scratch and image our first Debian system:
- Install a Debian system manually for use as the installation server.
- Install the FAI packages along with dependent packages on the new system.
- Configure FAI.
- Run
fai-setupto create the NFS root filesystem for installation clients. - Configure network booting for installation clients.
- Customize the installation process for all systems, as well as special configuration particular to our first installation client.
- Boot and install our first FAI client system.
Once again we find ourselves in need of a host, in order to configure other hosts. Our cfengine master system (named goldmaster) will function as our FAI installation host. This host is running the current stable branch, Debian 4.0. The IP address of this host on our example network is 192.168.1.249.
If you encounter any problems with the examples and commands in this section, refer to the online FAI documentation here: http://www.informatik.uni-koeln.de/fai/fai-guide/ch-inst.html#s-faisetup. By the time you read this, Debian 5.0 ("Lenny") will surely be out, and there's a chance that you'll need to update this procedure.
Installing and Configuring the FAI Packages
Install the needed packages by using apt-get or aptitude to install the fai-quickstart metapackage:
# aptitude install fai-quickstart
This code will install all the needed packages, such as dhcp3-server and tftpd-hpa, as well as the fai-client and fai-server packages.
Now that you have the required packages, edit /etc/fai/make-fai-nfsroot.conf. This file controls the creation of the nfsroot filesystem in /srv/fai/nfsroot. You need to make only these minor changes from the default:
NFSROOT_ETC_HOSTS="192.168.1.249 goldmaster"

SSH_IDENTITY=/home/nate/.ssh/id_dsa.pub
Be sure to substitute the proper values for your network. Here is the file in its entirety:
# these variables are only used by make-fai-nfsroot(8)

# here you can use also variables defined in fai.conf


# directory on the install server where the nfsroot for FAI is

# created, approx size: 250MB, also defined in bootptab or dhcp.conf

NFSROOT=/srv/fai/nfsroot


# Add a line for mirrorhost and installserver when DNS is not available

# on the clients. This line(s) will be added to $nfsroot/etc/hosts.

NFSROOT_ETC_HOSTS="192.168.1.249 goldmaster"


FAI_DEBOOTSTRAP="etch http://ftp.debian.org/debian"


# the encrypted (with md5 or crypt) root password on all install clients during

# installation process; used when log in via ssh; default pw is: fai

FAI_ROOTPW='FOOBARBAZ.E$djxB128U7dMkrFOOBARBAZ'


# this kernel package will be used when booting the install clients

KERNELPACKAGE=/usr/lib/fai/kernel/linux-image-2.6.18-fai-kernels_1_i386.deb


# location of a identity.pub file; this user can log to the install

# clients in as root without a password; only useful with FAI_FLAGS="sshd"

SSH_IDENTITY=/home/nate/.ssh/id_dsa.pub

# - - - - - - - - - - - - - - - - - - - - - - - - - - - - - - - - - -

# following lines should be read only for most of you


FAI_DEBOOTSTRAP_OPTS="--exclude=dhcp-client,info"
The configuration for the FAI package (but not the configuration for installation clients) is stored in /etc/fai/fai.conf. We didn't change anything in fai.conf. Here is the complete file from our goldmaster system:
# /etc/fai/fai.conf -- configuration for FAI (Fully Automatic Installation)


# Access to Debian mirror via NFS mounted directory

# If FAI_DEBMIRROR is defined, install clients mount it to $MNTPOINT

#FAI_DEBMIRROR=yournfs debianmirror:/path/to/debianmirror


# LOGUSER: an account on the install server which saves all log-files

# and which can change the kernel that is booted via network.

# Configure .rhosts for this account and PAM, so that root can log in

# from all install clients without password. This account should have

# write permissions for /srv/tftp/fai. For example, you can use write

# permissions for the group linuxadm. chgrp linuxadm /srv/tftp/fai;chmod

# g+w /srv/tftp/fai. If the variable is undefined, this feature is disabled.

# Define it, to enable it, eg. LOGUSER=fai

LOGUSER=


# set protocol type for saving logs. Values: ssh, rsh, ftp

FAI_LOGPROTO=rsh


# the configuration space on the install server

FAI_CONFIGDIR=/srv/fai/config


# how to access the fai config space

# default if undefined here: nfs://'hostname'/$FAI_CONFIGDIR

# supported URL-types: nfs, file, cvs, cvs+ssh, svn+file, svn+http,...

#FAI_CONFIG_SRC=nfs://yourservername$FAI_CONFIGDIR


# the following variables are read only for most users


# mount point where the mirror will be mounted

MNTPOINT=/media/mirror


# the local configuration directory on the install client

FAI=/var/lib/fai/config
FAI uses apt-get to create the nfsroot filesystem. Once /etc/fai/fai.conf and /etc/fai/make-fai-nfsroot.conf are configured to your liking, run fai-setup:
# fai-setup
A lot of information will scroll by, but you need to look for these two lines that indicate success:
make-fai-nfsroot finished properly.

FAI setup finished.
If you don't see them, you'll need to troubleshoot your configuration. Most problems result from improper settings in /etc/fai/make-fai-nfsroot.conf or simply insufficient disk space on your host.
The nfsroot creation aspect of fai-setup is done when fai-setup invokes the make-fai-nfsroot command. In order to troubleshoot, you can call make-fai-nfsroot yourself with the -v flag to see more verbose (and useful) output. This is the best way to find out what caused the failure. Refer to the online FAI guide for up-to-date troubleshooting information.
Configuring Network Booting
We intend to boot our hosts from the network using PXE. PXE, which stands for Pre-eXecution Environment, is a method to boot computers using a network interface independent of any available storage devices or installed operating systems. Most network cards manufactured in the last several years support PXE boot.
DHCP is a standard method for assigning IP network information to hosts. DHCP servers can hand out the required information for PXE clients to boot from the network. The fai-quickstart metapackage installed software that we can use to boot network clients using PXE. These are the required Debian packages: tftp-hpa, tftpd-hpa, syslinux, dhcp3-common, and dhcp3-server. If any of these are missing from your system, install them using aptitude or apt-get.
Copy the sample dhcpd.conf file from the FAI examples directory into place for your DHCP server:
# cp -/usr/share/doc/fai-doc/examples/etc/dhcpd.conf /etc/dhcp3/dhcpd.conf
The file on our goldmaster system looks like this after editing:
deny unknown-clients;

option dhcp-max-message-size 2048;

use-host-decl-names on;

subnet 192.168.1.0 netmask 255.255.255.0 {

   option routers 192.168.1.1;

   option domain-name "campin.net";

   option domain-name-servers 192.168.1.1;

   option time-servers 192.168.1.249;

   option ntp-servers 192.168.1.249;

   option tftp-server-name "goldmaster.campin.net";

   server-name goldmaster;

   next-server 192.168.1.249;

   filename "fai/pxelinux.0";

}


host etchlamp {hardware ethernet 00:0c:29:25:ea:c7;fixed-address etchlamp;}
One of the most important settings is the first line in the file: deny unknown-clients. This setting ensures you boot only hosts that are specifically configured to do so. We've gathered the Ethernet MAC address of our first Debian system to be installed with FAI, and put it in this configuration file at the end.
In addition, we placed this new host, named etchlamp, into our site's DNS. We already conveniently host DNS with a DNS-hosting provider, so we managed to avoid setting it up initially at our new site. We'll set up our own internal DNS in Chapter 7.
The tftpd daemon runs from the inetd super server, so make sure you have a line like this in /etc/inetd.conf:
tftp dgram udp wait root /usr/sbin/in.tftpd /usr/sbin/in.tftpd -s /srv/tftp
If you add it, be sure to HUP the running inetd process.
To configure an FAI install client, use the command fai-chboot. When you're using PXE, this invocation tells the install client to boot the install kernel and perform an installation during the next boot:
# fai-chboot -IFv etchlamp
Because the hostname is already in DNS (you can use your /etc/hosts file if you're completely lacking DNS at the start), and the host's Ethernet MAC address is in the dhcpd.conf file, fai-chboot can set up the proper PXE boot configuration file in /srv/tftp/fai/pxelinux.cfg/.
Customizing the Install Client
Now we can boot a host, but we'll want some customization before we attempt an installation. We'll want to be sure a web server is preconfigured on the first Debian host we image. We'll end up using it as an infrastructure web server for Subversion, Nagios, and other applications. We'll get to those applications in later chapters, but for now we'll just worry about getting Apache 2 up and running.
To define a new class of our own in FAI, create a script called 60-more-host-classes and place it in the /srv/fai/config/class directory. This new script sets a class called WEB for our new host that denotes webserver:
#! /bin/bash


case $HOSTNAME in

    etchlamp)

        echo "WEB" ;;


esac
Setting a new class in FAI is as easy as creating the preceding script. That class is then used in other scripts within FAI that install packages, run scripts, and configure the system's disk drives. FAI's use of classes resembles the way cfengine uses classes.
Note The numbers prepended to the script names in the FAI script directory are used for the same purpose as the numbers in the names of run-control scripts such as those in /etc/rc3.d/ on Red Hat, Debian, and Solaris systems. They're used to order the execution of scripts in a directory. Under FAI, though, the start of a file name contains no S or K—only a number.
We already have a 50-host-classes file that is installed by default with FAI in the same directory, and it resembles the new 60-more-host-classes file. You want to make sure your customizations are contained in discrete files as often as possible. When you later choose to build an FAI server automatically, you won't have to edit files programmatically. This means you'll only have to copy a new file into place, which is always less error-prone, and also means that the FAI authors' updates to the scripts don't need to be merged back into your copy of the file.
Also in the /srv/fai/config/class/ directory is a file called FAIBASE.var. This file contains settings for all hosts installed using FAI, because FAI applies the FAIBASE class to all installation clients. Some variables in this file need modification: the time zone is wrong for our site, as is the keymap. You'll also need to change the root password from the default (in this same file) by putting a new MD5 or crypt entry in this file for the ROOTPW variable.
Here's the FAIBASE.var file after our modifications:
# default values for installation. You can override them in your *.var files


# allow installation of packakges from unsigned repositories

FAI_ALLOW_UNSIGNED=1


CONSOLEFONT=

KEYMAP=us-latin1


# Set UTC=yes if your system clock is set to UTC (GMT), and UTC=no

# if not.

UTC=yes

TIMEZONE=US/Pacific


# root password for the new installed linux system; md5 and crypt

# are possible

# pw is "fai"

ROOTPW='Ragbarfoo3f3Y'


# moduleslist contains modules that will be loaded by the new system,

# not during installation these modules will be written

# to /etc/modules

# If you need a module during installation, add it to $kernelmodules

# in 20-hwdetect.source. But discover should do most of this job

MODULESLIST="usbkbd ehci-hcd ohci-hcd uhci-hcd usbhid psmouse"
We've already decided that our new host etchlamp will belong to the WEB class. Let's set up a custom package list for the WEB class in a new file in the /srv/fai/config/package_config/ directory. As you've probably guessed, FAI uses this directory to define the packages installed for classes of hosts. All hosts will by default use the FAIBASE package configuration, but our new host needs some additional packages.
Here are the contents of /srv/fai/config/package_config/WEB:
PACKAGES aptitude

apache2-utils

apache2.2-common

apache2-mpm-prefork

libapr1

libexpat1

libpq4


libsqlite3-0

libaprutil1

mime-support

libapache2-mod-php5

libxml2

php5

php5-common
This takes care of our wishes for the packages installed for the WEB class.
It is so easy to configure exactly which packages should go onto a system that we decided we wanted to modify the base system. Namely, we changed /srv/fai/config/package_config/FAIBASE to use postfix and syslog-ng instead of exim and sysklogd. We added these lines:
postfix openssl ssl-cert

syslog-ng
and we removed this line:
exim4
The next step is configuration of our first host's disk layout. We set up custom partitioning for the WEB class in the file /srv/fai/config/disk_config/WEB:
# <type> <mountpoint> <size in mb> [mount options]     [;extra options]

disk_config disk1

primary  /             150-      rw,errors=remount-ro ; -c -j ext3

logical  swap          400-500      rw
Finally, you want to make sure cfengine is configured properly and that it's pulling configuration files from the master system after installation. The first step is to make sure that cfengine daemons are started at boot time. We handle this by creating a cfengine script and placing it at /srv/fai/config/scripts/FAIBASE/50-cfengine:
#! /usr/sbin/cfagent -f


control:

   any::

   actionsequence = ( editfiles )

   EditFileSize = ( 30000 )


editfiles:

   any::

        { ${target}/etc/aliases

          AutoCreate

          AppendIfNoSuchLine "root: [email protected]"

        }


        { ${target}/etc/default/cfengine2

          ReplaceAll "=0$" With "=1"

        }
The edit of the mounted root filesystem's /etc/default/cfengine2 in this cfengine script changes the lines:
RUN_CFSERVD=0

RUN_CFEXECD=0

RUN_CFENVD=0
to these:
RUN_CFSERVD=1

RUN_CFEXECD=1

RUN_CFENVD=1
At boot time or if manually executed, the Debian cfengine2 init script will start the cfengine daemons only if the values of the RUN_* variables are set to 1. This 50-cfengine script also ensures that /etc/aliases contains a root alias before installation is complete.
Now we need to get the files update.conf and cfagent.conf in place for when cfengine starts up upon our new host's first boot. We'll use FAI's fcopy command to move the update.conf and cfagent.conf files into place during installation. We'll create /srv/fai/config/scripts/FAIBASE/60-create-cf-config, with these contents:
#!/bin/bash

error=0 ; trap "error=$((error|1))" ERR


fcopy etc/cfengine/update.conf

fcopy etc/cfengine/cfagent.conf


exit $error
The fcopy command works on files placed under files/ in the FAI config directory, in a directory named after the file you need to copy. The files in the directory, which are named after FAI classes, contain the appropriate contents for hosts matching the class contained in the file name. According to the FAI docs, if multiple classes match, then the class with the highest matching priority gets its file copied.
We're using the FAIBASE class because we want all hosts to get the basic update.conf and cfagent.conf files.
The contents of the identical /srv/fai/config/files/etc/cfengine/cfagent.conf/FAIBASE and /srv/fai/config/files/etc/cfengine/update.conf/FAIBASE files are:
control:


        solaris|solarisx86::

                cf_base_path    = (  /opt/csw/sbin )

                workdir            = ( /var/cfengine )

                client_cfinput  = ( /var/cfengine/inputs )


        debian::

                cf_base_path    = ( /usr/sbin )

                workdir            = ( /var/lib/cfengine2 )

                client_cfinput  = ( /var/lib/cfengine2/inputs )


        redhat::

                cf_base_path    = ( /usr/pkg/cfengine/sbin )

                workdir            = ( /var/cfengine )

                client_cfinput  = ( /var/cfengine/inputs )


        !(debian|redhat|solaris|solarisx86)::

                cf_base_path    = ( /usr/pkg/cfengine/sbin )

                workdir            = ( /var/cfengine )

                client_cfinput  = ( /var/cfengine/inputs )


        any::

                actionsequence  = (     copy.IfElapsed0

                                        links.IfElapsed0

                                        processes.IfElapsed0

                                        )


                domain          = ( campin.net )

                policyhost      = ( goldmaster.campin.net )

                master_cfinput  = ( /var/lib/cfengine2/masterfiles/PROD/inputs )

                SplayTime       = ( 0 )


ignore:

     # RCS/svn administrative stuff will be ignored in all copies

     RCS

     .svn


processes:


        any::

                "cfexecd" restart "$(cf_base_path)/cfexecd"

                "cfservd" restart "$(cf_base_path)/cfservd"

                "cfenvd" restart "$(cf_base_path)/cfenvd"


links:

        redhat|solaris|solarisx86::

                /var/cfengine/bin/cfagent       -> $(cf_base_path)/cfagent


        # debian already sets up a symlink from /var/lib/cfengine2/bin

        # to /usr/bin so no changes required on that platform


copy:


#

# Everything in /var/cfengine/masterfiles/inputs on the master

# _and_ everything in its subdirectories is copied to every host.

#

        $(master_cfinput)/          dest=$(workdir)/inputs/

                                     r=inf

                                     mode=700

                                     type=binary

                                     exclude=*~

                                     exclude=#*

                                     exclude=*,v

                                     purge=true

                                     server=$(policyhost)

                                     trustkey=true

                                     encrypt=true
You've seen this update.conf file before; we're simply getting it into place without using cf.preconf this time. The convenience of FAI's fcopy command makes cf.preconf unnecessary here.
Finally, we had to override an error from the postfix installation involving a missing root alias. In the file /srv/fai/config/hooks/savelog.LAST.source, we changed:
myignorepatterns="XXXXX"
to:
myignorepatterns="/etc/aliases exists, but does not have a root alias"
This change allows the host to fully install without having to stop for this error.
Installing Your First Debian Host
Now we're ready to boot our host etchlamp. We need to start a PXE boot on the host itself, which normally involves hitting the proper key on the keyboard during boot. We don't recommend setting the BIOS on your host to boot using PXE by default, at least not at a higher preference than booting from the hard disk. The last thing you want is an accidental reinstallation the next time you reboot the host! If you really prefer to boot from PXE as the first option, you can always remove the entry for the host's MAC address in dhcpd.conf after successful installation.
You know that PXE boot is working when you see initial output like this (this output comes from the FAI Guide; we couldn't capture this information directly from our example systems):
DHCP MAC ADDR: 00 04 75 74 A2 43

DHCP.../

CLIENT IP: 192.168.1.12 MASK: 255.255.255.0  DHCP IP: 192.168.1.250

GATEWAY IP: 192.168.1.254


PXELINUX 3.31 (Debian, 2007-03-09)  Copyright (C) 1994-2005 H. Peter Anvin

UNDI data segment at:   0009D740

UNDI data segment size: 3284

UNDI code segment at:   00090000

UNDI code segment size: 24C0

PXE entry point found (we hope) at 9D74:00F6

My Ip address seems to be C0A801C0 192.168.1.12

ip=192.168.1.12:192.168.1.250:192.168.1.254:255.255.255.0
You'll know that FAI is working when you see output on the screen like this (again, taken from the FAI Guide):
          ------------------------------------------------

                Fully Automatic Installation  -  FAI


            FAI 3.2, 21 Aug 2007  Copyright (c) 1999-2007

            Thomas Lange  <[email protected]>

          ------------------------------------------------


Calling task_confdir

Kernel parameters: initrd=initrd.img-2.6.18-5-486 ip=dhcp

root=/dev/nfs nfsroot=/srv/fai/nfsroot boot=live

FAI_FLAGS=verbose,sshd,createvt FAI_ACTION=install

BOOT_IMAGE=vmlinuz-2.6.18-5-486
Once you've done the imaging and reboots, you should be able to ssh into the host:
# ssh etchlamp -lroot

root@etchlamp's password:


This system is running linux:linux_i686_2_6_18_6_486__1_Fri_Jun_6_21_47_01_UTC_2008

=-=-=-=-=-=-=-=-=-=-=-=-=-=-=-=-=-=-=-=-=-=-=-=-=-=-=-=-=-=-=-=-=-=-=-=-=-=-=

        You are on a private campin.net system.

        Unauthorized use is prohibited, all activity is monitored.

=-=-=-=-=-=-=-=-=-=-=-=-=-=-=-=-=-=-=-=-=-=-=-=-=-=-=-=-=-=-=-=-=-=-=-=-=-=-=

## SA Staff: for local-only additions here, put content in /etc/motd-local ##-


etchlamp:~# df -h

Filesystem            Size  Used Avail Use% Mounted on

/dev/sda1             3.6G  390M  3.0G  12% /

tmpfs                  78M     0   78M   0% /lib/init/rw

udev                   10M   52K   10M   1% /dev

tmpfs                  78M  4.0K   78M   1% /dev/shm

etchlamp:~#
The host has the cfengine-configured /etc/motd, and the disk is partitioned according to our custom settings. In addition, the ps command shows that the Apache server is running. Mission accomplished!
Overall, FAI is a pleasure to work with. The directory names and scripts are self- explanatory, the class mechanism is intuitive and easy to work with, and the packages put useful starting configuration files into place. In addition, the fai-doc package includes sample configurations for the dhcpd and tftpd daemons on the system. Even for a newbie, going from no automated installation system to a fully automated mass-installation system using FAI can happen in a matter of hours.
Employing JumpStart for Solaris
JumpStart, or Custom JumpStart as it's called by Sun, is an automatic installation system for the Solaris OS. It's based on profiles, allowing a system to match installation profiles using specific criteria such as Ethernet MAC addresses or general criteria such as the system's CPU architecture. (For more information on the general JumpStart architecture, see http://docs.sun.com/app/docs/doc/817-5506/jumpstartoverview-4?a=view.)
Using JumpStart can be an entirely hands-off process, although an unattended installation might take place off CD or DVD media and use configuration files stored on the CD. In this section we configure our systems for a hands-free installation, but we'll boot from the network, as well as use profiles and install media from the network.
In getting started, we again have a chicken-and-egg problem: we need a host to configure as our JumpStart host before we can automatically image other hosts. We'll use one Solaris 10 host to handle the three network-based JumpStart roles:
- Boot server: This system provides network clients with the information they need to boot and install the operating system.
- Profile server: This system hosts what the JumpStart documentation calls the "JumpStart Directory." This host shares the
rulesfile for networked installation clients. Therulesfile contains information on the profile to be used, as well as preinstallation and postinstallation scripts. You can also store profile information on a local floppy or optical media, if that's a better option at your site. - Install server: This system contains the Solaris disk images used to install the Solaris operating system. One install server can support many different hardware platforms and OS releases, such as SPARC and x86, plus Solaris 8 and Solaris 10.
Follow these steps to set up a new JumpStart installation host on our network:
- Manually install a Solaris system to use as the JumpStart server.
- Set up the installation server role.
- Copy the Solaris installation media to the local disk.
- Share the installation media via NFS.
- Set up the profile server.
- Copy the sample profiles from the Solaris installation media to a new profile directory.
- Export the profile directory tree via NFS.
- Customize the profile information for your first installation client.
- Add an installation client.
- Boot the installation client and watch as unattended installation commences.
We picked up a Sun Enterprise 220R Server—an older PCI-bus, Sun SPARC–based server system. We installed Solaris 10 on it using CD install media, and patched it up with the latest 0508 patch bundle. We named the host hemingway (after the famous author), added it to the campin.net DNS, and gave it the IP address 192.168.1.237.
We are going to image a SPARC-based system named aurora, with the IP address 192.168.1.248 and the Ethernet MAC address 08:00:20:8f:70:ea. We have placed aurora into our DNS as well.
Setting Up the Install Server
The first thing we'll set up is the install server, which will host the Solaris installation files and packages. Here's how to set up an install directory using a Solaris 10 DVD ISO that we copied over using scp:
# mkdir /mnt/cdrom

# lofiadm -a /jumpstart/sol10-sparc.iso

# mount -o ro -F hsfs -o ro /dev/lofi/1 /mnt/cdrom

# mount -o ro -F hsfs -o ro /dev/lofi/1 /mnt/cdrom

# cd /mnt/cdrom/Solaris_10/Tools/
If you have a DVD drive in the system and you're using the Volume Manager to manage removable media (the default), simply change the directory to /cdrom/cdrom0/s0/Solaris10/Tools.
Whether using a loopback-mounted ISO or a real DVD, issue these commands to copy the DVD image to the server's hard disk:
# mkdir -p /jumpstart/Sol10sparc

# ./setup_install_server /jumpstart/Sol10sparc

Verifying target directory...

Calculating the required disk space for the Solaris_10 product

Calculating space required for the installation boot image

Copying the CD image to disk...

Copying Install Boot Image hierarchy...

Install Server setup complete
You'll need to verify that this new install directory is exported over NFS. Run the share command and grep the pathname:
# share | grep '/jumpstart/Sol10sparc'

-               /jumpstart/Sol10sparc   ro,anon=0   ""
You should see the preceding output. If not, check the /etc/dfs/dfstab file for an entry like this:
share -F nfs -o ro,anon=0 /jumpstart/Sol10sparc/
Add the entry it if it's missing. Once that entry is in place, verify that the NFS service is running. Issue this command on Solaris 10:
# svcs -l svc:/network/nfs/server:default
If it's not running, enable it with this command:
# svcadm enable svc:/network/nfs/server:default
Ensure the install-server directory is shared:
# shareall
If you encounter problems, see the Sun docs here: http://docs.sun.com/app/docs/doc/817-5504/6mkv4nh3i?a=view. The documentation is thorough, so you should be able to work out any problems.
Setting Up the Profile Server
The directory containing the rules file, the rules.ok file, and the profiles is called the JumpStart directory, and the server that hosts the JumpStart directory is called the profile server. First create the directories we'll use:
# mkdir /jumpstart/profiles

# mkdir /jumpstart/profiles/aurora

# cd /jumpstart/profiles/aurora
Next, copy over the sample profiles, which you'll need to validate the new rules file (they're also useful as a reference):
# cp -r /mnt/cdrom/Solaris_10/Misc/jumpstart_sample /jumpstart/profiles/
Next, share out this directory over NFS by adding this line to /etc/dfs/dfstab:
share -F nfs -o ro,anon=0 /jumpstart/profiles
# /usr/sbin/svcadm restart nfs/server
Now validate the addition:
# /usr/sbin/share|grep profile

-               /jumpstart/profiles   ro,anon=0   ""
Creating the Profile
The profile file is a text file that describes the software to be installed on a system. A profile describes aspects of the configuration such as the software group to install and the disk partition (slice) layout. The format is easy to understand, and because we're taking advantage of the sample configuration files included with the Solaris installation media, we can simply modify an existing profile to suit our needs.
The Sun online documentation is very good. For the complete syntax and all possible options for JumpStart profiles, please refer to http://docs.sun.com/app/docs/doc/817-5506/preparecustom-53442?a=view.
We'll start our profile with an example profile from the jumpstart_sample directory:
$ pwd

/jumpstart/profiles/aurora

$ cp ../jumpstart_sample/host_class .

$ mv host_class basic_prof
Edit the file basic_prof to suit your needs. We chose to install the entire Solaris 10 distribution with the package SUNWCXall, and we set up two filesystems and a swap slice. Here are the contents of basic_prof:
Install_type    initial_install

System_type     standalone

partitioning    explicit

filesys         c0t0d0s0 10000 /

filesys         c0t0d0s1 1024 swap

filesys         c0t0d0s7 free /opt

cluster         SUNWCXall
The Install_type keyword is required in every profile. Besides initial_install, other possible values for that keyword include upgrade and flash_install for upgrades and installations via a flash archive, respectively (a flash archive is a system image, not unlike a tarball snapshot of a system). The System_type keyword specifies that the system is to be installed as a stand-alone system. We explicitly lay out the disk with a 10,000MB root slice and a 1,024MB swap slice, and we allocate the remaining space to the /opt filesystem.
Next, we'll test our profile. This step is optional but recommended. In place of /mnt/cdrom, give the base path to your Solaris DVD:
# pwd

/jumpstart/profiles/aurora

# /usr/sbin/install.d/pfinstall -D -c /mnt/cdrom/  basic_prof


Parsing profile

         1: install_type        initial_install

         2: system_type standalone
For this to work, you need to be on a system running the same OS version and hardware platform as the system for which you're setting up the profile. See http://docs.sun.com/app/docs/doc/817-5506/preparecustom-25808?a=view for more details.
The output of pfinstall goes on for many, many screens, but eventually should end with this:
Installation log location

        - /a/var/sadm/system/logs/install_log (before reboot)

        - /var/sadm/system/logs/install_log (after reboot)


Mounting remaining file systems


Installation complete


Test run complete. Exit status 0.
Successful completion of pfinstall means that our profile is ready.
Creating the sysidcfg File
The sysidcfg file is a preconfiguration file you use to configure a wide variety of basic system settings, including but not limited to:
- Time-zone information
- IP address and route setting
- Directory settings (e.g., DNS, Lightweight Directory Access Protocol, Network Information Service)
- Graphics and keyboard settings
- Security policy
- Language information
- Root password
The sysidcfg file isn't technically part of the profile (because it's not included in the rules file); it's used earlier than profile information in the JumpStart installation process. We do store it in the same profile directory where the rest of aurora's JumpStart configuration files are kept, simply because it is convenient to do so. (For this reason, we describe it here in the section about setting up your profile server.)
Like the rest of our JumpStart files, sysidcfg is a text file. We created it for the host aurora in the /jumpstart/profiles/aurora directory, with these contents:
system_locale=en_US

terminal=vt100

name_service=DNS {domain_name=campin.net name_server=192.168.1.1

                  search=campin.net,home.campin.net}

network_interface=PRIMARY {default_route=192.168.1.1

                           netmask=255.255.255.0

                           protocol_ipv6=no}

security_policy=NONE

timezone=US/Pacific

timeserver=localhost

nfs4_domain=campin.net

root_password=FOOqi4sBARbaz
We specified timeserver=localhost so that the installation would assume that the local time was okay. We'll configure network-based time synchronization using cfengine after initial host installation (in Chapter 7).
Experienced Solaris SAs will recognize these system settings as the earliest prompts in an interactive Solaris installation. The Custom JumpStart process uses the sysidcfg file to answer these questions automatically.
For more information on the sysidcfg file, see the sysidcfg(4) man page or http://docs.sun.com/app/docs/doc/817-5504/6mkv4nh2m?a=view.
Creating the postinstall Script
We need to customize our system after the JumpStart installation is complete, but before the host boots for the first time. In many JumpStart scenarios, the system doesn't boot all the way to the console login prompt, but pauses when partially done with the first boot and prompts the user for information about power management settings or the NFSv4 default domain setting. Our script works around those two issues, and also sets up cfengine when the system boots for the first time. We provide details on how to accomplish this in the following explanation of our postinstall script. We explain the script section by section:
#!/bin/sh


PATH=$PATH:/usr/sbin


mkdir -m 700 /a/.ssh


echo "ssh-dss AAAAB3NzaC...J5ExulczQ== nate@somehost" > /a/.ssh/authorized_keys
Here we put an SA's personal SSH public key into the root account's authorized_keys file. This allows for secure and easy login to the system.
Note The public key placed into the root user's authorized_keys file is shortened for the purposes of this book. You can find the code samples for this chapter, including the unabbreviated version of this script, in the Downloads section of the Apress web site (http://www.apress.com).
Note that JumpStart mounts the future root filesystem at /a/. We'll use this path for the rest of this script.
The next section of code is used to detect the version of Solaris that the system is running:
OS_TYPE=`uname -rs`

case "$OS_TYPE" in

        "SunOS 5.10")
We expect to be installing only Solaris 10 systems, but it's wise to ensure that we effect changes only on the system types where we've tested this procedure. The settings for Solaris 9 would surely differ, and we don't yet know if Solaris 11 will be configured the same way. We avoid errors through defensive scripting.
Here we're creating an init script that will be run when the system is first booted:
cat > /a/etc/rc2.d/S99runonce <<ENDSCRIPT
The following procedure simply won't work from within a JumpStart installation environment, so we make it happen when the real system comes up after JumpStart. The script continues, with the contents of the S99runonce script:
#!/bin/sh

# used at first boot after being jumpstarted

PATH=$PATH:/usr/sbin:/opt/csw/bin:/opt/csw/sbin


LOGFILE=/var/tmp/runonce.out

LOGFILE_ERR=/var/tmp/runonce.err

exec 1>$LOGFILE

exec 2>$LOGFILE_ERR


# get blastwave up and running:

#  - answer "all", then "y" then "y"

pkgadd -d http://www.blastwave.org/pkg_get.pkg all <<EOM

yes

yes

EOM


cp -p /var/pkg-get/admin-fullauto /var/pkg-get/admin


pkg-get install wget gnupg textutils openssl_rt openssl_utils

berkeleydb4 daemontools_core daemontools daemontools_core sudo cfengine
A software repository hosted at http://www.blastwave.org contains prepackaged freeware for Solaris systems. It resembles the popular http://www.sunfreeware.com site, but we prefer Blastwave. It is a community of capable developers and users adhering to high-quality standards for the software they upload to the site. In addition, you accomplish installation of packages from the repository through a command-line interface similar to Debian's apt-get tool. The Blastwave tool is called pkg-get. Here, upon our host's first boot, we use pkg-get to install several useful freeware tools, the most important of which is cfengine:
# setup cfengine key

cfkey


# bootstrap cfengine with a basic update.conf and cfagent.conf (for

# some reason we seem to need both) that will get the current configs

# from the cfengine master.


[ -d /var/cfengine/inputs ] || mkdir -p /var/cfengine/inputs
This next code snippet is basically our cf.preconf script from Chapter 5, integrated into the JumpStart postinstall script. In it, we set up the initial bootstrap update.conf and cfagent.conf files for the first cfagent run:
cat <<ENDCFCONFIG  |

tee /var/cfengine/inputs/update.conf /var/cfengine/inputs/cfagent.conf

# created by jumpstart installation, meant to bootstrap the real

# configs from the cfengine master. If you can see this, then for some

# reason we were never able to talk to the cfengine master. :(

control:


  any::


     AllowRedefinitionOf     = ( cf_base_path workdir client_cfinput )


     # all we care about right now is the first copy

     actionsequence  = (     copy.IfElapsed0 )


     domain          = ( campin.net )

     policyhost      = ( goldmaster.campin.net )


     # we host it on a Debian box

     master_cfinput  = ( /var/lib/cfengine2/masterfiles/inputs )

     workdir         = ( /var/cfengine )


     #

     # Splay goes here

     #

     SplayTime       = ( 0 )


  solaris|solarisx86::

             cf_base_path    = ( /opt/csw/sbin )

             workdir         = ( /var/cfengine )


  debian::

             cf_base_path    = ( /usr/sbin )

             workdir         = ( /var/lib/cfengine2 )


  !debian.!(solaris|solarisx86)::

             # take a best guess on the path for other hosts

             cf_base_path    = ( /var/cfengine/bin )


  any::

     client_cfinput  = ( $(workdir)/inputs )


copy:


# Everything in $(master_cfinput) on the master

# _and_ everything in its subdirectories is copied to every host.


        $(master_cfinput)/          dest=$(workdir)/inputs/

                                     r=inf

                                     mode=700

                                     type=binary

                                     exclude=*.lst

                                     exclude=*~

                                     exclude=#*

                                     exclude=RCS

                                     exclude=*,v

                                     purge=true

                                     server=$(policyhost)

                                     trustkey=true

                                     encrypt=true


ENDCFCONFIG


/opt/csw/sbin/cfagent -qv


# move myself out of the way

mv /etc/rc2.d/S99runonce /etc/rc2.d/.s99runonce

ENDSCRIPT
The /etc/rc2.d/S99runonce script runs only once, and upon completion it moves itself to a file name that won't be executed by Solaris upon subsequent boots:
        chmod 755 /a/etc/rc2.d/S99runonce

                ;;

esac


# configure power management

sed s/unconfigured/noshutdown/ /a/etc/power.conf > /a/etc/power.conf.sed

mv /a/etc/power.conf.sed /a/etc/power.conf


# permit root login over ssh

sed 's/^PermitRootLogin no/PermitRootLogin yes/' /a/etc/ssh/sshd_config >

 /a/etc/ssh/sshd_config.sed

mv /a/etc/ssh/sshd_config.sed /a/etc/ssh/sshd_config


# prevent prompts on first boot about power management

sed 's/^CONSOLE/#CONSOLE/' /a/etc/default/login > /a/etc/default/login.sed

mv /a/etc/default/login.sed /a/etc/default/login


# prevent prompts on first boot about the NFS domain

touch /a/etc/.NFS4inst_state.domain


cat > /a/etc/.sysidconfig.apps <<EOSYS

/usr/sbin/sysidnfs4

/usr/sbin/sysidpm

/lib/svc/method/sshd

/usr/lib/cc-ccr/bin/eraseCCRRepository

EOSYS


cat > /a/etc/.sysIDtool.state <<EOIDT

1 # System previously configured?

1 # Bootparams succeeded?

1 # System is on a network?

1 # Extended network information gathered?

1 # Autobinder succeeded?

1 # Network has subnets?

1 # root password prompted for?

1 # locale and term prompted for?

1 # security policy in place

vt100

EOIDT
The rest of the entries are well commented, and shouldn't need any additional explanation. This concludes our JumpStart postinstall script.
Creating the rules File
The rules file is a text file that contains a rule for each system or group of systems on which you intend to install Solaris. Each rule uses system attributes to match a profile to the system being installed. A rules file entry can match a profile to a system based on the system's hostname or hardware attributes, or it can simply match all hosts to a default profile. (For more information, see http://docs.sun.com/app/docs/doc/817-5506/preparecustom-56059?a=view).
A rules file has four basic fields:
- Rule keywords and rule value
- Begin script
- Profile
- Finish script
We'll begin our rules file using the sample file in the jumpstart_sample directory:
$ cd /jumpstart/profiles/aurora

$ cp ../jumpstart_sample/rules .
Edit the rules file to utilize the files we've created for our first system. Here's our rules file, excluding comments:
any - - basic_prof finish_install.sh
This will match any system because of the any keyword. For now there's nothing system-specific in our Jumpstart setup, so having the file apply to all systems is fine. We leave the "begin script" field essentially empty by putting in a hyphen, we specify the basic_prof profile for the third field, and we set the "finish script" field to be our recently created postinstall script (documented earlier).
Now we need to validate the rules file, which will create the rules.ok file—the file actually used during installation:
# pwd

/jumpstart/profiles/aurora

# ../jumpstart_sample/check -r rules

Validating rules...

Validating profile basic_prof...

The custom JumpStart configuration is ok.
(If you encounter problems during validation, refer to the Sun documentation for troubleshooting help: http://docs.sun.com/app/docs/doc/817-5506/preparecustom-11535?a=view.) After successful validation, you now have the rules.ok file in the same directory as the rules file:
# pwd

/jumpstart/profiles/aurora

# ls

basic_prof         finish_install.sh  rules              rules.ok           sysidcfg
Adding an Installation Client
Installation clients get access to the profile-server files when you run the add_install_client command as root, which will add entries to the /etc/bootparams file. The settings in the bootparams file are handed out when clients boot using tftp. You don't need to take manual steps beyond the add_install_client step.
Our host aurora, whose IP address is 192.168.1.248, is already configured in the DNS with forward and reverse entries. We collect the host's Ethernet MAC address by connecting to its serial port and watching the boot messages:
# cd /jumpstart/Sol10sparc/Solaris_10/Tools/

# ./add_install_client -i 192.168.1.248 -e 08:00:20:8f:70:ea -p

hemingway:/jumpstart/profiles/aurora/ -s hemingway:/jumpstart/Sol10sparc/ -c

hemingway:/jumpstart/profiles/aurora/ aurora sun4u

Adding Ethernet number for aurora.home.campin.net to /etc/ethers

updating /etc/bootparams
Now that our host aurora has all that it needs, we'll boot it from the network. Issue this command at the ok prompt:
{0} ok boot net - install

Resetting ...


screen not found.

Can't open input device.

Keyboard not present.  Using ttya for input and output.


Sun Ultra 2 UPA/SBus (2 X UltraSPARC-II 296MHz), No Keyboard

OpenBoot 3.11, 2048 MB memory installed, Serial #9400554.

Ethernet address 8:0:20:8f:70:ea, Host ID: 808f70ea.


Rebooting with command: boot net - install

Boot device: /sbus/SUNW,hme@e,8c00000  File and args: - install

SunOS Release 5.10 Version Generic 64-bit

Copyright 1983-2005 Sun Microsystems, Inc.  All rights reserved.

Use is subject to license terms.

whoami: no domain name

Configuring devices.

Using RPC Bootparams for network configuration information.

Attempting to configure interface hme0...

Configured interface hme0

Beginning system identification...

Searching for configuration file(s)...

Using sysid configuration file 192.168.1.237:/jumpstart/profiles/aurora//sysidcfg

Search complete.

Discovering additional network configuration...

Completing system identification...

Starting remote procedure call (RPC) services: done.

System identification complete.

Starting Solaris installation program...

Searching for JumpStart directory...

Using rules.ok from 192.168.1.237:/jumpstart/profiles/aurora/.

Checking rules.ok file...

Using profile: basic_prof

Using finish script: finish_install.sh

Executing JumpStart preinstall phase...
With our carefully configured postinstallation script, the system should boot back up into Solaris without prompts at the console for information such as power management settings or the NFSv4 default domain. It's entirely possible that your list of packages, if it differs from the ones in the basic_profile profile used here, could generate interactive prompts during the first boot. If so, you'll need to take steps in either the JumpStart configuration files or the postinstallation script to configure the host properly during installation.
The host aurora booted up into multiuser mode (runlevel 3) without any problems, and when we first connected via SSH we were greeted with our site-specific message of the day as configured by cfengine:
This system is running solaris:sunos_sun4u_5_10_Generic_127127_11

=-=-=-=-=-=-=-=-=-=-=-=-=-=-=-=-=-=-=-=-=-=-=-=-=-=-=-=-=-=-=-=-=-=-=-=-=-=-=

        You are on a private campin.net system.

        Unauthorized use is prohibited, all activity is monitored.

=-=-=-=-=-=-=-=-=-=-=-=-=-=-=-=-=-=-=-=-=-=-=-=-=-=-=-=-=-=-=-=-=-=-=-=-=-=-=

## SA Staff: for local-only additions here, put content in /etc/motd-local ##
If your system doesn't boot from the network, check your MAC and IP addresses used in the add_install_client command. If those settings appear to be correct, check that you have tftpd running under IPv4, not just IPv6. On Solaris 10, edit /etc/inetd.conf and make sure this line is there:
tftp dgram udp wait root /usr/sbin/in.tftpd in.tftpd -s /tftpboot
If you have to add it, make sure that you run this code afterward to convert the inetd.conf entry to a proper Service Management Facility (SMF) service:
# /usr/sbin/inetconv -i /etc/inet/inetd.conf
At this point, we've set up the three Custom JumpStart roles on our single Solaris installation host, and we've imaged a new system. We realize that JumpStart has a steeper learning curve than FAI, but stick with it if you encounter problems. Once you have profiles and postinstallation scripts working to your liking, JumpStart will prove invaluable due to the unattended and consistent imaging it provides for all new Solaris hosts at your site.
Kickstart for Red Hat
The automated installation system for Red Hat Linux is called Kickstart. This system uses a single configuration file, called a kickstart file, to answer all the questions that would normally be asked during interactive installation.
Kickstart resembles FAI and JumpStart in that it supports network booting (PXE, in this case), followed by a fully unattended installation. One of its main strengths is that Red Hat makes available a graphical utility to create or modify kickstart files, called Kickstart Configurator. This tool helps reduce errors and explain the meaning of fields in the file. It further proves its friendliness toward the SA by displaying the raw textual content of the file for the SA's inspection (or even further modification). So Kickstart appeals to first-time users as well as seasoned veterans.
We cover Kickstart for Red Hat Enterprise Linux version 5.2. Fedora and CentOS JumpStart configuration should be similar, but we make no attempt here to cover the differences.
Red Hat has very good documentation on Kickstart in its installation guide: http://www.redhat.com/docs/en-US/Red_Hat_Enterprise_Linux/5.2/html/Installation_Guide/index.html. We'll cover just the basics required to get Kickstart running and to install a particular host configuration.
Performing a PXE-Boot Kickstart Installation
Follow these steps to perform a Kickstart installation from the network:
- Create the kickstart file.
- Create and share the installation tree via NFS.
- Place the kickstart file in the NFS share.
- Configure TFTP for PXE booting.
- Start the TFTP service.
- Configure one or more hosts for network boot.
- Configure DHCP.
- Boot your client from the network using PXE boot and let the installation commence.
Getting the Kickstart Host
Once again, we're faced with the chicken-and-egg problem of where to get our installation host, in this case for Red Hat Linux. We chose again to use VMware, and we performed an interactive installation from DVD. Instead of covering the entire installation, we'll just mention a couple of important points:
- At the firewall screen during the installation, we chose to allow NFSv4 and SSH traffic.
- At the SELinux screen we chose to disable SELinux.
We named the system rhmaster and gave it the IP address 192.168.1.251.
Creating the Kickstart File
The kickstart file is a text file containing a series of keywords. Order is important in the file, which is one of the main reasons for using the graphical Kickstart Configurator application.
Every Red Hat Linux installation, whether performed interactively or via Kickstart, stores a kickstart file at /root/anaconda-ks.cfg documenting the way the system was installed. You can use this file to choose the same installation options again on many hosts, or to restore the host's OS installation in the event that it fails (assuming the file was saved in a safe place!).
The Kickstart Configurator application can open a preexisting kickstart file for editing, or start a new file from scratch. To use the application, you'll need to run a graphical desktop. Of course it's possible to display X Window System applications on a remote display, but we won't illustrate how to do that here.
We recommend starting Kickstart Configurator from a terminal window. This is because the documentation claims that the application path is /usr/sbin/system-config-kickstart, but on our system it is installed in /usr/bin. Try executing both paths inside a terminal window.
If you don't have either, install the system-config-kickstart package and try again.
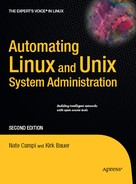
Basic Configuration Screen
Launching Kickstart Configurator lands you at the Basic Configuration screen. Select file ![]()
open ![]()
anaconda-ks.cfg in the root user's home directory. Starting out your Kickstart configuration with the settings from your existing system will make this process easier. You should not specify the same installation key as your existing system. You might want to change the root password used for the new system. The single most important setting on this screen is probably the "Reboot system after installation" box. If you don't check this box, your system will simply pause after completion of the Kickstart installation. That's probably not what you want.
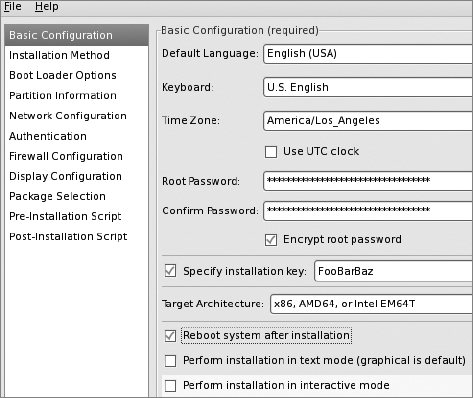
Select the Installation Method item in the left-hand pane, keep "Perform new installation" selected, and select "NFS" under "Choose the installation method." When you do that, you'll see two new text boxes that require entries: "NFS Server" and "NFS Directory." According to the Red Hat installation documentation, the latter needs to be the "directory containing the variant directory of the installation tree." In our case, we're installing the Server variant, and the Server directory we'll set up is /kickstart/rhel5_2/Server/. In the "NFS Server" box, enter our Kickstart server (rhmaster) host's IP (192.168.1.251), and in the "NFS Directory" box, enter the filesystem location where you plan to copy the DVD for later installation (in our case it is /kickstart/rhel5_2).
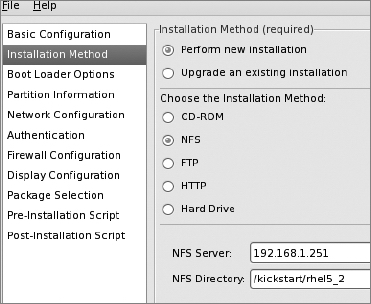
Boot Loader Options Screen
Next, select Boot Loader Options in the left-hand pane. This panel will be disabled if you selected an architecture other than x86 or x86_64. Uncheck "Use GRUB password."
As for the "Kernel parameters" field, keep the quiet parameter. It filters kernel messages during boot to show only warning and higher-severity kernel messages. The rhgb parameter is a Red Hat–specific option to enable the Red Hat graphical boot facility, so we'll keep it.
Partition Information Screen
Next, click the Partition Information entry in the left-hand pane. We're installing on new machines, so select "Clear Master Boot Record," "Remove all existing partitions," and "Initialize the disk label." It is always wise to take control of the entire disk for a server installation to fully utilize disk space and to clear the drive of any previous contents.
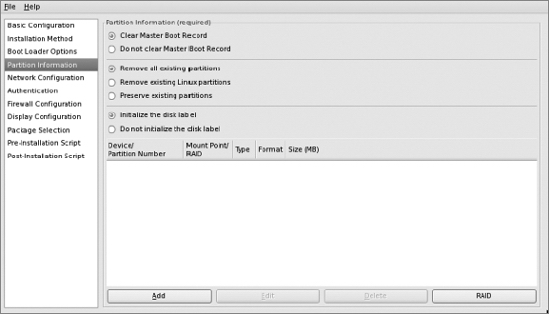
To add a partition, click the "Add" button. You'll get a pop-up window that lets you configure the first partition.
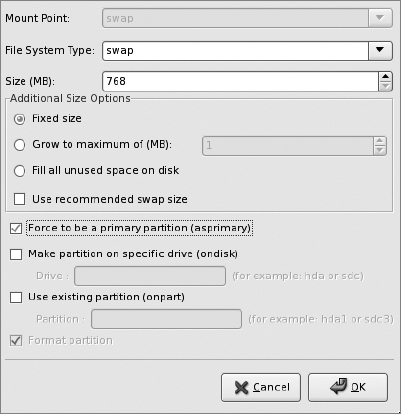
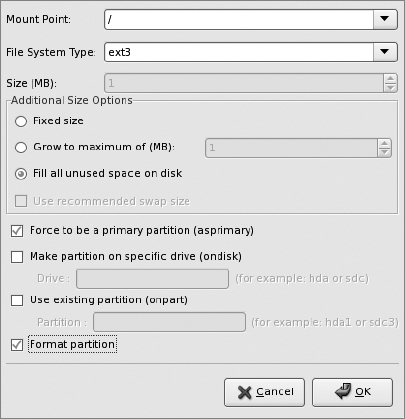
Configure swap first to be a fixed size, then click "OK." This will send you back to the main Partition Information screen. Once there, click "Add" again to add a root partition that fills up the rest of the disk.
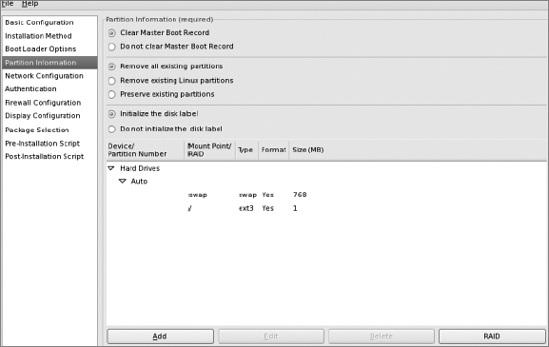
Once you've configured those two partitions, your Partition Information screen will look like this:
Network Configuration Screen
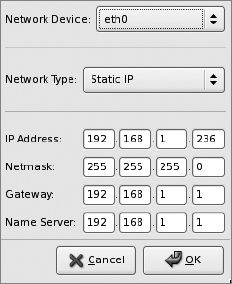
Select the Network Configuration screen and set up a network device. Edit your network interfaces as appropriate.

Click the "Edit Network Device" button and update the "IP Address" setting to a different static IP—the one for the new host.
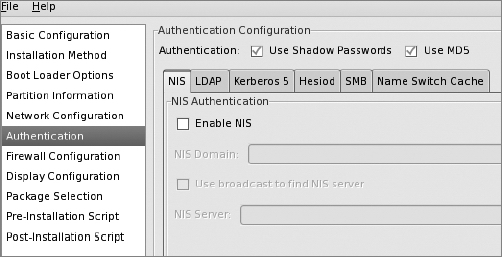
Authentication Screen
Select the Authentication entry in the left-hand pane. You don't need to change any settings; "Use Shadow Passwords" and "Use MD5" should already be checked.
Firewall Configuration Screen
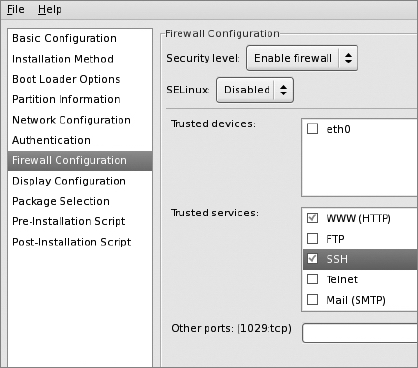
Select the Firewall Configuration entry in the left-hand pane. Keep the "Enable firewall" security setting and set SELinux to "Disabled." Don't set any trusted devices. Under "Trusted services," check "WWW (HTTP)" and keep SSH checked.
Display Configuration Screen
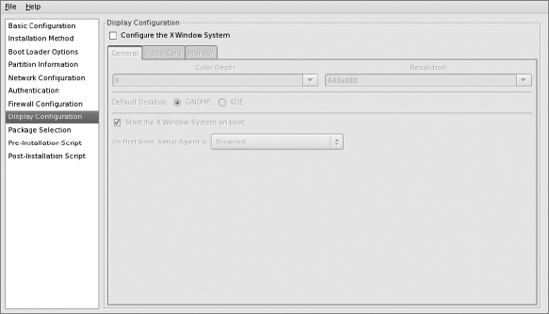
In the Display Configuration screen, uncheck "Configure the X Window System," which grays out the rest of the screen. You should still be able to display X apps remotely on another system if you need to, but otherwise you probably won't need X on the host.
Select the Package Selection entry in the left-hand pane. The middle pane will already be on "Desktop Environments," and it has "GNOME Desktop Environment" selected in the right-hand pane. You can uncheck it, however, because we don't need it on a server.

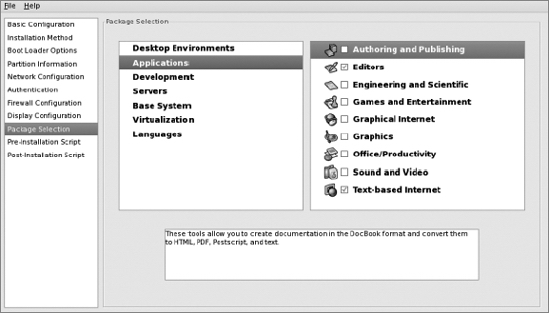
Now select "Applications" in the middle pane. In the right-hand pane, keep only "Editors" and "Text-based Internet" checked.
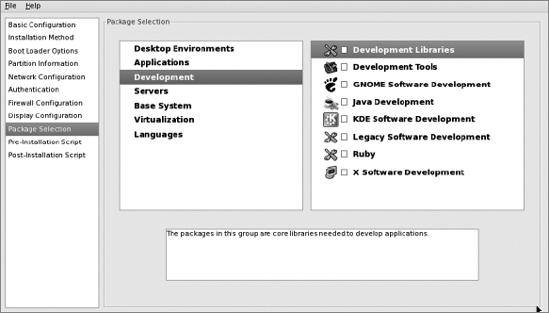
Under "Development" in the middle pane, don't select any check boxes:
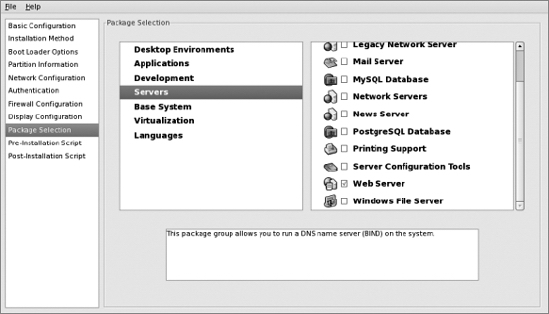
Under "Servers" in the middle pane, select only "Web Server":
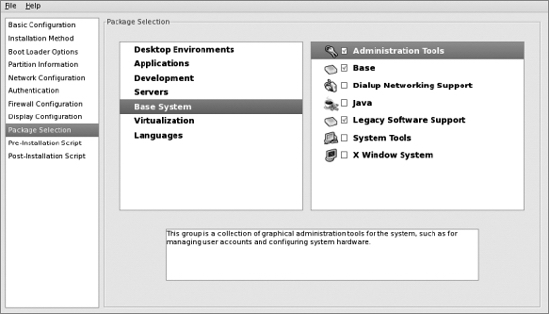
Under "Base System" in the middle pane, select "Administration Tools," "Base," and "Legacy Software Support":
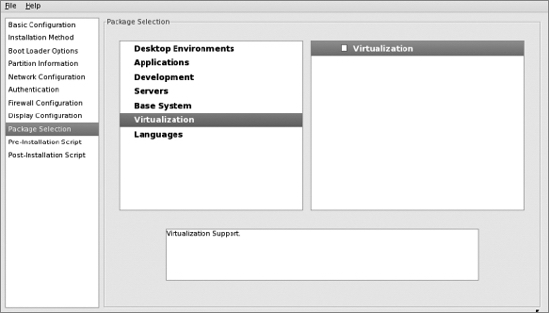
Now select "Virtualization" in the middle pane and uncheck "Virtualization" in the right-hand pane:
When you select "Languages" in the middle pane, you'll see that none of the languages listed in the right-hand pane are selected. Keep it that way:

Preinstallation Script Screen
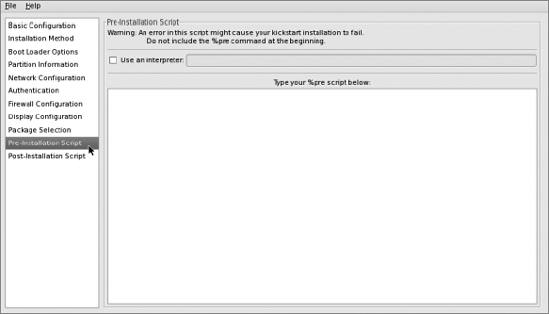
Select Pre-Installation Script in the left-hand pane and leave the screen's text box blank:
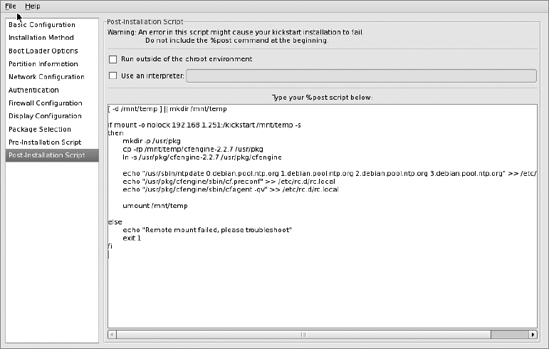
Postinstallation Script Screen
Select Post-Installation Script in the left-hand pane and paste in this small script to copy over some cfengine binaries and to run cf.preconf at boot:
[ -d /mnt/temp ] || mkdir /mnt/temp


if mount -o nolock 192.168.1.251:/kickstart /mnt/temp -s

then

        mkdir -p /usr/pkg

        cp -rp /mnt/temp/cfengine-2.2.7 /usr/pkg

        ln -s /usr/pkg/cfengine-2.2.7 /usr/pkg/cfengine


        echo "/usr/sbin/ntpdate 0.debian.pool.ntp.org 1.debian.pool.ntp.org

2.debian.pool.ntp.org 3.debian.pool.ntp.org" >> /etc/rc.d/rc.local

        echo "/usr/pkg/cfengine/sbin/cf.preconf" >> /etc/rc.d/rc.local

        echo "/usr/pkg/cfengine/sbin/cfagent –qv" >> /etc/rc.d/rc.local


        umount /mnt/temp


else

        echo "Remote mount failed, please troubleshoot"

        exit 1

fi
We're done! Save the file to /root/ks-192.168.1.236.cfg.
Here's the full ks.cfg file:
#platform=x86, AMD64, or Intel EM64T

# System authorization information

auth  --useshadow  --enablemd5

# System bootloader configuration

bootloader --append="rhgb quiet" --location=mbr --driveorder=sda

# Clear the Master Boot Record

zerombr

# Partition clearing information

clearpart --all --initlabel

# Use graphical install

graphical

# Firewall configuration

firewall --enabled --http --ssh

# Run the Setup Agent on first boot

firstboot --disable

key FOOac6b29f3e8BAR

# System keyboard

keyboard us

# System language

lang en_US

# Installation logging level

logging --level=info

# Use NFS installation media

nfs --server=192.168.1.251 --dir=/kickstart/rhel5_2

# Network information

network --bootproto=static --device=eth0 --gateway=192.168.1.1 --ip=192.168.1.236

 --nameserver=192.168.1.1 --netmask=255.255.255.0 --onboot=on

# Reboot after installation

reboot

#Root password

rootpw --iscrypted FOON772Cl.o$Y1TP4qlObokg.VRikneBAR


# SELinux configuration

selinux --disabled

# Do not configure the X Window System

skipx

# System timezone

timezone --isUtc America/Los_Angeles


# Install OS instead of upgrade

install

# Disk partitioning information

part swap --bytes-per-inode=4096 --fstype="swap" --size=768

part / --bytes-per-inode=4096 --fstype="ext3" --grow --size=1

%post

[ -d /mnt/temp ] || mkdir /mnt/temp


if mount -o nolock 192.168.1.251:/kickstart /mnt/temp -s

then


        mkdir -p /usr/pkg

        cp -rp /mnt/temp/cfengine-2.2.7 /usr/pkg

        ln -s /usr/pkg/cfengine-2.2.7 /usr/pkg/cfengine


        echo "/usr/sbin/ntpdate 0.debian.pool.ntp.org 1.debian.pool.ntp.org

2.debian.pool.ntp.org 3.debian.pool.ntp.org" >> /etc/rc.d/rc.local

        echo "/usr/pkg/cfengine/sbin/cf.preconf" >> /etc/rc.d/rc.local

        echo "/usr/pkg/cfengine/sbin/cfagent –qv" >> /etc/rc.d/rc.local


        umount /mnt/temp


else


        echo "Remote mount failed, please troubleshoot"

        exit 1

fi


%packages

@base

@core

@web-server

@admin-tools

@text-internet

@legacy-software-support

@editors

emacs

kexec-tools

bridge-utils

device-mapper-multipath

xorg-x11-utils

xorg-x11-server-Xnest

libsane-hpaio

-sysreport
Creating the Installation Tree and Making It Available
We'll use a Red Hat Enterprise Linux 5.2 DVD ISO to create our installation tree. First, mount the DVD as a loopback filesystem:
# mount -t iso9660 /root/rhel52.iso /mnt/iso/ -o loop
Use the df command to verify that it is mounted properly:
# df -h

Filesystem            Size  Used Avail Use% Mounted on

/dev/mapper/VolGroup00-LogVol00

                       66G  8.0G   55G  13% /

/dev/sda1              99M   21M   74M  22% /boot

tmpfs                  61M     0   61M   0% /dev/shm

/root/rhel52.iso      2.9G  2.9G     0 100% /mnt/iso
Now you can create the installation tree directory:
# mkdir -p /kickstart/rhel5_2

# cp -Rp /mnt/iso/* /kickstart/rhel5_2/
Next, we need to set up the NFS server. Navigate to System ![]() Administration
Administration ![]() Server Settings to configure NFS:
Server Settings to configure NFS:
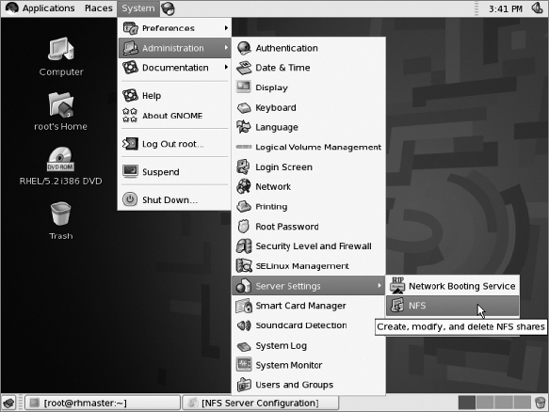
Use the system-config-nfs applet (found in the graphical desktop at system ![]()
administration ![]()
services) to share the /kickstart/rhel5_2 directory over NFS. Allow read-only access to the 192.168.1.0/24 subnet:
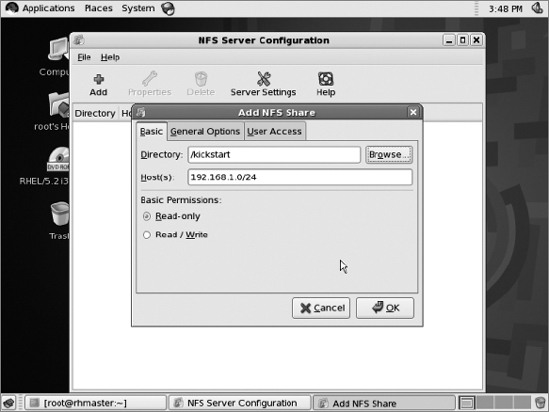
Copy the previously created kickstart file to our new NFS share.
# cp /root/ks-192.168.1.236.cfg /kickstart/rhel5_2/ks.cfg
This is the location we'll reference in the PXE boot configuration, described in the next section ("Setting Up Network Boot").
To install cfengine on your Red Hat systems, compile cfengine 2.2.7 and install it to /usr/pkg/cfengine-2.2.7 on the rhmaster machine. Copy the installation to /kickstart/cfengine-2.2.7 so that Kickstart clients can mount and copy the files. Then place cf.preconf in /usr/pkg/cfengine/sbin/ so that it can be copied over with the rest of the installation.
The Kickstart cf.preconf file is the same file from /var/lib/cfengine2/masterfiles/PROD/inputs/cf.preconf on the cfengine master. It is already written to bootstrap Red Hat systems, so our postinstall script simply needs to copy the cfengine binary directory to the correct location on the local system, and run cf.preconf upon boot. The postinstall script takes care of all of this.
Now that we have our kickstart file ready, we need to set up network booting.
Trivial File Transfer Protocol (TFTP)
We'll need the tftp-server and syslinux packages, which aren't installed by default, according to the Red Hat Installation Guide. Use yum to install the packages.
Interestingly, our rhmaster system did already have the tftp-server package installed. It had even placed the files required for boot into /tftpboot:
# ls /tftpboot/linux-install/

msgs  pxelinux.0  pxelinux.cfg
That saves some steps. If the packages aren't on your system, here's how to populate it: the tftp-server package creates the /tftpboot directory. We'll need to create the /tftpboot/linux-install directory:
# mkdir /tftpboot/linux-install

# cp /usr/lib/syslinux/pxelinux.0 /tftpboot/linux-install
Create /tftpboot/linux-install/msgs:
# mkdir /tftpboot/linux-install/msgs
Copy the .msg files from the isolinux/ directory on the installation tree:
# cp /kickstart/rhel5_2/isolinux/*msg /tftpboot/linux-install/msgs/
Now it is time to set up support for the release and variant of Red Hat we're planning to use. We can support different variants (server vs. workstation) and versions (Red Hat 5.1 vs. Red Hat 5.2) from the same PXE server. On our system, we'll be setting up only 5.2 Server, although we can extend it later if we need to.
We need to set up an OS-specific directory underneath linux-install:
# mkdir /tftpboot/linux-install/rhel5_2
Copy the initrd.img and vmlinuz files from the images/pxeboot directory of your installation tree to the OS-specific tftp directory:
# cp /kickstart/rhel5_2/images/pxeboot/initrd.img /tftpboot/linux-install/rhel5_2/

# cp /kickstart/rhel5_2/images/pxeboot/vmlinuz /tftpboot/linux-install/rhel5_2/
Next, we need to set up PXE config files. Create the /tftpboot/linux-install/pxelinux.cfg directory:
# mkdir /tftpboot/linux-install/pxelinux.cfg
The /tftpboot/linux-install/pxelinux.cfg/ directory will need a file for each system to be installed. The file's name is either the hostname or IP address of the system to be booted/installed. If no matching file is found (based on IP or hostname), the config file named default is used. This is standard syslinux PXE/TFTP server configuration, and is not Red Hat–specific.
The PXE config file for our system with MAC address 00:0c:29:d1:19:82 will be /tftpboot/linux-install/pxelinux.cfg/01-00-0c-29-d1-19-82, and the file contents are:
default 1

timeout 100

prompt 1

display msgs/boot.msg

F1 msgs/boot.msg

F2 msgs/general.msg

F3 msgs/expert.msg

F4 msgs/param.msg

F5 msgs/rescue.msg

F7 msgs/snake.msg


label 1

 kernel rhel5_2/vmlinuz

 append initrd=rhel5_2/initrd.img ramdisk_size=6878 ip=dhcp

 ks=nfs:192.168.1.251:/kickstart/rhel5_2/ks.cfg
Next, enable tftp and xinetd, the latter of which starts the tftp daemon upon connections from clients:
# chkconfig --level 345 xinetd on

# chkconfig --level 345 tftp on
If xinetd was already running, restart it:
# /etc/init.d/xinetd restart
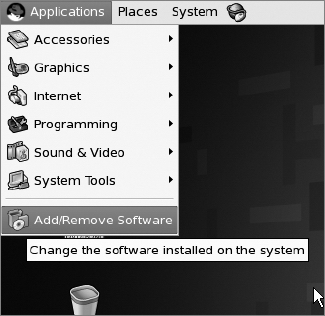
If your Kickstart server doesn't already have DHCP installed and running, open the Add/Remove Software menu item on the Applications menu:
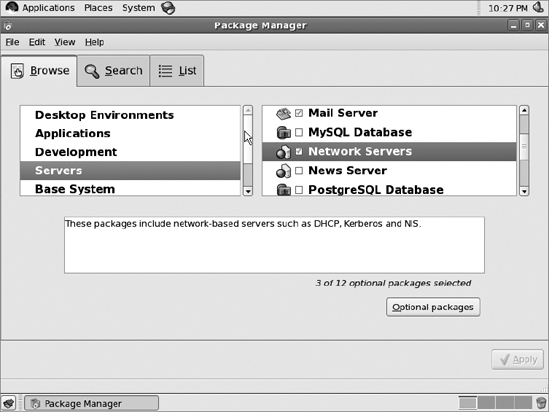
Under the Browse tab, select "Servers" in the left-hand pane, then "Network Servers" in the right-hand pane. Now click the "Optional packages" button:
Then click the check box for "dhcp":
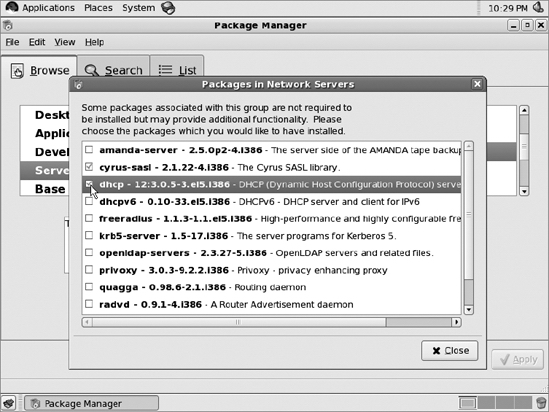
Click the "Close" button, then the "Apply" button. Then select "Continue" under the "Package Selections" dialog box that pops up.
Here is the /etc/dhcpd.conf file from our Kickstart server:
deny unknown-clients;

option dhcp-max-message-size 2048;

use-host-decl-names on;


subnet 192.168.1.0 netmask 255.255.255.0 {

   option routers 192.168.1.1;

   option domain-name "campin.net";

   option domain-name-servers 192.168.1.1;

}


# based on error message we got without it:

ddns-update-style ad-hoc;


allow booting;

allow bootp;

class "pxeclients" {

        match if substring(option vendor-class-identifier, 0, 9) = "PXEClient";

        next-server 192.168.1.251;

        filename "linux-install/pxelinux.0";

}


host rhlamp {hardware ethernet 00:0c:29:d1:19:82;fixed-address rhlamp;}
We set up the host rhlamp as our first installation client. We gathered its MAC address during an attempted PXE boot and put the rhlamp.campin.net forward and reverse entries into the DNS.
Installing a Host Using Kickstart
Set the BIOS on your installation client to boot from the network first, or press whatever key is necessary to interrupt the normal boot sequence and boot using PXE.
It will be immediately apparent if the Kickstart configuration is fully functional. If the host boots properly using PXE but can't find or otherwise get all the information it needs from the ks.cfg file, it will go into an interactive installation. If it doesn't boot at all, then you need to troubleshoot your DHCP/tftpd configuration.
When it reboots after Kickstart completion, it will not be registered with RHN, which is required to use the Red Hat software channels. The tool /usr/sbin/rhnreg_ks was designed to register hosts noninteractively, such as from Kickstart installation postinstall scripts. You'll find an example in the Red Hat Installation Guide: http://www.redhat.com/docs/en-US/Red_Hat_Enterprise_Linux/5.2/html/Installation_Guide/s2-kickstart2-post-examples.html.
The Proper Foundation
Our site now has the two most critical pieces of core infrastructure:
- Automated installation
- Automated configuration
We have the ability to deploy new Red Hat, Debian, and Solaris systems rapidly. These systems will join our infrastructure and will be automatically managed by cfengine. This puts us in the enviable position of not needing to manually log into any systems to make changes. We'll make changes centrally, and allow changes to take place via automated means—and automated means only.
In the next chapter, we'll take advantage of this foundation to start configuring important infrastructure services, with almost all of our activity actually taking place on the cfengine master instead of on the hosts running those services.