
4 Deploying ARM templates
- Understanding what happens when a template is deployed
- Choosing a deployment tool
- Picking the correct template deployment scope and mode
- Understanding how authorizations, policies, and resource locks influence deployments
- Debugging template deployments
After discussing how to write ARM templates in the previous chapters, it is time for a more in-depth discussion of what happens when you deploy a template. Every deployment goes through the same series of steps after you have submitted it to Azure Resource Manager. The first part of this chapter goes through those steps one by one.
After we discuss the deployment process, we’ll look at two more deployment topics: how you can use ARM to validate templates without actually deploying them, and how you can perform a dry run using a template. Such a dry run lists all the changes that would be made when deploying the template for real. Finally, we’ll touch on troubleshooting templates and explain what you can do when the deployment of a template fails. Before we dive into the details of the deployment process, let’s start with a quick overview.
4.1 An overview of the deployment process
All ARM deployments go through the same process for deployment. Figure 4.1 visualizes that process.

First, the deployment has to be submitted to ARM. You can submit a deployment in many ways, and this chapter discusses the most common ones: the Azure CLI, Azure PowerShell, Azure SDKs, GitHub Actions, and Azure DevOps. When submitting a deployment, you specify the ARM template to deploy, provide values for parameters, and specify the deployment scope. The deployment scope determines where in Azure the resources declared in the template should be deployed. Section 4.2 discusses submitting a deployment in detail, including the concept of a deployment scope.
After the deployment is started, ARM performs several validations. First, the template itself is validated. Next, the deployment scope is determined, and ARM validates whether the user that started the deployment has the necessary authorizations on this scope. If the necessary authorization is not in place, the deployment stops at this point.
After the validation is completed successfully, the execution phase starts. In the execution phase, resources are created or updated as necessary. ARM performs as many resource operations in parallel as possible, respecting any ordering imposed by your template. During each resource operation, authorizations, policies, and locks are evaluated and applied when applicable. Section 4.3 discusses the execution phase.
When submitting the deployment, you can also specify a deployment mode. If the deployment mode is set to Complete, the deployment also goes through a clean-up phase. During this phase, resources in your deployment scope that are not defined in the ARM template are removed from Azure. Section 4.4 discusses this phase in detail.
Now that you have a good overview of the deployment process, let’s zoom in on submitting a template for deployment.
4.2 Submitting a deployment
A template deployment is always started by submitting the template to ARM. But just having a template is not enough. To submit a template, you need to have four things:
-
Optionally, a parameter file or parameter values to submit along with the template
-
A deployment scope: where do you want the declared resources to be created
Assuming you read chapter 3, you probably have at least one ARM template ready to deploy. You might also have a corresponding parameter file, but don’t worry if you don’t yet; later you’ll learn how to specify parameter values when deploying. The following two sections discuss deployment scopes and tooling.
4.2.1 Choosing a deployment scope
Azure allows you to organize resources into multiple levels of groups: management groups, subscriptions, and resource groups. These groupings are important, as a template deployment always targets such a group. Figure 4.2 shows these groupings and how they relate to the Azure Active Directory (AAD).

When interacting with the resource manager to deploy a template, you specify one of these types of groups. That group is then called the deployment scope, and all resources in the template are deployed into that scope. Templates can deploy to different scopes, namely the AAD tenant, a management group, a subscription, or a resource group. Let’s discuss each of these scopes in more detail, starting with the AAD tenant.
Azure Active Directory (AAD) is Microsoft’s identity and access management service. It allows you to sign in and access resources in Microsoft 365, external SaaS applications, and Azure.
In this book, AAD will only be used in the context of management groups, subscriptions, and access to resources. AAD recognizes so-called tenants that represent different organizations that use Azure. Each tenant has one or more domains (such as @example.com) linked to it. All users with a username that ends in that domain belong to the tenant.
Every management group, subscription, resource group, and resource is associated with a single tenant. ARM has a trust relationship with AAD to provide the user with login and authorization functionality. When you write an ARM template that uses the tenant as the deployment scope, you can only create management groups and subscriptions.
Management groups are the highest level of grouping within AAD. They allow you to group subscriptions into logical containers and make it easier to manage access, policies, and compliance in larger environments.
By default, there is always one root management group in every AAD tenant. This top-level management group contains all other management groups and subscriptions. It cannot be renamed or removed. The hierarchy of management groups can go as deep as six levels. When you write a template with a management group as the deployment scope, you can create subscriptions, nested management groups, Azure policies, and authorization rules.
Subscriptions are the second level in the hierarchy. They are always within a management group, they can only be connected to a single Azure tenant, and they can contain multiple resource groups. Subscriptions are the billing boundary for collecting usage data and generating invoices.
You can write templates that have a subscription as the deployment scope. You can then declare authorization rules, Azure policies, and resource groups.
Resource groups are the lowest type of grouping in the hierarchy and contain the resources you create, like Azure App Services, virtual machines, or SQL databases. It is recommended that you group resources that share the same lifecycle in a resource group. Resources share a lifecycle when you deploy, update, and delete them together, such as when using ARM templates.
A resource group has a location (an Azure region), and the resource group’s location serves as the default location for all resources within it. Still, it can contain resources in a different Azure region. Resources can be moved between resource groups, but some limitations apply. As resource groups are only logical groupings, nothing prevents resources in different resource groups from connecting. For example, a virtual machine in one resource group can still connect to a database in another.
All the templates you have seen so far deploy resources into a resource group. The resource group is the most-used scope for deployments. Now that you know the different deployment scopes available, let’s explore some of the different ways you can deploy an ARM template.
4.2.2 Submitting a template using different tools
Templates are submitted to ARM for deployment using a RESTful API, just as individual resources are manipulated. However, in practice, you’ll almost never use this API directly but instead use a tool that encapsulates that API call. Let’s look at a few of the most-used tools.
The Azure command-line interface (CLI) is a set of commands used to create and manage Azure resources. The Azure CLI is available across Azure services and is designed to get you working quickly with Azure and with an emphasis on automation.
The Azure CLI is available to install on Windows, Linux, and macOS. If you don’t have the Azure CLI installed on your computer yet, you can download it from Microsoft (https://docs.microsoft.com/en-us/cli/azure/install-azure-cli). Besides running on your own system, it can be run in a Docker container or Azure Cloud Shell.
Commands for the Azure CLI always start with az. Commands executed with the Azure CLI require you to authenticate, which you can do with the az login command.

To deploy an ARM template, you use the az deployment command. After this command, you specify the type of deployment scope. The four keywords available are group, sub, mg, and tenant, for resource group deployments, subscription deployments, management group deployments, and tenant deployments respectively. Adding the keyword create completes the command. Putting this together, you deploy a template to a resource group using the az deployment group create command. You then need to pass in parameters to complete the command.
All deployments require a template file argument, which points to your ARM template file. Specifically, for resource groups, you need to specify the name of the resource group you are deploying to. All other deployment scopes require you to define a location. For example, to create a new resource group deployment, you would give the following command:
az login
az deployment group create
    ➥ –-subscription "subscription-name-or-id"
    ➥ --resource-group "resource-group-name"
    ➥ --template-file "path-to-arm-template.json"
The first command opens a browser that allows you to log into Azure. The second command starts the actual deployment. It is not mandatory to specify a subscription if you have access to only one subscription. As an alternative, you can specify a default subscription using the az account set --subscription "subscription-name-or-id" command. To retrieve a list of all subscriptions available, you can use the az account list command.
Extra parameters are available for additional options, such as for setting parameters. If you have a parameter file that accompanies the template file, you can reference it using the following command:
az deployment group create
    ➥ --resource-group "<resource-group-name>"
    ➥ --template-file "<path-to-arm-template.json>"
    ➥ --parameters "@<path-to-parameter-file.json>"
In this example, the optional parameter --subscription is omitted, and a reference to the parameter file is added using --parameters. The @ symbol signifies that a file is referenced and is followed by the actual filename, like this: --parameters @my-parameters.json. Parameters can also be set using a JSON string. In that case, the @ symbol is omitted, and the parameters are specified using key/value pairs, like this:
Finally, if you get stuck or want to explore more deployment options when creating deployments through the Azure CLI, you can use the --help parameter to output all available options and switches.
To deploy an ARM template using PowerShell, you first need to install the Azure PowerShell module on your local computer. There are two major versions of PowerShell: Windows PowerShell and PowerShell. PowerShell is, like the Azure CLI, cross-platform and available for Windows, Linux, and macOS. Windows PowerShell is only available for Windows. For more information about how to get started using Azure with PowerShell, see Microsoft’s “Get started with Azure PowerShell” article (http://mng.bz/7yeg).
The way PowerShell commands, called cmdlets, work is similar to the way the Azure CLI works. In general, PowerShell cmdlets and Azure CLI commands are named and structured quite similarly.
There are multiple versions of the Azure PowerShell module available, so it is important to make sure you are working with the latest version and reading the latest documentation. Note that updating an existing environment to the latest version may introduce breaking changes. All cmdlets that are part of the newest version, called the Azure PowerShell Az module, start with an action, followed by a dash, and then Az, like this: New-AzSubscriptionDeployment.
For Azure PowerShell, the cmdlets you use are different for each type of deployment scope. For example, if you target a resource group, the PowerShell cmdlets look like this:
Connect-AzAccount
Set-AzContext -Subscription "xxxxxxxx-xxxx-xxxx-xxxx-xxxxxxxxxxxx"
New-AzResourceGroupDeployment
    ➥ -ResourceGroupName <resource-group-name>
    ➥ -TemplateFile <path-to-template>
The first cmdlet, Connect-AzAccount, opens a browser that allows you to log in to Azure. The second cmdlet, Set-AzContext, is used to select the default subscription that will be used by all other Az commands. The final cmdlet submits an ARM template for deployment.
To change the deployment scope to the subscription, you would use the following cmdlet:
You can see that the two cmdlets are different, since the deployment scope is in the name of the command. The arguments also change, depending on the scope. Deployments that target the tenant deployment scope or the management group deployment scope have the same arguments as the cmdlets for the subscription, but the cmdlet names change to New-AzTenantDeployment and New-AzManagementGroupDeployment.
Just as when using the Azure CLI, you pass a template file and parameter using arguments:
New-AzResourceGroupDeployment
    ➥ -ResourceGroupName "<resource-group-name>"
    ➥ -TemplateFile "<path-to-arm-template.json>"
    ➥ -TemplateParameterFile "<path-to-parameter-file.json>"
    ➥ -firstParameter "example"
    ➥ -secondParameter 2
The preceding example is similar to the deployment created in the Azure CLI section—it creates a new resource group deployment. A significant difference is that the parameter used for providing a parameter file, TemplateParameterFile, does not require an @ symbol and cannot be reused to provide parameter values. Instead, parameter values that you want to provide directly should be added as parameters to the cmdlet itself, like firstParameter and secondParameter.
It is also possible to start an ARM template deployment from code. A common reason you may want to deploy from code is to provide a service that allows clients to create their own database or working environments. To make this possible, software development kits (SDKs) are available for many languages, including .NET, Java, JavaScript, Python, and many more. As there are too many languages to demonstrate, we’ll use .NET as an example in this section.
In a .NET programming language like C#.NET or VB.NET, SDKs come in the form of NuGet packages. For working with Azure, you require a NuGet package called Microsoft.Azure.Management. Microsoft also recommends using the Microsoft .Azure.Management.Fluent package, which allows you to create resources in a fluent way, which is often considered more readable and easier to maintain.
Before any interaction with Azure can occur, you first need to authenticate. When using C#, authenticating would look like this:
var credentials = SdkContext.AzureCredentialsFactory
    .FromServicePrincipal(clientId, clientSecret, tenantId,
        AzureEnvironment.AzureGlobalCloud);

var azure = Azure
    .Configure()
    .Authenticate(credentials)
    .WithDefaultSubscription();
The first command starts with a reference to the static SdkContext.AzureCredentialsFactory property, on which the FromServicePrincipal method is called to create a credentials class for headless authentication.
Note Non-personal accounts, called service principals, use headless authentication. This form of authentication is beyond the scope of this book, but if you want to learn more, you can start with Microsoft’s “Application and service principal objects in Azure Active Directory” article (http://mng.bz/mOmM).
The second command makes the actual connection to Azure, using the static Azure class, performing the actual authentication, and selecting the default subscription for the service principal. This result of this call is an entry point into your Azure environment, and it is captured in the variable called azure. It is then available for starting all sorts of operations, including template deployments:
azure.Deployments.Define("DeploymentName")
    .WithExistingResourceGroup("ResourceGroupName")
    .WithTemplate("<your-template-as-json-string>")
    .WithParameters(new {
        firstParameter: "example",
        secondParameter: 2
    })
    .Create();
In this snippet, you see how fluent syntax is used to Define a new deployment. The parameters that you saw in the Azure CLI and Azure PowerShell sections are used here as function calls in the fluent syntax. You have seen these options before, such as the resource group name, JSON template, and any parameters.
In the end, manually deploying templates is not the best way forward for most organizations. Instead, it’s better to use tools to automate deployments, increasing automation and repeatability and reducing access to cloud environments using personal accounts.
One approach to automation is deploying an ARM template from a continuous integration/continuous deployment (CI/CD) pipeline. If you are already using a CI/CD pipeline for building, testing, and deploying software, it makes sense to also use pipelines for deploying your infrastructure. A more elaborate example of using Azure DevOps pipelines to do this is included in this chapter’s last section.
Of course, CI/CD pipelines are not only available in Azure DevOps. Many similar software development tools allow you to implement CI/CD pipelines as well, such as these:
As an alternative to CI/CD pipelines, you can also use Azure Deployment Manager. This is a built-in Azure tool for orchestrating complex deployments across multiple subscriptions and regions. You’ll learn about this tool in chapter 12.
Now that you’ve learned about four approaches to submitting deployments, let’s take a closer look at what happens after submission.
4.3 The execution phase
This chapter started with a flowchart that describes what happens when you submit a deployment. In this section and the following one, we’ll zoom in on the last two phases: execution and clean up.
As you can see in figure 4.3, the execution phase itself executes a series of steps for every resource in the template that is being deployed. First, ARM checks if the correct role-based access control (RBAC) assignments are in place for every resource that is defined. Next, any Azure policies and resource locks on the resource are evaluated. Finally, the actual resource provisioning starts by creating a new resource or updating an existing resource.

The remainder of this section explores these steps in more detail, starting with RBAC.
4.3.1 Role-based access control
The Azure Resource Manager is also used to assign permissions to users and validate these permissions before an action is executed. Azure RBAC gives you fine-grained control over
In the ARM RBAC model, these three questions are answered using role assignments, which consist of three elements, relating to the three preceding questions:
You can create and assign role assignments by providing values for each of these three dimensions. For example, you could assign the user Pieter Post access to the resource Rode Wagen in the role of Owner. Let’s explore the different components that make up a role assignment.
A security principal in Azure is an object that represents a user, group, service principal, or managed identity. These identities are stored in the Azure Active Directory (AAD). The scope on which access is granted should belong to the same AAD as the one that contains the users.
By assigning a role definition on a particular scope, you limit the security principal’s actions to a specific resource or resource container. For example, assigning a scope enables you to make someone a Contributor on your test subscriptions but only a Reader on production ones.
You can assign a role at four levels:
Since these scopes form a top-down hierarchy, any role assigned to a subscription also gives those permissions to any resource group or resource in that subscription. This means that the effective permissions on any scope are determined using an additive model. For example, when you assign an Owner role at the subscription level and a Read role on a resource group in that subscription, that security principal still has an Owner role on that resource group.
A role is a collection of permissions that lists the available operations to anyone who has that role assigned. Roles can be high level, like the Contributor role on a subscription, including Read and Write access for resources of all types, or they can be specific, like the Storage Blob Data Reader, which only allows read access to Azure Blob Storage.
Which actions are part of a role is described in a role definition. Role definitions are Azure resources, and the following snippet shows the role definition for Storage Blob Data Reader:
{
    "Name": "Storage Blob Data Reader",
    "Id": "2a2b9908-6ea1-4ae2-8e65-a410df84e7d1",
    "IsCustom": false,
    "Description": "Allows read access to Azure Storage blob containers ",
    "Actions": [
        "Microsoft.Storage/storageAccounts/blobServices/containers
            ➥ /read",
        "Microsoft.Storage/storageAccounts/blobServices/
            ➥ generateUserDelegationKey/action"
    ],
    "DataActions": [
        "Microsoft.Storage/storageAccounts/blobServices/
            ➥ containers/blobs/read"
    ],
    "AssignableScopes": [ "/" ]
}
Every role has a mandatory Id, Name, and Description. Of these, only the Id has to be globally unique, so it is a Guid. The Actions and DataActions properties are lists of the actions that this role gives access to. An action always starts with a full resource type, followed by a slash and a specification of the action. The AssignableScopes property is a list of scopes that the role is valid for. Finally, the IsCustom property reflects the type of role definition. There are two types of role definitions:
Built-in role definitions contain one or more permissions tied to a specific resource type. They allow you to quickly allow a particular principal to perform its responsibilities without finding the specific permissions yourself. For example, you could assign the Networking Contributor role to a user, which would allow that user to manage virtual networks but not manage any other type of resource.
Custom role definitions are used when you need to specify your own set of permissions. Let’s say you want a user to be a Network Contributor and also allow them to manage VMs and storage accounts. Instead of assigning three different roles, you can create a new custom definition and only assign those permissions. Custom roles can be shared between subscriptions that are connected to the same Azure tenant.
Azure Active Directory roles and Azure RBAC
You might also run into another type of role in Azure: Azure Active Directory roles. These roles can also be assigned to users, groups, applications, and service principals and can manage access to various Azure AD actions. For example, you could assign the User Administrator role to a user to allow them to manage users and groups.
Azure AD roles are used to manage access to Azure AD resources, whereas Azure roles are used to control access to Azure resources. We will not be using Azure Active Directory roles in the remainder of this book.
Creating and deploying a role assignment using an ARM template
Role definitions and role assignments are resources in Azure, just like VMs or SQL databases. Thus, it is possible to use ARM templates to both create role definitions and assign them. Here is an example of how to create a role definition.
Listing 4.1 An ARM template for a role definition
{
    "$schema": "https:/ /schema.management.azure.com/schemas/
        ➥ 2018-05-01/subscriptionDeploymentTemplate.json#",
    "contentVersion": "1.0.0.0",
    "resources": [
        {
            "type": "Microsoft.Authorization/roleDefinitions",
            "apiVersion": "2018-07-01",
            "name": "ResourceGroupReader",
            "properties": {
                "roleName": "Custom Role - RG Reader",
                "description": "Sub Lvl Deployment RG reader",
                "type": "customRole",
                "isCustom": true,
                "permissions": [
                    {
                        "actions": [
                            "Microsoft.Resources/subscriptions/
                                ➥ resourceGroups/read"
                        ],
                        "notActions": []
                    }
                ],
                "assignableScopes": [ "[subscription().id]" ]
            }
        }
    ]
}
This template creates a custom role definition, as you can see by its type and isCustom properties. This role definition can be used to give any principal the authorizations defined in the permissions array. The assignableScopes property is set to the ID of the subscription it is deployed to, making it the only scope where this custom role definition is usable.
After creating this role, it can be assigned using the following template.
Listing 4.2 An ARM template for a role assignment
{
    "$schema": "https:/ /schema.management.azure.com/schemas/
        ➥ 2019-04-01/deploymentTemplate.json#",
    "contentVersion": "1.0.0.0",
    "parameters": {
        "roleDefinitionID": {
            "type": "string"
      },
      "principalId": {
          "type": "string"
        }
    },
    "resources": [
        {
            "type": "Microsoft.Authorization/roleAssignments",
            "apiVersion": "2020-04-01-preview",
            "name": "AssignReadRoleDefinition",
            "properties": {
            "roleDefinitionId": "[resourceId('Microsoft.Authorization/
                ➥ roleDefinitions', parameters('roleDefinitionId'))]",
            "principalId": "[parameters('principalId')]",
            "scope": "[resourceGroup().id]"
        }
      }
    ]
}
This template assigns the role definition specified by the roleDefinitionID parameter to the principal specified by the principalId parameter. The scope is configured to be the resources group where it is deployed, as specified by the scope property.
Managing access to Azure resources is one aspect of working responsibly. Along with setting security boundaries, authorizations also help limit the impact of mistakes. By providing users with limited access to only resources they need to work with, accidental changes or deletions through user error have a limited impact.
4.3.2 Azure Policy
Although the nitty-gritty bits and pieces of Azure Policy are outside the scope of this book, it is a good idea to get familiar with what Azure Policy is, so you can better understand how it affects the deployment of resources. Azure Policy is a system that helps you enforce organizational standards and assess the compliance of Azure resources.
With Azure Policy, you can write Policy Definitions (also a resource type!), which describe rules you want to apply to Azure resources. After creation, a policy is assigned to any scope to make it active on that scope. That assignment is done using a Policy Assignment, which is again also a resource type.
A policy has two parts: First, a resource query specifies when the policy should apply. A possible query would be all storage accounts in West Europe or all virtual machines running Windows 2019. The second part is the effect, which describes what happens when a matching resource is found.
Each policy definition has only one effect. There are six types of effects available for use: append, audit, deny, modify, auditIfNotExists, and deployIfNotExists. Depending on the type of effect, the policy is evaluated either before a resource deployment or after a resource deployment.
The append, audit, deny, and modify effects are applied before a resource is created or updated. If the resource matches a policy’s filter, the resource to be deployed is changed according to the specification (append or modify), the deployment is aborted (deny), or the resource is marked as incompliant (audit) for later follow-up.
The other effects are applied after a resource is deployed. These effects are useful when you want a resource always to have specific firewall settings, for example. In that case, a resource is marked as incompliant due to a missing child resource (auditIfNotExists), or that missing child resource can automatically be deployed (deployIfNotExists). These effects run approximately 15 minutes after the resource provider has returned a success status code.
In figure 4.4, you can see the differences between these two groups of effects. The policy action in the execution phase refers to the append, audit, deny, and modify effects. The policy block at the bottom right refers to the auditIfNotExists and deployIfNotExists effects.

If you want to learn more about Azure Policy, you can start with Microsoft’s “What is Azure Policy?” article (http://mng.bz/5QND).
4.3.3 Resource locks
Resource locks are used to prevent the accidental deletion or modification of a resource. Resource locks in themselves are also a type of resource. You can compare this to a bike lock that is “added” to a bike. Resource locks work in the same way; they are added to a resource.
There are two types of locks you can use:
-
CanNotDelete—This type of lock ensures that users who are authorized can read and modify a resource but cannot delete it. In the Azure portal, this is shown as a delete lock. -
ReadOnly—This lock type ensures that authorized users can read a resource but cannot delete or modify it.
As locks are just another resource type, you can create them using an ARM template as shown in the following listing.
Listing 4.3 An ARM template to create a resource lock
{
    "$schema": "https:/ /schema.management.azure.com/schemas/
        ➥ 2019-04-01/deploymentTemplate.json#",
    "contentVersion": "1.0.0.0",
    "resources": [
        {
            "type": "Microsoft.Authorization/locks",
            "apiVersion": "2016-09-01",
            "name": "rgLock",
            "properties": {
                "level": "CanNotDelete",
                "notes": "Resource Group should not be deleted."
            }
        }
    ]
}
By default, a lock locks the scope to which it is deployed. If you deployed this example on a resource group, it would lock that resource group and all resources using the CanNotDelete lock type. If you want to specify a different scope, you could use the scope property as follows.
Listing 4.4 An ARM template for creating a scoped resource lock
{
    "$schema": "https:/ /schema.management.azure.com/schemas/
        ➥ 2019-04-01/deploymentTemplate.json#",
    "contentVersion": "1.0.0.0",
    "resources": [
        {
            "type": "Microsoft.Authorization/locks",
            "apiVersion": "2016-09-01",
            "name": "storageAccountLock",
            "scope": Microsoft.Storage/storageAccounts/storageAccountName",
            "properties": {
                "level": "CanNotDelete",
                "notes": "Storage Account should not be deleted."
            }
        }
    ]
}
The preceding lock would only lock the specified storage account.
Keep in mind that locking resources can have unexpected results. For example, if you put a read-only lock on a resource group containing virtual machines, you cannot reboot these machines anymore, since rebooting uses a POST request. Another example involves the limit of 800 deployments kept in the deployment history for a resource group. By default, ARM automatically starts cleaning up the deployment history so you don’t hit that 800 and are blocked. But when you add a CanNotDelete lock on that resource group, ARM will no longer be able to automatically clean up your deployment history, and deployments will start failing once you reach the limit of 800 deployments.
4.3.4 Resource provisioning
Finally, when all the checks in the execution pipeline have passed, ARM deploys the resource as specified in the ARM template. ARM verifies whether there is already an existing resource with the same ID as the resource you are deploying before the deployment starts. If there is, ARM updates that resource to match the definition in your ARM template. If there isn’t, ARM creates a new resource. This is the idempotent nature of working with ARM templates.
All these steps—checking RBAC, executing Azure policies, respecting resource locks, and provisioning the resource—are repeated for every resource defined in the template. Once these steps are completed for all resources, the clean-up phase starts.
4.4 The clean-up phase
After the execution phase, ARM optionally performs a clean-up phase, where resources that exist in Azure but are not specified in your template are removed.
Using the deployment mode, you decide whether this clean-up phase is executed or not. There are two deployment modes that you can choose from to decide how your infrastructure is deployed:
The deployment mode is specified using an extra parameter when you submit the deployment. Using the Azure CLI, you would do this by specifying an extra parameter, like –-mode Complete. Using Azure PowerShell, you would use -Mode Complete. The default value for the deployment mode is Incremental, and only when you choose a deployment mode of Complete is the clean-up phase executed.
During the clean-up phase, authorizations using RBAC and resource lock checks are performed, just as during the execution phase. If any of these checks fail, resources are not removed.
4.4.1 Incremental deployment mode
With Incremental deployments, you create or update resources as defined in your ARM template. Incremental deployments do not change resources that are not present in the ARM template. Nor will they change property values of existing resources when these properties are not specified within the template.
Suppose you are deploying an ARM template that contains a Storage Account B to a resource group that already contains another Storage Account A. In figure 4.5, you can see that Storage Account B is deployed, next to the existing Storage Account A. The result of this deployment is that you now have two different storage accounts.

4.4.2 Complete deployment mode
Using the Complete deployment mode, ARM changes your existing environment to precisely reflect your ARM template’s content. This means that when resources exist in your cloud environment but don’t exist in your ARM template, they are removed. This is done during the clean-up phase, where all these resources are cleaned up.
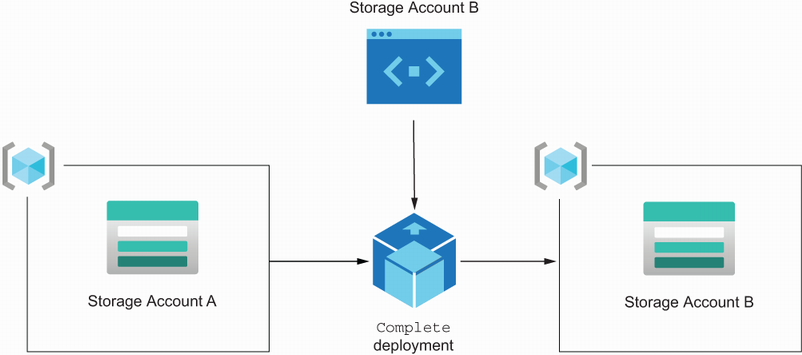
Figure 4.6 shows how ARM deploys the template when the deployment mode is set to Complete. As in the previous section, Storage Account A is present in the cloud and Storage Account B is specified in the template. After the deployment of the template, ARM removes Storage Account A during the clean-up phase because it was not specified in the template.
4.4.3 Combining deployment modes
Now let’s consider these deployment modes in a real-world situation. You are the developer of a website that you host in Azure. Because your system is a worldwide success and is deployed in various Azure regions, your team decides to rename all services to keep better track of which services are deployed where. And last, but not least, you want one process to take care of all this with the least amount of downtime.
To do this, you update the code of your application to use the new names and update your templates to define the resources you need with the new name. This means that the names of the service plan and web app are changed like this:
-
The
service-planresource is renamed toservice-plan-westeurope. -
The
service-appresource is renamed toservice-app-westeurope.
To automate the creation of the new infrastructure and the removal of the old infrastructure, you decide to take a two-step approach. In figure 4.7, the same ARM template is deployed twice, the first time in Incremental mode, to create resources with the new names. During this deployment, the names ending in westeurope will be created next to the existing resources. After this creation, the new application code is deployed, which starts using the newly created infrastructure. After some time, the same template is deployed, but now in Complete mode. In this second deployment, the old infrastructure that is no longer needed is also removed.

warning Please note that while the preceding approach is valid, its implications should be carefully considered in real-world scenarios. For example, using this approach with databases can potentially destroy data, as data in databases is not automatically backed up using this approach.
Now that you have a complete understanding of what happens when you deploy an ARM template, let’s explore two approaches for validating your template and the possible deployment outcomes.
4.5 Template validation and what-if deployments
When working with real applications, it is important to verify whether your templates are valid before you deploy them. Also, before making updates to existing infrastructure, you may want to verify which changes ARM will make when you deploy the template for real. For both these cases, ARM provides a solution.
4.5.1 Validating an ARM template
The first thing that ARM always does before it starts the actual deployment of a template is validate it. It is also possible for you to trigger this validation yourself. You can manually trigger validation by specifying a deployment mode of validate:
az deployment group validate
    ➥ –-subscription "subscription-name-or-id"
    ➥ --resource-group "resource-group-name"
    ➥ --template-file "path-to-arm-template.json"
The preceding example does not deploy the template but terminates after the validation phase. This way, you can validate that the template is well-formatted and valid, that functions correctly evaluate, that there are no conflicting names, and that you have the proper authorizations on the deployment scope.
When you are working with a CI/CD pipeline, you can use the validate deployment mode to check whether or not your ARM templates can deploy successfully. Often the validation is performed as soon as possible in the pipeline to provide fast feedback to developers.
4.5.2 What-if deployments
What-if deployments are used for determining what would happen if you deployed an ARM template. What-if deployments are useful when you are about to make changes to a production environment and you need to verify that the correct changes will be made.
A what-if deployment goes through the complete deployment process you learned about in this chapter, but with one difference. Instead of making actual changes to your Azure environment, it outputs the changes it would make as text.
Because ARM templates can quickly become large, it can be challenging to get an overview of changes and their effect on your different environments. Performing a what-if deployment before the actual deployment gives you that little bit of extra confidence you may need to run a template.
A what-if deployment is started using the Azure CLI, like this:
az deployment group what-if
    ➥ –-subscription "subscription-name-or-id"
    ➥ --resource-group "resource-group-name"
    ➥ --template-file "path-to-arm-template.json"
This is the same syntax you would use for deploying the template, but with one change. The what-if keyword replaces the create keyword. Referring back to the example in section 4.4.2, where you were performing a Complete deployment of Storage Account B to a resource group that already contained Storage Account A, if you were to run this as a what-if deployment, you would receive the output shown in figure 4.8.

After running the what-if command, you can see which changes ARM would make if the deployment were to be executed for real. In figure 4.8 you can see the two changes that we mentioned before. First, the armtemplatebook storage account is removed, and then the renamedstorageaccnt storage account is created.
Template validation and what-if deployments are great for validating your template and checking for desired outcomes, but you’ll still run into deployment errors now and then. Let’s take a look at how you can troubleshoot these errors.
4.6 Troubleshooting template deployments
The Azure Resource Manager does provide some information about errors, or problems in general, when a deployment fails. But to be honest, you need to have some experience with ARM to fully understand the error messages and know how to solve problems. Unfortunately, there is no such thing as debugging ARM templates and running through templates step by step to see which steps succeed or fail.
However, some strategies may help you get back on track when you encounter problems. One, which seems extremely obvious, but is often overlooked, is to move back to the previous working version. Once you get the old template back up and running again, you can try to move to the desired version step by step, to see where your problem is. If you run into a problem again, go back again and take an even smaller step. This way, you can locate the precise cause of the problem.
Another approach is to navigate to the Azure portal and find the failing deployment there. You can click on its details to see the error details. Sometimes this will give you the more detailed information you need to pinpoint the cause of the problem. When you browse the deployments list, you can redeploy a template by selecting it and clicking the Redeploy button. That will take you to another view in the portal, where you can edit the original template and then redeploy. This is a bit of a trial-and-error approach, but it may help you to find your issue.
The last strategy for finding the cause of your problems is to break your template into linked templates, a technique that is discussed in chapter 5. This may sound strange at first, as this feels like you will be increasing complexity. However, when you use many small, linked templates and one template that brings all these templates together, they all appear as separate deployments in the portal. You can then more easily spot where the error is located, as that specific deployment will fail. This helps in narrowing down the cause of your problem.
Summary
-
Azure allows you to organize resources into different levels of groups: management groups, subscriptions, and resource groups. A template deployment always targets one of these groups.
-
Management groups are the highest level and allow you to group subscriptions into logical containers, which makes it easier to manage access, policies, and compliance in larger environments.
-
ARM is a built-in tool for orchestrating complex deployments across multiple subscriptions and regions.
-
ARM has an option for performing a clean-up phase to remove resources that exist in Azure but are not specified in your template.
-
The deployment mode allows you to decide whether the clean-up phase is executed and how your infrastructure is deployed.
-
What-if deployments are used to determine what would happen if you deploy an ARM template. They are useful for verifying that the correct changes are going to be made before deploying to a production environment.