12 Governing your subscriptions using Azure Policy
- The benefits of using Azure Policy
- Using the built-in policies
- Writing, testing, and deploying custom policies
- Reviewing the current compliance status and improving it
All the examples and scenarios you have seen so far were relatively small. They covered mostly one application or were deployed to one or two subscriptions. When that is the case, it is straightforward to keep track of what resources you have running in Azure and to make sure that your solution is secure, compliant, and cost-effective. When your cloud workload gets bigger, that is much harder to do. Luckily, Azure has a built-in feature called Azure Policy that can help you govern your Azure resources, and you can use Azure Policy with Infrastructure as Code, which is then often called Policy as Code. In this chapter, you will learn how to use Azure Policy to govern Azure architectures.
Imagine you work at an enterprise organization that wants to make the move to the Azure cloud. Currently, all the teams run their applications and infrastructure in one or more on-premises data centers. What is often done in such a situation is that you build something called a landing zone in Azure and use a hub and spoke architecture.
When explaining the concept of the Azure landing zone, it is useful to compare it to building a home. If you want to build a new home, you could choose to do everything yourself: dig the foundations, lay the bricks, and do all the plumbing. The same goes for the Azure Cloud. You could start to build the infrastructure manually, yourself, but as with a house, you might find that this is very time consuming, and you would risk making a lot of mistakes. It would be much easier to use ready-made foundations and a blueprint that shows you exactly how to do things and implement best practices. You could still customize the structure to meet your personal needs, but the building would be architecturally sound, safe, and faster to build. An Azure landing zone is exactly like that. It covers the network architecture, security, identity, and governance, allowing DevOps teams to start building right away on a perfectly laid-out foundation.
Landing zones are often implemented using a hub and spoke architecture. In this type of architecture, you have a central hub. The network in the hub acts as a central point of connectivity to on-premises resources for many spoke virtual networks, as shown in figure 12.1. You might also find other resources in the hub that are shared amongst spokes, like and Azure Firewall or Log Analytics for central log management.
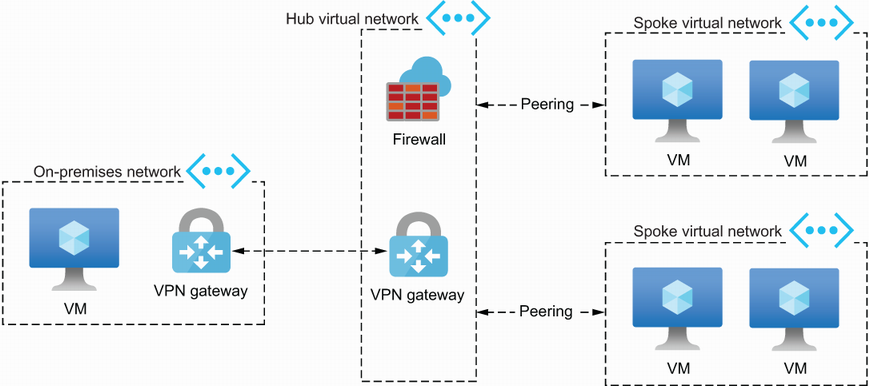
In the middle of figure 12.1, you’ll find the hub virtual network. It contains the resources needed to provide connectivity to the on-premises network on the left. That connection is often established using a VPN gateway or an Azure ExpressRoute. The connection in the hub network can then be used by multiple spokes, as shown on the right. Each spoke virtual network holds one workload, and the spokes allow you to isolate your workloads from those of the other teams. In spokes, you can run, for example, virtual machines (VMs), Azure web apps, and databases. More information on Azure landing zones and the hub and spoke architecture can be found in Microsoft’s “What is an Azure landing zone?” article (http://mng.bz/R4AR).
The hub and all the spokes are often hosted in their own Azure subscriptions. This means that each workload gets at least two subscriptions: one for the production workload, and one for the non-production workload. When building a hub and spoke architecture, the number of subscriptions and resources that you need to manage can grow quickly. It becomes harder and harder to oversee what resources are used and how those resources are configured. For example, you might want to make sure that when a storage account is created, it is only accessible over HTTPS, or that you can never open the SSH port to the internet. You might want to prevent certain resources from being used or make sure they can only be created in certain Azure regions. You might want to ensure that every VM that is created in any spoke always has a backup policy defined. But how can you do that?
Throughout this chapter, you will learn how to use Azure Policy to govern resources and enforce standards like the examples just mentioned. But first, let’s take a closer look at what policies are.
12.1 Azure Policy
Policies in Azure help you to enforce standards and assess compliance with standards in your environment. Its compliance dashboard gives you an aggregated view of the overall status of the environment. The dashboard also enables you to drill down to check the compliance status of individual resources. Policies are often used to implement use cases such as governance for resource consistency, regulatory compliance, security, cost, and management. A lot of policies for common use cases are built in, but you can also write your own. You will see examples of both throughout this chapter.
When working with policies, you will work with three resource types in Azure: policy definitions, initiatives, and assignments. Policies are defined in what is called a policy definition. Policies can be assigned to a scope, which you do using a policy assignment resource. You often, however, assign multiple policies as a group using the initiative resource. All these resources can be created using either an ARM template or a Bicep file.
On the left of figure 12.2, you’ll see multiple policies defined. Policies are often grouped into an initiative, as shown in the middle, and that initiative is then assigned to a particular scope. The scope dictates where the policies apply. Let’s dive into more detail on each of these concepts.

12.1.1 Policy definitions
Policy definitions contain the business rules you want to enforce. Azure Policy evaluates and compares your resources to those rules, and whenever the outcome of the evaluation does not match an expected result, a policy can trigger various effects.
Let’s examine one of the built-in policies (you’ll learn more about built-in policies in section 12.2) to see what a policy looks like and how it works. The following listing shows the definition for the Allowed Locations policy using Bicep (12-01.bicep).
Listing 12.1 Deny policy based on location
resource allowedLocations 'Microsoft.Authorization/
    ➥ policyDefinitions@2020-09-01' = {
    name: 'Allowed locations'
    properties: {
        policyType: 'BuiltIn'
        displayName: 'Allowed locations'
        description: 'This policy enables you to restrict the locations ...'
        metadata: {
            version: '1.0.0'
            category: 'General'
        }
        mode: 'Indexed'
        parameters: {
            'listOfAllowedLocations': {
                type: 'Array'
                metadata: {
                    description: 'The list of locations that can
                        ➥ be specified when deploying resources.'
                    strongType: 'location'
                    displayName: 'Allowed locations'
                }
            }
        }
        policyRule: {                 ❶
            if: {
                allOf: [
                    {
                        field: 'location'
                        notIn: '[parameters('listOfAllowedLocations')]'
                    }
                    {
                        field: 'location'
                        notEquals: 'global'
                    }
                    {
                        field: 'type'
                        notEquals: 'Microsoft.AzureActiveDirectory/b2cDirectories'
                    }
                ]
            }
            then: {
                effect: 'Deny'        ❷
            }
        }
    }
}
❶ The policyRule is the business logic of the policy.
❷ The effect that’s applied when the policy evaluates to true
This definition might look a bit overwhelming at first, introducing a lot of new terminology. For now, it’s enough to learn about the basic structure. We’ll walk through the details in section 12.3, where you’ll learn how to create your own policies.
The business rules of the policy can be found in the policyRule section. That is like the query part of the definition. In this example, an if statement is used with multiple comparison expressions grouped in the allOf. All these statements are evaluated and shown in the output after evaluation, even if the first one, for example, fails.
The first comparison in the allOf uses a parameter. That allows you to make the policies more generic and reuse them easily. When the policy evaluates to true, the effect, as defined in the then section will be applied. In this example, the Deny effect is used. As the name implies, the deployment will be denied and therefore cancelled. There are six other effects to choose from: Append, Audit, AuditIfNotExists, DeployIfNotExists, Disabled, and Modify. You will read more about them when you learn how to write your own policy definitions in section 12.4.
The evaluation of a policy happens at different times:
-
During the standard compliance evaluation cycle, which happens every 24 hours
-
When you trigger it manually, which you will learn how to do later
12.1.2 Initiatives or policy sets
Assigning individual policies is not very convenient—it means a lot of administration. You will often want to group policies together and assign them in one go. Such a group is called an initiative, or a policy set.
An initiative has a name, a description, and a list of policies. The following listing shows a simple initiative that contains the policy that was created in the previous section (12-02.bicep).
Listing 12.2 A sample initiative
targetScope = 'managementGroup'

param managementGroupName string

module allowedLocationsPolicyDefinition '12-01.bicep' = {
    name: 'allowedLocationsPolicyDefinition'
}

resource initiative 'Microsoft.Authorization/
    ➥ policySetDefinitions@2020-09-01' = {
    name: managementGroupName
    properties: {
        description: 'Definition set for management group
            ➥ '${managementGroupName}''
        policyDefinitions: [                  ❶
            {
                policyDefinitionId:
                    ➥ allowedLocationsPolicyDefinition.outputs.policyDefinitionId
            }
        ]
    }
}
❶ The policyDefinitions array contains the policies.
The preceding example creates an initiative with just one policy in it, but as you can see, the policyDefinitions property is an array and can contain more. This array is filled with the resource IDs of the policy definitions you want to use. In Bicep, its quite easy to get that by using an output parameter, as shown in this example.
12.1.3 Assignment
Now that you have seen what a policy definition looks like and how you can group them into initiatives, you’ll need to put them into action by assigning them. Assigning a policy to a scope means that the policy will be enforced on that scope, where a scope can be a resource group, subscription, or management group. When talking about an assignment, it is important to know about two types of scopes: the location of the definition, and the scope on the assignment.
A policy definition or initiative can either be deployed to a management group or to a subscription. This location sort of “maximizes” the scope to which the definition or initiative can be assigned. This means that when you deploy the policy (or initiative) definition to a subscription, you can only assign it to resources in that subscription. If you deploy it to a management group, you can assign it to any child management group or subscriptions in that management group.
Figure 12.3 shows that when you deploy a policy to the management group named Spokes, you can then assign the policy to that management group or to any of the subscriptions in it. You cannot assign it anywhere else. Not to the management group higher up in the tree, or to the Hub management group on the same level, or the Hub’s children. Depending on where you want to assign the policy, you will need to deploy it appropriately in the subscription and management group hierarchy.

Now let’s talk about the second scope that is important when using policies. When you assign a policy or an initiative to a particular scope, that assignment applies the policy on all resources on that scope and every scope below it. When you build a hub and spoke architecture like the one introduced at the beginning of the chapter, you’ll often start by designing your management group and subscription layout. A very simple outcome is shown in figure 12.4.

At the top of figure 12.4, you see the root management group that exists by default. Below that, two other management groups were created—one for the hub and one for the future spokes. In each of those management groups you’ll find one or more subscriptions.
The reasons for such a hierarchy are often twofold: you can set permissions at the correct level and also assign policies at the correct level. For example, you may have policies that should apply to every resource you create, no matter the scope, such as the allowed locations policy you saw earlier. That would be an ideal candidate to assign at the Tenant Root Group management group level. Other policies or initiatives might only need to have an effect on a lower scope. You could, for example, want to assign policies that apply to all spokes but not to resources in the hub. You would assign those on the Spokes management group, as shown in figure 12.5. Assigning a policy or initiative on the Spokes management group makes it effective on all resources deployed at that scope and every subscription in it.

In Azure, a policy assignment is also modeled as a resource. To assign the initiative shown in listing 12.2, the Bicep template shown in listing 12.3 could be used (12-03.bicep).
Listing 12.3 A sample assignment
targetScope = 'managementGroup'

param managementGroupName string
param policySetName string

var managementGroupScope = '/providers/Microsoft.Management/
    ➥ managementGroups/${managementGroupName}'

resource initiativeAssignment
    ➥ 'Microsoft.Authorization/policyAssignments@2020-09-01' = {
    name: managementGroupName
    location: 'westeurope'
    properties:{
        description: 'The assignment of the policy set definition
    ➥ '${policySetName}' to management group '${managementGroupName}''
        policyDefinitionId:                                                 ❶
    ➥ '${managementGroupScope}/providers/Microsoft.Authorization/
    ➥ policySetDefinitions/${policySetName}'
    }
}
❶ The policyDefinitionId defines the policy or initiative to assign.
This template has two parameters: one for the management group name to which the initiative has been deployed (the deployment location), and another for the name of that initiative, in the form of the policySetName. The resource that is deployed is of type Microsoft.Authorization/policyAssignments, and the scope on which you deploy it will dictate where it should have effect. In our example, you deploy this to the Spokes management group, as shown in figure 12.5, whereas the initiative itself, shown in listing 12.2, has been deployed to that same scope or to the Tenant Root Group, as shown in figure 12.3. Before you learn how to create your own policies, let’s first see what Azure provides you out of the box.
12.2 Examining the built-in policies and initiatives
Open a browser, go to the Azure portal, and find the policy overview using the menu or by searching for “policy” in the search bar at the top. You will be taken to the Policy overview that shows your current compliance status. The compliancy status is an overall score that shows you how well your Azure resources comply with all active policies. You will learn more about that in section 12.7. For now, navigate to the Definitions section using the button on the left, as highlighted in figure 12.6.

You will be taken to the policy definition overview (figure 12.7). It shows a list of all the built-in and custom-created policies and initiatives. Whether an item is built-in or custom is shown in the Type column. When an item is custom, you will find its definition location in the second column. That can help you to determine which assignment scope you can use. The Definition Type column tells you if an item in the list is an initiative or a policy.

The list of built-in policies and initiatives is quite long, as you’ll see when you scroll through it. In section 12.5 you’ll see how you can use one of the built-in policies in your own custom assignments or initiatives. In the list of initiatives, you might recognize a few familiar compliance standards, like ISO 27001. Clicking on one of the initiatives will show you the list of included policies, and then clicking on one of the policies will show you its details, as in figure 12.8.
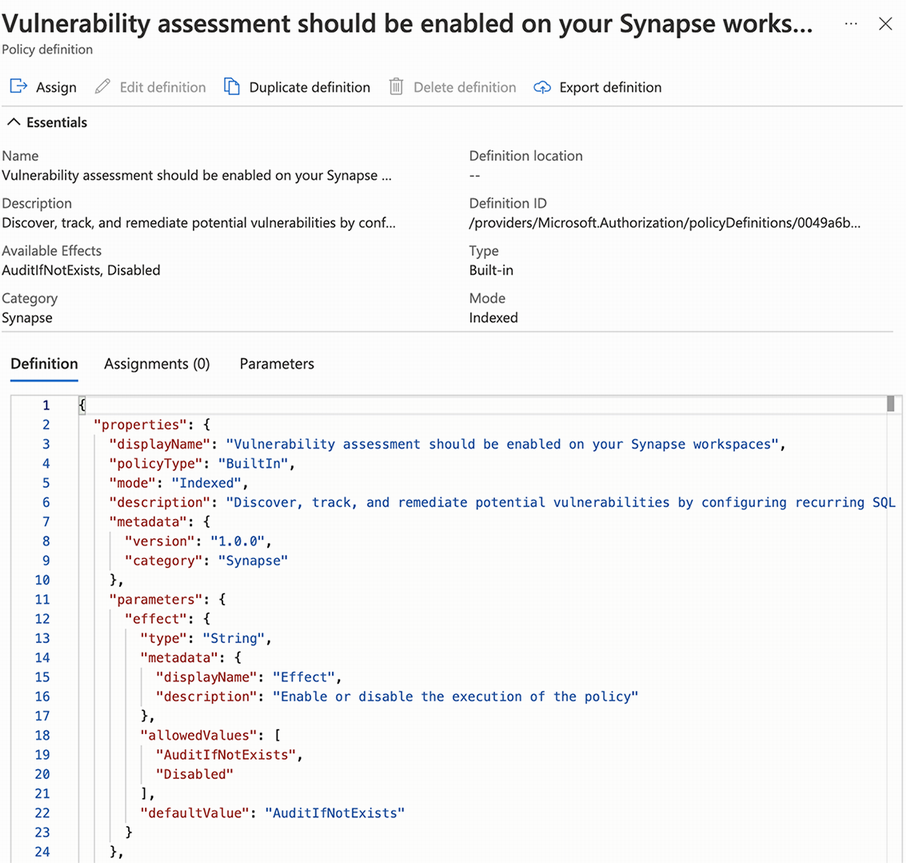
The name and description will help you figure out what the policy can do for you. Some policies can be used with different effects, which you can set when assigning the policy. The policy in figure 12.8 can be used with a Disabled or AuditIfNotExists effect, as shown in the Available Effects property. When you want to use this policy in a custom initiative, you will need the Definition ID shown at the top right, which is the unique identifier for this policy. The policy rule of the definition is shown in JSON format. When you create your own policies, it is often helpful to find a policy that does more or less what you are looking for and then copy this JSON. You can then modify it to meet your needs.
You might want to create your own policy if you have a requirement that cannot be met by an out-of-the-box policy. The following section shows you how to do that.
12.3 Using custom policies
Although Azure Policy is already quite complete, and new policies are added frequently, you can still run into situations where you want to add one or more custom policies. Before you do, though, it’s best to think about it for a moment and make sure you understand the parts involved. A custom policy is “just” another Azure resource and a policy assignment is also “just” another resource. This means that you can create resources that assign resources to govern other resources. How about that? This can be hard to grasp, and if you’re struggling with this idea, it might be wise to re-read section 12.1 and study figure 12.5 a bit more.
12.3.1 Creating a custom policy
Imagine that your team is working with the hub and spoke architecture from the introduction, and they want to run a SQL Server on Azure. You want to make sure that the SQL Server is not accessible over the internet, but only via a private network. A SQL Server has a single property called publicNetworkAccess that you can set to either Enabled or Disabled to make it publicly available or not. Your goal is to create a policy that looks for that property and ensures it is set to Disabled. Otherwise, you deny the deployment.
To do this, open VS Code and create a new Bicep file called denyAnySqlServerAccessFromInternet.bicep. Set the targetScope to subscription and add the basic policy definition structure. You can do that by using the built-in templates in VS Code. Unfortunately, there is no default for a Deny policy, but the Audit one comes close. Type pol and pick res-policy-definition-audit-effect from the list, or copy and paste the following example.
Listing 12.4 The policy definition structure
targetScope = 'subscription'

resource policyDefinition 'Microsoft.Authorization/
    ➥ policyDefinitions@2020-09-01' = {
    name: 'name'
    properties: {
        displayName: 'displayName'
        policyType: 'Custom'
        mode: 'All'                     ❶
        description: 'description'
        metadata: {
            version: '0.1.0'
            category: 'category'
        }
        parameters: {                   ❷
            parameterName: {
                type: 'String'
                defaultValue: 'defaultValue'
                metadata: {
                    displayName: 'displayName'
                    description: 'description'
                }
            }
        }
        policyRule: {
            if: {                       ❸
                allOf: [
                    {
                        field: 'field'
                        equals: 'conditionValue'
                    }
                    {
                        field: 'field'
                        equals: 'conditionValue'
                    }

                ]
            }
            then: {
                effect: 'Audit'
            }
        }
    }
}
❶ Switch between resources that do or do not have tags and location.
❷ Using parameters makes the definition reusable.
❸ Different logical operators can be used to create the logic.
Let’s work through this basic structure of the preceding listing to understand each property. The name here is the name of the resource, just as in any other Bicep resource. The displayName is used when showing the definition in contexts such as the Azure portal. The description field allows you to explain the policy to your users in one or more sentences. The policyType allows you to indicate that the policy you are creating is a custom policy, for which the only valid value is Custom.
The mode property allows you to specify which resources to target. Some resources in Azure do not allow you to set the location, tags, or both. Setting the mode to Indexed makes the policy skip the evaluation of resources that do not have the location or tags properties. Setting it to All causes the policy to evaluate all resources.
A metadata object allows you to set additional information on the definition, like a version or category. The category is used to group policies in the portal and other interfaces.
The definition allows you to use parameters. They work and operate the same way as in ARM templates. You can also use the same types. Using parameters, you can make your definitions more flexible and usable in more situations. In this example, you could use a parameter for the publicNetworkAccess value you would like to set.
The most important part of the definition is, without a doubt, the policyRule section. This is where you define the business logic of the policy. The rules you define must always lead to a true or false result. The policyRule is the selector that determines which resources the policy applies to. Finally, you define what you want to do with a noncompliant resource by setting the effect in the then section of the policyRule.
A definition for your requirement on the SQL Server’s public accessibility could look like the following listing (12-04.bicep).
Listing 12.5 A custom policy definition
targetScope = 'subscription'

resource denyAnySqlServerAccessFromInternet 'Microsoft.Authorization/policyDefinitions@2019-09-01' = {
    name: 'denyAnySqlServerAccessFromInternet'
    properties: {
        displayName: 'Deny Any SQL Server Access from the Internet'
        policyType: 'Custom'
        mode: 'All'
        description: 'Deny Any SQL Server Access from the Internet IP address'
        metadata: {
            version: '1.0.0'
            category: 'SQL Server'
        }
        parameters: {
            effect: {                   ❶
                type: 'String'
                allowedValues: [
                    'Audit'
                    'Deny'
                    'Disabled'
                ]
                defaultValue: 'Deny'
            }
        }
        policyRule: {
            if: {
                allOf: [                ❷
                    {
                        field: 'type'
                        equals: 'Microsoft.Sql/servers'
                    }
                    {
                        field: 'Microsoft.Sql/servers/publicNetworkAccess'
                        notEquals: 'Disabled'
                    }
                ]
            }
            then: {
                effect: '[parameters('effect')]'
            }
        }
    }
}
❶ A parameter is used to set the effect.
❷ allOf is an operator that allows for more than one expression.
This policy has one parameter defined that allows you to set the effect of the policy. The allowedValues property on that parameter shows that three effects can be used.
The policy rule defines two conditions that resources have to meet before this policy applies to them. First, the type of the source should be Microsoft.Sql/servers. Second, the value for Microsoft.Sql/servers/publicNetworkAccess should be Disabled. If both these conditions evaluate to true, hence the allOf, then the effect is applied.
Now that you have written your first policy, it is time to see it in action. To do that, you need to deploy the definition and then assign it to a particular scope. Use the following Azure CLI command to deploy the Bicep file that contains the definition:
This example uses the regular syntax to deploy the definition, as it is just a standard Bicep file. You can deploy it to the current subscription, making that subscription the definition location, which if you remember, dictates where you can assign it. To assign this definition, you can use the following Azure CLI command:
az policy assignment create --name sqlPolicyAssignment –policy
    ➥ "denyAnySqlServerAccessFromInternet"
This command uses policy assignment create to assign the previously created definition and uses sqlPolicyAssignment as its name. When you don’t specify a scope for the assignment, like in this example, the scope defaults to the deployment scope. If you have currently selected a subscription in the Azure CLI’s context, that becomes the scope of the assignment. You can specify a different scope using the --scope parameter if you need to. Later on, you will learn how to do the assignment using Bicep. Now that the definition is deployed and assigned, it is time to test the policy.
12.3.2 Testing a policy
You obviously need to test the policy before you assign it to a scope in which resources are used by others. What you can do is create a separate subscription that is used to verify policies. Verifying policies can be done in multiple ways.
One option is to use the Policy extension in Visual Studio Code. For more information on how to install and configure this extension, see Microsoft’s “Use Azure Policy extension for Visual Studio Code” article (http://mng.bz/2nWo). This extension will, for now, only work on Windows. After it’s installed, and you start this extension, you will see that it has three sections to work with: Resources, Policies, and Evaluation. When you want to use the extension to evaluate a policy, you’ll need to select an item from each of these sections.
You first select the resource against which you want to evaluate your policy. In this example, you are writing a policy for a SQL Server, so you select a SQL Server in the resources section of the extension. Navigate to it by opening the right subscription and resource group, and select it using the pin icon on the right (see figure 12.9).
In the next section, the Policies window, select the assignment in which your definition is used. In this example, that is the sqlPolicyAssignment assignment that you created in the previous section. You can then select the actual definition. In this example, it is the denyAnySqlServerAccessFromInternet policy that you deployed in the previous section. You select both using the pin icons on their right.
The three selected resources will have been added to the bottom pane of the Evaluation section of the window. Click the checkmark icon to the right of each of them to include them in your selection. Your selection should resemble figure 12.9.

Now that you have selected the resource, the assignment, and the definition, you can run the evaluation using the play button in the Evaluation bar. The result will open in a new pane on the right, and it will look something like the following JSON.
Listing 12.6 The policy evaluation result
{
    "policyEvaluations": [
        {
            "policyInfo": {
                "policyDefinitionId": "/subscriptions/
    ➥ c5725c48-2107-4cc5-957d-d800701b0705/providers/
    ➥ Microsoft.Authorization/policyDefinitions/
    ➥ Deny Any SQL Server Access from the Internet",
                "policyDefinitionName": "Deny Any SQL
                    ➥ Server Access from the Internet",
                "policyDefinitionDisplayName":
                    ➥ "denyAnySqlServerAccessFromInternet",
                "policyDefinitionVersion": "1.0.0",
                "policyDefinitionEffect": "Deny",
                "policyAssignmentId": "/subscriptions/
    ➥ c5725c48-2107-4cc5-957d-d800701b0705/providers/
    ➥ Microsoft.Authorization/policyAssignments/sqlPolicyAssignment",
                "policyAssignmentName": "sqlPolicyAssignment",
                "policyAssignmentScope": "/subscriptions/
                    ➥ c5725c48-2107-4cc5-957d-d800701b0705",
                "policyAssignmentParameters": {},
                "policyAssignmentEnforcementMode": "Default",
                "policyExemptionIds": []
            },
            "evaluationResult": "NonCompliant",      ❶
            "evaluationDetails": {
                "evaluatedExpressions": [            ❷
                    {
                        "result": "True",
                        "expressionKind": "Field",
                        "expression": "type",
                        "path": "type",
                        "expressionValue": "Microsoft.Sql/servers",
                        "targetValue": "Microsoft.Sql/servers",
                        "operator": "Equals"
                    },
                    {
                        "result": "True",
                        "expressionKind": "Field",
                        "expression":
    ➥ "Microsoft.Sql/servers/publicNetworkAccess",
                        "path": "properties.publicNetworkAccess",
                        "expressionValue": "******",
                        "targetValue": "Disabled",
                        "operator": "NotEquals"
                    }
                ]
            },
            "effectDetails": {
                "policyEffect": "Deny",
                "existenceScope": "None"
            }
        }
    ],
    "modifiedFields": [],
    "messages": [
        "EventServiceEntry/subscriptions/
    ➥ c5725c48-2107-4cc5-957d-d800701b0705/resourceGroups/
    ➥ policy-demo/providers/Microsoft.Sql/servers/book-policy-sql",
        "DebugDuration (ms): 34, Info: RequestType: 'Validation',
➥ ResourceType: 'Microsoft.Sql/servers', Containers: '1',
➥ ContainersToEvaluate: '1', GotFullResourceContent: 'False',
➥ GotTrackedContent: 'False', AltCompanionPort: 'False'",
        "Debug<null>"
    ]
}
❶ The result of the evaluation, either Compliant or NonCompliant
❷ Detailed results of each expression
There are two important parts to this result. The first is the evaluationResult property. For this example, that returns NonCompliant because the SQL Server was created with public access enabled. The second interesting part here is the evaluationDetails array that lists the results of the individual evaluation expressions. The example definition has two, so there are two results here. These results allow you to easily identify whether the evaluationResult is as expected and why the evaluation came to this result.
You can get a similar experience when creating a new resource through the Azure portal while the policy is effective. If you are about to create a resource that violates the policy, you will receive a validation error, as shown in figure 12.10.

When you click on the validation error, you’ll see which policy assignment was violated, on the right. When you click on the Raw Error link, you’ll get a JSON result similar to listing 12.6.
The example in this section used the Deny effect. There are a few other effects that you can use, so let’s learn more about them.
12.4 Using the different effects
Policies can use the following effects: Append, Audit, AuditIfNotExists, Deny, DeployIfNotExists, Disabled, or Modify. Remember, the effect is the thing that you want the policy to do whenever it finds a matching resource. Let’s look at each of them to learn what it can do and what the syntax looks like.
12.4.1 Append effect
An often used resource in Azure is a storage account. You can imagine that in a hub and spoke architecture with a lot of spokes, there will be a lot of storage accounts. It would therefore be useful to create a policy that will add a default firewall rule. That will make the use of the storage account type more secure and compliant by default, since you limit its exposure. When you assign a policy with this rule to the Spokes management group in this chapter’s scenario, you will ensure that no spoke can ever create a storage account without it.
The Append effect can be used to accomplish this goal. Append is used to add additional fields to the resource that is created or updated. It does that when the if condition in the policy rule is met. When the field you append already exists, but with a different value, the Append effect acts as a Deny effect, so the deployment will fail. The following listing shows an example of a policy with the Append effect (12-05.bicep).
Listing 12.7 A policy definition with the Append effect
targetScope = 'subscription'

resource appendIpToStorageFirewall 'Microsoft.Authorization/
    ➥ policyDefinitions@2020-09-01' = {
    name: 'appendIpToStorageFirewall'
    properties: {
        policyType: 'Custom'
        displayName: 'Ensure the storage account has a firewall rule'
        description: 'Add an IP address to the storage accounts firewall'
        metadata: {
            version: '1.0.0'
            category: 'Network Security'
        }
        mode: 'All'
        policyRule: {
            if: {
                field: 'type'
                equals: 'Microsoft.Storage/storageAccounts'
            }
            then: {
                effect: 'Append'
                details: [
                    {
                        field: 'Microsoft.Storage/storageAccounts/     ❶
                            ➥ networkAcls.ipRules[*]'
                        value: {
                            value: '40.40.40.40'
                            action: 'Allow'
                        }
                    }
                ]
            }
        }
    }
}
❶ The value for “field” is an alias.
The Append effect has a mandatory details array. The preceding example contains one entry, but it can take multiple field/value pairs if you need them. This example adds a new row to the firewall ruleset of a storage account. The ipRules property used here is an array, and in this example, you can see the [*] notation being used. This means that the given value is to be added to the array. You could also use the ipRules property without [*] and provide a complete array as the value. When you do this, and the original resource already contains a non-empty array for this value, a conflict error will be thrown.
The value of the field property, Microsoft.Storage/storageAccounts/networkAcls.ipRules[*] in listing 12.7, is called an alias. You use property aliases to access specific properties for a resource type; you could see the value of the field property as the path to a property. Although the word alias might make you think that there are other ways to point to this specific property, that is not the case; you need the alias to address properties. You can find the alias for a specific property in at least two ways: use the extension in Visual Studio Code or use the Azure CLI. Using the extension, you can drill down to the resource type you want to write a policy for, as shown in figure 12.11.

In figure 12.11 you are looking for the alias on a storage account, so you drill down to it by opening the subscription, choosing Resource Providers, then Microsoft.Storage, and then selecting the storage account. A new pane with the entire resource definition in JSON will open, like the one in figure 12.12.

If you hover over the ipRules property, a pop-up with the aliases will show. Here you see that there are two aliases available, one with and one without [*].
12.4.2 Audit effect
When your Azure landing zone with the hub and spoke architecture has been in use for a while, quite a few resources will be deployed into it. Since it is hard to come up with all the required policies when you first set up the architecture, you will want to create new policies after teams are onboarded onto the landing zone. It can be a good idea to create your new policies with the Audit effect first, and later change that to something else. This policy effect creates a warning event when evaluating a noncompliant resource, but it does not stop the resource from being created or updated. That means you can first see the policy working, and find out which already existing resources are noncompliant before blocking their deployment with another effect.
The definition of the Audit effect is very simple, as it does not contain any additional properties:
Audit events are gathered and reported in dashboards, which will be discussed in section 12.7.
12.4.3 AuditIfNotExists effect
AuditIfNotExists allows you to audit a missing resource that is related to one that you are deploying. In the scenario of the hub and spoke architecture, every spoke will get its own virtual network, which will have at least one subnet. On that subnet you’ll want to enforce the use of a network security group (NSG) to define what traffic is allowed in and out. You’ll also want to at least audit that diagnostic settings are enabled on that NSG so you can always identify what is going on. The following policy does just that (12-06.bicep).
Listing 12.8 A policy definition with the AuditIfNotExists effect
targetScope = 'subscription'

resource auditNSGwithoutLogAnalyticsEnabled 'Microsoft.Authorization/
    ➥ policyDefinitions@2020-09-01' = {
    name: 'AuditNSGwithoutLogAnalyticsEnabled'
    properties: {
        policyType: 'Custom'
        displayName: 'Log analytics should be enabled for
            ➥ Network Security Group'
        description: 'This policy requires Network Security Groups to
            ➥ have a diagnostic setting set that exports logs
            ➥ to a log analytics workspace.'
        metadata: {
            version: '1.0.0'
            category: 'Network Security'
        }
        mode: 'All'
        policyRule: {
            if: {
                field: 'type'
                equals: 'Microsoft.Network/networkSecurityGroups'
            }
            then: {
                effect: 'AauditIfNotExists'
                'details': {
                    'type': 'Microsoft.Insights/diagnosticSettings'
                    'existenceCondition': {                             ❶
                        'allof': [
                            {
                                'field': 'Microsoft.Insights/
                                    ➥ diagnosticSettings/metrics.enabled'
                                'equals': 'True'
                            }
                            {
                                'field': 'Microsoft.Insights/
                                    ➥ diagnosticSettings/logs.enabled'
                                'equals': 'True'
                            }
                            {
                                'field': 'Microsoft.Insights/diagnosticSettings/workspaceId'
                                'exists': 'True'
                            }
                        ]
                    }
                }
            }
        }
    }
}
❶ Apply the effect when the statements in the existenceCondition are true.
In the if statement of this policyRule, you can see that the policy will look for type Microsoft.Network/networkSecurityGroups. When that is the case, the then will look for the related type Microsoft.Insights/diagnosticSettings in the details section and check if the existenceCondition on that is true. In this example, you want metrics or logs to be enabled, and the destination log analytics workspace should be set in the workspaceId property. If not, the policy will lead to an audit event. Audit events are gathered and reported in dashboards, which are discussed in section 12.7.
12.4.4 DeployIfNotExists effect
Like AuditIfNotExists, the DeployIfNotExists effect allows you to take action on a missing subresource, after deploying a resource. In this case, the action is not an audit event, but the automated deployment of another resource. This deployment is started after the related resource has been deployed successfully.
A common requirement for subscriptions, especially in the hub and spoke architecture, is to enable Microsoft Defender for specific resource types. This enhances the security and warnings on the enabled services. This gives the owner of the platform a lot of detailed insights into the security levels for all the spokes.
Note Not too long ago, Microsoft renamed Azure Security Center to Microsoft Defender for Cloud and Azure Defender to Microsoft Defender. That’s why in some policies you’ll still see references to Azure Defender or Azure Security Center (ASC).
The following policy uses the DeployIfNotExists effect to enable Microsoft Defender for storage after a new subscription has been created (12-07.bicep).
Listing 12.9 A policy definition with the DeployIfNotExists effect
targetScope = 'subscription'

resource enforceMsDefenderStoragePolicyDefinition 'Microsoft.Authorization/
    ➥ policyDefinitions@2020-09-01' = {
    name: 'msDefenderStorage_deployIfNotExists'
    properties: {
        displayName: 'Enforce Microsoft Defender for Storage'
        description: 'Enforces Microsoft Defender
            ➥ for Storage on subscriptions.'
        mode: 'All'
        policyType: 'Custom'
        policyRule: {
            if: {
                allOf: [
                    {
                        field: 'type'
                        equals: 'Microsoft.Resources/Subscriptions'
                    }
                ]
            }
            then: {
                effect: 'DeployIfNotExists'
                details: {
                    type: 'Microsoft.Security/pricings'
                    name: 'StorageAccounts'
                    deploymentScope: 'Subscription'                             ❶
                    existenceScope: 'Subscription'                              ❷
                    roleDefinitionIds: [                                        ❸
                        '/providers/Microsoft.Authorization/roleDefinitions/
                            ➥ 8e3af657-a8ff-443c-a75c-2fe8c4bcb635'
                    ]
                    existenceCondition: {                                       ❹
                        field: 'Microsoft.Security/pricings/pricingTier'
                        equals: 'Standard'
                    }
                    deployment: {
                        location: 'westeurope'
                        properties: {
                            mode: 'Incremental'
                            template: {                                         ❺
                                '$schema': 'https:/ /schema.management.azure.com/
                                    ➥ schemas/2015-01-01/deploymentTemplate.json#'
                                contentVersion: '1.0.0.0'
                                resources: [
                                    {
                                        type: 'Microsoft.Security/pricings'
                                        apiVersion: '2018-06-01'
                                        name: 'StorageAccounts'
                                        properties: {
                                             pricingTier: 'Standard'
                                        }
                                    }
                                ]
                            }
                        }
                    }
                }
            }
        }
    }
}
❶ deploymentScope sets where the defined template is deployed.
❷ existenceScope sets where the if section of the policy is applied.
❸ Roles needed when the template is deployed
❹ The logic for when the template should be deployed
❺ The template that should be deployed when all evaluates to true
In this policyRule, the if targets the Microsoft.Resources/Subscriptions type. The details property in the then contains the template that is used to deploy an additional resource when this policy is triggered. The resources to be deployed as part of the policy are specified in the deployment property. What you define there in the template property is an ARM template. In this example, that template contains one resource of type Microsoft.Security/pricings.
Writing that template section from within the Bicep file is not ideal. You don’t get IntelliSense and autocompletion, for example. Instead, you can now use a new function in Bicep that allows you to load text from another file—the template: loadTextContent() function. You can move the contents from the template property in listing 12.9 into its own JSON file (securityCenterPricing.json), and then replace the original template entry with the following line:
That separate file now will now be recognized as an ARM template by VS Code, making your editing experience much better. It also makes the policy much smaller and more readable (12-07-with-load-from-file.bicep).
When the existenceCondition evaluates to false, the deployment of the template is started. The deploymentScope accepts either ResourceGroup or Subscription, indicating a deployment at either the subscription or resource group level. Since the deployment in this example is to the subscription level, Subscription is set here. The existenceScope sets where the if section of the policy is applied and can be set to ResourceGroup or Subscription. Since this example needs to match the subscription type itself, this property is set to Subscription.
For Azure Policy to be able to deploy the template when this policy evaluates to true, you need to assign a managed identity to the assignment when you create it so that it can use that identity during the deployment. The roleDefinitionIds list in this policy specifies what roles the managed identity needs to have to be able to run the deployment in this policy. In section 12.6, when you learn how to create your own assignments using Bicep, you will also learn how to set this managed identity.
The fact that the template you specify in the policy is deployed after the initial resource has been deployed, and not during deployment, and the use of the managed identity means that you can use policies with this effect to help in edge cases other than strictly governance. In the hub and spoke architecture, for example, you’ll often deploy central services like DNS and private DNS zones into the hub. Suppose that you, as a member of a spoke team, want to use and deploy a storage account into your spoke. You only want that storage account to be available over a private IP address in your own virtual network. To accomplish that, you would deploy a private link into that storage account. That, however, requires integration with the private DNS zone that was deployed centrally in the hub. You, as a spoke, do not have permissions to create your DNS record there. Using a policy could solve that problem, since you could target the private link as the resource and then create the DNS record in the template in the policy. You could then assign policy permissions to be allowed to do that. To read more on this specific scenario and implementation, read Microsoft’s “Private Link and DNS integration at scale” article (http://mng.bz/1ogQ).
12.4.5 Disabled effect
The disabled effect allows you to pause the evaluation of a policy.
This can be useful for testing when you parameterize the effect property in the definition, as shown in listing 12.5.
12.4.6 Modify effect
In section 12.4.1 on the Append effect, you read about how you could use that effect to improve the security of a storage account. Let’s make that even better by using another policy to set another property on the storage account to a desired value. A storage account has a property called allowBlobPublicAccess. When you set that to false, users are required to use a form of authentication to access anything in the account—anonymous access is no longer an option.
The Modify effect can be used to add, update, or remove properties on a subscription, resource group, or resource. Modify policies are evaluated before the resource request is handed over to the resource provider. The changes that might occur because of the policy are therefore applied to the request content on the fly, when the if condition of the policy is met. That is different than the DeployIfNotExists effect, which makes its changes after the resource has been deployed by the resource provider.
Being able to modify the request and therefore the created resource is very powerful, but it’s something to be wary of. The person who deploys resources to Azure might not be completely aware of all the policies that are in effect. That is especially true in the hub and spoke architecture we’ve been talking about in this chapter. Policies are often managed by a central team, and it might come as a surprise to someone deploying a resource that the result is different than what was defined in a template because of a policy.
The Modify effect might feel a bit like the Append effect at first, but it is much more powerful. The Modify effect supports three types of operations:
-
addOrReplace—Adds the defined property or tag and its value. It even does that when the tag or property already exists with a different value. Note that this is different than theAppendeffect, which would change its effect todenywhen trying to change a value.
With those operations, you can do the following three things:
-
Add, replace, or remove tags. Remember this when you want to work with tags to set the mode of a policy to
Indexedto exclude resources that do not have tags. -
Add or replace the managed identity on virtual machines or virtual machine scale sets.
-
Add or replace values for an alias. Not all aliases can be used with the
Modifyeffect—the alias needs to have aModifiableattribute. You can find aliases that support this effect by using the following PowerShell command:Get-AzPolicyAlias | Select-Object -ExpandProperty 'Aliases' | Where-Object { $_.DefaultMetadata.Attributes -eq 'Modifiable' }.
Let’s take a look at an example policy using the Modify effect. The following policy sets the allowBlobPublicAccess property on a storage account to false via its alias (12-08.bicep). Since that property was added in a later version of the Storage Account API, you cannot use it on older versions. Using the condition within the operation will allow you to specify that.
Listing 12.10 A policy definition with the Modify effect
targetScope = 'subscription'

resource setAllowBlobPublicAccessToFalse 'Microsoft.Authorization/policyDefinitions@2020-09-01' = {
    name: 'setAllowBlobPublicAccessToFalse'
    properties: {
        policyType: 'Custom'
        displayName: 'Set setAllowBlobPublicAccessToFalse to
            ➥ false on a Storage Account'
        description: 'Set setAllowBlobPublicAccessToFalse to
            ➥ false on a Storage Account when the API version is
            ➥ greather than 2019-04-01'
        metadata: {
            version: '1.0.0'
            category: 'Network Security'
        }
        mode: 'All'
        policyRule: {
            if: {
                field: 'type'
                equals: 'Microsoft.Storage/storageAccounts'
            }
            then: {
                effect: 'Modify'
                details: {
                    roleDefinitionIds: [
                        '/providers/microsoft.authorization/roleDefinitions/
                            ➥ 17d1049b-9a84-46fb-8f53-869881c3d3ab'
                    ]
                    conflictEffect: 'Audit'
                    operations: [                                           ❶
                        {
                            condition: '[greaterOrEquals(requestContext()   ❷
                                ➥ .apiVersion, '2019-04-01')]'
                            operation: 'addOrReplace'
                            field: 'Microsoft.Storage/storageAccounts/
                                ➥ allowBlobPublicAccess'
                            value: false
                        }
                    ]
                }
            }
        }
    }
}
❶ One or more operations can be defined here.
❷ Conditionally run the operation using an expression.
This example targets storage accounts, as you can see in the if within the policyRule, where the type is compared to Microsoft.Storage/storageAccounts.
The operations are defined in the operations array within the policy. Since that is an array, it allows you to alter multiple properties or tags from a single policy. Each operation has an operation, field, value, and condition property. The operation field may contain one of the three operations mentioned previously: addOrReplace, add, or remove. The field needs to contain an alias that points to a property on the resource. An expression can optionally be provided in the condition field to make the operation only do its work in specific scenarios. In this example, the property on the resource, referenced by its alias (allowBlobPublicAccess), will only be set when the API version of the resource deployed is greater than 2019-04-01. This ensures you can’t apply it on storage accounts that do not support the property because they are of an older version.
The details section defines a list with role definition IDs in the roleDefinitionIds property. You have seen that one before on the DeployIfNotExist effect. When you use this policy in an assignment, you need to specify an identity on the assignment. The list indicates which roles the identity on the assignment needs. That identity is used when the policy needs to process the operations and during a remediation task.
12.5 Creating your own initiative
Now that you’ve seen how to write your own policies, it’s time to write a custom initiative. Remember that an initiative allows you to group policies and then assign that group of policies all at once. An initiative may contain both custom and built-in policies.
The following listing creates an initiative that uses one custom policy definition (12-09.bicep).
Listing 12.11 Your own custom initiative
targetScope = 'subscription'

module allowedLocationsPolicyDefinition './allowedLocations.bicep' = {
    name: 'allowedLocationsPolicyDefinition'
    scope: subscription()
}

resource initiative 'Microsoft.Authorization/
    ➥ policySetDefinitions@2020-09-01' = {
    name: 'MyCustomInitiative'
    properties: {
        description: 'This policy definition set comprises the scoped
            ➥ policies for subscription '${subscription().displayName}''
    policyDefinitions: [
        {
            policyDefinitionId: allowedLocationsPolicyDefinition
                ➥ .outputs.policyDefinitionId
                parameters: {
                    listOfAllowedLocations: {
                        value: [
                            'northeurope'
                            'westeurope'
                        ]
                    }
                }
            }
        ]
    }
}
This template first defines a module that references a custom policy. Then the actual initiative is declared, using the type Microsoft.Authorization/policySetDefinitions. The policyDefinitions array is the most interesting part. This array allows you to list one or more policy definitions. This example uses the output of the module to fetch the policyDefinitionId. Since this policy has a parameter, the listOfAllowedLocations, you need to specify that here. The syntax for that is similar to how you would do that in an ARM template parameter file.
You can deploy this initiative using a standard Azure CLI command to deploy the Bicep file:
The preceding command starts a deployment of the referenced file at the subscription level.
To add a built-in policy definition to your initiative, you need to find the definition ID. One way to do that is through the Azure portal. Go to the definitions overview, find the policy you want to use, and copy its Definition ID as shown in figure 12.13.

You then can add the following snippet to the policyDefinitions list:
{
  policyDefinitionId: '/providers/Microsoft.Authorization/
    ➥ policyDefinitions/0b60c0b2-2dc2-4e1c-b5c9-abbed971de53'
}
With the policy definition and initiative in place, let’s see how you can assign them.
12.6 Assigning a policy or initiative
Policies and initiatives can’t do anything until you assign them. The Bicep template for the assignment is shown in the following listing (12-10.bicep).
Listing 12.12 Your custom assignment
targetScope = 'subscription'

param policySetName string

resource myFirstAssignment 'Microsoft.Authorization/
    ➥ policyAssignments@2020-09-01' = {
    name: 'MyFirstAssignment'
    location: 'westeurope'
    identity:{
        type: 'SystemAssigned'
    }
    properties:{
        policyDefinitionId: '${subscription().id}/providers/Microsoft
           ➥ .Authorization/policySetDefinitions/${policySetName}'
    }
}
The assignment resource is of type Microsoft.Authorization/policyAssignments. The policyDefinitionId property lets you point to the policy definition or initiative you want to assign. In this example, a parameter for the name of the policy set is used. During deployment, that will be MyCustomInitiative, which you created in listing 12.11. Notice the use of subscription().id on that same line. Since the initiative is custom and was deployed to this subscription, you need to address the initiative correctly. If you look again at the small snippet at the end of the previous section, where you used a built-in policy definition, you’ll see that you did not need to specify this narrow scope. That is because built-in policies and initiatives are available at any scope.
The identity section is used to assign a system-assigned managed identity to this assignment. Remember that the Modify and DeployIfNotExists effects can deploy or modify resources though the policy. As creating or modifying resources in Azure requires permissions, the policy system uses this identity to be allowed to make those changes in your environment. So, after you assign the policy and the identity has been created, you need to ensure that this identity gets the correct permissions to fulfill its job.
The scope of the assignment is determined by the deployment scope. That means that when you deploy this template at a subscription level, it will be effective for all resources in that subscription. The same goes for when you deploy it to a management group. It will then work for every subscription and its child resources. The following command can be used to deploy this assignment at the subscription level:
az deployment sub create --template-file policySetAssignment.bicep
    ➥ --parameters '{ "policySetName":
    ➥ { "value": "MyCustomInitiative" } }' -l westeurope
Here you again use the az deployment sub create command, like you have seen a few times earlier in the chapter. This time you use the --parameters switch to pass in the value for the policySetName parameter.
You can also use this command to modify an existing assignment. When you create a new subscription in Azure, as you will do a lot in a hub and spoke architecture, you might want to automatically onboard that subscription into Microsoft Defender for Cloud. Microsoft Defender for Cloud helps you keep your resources secure and follow security best practices. That is done by creating an assignment and assigning a policy initiative to your subscription as part of the onboarding. That initiative is called ASC Default and stands for Azure Security Center Default. Azure Security Center is the old name for Microsoft Defender for Cloud. You might want to change that assignment. Since every resource in Azure is addressed by its name, a policy assignment is no different. The following listing changes a property on the ASC Default assignment on a particular subscription.
Listing 12.13 An assignment updating an existing assignment
Param allowedContainerImagesInKubernetesClusterRegex string

resource policyAssignment 'Microsoft.Authorization/
    ➥ policyAssignments@2020-09-01' = {
    name: 'ASC Default (subscription: ${subscription().id})'
    scope: subscription()
    properties: {
        displayName: 'ASC Default (subscription: ${subscription().id})'
        policyDefinitionId: '/providers/Microsoft.Authorization/
            ➥ policySetDefinitions/${policyDefinitionId}'
        parameters: {
            'allowedContainerImagesInKubernetesClusterRegex': {
                 value: allowedContainerImagesInKubernetesClusterRegex
            }
        }
    }
}
The name of the existing assignment can easily be found in the Azure portal or using the VS Code extension. For the assignment created by Microsoft Defender for Cloud, the name follows this syntax: ASC Default (subscription:<subscription id>). So, the value in the Bicep template becomes ASC Default (subscription: ${subscription().id}) to make it work for every subscription. The parameter section can then be used to change values on the assignment. In this example, a new value for the allowedContainerImagesInKubernetesClusterRegex property is set. You can find the available properties by opening the assignment in the portal, as shown in figure 12.14.

Figure 12.14 shows you the properties for the ASC Default assignment on a particular subscription. On that page, you’ll find the parameter list. The Parameter ID is what you are looking for. Now that you have learned about policies, let’s see how you can view the current compliance status and act on that.
12.7 Reviewing compliance status
In the previous section, you’ve been using and modifying the ASC Default assignment. Let’s review its compliance status by opening a browser and navigating to the policy overview in the Azure portal (figure 12.15).

This dashboard will give you a quick insight into how compliant you are. Figure 12.15 shows an overall compliance score of 24%, which obviously isn’t great. At the top of the figure, you can select the scope you want to see the compliance status for by clicking on the three dots (...) button. That allows you to scope to a particular subscription or management group. That means, for example, that every team in the hub and spoke architecture can scope to its own resources easily.
The list in the lower half of the dashboard shows you the score per initiative. Clicking on one of them will bring you to a dashboard that shows detailed information on that initiative, as shown in figure 12.16.

This view gives you detailed information on the compliance status for the individual assignment and quickly shows you all noncompliant policies. When you click on one of the noncompliant policies, you get the overview of a single noncompliant policy, as shown in figure 12.17.

You get to see which resources are noncompliant, and you can drill down into the details of why a resource is noncompliant by clicking Details in the Compliance Reason column. A pane like the one in figure 12.18 will be shown. The Compliance Details pane shows you the reason for noncompliance at the bottom.

12.7.1 Remediating noncompliant resources
You can remediate a noncompliant resource through the policy portal, often with a single click if you have used or created a policy with the Modify or DeployIfNotExists effect.
Although that is a simple and quick way to fix your noncompliant resources, you might prefer to do it using IaC. That way, you change your template once and use that to make current and future resources compliant in any environment. Changes will be nicely rolled out using a deployment pipeline that has the correct permissions, and changes are tested using your regular process. Then, after at most 24 hours, the policy portal can again be checked to see whether the score improved. You can, of course, also use the VS Code Policy extension to verify whether the resource is now compliant or not by running the evaluation from there.
12.7.2 Creating an exemption
You sometimes will not want, or cannot get, a resource or scope compliant with a policy for whatever reason. This mostly applies to built-in policies, like the ASC Default set that is applied to your subscription when you onboard on Microsoft Defender for Cloud. Luckily, you can create what is called an exemption to stop resources from being evaluated. Such an exemption can be created in Bicep as follows (12-11.bicep).
Listing 12.14 A policy exemption
resource privateEndpointShouldBeEnabledPolicyExemption
    ➥'Microsoft.Authorization/policyExemptions@2020-07-01-preview' = {
    name: 'privateEndpointShouldBeEnabledPolicyExemption'
    properties: {
        displayName: 'ASC-Private endpoint should be enabled'
        policyAssignmentId: '${subscription().id}/providers/
            ➥ Microsoft.Authorization/policyAssignments/SecurityCenterBuiltIn'
        policyDefinitionReferenceIds: [
            'privateEndpointShouldBeEnabledForMysqlServersMonitoringEffect'
            'storageAccountShouldUseAPrivateLinkConnectionMonitoringEffect'
            'privateEndpointShouldBeConfiguredForKeyVaultMonitoringEffect'
        ]
        exemptionCategory: 'Waiver'
        expiresOn: '01/01/2022 12:00'
        description: 'Using firewall rules for now.'
    }
}
To create an exemption, you need a resource of type Microsoft.Authorization/ policyExemptions. You need to tell it which assignment to target using the policyAssignmentId property. The value to use can be found in the Azure portal, as shown in figure 12.19, or you can use an output when you have defined the assignment in Bicep.

When you navigate to the assignment in the portal, one of its properties is the Assignment ID. The policyDefinitionReferenceIds array is filled with the reference IDs of the policies you want to create the exemption for. These, again, can be found in the Azure portal. When you click the View Definition button in figure 12.19, you will be taken to the next overview in figure 12.20.
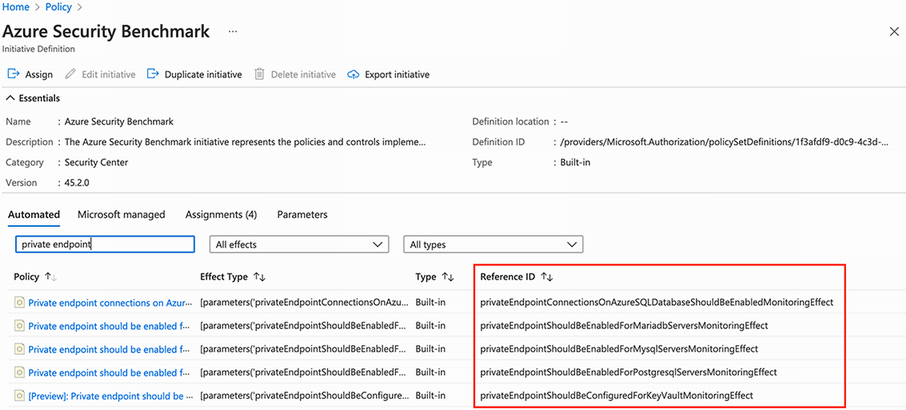
This overview shows you the policies in this definition. Here you can find the Reference IDs on the right. Use the search box to find the right one. Since policyDefinitionReferenceIds is an array, you can create an exemption for one or more policies at once. The exemptionCategory property can hold two values: Waiver or Mitigated. You should use Mitigated when the policy intent is met through another method. Use Waiver when you temporarily accept the noncompliant resource. The expiresOn property can be set to make the exemption inactive after a certain date. The policies will then be effective again after this date. This is especially useful in temporary situations.
You can deploy the previous exemption with the following command:
When you navigate to the policy definition within the assignment on which you created the exemption, you should see the details as shown in figure 12.21. Here you see the definition for one of the policies that was included in the exemption, “Storage accounts should use private link.” You can see that the compliance status is currently Exempt, and the bottom of the screen shows a list of resources that are covered by this policy and are now exempted.

Summary
-
Azure Policy enables you to govern your Azure environment through Policy as Code.
-
A policy is defined in a policy definition that contains the business rules you want to enforce. A policy has a resource selector that specifies to which resources it applies. A policy can have any of the following effects:
Audit,Deny,Append,Modify,AuditIfNotExists,DeployIfNotExists. -
An initiative can be used to group policies so that you can assign them in one go.
-
Azure offers a lot of policy definitions and initiatives for you to use out of the box, helping you to implement (security) best practices.
-
Using Bicep, you can create custom policies, include them in custom initiatives (with built-in policies if you want), and then assign them to a particular scope.
-
Exemptions are used to (temporarily) exclude resources from being evaluated by Azure Policy.