Exposing management endpoints (RDP, SSH, HTTP, and others) over a public IP address is not a good idea. Any kind of management access should be controlled and allowed only over a secure connection. Usually, this is done by connecting to a private network (via S2S or P2S) and accessing resources over private IP addresses. In some situations, this is not easy to achieve. The cause of this can be insufficient local infrastructure, or in some cases, the scenario may be too complex. Fortunately, there are other ways to achieve the same goal. We can safely connect to our resources using Azure Bastion, Azure Virtual WAN, and Azure Private Link.
We will cover the following recipes in this chapter:
- Creating an Azure Bastion instance
- Connecting to a virtual machine with Azure Bastion
- Creating a virtual WAN
- Creating a hub (in Virtual WAN)
- Adding a Site-to-Site connection (in a virtual hub)
- Adding a virtual network connection (in a virtual hub)
- Creating a Private Link endpoint
- Creating a Private Link service
Technical requirements
For this chapter, the following is required:
- An Azure subscription
Creating an Azure Bastion instance
Azure Bastion allows us to connect securely to our Azure resources without additional infrastructure. All we need is a browser. It is essentially a PaaS service provisioned in our virtual network that provides a secure RDP/SSH connection to Azure Virtual Machines. The connection is made directly from the Azure portal over Transport Layer Security (TLS).
Getting ready
Before we can create an Azure Bastion instance, we must prepare the subnet.
In order to create a new subnet for Azure Bastion, we must do the following:
- Locate the virtual network that will be associated with our Azure Bastion instance.
- Select the Subnets option under Settings and select the option to add a new subnet, as shown in Figure 9.1:
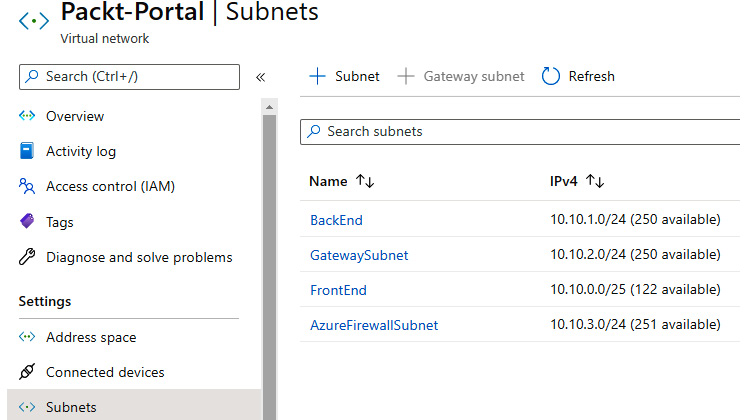
Figure 9.1: Creating a new subnet for Azure Bastion
- In the new pane, we must fill in the Name and Address range fields. It's very important that the subnet is named AzureBastionSubnet and that the subnet uses a prefix of at least /27 (this is a service requirement, and we will not be able to proceed otherwise). Options for NAT gateway and Network security group (NSG) can be added if needed (for example, a rule forcing traffic through network address translation (NAT)). The Service endpoints and Subnet delegation fields are not required, and as this subnet should be dedicated to Azure Bastion only, it is not recommended to use them:
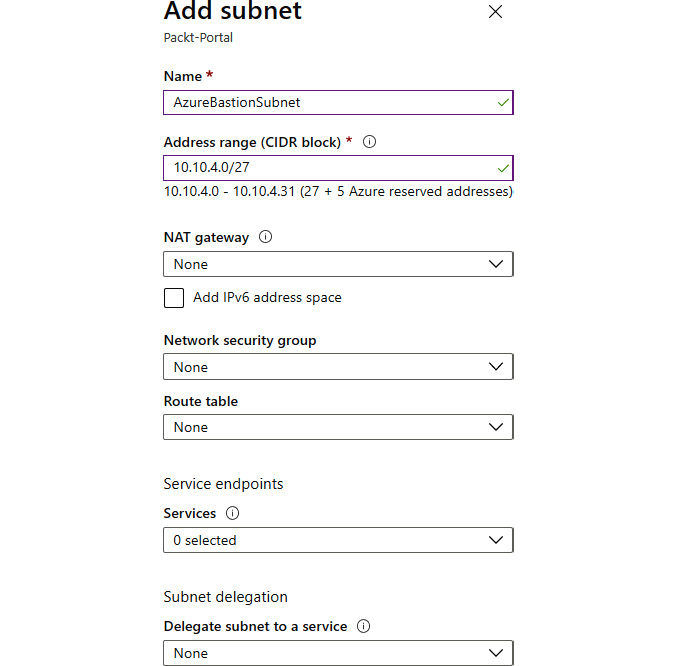
Figure 9.2: Fill in Name and Address range for the subnet
How to do it…
In order to create a new Azure Bastion instance, we must follow these steps:
- In the Azure portal, select Create a resource and choose Azure Bastion under Networking (or search for Azure Bastion in the search bar).
- In the new pane, we must provide information for the Subscription, Resource group, Name, and Region fields. Next, we must make a selection for Virtual network (only networks in the same region will be available) and Subnet (the one that we previously created) and provide information for Public IP address (select an existing one or create a new one):
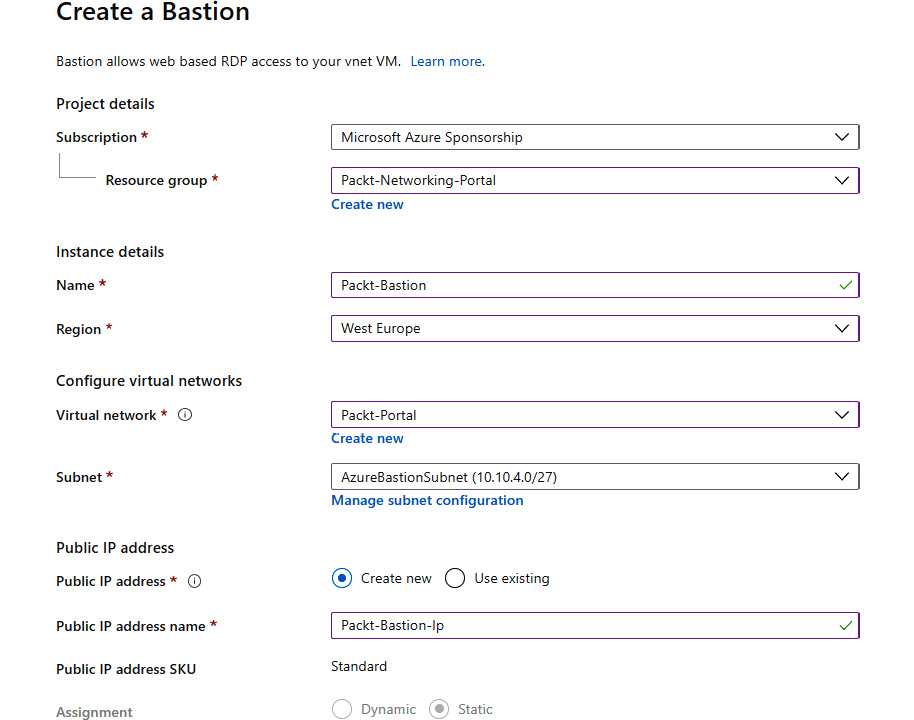
Figure 9.3: Configuration details of a Bastion instance
How it works…
Azure Bastion is provisioned inside our virtual network, which allows communication with all resources on that network. Using TLS, it provides a secure RDP and SSH connection to all resources on that network. The connection is made through a browser session, and no public IP address is required. This means that we don't need to expose any of the management ports over a public IP address.
After creating the Azure Bastion instance, let's move on to the next recipe, where we will learn how to connect to a virtual machine with Azure Bastion.
Connecting to a virtual machine with Azure Bastion
With Azure Bastion, we can connect to a virtual machine through the browser without a public IP address and without exposing it publicly.
Getting ready
Before you start, open the browser and go to the Azure portal via https://portal.azure.com.
How to do it…
In order to connect to a virtual machine with Azure Bastion, we must follow these steps:
- In the Azure portal, find the virtual machine you want to connect to. The virtual machine needs to be on the same virtual network as Azure Bastion is deployed on.
- In the Virtual machine pane, select the Connect option under Settings. Select the BASTION tab, and on that tab, select Use Bastion:
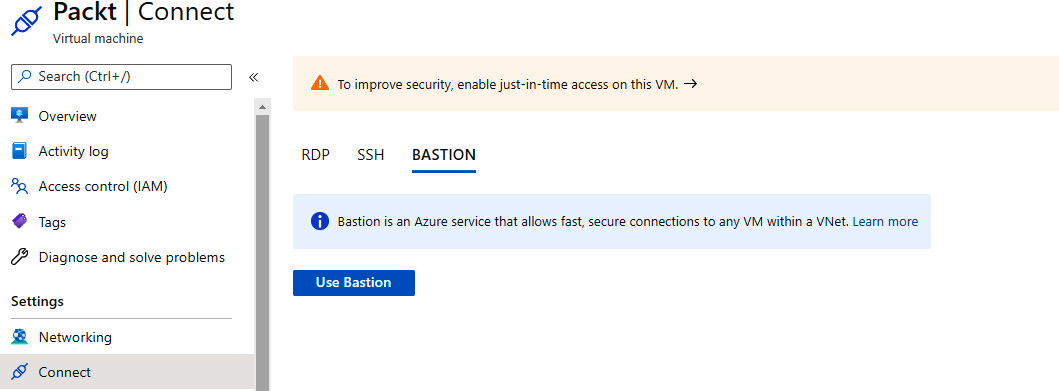
Figure 9.4: Connecting to a virtual machine with Azure Bastion
- Select the Open in new window option and fill in Username and Password:

Figure 9.5: Adding a username and password for the virtual machine
The connection will open in a new window, allowing you to fully manage your virtual machine. The interface depends on the default management port, RDP or SSH.
How it works…
Azure Bastion uses a subnet in the virtual network to connect to virtual machines in that specific network. It provides a safe connection over TLS and allows a connection to a virtual machine without exposing it over a public IP address.
In this recipe, we learned how to connect a virtual machine with Azure Bastion. In the next recipe, we'll learn how to create a virtual WAN.
Creating a virtual WAN
In many situations, the network topology can get very complex. It can be difficult to keep track of all network connections, gateways, and peering processes. Azure Virtual WAN provides a single interface to manage all these points.
Getting ready
Before you start, open the browser and go to the Azure portal via https://portal.azure.com.
How to do it…
- In the Azure portal, select Create a resource and choose Virtual WAN under Networking (or search for Virtual WAN in the search bar).
- In the new pane, we must provide information for the Subscription, Resource group, Resource group location, Name, and Type fields:
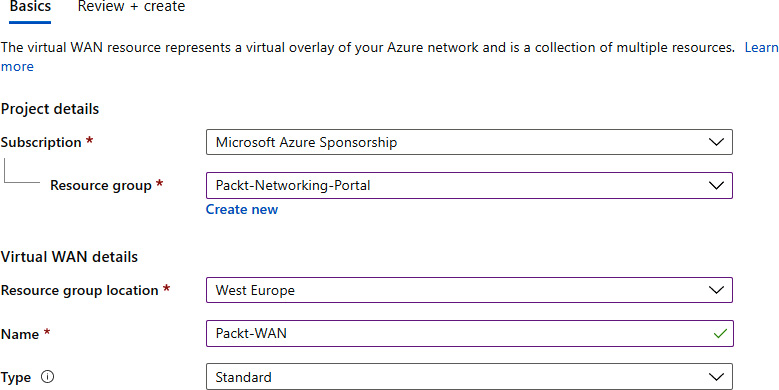
Figure 9.6: Information for the virtual WAN resource
Azure Virtual WAN is ready for deployment and it usually takes only a few minutes to complete.
How it works…
Azure Virtual WAN brings multiple network services to a single point. From here, we can configure, control, and monitor connections such as Site-to-Site, Point-to-Site, ExpressRoute, or a connection between virtual networks. When we have multiple Site-to-Site connections or multiple virtual networks connected with peering, it can be hard to keep track of all these resources. Virtual WAN allows us to do that with a single service.
This is accomplished with hubs, and in the next recipe, we'll see how to set one up.
Creating a hub (in Virtual WAN)
Hubs are used as regional connection points. They contain multiple service endpoints that enable connectivity between different networks and services. They're the core of networking for each region.
Getting ready
Before you start, open the browser and go to the Azure portal via https://portal.azure.com.
How to do it…
- In the Azure portal, locate the previously created virtual WAN.
- In the Virtual WAN pane, select Hubs under the Connectivity section. Select the option to add a new hub:
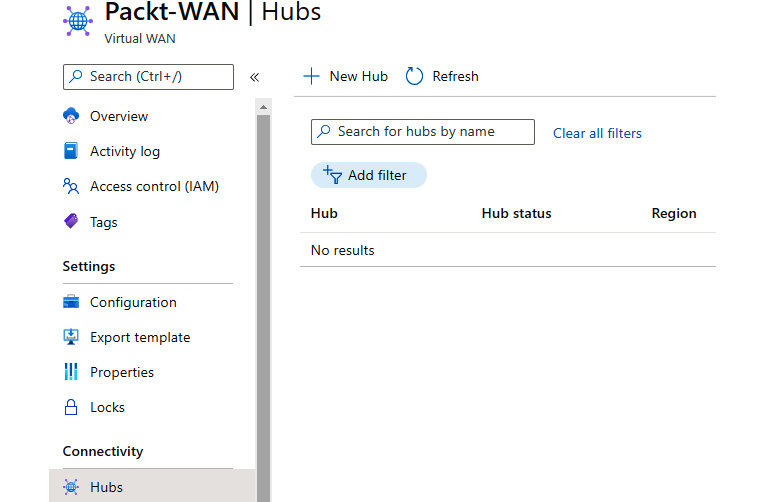
Figure 9.7: Adding a new hub
- In the new pane, we need to provide information in the Region, Name (for the new hub), and Hub private address space fields. Subscription and Resource group are grayed out as they use the same options as Virtual WAN:
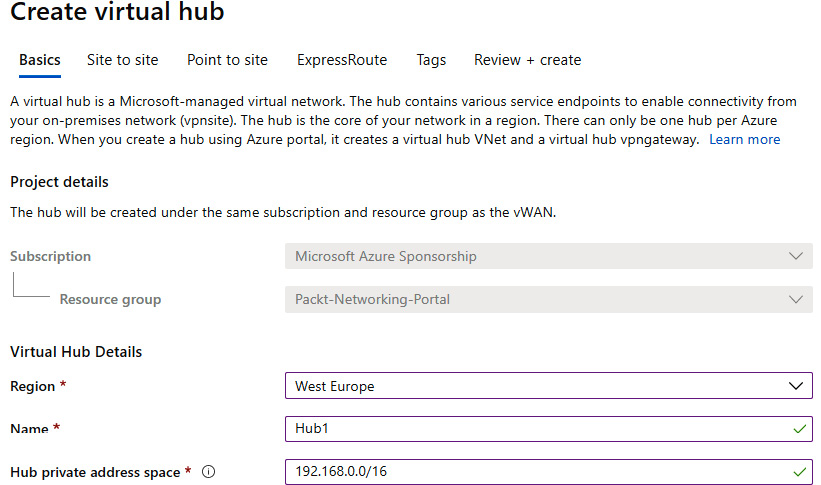
Figure 9.8: Information for the new virtual hub
- The next three steps are optional, and we can choose any or all of them. The first step is to configure a Site-to-Site gateway. If we enable this option, we need to select an option for Gateway scale units (or SKU). An autonomous system number (AS Number) is provided to be used if needed (for VPN configuration later):
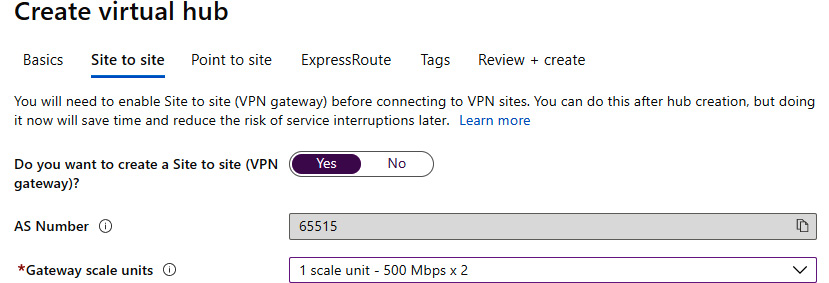
Figure 9.9: Configuring a Site-to-Site gateway
- The next optional setting is Point to site. If we choose to enable it, we need to select an option for Gateway scale units and Point to site configuration. Click on Create new to add a new configuration:
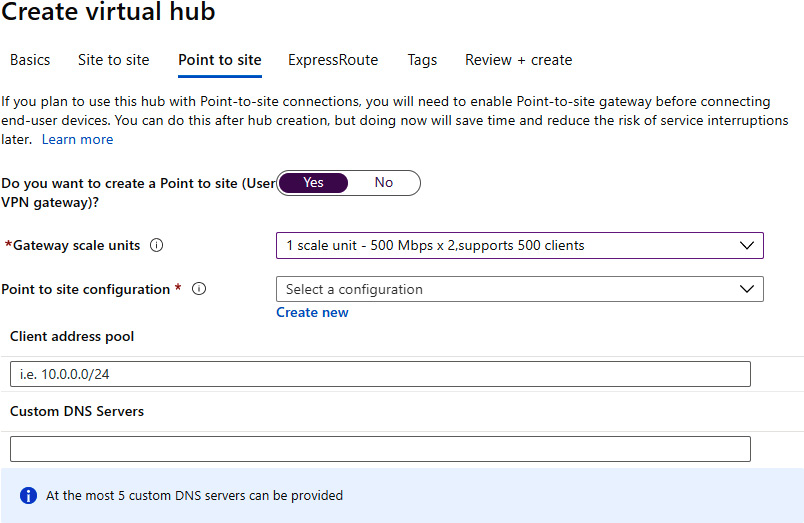
Figure 9.10: Configuring a Point-to-Site gateway
- In the new pane, we need to provide information for Configuration name, Tunnel type, and Authentication method. If Azure certificate is used, we need to provide certificate information (for more information about certificates, see the Creating a Point-to-Site connection recipe from Chapter 8, Creating hybrid connections):
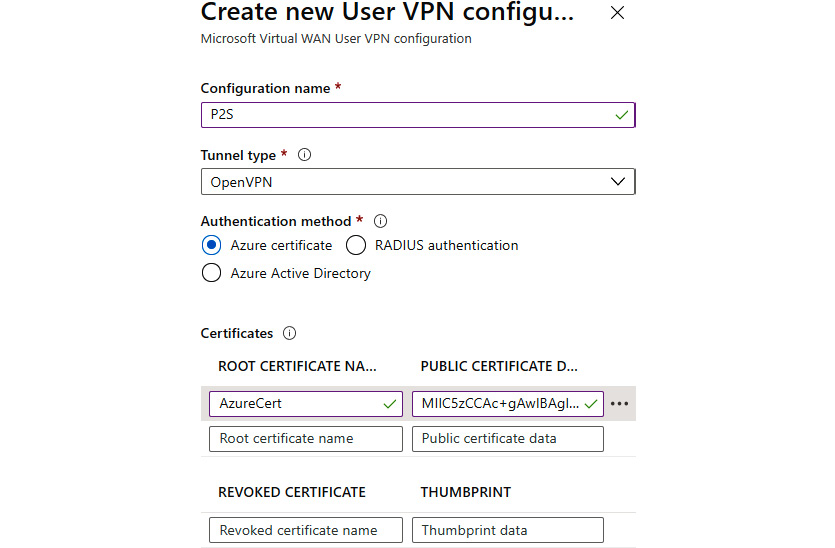
Figure 9.11: Creating a new VPN configuration
- After the Point-to-Site configuration is added, we are returned to the previous pane. We need to fill in the Client address pool field, and optionally Custom DNS Servers:
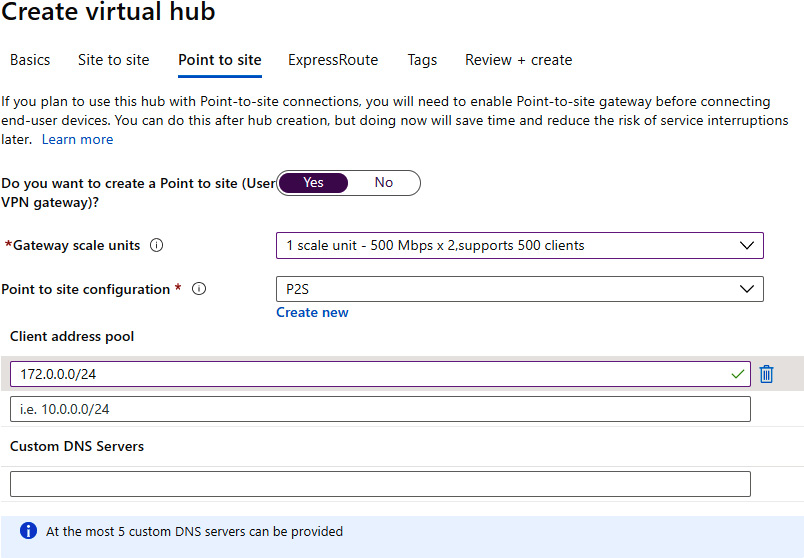
Figure 9.12: Adding Client address pool and Custom DNS Servers information
- The third optional setting is ExpressRoute. If we choose to enable it, we need to select an option for Gateway scale units:
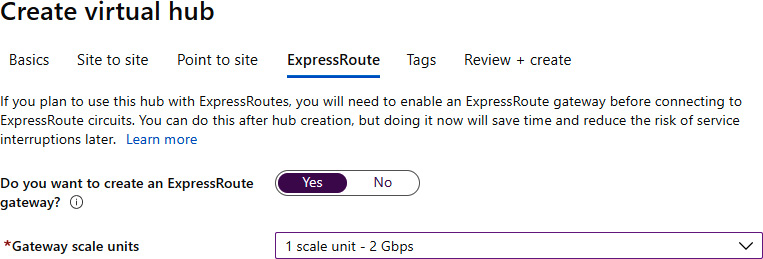
Figure 9.13: Configuring ExpressRoute
- We can optionally add tags, and then proceed with the creation of the virtual hub. It can take up to 30 minutes to complete deployment.
How it works…
Virtual hubs represent control points inside a region. From there, we can define all connections to virtual networks inside the region. This applies to Site-to-Site, Point-to-Site, and ExpressRoute. Each section is optional, and we can create a hub without any configurations for connection types. If we choose to create them at this point, we need to provide an SKU for each type. A Point-to-Site connection also requires the user's VPN configuration to be provided. Each connection type can be added at a later time as well.
In this recipe, we learned how to create a virtual hub. Let's move on to the next recipe and learn how to add a Site-to-Site connection in a virtual hub.
Adding a Site-to-Site connection (in a virtual hub)
After a virtual hub is created and the Site-to-Site SKU is defined inside the hub, we can proceed to create a Site-to-Site connection. For this, we need to apply the appropriate connection settings and provide configuration details.
Getting ready
Before you start, open the browser and go to the Azure portal via https://portal.azure.com.
How to do it…
In order to create a Site-to-Site connection in a virtual hub (under a virtual WAN), we must take the following steps:
- Find the virtual WAN and locate the previously created virtual hub under Hubs in the Connectivity section. Select that hub:

Figure 9.14: Selecting the previously created hub in the Connectivity section
- In the Virtual HUB pane, go to the VPN (Site to site) settings under Connectivity. Select the Create new VPN site option:
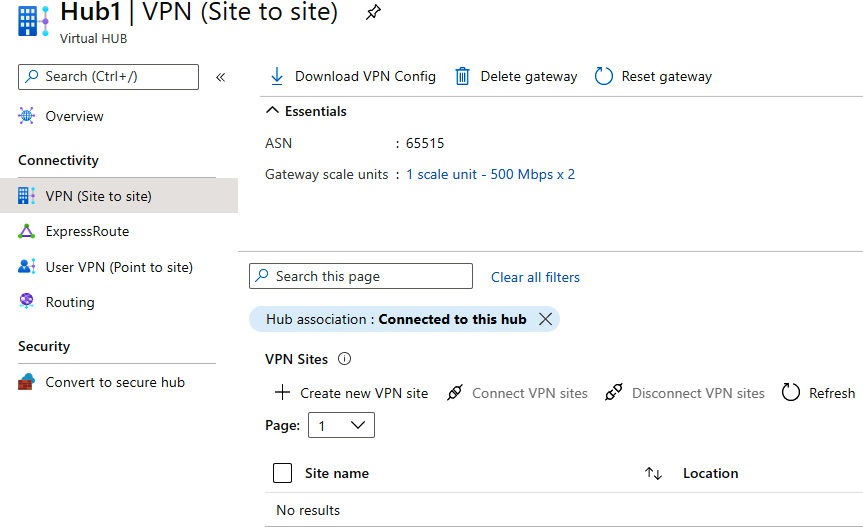
Figure 9.15: Selecting the Create new VPN site option in the Virtual HUB pane
- A new pane will appear. Subscription and Resource group are grayed out, as the VPN site is a child resource under the virtual WAN and must use the same options as the virtual WAN. We need to provide information in the Region, Name (of the VPN site), and Device vendor fields. We have the option to enable or disable Border Gateway Protocol (BGP). If BGP is not configured, we need to provide at least one private address space. We also need to define a hub (or more of them) that will be used in the connection:
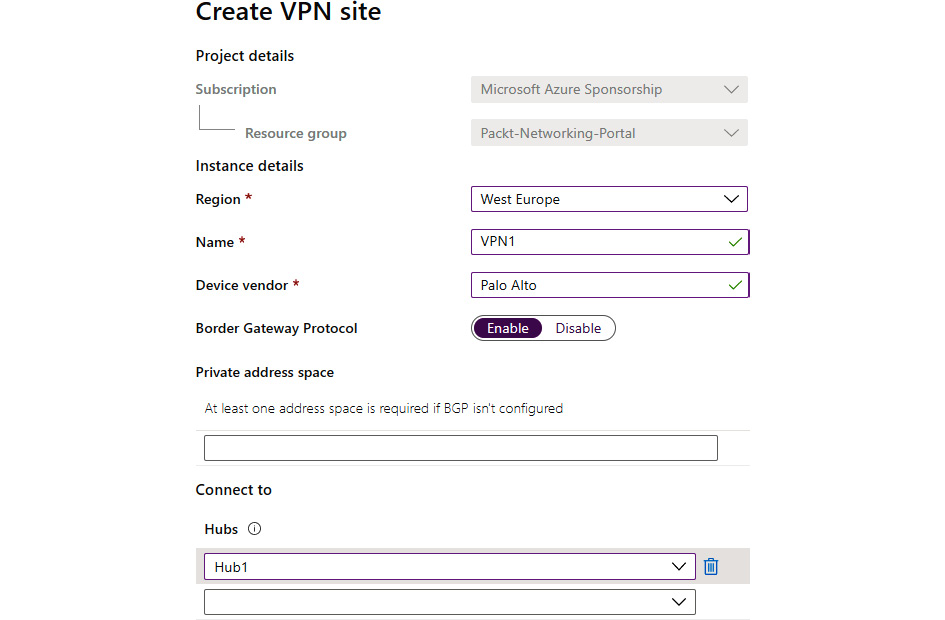
Figure 9.16: Creating a VPN site
- In the Links section of the VPN site, we need to provide information for Link name, Provider name, Speed (in Mbps), IP address / FQDN (of the VPN device we want to connect to), BGP address, and ASN as shown in Figure 9.17:

Figure 9.17: Providing link details in the Links pane
- After the VPN site is created, we can download the VPN configuration for the VPN device. After the VPN device is configured, we can select the VPN site and initiate the connection with the Connect VPN sites option:
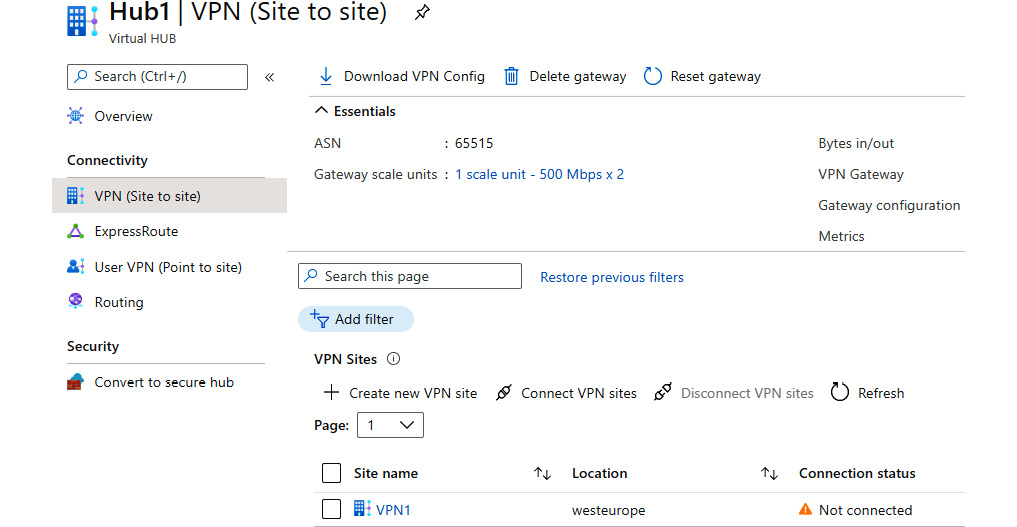
Figure 9.18: Clicking on the Connect VPN sites option to initiate the connection
- This will open a new pane. We must provide information for Pre-shared key (PSK), Protocol and IPSec, and choose options for Propagate Default Route and Use policy based traffic selector:
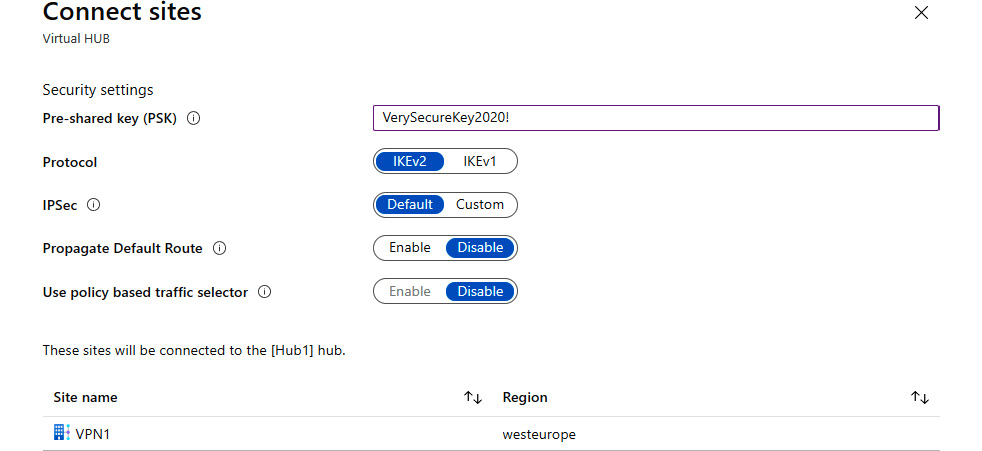
Figure 9.19: Providing information in the Connect sites pane
How it works…
Adding a Site-to-Site connection to our virtual hub allows us to connect to a virtual hub in a specific region from our on-premises network (or other networks using Virtual appliance). To do so, we must provide information about the VPN connection in the virtual hub and configure the VPN device that will be used to connect.
However, this allows us only to connect to the hub. We need to connect virtual networks in order to access Azure resources. In the next recipe, we'll see how to add a virtual network connection to the virtual hub.
Adding a virtual network connection (in a virtual hub)
A virtual hub represents a central point in an Azure region. But to actually use this point, we need to connect virtual networks to a virtual hub. Then, we can use the virtual hub as intended.
Getting ready
Before you start, open the browser and go to the Azure portal via https://portal.azure.com.
How to do it…
In order to add a virtual network connection in a virtual hub (under a virtual WAN), we must take the following steps:
- Find the virtual WAN and locate the previously created virtual hub under Virtual network connections in the Connectivity section. Select the Add connection option:
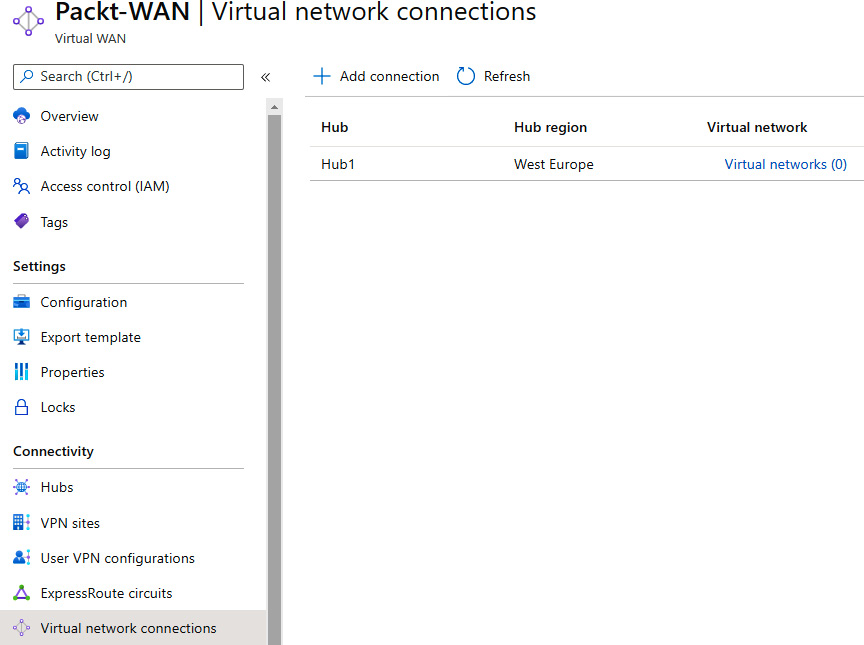
Figure 9.20: Adding a previously created virtual hub
- In the new pane, we need to provide information in the Connection name, Hubs, Subscription, Resource group, and Virtual network fields. Next, we need to provide Routing configuration information. We can select Yes for Propagate to none. If we select No, we need to provide information for Associate Route Table, Propagate to Route Tables, and Propagate to labels. Static routes is an optional setting:
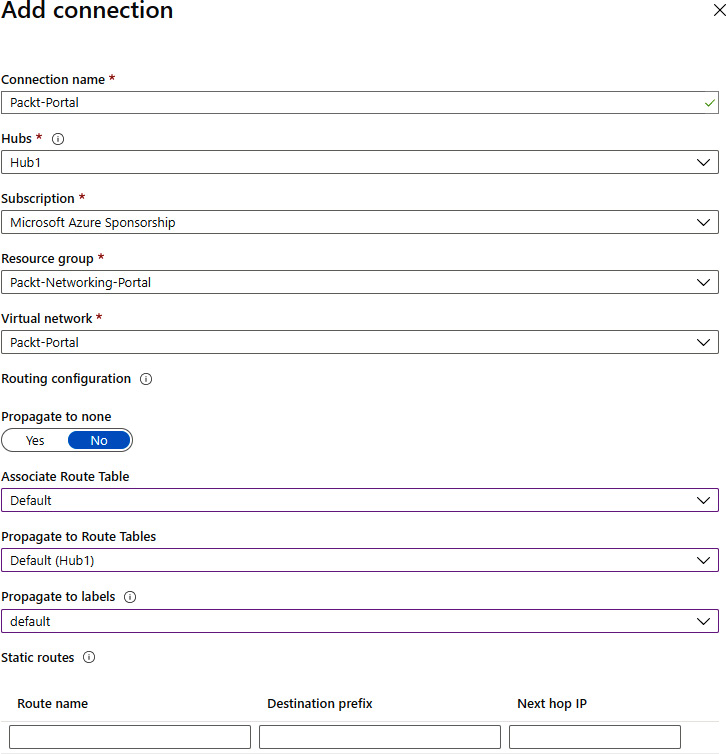
Figure 9.21: Configuring the virtual hub details
How it works…
Connecting a virtual network to a virtual hub will allow us to access resources when connected to the same hub. A connection can be made over a Site-to-Site connection, a Point-to-Site connection, or from another virtual network (connected to the same hub). When creating a connection, we need to provide routing and propagation rules in order to define the network flow. We can also define a static route. A static route will force all traffic to go through a single IP address, usually through a firewall or network virtual appliance.
Let's move on to the next recipe and learn how to create a Private Link endpoint.
Creating a Private Link endpoint
Private Link allows us to connect to PaaS services over a secure network. As these services are usually exposed over the internet, this gives us a more secure method of access. There are two components available to make a secure connection—a Private Link endpoint and a Private Link service. Let's start by creating a Private Link endpoint first.
Getting ready
We need to create a service that will be associated with the Private Link endpoint:
- Open the browser and go to the Azure portal via https://portal.azure.com. Select the option to create a new service. Search for SQL Server (logical server) and select the Create new option.
- In the new pane, we must provide information in the Subscription, Resource group, Server name (must be a unique FQDN), and Location fields. Finally, we must provide credentials for the administrator login before selecting Review + create:

Figure 9.22: Associating a new service with a Private Link endpoint
How to do it…
In order to deploy a new Private Link endpoint, we must take the following steps:
- Go to the Azure portal and select the option to create a new service. Search for Private Link and select the Create new option.
- In the new pane, Private Link Center, select Create private endpoint:

Figure 9.23: Creating a new Private Link endpoint
- In the new pane, under the Basics section, provide information for Subscription, Resource group, Name, and Region:

Figure 9.24: Basic information for the Private Link endpoint
- In the Resource section, we must select an option for Subscription, Resource type (in our case, Microsoft.Sql/servers), Resource (only resources of the selected resource type will be available), and Target sub-resource:
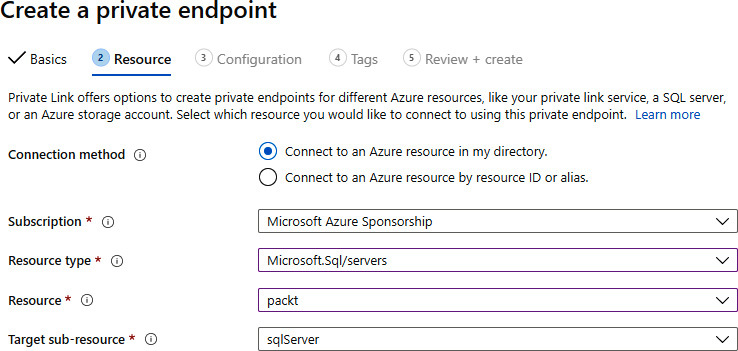
Figure 9.25: Configuring the resources for the Private Link endpoint
- On the Configuration pane, we must provide Networking settings and select the virtual network and subnet that will be associated. Optionally, we can add integration with a private DNS. If we choose to add DNS integration, we must provide information for Subscription and Private DNS zones:

Figure 9.26: Setting up the network configuration
How it works…
The Private Link endpoint associates the selected PaaS resource with the subnet on the virtual network. By doing so, we have the option to access the PaaS resource over a secure connection. Optionally, we can integrate a private DNS zone and use DNS resolution instead of IP addresses.
A Private Link endpoint allows us to link services directly but only individual services and only directly. If we need to add load balancers in place, we can use a Private Link service.
Creating a Private Link service
A Private Link service allows us to set up a secure connection to resources associated with Standard Load Balancer. For that, we need to prepare infrastructure prior to deploying the Private Link service.
Getting ready
We must create a virtual machine first. Check the Creating Azure virtual machines recipe from Chapter 2, Virtual machine networking. Note that in the Networking section, we want to select the same virtual network that was used to connect the SQL server in the previous recipe.
A Private Link service requires Standard Load Balancer as well. See the Creating a public load balancer, Creating a backend pool, Creating health probes, and Creating load balancer rules recipes from Chapter 10, Load balancers. Note that in the backend target, we need to select the virtual machine we just created.
Now, open the browser and go to the Azure portal via https://portal.azure.com.
How to do it…
In order to deploy the new Private Link service, we must take the following steps:
- In the Azure portal, select the option to create a new service. Search for Private Link and select the Create new option.
- In the new pane, Private Link Center, select Create private link service:
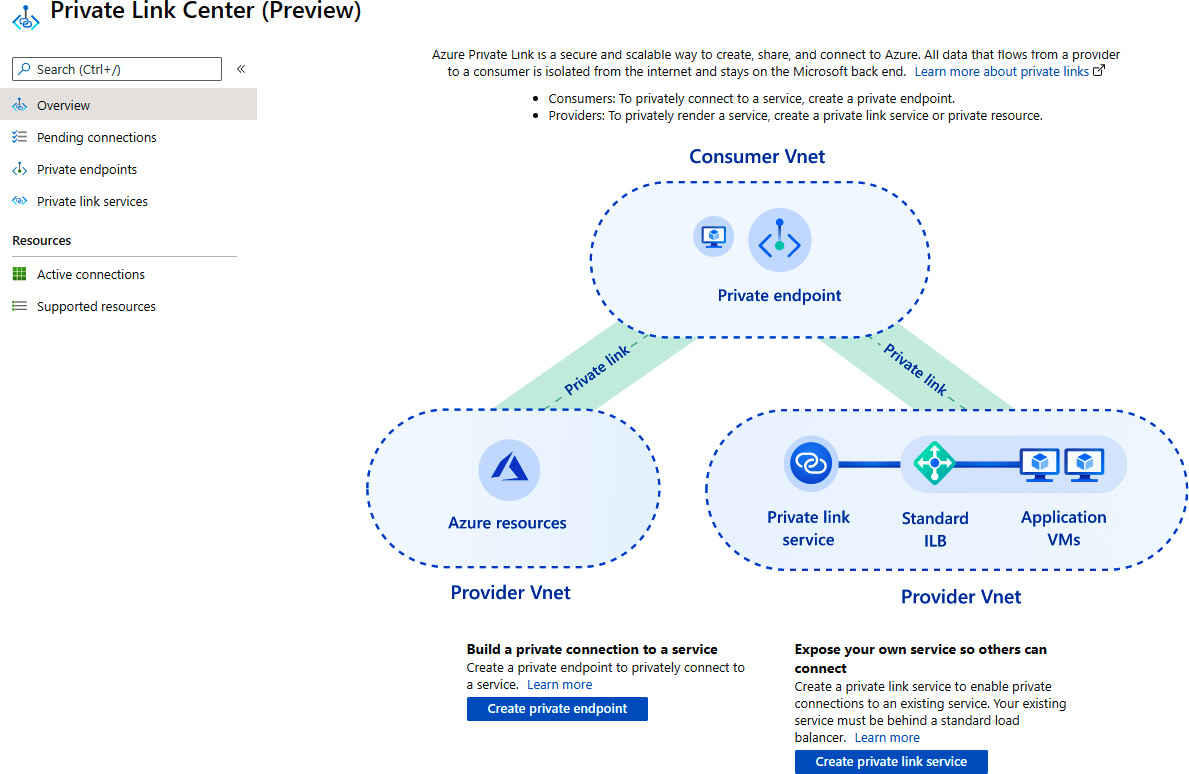
Figure 9.27: Creating a new Private Link service
- Under Basics, we need to provide information for Subscription, Resource group, Name, and Region:

Figure 9.28: Information about the new Private Link service
- Under Outbound settings, we must select options for Load Balancer, Load Balancer frontend IP address, and Source NAT subnet. Source NAT Virtual network is automatically selected and grayed out. We can also select Yes or No for Enable TCP proxy V2 and whether the private IP address is going to be dynamic or static:
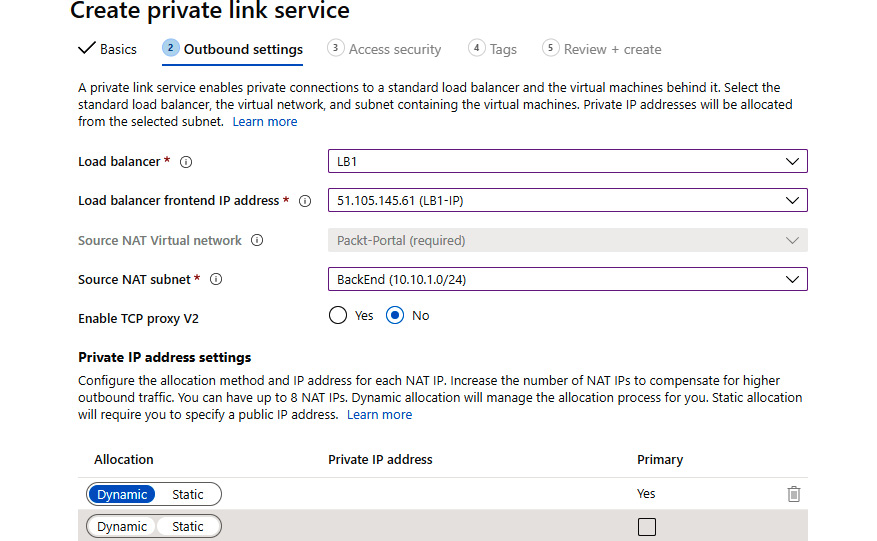
Figure 9.29: Configuring the outbound settings
- In Access security, we can select who can request access to our service. The options are Role-based access control only (RBAC), Restricted by subscription, and Anyone with your alias. The default and recommended option is to use RBAC as native access control in Azure:
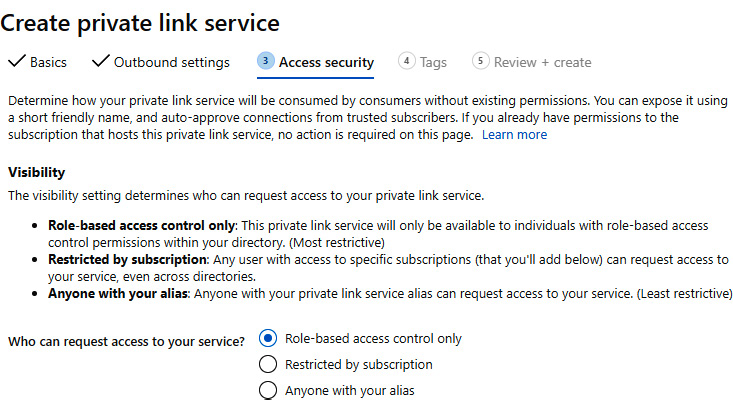
Figure 9.30: The Access security pane
How it works…
A Private Link service and a Private Link endpoint work in a similar way, allowing us to connect to services (that are by default publicly accessible) over a private network. The main difference is that with a Private Link endpoint, we link PaaS services, and with a Private Link service, we create a custom service behind Standard Load Balancer.