The interview is an essential element of news and magazine reporting. It provides for a factual testimony from a participant or witness to an event. Interviews can be shot in a location that reinforces the story and possibly gives more information to the viewer about the speaker (e.g. office, kitchen, garden etc.). The staging of an interview usually involves placing the interviewee against a suitable background that may echo the content or reinforce the identity of the guest. Exterior interviews are easier to stage when there is a continuity of lighting conditions such as an overcast day or where there is consistent sunshine. The natural lighting will have to cater for three shots and possibly three camera positions – an MCU of the interviewee, a similar sized shot of the interviewer and some kind of two-shot or ‘establishing’ shot of them both. If it is decided to shoot the interview in direct sunlight, then the interview needs to be positioned with the sun lighting both ‘upstage’ faces (i.e. the camera is looking at the shaded side of the face) using a reflector to bounce light into the unlit side of the face. The position of the participants can be ‘cheated’ for their individual close shots to allow a good position for modelling of the face by the sun. Because of the intensity of sunlight and sometimes because of its inconsistency, it is often preferable to shoot the interview in shade avoiding backgrounds that are in the full brightness of the sun. After the interview has been shot, there is often the need to pick up shots of points raised in the interview (e.g. references to objects, places or activity etc.). In order for normal ‘invisible’ editing to be applied, the shots should match in size and lens angle between interviewee and interviewer.
Crossing the line
There may be a number of variations in shots available depending on the number of participants and the method of staging the discussion/interview. All of these shot variations need to be one side of an imaginary line drawn between the participants. To intercut between individual shots of two people to create the appearance of a normal conversation between them, three simple rules have to be observed. Firstly, if a speaker in a single is looking from left to right in the frame then the single of the listener must look right to left. Secondly the shot size and eyeline should match (i.e. they should individually be looking out of the frame at a point where the viewer anticipates the other speaker is standing). Finally, every shot of a sequence should stay the same side of an imaginary line drawn between the speakers. Most interviews will be edited down to a fraction of their original running time. Be aware of the need for alternative shots to allow for this to happen. Make sure your two-shots, cutaways, reverse questions, noddies etc. follow the interview immediately. Not only does this save the editor time in shuttling but light conditions may change and render the shots unusable. Match the interviewee and interviewer shot size. If the interview is long, provide cutaways on a separate tape. Listen to the content of the interview, which may suggest suitable cutaways.
• |
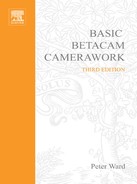
Set interviewee’s position first, ensuring good background and lighting. |
• |
Then set interviewer beside camera lens (A) to achieve a good eyeline on the interviewee. |
• |
It is useful for editing purposes to precede the interview with details of name and title of the interviewee. |
• |
Remind the reporter and interviewee not speak over the end of an answer. |
• |
Do not allow interviewee to speak over a question. |
• |
Agree with the journalist that he/she will start the interview when cued (or take a count of 5) when the camera is up to speed. |
• |
Record the interviewee’s shot first, changing size of shot on the out-of-frame questions. |
• |
Reposition for the interviewer’s questions and ‘noddies’ (B).An over-the-shoulder two-shot from this position can be useful to the editor when shortening the answers. |
• |
Match the MCU shot size on both participants. |
• |
Do cutaways immediately after interview to avoid changes in light level. |
• |
Always provide cutaways to avoid jump cuts when shortening answers. |
• |
A wide two-shot of the two participants talking to each other (without sound) can be recorded after the main interview if the shot is sufficiently wide to avoid detecting the lack of lip synch if the shot is used for editing purposes in mid-interview (C). |
• |
Watch that the background to an establishing two-shot is from a different angle to any cutaway shot of the subject. For example, a wide shot of the ruins of a fire is not used later for the background to an interview about the fire. This causes a continuity ‘jump’ if they are cut together. |
• |
Think about sound as well as picture, e.g. avoid wind noise, ticking clocks or repetitive mechanical sounds etc., in background. |
• |
Depending on the custom and practice of the commissioning organization that cut the material, use track 1 for v/o and interview, and use track 2 for effects. |
• |
Indicate audio track arrangements on the cassette and put your name/story title on the tape. |