
10
Power Platform
Dynamics 365 Marketing is a very powerful tool on its own, but the real power is in the Microsoft ecosystem. Microsoft Power Platform is a collection of low-code tools to help companies achieve more. You can see the different tools in Power Platform in Figure 10.1:

Figure 10.1 – Microsoft Power Platform
We are not going to go through all these applications. In this chapter, we’re going to focus on the tools that have the most impact on Dynamics 365 Marketing. We will go through how you can make changes and customizations with Dataverse and Power Apps. For everything you want to automate, you can utilize the capabilities of Power Automate.
In this chapter, we will scratch the surface of the following areas, so make sure you look through the resources in the Further reading section for a deeper understanding of them:
- Dataverse
- Power Apps
- Power Automate
- Power Pages
- Customer Insights
By the end of this chapter, you will know how to customize the data model in Dataverse to adhere to your company’s needs, how to make changes to model-driven apps to customize your marketing application, and how to use canvas apps to create apps for all of your company’s needs. We’ll look at how you can make life easier and more automated with Power Automate. The event portal built into Power Pages is something that can help you, as can getting a 360-degree view of your customer with Customer Insights.
Dataverse
Dataverse is the database that all Dynamics 365 Customer Relationship Management (CRM) applications are built upon. You cannot have a Dynamics 365 solution built on something other than Dataverse. Dynamics 365 Marketing cannot be set up on-premises. Power Pages and model-driven Power Apps also run exclusively on Dataverse. Dataverse is where you make your customizations to the database, and where you can add specific things that are just relevant to your company. This can be a column on the account where you register a local VAT number, or have your own membership number that you want to register.
In Dataverse, everything is stored in tables. A table contains several columns where you add information specific to each row.
In Figure 10.2, you can see the following:
- Table name: Account
- Row: MaCoTra AS
- Column: https://www.macotra.no/:
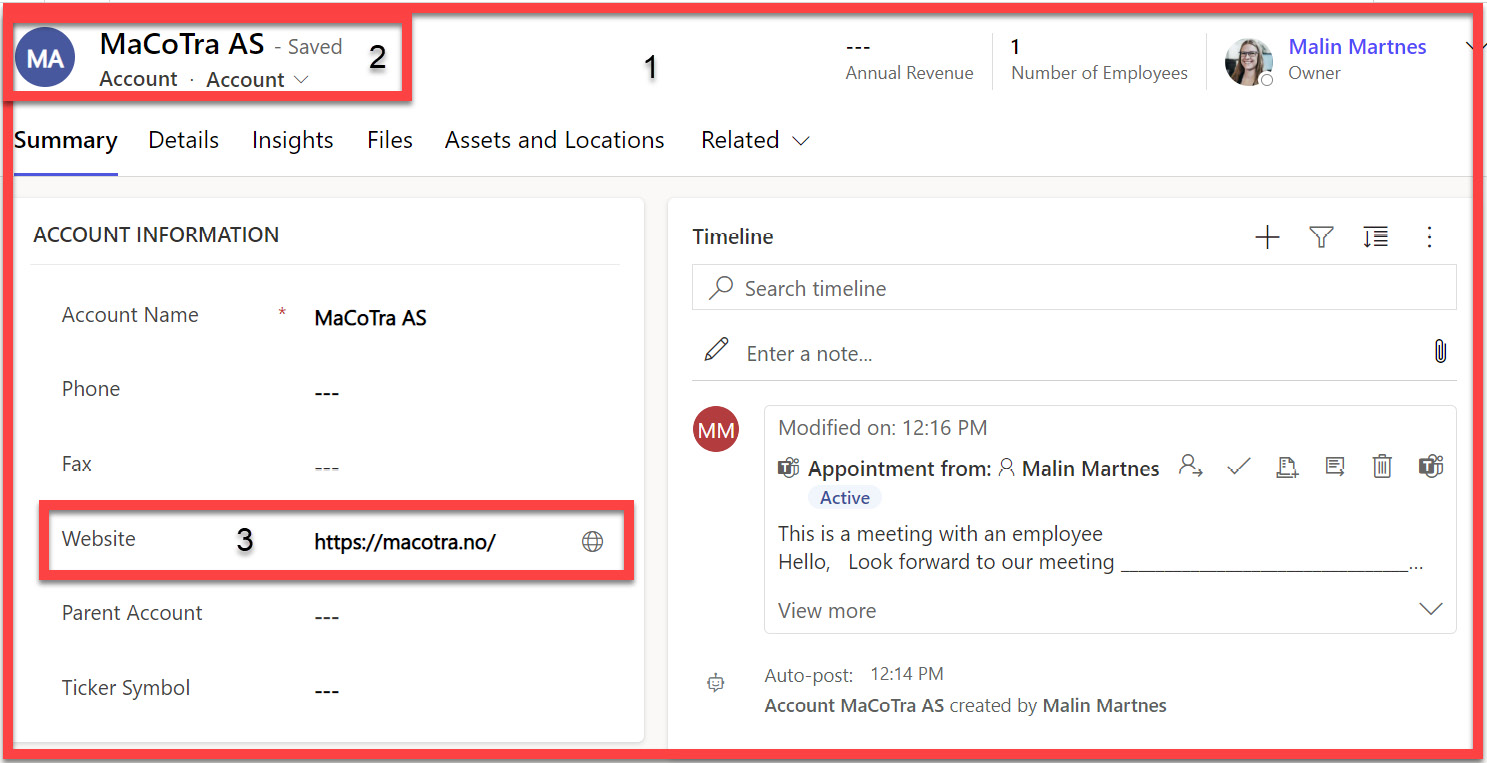
Figure 10.2 – Account table
All of your data is stored in tables, and all of your tables have several columns. The data is stored in separate rows.
But we don’t start from a blank canvas when we set up a new Dynamics environment. Let’s go through what is behind this.
Microsoft, together with Adobe and SAP, has collaborated and created the Open Data Initiative (ODI). The ODI is a collection of standard data formats. These companies work together so that every company that uses one of their solutions can easily integrate and have a familiar data structure in their environments. The core of the ODI is the Common Data Model (CDM), which is the definition of how data should look and how it should interact with other data sources. The CDM is a defined data schema with core tables that you can customize, and you can also add your own tables with your own data but still have the foundation in place. It is a way for you to have a predefined data schema rather than starting from scratch.
Dataverse is built on the CDM and has predefined tables, such as the following:
- Account
- Contact
- Activity
- Phone Call
- Owner
- Task
- Currency
In addition to this, when you add one or more of the Dynamics 365 applications, you will get a set of predefined tables.
A very important aspect of using Microsoft technology is its built-in security. Let’s look at how this is sorted in Dataverse and Dynamics 365.
Security
For users to have access to Dataverse, they need the following:
- The user must be created in Azure Active Directory (AAD)
- The correct license
- One or more security roles
Security is a big topic and this is a short chapter, so we cannot cover everything about security here. To learn and understand more about security and how it’s set up, I recommend reading the Learn module from Microsoft, which specifies security concepts in Dataverse: https://learn.microsoft.com/en-us/power-platform/admin/wp-security. In the Microsoft 365 admin center, you can add your users and give them the right licenses so that they have access to your tenant. The next thing to do is go to the Power Platform admin center and give the user the security role. The security role is what gives you access to each table and tells the system what data you should have access to.
Solutions
Every change you make in the system should be made in Solutions. You can find your solutions at https://make.powerapps.com/, as shown in Figure 10.3:

Figure 10.3 – Solutions in make.powerapps.com
As you can see in Figure 10.3, you must make sure you’re in the right environment, which can be changed at the top right. You must create a solution and do all the customizations and development you want to do to the system. Solutions can be lifted from one environment to the next.
Once you’ve created your solution, you can fill it with the existing tables to make changes to these. In Figure 10.4, you can see that I’ve added the Account and Contact tables to my solution:

Figure 10.4 – Tables added to a solution
Now, I can make changes to the Account and Contact tables. I can also create my own tables; let’s go through how that’s done.
Creating new tables
To create a new table, click + New | Table, as shown in Figure 10.5:
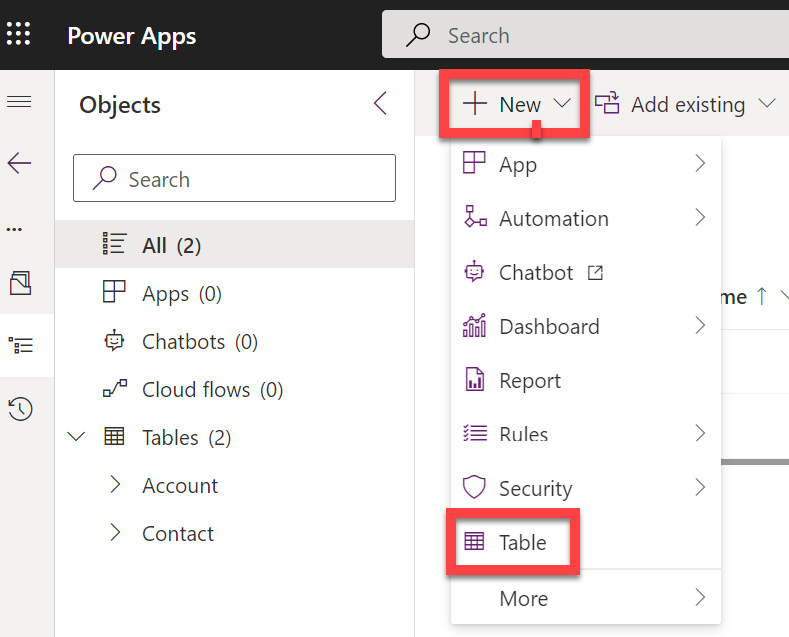
Figure 10.5 – Creating a new table
You will see a window where you can fill in the Display name field to give your table a new name, as shown in Figure 10.6:
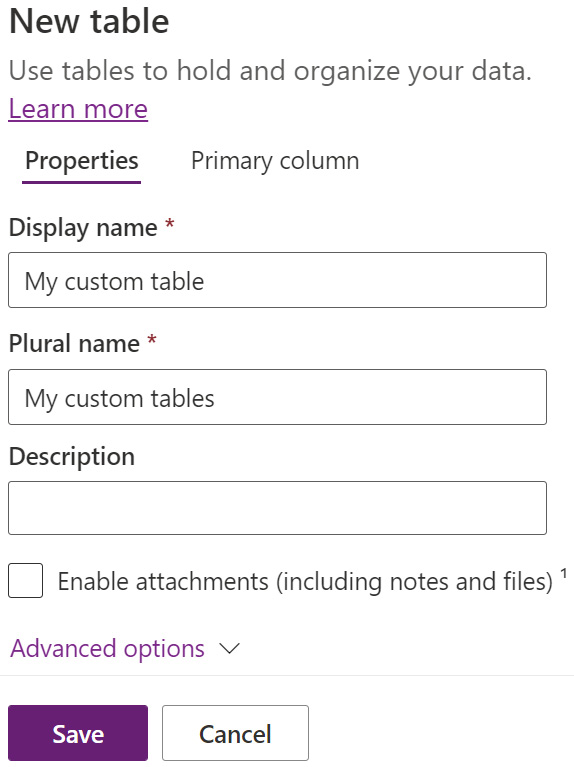
Figure 10.6 – Naming a new table
Be aware that there are a lot of important options in the Advanced options area, so make sure you go through them before clicking Save. Once the table has been saved, you can see it in your solution, as shown in Figure 10.7:

Figure 10.7 – The new table in your solution
Several columns are created when you save the table, but you will also need to create your own columns. Let’s go through how you can create new columns for your new table.
Creating new columns
Once your new table has been created, you can add a new column by clicking + New | Column, as shown in Figure 10.8:

Figure 10.8 – Creating a new column
When you create a new column, you must select a Data type option, as shown in Figure 10.9:
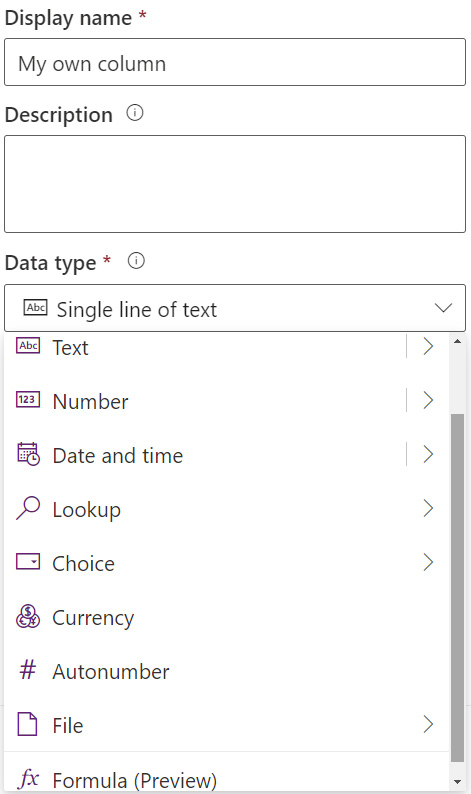
Figure 10.9 – Data type for a new column
The data type cannot be changed after the new column is saved; you must delete and create it again.
When you’ve saved the column, you can go into Columns and check that it’s been added, as shown in Figure 10.10:
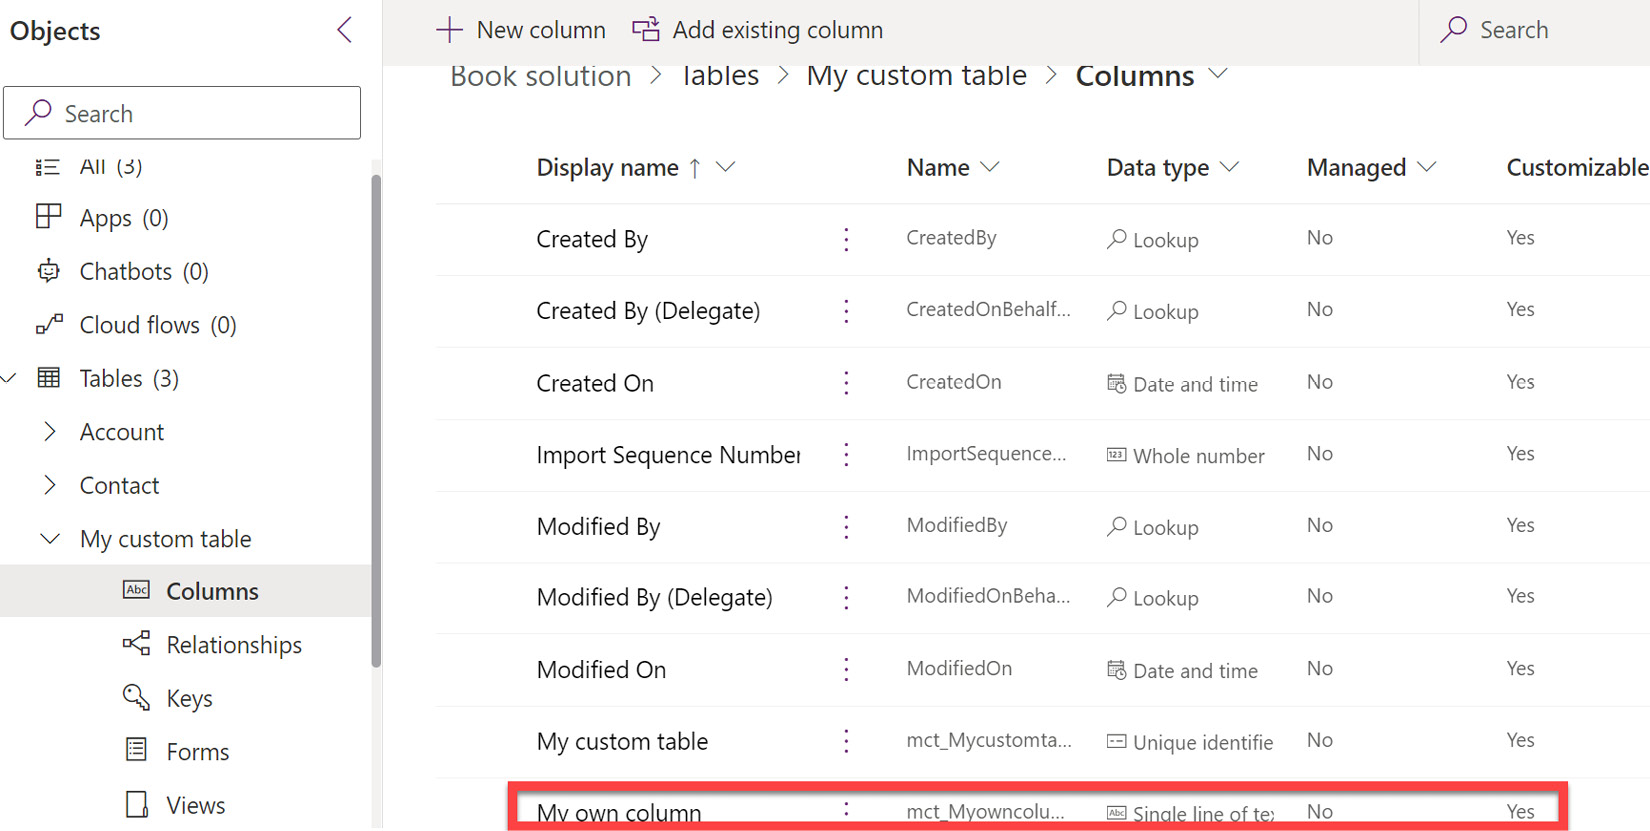
Figure 10.10 – My column
Now that we’ve created a table with a column, it’s time to create our form so that we can see and create rows.
Creating forms
To create a new form, click on + New | Form and select the type of form you want to create, as shown in Figure 10.11:

Figure 10.11 – Creating a new form
The most used form is Main Form. When you click on + Main Form, a new form will be created with the default column (often the Name column) and the Owner column. As you can see in Figure 10.12, the new form is in the middle of the screen and you can see our columns, including the one we just created, on the left-hand side:

Figure 10.12 – New form with the new column shown
We can now drag the created column into the form, save and publish our form, and start using our new form, which shows our new table with our new column.
We can also add other components, not just columns, to a form – you can see the other components in Figure 10.13:
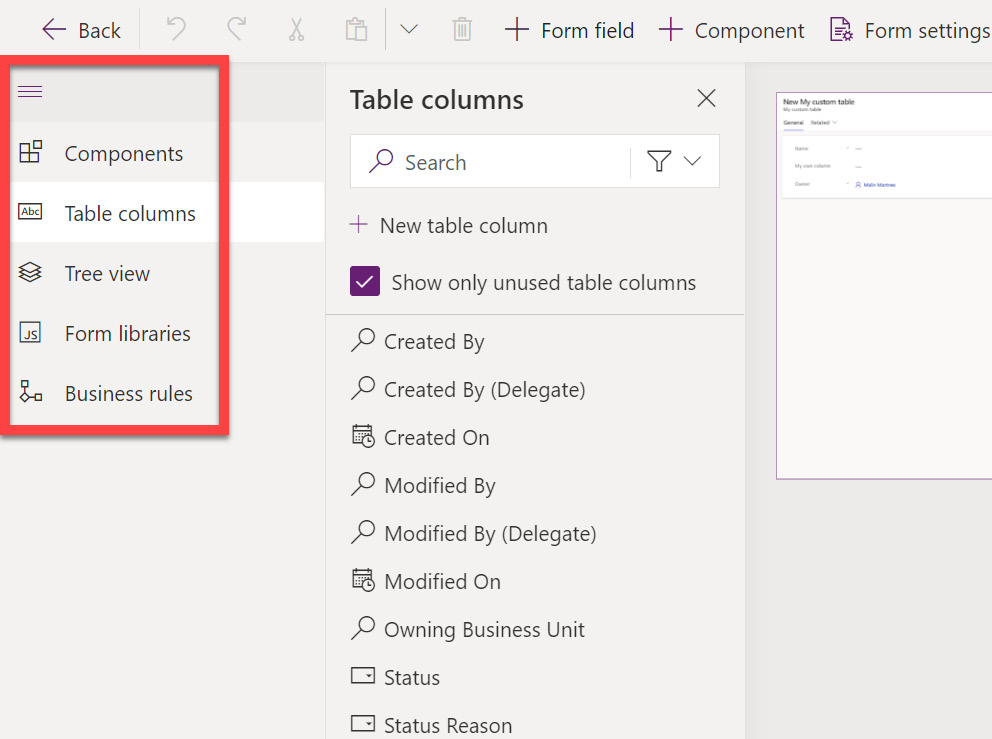
Figure 10.13 – Adding other components
Now that we’ve created the form for our new table with our new column, how are we going to consume this data? We can create views to do this.
Creating views
Back in the solution, we can click on + New again and create a new view by selecting View, as shown in Figure 10.14:

Figure 10.14 – Creating a new view
When we click on View, we get a popup in which we can give the view a name, as shown in Figure 10.15:
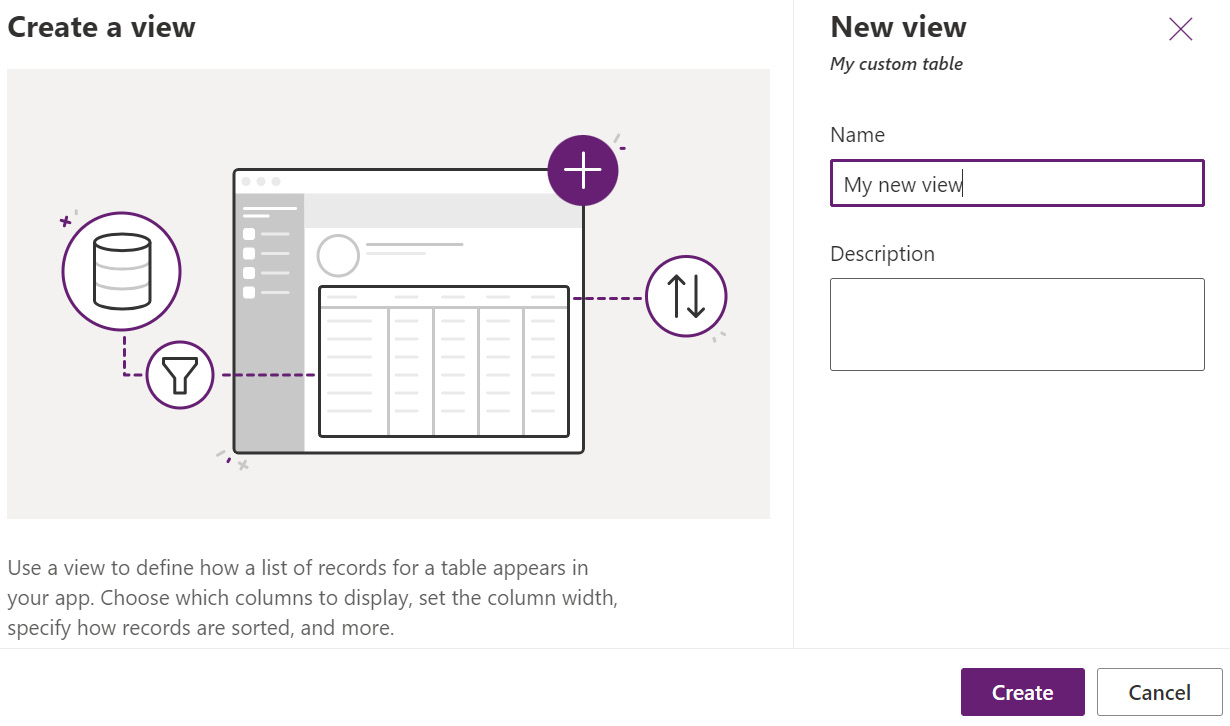
Figure 10.15 – Naming a new view
We can then add the column of our choice to the view. As you can see in Figure 10.16, I’ve added the column we created previously:
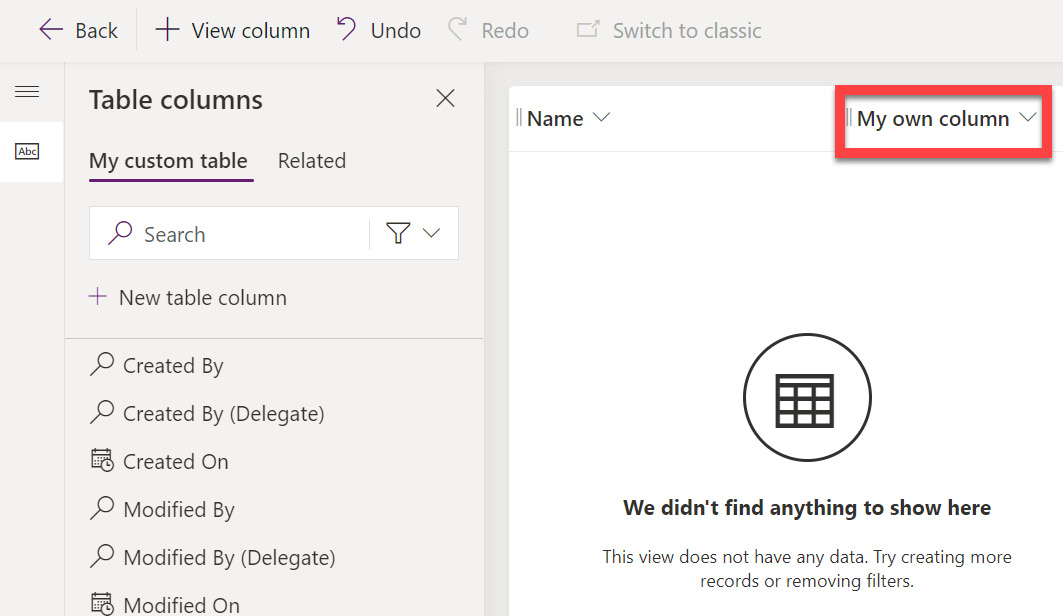
Figure 10.16 – Adding a column to the view
We can now save and publish the view. With that, our new table, with the new column, is ready to be viewed.
Now, let’s talk about Power Apps and how you can put all of this together to create your own apps to show the data.
Power Apps
Power Apps consists of two different tools for creating apps:
- Model-driven
- Canvas
There are several templates you can use when creating both model-driven and canvas applications. These are very good for learning purposes, so make sure you check out the templates and learn how they’re built.
Let’s look at how to use these solutions.
Model-driven
Every CRM application in Dynamics 365 is a model-driven Power Apps app. This means that if you know how to edit and create a model-driven app, you know how to make changes to your Dynamics 365 Marketing solution to customize it to your company’s needs. Let’s start with how you can edit an existing app.
Editing apps
To be able to edit an existing app, you must first add it to your solution. You can do this by clicking Add existing | App, then Model-driven app, as shown in Figure 10.17:

Figure 10.17 – Adding an existing model-driven app
Then, you can select the app you want to edit. The app will now appear in your solution and you can click on it to make changes.
When you open the app, you will see the app on the middle screen, information about the app on the right, and your pages and options on the left-hand side, as shown in Figure 10.18:

Figure 10.18 – Editing the Marketing application
Let’s add the table that we created earlier in this chapter. Click + Add page, as shown in Figure 10.18; you will get a popup in which you can choose from the following page types:
- Table based view and form
- Dashboard
- Custom
This is shown in Figure 10.19:
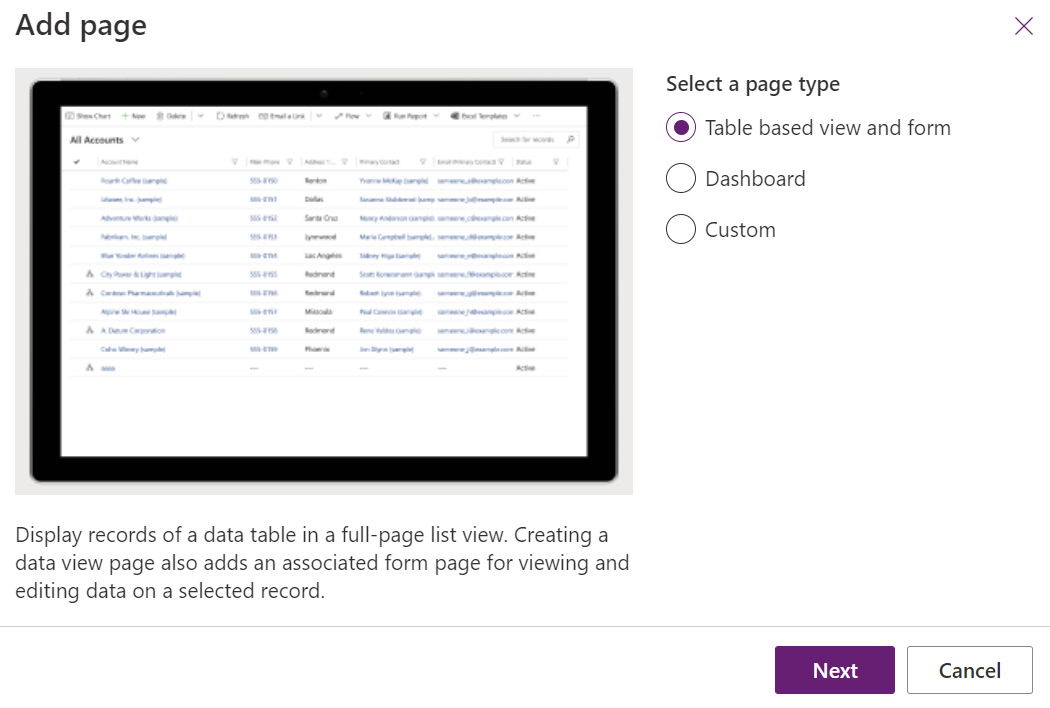
Figure 10.19 – Adding a page to an app
When you click Next, you can select the tables you want to add. You can select existing tables or create new tables. In Figure 10.20, you can see that I’ve searched for and selected the table we created. I’ve also checked the checkbox for it to show in the navigation, as shown in Figure 10.20:
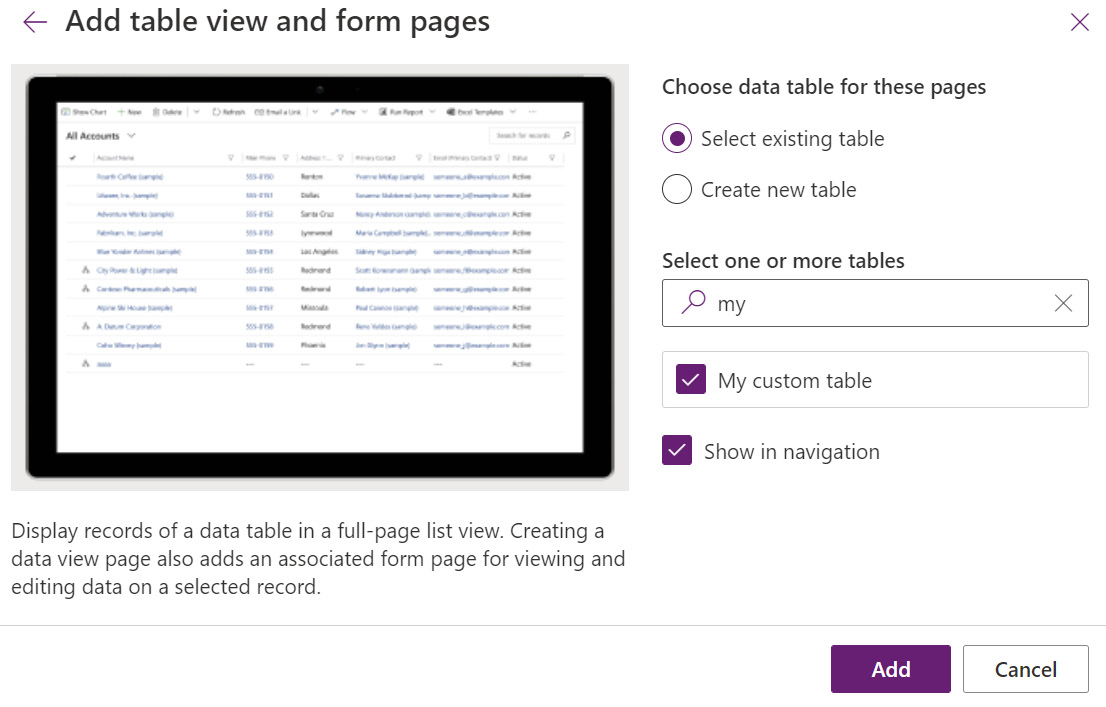
Figure 10.20 – Selecting the table
When I click Add, My custom table is added to the solution. I can also see that my new view is available, and I can immediately see that the app works and that I can add a new row for my custom table, where My own column has already been added to the form, as shown in Figure 10.21:
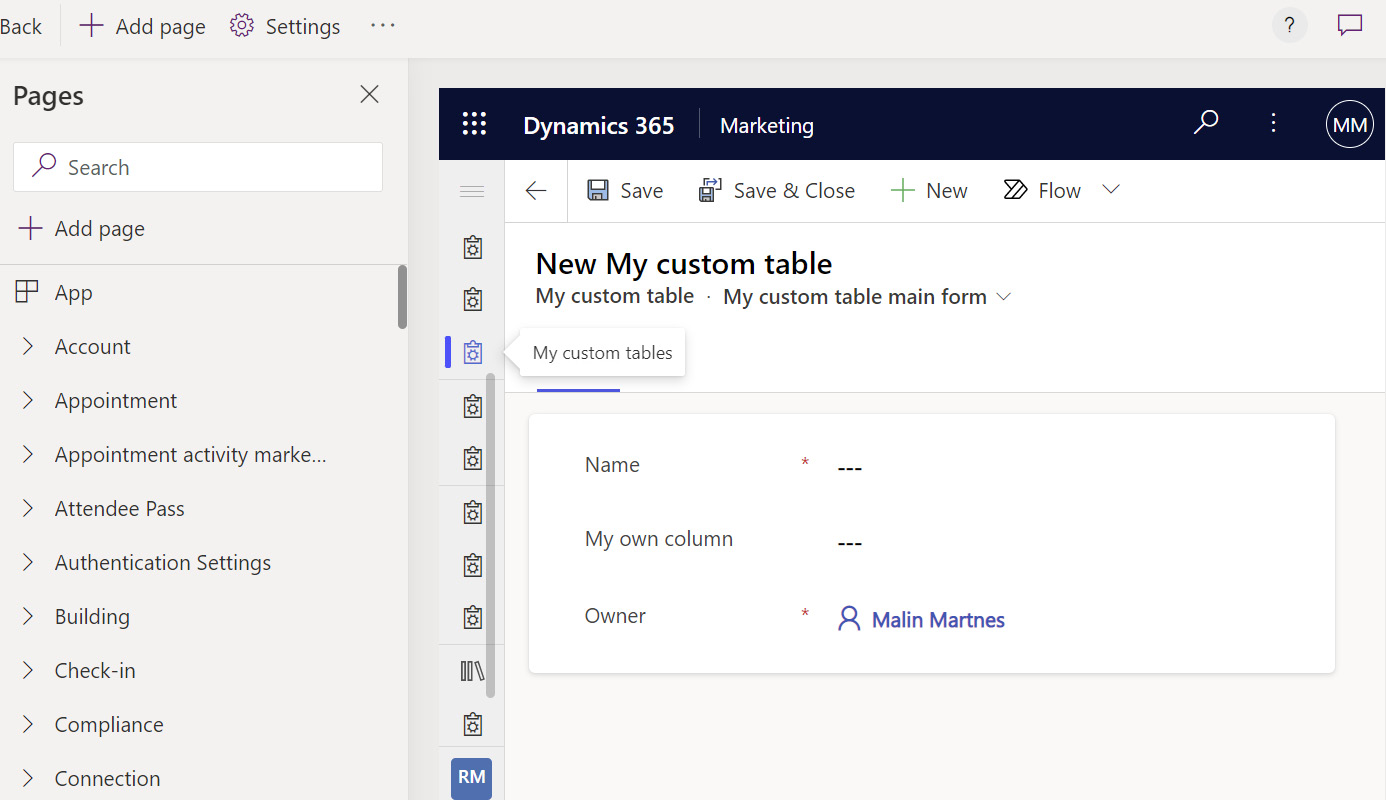
Figure 10.21 – My custom table added to the Marketing app
You can also make changes to Navigation if you want to add another subsection or move the different tables around. You can even remove parts of Navigation if nobody is using them.
Let’s say you want to use the Real-time marketing (RTM) area, so you want to have everything you need in this area. The Customer section is in the Outbound marketing area, as of October 2022. By making changes in Navigation and clicking on the three dots in the group (where you can find Accounts, Contacts, and more), you can move the entire section up to the RTM area, as shown in Figure 10.22:
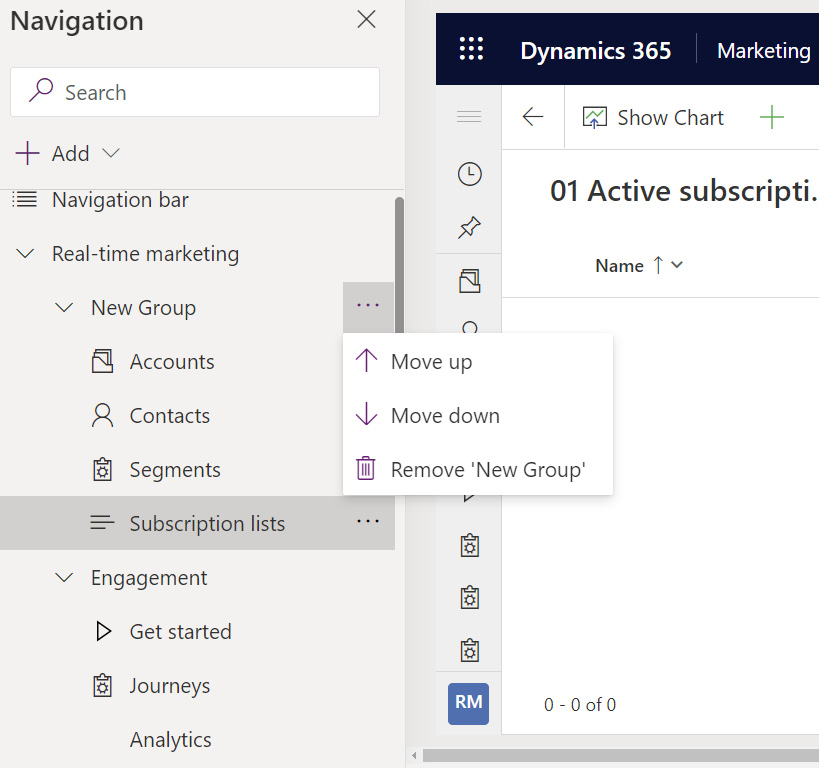
Figure 10.22 – Moving a group up and down
Click Save and then Publish to go live with the changes. Now, when I open the Marketing app, I will see that this section has moved and is now in the RTM area, as shown in Figure 10.23:

Figure 10.23 – Changes in Navigation in the Marketing app
I can also see that My custom tables has been added to the solution, and I can start working with this table.
With that, we’ve made changes to the existing Marketing application, but we can also create our own applications, where we can have much simpler navigation. You can create as many applications as are needed in your environment.
Creating new apps
To create a new app, you go back to your solution and click + New | App | Model-driven app, as shown in Figure 10.24:

Figure 10.24 – Creating a new model-driven app
Here, you can give your new app a name and start adding pages to your application in the same way that you can make edits to an existing app. In Figure 10.25, you can see that I’ve added Account, Contact, and My custom table to the application:

Figure 10.25 – My new model-driven app
The app is now ready to be saved and published and shared with the users that will benefit from this app.
This is the no-code way to create a new application. Now, let’s look at the other Power Apps app you can create: the canvas app.
Canvas
There are several ways to create a new canvas app. You can start from the solution and click + New | App | Canvas app, as shown in Figure 10.26:

Figure 10.26 – Creating a new canvas app
The first thing you must do is select your format: Tablet or Phone. This is an important step and cannot be changed later. When you start this way, you will get a blank app, as shown in Figure 10.27:

Figure 10.27 – A blank canvas app
Starting from a blank app means that you will have to do all the setup yourself and for this, you will need to know some basics about canvas apps. I have recommended several books in the Further reading section of this chapter where you can learn more about creating canvas apps.
The easiest way to create a canvas app when you’re using Dataverse is to start from data. As you can see in Figure 10.28, you can create your apps from the following options:
- Blank
- Dataverse
- SharePoint
- Excel
- SQL
- Image
- Figma
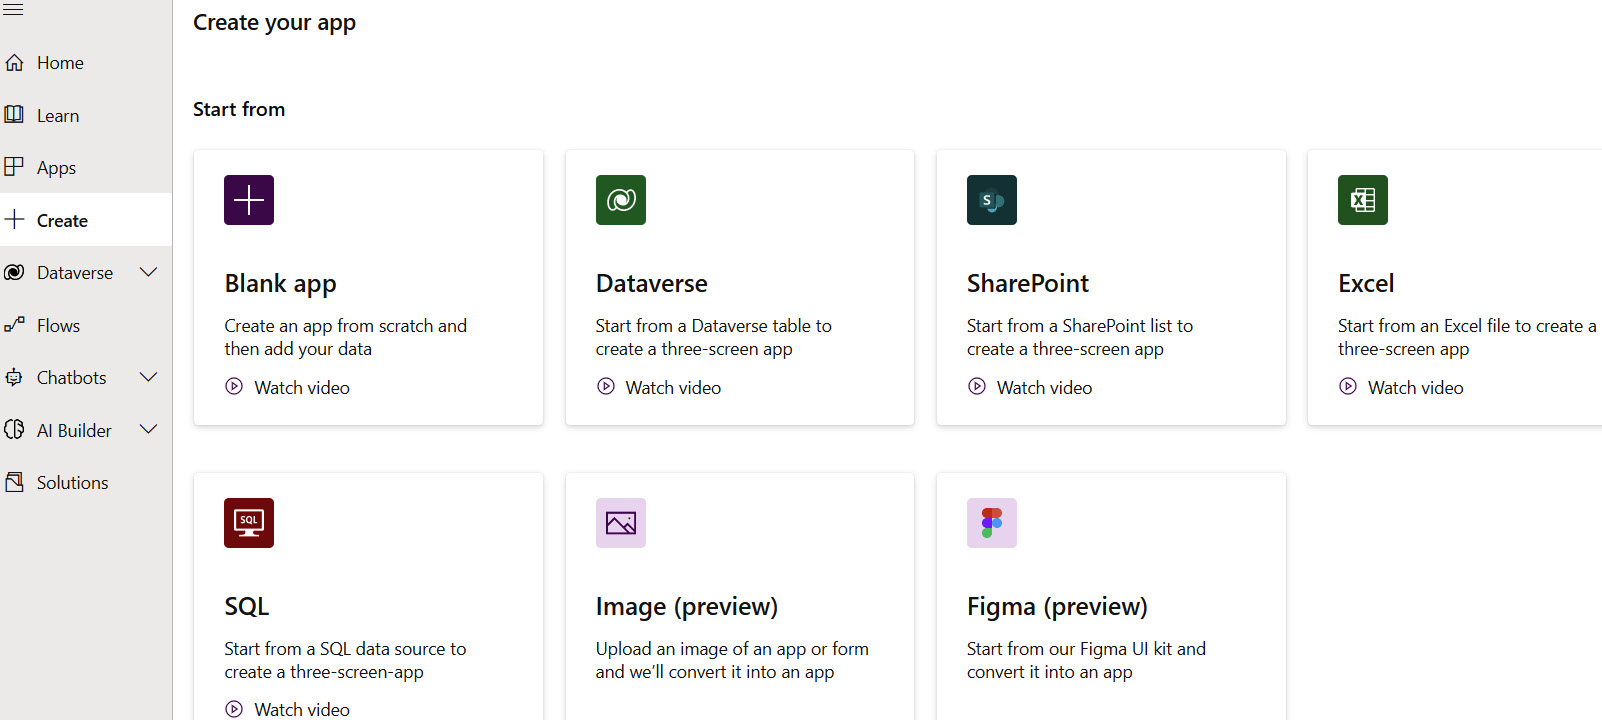
Figure 10.28 – Create your app
I selected Dataverse, so now, I must connect to the right environment and choose a table. In Figure 10.29, you can see that I’ve selected My custom tables, which we created earlier in this chapter:
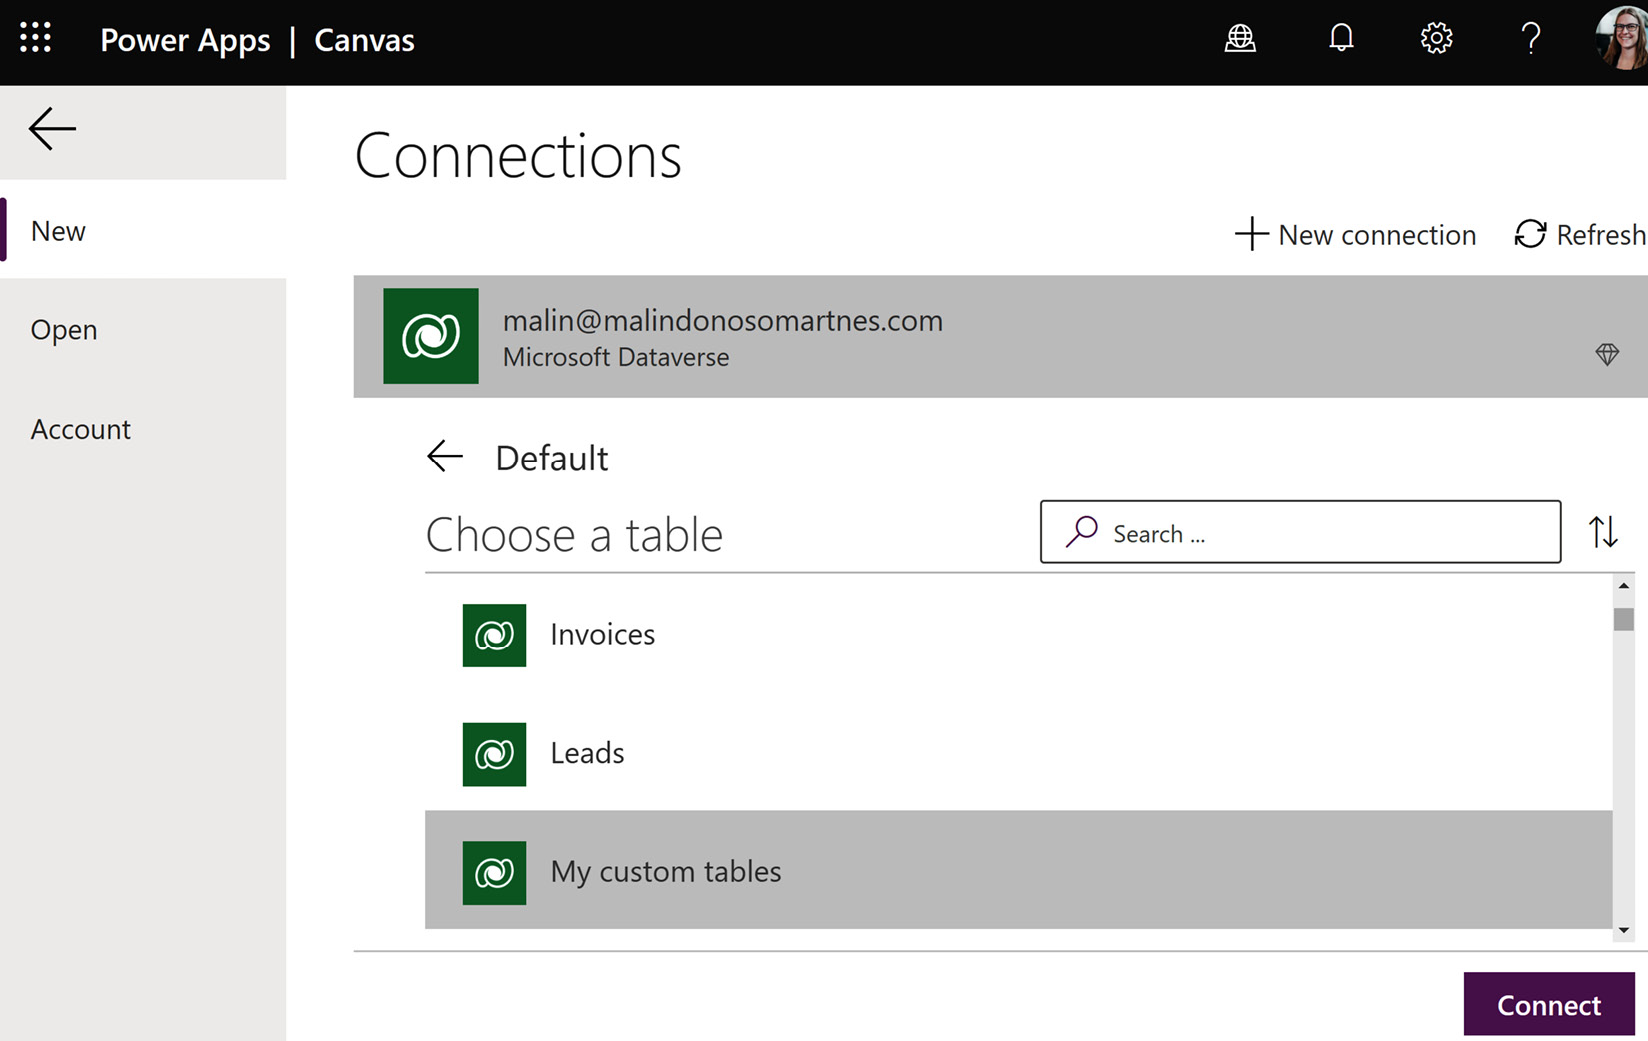
Figure 10.29 – Creating a canvas app from Dataverse
When I click Connect, Microsoft creates a three-screen application for me, which I can start using or editing. You can see the app in Figure 10.30:
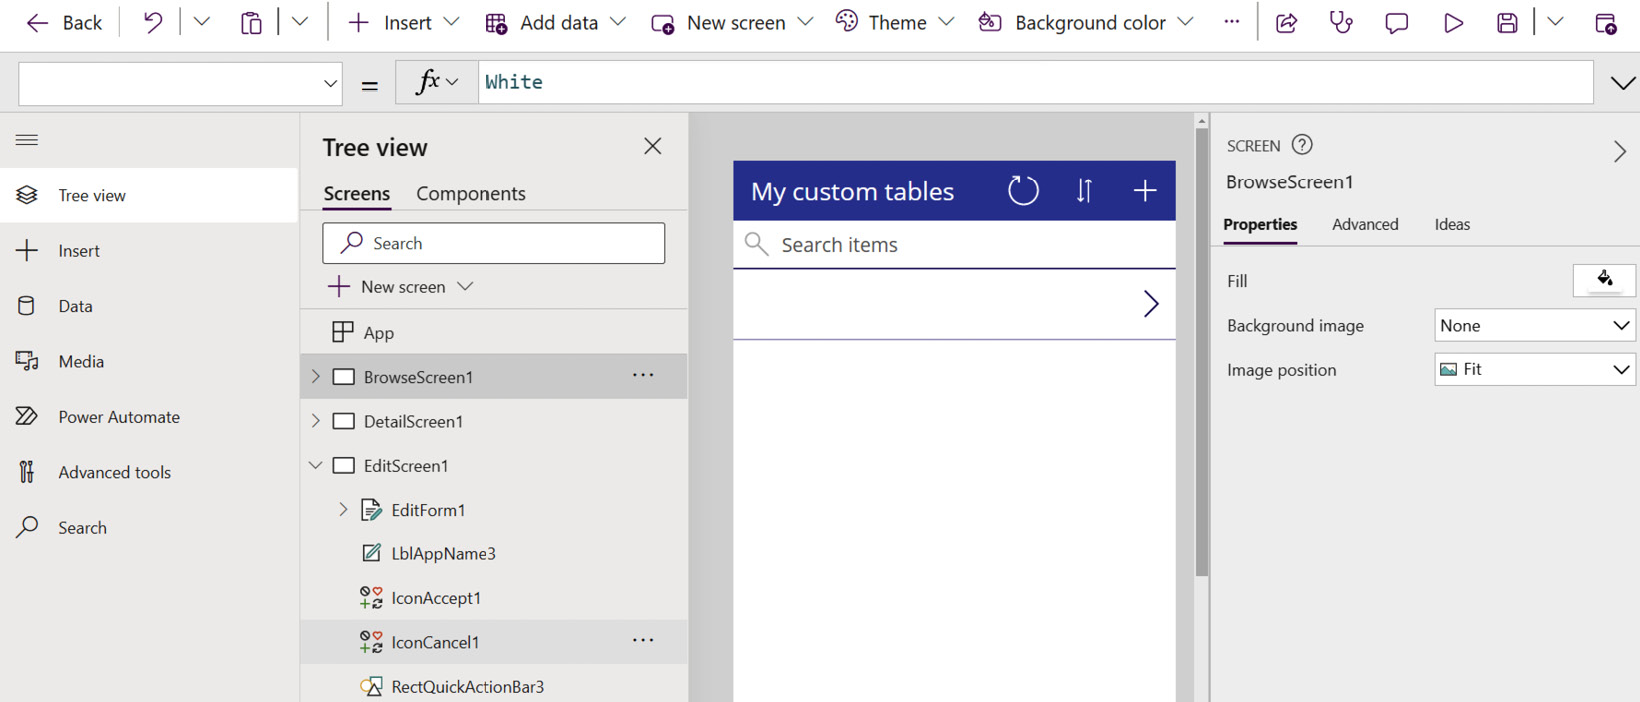
Figure 10.30 – Canvas app based on My custom tables
I can now start using Power Fx to create a beautiful application that my users will want to use.
We’ve very quickly gone through how you can create new applications that you can continue to customize. Now, let’s go through how to create automagic with Power Automate.
Power Automate
In Power Automate, you can create automations and keep track of processes. These automations are called flows. There are different types of flows that you can create:
- Cloud flows: These are the types of flows we’re going to go through in this chapter. You can create an automated, instant, or scheduled flow.
- Desktop flows: These are robotic process automation (RPA) capabilities where you can automate tasks in an application or on your desktop. These will not be covered in this chapter.
- Business process flows (BPFs): You can find BPFs in several areas of the CRM applications in Dynamics 365. You can see this in the opportunity in Sales and the event record in Marketing. They are the process bars that you can see on top of the event records. This is where you can add the tasks you want the users to complete before moving to the next stage. We will not cover BPFs in this chapter.
- Process advisor flow: With this flow, you make recordings of different people doing tasks, and then get information on how the process has been for the different users and how you can best optimize these processes. We will not cover the process advisor flow in this chapter.
- Approval flows: These trigger an approval where a user must approve or deny the request. They can be good to use if you’re running a big event and need to have certain speakers approved by your manager. We will not cover approval flows in this chapter.
Now, let’s go through how cloud flows can help your company flow better and more automagically.
Cloud flows
We went through a cloud flow in Chapter 9, Dynamics 365 Customer Voice (Send a survey when a lead is qualified in Dynamics 365), as you can see in Figure 10.31:
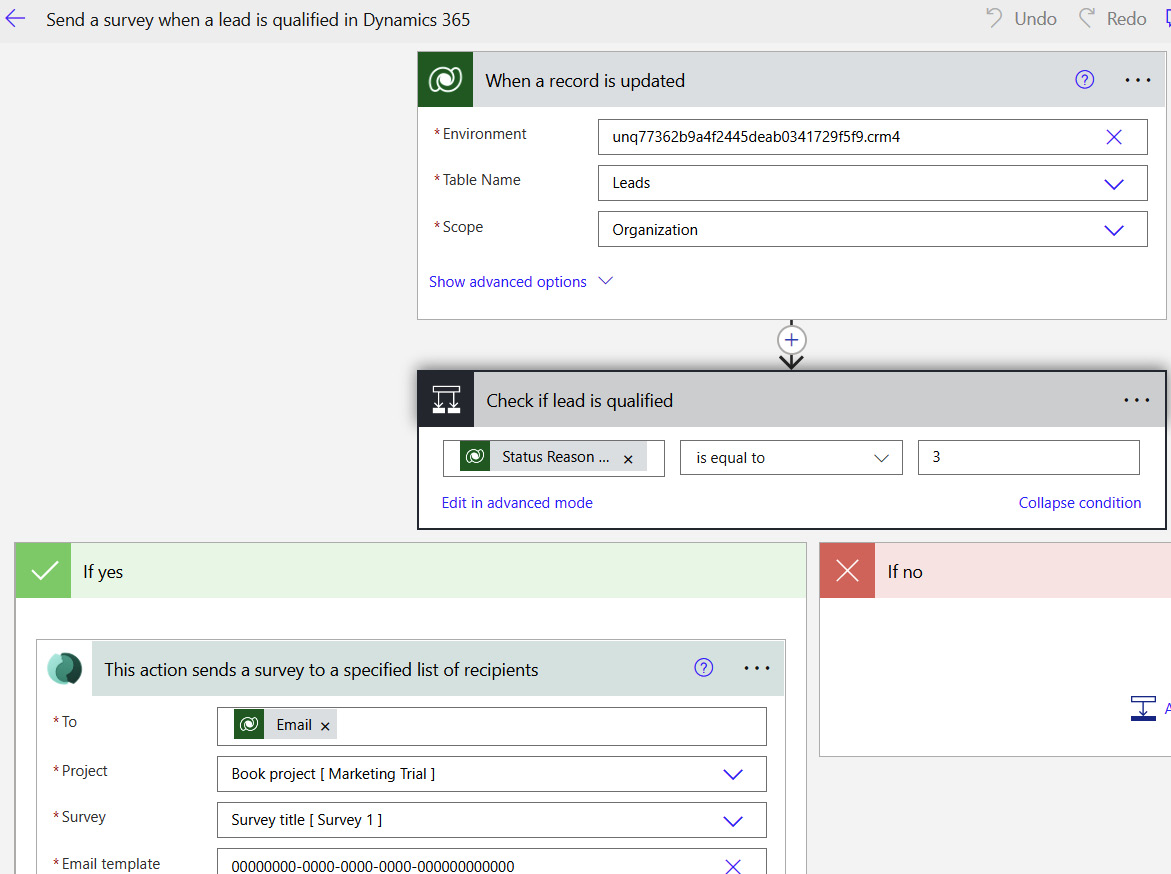
Figure 10.31 – Power Automate flow
Every flow needs to have two things:
- A trigger
- An action
Trigger
The trigger is what starts the flow, and the action is what happens. In Figure 10.31, the trigger is When a record is updated, which means the flow will trigger when a row in the Leads table has changed. There is always one trigger for each flow, and a flow can never have more than one trigger. If this flow should be triggered by a row in another table, then you must create another flow.
Action
Check if lead is qualified is the action, as shown in Figure 10.32:
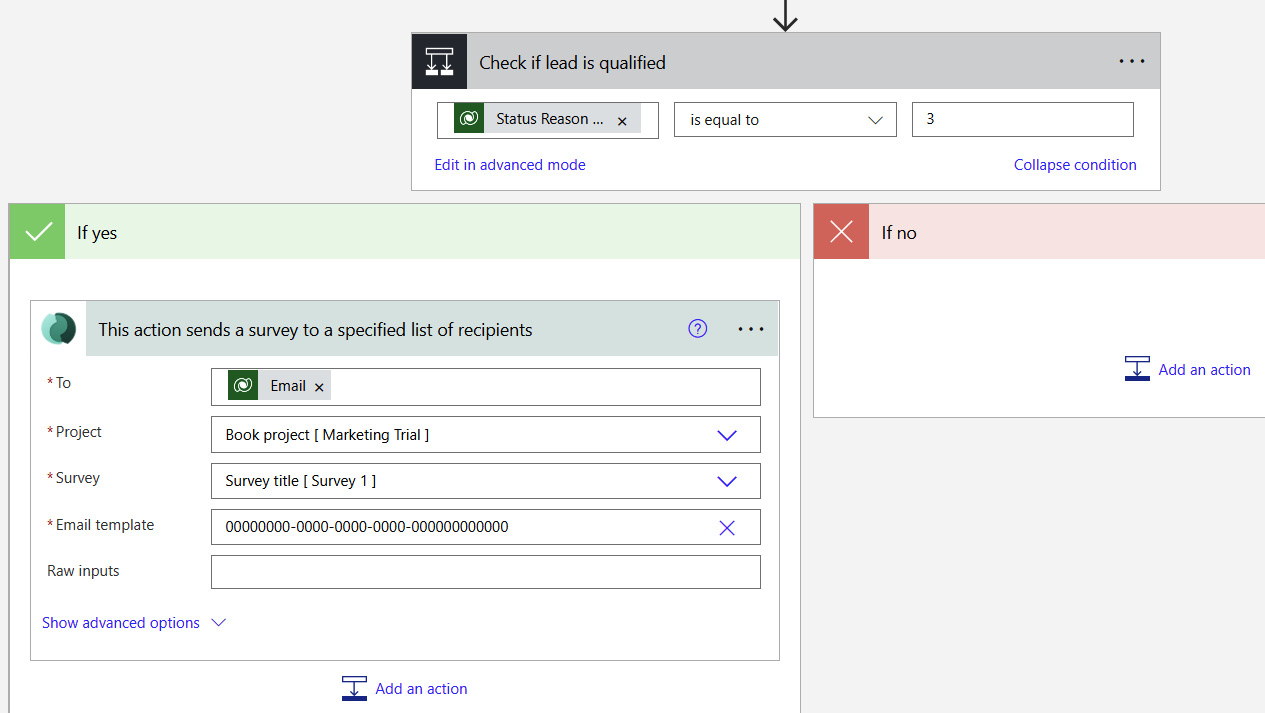
Figure 10.32 – Action of a flow
This will check whether the status reason for the lead is equal to 3 (which is qualified in Dataverse). The flow then has an If yes and If no path that it sends the customer down, depending on the status reason of the lead. In the If yes stage, the customer gets an email where they can complete a Customer Voice survey.
This is just one way of automagic in Dynamics 365 from Power Automate. Let’s see how we can use the marketing triggers in real-time marketing with Power Automate.
Custom marketing triggers
You can use Power Automate with custom marketing triggers in many complex ways. You can trigger a cloud flow or an approval flow through a custom trigger in the RTM journey. Let’s create a simple journey where we trigger a cloud flow to post about the awesome job the marketing campaign has done of successfully guiding a person through the journey.
To make this work, we need the following:
- A custom trigger
- An RTM journey
- A flow
We went through creating a custom trigger and an RTM journey in Chapter 7, Real-Time Marketing Journeys, so we will not repeat how to do this.
In Figure 10.33, you can see that I created a journey that sends an email. Based on this email, I have an if/then branch that has the condition of opening the email, and in the positive path of this condition I trigger the flow:

Figure 10.33 – Journey that activates a custom trigger
I’ve created a trigger called Start a Flow, which allows me to start a flow, as the name suggests. Let’s see how the flow needs to be set up.
In the flow, I’m using the Dataverse When an action is performed option, as you can see in Figure 10.34:
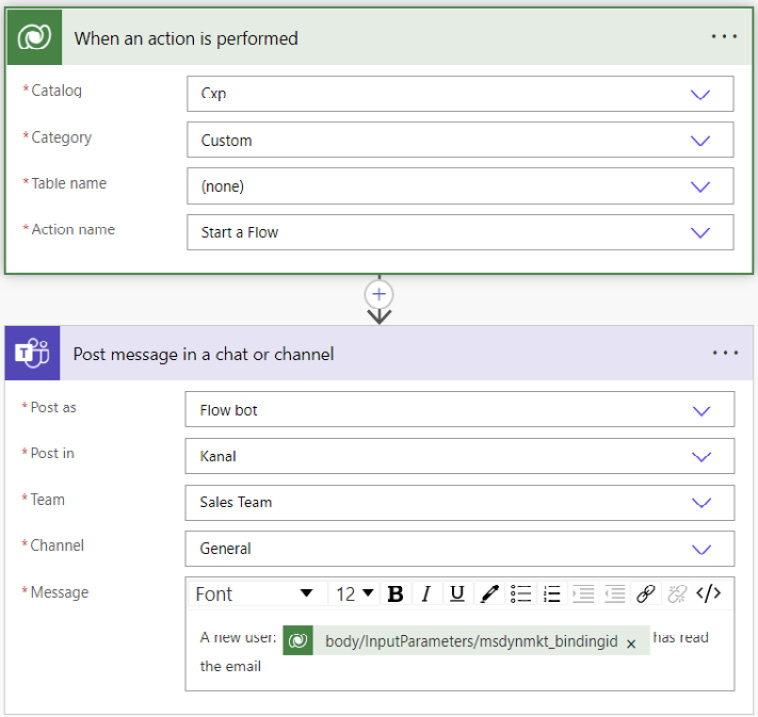
Figure 10.34 – Power Automate with a trigger and an action
In the trigger, I set the options as follows:
- Catalog: Cxp
- Category: Custom
- Table name: (none)
- Action name: Start a Flow
This is the way you must do the setup to make it work. You can find your custom trigger in your Action name dropdown.
The next thing you must do is create the action. This is what you want the flow to do. I’ve selected Post message in a chat or channel from Teams.
Once I’ve saved my flow, I can go back to Dynamics 365 Marketing and activate my journey. This will cause the email to be sent. If this email has been read, the journey will continue down the positive path and trigger the custom trigger, which again triggers the Power Automate flow.
We can see from the flow that it has been triggered, as shown in Figure 10.35:
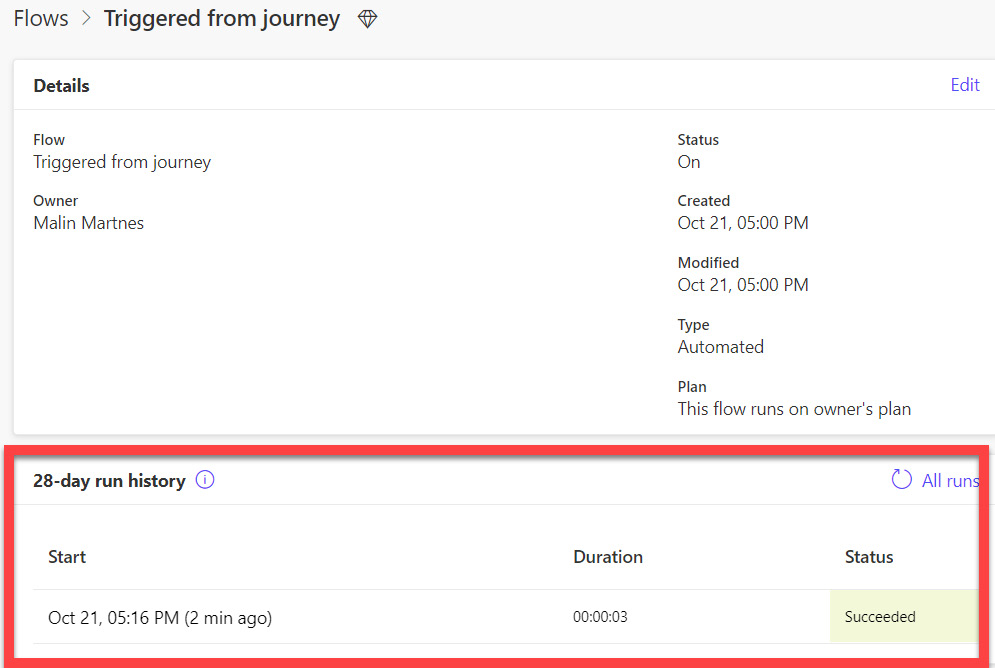
Figure 10.35 – The triggered flow
Now, I can go into Microsoft Teams and see that I have a post in Sales Team in the General channel, as shown in Figure 10.36:

Figure 10.36 – Posted in a channel in Teams
This flow will probably not be something you will be using a lot, but it is a way of showing you how you can combine the custom triggers in Dynamics 365 Marketing with a Power Automate flow.
With that, we’ve gone through some ways of using Power Automate and hopefully given you some tips on how you can use this amazing tool for a more automated work life. Now, let’s see how we can use Power Pages as an addition to Dynamics 365 Marketing.
Power Pages
Power Pages changed names in the fall of 2022; before this, it was called Power Apps Portals.
In Chapter 8, Managing Events, we went through a bit about Power Pages and how you can fully integrate it with Dynamics 365 Marketing. Power Pages is a separate product with a separate license. In Figure 10.37, you can see the details of a configured Power Pages page:
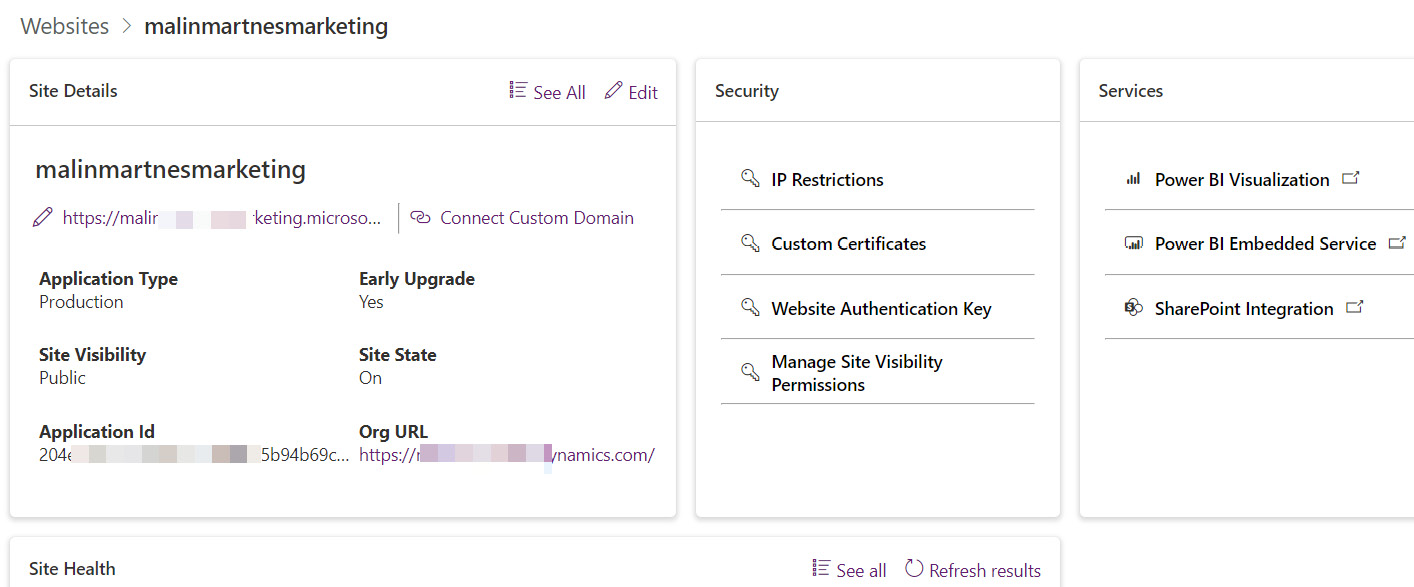
Figure 10.37 – Power Pages setup
From here, I can make edits and do maintenance on my page.
The fall of 2022 is a difficult time to write much about Power Pages, as most of the editing options are changing. The event template is not available in the new interface. For these screenshots, I’ve selected a generic template to show you how easy it can be to configure the page.
Once we’ve set up our page, we can make edits. By clicking Edit, as shown in Figure 10.38, we can start customizing our page:

Figure 10.38 – Editing Power Pages
- A Pages workspace: Here, you can make changes to the design with no code, such as adding or changing the text, image, or video and connecting to lists and forms. You can see the Pages workspace in Figure 10.39:
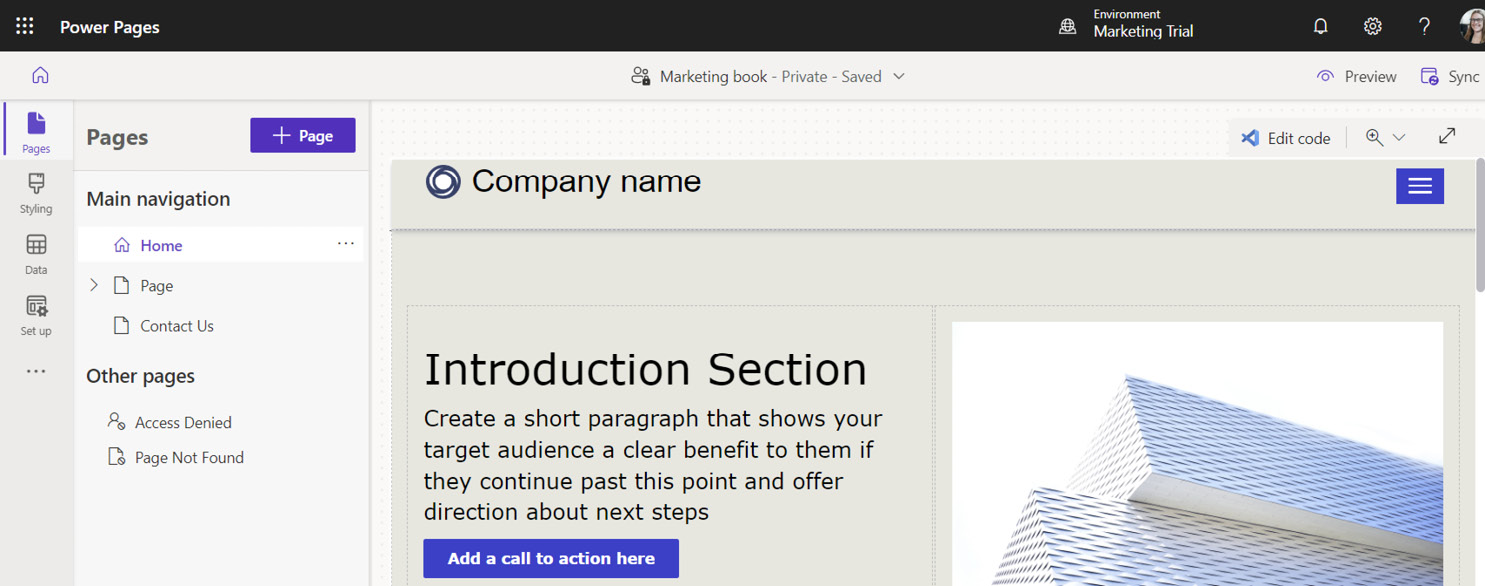
Figure 10.39 – The Pages workspace
- The Styling workspace: Here, you can update and apply global styles to your site. You can see the Styling workspace in Figure 10.40:
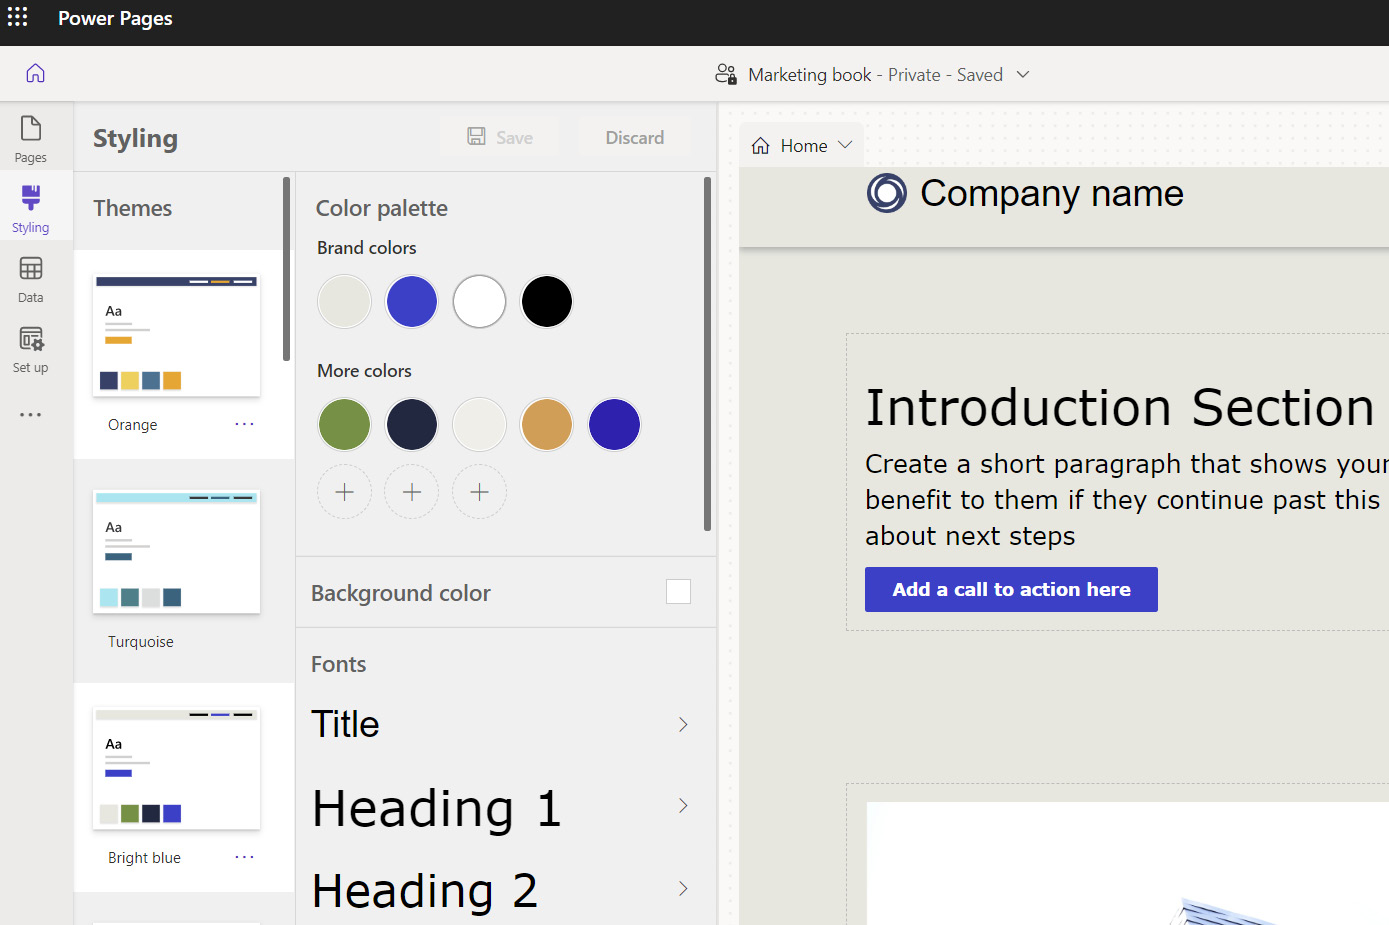
Figure 10.40 – The Styling workspace
- The Data workspace: Here, you can work with your data from Dataverse and connect to the model-driven forms and views. You can see the Data workspace in Figure 10.41:
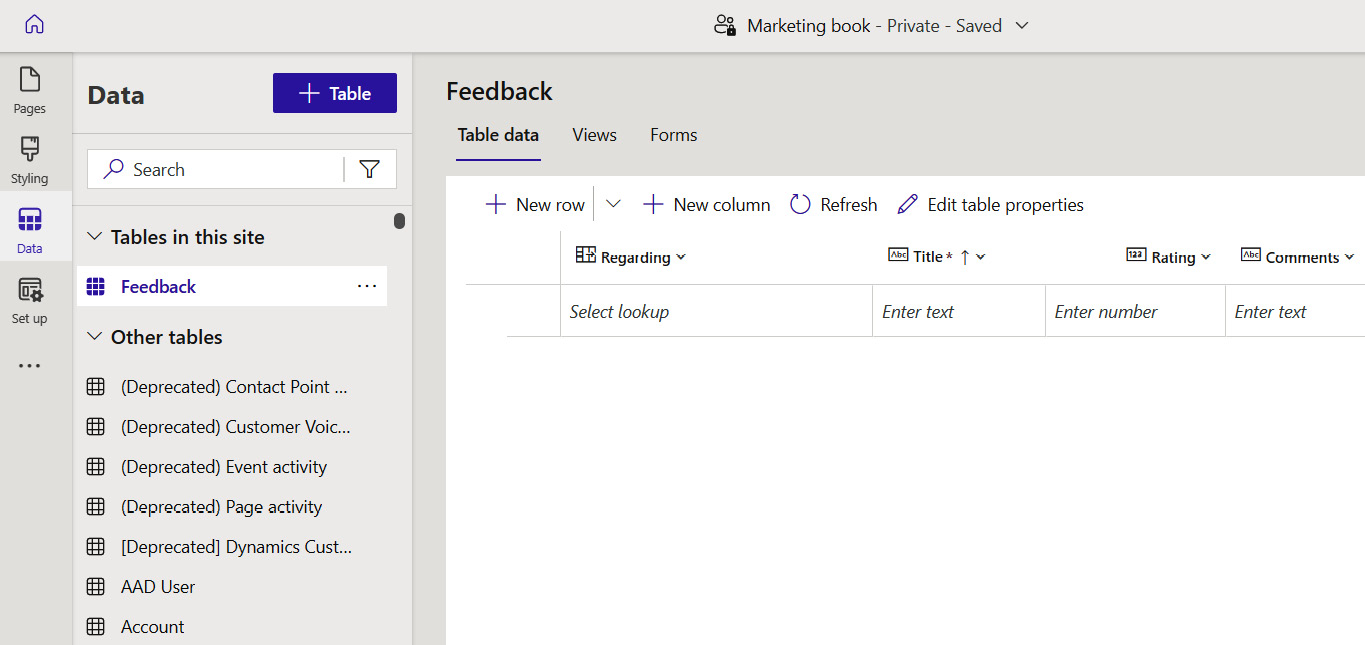
Figure 10.41 – The Data workspace
- The Set up workspace: Here, you do administrative tasks such as setting up security and permissions. You can see the Set up workspace in Figure 10.42:

Figure 10.42 – The Set up workspace
As you can see, there are several ways you can customize and utilize Power Pages to work with your Dynamics 365 Marketing application.
Now, let’s look at an outsider: Customer Insights isn’t part of Power Platform but it is a Dynamics 365 application that is tightly connected to Dynamics 365 Marketing.
Customer Insights
Dynamics 365 CI is Microsoft’s customer data platform (CDP). It will help you, with the use of AI, to get an overview of your customers based on several data sources and in real time. CI is tightly integrated with Dynamics 365 Marketing and can create segments with the use of AI, which you can then use in your journeys.
As you can see in Figure 10.43, a lot of information about your customer is potentially stored in CI:

Figure 10.43 – Customer information
As you can see in Figure 10.44, there are several segments in my CI environment, and any of these can be updated with data from multiple data sources and automatically transferred to Marketing as a segment:
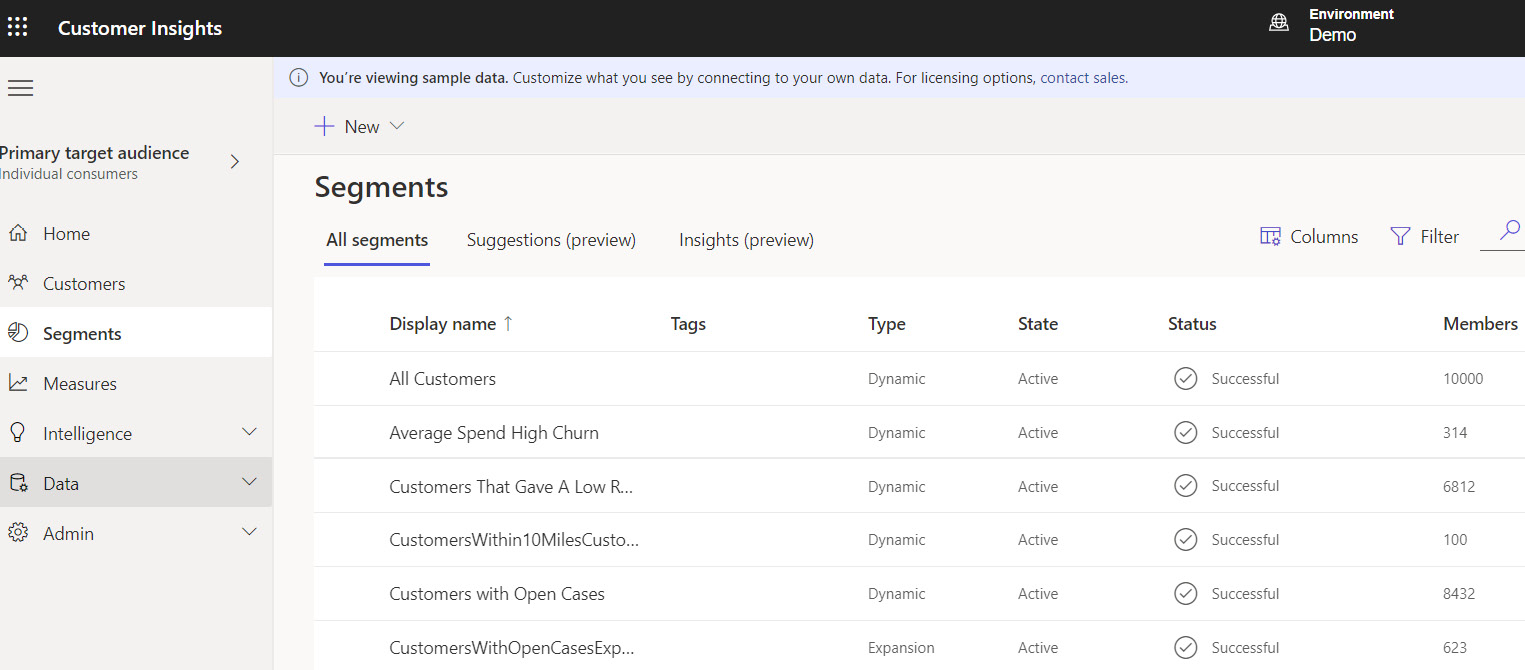
Figure 10.44 – Segments in Customer Insights
A segment coming from CI will always be static and will be updated by CI every time synchronization runs. You should never make changes to these segments. These segments are always created as drafts, so you must activate them to use them in a journey.
CI will never create new contacts in Dynamics 365 Marketing, it will just work with the ones you already have in the system.
Summary
As you saw, there is a lot of functionality in Microsoft Power Platform. Your marketing solution is built on top of Dataverse, where you can create new tables, columns, forms, and views. This way, you can create a solution that is tailored to you and your company’s needs. With the use of Power Apps, you can either edit your Marketing application or create new applications that are custom-tailored for you. With canvas apps, you can create beautiful applications that help your company with the help of Power Fx.
To make your life easier and to make it automagic, you have Power Automate. This can be integrated into your marketing solution, and you can integrate it with other applications in your portfolio.
We ended this chapter with Power Pages and Customer Insights – two solutions that can help expand your marketing solution and give your company everything they need to have a complete holistic overview of your customers.
We’ve now been through the core functionality of Dynamics 365 Marketing and solutions that can help you in your marketing efforts. Congratulations on completing this book. I hope you’ve learned a lot and will now go and learn even more by testing Dynamics 365 Marketing and using it for your company’s marketing automation efforts. Thank you for reading this book!
Questions
The following are some questions that will help you gauge your understanding of the topics discussed in this chapter. The answers are available in the Assessments section at the end of the books:.
- You must bring your own safety to Dataverse.
- No
- Yes
- You can only create new Text columns in Dataverse.
- No
- Yes
- Model-driven and canvas apps are edited with the same functionality.
- No
- Yes
- You cannot edit the out-of-the-box Dynamics 365 Marketing application.
- No
- Yes
- In which ways can you create a canvas app?
- Blank
- From model-driven
- From data
- Image
- Figma
- UI
- What does a Power Automate Flow always consist of?
- An action
- An app
- A trigger
- A consequence
- Data
Further reading
- Power Platform and Dynamics 365/Customer Engagement/CRM:
- Microsoft Power Platform Functional Consultant: PL-200 Exam Guide: Learn how to customize and configure Microsoft Power Platform and prepare for the PL-200 exam: https://www.amazon.com/Microsoft-Power-Platform-Functional-Consultant-ebook/dp/B08KQKQ22W/ref=pd_rhf_d_dp_s_pd_crcd_sccl_1_1/143-1488019-8399560?pd_rd_w=3V8GJ&content-id=amzn1.sym.cee83ff1-8fc1-4533-a3f5-bf3d998f4558&pf_rd_p=cee83ff1-8fc1-4533-a3f5-bf3d998f4558&pf_rd_r=C5KSYVSFR7139E03J3VQ&pd_rd_wg=dAtDl&pd_rd_r=9a05d0a8-5825-4045-a0ea-828d5664f16a&pd_rd_i=B08KQKQ22W&psc=1
- Fundamentals of CRM with Dynamics 365 and Power Platform: Enhance your customer relationship management by extending Dynamics 365 using a no-code approach: https://www.amazon.com/Fundamentals-CRM-Dynamics-Power-Platform-ebook/dp/B08HYWX6VL/ref=d_reads_cwrtbar_sccl_2_37/143-1488019-8399560?pd_rd_w=6rQel&content-id=amzn1.sym.c3636f1d-aab3-4576-85e3-007dd638fbde&pf_rd_p=c3636f1d-aab3-4576-85e3-007dd638fbde&pf_rd_r=9SR96CB8T26Z4QH3N633&pd_rd_wg=pEJwX&pd_rd_r=c40b2e99-6e24-41ca-be15-d9176df278b7&pd_rd_i=B08HYWX6VL&psc=1
- Mastering Microsoft Dynamics 365 Customer Engagement: An advanced guide to developing and customizing CRM solutions to improve your business applications, 2nd Edition: https://www.amazon.com/Mastering-Dynamics-365-customization-development-ebook/dp/B07G1B7TB8/ref=d_reads_cwrtbar_sccl_2_38/143-1488019-8399560?pd_rd_w=6rQel&content-id=amzn1.sym.c3636f1d-aab3-4576-85e3-007dd638fbde&pf_rd_p=c3636f1d-aab3-4576-85e3-007dd638fbde&pf_rd_r=9SR96CB8T26Z4QH3N633&pd_rd_wg=pEJwX&pd_rd_r=c40b2e99-6e24-41ca-be15-d9176df278b7&pd_rd_i=B07G1B7TB8&psc=1
- Power Platform and Dynamics 365 CE for Absolute Beginners: Configure and Customize Your Business Needs: https://www.amazon.com/Power-Platform-Dynamics-Absolute-Beginners/dp/1484285999/
- ref=sr_1_10?crid=129M36R5NWNSJ&keywords=dataverse&qid=1666284749&qu=eyJxc2MiOiIyLjQ0IiwicXNhIjoiMi40NyIsInFzcCI6IjIuNDkifQ%3D%3D&s=books&sprefix=dataverse%2Cstripbooks-intl-ship%2C154&sr=1-10
- Dataverse:
Microsoft Dataverse: The Power Platform Series: Leveraging Microsoft Dataverse to build real world business solutions: https://www.amazon.com/Microsoft-Dataverse-Platform-Leveraging-solutions-ebook/dp/B08S37P2JW/ref=sr_1_1?crid=129M36R5NWNSJ&keywords=dataverse&qid=1666284749&qu=eyJxc2MiOiIyLjQ0IiwicXNhIjoiMi40NyIsInFzcCI6IjIuNDkifQ%3D%3D&s=books&sprefix=dataverse%2Cstripbooks-intl-ship%2C154&sr=1-1
- Power Apps:
- Beginning Power Apps: The Non-Developer’s Guide to Building Business Applications: https://www.amazon.com/Beginning-Power-Apps-Non-Developers-Applications-ebook/dp/B08YXC29DW/ref=d_reads_cwrtbar_sccl_2_8/143-1488019-8399560?pd_rd_w=6rQel&content-id=amzn1.sym.c3636f1d-aab3-4576-85e3-007dd638fbde&pf_rd_p=c3636f1d-aab3-4576-85e3-007dd638fbde&pf_rd_r=9SR96CB8T26Z4QH3N633&pd_rd_wg=pEJwX&pd_rd_r=c40b2e99-6e24-41ca-be15-d9176df278b7&pd_rd_i=B08YXC29DW&psc=1
- Microsoft Power Apps Cookbook: Apply low-code recipes to solve everyday business challenges and become a Power Apps pro, 2nd Edition: https://www.amazon.com/Microsoft-Power-Apps-Cookbook-challenges-dp-180323802X/dp/180323802X/ref=dp_ob_title_bk
- Learn Microsoft Power Apps: The definitive handbook for building solutions with Power Apps to solve your business needs, 2nd Edition: https://www.amazon.com/Learn-Microsoft-Power-Apps-definitive-dp-1801070644/dp/1801070644/ref=dp_ob_title_bk
- Power Automate:
Workflow Automation with Microsoft Power Automate: Use business process automation to achieve digital transformation with minimal code, 2nd Edition: https://www.amazon.com/Workflow-Automation-Microsoft-Power-Automate/dp/1803237678/ref=sr_1_1?crid=3FGP733IBLHJM&keywords=power+automate&qid=1666284904&qu=eyJxc2MiOiIzLjg5IiwicXNhIjoiMy40OCIsInFzcCI6IjMuMTcifQ%3D%3D&s=books&sprefix=power+automate%2Cstripbooks-intl-ship%2C142&sr=1-1
- Developer:
Pro Microsoft Power Platform: Solution Building for the Citizen Developer: https://www.amazon.com/Pro-Microsoft-Power-Platform-Developer-ebook/dp/B08KVRRVVN/ref=d_reads_cwrtbar_sccl_2_2/143-1488019-8399560?pd_rd_w=6rQel&content-id=amzn1.sym.c3636f1d-aab3-4576-85e3-007dd638fbde&pf_rd_p=c3636f1d-aab3-4576-85e3-007dd638fbde&pf_rd_r=9SR96CB8T26Z4QH3N633&pd_rd_wg=pEJwX&pd_rd_r=c40b2e99-6e24-41ca-be15-d9176df278b7&pd_rd_i=B08KVRRVVN&psc=1