
3
What Are Segments and Lists?
In Chapter 2, Managing Leads, Accounts, and Contacts, you learned about leads, contacts, and accounts. Now, let’s see how we can use these in segments and lists.
Segments and lists are used as a way to group contacts. You can use these groups to specify who you want to focus your marketing efforts on. We’re going to look at how you can use subscription centers to follow privacy rules and legislations, such as GDPR, and make sure you’re marketing to the right people. In this chapter, we’re going to cover the following:
- Understanding and managing segments
- Understanding and managing subscription centers and lists
By the end of the chapter, you’ll understand what segments and lists are, what the differences between them are, and when to use them. Let us start with what segments are and see how they are created and managed.
Understanding and managing segments
As mentioned before, segments are a way to group your contacts based on their registered information. Any type of column can be used to specify your segments. You can also use the information in related tables to create your segment. In this section, we’re going to take a look at the different types of segments and how you can specify which contacts to target.
What are segments?
A segment is a list of contacts, not any other table. You can use the information on, for example, an account or a lead to decide what contact you’ll use, but there will only ever be contacts in your segment. You can set criteria on the segments to find the specific selection of contacts you want. The only required field of any segment is its name. In dynamic segments, you will find the name at the top of the form, as shown in Figure 3.1:

Figure 3.1: Name in a dynamic segment
In your static segments, you will find the name of the segment in a side panel, as you can see in Figure 3.2:

Figure 3.2: Name in a static segment
Make sure you give your segments suitable names so that people can understand what they’re used for.
You can create as many segments as you want in Dynamics 365 Marketing; they are essential when you start talking with your customers. You can read more about how segments are used in a customer journey in Chapter 6, Outbound Customer Journeys, and Chapter 7, Real-Time Marketing Journeys.
You can create a dynamic or a static segment. You choose between them when you’re creating the segment, as you can see in Figure 3.3:

Figure 3.3: Choosing a dynamic or static segment
Let’s start going through what a dynamic segment is.
Dynamic segments
A dynamic segment is a collection of contacts with a matching set of criteria. The segment will automatically add or remove a contact when it matches the criteria. You define the dynamic segment criteria with queries that you build in the segment designer. How do we build these queries? Let’s dive into queries in the segment designer.
Segment designer
The first thing you should do when working with segments is to select what view you want: the natural view or the tree view. This doesn’t in any way change the functionality; it’s just about how your mind processes the queries best. In Figure 3.4, you can see how the natural view looks:
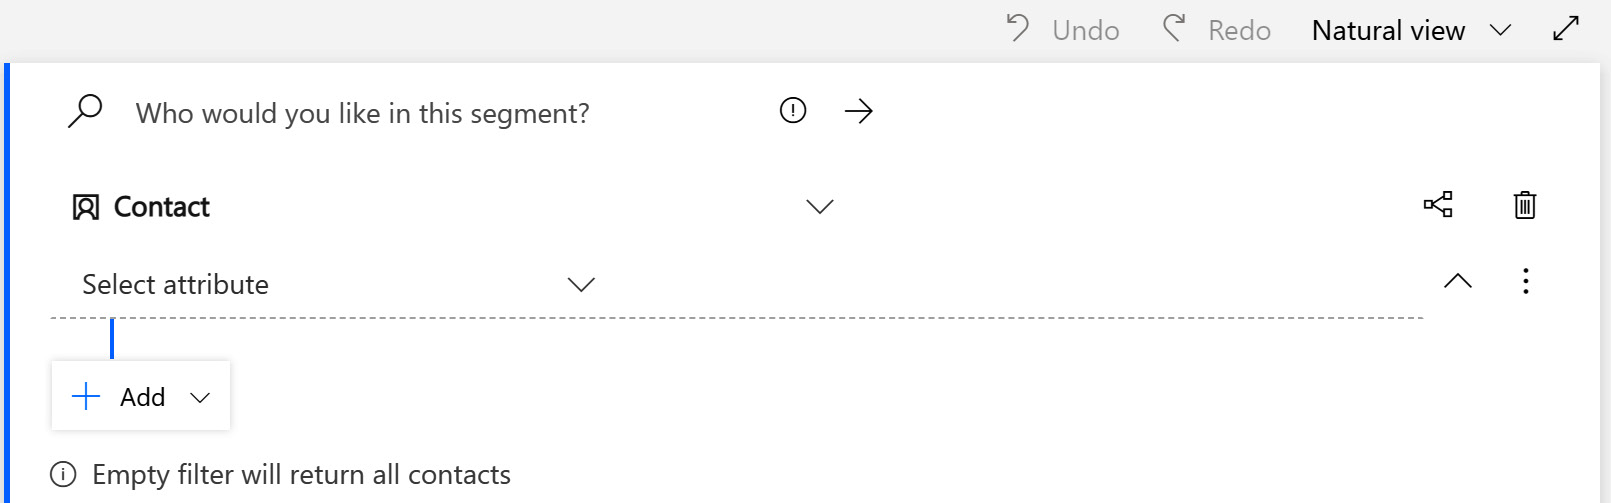
Figure 3.4: Natural view in a dynamic segment
In Figure 3.5, you can see how the tree view looks. As you can see, the differences between the two aren’t that big; it’s just about picking the one you feel most comfortable with:

Figure 3.5: Tree view in a dynamic segment
A query in a segment can contain one single criterion or a long list of criteria. There are three different segment blocks that you can use in your queries. We’ll go through what you can do with each of them.
Query blocks
In query blocks, you can select the tables that contain the attributes you want to filter by. If you don’t specify any filters, you’ll get all the contacts in Dataverse as members of the segment. As you can see in Figure 3.6, you can choose any of the tables that are related to the contact:

Figure 3.6: Selecting the tables in a dynamic segment
To see how all the tables are connected, you can click on the icon marked in red in Figure 3.7:
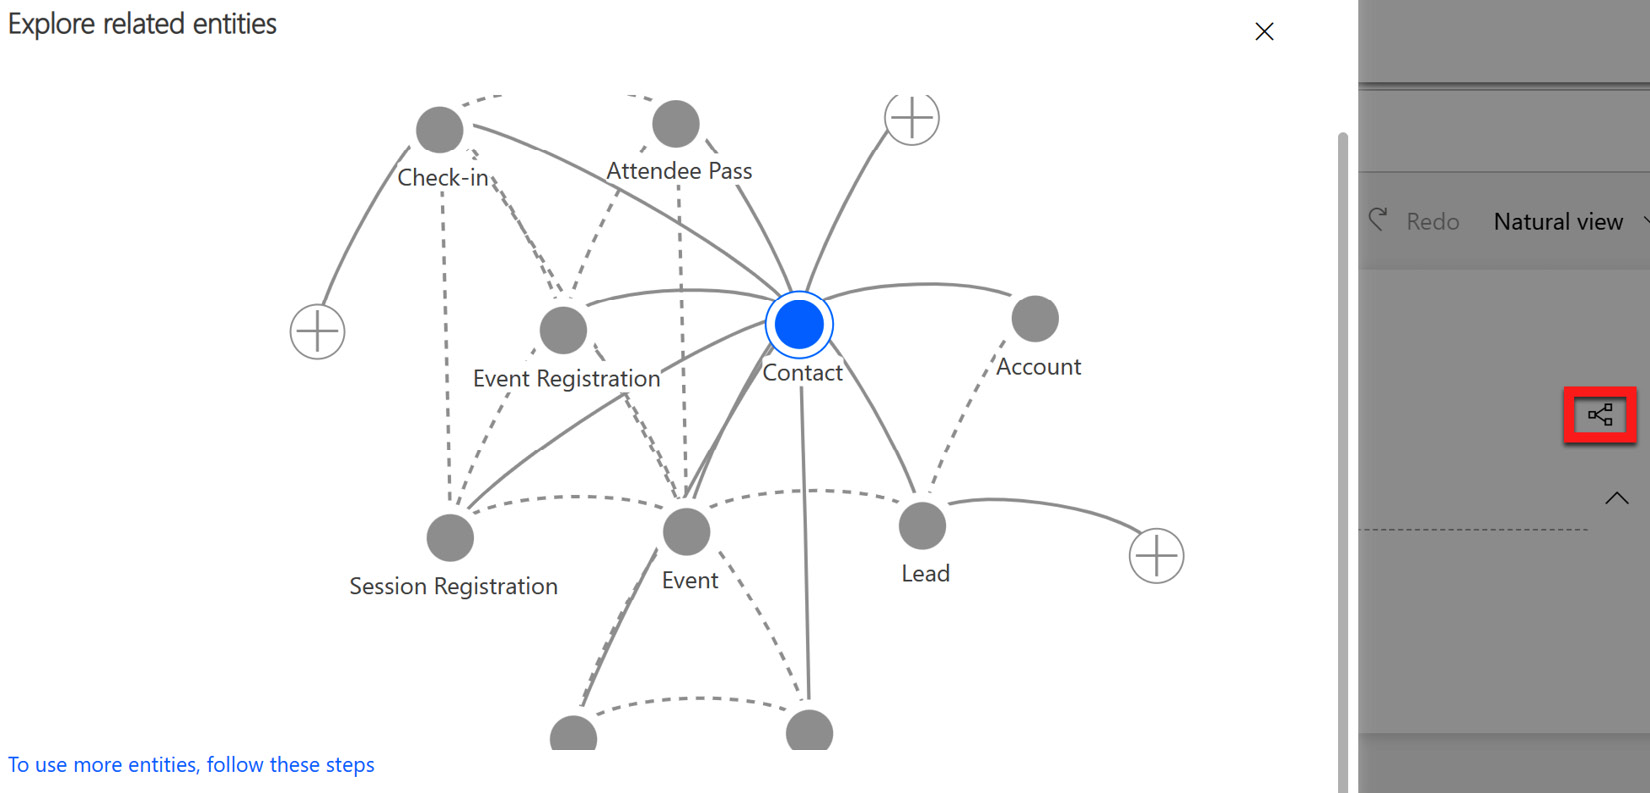
Figure 3.7: Exploring related tables
In the popup that you can see in Figure 3.7, you can see how the different tables in Dataverse are connected to the Contact table. This can make it easier to understand the underlying data structure and how everything is connected to the Contact table.
Moving back to the query blocks, we can select an attribute (a column on the table you chose). As you can see in Figure 3.8, I’ve started to type in em and attributes containing em come up:
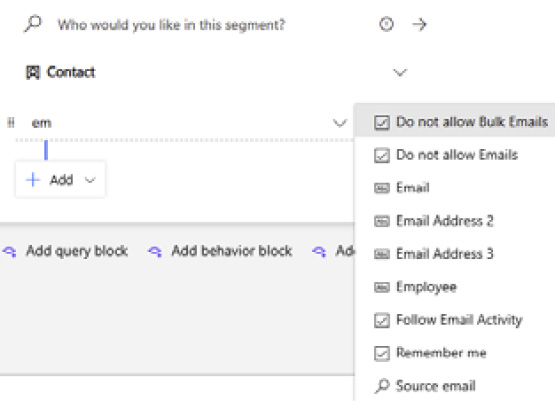
Figure 3.8: The columns you can choose as attributes in a segment
Once you’ve chosen the Email attribute, you can specify the operator. The operator can be 1 of 10 set variables, as shown in Figure 3.9:

Figure 3.9: The variables for the operator
Here, you can choose whether the Email column contains data. There’s no use in sending an email to someone that doesn’t have the email field filled out – or you might want to create a segment for contacts whose email contains a specific domain. Another way of writing your queries is by using natural language.
Natural language is writing what you want to query with normal text, without knowing the name of the columns in your data. This works for English as a language as of November 2022.
In Figure 3.10, you can see that I’ve written a sentence saying I want to see all the contacts that live in Oslo. I am then getting a suggestion of the address1_city column and that it should be Oslo. It then also puts this query in the segment, and it has translated what I asked into a query:

Figure 3.10: Natural language in a segment
Now that we’ve seen how we can ask questions and use the query blocks to make our segments as specific as we need them to be, let’s take a look at another way of querying with behavioral blocks.
Behavioral blocks
In behavioral blocks, you create queries based on the behavior of the contact. You want to have a segment of all the contacts that have checked into an event, to make sure they get a follow-up email thanking them for being there. This is done by choosing the Event check-in interaction and then further specifying which event you want the customer to have checked into, as you can see in Figure 3.11:
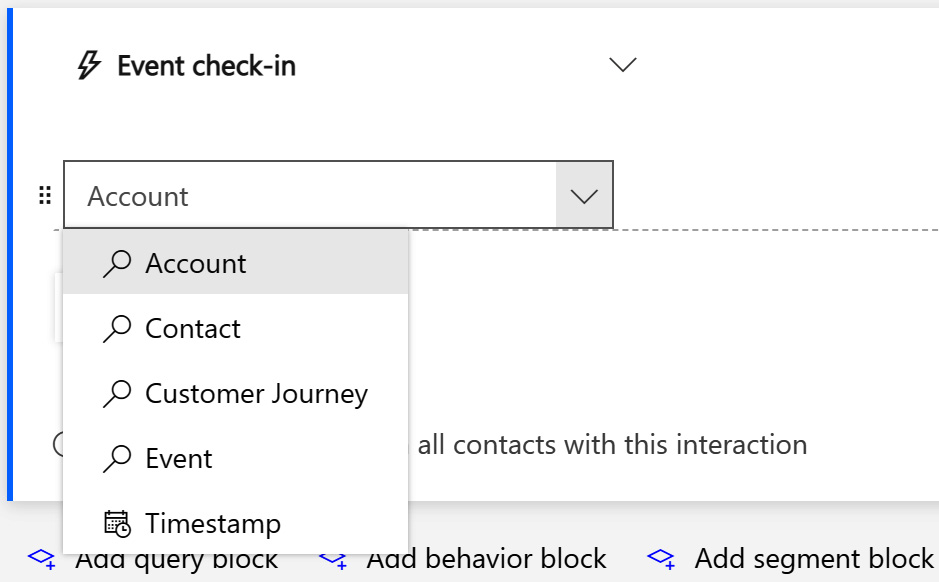
Figure 3.11: Event check-in interaction chosen
There are several interactions you can build a query on, such as the following:
- Form submitted or visited
- LinkedIn form submitted
- Marketing list subscribed or unsubscribed to
- Activity on a contact
- Customer Voice answered
- Website visited or clicked on
- Several interaction options for emails
If you don’t have any filters on the query blocks, a blank filter will give you all the contacts for the interaction specified.
We’ve now gone through the query blocks and the behavior block. Let’s take a look at the last type of block we have in the system, the segment block.
Segment blocks
The segment block is a block where you can find other segments to use in a query. You might want to find all the contacts that are your active customers, but if you don’t want to create that filter every time, you can add it to a segment block, as you can see I’ve done in Figure 3.12:
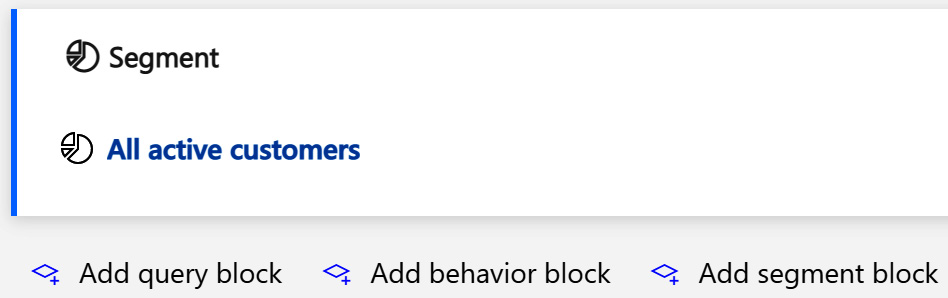
Figure 3.12: A segment block with the All active customers segment chosen
So far, we’ve created simple segments, but in real life, we usually have more complex requests. Let us go through some more complex ways of using these queries.
Complex queries
Now, we’ve gone through the query blocks, the behavior blocks, and the segment blocks; however, a lot of the time, we will actually use a combination of these. We have three different options when it comes to combining our queries, or, and also, and but not, as you can see in Figure 3.13:

Figure 3.13: The three different ways of combining our queries
Let’s have a look at these options more closely:
- or gives you all the contacts that are in one or another block. If we want to build a list of all our contacts that live in Oslo or have signed up for the Oslo local newsletter, we can create our query to include contacts from both of these blocks, as you can see in Figure 3.14:
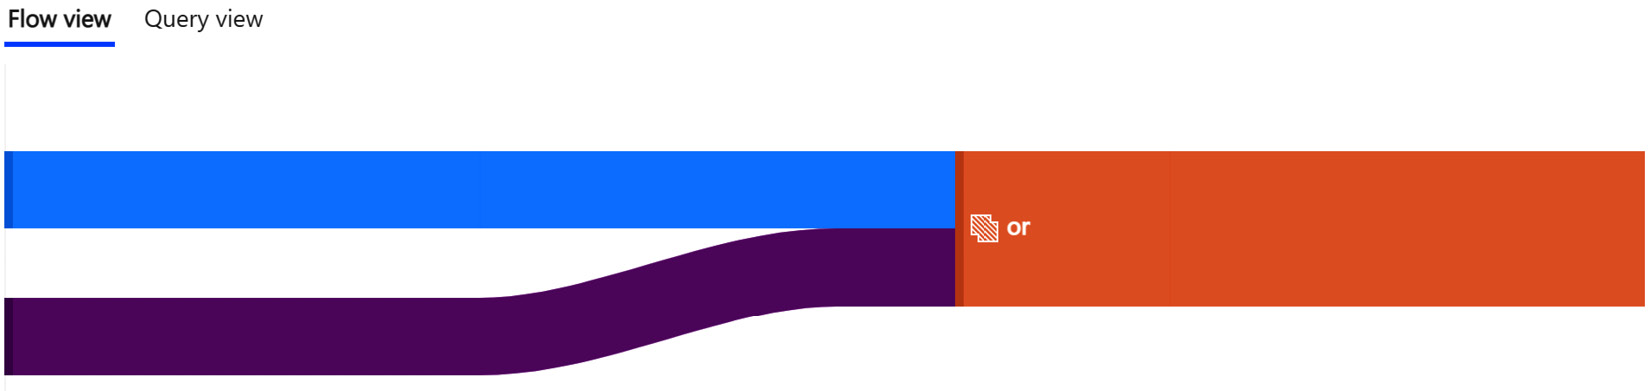
Figure 3.14: The flow of a query with or
- and also gives you contacts that meet the query of two or more queries. We might want to have a segment with all contacts from Oslo that have clicked on a link in an email. As we can see in Figure 3.15, both queries bring contacts into the query, while some are not included:
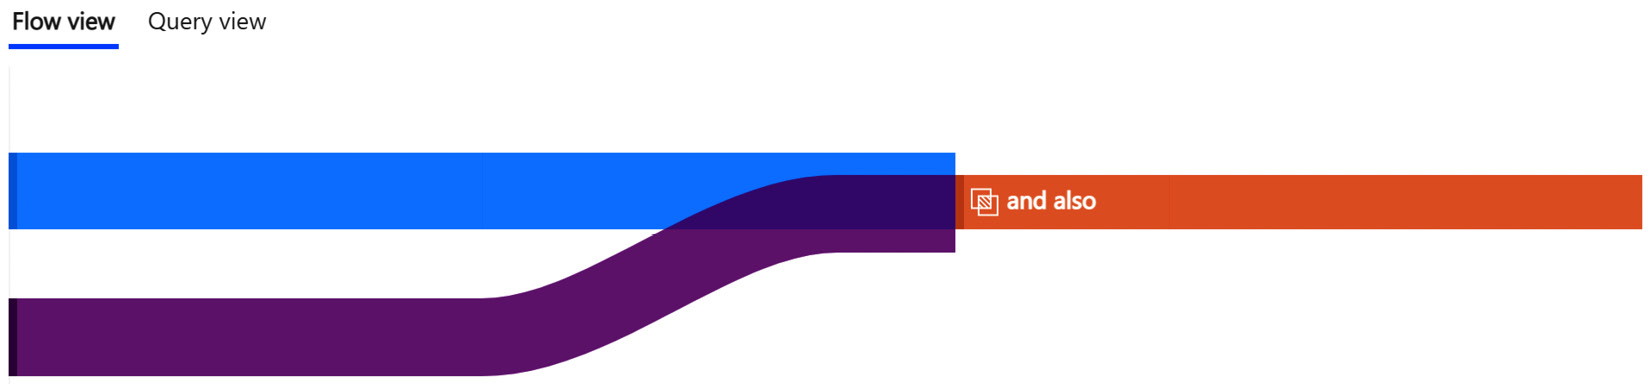
Figure 3.15: The flow of a query with and also
- but not gives you contacts that meet one query but are not in another query. If we want to find our contacts that are in Oslo but have not visited our website in the past year, then we use the but not operator to exclude everyone that has visited our website and that also lives in Oslo. The flow of the but not query is shown in Figure 3.16. You can see that some contacts are incorporated into the blue line, and the purple line represents the contacts excluded by the but not query:

Figure 3.16: The flow of a query with but not
If you have a list of contacts that you should never send any emails to, that’s an important block to add to any segment to which you’ll send an email as a but not segment block.
To include members in your dynamic segment, you have to save it and go live. You cannot use a segment anywhere until it’s gone live. Once you’ve gone live with a segment, you have to click the Edit or Stop button to be able to make any changes to the segment. You’ll also get a list of members in your segment once it’s live. You can see the list of members under the Members tab for your segment, as you can see in Figure 3.17:

Figure 3.17: A live segment with a list of members in it
We’ve now taken a look at all the different options for how to build a dynamic segment. The dynamic segment changes based on the criteria you put in the query and is a living, changing segment. Let’s take a look at how we build a static segment.
Static segments
A static segment is a segment that will not update automatically. If you add a contact, they will never appear or disappear as they would on a dynamic segment. In a static segment, the contact can either remove themselves or you can remove them. As you can see in Figure 3.18, you can add a member manually or with a query, and you can remove members with a query or by selecting the ones you want to remove and clicking Remove:

Figure 3.18: Static segment – adding members
Let’s see how you can add or remove them manually.
Adding or removing members manually
You can pick contacts manually for your segment. You might have a group of contacts that will receive a Christmas present from the company. This is a list to which only certain, handpicked people will be manually added. You can add these manually by clicking on the Add button; a side panel appears and you can select the contacts you want to add, as you can see in Figure 3.19:

Figure 3.19: Adding records to a static segment
Let’s take a look at an easier way of adding contacts, with queries, much like the queries in dynamic segments.
Adding or removing members by query
Now that you’ve gone through dynamic segments, the method for building queries should be familiar to you. In static segments, you can use query blocks or segment blocks to build your queries. In Figure 3.20, we can see how we build these queries. We find the contact table and then we find the attribute, which is Address 1: City. We then specify what city we want to filter by – in this case, Oslo:
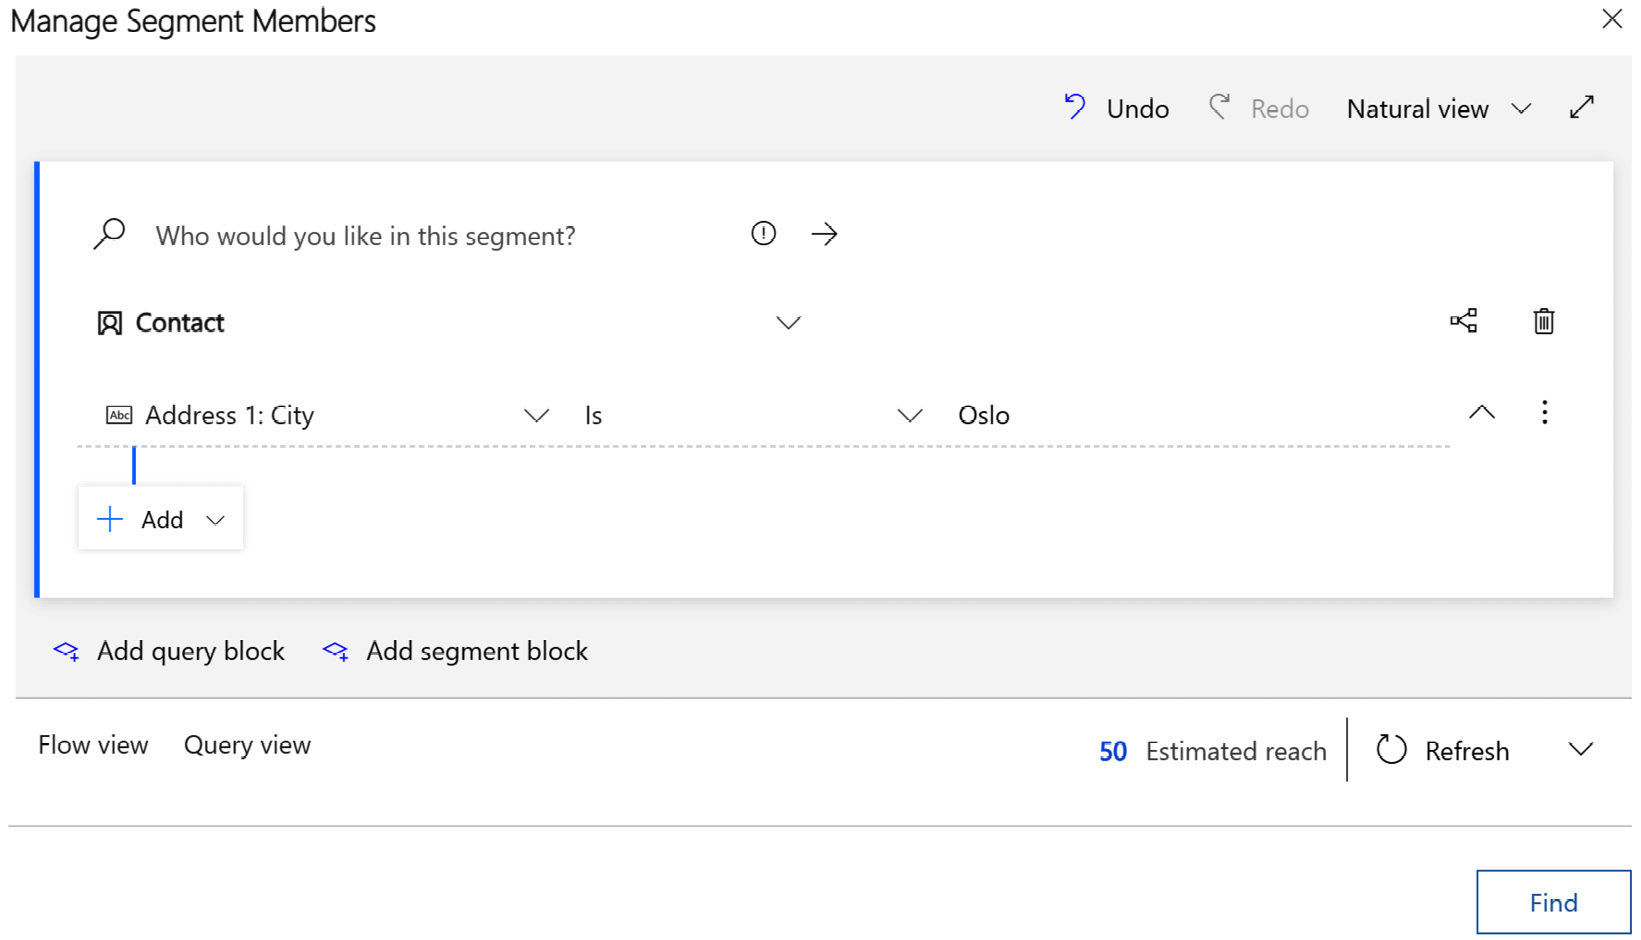
Figure 3.20: Building queries in a static segment
We will also get an estimated reach of the segment. Here, there are an estimated 50 people in the segment. When we click Find, we move to another page. As you can see in Figure 3.21, we get a list of all the contacts and we can choose the members we want to add, edit the query, or add all members to our segment:

Figure 3.21: Selecting members for a static segment
If you want to remove members from the segment using a query, you can click on the Remove by Query button, add your query, and remove the contacts.
Now that we’ve looked at dynamic and static segments, let’s take a look at a more automated type of segment created with the help of AI: Customer Insights (CI) segments.
CI segments
Dynamics 365 CI is a system you will learn more about in Chapter 10, Power Platform. One of the benefits of CI is that it can automatically create segments that you can use in Dynamics 365 Marketing. These segments will change when they’re updated from CI, so they behave differently from other segments. Every time a segment is pushed from CI, the entire segment will update in Dynamics 365 Marketing. A customer of mine uses an external system to manage their consent. This consent is pushed to CI and from there, it’s pushed to Dynamics 365 Marketing, where they can utilize these segments.
Real-time marketing segments
Since the wave 2 2022 release in October, there is a new way of creating segments in Real-time marketing. Let’s go through this.
When you create a new RTM segment, you give it a name, choose the target audience (Contact or Lead), and give the segment a description as shown in Figure 3.22:

Figure 3.22: Creating a new real-time marketing segment
When the segment is created, you get a new screen where you can edit your segment as shown in Figure 3.23:
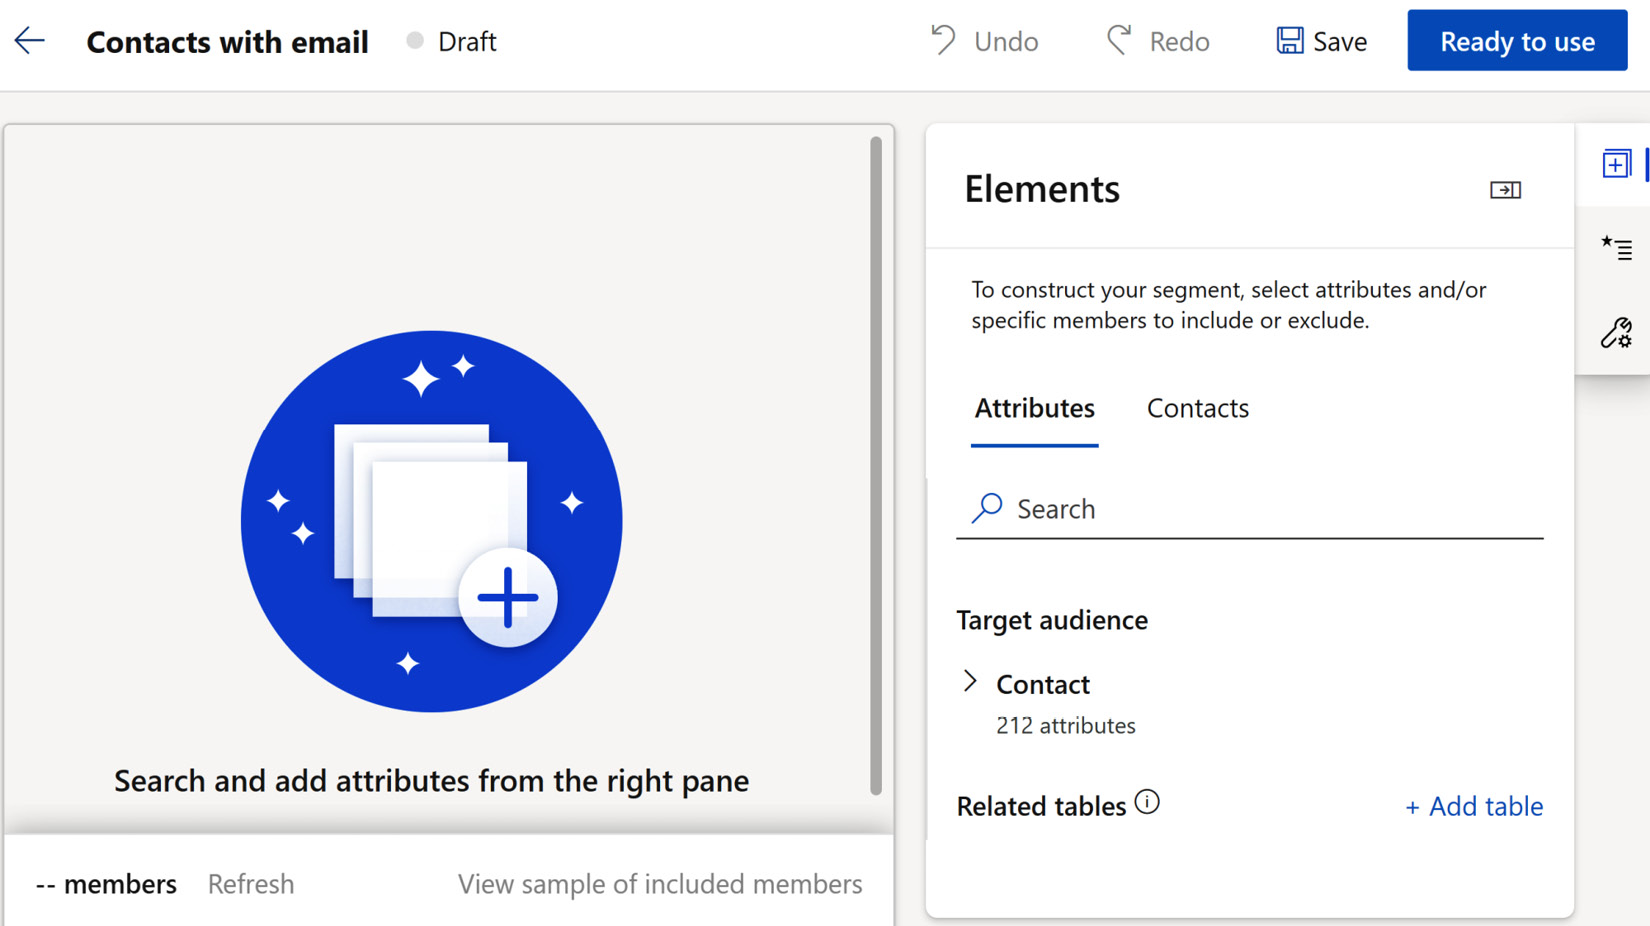
Figure 3.23: RTM segment builder
You can select the attributes and set the conditions to create your segment as shown in Figure 3.24:

Figure 3.24: Selecting attributes and groups
You can also create subgroups and add multiple groups where you can have different conditions to create your segment. This way, you can create your segment according to your needs exactly.
On the right-hand side, you have three menu areas; the second is Query Assist, where you can use natural language to help build your segment, as shown in Figure 3.25:

Figure 3.25: Query Assist
You can write which contacts you want to find, and the assistant helps you create the queries needed for the segment.
In the Settings area, you can say whether you want to automatically refresh the segment (dynamic), or have a static segment as shown in Figure 3.26:

Figure 3.26: Settings for the segment
When you’re satisfied with the segment, you must set it as ready to use and the segment will go live and find all the contacts or leads that match the conditions you set in the segment.
Now that we’ve gone through the different segments there are and how you can create queries to find the contacts you’re looking for, let’s take a look at subscription centers and marketing lists and how these are created and used in Dynamics 365 Marketing.
Understanding and managing subscription centers and lists
Now, we’ve seen what the different segments are and how we can find the different segments we need to market to. According to GDPR, we can’t just send information to anyone we want; we need to control to whom we can send information. We control all of this through subscription centers and lists of people we can contact.
Subscription centers
A subscription center is a marketing page where your contacts can see what type of communication preferences they have and change their contact details. You cannot send out any email messages in Dynamics 365 Marketing without a link to a subscription center. Those of you who live in Europe are probably familiar with GDPR and know that there are legal requirements to adhere to in order to send emails to a customer. What you might not know is that an unsubscribe link will also help you with your deliverability, as many spam filters and internet reputation monitors will give you a bad score if you don’t have an unsubscribe link.
With every Dynamics 365 Marketing instance, you will always get a default subscription center out of the box. It is important to never delete the default subscription center page, as you cannot create it again. As you can see in Figure 3.27, there is a lot of information on the automatic Default Marketing Page already set up for you out of the box:
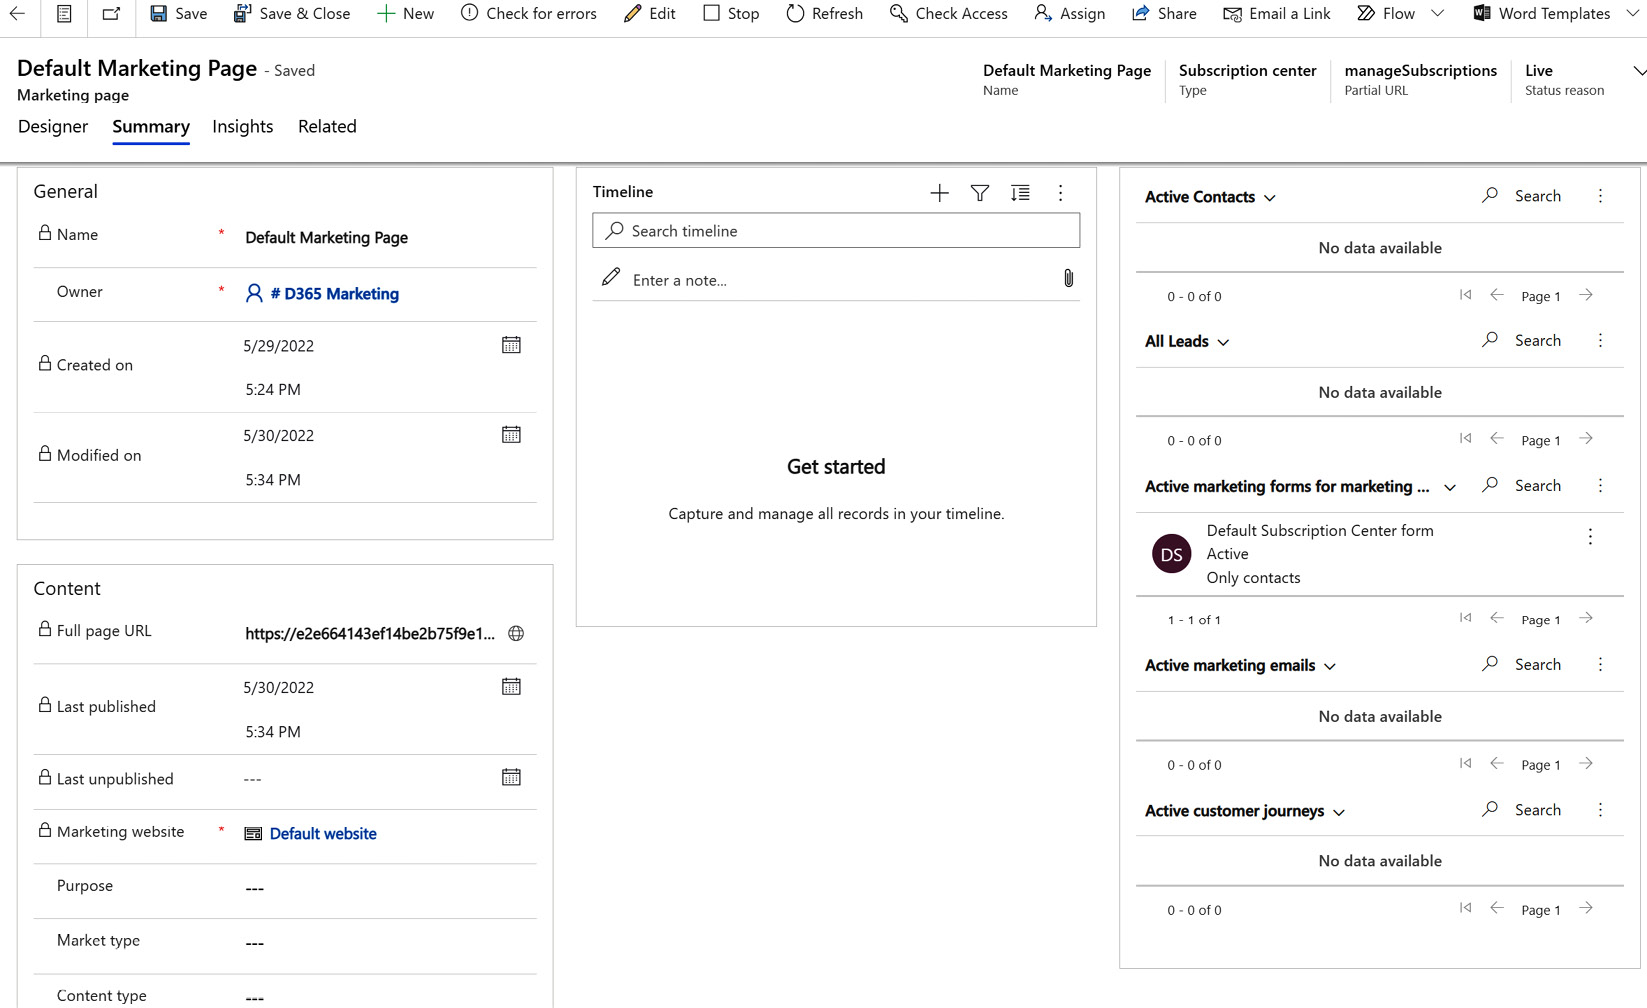
Figure 3.27: Default Marketing Page
You will learn more about marketing forms and marketing pages in Chapter 4, Managing Marketing Forms, Pages, and Websites. You can also create different subscription centers and subscription lists tailored to your company’s needs.
Your subscription centers can contain several subscription lists. Let us take a look at how we create subscription lists.
Subscription lists
A subscription list is a list where contacts register or unregister, for example, to a weekly newsletter. The actual setup for subscription lists is simple, as you can see in Figure 3.28. You give the list a name; it is always a static list and it always goes to contacts. Once you’ve saved the list, you can see the members and add or remove members manually or wait for your contacts to register themselves:
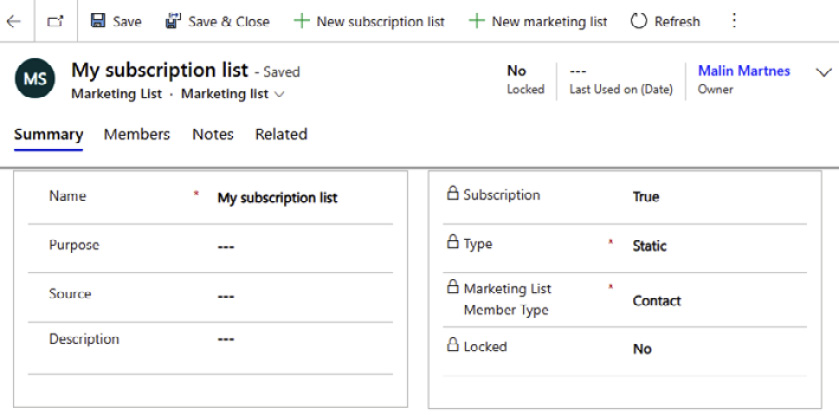
Figure 3.28: Marketing list
When you’ve created the subscription list, it’s time to create your marketing form. Your marketing form needs to be a Form-type subscription center. You need to add your subscription list to the subscription form. You can have one or several subscription lists on a single subscription form. In Figure 3.29, you can see the default subscription center form with just the Email field and the Do not email checkbox:

Figure 3.29: Default marketing form-type subscription
Once your marketing form is done, it is time to create your marketing page. Your marketing page needs to be a Subscription Center-type marketing page. You can only add a Subscription-type marketing form to a Subscription-type marketing page. As you can see from Figure 3.30, the marketing page looks the same as the marketing form. That’s because the page contains the marketing form and nothing has been added to the page. You can style your marketing page to look more like your company’s style:
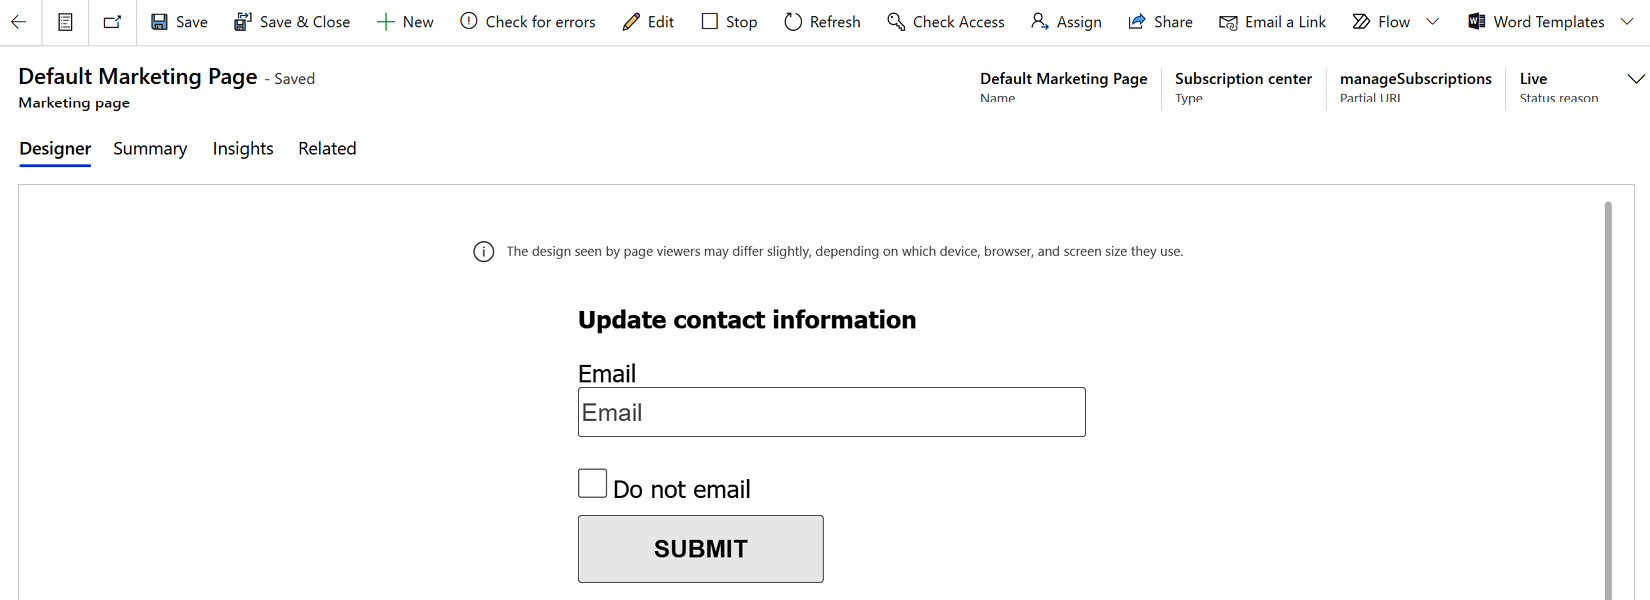
Figure 3.30: Marketing page subscription
Your subscriptions are now ready to be used in emails. You can do this more easily by adding your subscription center to your content settings, as you can see marked in red in Figure 3.31. Remember that you must have gone live with your form, your marketing page, and your content settings to be able to utilize them:

Figure 3.31: Default content settings
Now, we’ve gone through the subscription centers and how lists in Dynamics 365 Marketing are used. If you’re familiar with Dynamics 365 Sales or Customer Service, you might be familiar with marketing lists. These aren’t used much in Dynamics 365 Marketing, but you can add them in, for example, Dynamics 365 Sales and utilize them in a segment.
Marketing lists
These lists have some similarities to segments but can’t be used in customer journeys (except for subscription lists) and don’t run on marketing insights services. You can create a static marketing list in sales, where your salespeople add their contacts to the list and use that as an inclusion list in a segment. You might not want the salespeople to have access to Dynamics 365 Marketing, but you still want them to be able to add people to the Christmas presents list. You would then create a marketing list in Dynamics 365 Sales and use that list as an inclusion in your Christmas card segment.
Summary
In this chapter, you’ve learned that there are several ways of grouping your contacts.
With segments, you can group based on queries. Queries can use information based on a contact or any related table. Segments can query based on the interactions of a contact. Segments can also use a segment block and query based on other segments. You can also combine queries to include, exclude, or combine different blocks. These segments can be used in customer journeys or taking out lists.
You also have the very important subscription lists, which are where you can control all your newsletters and everything you send out from Dynamics 365 Marketing. We’ve gone through how subscription guests are connected to marketing forms and two marketing pages. We’ve also seen how important these subscription lists are for sending out emails in Dynamics 365 Marketing and for the general deliverability of emails, as well as GDPR. We’ve also gone through how you can add a subscription center to your content settings to make it easier to use this subscription center in your content. Subscription lists are a type of marketing list and are always static.
Last but not least, you have your marketing lists, which have been around in Dynamics 365 for several years already. Marketing lists (except for subscription lists) aren’t used as much in Dynamics 365 Marketing as in other Dynamics 365 applications.
In Dynamics 365 Marketing, it’s important to know what segments, subscription centers, and lists are and how you use them. If you don’t set this up correctly, you might violate GDPR. For a lot of customers, it’s important to group contacts together to know who your customers are, where your customers live, whether they open the emails you send, or whether they attend your events – or maybe you just have them in your system and never contact them at all, or you’re allowed to contact them but you don’t have control over that, thus not utilizing the full marketing potential of your contact.
In the next chapter, we’re going to cover everything about marketing forms and pages. We’ve already talked a bit about it in this chapter, with adding subscription lists to subscription center forms and subscription center pages. In the next chapter, we’re going to dig deeper into forms and pages and see what we can use them for and how you can make functional forms and pages.
Questions
The following are some questions that will help you gauge your understanding of the topics discussed in this chapter. The answers are available in the Assessments section at the end of the book.
- What are the three different blocks you can use in segments?
- Demographic
- Query
- Segment
- Contact
- Behavior
- Where do you add a subscription list?
- Marketing schema
- Marketing forms
- Marketing pages
- Marketing subscriptions
- What are the three operators to combine several blocks in segments?
- include
- or
- but not
- exclude
- if else
- and also
- Can marketing lists be used in customer journeys?
- Yes
- No
- Yes, but only subscription lists