
Chapter 4: URLs, Views, and Templates
In this chapter, we will build the URL patterns that route to different views, processing a request sent to the server. One of the jobs of a view is to send processed information in the form of context to a template that will be used to render static or dynamically changing content. By the end of this chapter, we will have created several URL patterns for the user to visit and view data. Some examples will trigger errors or not-found exceptions on purpose to help demonstrate the concepts provided in this chapter.
Django is based on what is called the Model-Template-View (MTV) architectural design pattern, which is similar to the well-known Model-View-Controller (MVC) design pattern used for a variety of popular web-based software systems today. The view in both of these architectural design patterns is what sometimes confuses people who are starting to learn Django and come from an MVC background. In both patterns, the model is the same, and both correspond to the tables within a database. In Django, the view is best compared to the controller used in the MVC design pattern, while the template in Django's MTV pattern is best compared to the view in an MVC design pattern.
We will begin this chapter by discussing URL patterns that let us tell Django what paths we want available on a website, within our project. A path is considered anything found after the suffix of a web address, where a suffix is the .com, .org, or .edu part of a URL. The path in www.example.com/my-url-pattern/ would be /my-url-pattern/. We can tell Django to map different URL patterns to different views and we can point different URL patterns to the same view. Views are what process a request and return a response. Usually, a response is returned in the form of an HTML template, but a response can also be in the form of JSON, XML, or any other data type. Templates take context provided by a view and/or a context processor and then use that context data to render dynamic HTML in a client's browser. Context is actually a dictionary of dynamic variables that change as conditions and states change within your app. Data that lives in the database is also provided to the template through that same context. Views perform queries and/or communicate with caching systems and APIs to fetch data from a data storage device, used when rendering templates.
In this chapter, we will cover the following:
- Configuring URL patterns
- Mapping URL patterns
- Resolving URLs
- Resolving absolute URLs
- Working with complex views
- Working with templates
Technical requirements
To work with the code in this chapter, the following tools will need to be installed on your local machine:
- Python version 3.9 – used as the underlying programming language for the project
- Django version 4.0 – used as the backend framework of the project
- pip package manager – used to manage third-party Python/Django packages
We will continue to work with the solution created in Chapter 2, Project Configuration. However, it is not necessary to use the Visual Studio IDE. The main project itself can be run using another IDE or run independently using a terminal or command-line window from within the project root folder. This is where the manage.py file resides. Whatever editor or IDE you are using, a virtual environment will also be needed to work with the Django project. Instructions for how to create a project and virtual environment can be found in Chapter 2, Project Configuration. You will need a database to store the data contained in your project. PostgreSQL was chosen for the examples in the previous chapter; however, any database type that you choose for your project can be used to work with the examples in this chapter.
We will also be using data that is in the form of a Django fixture, provided previously in Chapter 3, Models, Relations, and Inheritance, in the subsection titled Loading the Chapter_3 data fixture. Make sure the chapter_3 fixture is loaded into your database. If this has already been done, then you may skip the next command. If you have already created the tables found in Chapter 3, Models, Relations, and Inheritance, and have not loaded that fixture yet, then run the following command, after activating your virtual environment:
(virtual_env) PS > python manage.py loaddata chapter_3
All of the code created in this chapter can be found in the GitHub repository for this book: https://github.com/PacktPublishing/Becoming-an-Enterprise-Django-Developer. The bulk of the code used in this chapter can be found in the /becoming_a_django_entdev/becoming_a_django_entdev/chapter_4/ directory.
Check out the following video to see the Code in Action: https://bit.ly/3A6AxNU.
Preparing for this chapter
Start by creating a new app in your project called chapter_4 by following the steps discussed in Chapter 2, Project Configuration, in the subsection titled Creating a Django app. As discussed in that section, don't forget to change the value of your name = variable for your app class found in the /becoming_a_django_entdev/becoming_a_django_entdev/chapter_4/apps.py file to now point to the path where you installed your app. Be sure to also include this app in your INSTALLED_APPS variable found in the settings.py file as well.
Configuring URL patterns
Django controls and processes URL patterns in what it calls a URL dispatcher. Django starts with the urls.py file, which is specified as the ROOT_URLCONF variable, found in the settings.py file. Visual Studio automatically created the ROOT_URLCONF variable for us when we created a project and it should have also done so when executing the Django startproject command.
If your project did not create this variable, add the following setting to your settings.py file:
# /becoming_a_django_entdev/settings.py
...
ROOT_URLCONF = 'becoming_a_django_entdev.urls'
The urls.py file defined in the ROOT_URLCONF variable is what Django considers the root URLconf of any project, short for URL configuration. Other url.py files can be linked together by importing them using an import() function. Django looks for only one thing in these urls.py files, a single variable named urlpatterns, which contains a set of URL patterns that have been defined for a project or reusable app. This file can contain many methods, classes, and other utilities that help you formulate those patterns.
Basic path functions
Django provides us with a variety of path functions to build URL patterns. These functions create and return elements that will be included within any urlpatterns variable. The path() and re_path() functions can accept up to four positional arguments in the following order: route, view, kwargs, and name. The first two of these arguments are required and must be defined. The first argument, route, expects a string; this can be a simple string or a fairly complex string when combining path converters and using regular expressions. If you are using a method to perform logic of some kind for this argument, it just needs to return a string. The route argument is the path that Django is listening for and then mapping to the second argument, view. The view argument is used to tell Django how to process the GET request of a URL pattern. view can perform any kind of logic. The third argument is the Keyword Arguments (kwargs), and this is a dictionary of additional keywords to pass into view. The last argument, name, is a way to map URL patterns when using other functions, such as a reverse lookup.
Let's go over some examples of using basic functions before we dive into more complicated URL patterns, using path converters.
Function – static()
The static() function is provided by Django to help serve up static files when running a project locally and with debug mode turned on. These are files such as images, CSS, and JavaScript files that are placed in the static folder of a Django app. This function will enable access to those static folders, allowing you to run your project and add, delete, and edit those files all without having to run the python manage.py collectstatic command to reflect those changes in your browser. Of course, in the browser, you still have to hit refresh unless you have other tools/plugins installed in your browser to update a page when it detects changes to files that it is using.
Static files
To activate static files in your local environment, in your main urls.py file, add the following import statements and append the following function to the urlpatterns variable:
# /becoming_a_django_entdev/urls.py
from django.conf import settings
from django.conf.urls.static import static
urlpatterns = [...] + static(
settings.STATIC_URL,
document_root = settings.STATIC_ROOT
)
In the preceding example, we imported the settings.py file to gain access to the values of the STATIC_URL and STATIC_ROOT variables. Since we installed the pip whiteNoise package, to work with Heroku as our host, we actually do not need to write the static() function depicted previously. This means we can skip writing the preceding code if we want to, but adding it will not hurt either and will allow your project to work on other hosts.
This can also be written using a conditional that checks whether DEBUG is enabled.
The alternative would be written as follows:
# /becoming_a_django_entdev/urls.py
...
urlpatterns = [...]
if settings.DEBUG:
urlpatterns += static(
settings.STATIC_URL,
document_root = settings.STATIC_ROOT
)
Please use only one of the examples depicted in this subsection and not both of them at the same time. You can comment out the unused one.
Let's configure media files next.
Media files
Even with the whitenoise package, we still need to use the static() function to serve up media files. Media files are just like static files except they are considered what a user would upload through FileField, ImageField, or several other methods of uploading files to a media storage device. These files are also known as User-Generated Content (UGC) and they can range from anything such as an image to a PDF document, Excel document, Word document, audio file, or even movie file. The file that gets uploaded is placed in the media folder that we created and configured in Chapter 2, Project Configuration.
To access these images when running a project locally, follow these steps:
- In your main urls.py file, insert the following highlighted code:
# /becoming_a_django_entdev/urls.py
...
from django.conf import settings
from django.conf.urls.static import static
urlpatterns = [...] + static(
settings.STATIC_URL,
document_root = settings.STATIC_ROOT
) + static(
settings.MEDIA_URL,
document_root = settings.MEDIA_ROOT
)
- This can also be added to the debug conditional statement shown in the previous subsection, titled Static files.
- If you downloaded the code that came along with this book, a sample image has been included in the directory called /media and is used to test whether accessing media files is actually working. If the /media folder is not created at this time in your project, go ahead and create that in your IDE or file browser or by running the following command:
(virtual_env) PS > mkdir media
- Copy the /becoming_a_django_entdev/media/media.jpg file into your project in the same directory.
- Run your project and attempt to navigate to the URL http://localhost:8000/media/media.jpg without the preceding code and you should get a 404 response. Then try it with the preceding code and you should see the media image shown here:
Figure 4.1 – Media sample image
Let's take these functions a step further and build our first path next.
Function – path()
A path() function takes in the route, view, kwargs, and name attributes and returns a single element to be included in the urlpatterns list. A path() function can be thought of as handling static paths as well as dynamic paths using path converters. If you want to use regular expressions to register a dynamic path converter, you will want to use the re_path() function instead.
Follow these steps to work with the path() function in your project:
- First, run your project and navigate to the base URL of the project at http://localhost:8000/. You might be wondering why we are seeing a Page not found (404) message, as shown here:

Figure 4.2 – 404 with debug turned on
When we activated the static and media URL patterns, we caused this error message to happen. This is the reason we are not seeing the famous Django success rocket ship that we are used to seeing. It's nothing to be alarmed about; it just means that we haven't created a URL pattern to handle the home page yet. This error message can be thought of as a reminder to create that home page, which we will do next.
Using the path() function, we will define a single static URL pattern that will listen for the home page URL. Before we do that, let's create the HTML file that it will serve up. When we used Visual Studio to create the chapter_4 app, a file named index.html was automatically created for us in the /becoming_a_django_entdev/chapter_4/templates/chapter_4/ directory.
- If you do not have the /chapter_4/templates/chapter_4/index.html file in that directory, go ahead and create this file now, or copy the one provided with this book. Sometimes this file is not automatically created for us.
The index.html file will be used as a custom home page and we will focus on just the URL pattern at this time; we will have dived into templates in more depth by the end of this chapter.
Writing a URL pattern to listen for the home page is pretty easy compared to how complex other URL patterns can be to write. Django will try to match a URL to a pattern by starting from first to last in the order that they are placed within the urlpatterns list. It's usually best to include static URL patterns at the top and then place your dynamic patterns below them. If a static pattern is similar to a dynamic pattern, the static URL pattern will be matched first, which is likely what you want to happen.
- In your main /becoming_a_django_entdev/urls.py file, add the following code:
# /becoming_a_django_entdev/urls.py
...
from django.urls
import path
from django.views.generic
import TemplateView
urlpatterns = [
path(
'',
TemplateView.as_view(
template_name = 'chapter_4/index.html'
)
),
]
The preceding path() function is used to listen for a route/path defined as nothing (''), and then we are using the built-in TemplateView class, provided by the django.views.generic library, to serve up the home page in template form. Since this is a static page and a static URL, meaning no content on the page will change and the URL itself will not change either, we do not need to write a view class to handle how the context of the page will change. Instead, we can skip creating the view in this example by using the TemplateView class. With a TemplateView class, we could still pass in keyword arguments and define the name argument if we wanted to. If we did want to pass in kwargs, that would be done using the following step.
- Add kwargs to your home page:
# /becoming_a_django_entdev/urls.py
...
urlpatterns = [
path(
'',
TemplateView.as_view(
template_name = 'chapter_4/index.html'
),
kwargs = {
'sub_title': 'I am the sub title.'
}
),
]
- In the /chapter_4/index.html file that is provided with this book, a conditional will check whether sub_title has a value and then displays that value in your template. Copy that conditional into your file, as highlighted here:
# /becoming_a_django_entdev/chapter_4/templates/chapter_4/index.html
{% load static %}
<html>
<head><title></title></head>
<body style="text-align:center">
<img src="{% static 'chapter_4/home_page.jpg' %}" role="img" alt="Home Page Image" width="400" style="margin: 0 auto" />
{% if sub_title %}
<p>{{ sub_title }}</p>
{% endif %}
</body>
</html>
We will explain more about building templates before the end of this chapter, in the Working with templates section.
One of the reasons we configured our project to handle static files in Chapter 2, Project Configuration, and in this chapter, under the subsection titled Static files, was to access those files within a template, as is done in the example shown previously. The {% load static %} tag statement allows us to begin using the static template tag, such as {% static 'chapter_4/home_page.jpg' %}. The {% static %} tag returns a working URL, pointing to the image file at http://localhost:8000/chapter_4/home_page.jpg.
- Create the /static/chapter_4/ folder in your project using the IDE, file browser, or the following command:
(virtual_env) PS > mkdir becoming_a_django_entdev/chapter_4/static/chapter_4
- Copy the /chapter_4/home_page.jpg file provided with the code of this book into your project.
Django automatically searches the static folder found in each app of a project. It is common practice to override static files, such as images, CSS, and JavaScript files, of packages that are installed in your virtual environment by including the same path and filename in the static folder of any app in your project. The same principle also applies when working with template files.
In step 5, the highlighted {{ sub_title }} variable tag is the keyword argument that was passed into that URL pattern in step 4. A custom function/callable can also be used instead of hardcoding a value here. Any context variable can be recalled in a template using the bracket syntax, {{ }}. Objects such as a dictionary, list, set, and query set can all be accessed using a period for each key and subkey, as in {{ context_variable.key.subkey }}.
- Now, run your project and you should no longer see a 404 debug message. Instead, you should see the following screenshot:

Figure 4.3 – Project home page
Next, let's work with the include() function to import URL patterns from other apps/packages.
Function – include()
The include() function is used to import additional urls.py files that contain their own urlpatterns variable. This is how we can write URL patterns for reusable apps, and then include them for use in a project within ROOT_URLCONF of a site.
Let's use this to better organize our chapter-specific URL patterns by following these steps:
- If this file was not already created for you, go ahead and create a urls.py file inside of your /becoming_a_django_entdev/chapter_4/ folder, and then add the following URL pattern to that file:
# /becoming_a_django_entdev/chapter_4/urls.py
from django.urls
import path
from django.views.generic
import TemplateView
urlpatterns = [
path(
'chapter-4/',
TemplateView.as_view(
template_name='chapter_4/chapter_4.html'
)
),
]
- In the main /becoming_a_django_entdev/urls.py file that we have been using, comment out the previous patterns that we created in this chapter and add the following path statement:
# /becoming_a_django_entdev/urls.py
...
from django.urls
import include, path
urlpatterns = [
path(
'',
include(
'becoming_a_django_entdev.chapter_4.urls'
)
),
]
- Copy the chapter_4.html template file that is provided with the code of this book into your project, found in the /becoming_a_django_entdev/chapter_4/templates/chapter_4/ directory.
- Navigate to the URL http://localhost:8000/chapter-4/, and you should see a white page that only says This is Chapter 4, as shown in the following screenshot:

Figure 4.4 – URL pattern – include()
Now that we have the include() example working, we will put all new URL patterns in the /chapter_4/urls.py file and organize all future chapters in a similar manner.
Now, let's practice redirecting URLs.
Redirecting patterns
Instead of using the TemplateView class as we have been, we can write URL patterns to handle redirects from within the project, without having to configure them directly in a web server. This is convenient because in traditional web development, redirects are handled by the web server and it is much easier to manage in a project than it is in a web server. Redirects can be handled using the RedirectView class provided by Django.
We are going to specify a redirect rule on the http://localhost:8000/my_path/my_unwanted_url/ path to take us to http://localhost:8000/my_wanted_url/ instead. Follow these steps to configure your redirect:
- Add the following pattern to your existing /chapter_4/urls.py file:
# /becoming_a_django_entdev/chapter_4/urls.py
...
from django.urls
import include, path
from django.views.generic
import (
TemplateView,
RedirectView
)
urlpatterns = [
...,
path(
'my_path/my_unwanted_url/',
RedirectView.as_view(
url = 'http://localhost:8000/my_wanted_url/'
)
),
]
- Run your project and navigate to the URL http://localhost:8000/my_path/my_unwanted_url/. You should now be redirected to, and also see in the address bar of the browser, http://localhost:8000/my_wanted_url/. In the body of the page, you should see a 404 response because we have not yet defined a URL pattern for the my_wanted_url path. This is to be expected when performing this step.
- Additional arguments can be included, such as stating that we want this to be a permanent or temporary redirect, by writing the path using the following example:
# /becoming_a_django_entdev/chapter_4/urls.py
...
urlpatterns = [
...,
path(
'my_path/my_unwanted_url/',
RedirectView.as_view(
url = 'http://localhost:8000/my_wanted_url/',
permanent = True
)
),
]
Django also allows us to define pattern_name and query_string as additional arguments of the RedirectView class.
Note
The preceding path has a hardcoded value of http://localhost:8000/, which can become a problem in a remote environment that is not your local machine. To overcome this, you will need to adopt the concept of global context variables discussed later in this chapter in the subsection titled Creating a context processor.
Next, let's discuss using path converters to listen for dynamic path routes.
Using path converters
A path converter in Django is a URL pattern that is designed to listen to a dynamic path, where that path can change. There are five standard path converters built into Django and available to use: str, int, slug, uuid, and path. These are preformatted converters that allow a variety of choices and permit strings and integers within a pattern. For example, the path converter called path is used in the following code to search for any variety of characters, numbers, and certain symbols that a URL can possess.
To practice using path converters, follow these steps:
- Add the following URL pattern to your /chapter_4/urls.py file:
# /becoming_a_django_entdev/chapter_4/urls.py
...
from django.urls
import include, path
from django.views.generic
import ..., TemplateView
urlpatterns = [
...,
path(
'my_path/<path:my_pattern>/',
TemplateView.as_view(
template_name = 'chapter_4/index.html'
)
),
]
- Now, navigate to the URL http://localhost:8000/my_path/testing/, and you should see the same home page that we saw before. We are seeing the same page because we are pointing to the same index.html file, just to see that it is working. Additionally, if we navigate to the URL http://localhost:8000/my_path/2022/, we will also see the same home page. This is to be expected. The one thing we won't see is the value of the sub_title keyword argument on this page because we did not pass that into this URL pattern. The conditional {% if sub_title %} statement found in that template is used to prevent breakage if no sub_title is provided.
- Change the existing my_path path converter shown in step 1 from path to int and change my_path to my_year_path, as shown in the following code, allowing for the URL http://localhost:8000/my_year_path/2022/ to work:
# /becoming_a_django_entdev/chapter_4/urls.py
...
from django.urls
import include, path
from django.views.generic
import ..., TemplateView
urlpatterns = [
...,
path(
'my_year_path/<int:my_year>/',
TemplateView.as_view(
template_name = 'chapter_4/index.html'
)
)
]
- Next, run your project again. With the int path converter, the URL http://localhost:8000/my_year_path/testing/ should no longer work when we try to navigate to it. Instead, we should see the same 404 debug message that we saw earlier. It will only allow a numeric value of any length now. This means we should see the home page image when we visit the URL http://localhost:8000/my_year_path/2/, or any numeric value.
When we wrote int:my_year, the my_year in this argument can be named anything we want. The same applies to the my_pattern in the path:my_pattern argument and in any other converter type. The second parameter is what is used to access that key word argument in a view class or method.
Let's write a custom path converter next.
Custom path converters
A custom path converter is a way for us to write a class that uses a regular expression to define the path that Django listens for. The converter class is structured in a way to return the data type that is intended to be used in the view, such as an int data type used in the example of the previous subsection. This class also returns another string representation of the data type sent to the view that is intended to be used in the URL. For example, if we do not want http://localhost:8000/my_year_path/2/ to be a valid URL and we only want to allow four-digit numbers, a custom path converter can be used to accomplish this.
Follow these steps to create your custom path converter:
- In your /chapter_4/ app directory, create a new file called converters.py.
- Inside the file, add the following class, with the two methods provided:
# /becoming_a_django_entdev/chapter_4/converters.py
class YearConverter:
regex = '[0-9]{4}'
def to_python(self, value):
return int(value)
def to_url(self, value):
return '%04d' % value
- In your /chapter_4/urls.py file, add the following code, which registers the newly created converter class for use where it is highlighted in <year:year> in the following code block:
# /becoming_a_django_entdev/chapter_4/urls.py
...
from django.urls
import path, register_converter
from .converters
import YearConverter
register_converter(YearConverter, 'year')
urlpatterns = [
...,
path(
'my_year_path/<year:year>/',
TemplateView.as_view(
template_name = 'chapter_4/index.html'
)
),
]
- Now, run your project and navigate to the URL http://localhost:8000/my_year_path/2/; you should see a 404 debug message. This occurs because the preceding pattern will only accept a four-digit integer now, including 0001 and 1111, which is to be expected.
We can get even more in-depth by writing a method-based or class-based view and in that view compare whether a year is greater than, say, the year 1900, and if it is not, return a 404 response. We will discuss doing that soon in the section titled Working with conditional responses of this chapter.
Next, let's practice working with regular expression paths.
Function – re_path()
A re_path() function, better known as a regular expression path function, is similar to a path() function but allows us to pass in a formatted regular expression string as the route parameter without the need to create a custom path converter.
For example, we could write the same year example as previously without the converter class. In your /chapter_4/urls.py file, add the path shown as follows, and comment out the previous my_year_path:
# /becoming_a_django_entdev/chapter_4/urls.py
...
from django.urls
import path, re_path
...
urlpatterns = [
...,
re_path(
'my_year_path/(?P<year>[0-9]{4})/$', TemplateView.as_view(
template_name = 'chapter_4/index.html'
)
),
]
There is actually a difference between using a re_path() function and writing your own converter class. The difference is in the data type of the value of the pattern recognized when we use that value within a view class or method. With the re_path() function, the data type of this value when used in a view will always be a string, whereas the data type of the value when using a converter class will always be the data type defined by the def to_python() method of that class, meaning you can transform the data type to anything you want, if you need to.
Before we illustrate the difference in data types between using a converter class and using the re_path() function, let's map a URL pattern to a simple view.
Mapping URL patterns
Writing custom views is a way for us to perform all of the tasks and services needed to render a page that includes all of the content that we want. Within a view, we can validate against business logic rules to determine how to handle a request.
In this exercise, we will use the year pattern that we wrote earlier in this chapter, to only allow a year greater than 1900. Anything less than that, we will tell Django to serve up a 404 response.
Using simple views
A simple view is also known as a method-based view, which is a callable function in Python.
Follow these steps to map to a simple view in your project:
- In your /chapter_4/urls.py file, revert to using the same converter class that we wrote in the Using path converters subsection of this chapter. Reference a view that we will write next in a different file called practice_view(), as highlighted here:
# /becoming_a_django_entdev/chapter_4/urls.py
...
from django.urls
import ..., register_converter
from .converters
import YearConverter
from .views
import practice_view
register_converter(YearConverter, 'year')
urlpatterns = [
...,
path(
'my_year_path/<year:year>/',
practice_view
),
]
The thing we did differently from before is that we replaced the TemplateView class with a custom simple view class, called practice_view.
- Create the view method called practice_view() in a views.py file in your /becoming_a_django_entdev/chapter_4/ directory. Then, add the code shown here:
# /becoming_a_django_entdev/chapter_4/views.py
from django.template.response
import (
TemplateResponse
)
def practice_view(request, year):
return TemplateResponse(
request,
'chapter_4/my_practice_page.html',
{
'year': year
}
)
- Copy the template file provided with the code of this book into your project, located at /becoming_a_django_entdev/chapter_4/templates/chapter_4/my_practice_page.html.
- Navigate to the URL http://localhost:8000/my_year_path/1066/ and you should see the practice page shown in the following screenshot:

Figure 4.5 – Out-of-bounds year returns valid response
We are almost there. The success message we see here is to be expected. What we actually want is to return a 404 response instead of a valid path, in order to comply with the business logic discussed earlier, to only allow a year greater than or equal to 1900. Therefore, we need to use keyword arguments and conditional statements to perform custom validation when a request is processed, which we will do next.
Using kwargs in views
To access keyword arguments inside of a view method, we need to pass it in as a positional argument of that method. In the example, def practice_view(request, year):, year would be the positional keyword argument. Since we defined a path converter in the urls.py file with the name of year, we are required to include year as a positional argument when accessing a view with that same name. Without this argument, Django would give us an error during runtime.
Follow these steps to configure your view method:
- In your /chapter_4/urls.py file, use the following URL pattern along with the same path converter class that we created earlier. Comment out the other my_year_path patterns:
# /becoming_a_django_entdev/chapter_4/urls.py
...
from django.urls
import ..., register_converter
from .converters
import YearConverter
from .views
import ..., practice_year_view
register_converter(YearConverter, 'year')
urlpatterns = [
...,
path(
'my_year_path/<year:year>/',
practice_year_view
),
]
- In your /chapter_4/views.py file, write the new method provided here:
# /becoming_a_django_entdev/chapter_4/views.py
from django.template.response
import (
TemplateResponse
)
...
def practice_year_view(request, year):
print(type(year))
print(year)
return TemplateResponse(
request,
'chapter_4/my_year.html',
{'year': year}
)
- Copy the template file provided with the code of this book, found in /becoming_a_django_entdev/chapter_4/templates/chapter_4/my_year.html.
- Now, navigate to the URL http://localhost:8000/my_year_path/2022/ and you should see a successful response. When we look at the terminal or command window, we will see that it is telling us the value of year is 2022 and that it is of an integer, <class 'int'>, data type, as depicted in the following screenshot:

Figure 4.6 – Converter class – integer data type
- Change the URL pattern in your /chapter_4/urls.py file back to using the re_path() function instead of the custom YearConverter example, as shown:
# /becoming_a_django_entdev/chapter_4/urls.py
...
from .views
import ..., practice_year_view
#register_converter(YearConverter, 'year')
urlpatterns = [
...,
re_path(
'my_year_path/(?P<year>[0-9]{4})/$',
practice_year_view
),
]
You can comment out the register_converter that we previously used.
- Visit the URL http://localhost:8000/my_year_path/2022/ one more time. You should see how the output will change from <class 'int'> to <class 'str'> in your terminal or command-line window, as depicted here:

Figure 4.7 – Converter class – string data type
Now, we can actually see the differences between writing a pattern using re_path() and the alternative, going through the steps to create a custom converter class. With the re_path() function, we now have to take additional steps in a view to convert a keyword argument into an integer before we can even check whether the year value is greater than a certain year. If we do not do that conversion, we would wind up with an error telling us '>=' not supported between instances of 'str' and 'int'. If the same regular expression pattern is used over and over again, it would mean converting a string into an integer many times, one time for each view that is being used by that pattern. This is what is known as the Write Everything Twice (WET) design principle and is usually frowned upon. Writing a converter class will solve that problem and allow you to write it just once according to the Don't Repeat Yourself (DRY) design principle.
Let's work with conditional responses next.
Working with conditional responses
Instead of returning a valid TemplateResponse() like we have been doing in previous exercises, we will finally check if the value of the year kwarg is greater than or equal to 1900. If the year value is less than 1900, we are going to raise a Http404() response. Using the URL pattern that uses the custom path converter YearConverter class that we wrote earlier, we will serve up an integer instead of a string as the data type of the keyword argument year, allowing us to perform mathematical operations using that value.
Follow these steps to configure your conditional statements:
- In your /chapter_4/urls.py file, add the following code, making sure to comment out or delete the other my_year_path patterns:
# /becoming_a_django_entdev/chapter_4/urls.py
...
from django.urls
import ..., register_converter
from .converters
import YearConverter
from .views
import ..., practice_year_view
register_converter(YearConverter, 'year')
urlpatterns = [
...,
path(
'my_year_path/<year:year>/',
practice_year_view
),
]
- In your /chapter_4/views.py file, modify practice_year_view() to look like the following highlighted code:
# /becoming_a_django_entdev/chapter_4/views.py
from django.http
import Http404
from django.template.response
import (
TemplateResponse
)
def practice_year_view(request, year):
if year >= 1900:
return TemplateResponse(
request,
'chapter_4/my_year.html',
{'year': year}
)
else:
raise Http404(f'Year Not Found: {year}')
- Now, visit the URL http://localhost:8000/my_year_path/1066/, and you should see the following 404 message, which is intentional:
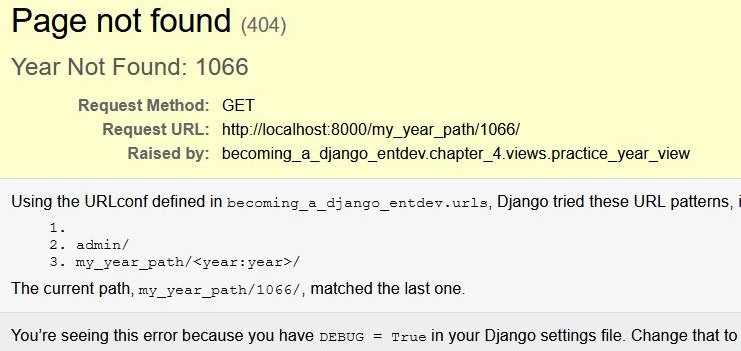
Figure 4.8 – Out-of-bounds year returns invalid response
- Next, visit a path with a year greater than 1900, such as http://localhost:8000/my_year_path/2022/, and you should see a successful response, as on the year page depicted here:

Figure 4.9 – In-bounds year returns valid response
Let's link models to our views and templates next.
Linking models to views and templates
Using the same models that we created in Chapter 3, Models, Relations, and Inheritance, we can provide information about those objects within a template. We will write a URL pattern that will point to a new simple view method and display information about a vehicle.
Follow these steps to display model information in your templates:
- In your /chapter_4/urls.py file, include the following URL pattern:
# /becoming_a_django_entdev/chapter_4/urls.py
...
from .views
import ..., vehicle_view
urlpatterns = [
...,
path(
'vehicle/<int:id>/',
vehicle_view,
name = 'vehicle-detail'
),
]
Our new view will listen for the primary key, also known as the ID, that is passed in to us as a keyword argument of that path converter. The ID is used to look up that object in the database, and if not found, it will serve up a 404 response instead. Instead of writing <int:id>, we could target the path converter to listen for a string, such as the VIN using <str:vin>. Then, in the view where we perform the database query, search for a record matching the VIN instead of the ID of a vehicle. You are welcome to practice both options.
- In your /chapter_4/views.py file, add the following import statement and view method:
# /becoming_a_django_entdev/chapter_4/views.py
...
from django.http
import Http404
from ..chapter_3.models
import Vehicle
def vehicle_view(request, id):
try:
vehicle = Vehicle.objects.get(id=id)
except Vehicle.DoesNotExist:
raise Http404(f'Vehicle ID Not Found: {id}')
return TemplateResponse(
request,
'chapter_4/my_vehicle.html',
{'vehicle': vehicle}
)
The preceding import statement uses two periods (..), which is Python path syntax, to navigate up one directory level and enter the sibling chapter_3 folder, to access the models that are written in the chapter_3 app. When you are working with many different apps in your project, this is common practice. The try/except block shown previously checks to see whether the requested object exists and if it does exist, a 404 response is raised.
- Copy the template file that has been provided along with the code of this book, located at /becoming_a_django_entdev/chapter_4/templates/chapter_4/my_vehicle.html.
We can access any field in a model object from within the template by using the name of the context variable that we passed into TemplateResponse. For example, when used in a template file, the vehicle context variable would be written as {{ vehicle.vin }}. This is already done in the template file you just copied into your project.
- Run your project and navigate to http://localhost:8000/vehicle/4/. You should see vehicle detail information on this page, as shown in the following screenshot:

Figure 4.10 – Vehicle ID = 4
If you change the ID in your URL, the vehicle will change. If you activated the VIN as the path converter, then you would navigate to http://localhost:8000/vehicle/aa456789012345678/ in order to see the same results, using the data provided in the chapter_3 data fixture.
Now that we have views to work with, we can practice getting the reverse URL when providing only the kwarg of a path converter and the name attribute value.
Resolving URLs
Resolving a URL is the process of taking a relative path or object and obtaining the URL that relates to a unique field such as a primary key. Django's reverse resolution of URL patterns is a method of generating a URL structure using argument values that we provide instead of hardcoding URL paths in places, which can break over time. We can use template tags and statements throughout the project to use the name argument of a URL pattern. This is encouraged as best practice and follows a DRY design principle, which is less prone to breakage as your project evolves.
Let's discuss how to use the name attribute to get a reverse resolution pattern.
Naming URL patterns
Using the same custom YearConverter class and the same my_year_path URL pattern that we created earlier in this chapter, do the following to configure your URL pattern.
In your /chapter_4/urls.py file, you should have the path shown in the following code block, using the highlighted name attribute:
# /becoming_a_django_entdev/chapter_4/urls.py
...
from django.urls
import ..., register_converter
from .converters
import YearConverter
from .views
import ..., practice_year_view
register_converter(YearConverter, 'year')
urlpatterns = [
...,
path(
'my_year_path/<year:year>/',
practice_year_view,
name = 'year_url'
),
]
Now we can use a reverse() function, which we will do next.
Using the reverse() function
The reverse() function provides us with the relative URL of an object, providing the name attribute value. In our view, we will write several print statements to tell us the relative path of objects when provided with different input arguments.
Follow these steps to configure your view method:
- In your /chapter_4/views.py file, add the following import statement, below the existing import statements:
# /becoming_a_django_entdev/chapter_4/views.py
...
from django.urls import reverse
- In your /chapter_4/views.py file, and in the same practice_year_view() method, go ahead and include the following print statements. Make sure these are placed before your conditional statement that executes the return/raise calls:
# /becoming_a_django_entdev/chapter_4/views.py
...
def practice_year_view(request, year):
...
print(reverse('year_url', args=(2023,)))
print(reverse('year_url', args=(2024,)))
...( Repeat as desired )...
- Run your project and navigate to any URL using this pattern, such as http://localhost:8000/my_year_path/2022/. What will be printed in your terminal or command-line window is the formatted relative path for each of the URLs, as shown in the following screenshot:
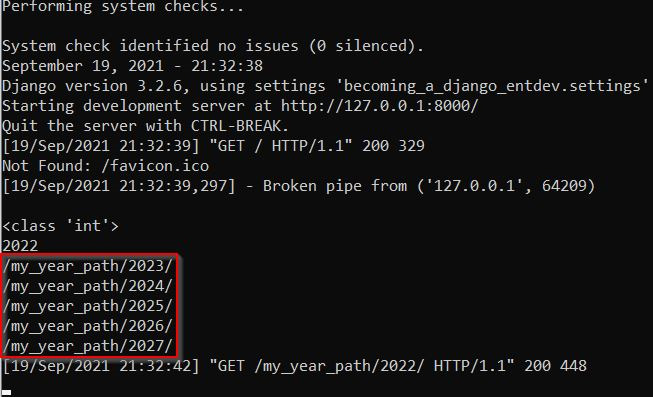
Figure 4.11 – Naming URL – view usage
The reverse() method is how we can look up a URL, using the arguments that are passed into that function. The reverse() method can be imported and used anywhere within a project, not just within a view class or method. This method takes in two positional arguments, the first being the name of a URL pattern, such as year_url highlighted in the preceding example, and is required. The second positional argument is the keyword arguments that get passed into the reverse() method, which is sometimes required. If there is more than one path converter defined for a URL pattern, they would be included in the reverse() method in the order in which they were created for that pattern and separated by a comma. Remember that the position of the keyword arguments pertaining to each path converter is important and follows the order in which keyword arguments were created for that URL pattern.
Using the {% url %} template tag
The {% url arg1 arg2 %} template tag works just like the reverse() method, except used directly in a template. This tag also takes in two positional arguments, just like the reverse() method does. The first argument listens for the name of the URL pattern and the second is the arguments list. These arguments are separated with a space when using this template tag. Additional arguments are provided in the order the path converters were created for that URL pattern. When using the {% url %} tag, it is acceptable to include arguments written with and without keyword syntax. For example, both of the following tags and how they are used are valid:
# Dummy Code
{% url 'year_url' 2023 5 25 %}{% url 'year_url' year=2023 month=5 day=25 %}The second example in the preceding code block would be used if we had actually created three path converters for the URL pattern, being year, month, and day.
They can also be replaced by using context variables, if we created the three context variables called year, month, and day to be used in a template, as shown in the following code block:
# Dummy Code
{% url 'year_url' year month day %}The code shown previously was for illustrative purposes only and will break if you try to use it without building the related URL patterns and views.
Follow these steps to configure your project for this exercise:
- In your existing /chapter_4/my_year.html file, uncomment the following hyperlinks that have been provided with the code of the book when you copied this file into your project or add them manually as shown. They are formatted using the Django {% url %} template tag:
# /becoming_a_django_entdev/chapter_4/templates/chapter_4/my_year.html
...
<html>
...
<body style="text-align:center">
...
<br /> <br />
<a href="{% url 'year_url' 2023 %}">2023</a>
<a href="{% url 'year_url' 2024 %}">2024</a>
...( Repeat as desired )...
</body>
</html>
- Run your project and navigate to the same URL, http://localhost:8000/my_year_path/2022/, and you should now see what is depicted in the following screenshot, with the hyperlinks rendered to the page:

Figure 4.12 – Naming URL – template usage
Each hyperlink that is rendered points to the correlating relative path at href="/my_year_path/####/". We can continue modifying these two examples to format absolute URLs instead of relative URLs. This means we will include the www.example.com part of the URL. We will discuss that in the section titled Resolving absolute URLs later in this chapter. Let's process trailing slashes next.
Processing trailing slashes
In Django, we can use the re_path() function in combination with the custom YearConverter class to write one URL pattern accepting a path with and without a trailing slash, /. What this means is that we can write a URL to listen for www.example.com/my_path/ and will also allow www.example.com/my_path to render a success, essentially combining two paths into one statement.
To process your trailing slashes, in your /chapter_4/urls.py file, add the following path and comment out all other my_year_path examples:
# /becoming_a_django_entdev/chapter_4/urls.py
...
from django.urls import (
...,
re_path,
register_converter
)
from .converters
import YearConverter
from .views
import ..., practice_view
register_converter(YearConverter, 'year')
urlpatterns = [
...,
re_path(
r'^my_year_path/(?P<year>[0-9]+)/?$',
practice_view
),
]
route is defined in the re_path() function as r'^my_year_path/(?P<year>[0-9]+)/?$', which constructs the path in a way that will listen for an optional forward slash. year is also written using just the tag name. If we were to write the statement using <year:year> as we did in previous exercises, then we would receive the following error message in the terminal or command-line window:
django.core.exceptions.ImproperlyConfigured: "^my_year_path/(?P<year:year>[0-9]+)/?$" is not a valid regular expression: bad character in group name 'year:year' at position 18
Since we are listening for a trailing slash via the use of regular expression operations, there is no need to modify values in the settings.py file, such as APPEND_SLASH. In order to actually use the APPEND_SLASH variable, Django requires the common middleware to be installed. You can learn more about using this approach instead of the regular expression approach here: https://docs.djangoproject.com/en/4.0/ref/settings/#append-slash. Using the regular expression basic structure shown previously, we don't need to worry about middleware.
Now that we have resolved relative URLs, let's resolve absolute URLs next.
Resolving absolute URLs
An absolute URL includes the scheme, host, and port of a URL, as in the following format, scheme://host:port/path?query. This is an example of an absolute URL: https://www.example.com:8000/my_path?query=my_query_value.
Next, we will resolve an absolute URL while introducing the practice of using custom context processors.
Creating a context processor
Context processors are useful in many ways: they provide context that is shared globally among all templates and views within a project. Alternatively, the context being created in a view can only be used by the template that the view is using and no other templates. In the next example, we will create and then activate a custom global context processor where we will add the base URL of the site. We will call the context variable base_url, referring to scheme://host:port of the URL found throughout this project's site.
Follow these steps to create your context processor:
- In the same folder as your settings.py file, create a new file called context_processors.py.
- Inside this file, place the code provided as follows, which will construct the http://localhost:8000 portion of the site based on the environment we are running the project on:
# /becoming_a_django_entdev/context_processors.py
def global_context(request):
return {
'base_url': request.build_absolute_uri(
'/'
)[:-1].strip('/'),
}
Context is returned as a dictionary of key-value pairs, where we can pack as many keys as we would like to.
- To register this context processor for inclusion during runtime, we need to add it to the settings.py file, under the TEMPLATES variable. Include the path to your global_context() method, as shown:
# /becoming_a_django_entdev/settings.py
TEMPLATES = [
{
...
'OPTIONS':
{
'context_processors': [
...,
'becoming_a_django_entdev.context_processors.global_context',
],
},
},]
Place your custom context processor below any existing context_processors in the preceding list.
Context processors can be broken down into individual apps within a project as well. Include each additional context processor that you create inside the preceding list and in the order desired. Additional global context processor variables have been included with the code of this book for extra practice as well.
Let's use our newly created base_url context in a template next.
Using context processor data in a template
Using a {% url %} template tag, we can modify hyperlinks to use the context that we just made available in the previous example as a context processor called global_context().
Follow these steps to configure your template:
- In your /chapter_4/urls.py file, add the following path and comment out all other my_year_path examples:
# /becoming_a_django_entdev/chapter_4/urls.py
...
from django.urls
import ..., register_converter
from .converters
import YearConverter
from .views
import ..., practice_year_view
register_converter(YearConverter, 'year')
urlpatterns = [
...,
path(
'my_year_path/<year:year>/',
practice_year_view,
name = 'year_url'
),
]
- In your my_year.html file, write/uncomment the following hyperlink examples:
# /becoming_a_django_entdev/chapter_4/templates/chapter_4/my_year.html
...
<html>
...
<body style="text-align:center">
...
<br /> <br />
<a href="{{ base_url }}{% url 'year_url' 2023 %}">2023</a>
<a href="{{ base_url }}{% url 'year_url' 2024 %}">2024</a>
...( Repeat as desired )...
</body>
</html>
- Navigate to http://localhost:8000/my_year_path/2022/ one more time. Your href attribute on each hyperlink will now look like href="http://localhost:8000/my_year_path/####/" instead of what it was rendering before, as href="/my_year_path/####/".
When we added the {{ base_url }} template variable, we referenced the dictionary key of the context that was provided.
From the request object
In this exercise, we will resolve the absolute URL using a request object. Follow these steps to do that in your project:
- In your /chapter_4/views.py file, in your existing practice_year_view() method, include the following print statements. These statements will use the build_absolute_uri() method provided in your request object, as part of the Django framework. This will return to us the absolute URL of the reverse lookup:
# /becoming_a_django_entdev/chapter_4/views.py
...
from django.urls
import reverse
def practice_year_view(request, year):
...
print(
request.build_absolute_uri(
reverse('year_url', args=(2023,))
)
)
print(
request.build_absolute_uri(
reverse('year_url', args=(2024,))
)
)
...( Repeat as desired )...
The preceding print statements also utilize the reverse() method found in the django.urls library.
- Run your project and navigate to http://localhost:8000/my_year_path/2022/. You should see the following paths printed in your terminal or command-line window:

Figure 4.13 – Naming URL – view usage – absolute URL
Note
The relative path of the current page can be retrieved from the request object using print(request.path). On this page, it would return /my_year_path/2022/. Using print(request.build_absolute_uri()) without the reverse() lookup function will return the absolute path of that particular request.
Let's practice looking up absolute URLs from within a model class next.
From within a model class
We will be expanding on the same vehicle_view() method for this next example, to get a formatted URL from an existing object. We are going to work in the same /chapter_3/models.py file that we worked on in Chapter 3, Models, Relations, and Inheritance.
Follow these steps to configure your model class:
- In your /chapter_3/models.py file, add the following two methods (get_url() and get_absolute_url()) to your existing Vehicle model class:
# /becoming_a_django_entdev/chapter_3/models.py
class Vehicle(models.Model):
...
def get_url(self):
from django.urls import reverse
return reverse(
'vehicle-detail',
kwargs = {'id': self.pk}
)
def get_absolute_url(self, request):
from django.urls import reverse
base_url = request.build_absolute_uri(
'/'
)[:-1].strip('/')
return base_url + reverse(
'vehicle-detail',
kwargs = {'id': self.pk}
)
These methods import the reverse() function that was introduced earlier in this section to get the URL of the object in reference. The import statements are added to the methods themselves instead of at the top of this document to allow for better performance handling when using these model class methods. The first method, get_url(), is used to return a relative URL path to that object, while the other method, get_absolute_url(), is intended to return the absolute path to that object.
- In your /chapter_4/views.py file, in the existing vehicle_view() method, add the following print statements as part of the else catch, just after the except catch:
# /becoming_a_django_entdev/chapter_4/views.py
...
from django.http
import Http404
from ..chapter_3.models
import Vehicle
...
def vehicle_view(request, id):
try:
vehicle = Vehicle.objects.get(id=id)
except Vehicle.DoesNotExist:
raise Http404(f'Vehicle ID Not Found: {id}')
else:
print(vehicle.get_url())
print(vehicle.get_absolute_url(request))
...
The else catch means the Vehicle object that it was searching for was found without errors. Remember to leave the same return statement that we previously wrote at the end of this vehicle_view() method.
- Run your project and navigate to http://localhost:8000/vehicle/4/. In your terminal or command-line window, you should see the two different relative and absolute paths to the object that we looked up in the vehicle_view() method, as shown:

Figure 4.14 – Model URLs
We have been practicing with simple views, otherwise known as method-based views. Many projects need views to provide a bit more power and usability, which can be achieved with class-based views, which we will create next.
Working with complex views
A view method will suffice for a lot of different situations. For more robust and large-scale projects, we can apply a few tricks to make these views more adaptable in complicated use cases. Class-based views are used when writing adaptable and reusable applications.
Class-based views
With class-based views, we can write code that can be reused and extended easily. Just like when we extended models in Chapter 3, Models, Relations, and Inheritance, we can extend view classes in the exact same way, whereas function-based view methods cannot provide this ability. Two templates have been provided with the source code of this book to be used in the next exercise. These two files are the exact same file as the my_vehicle.html file, except that the title of the <h1> tag in each has been changed to VehicleView Class 1 and VehicleView Class 2 so that when we run the following examples, we can see the differences between them.
Follow these steps to configure your class-based views:
- Copy the files called my_vehicle_class_1.html and my_vehicle_class_2.html in the /becoming_a_django_entdev/chapter_4/templates/chapter_4/ directory of the code provided with this book into your project at the same directory.
- In your /chapter_4/urls.py file, add the following import statement and URL pattern:
# /becoming_a_django_entdev/chapter_4/urls.py
...
from .views
import ..., VehicleView
urlpatterns = [
...,
path(
'vehicle/<int:id>/',
VehicleView.as_view(),
name = 'vehicle-detail'
),
]
Don't forget to comment out the old /vehicle/ URL patterns that were written before experimenting with this one.
- In your /chapter_4/views.py file, create the class-based view called VehicleView and add the import statements, as shown:
# /becoming_a_django_entdev/chapter_4/views.py
...
from django.http
import Http404
from django.template.response
import (
TemplateResponse
)
from django.views.generic
import View
from ..chapter_3.models
import Vehicle
...
class VehicleView(View):
template_name = 'chapter_4/my_vehicle_class_1.html'
- Add the following get() method to your VehicleView class:
# /becoming_a_django_entdev/chapter_4/views.py
...
class VehicleView(View):
...
def get(self, request, id, *args, **kwargs):
try:
vehicle = Vehicle.objects.get(id=id)
except Vehicle.DoesNotExist:
raise Http404(
f'Vehicle ID Not Found: {id}'
)
return TemplateResponse(
request,
self.template_name,
{'vehicle': vehicle}
)
- Add the following post() method and import to your VehicleView class:
# /becoming_a_django_entdev/chapter_4/views.py
...
from django.http
import ..., HttpResponseRedirect
...
class VehicleView(View):
...
def post(self, request, *args, **kwargs):
return HttpResponseRedirect(
'/success/'
)
- Run your project and navigate to http://localhost:8000/vehicle/4/. You should see the main title is displayed as VehicleView Class 1 now.
- Next, modify the URL pattern to overload template_name, using the following example:
# /becoming_a_django_entdev/chapter_4/urls.py
...
from .views
import ..., VehicleView
urlpatterns = [
...,
path(
'vehicle/<int:id>/',
VehicleView.as_view(
template_name = 'chapter_4/my_vehicle_class_2.html'
),
name = 'vehicle-detail'
),
]
- Now, rerun your project and navigate to the URL at http://localhost:8000/vehicle/4/. You should see the title on the page displayed as VehicleView Class 2 this time.
The def get() submethod depicted in step 4 is where all of the code in the method-based view is moved to. It's also the only required method. Other optional methods, such as def post(), are used when working with form objects, when a postback response is executed. It can also be used to redirect the user to a success page, which is illustrated in the code of step 5, but you will never get Django to trigger this redirect with how we are using this class now, which is to be expected. We will discuss this in more depth later in Chapter 5, Django Forms. When we are working with positional keyword arguments of a URL, they are passed into the view class, where the id attribute is written in the preceding get() method. If you have more than one keyword argument, they would be added after id in the order that they exist in that URL pattern.
We performed step 7 and step 8 just to check that this is working and to see how we can still override default settings just like we did earlier in this chapter. Let's extend our class-based views next, also known as inheritance.
Extending class-based views
Extending class-based views, also known as inheritance, is done in the exact same way as when we extended model classes in Chapter 3, Models, Relations, and Inheritance. We can display the same title on the page by extending the first class into a second class, eliminating the need to define template_name in the URL pattern itself, among many other benefits.
Follow these steps to extend your class:
- In your /chapter_4/urls.py file, comment out the previous URL patterns and write a new one using the code provided, where we are using VehicleView2 as the view class now:
# /becoming_a_django_entdev/chapter_4/urls.py
...
from .views
import ..., VehicleView2
urlpatterns = [
...,
path(
'vehicle/<int:id>/',
VehicleView2.as_view(),
name = 'vehicle-detail'
),
]
- Next, in your /chapter_4/views.py file, add the following VehicleView2 class constructed from the VehicleView class:
# /becoming_a_django_entdev/chapter_4/views.py
...
class VehicleView2(VehicleView):
template_name = 'chapter_4/my_vehicle_class_2.html'
- Run your project and navigate to the URL http://localhost:8000/vehicle/4/. You should see the same title, VehicleView Class 2, displayed on the page.
The preceding example is just a very simple extension of the existing VehicleView class that demonstrates how to extend a view class. The only thing we are changing/overriding in this exercise is the template_name variable in order to demonstrate this concept.
Next, let's learn what asynchronous views are used for.
Asynchronous views
Django also offers support of asynchronous views, a feature first introduced in Django 3.1. Asynchronous views are views that can be processed in individual processing threads and run together at the same time. These are used to build better multithreaded apps. Traditional Django projects use the Web Server Gateway Interface (WSGI) by default. To actually use asynchronous function- and class-based views, we need to configure a project and the server to use the Asynchronous Server Gateway Interface (ASGI) instead of WSGI. Since this requires quite a bit more work to configure the server and potentially the hosting provider, we will skip providing any examples for this section, but if this is something you want or need in your project, you can get started here: https://docs.djangoproject.com/en/4.0/topics/async/.
Up to now, we have been using templates that have been pre-built and provided with the code of this book in order to demonstrate core programming concepts. Next, let's explore what it takes to actually build those templates on our own.
Working with templates
The Django template language provides us with a set of template tags and template filters that are used to perform simple actions directly within a template. It makes it easy to perform simple logic operations, such as Python operations. Tags and filters are actually two different things that closely resemble each other. The Django template language can be closely compared to Shopify's Liquid syntax and is similar to the Razor syntax used in ASP.NET frameworks, but the Django template language is a bit easier to use and read. Django also allows us to create custom tags and filters for use within a project. Custom filters are most commonly used to transform a single context variable. Custom tags provide for more robust and complex use cases. For a complete breakdown of all of the template tags and template filters that exist, read the official Django documentation about them here: https://docs.djangoproject.com/en/4.0/ref/templates/builtins/.
Next, we will touch briefly on the features and capabilities of the most commonly used template tags and filters that are available.
Template tags
We can structure a template to feel more like an app by breaking it down into smaller components. Those components can then be used interchangeably within other templates. For example, we can write a base template that contains the <head> and <body> elements of a page and then break apart subtemplates that structure the body content of each of those templates. Areas can be created in the <head> and <body> of a document where we can pass dynamic text and HTML into them, such as the <title> tag.
For the next example, let's use the {% block %}, {% extend %}, and {% include %} template tags to create two template files, demonstrating how to break templates down into manageable pieces.
Follow these steps to configure your template tags:
- In your /chapter_4/urls.py file, comment out the other paths and include the following path:
# /becoming_a_django_entdev/chapter_4/urls.py
...
from .views
import ..., TestPageView
urlpatterns = [
...,
path(
'test_page_1/',
TestPageView.as_view(),
name = 'test-page'
),
]
- In your /chapter_4/views.py file, create the following class-based view called TestPageView, using the code provided here:
# /becoming_a_django_entdev/chapter_4/views.py
...
from django.template.response
import (
TemplateResponse
)
from django.views.generic
import View
...
class TestPageView(View):
template_name = 'chapter_4/pages/test_page_1.html'
def get(self, request, *args, **kwargs):
return TemplateResponse(
request,
self.template_name,
{
'title': 'My Test Page 1',
'page_id': 'test-id-1',
'page_class': 'test-page-1',
'h1_tag': 'This is Test Page 1'
}
)
In the TestPageView class, we are defining a default template_name as 'chapter_4/pages/test_page_1.html'. In the get() method, we pass in hardcoded context variables to be used in this demonstration. In a real-world scenario, this information would be generated after performing logic that is written to generate those values.
- Create the /becoming_a_django_entdev/chapter_4/templates/chapter_4/pages/test_page_1.html file and add the following code:
# /becoming_a_django_entdev/chapter_4/templates/chapter_4/pages/test_page_1.html
{% extends 'chapter_4/base/base_template_1.html' %}
{% load static %}
{% block page_title %}{{ title }}{% endblock %}
{% block head_stylesheets %}{% endblock %}
{% block js_scripts %}{% endblock %}
{% block page_id %}{{ page_id }}{% endblock %}
{% block page_class %}{{ block.super }} {{ page_class }}{% endblock %}
{% block body_content %}
{% if h1_tag %}
<h1>{{ h1_tag }}</h1>
{% else %}
<h1>Title Not Found</h1>
{% endif %}
{% endblock %}
This template starts with the {% extends %} template tag, which states that we want to actually start with the /chapter_4/base/base_template_1.html file, even though we specified the test_page_1.html file in our view class. Then, everywhere there is a {% block %} tag found in this file, we override or append to that same {% block %} found in the base_template_1.html file that we are extending. We are passing the value of {{ title }}, which was defined in the view, into the {% block page_title %} tag of the /chapter_4/pages/test_page_1.html file. The {{ block.super }} tag can be used to keep what is found in that same block of the base_template_1.html file. Without this tag, all code inside the parent block will be overwritten. HTML can be written inside of any block; the {% block body_content %} block, shown in step 5 that follows, is where the bulk of the page content will be found.
- Create the /chapter_4/base/base_template_1.html file and add the code shown here:
# /becoming_a_django_entdev/chapter_4/templates/chapter_4/base/base_template_1.html
{% load static %}
<!DOCTYPE html>
<html lang="en" xmlns="http://www.w3.org/1999/xhtml">
<head>
<meta charset="utf-8" />
<title>{% block page_title %}My Page Title{% endblock %}</title>
<link rel="stylesheet" href="{{ base_url }}{% static 'chapter_8/css/site.css' %}">
{% block head_stylesheets %}{% endblock %}
<script defer type="text/javascript" src="{{ base_url }}{% static 'chapter_8/js/site-js.js' %}"></script>
</head>
</html>
- In the same /chapter_4/base/base_template_1.html file that you just created, insert the body code provided next, just below your existing closing </head> tag:
# /becoming_a_django_entdev/chapter_4/templates/chapter_4/base/base_template_1.html
...
</head>
<body id="{% block page_id %}{% endblock %}" class="{% block page_class %}base-template-class{% endblock %}" style="text-align: center;">
{% block header %}
{% include 'chapter_4/headers/header_1.html' %}
{% endblock %}
{% block site_container %}
<div class="site-container">
<div class="body-content">
{% block body_content %}
{% endblock %}
</div>
{% block footer %}
{% include 'chapter_4/footers/footer_1.html' with message='Footer of Document' %}
{% endblock %}
</div>
{% endblock %}
{% block js_scripts %}{% endblock %}
</body>
</html>
- Copy the /chapter_4/headers/header_1.html and /chapter_4/footers/footer_1.html files provided with the code of this book into your project in the same directory.
- Copy the /chapter_4/static/chapter_4/css/site.css and /chapter_4/static/chapter_4/js/site-js.js files provided with the code of this book into your project at the same directory.
- Run your project and navigate to http://localhost:8000/test_page_1/. You should see the following information in your browser window:

Figure 4.15 – Extending templates
In the preceding steps, the main HTML of the page is broken down into a header, body content, and footer format. The {% include %} tags used previously demonstrate different ways of working with those files. Adding a with attribute to any {% include %} tag is how we can pass context into that file from the parent template. That is what is done to the preceding footer file. This means making context available without the need for a context processor or by writing code twice. The preceding HTML is structured in a way that allows us to get fancy by modifying everything within the {% block site_container %} tag, if we wanted or needed to. In order to do that, we would write the {% block site_container %} block again in the file that extends this template file and write the modified code there. That is essentially what step 3 did for us, with the {% block body_content %} tag.
Let's work with template filters next.
Template filters
Template filters are a way to transform the value of a context variable. They can do things such as make a string upper or lowercase using the {{ context_variable|upper }} or {{ context_variable|lower }} filters. They can be used to find the number of items in a list using the {{ my_list|length }} filter or even format time with a {{ my_time|time:" n/j/Y" }} filter. When using a time filter, it is not necessary to specify the :" n/j/Y" argument of that filter. Even without these specifications, Django will default to the setting specified in your settings.py file as the TIME_FORMAT variable. To learn about all of the filters that are available, visit the official Django documentation found here: https://docs.djangoproject.com/en/4.0/ref/templates/builtins/#built-in-filter-reference.
Let's check out custom tags and filters next.
Custom tags and filters
Earlier, in Figure 4.10, we saw that the value of the make of the vehicle was displayed as the number 3. This is a perfect example of how we can write a custom filter that takes in a numeric value and returns the string representation of that value.
Follow these steps to create your custom filter:
- Create a new folder in the /becoming_a_django_entdev/chapter_4/ directory called templatetags.
- Create a new file in this folder called chapter_4.py and inside this file, place the following code:
# /becoming_a_django_entdev/chapter_4/templatetags/chapter_4.py
from django.template
import Library
register = Library()
@register.filter(name = 'vehicle_make')
def vehicle_make(value):
from ...chapter_3.models import MAKE_CHOICES
for i, choice in enumerate(MAKE_CHOICES):
if i == value:
try:
return choice[1]
except ValueError:
pass
return ''
Here, we are writing a very simple method called vehicle_make() that takes in the numeric value of 3 and returns to us the string representation of Chevrolet, when used in a template. In this method, we are using Python path syntax to import the MAKE_CHOICES variable, which we created in Chapter 3, Models, Relations, and Inheritance, in the subsection titled Mutable versus immutable objects.
- Make sure you have uncommented previous URL patterns and use the one shown in the following code block:
# /becoming_a_django_entdev/chapter_4/urls.py
...
from .views import ..., vehicle_view
urlpatterns = [
...,
path(
'vehicle/<int:id>/',
vehicle_view,
name = 'vehicle-detail'
),
]
- In your existing /chapter_4/my_vehicle.html file, change {{ vehicle.make }} to the statement we can see highlighted in the following code block, and add the chapter_4 template tag library to your {% load %} tag:
# /becoming_a_django_entdev/chapter_4/templates/chapter_4/my_vehicle.html
{% load static chapter_4 %}
...
{% if vehicle %}
...
<p>{{ vehicle.make }}</p>
<p>{{ vehicle.make|vehicle_make }}</p>
...
{% endif %}
...
In order to use the template filter that we registered, we import it into the HTML file using the {% load chapter_4 %} tag, where the name of the template tag set that we are loading is the name of the Python file that we created in any templatetags folder of an app.
- Now, making sure your project is running, you can navigate to the URL at http://localhost:8000/vehicle/4/ to see that our vehicle now says Chevrolet.
Creating custom template tags instead of custom filters can be done by changing @register.filter(name = 'my_filter') to @register.tag(name = 'my_tag'). In this scenario, the tag can be used in a template similar to {% my_tag %}. To learn more about the complexities of writing your own template tags and how they can be useful in your project, visit the official documentation on that subject found here: https://docs.djangoproject.com/en/4.0/howto/custom-template-tags/#writing-custom-template-tags.
Next, let's add some custom error pages.
Error page templates
Django provides a very easy way to create your own custom error page templates for errors such as 400, 403, 404, and 500. Other errors, such as a 502 Bad Gateway error, will not work since the error implies there is a problem with your web server and not with Django itself. For the four error types that we can manipulate, we can create four files in any of the templates directories, 400.html, 403.html, 404.html, and 500.html, as long as they are not placed in a subfolder. These four template files have been provided with the code of this book and follow the same design pattern as depicted in the subsection titled Template tags of this chapter. In order to see a custom debug template, we must turn off DEBUG in the settings.py file.
Follow these steps to configure your error pages:
- Copy the four error page template files found in the /becoming_a_django_entdev/chapter_4/templates/ directory provided with the code of this book into the same directory of your project. Those four files are 400.html, 403.html, 404.html, and 500.html, and also copy the base_error.html file found in the same directory.
- In your settings.py file, change the following value to False:
# /becoming_a_django_entdev/settings.py
...
DEBUG = False
- Make sure your virtual environment is activated and run the collectstatic command shown here, in order to have access to the static files that have been created up to this point in time:
(virtual_env) PS > python manage.py collectstatic
- With DEBUG turned off, we have to run the collectstatic command in order to see changes reflect in the browser every time a static file is changed.
- Now, run your project and navigate to any non-existent URL on the site, a URL that we have not created a URL pattern for yet, such as http://localhost:8000/asdfasdf. You should see the following message in your browser window instead of the debug error message we are used to seeing, such as in Figure 4.2:

Figure 4.16 – Custom error page
Summary
By now, we have constructed what might feel like an entire project, but in reality, an application will consist of so much more than what was covered in this chapter. What we do have is a way to route URL paths to views and render different contexts in each template used. We learned how we can query the database in a view to get the data that we want to render in a template. We even covered the different ways we can handle and process an error page or simply redirect a URL to another path. We even used class-based views to write reusable class structures, making a project more adaptable to change in the long run.
In the next chapter, we will discuss how we can use form objects in combination with the function-based and class-based views and templates we learned how to create in this chapter.