
Chapter 10: Database Management
In programming, the subject of database management encompasses a broad spectrum of subcategories. Many of those categories were already introduced in earlier chapters, such as in Chapter 2, Project Configuration, when we discussed the concept of using a database management tool, or in Chapter 3, Models, Relations, and Inheritance, when we explored the concept of model managers. While these subjects can be considered topics of this chapter, they were introduced in earlier chapters to better fit what that chapter's subject matter was discussing or to serve as a tool that was suited to the exercises in those earlier chapters. The Django fixtures that were introduced and used in Chapter 3, Models, Relations, and Inheritance, can also be considered a database management tool and will finally be covered in more depth in this chapter.
Django fixtures are used to import and export data found in a database that is connected to a Django project. The chapter_3 data fixture that was provided and used throughout every chapter prior to this chapter helped to demonstrate those exercises by providing the necessary test/dummy data for you. We will cover how to export data, creating our own data fixtures for projects and developers to use. We will also explain in a little more depth the import process that we have been using and the options that are available.
In this chapter, we will explore other methods of executing queries that enhance the overall performance of your system. The two methods commonly used are select_related() and prefetch_related(), which are known in Django as performance boosters. We will practice using these performance boosters on queries made to the Vehicle and Seller model class data that exists in our database. We will use the Django Debug Toolbar (DjDT) introduced in Chapter 9, Django Testing, to monitor how the performance changes.
In this chapter, we will cover the following:
- Exporting data into a data fixture
- Importing data from a data fixture
- Boosting query performance using the select_related() method
- Boosting query performance using the prefetch_related() method
- Boosting query performance using the Prefetch() class
Technical requirements
To work with the code in this chapter, the following tools will need to be installed on your local machine:
- Python version 3.9 – used as the underlying programming language for the project
- Django version 4.0 – used as the backend framework of the project
- pip package manager – used to manage third-party Python/Django packages
We will continue to work with the solution created in Chapter 2, Project Configuration. However, it is not necessary to use the Visual Studio IDE. The main project itself can be run using another IDE or run independently using a terminal or command-line window from within the project root folder, which is where the manage.py file resides. Whatever editor or IDE you are using, a virtual environment will also be needed to work with the Django project. Instructions for how to create a project and virtual environment can be found in Chapter 2, Project Configuration. You will need a database to store the data contained in your project. PostgreSQL was chosen for the examples in the previous chapter; however, any database type that you choose for your project can be used to work with the examples in this chapter.
We will also be using data that is in the form of a Django fixture, provided in Chapter 3, Models, Relations, and Inheritance, in the subsection titled Loading the chapter_3 data fixture. Make sure the chapter_3 fixture is loaded into your database. If this has already been done, then you may skip the next command. If you have already created the tables found in Chapter 3, Models, Relations, and Inheritance, and have not loaded that fixture yet, then run the following command, after activating your virtual environment:
(virtual_env) PS > python manage.py loaddata chapter_3
All of the code created in this chapter can be found in the GitHub repository for this book: https://github.com/PacktPublishing/Becoming-an-Enterprise-Django-Developer. The bulk of the code depicted in this chapter can be found in the /becoming_a_django_entdev/becoming_a_django_entdev/chapter_10/ directory.
Check out the following video to see the Code in Action: https://bit.ly/3zYgbqd.
Preparing for this chapter
Start by creating a new app in your project called chapter_10 by following the steps discussed in Chapter 2, Project Configuration, in the subsection titled Creating a Django app. As discussed in that section, don't forget to change the value of the name = variable for your app class found in the /becoming_a_django_entdev/becoming_a_django_entdev/chapter_10/apps.py file to now point to the path where you installed your app. Be sure to also include this app in the INSTALLED_APPS variable found in the settings.py file as well.
In the main urls.py file of the site, add the following path, which points to the URL patterns of this chapter that we will be creating:
# /becoming_a_django_entdev/urls.py
...
urlpatterns = [
path(
'',
include(
'becoming_a_django_entdev.chapter_10.urls'
)
),
]
Next, copy the /chapter_10/urls.py file from the code provided with this book into your project in the same directory.
In the following exercises, we will use the DjDT that was introduced in Chapter 9, Django Testing, to monitor performance. Please make sure that you have installed the DjDT in your project before proceeding. Instructions can be found in the subsection titled Installing the DjDT of that chapter.
Now that we have created the app for this chapter, let's start by creating our own data fixtures.
Exporting data into a data fixture
A data fixture is considered a collection of files that contain data objects related to the models in your application. This really refers to a directory of files that Django searches in for data; by default, that is the fixtures folder found in every Django app. This directory can also be changed by modifying the settings.py variable called FIXTURE_DIRS, but this is not necessary if you intend to use the default directory and behavior. Django fixture files can be written in JSON, JSONL, XML, or YAML file formats. This means you can easily export data from other systems if that data is exported into one of these formats, even if that other system is not a Django project. Keep in mind that the table structure of the objects must match exactly if you wish to do a clean export from an old system and import into a new system.
Usually, there is a great deal of data parsing involved when exporting from an older legacy system and importing into the newly updated system. The other option is to use one or a combination of many command options when exporting or importing data to prevent errors when data structures do not align. Sometimes, using the options provided is not enough to accomplish what needs to be done to your data. Parsing data is the process of transforming data from one format or data type to another. We sometimes have to parse data because a newer system changes the data structure and/or constraints that were set on the old data structures. When that happens, we sometimes get errors during the import. Sometimes, data imports fine but at runtime, your users experience odd behavior as a result of improperly formatted data found within your database. We will only cover using the options provided in this chapter; if data in your system is so complex that it needs to be parsed, you will have to look into writing your own Python script to transform your data as needed.
Let's practice using the Django dumpdata management command next.
Using the dumpdata command
The dumpdata management command is the opposite of the loaddata command that we have been using to import the chapter_3 fixture data. It is used to export data from a database connected to your Django project into a data fixture. By default, Django will export data fixtures into JSON format, but you can specify a different format by using the --format option when running the dumpdata command.
We will start by just dumping the tables of all applications in our project using the -o or --output option to place a fixture in the chapter_10 app directory, in order to keep the chapter exercises nicely organized. Every dumpdata exercise in this chapter will use the --output option for this reason; it is not a required option.
More information about these options and other options that are not covered can be found here: https://docs.djangoproject.com/en/4.0/ref/django-admin/#dumpdata.
Before proceeding with this exercise, make sure you have data in your database, whether you added it manually or imported it from the chapter_3 app. We will export all existing data into a chapter_10 data fixture folder for practice, by following these steps:
- Make sure you are inside your project's root directory, the same folder where your manage.py file is located. Then, open your command-line window or terminal and activate your virtual environment, but do not run your project at this time.
- Create a new folder called fixtures in your /becoming_a_django_entdev/chapter_10/ directory using the following command:
(virtual_env) PS > mkdir becoming_a_django_entdev/chapter_10/fixtures
- Execute the dumpdata command using the -o output option to place the dumped data into a file called chapter_10.json inside the folder we just created:
(virtual_env) PS > python manage.py dumpdata -o becoming_a_django_entdev/chapter_10/fixtures/chapter_10.json
If you were successful, you should now see a new file called chapter_10.json in your /becoming_a_django_entdev/chapter_10/fixtures/ folder, as shown in the following screenshot, using the Solution Explorer in the Visual Studio IDE:

Figure 10.1 – Dumping all data with the dumpdata command
The reason we had to create the fixtures folder first is that the dumpdata command will fail if we specify a folder that does not exist. The actual .json file doesn't have to exist, Django will create that file for you. Keep in mind that if your .json file does already exist and you run the dumpdata command specifying that file as the output option, then all the data in your existing fixture file will be overwritten and lost.
Inside the chapter_10.json file that was created, you will notice that it is in minified file format. You are welcome to format that document into something readable. In Visual Studio, you can right-click inside your document and select Format Document to do that. You can also copy and paste that data into an online formatting tool, such as my favorite, https://jsonlint.com/. Formatting the document is not necessary but it is helpful if you want to read the data objects and/or edit them directly in that file.
You'll also notice that inside the chapter_10.json file that was created, you will have data for every app of your project, including the auth, authtoken, and chapter_3 data tables and any Django-related data tables, such as the admin and contenttypes tables. This is far more information than what was provided to you in the chapter_3.json data fixture. Odds are, you won't need to include information such as the admin.logentry and contenttypes.contenttype objects, as they usually cause conflicts when importing that data into a different system.
In the next subsection, we will practice exporting only the tables found in a specific application of a project by specifying the app_name and/or model_name of what data we want to include.
Exporting a specific application
When using the dumpdata command without specifying any application, just like we did in the previous exercise, Django will export data from all tables in all applications of a project. There is no option syntax for doing this; if there was, it would be in dumpdata {{ app_name }} or dumpdata {{ app_name.model_name }} format, without the curly brackets of course.
To specify an app or table, follow these steps:
- Make sure you are inside your project's root directory, the same folder where your manage.py file is located. Then, open a command-line window or terminal and activate your virtual environment, but do not run your project at this time.
- Execute the following dumpdata command, which will specify all of the tables found only in the chapter_3 application:
(virtual_env) PS > python manage.py dumpdata chapter_3 -o becoming_a_django_entdev/chapter_10/fixtures/chapter_3_models.json
Now, what should have been created for us is a single file called chapter_3_models.json in the /chapter_10/fixtures/ folder. It should contain data for only the vehiclemodel, engine, vehicle, and seller tables. All of the other data that we saw in the previous fixture file will no longer be found in this new file.
- Inside that file, format the data so that you can read what is found in it. If you are using Visual Studio, right-click inside your document and select Format Document or copy and paste the data into the online tool found at https://jsonlint.com/. Your data should look similar to that in the following screenshot:
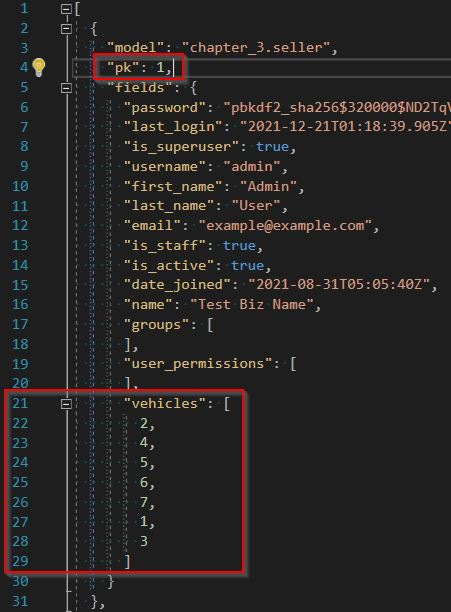
Figure 10.2 – Dump chapter_3 app dumpdata command
By default, all related objects are displayed using the foreign key of that related object. We can see this with all seven of the related Vehicle objects, represented as a list of the numbers 1 through 7 in the preceding screenshot. The order depends on the default ordering of that model.
Note
JSON exports don't always follow the same or logical order. Your results may vary. In the preceding screenshot, each object that was exported includes its original primary key, represented as the "pk" field. We can remove this using the --natural-primary option, which we will soon discuss.
- To practice exporting only a specific table, use the following command to export the Seller model data, by specifying chapter_3.seller as the source:
(virtual_env) PS > python manage.py dumpdata chapter_3.seller -o becoming_a_django_entdev/chapter_10/fixtures/chapter_3_sellers.json
Use the same dot notation to specify other models and/or other applications if you want extra practice.
Next, let's practice exporting everything again, as we did in the first exercise. This time, we will use the --exclude option to exclude apps that we do not want to be included.
Using the --exclude option
The --exclude or -e option is used to tell Django to exclude a particular app or model from the given inclusion of a dumpdata command. In this exercise, we will perform the same dump-everything operation that we performed earlier in the subsection titled Using the dumpdata command of this chapter and exclude all of the Django-related tables. We want to produce the same results as in the Exporting a specific application subsection, by using the --exclude option rather than telling Django what to include.
Follow these steps to perform your --exclude operation:
- Make sure you are inside your project's root directory, the same folder where your manage.py file is located. Then, open a command-line window or terminal and activate your virtual environment, but do not run your project at this time.
- Execute the following dumpdata command, which excludes the following applications:
(virtual_env) PS > python manage.py dumpdata -e contenttypes -e sessions -e authtoken -e auth -e admin -o becoming_a_django_entdev/chapter_10/fixtures/chapter_10_exclude.json
Note
Keep in mind that all the dumpdata commands in this chapter are very long single-line commands. Anything broken down onto a new line is likely separated by a single space, as is the case with the preceding command.
Options can also be written using an equals character, such as -e=app_name or --exclude=app_name.
The contents of the newly created chapter_10_exclude.json file should match the contents of the chapter_3_models.json file that we created in the previous subsection, titled Exporting a specific application. This is because we technically performed the same action, except the first time we told Django what to include, and the second time, we told Django what to exclude. Compare your files' output to see the results.
Next, let's practice exporting data as something other than the default JSON format.
Using the --format option
The --format option is used to tell Django to output the data into the format specified. The four types that we can specify when exporting data are JSON, JSONL, XML, and YAML. The default is JSON if this option is not specified.
Follow these steps to export your data in every format type possible, one format for each step:
- Make sure you are inside your project's root directory, the same folder where your manage.py file is located. Then, open a command-line window or terminal and activate your virtual environment, but do not run your project at this time.
- Execute the following dumpdata command, which dumps the Sellers objects as XML:
(virtual_env) PS > python manage.py dumpdata chapter_3.seller --format xml -o becoming_a_django_entdev/chapter_10/fixtures/chapter_3_sellers.xml
- Execute the following dumpdata command, which dumps the Sellers objects as JSONL:
(virtual_env) PS > python manage.py dumpdata chapter_3.seller --format jsonl -o becoming_a_django_entdev/chapter_10/fixtures/chapter_3_sellers.jsonl
- To work with YAML formats, you need to install the pip package called pyyaml. Add this package to your requirements.txt file and install it from that file or run the following command to install this package manually into your virtual environment:
(virtual_env) PS > pip install pyyaml
- Execute the following dumpdata command, which dumps the Sellers objects as YAML:
(virtual_env) PS > python manage.py dumpdata chapter_3.seller --format yaml -o becoming_a_django_entdev/chapter_10/fixtures/chapter_3_sellers.yaml
You should now have three more chapter_3_sellers files, one in each format: .xml, .jsonl, and .yaml. Open each of these documents to view how the data is represented in each format and how they differ from the default .json format.
Next, let's practice removing the primary key, the "pk" field, when exporting data into a fixture using the --natural-primary option.
Using the --natural-primary option
The --natural-primary option is used to generate a fixture that does not include the "pk" field for each object that is exported. This is helpful if you have a system that already has data and you need to append data to the existing data. Say the primary key was included; it could conflict with an existing object that has that same primary key but is not the same object. This could potentially result in lost or changed data that produces undesirable results.
Follow these steps to use the --natural-primary option:
- Make sure you are inside your project's root directory, the same folder where your manage.py file is located. Then, open a command-line window or terminal and activate your virtual environment, but do not run your project at this time.
- Execute the following dumpdata command, specifying the seller table found in the chapter_3 application:
(virtual_env) PS > python manage.py dumpdata chapter_3.seller --natural-primary -o becoming_a_django_entdev/chapter_10/fixtures/chapter_3_sellers_natural_primary.json
A new file called chapter_3_sellers_natural_primary.json should have been created in your /chapter_10/fixtures/ folder.
- Inside that file, format the data so that you can read what is found in it. If you are using Visual Studio, right-click inside your document and select Format Document or copy and paste the data into the online tool found here: https://jsonlint.com/.
Now, what you should see is the same exact data as in the previous subsection except all of the "pk" fields have been removed from your data, as shown:

Figure 10.3 – dumpdata --natural-primary option
You should also still be seeing the numeric foreign key values for all Vehicles of your Sellers, as shown earlier in Figure 10.2. This could prove problematic if we are dumping all data using the --natural-primary option. What could happen is a vehicle gets created in your new database with its own primary key that doesn't equal the foreign key specified. To overcome that problem, we should also use the --natural-foreign option, which we will discuss next.
Using the --natural-foreign option
The --natural-foreign option will print out a string representation of all related objects rather than the numeric foreign key value of that object. We also need to write a new model class method on all of our related objects in order to format and structure the string representation of that object when used in this way. The output can differ from the __str__() method that we covered in Chapter 3, Models, Relations, and Inheritance.
Follow these steps to add a new model method to your Vehicle model and then export your Seller data again using the --natural-foreign option:
- Inside your existing /chapter_3/models.py file, in the existing Vehicle model class, add the following natural_key() method:
# /becoming_a_django_entdev/chapter_3/models.py
from django.db import models
...
class Vehicle(models.Model):
...
def natural_key(self):
return self.full_vehicle_name()
This method is reliant on the existing full_vehicle_name() method created in Chapter 3, Models, Relations, and Inheritance, in the subsection titled Custom model method. Please make sure that method exists in your Vehicle model class before proceeding with the next steps.
- Make sure you are in your project root directory, the same folder where your manage.py file is located. Then, open a command-line window or terminal and activate your virtual environment, but do not run your project at this time.
- Execute the following dumpdata command, specifying all of the tables found in the chapter_3 application:
(virtual_env) PS > python manage.py dumpdata chapter_3.seller --natural-foreign -o becoming_a_django_entdev/chapter_10/fixtures/chapter_3_sellers_natural_foreign.json
A new file called chapter_3_sellers_natural_foreign.json should have been created in your /chapter_10/fixtures/ folder.
- Inside that file, format the data so that you can read what is found in it. If you are using Visual Studio, right-click inside your document and select Format Document or copy and paste the data into the online tool found here: https://jsonlint.com/.
What you should see now is something similar to the following screenshot, where the vehicles list is no longer represented by numbers; it now shows the string returned by the natural_key() method that we created:

Figure 10.4 – dumpdata --natural-foreign option
If you see duplicate string entries, as you do in the proceeding screenshot, this is because the natural key string representation uses data from models that happen to have the exact same value in this case, even though they're different objects. You may want to go back and configure the natural_key() method to return something more unique.
You are welcome to create a natural_key() method for every model that exists in the chapter_3 app and then rerun any combination of these commands over again for practice. Inside the /chapter_10/fixtures/ folder of the code provided with this book are many different fixture documents that have been pre-generated for you, all using the initial data provided in the chapter_3.json fixture file. Inside the /chapter_10/readme.md file, you can find a list of commands that extend the examples provided in this chapter. Each of the commands provided generates a different chapter_10 fixture file.
Note
You can combine options, such as combining --natural-foreign --natural-primary within a single command. Doing so would produce the results found in Figure 10.4 without the "pk" field present.
Next, let's practice importing data with the loaddata Django management command.
Importing data from a data fixture
Importing data from a fixture is done using the loaddata Django management command. As long as data exists in one of the four file formats, JSON, JSONL, XML, or YAML, it can be imported using this command. Data can be imported even if it was not exported from a Django project. The loaddata management command does not have as many options as the dumpdata command uses but they do share most of the same options.
We have been using this command throughout most of this book to ensure that we have test data available when working with the exercises of previous chapters. Instead of going through examples of how to use this command in depth, we will briefly remind ourselves how it is used and then describe each of the options that are available and what they are used for.
Using the importdata command
Follow these steps to practice loading the /chapter_10/fixtures/chapter_3_sellers.json fixture file that we created earlier in this chapter. If we are successful, we should see no change in our data because we are importing the same data, overwriting itself. You can practice changing field values and/or adding new objects to your file before importing if you wish to see data change in your database management tool:
- Make sure you are inside your project's root directory, the same folder where your manage.py file is located. Then, open a command-line window or terminal and activate your virtual environment, but do not run your project at this time.
- Execute the following loaddata command, telling Django to load only the chapter_3_sellers.json fixture:
(virtual_env) PS > python manage.py loaddata chapter_3_sellers.json
Note
In the previous section, we created many different fixture formats, all with the same name, chapter_3_sellers, and different file extensions. Because of this, you will have to include the file extension when executing your command. If you are using anything other than JSON file formats, don't forget to always include the --format option. If you do not have multiple file formats that share the same name, it is not necessary to include the file extension when using the loaddata command.
Each of the options available and what they are used for are listed here:
- --app – used to tell Django to search for the fixture file in only the app directory specified using this option, versus having Django search in every app directory. This is sometimes important if you have two fixture files with the same name that exist in two different Django app directories.
- --database – tells Django to use a database that is configured in your settings.py file that is not the default database specified. Django uses the name you provide to identify that database in your settings.py file. This can also be used with the dumpdata command.
- --format – used to tell Django to use a format other than the default JSON format when importing the data file provided.
- --exclude, -e – used to tell Django to omit the app_name or model_name provided from the data that you are importing.
- --ignorenonexistent, -i – used to omit specific fields or models that may have been removed since the time the fixture file was created.
Let's begin working with performance boosters next.
Using the select_related() method
The select_related() method is used as a performance booster on queries pertaining to all related ForeignKey and OneToOneField relationships. This method is primarily used for obtaining the data of single objects that relate to a parent object. This method will not work on ManyToManyField relationships. On the SQL level, this method generally uses a left outer join to look up related data. To learn more about the select_related() method in its entirety, visit https://docs.djangoproject.com/en/4.0/ref/models/querysets/#select-related.
Here, we will monitor the performance of a page that displays a list of vehicles and the details about each vehicle, including related field data. Use the following subsections to create the required view class, template, and URL pattern to demonstrate this concept in action.
Creating the view
Follow these steps to create your VehicleView class:
- In your /chapter_10/views.py file, add the following VehiclesView class and import statements:
# /becoming_a_django_entdev/chapter_10/views.py
from django.http import Http404
from django.template.response import (
TemplateResponse
)
from django.views.generic import View
from ..chapter_3.models import Vehicle
class VehiclesView(View):
template_name = 'chapter_10/vehicles.html'
In this view class, we are telling Django to use the /chapter_10/vehicles.html file as the template, which we will create soon.
- Add the following get() method to your VehiclesView class:
# /becoming_a_django_entdev/chapter_10/views.py
...
class VehiclesView(View):
...
def get(self, request, *args, **kwargs):
try:
vehicles = Vehicle.objects.all()
except Vehicle.DoesNotExist:
raise Http404('No Vehicles Found')
return TemplateResponse(
request,
self.template_name,
{'vehicles': vehicles}
)
To explain what this get() method is doing, we are performing an all() query on the Vehicle model object. If no vehicles are found, we then raise an Http404 not-found response. If vehicles are found, we then return a TemplateResponse with the vehicles QuerySet provided as context into the template that is rendered.
Note
The query performed in the get() method is not currently performance boosted. Jump ahead to the subsection titled First demo of this chapter to see the performance-boosted query.
Let's build the template next.
Building the template
Follow these steps to create your vehicles list template file:
- Create a file called vehicles.html in the /chapter_10/templates/chapter_10/ directory. Inside this file, add the following code:
# /becoming_a_django_entdev/chapter_10/templates/chapter_10/vehicles.html
{% load static chapter_4 %}
<html lang="en" xmlns="http://www.w3.org/1999/xhtml">
<head>
<title>All Vehicles Page</title>
</head>
<body style="text-align:center"
class="chapter_10">
<h1>All Vehicles</h1>
</body>
</html>
The {% load %} tag imports the templatetags file that we created in Chapter 4, URLs, Views, and Templates, in the subsection titled Custom tags and filters. If you do not have the chapter_4.py file created at this time, just remove chapter_4 from the {% load %} tag in the preceding code block and remove |vehicle_make shown in the code block in step 2.
- In that same file, just before the closing </body> tag, add the following conditional and for loop, which will populate your page with the information shown for each vehicle in the vehicles QuerySet:
# /becoming_a_django_entdev/chapter_10/templates/chapter_10/vehicles.html
...
<body ...>
...
{% if vehicles %}
{% for vehicle in vehicles %}
<br />
<p>VIN #: {{ vehicle.vin }}</p>
<p>Price: {{ vehicle.price }}</p>
<p>Make: {{ vehicle.make|vehicle_make }}</p>
<p>Model: {{ vehicle.vehicle_model }}</p>
<p>Engine: {{ vehicle.engine }}</p>
<p>Is Sold? {{ vehicle.sold }}</p>
<br /><hr />
{% endfor %}
{% endif %}
</body>
...
The preceding conditional statement will check to see whether there are any vehicles in the vehicles QuerySet object. Even though we are doing this with the try/except statement in the view class, it is still good practice to do this in the template just in case there are no exception handlers set in the view class/method to check for when an object is not found. We are displaying all of the field data that exists for each object. The Engine and VehicleModel data shown in the preceding code block are the related objects that we will monitor our performance on.
Let's map the URL pattern that we need next.
Mapping the URL pattern
Follow these step to map the URL pattern that we will be using to access this test page:
- In your /chapter_10/urls.py file, add the following path to the urlpatterns list:
from django.urls import path
from .views import VehiclesView
urlpatterns = [
...
path(
'all-vehicles/',
VehiclesView.as_view(),
name = 'all-vehicles'
),
]
The path that we just mapped to the VehiclesView class will point to the URL http://localhost:8000/all-vehicles/.
Next, let's inspect the performance of the vehicles listing page with the DjDT.
First demo
Follow these steps to view the vehicles listing page and inspect its database query performance with the DjDT:
- Make sure your project is running in your virtual environment and navigate to the URL http://localhost:8000/all-vehicles/. If you are using the data provided with the chapter_3 app fixture, you should see at least seven sets of vehicles, each separated by a solid horizontal line.
- Open the DjDT and look at the SQL section. You should see at least 15 queries, as shown in the following screenshot:

Figure 10.5 – Query without the select_related() method
- Now, in your /chapter_10/views.py file, under the get() method of the VehiclesView class, change your query to the one highlighted in the following snippet,where we are adding the select_related() method to the query that we last used:
# /becoming_a_django_entdev/chapter_10/views.py
...
class VehiclesView(View):
...
def get(self, request, *args, **kwargs):
try:
vehicles=Vehicle.objects.select_related(
'vehicle_model',
'engine'
).all()
...
Inside the select_related() method, we are telling Django to grab the related vehicle_model and engine field data.
- Refresh the page at http://localhost:8000/all-vehicles/ and inspect the SQL section of the DjDT one more time. This time, you should only see at least 1 query, as shown in the following screenshot:

Figure 10.6 – Query with the select_related() method
As we can see, with this particular set of data, we were able to shave about 14 SQL query operations off of this search task. This also shaved off 10.16 ms from the original time that it took. While 10.16 ms may seem very small, remember, we only have about a dozen records that pertain to this particular dataset; imagine the difference in a dataset with a few hundred thousand records. The time adds up.
When we open the SQL tab to see what is going on, we can see that this one SQL query that was performed used a series of LEFT OUTER JOIN operations to obtain all related objects.

Figure 10.7 – Inspecting the select_related() query
Let's see what the prefetch_related() method does next.
Using the prefetch_related() method
The prefetch_related() method is used as a performance booster on queries pertaining to ManyToManyField relationships. This method can also be used for ForeignKey and OneToOneField relationships and allows for forward and backward lookups, as we will soon practice doing. On the SQL level, this method will generally use a WHERE or INNER JOIN statement to perform lookup operations. Unlike the select_related() method, the prefetch_related() method will perform a separate SQL query for each of the related sets of objects. For example, if we looked up a Seller and wanted the related Vehicles and their related VehicleModel and Engine objects, then Django would perform four separate queries to look up all the related data. To learn more about the prefetch_related() method in its entirety, visit https://docs.djangoproject.com/en/4.0/ref/models/querysets/#prefetch-related.
The following are two exercises, related to the vehicles view and the sellers view, to practice using the prefetch_related() method in different ways.
Vehicles view
In this exercise, we will modify the existing VehiclesView class that we created in the Using the select_related() method section of this chapter. What we did in that exercise was created a page that displayed all of the vehicles that are in our system and then performance boosted how we looked up the related VehicleModel and Engine objects. Using the prefetch_related() method, we will look up the related Seller object to display who is selling that particular vehicle.
Use the following subsections to prepare your template for this demonstration. The view and URL pattern will remain the same as before.
Checking the view
Leave your existing VehiclesView class the same as before, where it is using the performance-boosted query from the last demonstration, as follows:
# /becoming_a_django_entdev/chapter_10/views.py
...
Vehicles = Vehicle.objects.select_related(
'vehicle_model',
'engine'
).all()
...
We will modify this soon, but we first want to monitor how displaying the seller object in the template will change the performance-boosted query that we have now.
Modifying the template
Follow these steps to modify your vehicles list template:
- In your /chapter_10/vehicles.html file, add the following highlighted code, just above the <br /><hr /> line and below your last vehicle detail item:
# /becoming_a_django_entdev/chapter_10/templates/chapter_10/vehicles.html
...
{% if vehicles %}
{% for vehicle in vehicles %}
...
<p>Is Sold? {{ vehicle.sold }}</p>
{% for seller in vehicle.
vehicle_sellers.all %}
{{ seller.username }}
{% endfor %}
<br /><hr />
{% endfor %}
{% endif %}
...
- It is important to note that the name used to access a seller, as in vehicle_sellers in vehicle.vehicle_sellers.all, is set on the vehicles field of the Seller model class, using the related_name argument. Make sure, in your /chapter_3/models.py file, under the Seller model class, that the vehicles field is using the arguments and values highlighted in the following snippet:
# /becoming_a_django_entdev/chapter_3/models.py
...
class Seller(AbstractUser):
...
vehicles = models.ManyToManyField(
Vehicle,
verbose_name = 'Vehicles',
related_name = 'vehicle_sellers',
related_query_name = 'vehicle_seller',
blank = True,
)
Note
If the value of a related_name or related_query_name argument of a field on a model class ever changes, you will need to rerun your Django migration commands once again to reflect those changes in your database.
Let's see how this changes our performance now.
Second demo
Follow these steps to see how these changes affect the output of the SQL tab in the DjDT:
- Make sure your project is running in your virtual environment and navigate to or refresh the URL http://localhost:8000/all-vehicles/ one more time.
- Inspect the SQL section of the DjDT one more time and you should no longer see 1 query as we saw before with the select_related() method. Instead, we are now seeing at least 8 queries, as shown in the following screenshot:
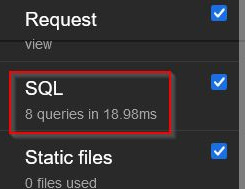
Figure 10.8 – Query with the select_related() method showing related seller
We are seeing seven extra queries in our search now, one extra for each seller that relates to all seven of the vehicles found.
- In your /chapter_10/views.py file, in the same VehiclesView class, change the query to the one shown in the following code snippet:
# /becoming_a_django_entdev/chapter_10/views.py
...
Vehicles = Vehicle.objects.prefetch_related(
'vehicle_sellers'
).select_related(
'vehicle_model',
'engine'
).all()
...
We just added the prefetch_related('vehicle_sellers') method to the query that we had before, keeping the previous select_related() operation. Make sure you are following proper Python indentation where this is used. There is limited room to display this properly in the preceding example.
- Refresh the URL http://localhost:8000/all-vehicles/ one more time and inspect the SQL section of the DjDT one more time. You should now see at least 2 queries, as shown in the following screenshot:

Figure 10.9 – Query using both the select_related() and prefetch_related() methods
If we inspect the SQL tab even further by clicking on it, we can see that Django performed the same LEFT OUTER JOIN lookup from before, and then the prefetch_related() method added the INNER JOIN and WHERE lookup, as shown in the following screenshot:
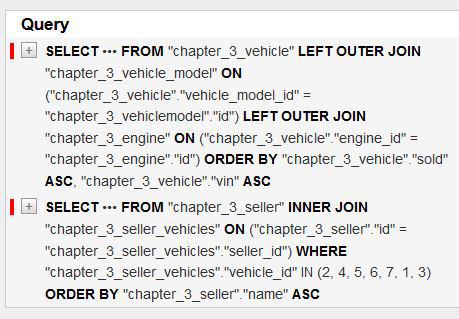
Figure 10.10 – Inspecting both the select_related() and prefetch_related() queries
We can see from before that Django was performing an additional lookup for each of the vehicle_sellers objects that it was seeking to display the username of, on your page. That was how we wound up with eight queries after adding the {% for seller in vehicle.vehicle_sellers.all %} loop to the /chapter_10/vehicles.html template file. When we added the prefetch_related() method to the query operation in the VehiclesView class, it just added one extra lookup operation that retrieved all seven of the vehicle_sellers objects that pertain to this dataset, resulting in the two queries that we have now and reducing the excess. Adding more field lookups and using context in multiple places within your template file can sometimes increase your query count.
Next, let's apply the prefetch_related() method to a sellers listing page and see how it behaves following a lookup in the opposite direction of how we used it here.
Sellers view
In this exercise, we will create a new URL pattern, view class, and template that will display a list of sellers and the related vehicles that they are selling.
Use the following subsections to create the required view class, template, and URL pattern needed to build the sellers listing page.
Creating the view
Follow these steps to create your SellersView class:
- In your /chapter_10/views.py file, add the following SellersView class and import statements:
# /becoming_a_django_entdev/chapter_10/views.py
from django.http import Http404
from django.template.response import (
TemplateResponse
)
from django.views.generic import View
from ..chapter_3.models import Seller, Vehicle
class SellersView(View):
template_name = 'chapter_10/sellers.html'
In this view class, we are telling Django to use the /chapter_10/sellers.html file as the template, which we will create soon. We are also using the same imports as before and then adding the Seller model class as a new import.
- Add the following get() method to your SellersView class:
# /becoming_a_django_entdev/chapter_10/views.py
...
class SellersView(View):
...
def get(self, request, *args, **kwargs):
try:
sellers = Seller.objects.all()
except Seller.DoesNotExist:
raise Http404('No Sellers Found')
return TemplateResponse(
request,
self.template_name,
{'sellers': sellers}
)
The get() method is structured the same as the VehiclesView class. The only difference is that we are using the Seller model class to perform a query on. Again, this query is not currently performance boosted; we will do that after we take a measurement of this query operation.
Let's build the template next.
Building the template
Follow these steps to build the sellers listing page template:
- Create a file called sellers.html in the /chapter_10/templates/chapter_10/ directory. Inside this file, add the following code:
# /becoming_a_django_entdev/chapter_10/templates/chapter_10/sellers.html
{% load static chapter_4 %}
<html lang="en" xmlns="http://www.w3.org/1999/xhtml">
<head>
<title>All Sellers Page</title>
<style type="text/css">
...Found With the Code of this Book...
</style>
</head>
<body style="text-align:center"
class="chapter_10">
<h1>All Sellers</h1>
</body>
</html>
The {% load %} tag imports the templatetags file that we created in Chapter 4, URLs, Views, and Templates in the subsection titled Custom tags and filters. If you do not have the chapter_4.py file created at this time, just remove chapter_4 from the {% load %} tag in the preceding code block and remove |vehicle_make where it is shown in step 3.
The code of this book also provides additional CSS class styles. You can find those styles in the same file found with the code of this book and copy and paste them into your document to view these objects in a more organized way. This is not a necessary step to proceed.
- Just before the closing </body> tag, add the following conditional and for loop, which will populate your page with the information for each seller in the sellers QuerySet:
# /becoming_a_django_entdev/chapter_10/templates/chapter_10/sellers.html
...
<body ...>
...
{% if sellers %}
{% for seller in sellers %}
<p>First Name: {{ seller.first_name }}</p>
<p>Last Name: {{ seller.last_name }}</p>
<p>Username: {{ seller.username }}</p>
<p>Business Name: {{ seller.name }}</p>
<p>Email: {{ seller.email }}</p>
<p>Last Login: {{ seller.last_login }}</p>
<p>Date Joined: {{ seller.date_joined
}}</p>
<p>Is Staff? {{ seller.is_staff }}</p>
<p>Is Active? {{ seller.is_active
}}</p>
<p>Is Superuser? {{
seller.is_superuser }}</p>
<br /><hr /><br />
{% endfor %}
{% endif %}
</body>
...
- Just after the Is Superuser paragraph and before the <br /><hr /><br /> code snippet line, insert the following conditional and for loop:
# /becoming_a_django_entdev/chapter_10/templates/chapter_10/sellers.html
...
{% for seller in sellers %}
...
<p>Is Superuser? {{
seller.is_superuser }}</p>
{% if seller.vehicles.all %}
<h2>Seller Vehicles</h2>
{% for vehicle in seller.
vehicles.all %}
<div class="vehicle-box">
<p>VIN #: {{ vehicle.vin
}}</p>
<p>Price: {{ vehicle.price
}}</p>
<p>Make: {{ vehicle.make
|vehicle_make }}</p>
<p>Model: {{ vehicle.
vehicle_model }}</p>
<p>Engine: {{
vehicle.engine }}</p>
<p>Is Sold? {{ vehicle
.sold }}</p>
</div>
{% endfor %}
{% endif %}
<br /><hr /><br />
{% endfor %}
...
The logic here is pretty much the same as the vehicles listing page that we previously built. We added an additional layer of looping inside the sellers loop that loops through the vehicles related to each seller.
Let's map the URL pattern that we will need next.
Mapping the URL pattern
Take the following step to map the URL pattern that we will be using to access this listing page.
In your /chapter_10/urls.py file, add the following path to your urlpatterns list:
from django.urls import path
from .views import SellersView, VehiclesView
urlpatterns = [
...
path(
'all-sellers/',
SellersView.as_view(),
name = 'all-sellers'
)
]
The path that we just mapped to the SellersView class will point to the URL http://localhost:8000/all-sellers/.
Let's inspect the performance of the sellers listing page with the DjDT next.
Third demo
Follow these steps to view the sellers listing page and inspect its database query performance with the DjDT:
- Make sure your project is running in your virtual environment and navigate to the URL http://localhost:8000/all-sellers/. If you are using the data provided with the chapter_3 app fixture, you should see at least one set of seller data and seven vehicles for the first seller.
If you have been following along with this book, you should have about three sellers in your database as a result of the exercises performed in previous chapters. Only one seller was provided in the chapter_3 fixture. For the performance results shown in the following steps, assume that you have three sellers and seven vehicles, as your actual data may vary.
- Open the DjDT and look at the SQL tab. You should see at least 19 queries, as shown in the following screenshot:
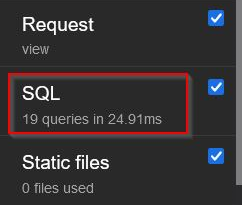
Figure 10.11 – Sellers list page not performance boosted
There are so many queries being executed because Django is looking up each vehicle and each related vehicle_model and engine over and over again. The conditional that we wrote {% if seller.vehicles.all %}, checking if vehicles exist, and also added a single query to the page performance.
- Now, in your /chapter_10/views.py file, under the get() method of the SellersView class, change the query to the one highlighted in the following code snippet, where we are adding the prefetch_related() method to what we had before:
# /becoming_a_django_entdev/chapter_10/views.py
...
class SellersView(View):
...
def get(self, request, *args, **kwargs):
try:
sellers = Seller.objects.prefetch_related(
'vehicles',
'vehicles__vehicle_model',
'vehicles__engine'
).all()
...
Inside the prefetch_related() method, we are telling Django to grab the related vehicles and then, in a separate action, the related vehicle_model and engine of each vehicle object. Whenever we need to specify other related fields, as we are doing in the preceding code block, we use a double underscore, __, to navigate up or down in a set of relationships. Please make sure you are following proper Python indentation where this is used. There is limited room to display this properly in the example shown previously.
- Refresh the URL http://localhost:8000/all-sellers/ one more time and inspect the SQL tab of the DjDT one more time. You should now see at least 4 queries, as shown in the following screenshot:
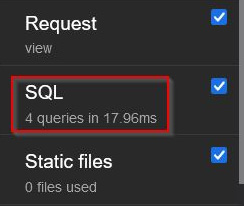
Figure 10.12 – Sellers list page performance boosted
We also saved 6.95 ms of time using the performance-boosted method with this query lookup task. If we inspect the SQL tab even further by clicking on it, we can see that Django performed one query for the Seller objects, one for the Vehicle objects, one for the VehicleModel objects, and the last for the Engine objects. Django used a combination of WHERE clauses and INNER JOIN operations to retrieve the related data.

Figure 10.13 – Inspecting the Sellers list page queries
Django also provides a Prefetch() class that can be used to perform even more complex queries with performance-boosted capabilities. Next, let's use this class to perform advanced filtering of the vehicles that relate to a seller.
Using the Prefetch() class
The Prefetch() class that is provided in the django.db.models library is used to control how a prefetch_related() operation is performed. For instance, we will use it to filter and show only vehicles that are of the VehicleModel that equals "Blazer LT". We can also prefetch all related objects when performing filters in this way. To learn about how to use this class in depth, visit https://docs.djangoproject.com/en/4.0/ref/models/querysets/#prefetch-objects.
Use the following subsections to prepare your view class and template for this demonstration. The URL pattern will remain the same as the demonstration found in the Sellers view subsection of this chapter.
Modifying the view
Follow these steps to modify your existing SellersView class for this next exercise:
- In your /chapter_10/views.py file, add the following import statement, preferably before the existing import statements:
# /becoming_a_django_entdev/chapter_10/views.py
from django.db.models import Prefetch
...
- In the SellersView class found inside this file, change your query statement to the one shown in the following code snippet:
# /becoming_a_django_entdev/chapter_10/views.py
...
class SellersView(View):
...
sellers = Seller.objects.prefetch_related(
Prefetch(
'vehicles',
to_attr = 'filtered_vehicles',
queryset = Vehicle.objects.filter(
vehicle_model__name =
'Blazer LT'
)
),
'filtered_vehicles__vehicle_model',
'filtered_vehicles__engine'
).all()
...
Please make sure you are following proper Python indentation where this is used. There is limited room to display this properly in the preceding example.
We are writing our query statement similar to what we wrote before. What we did differently this time is placed the Prefetch() class inside the prefetch_related() method, as the first argument of that method. The Prefetch() class accepts three arguments itself. The first is the lookup argument, which is usually a field but it can also be used to traverse relationships upstream and downstream using the double underscore, __, in the string. The second and third arguments are optional and do not have to be in the exact order. The to_attr argument is used to store the resulting QuerySet as a list of objects with the name specified as its value. The QuerySet argument is used to perform a specific query on the subset of those items. In the preceding example, we performed the filter() operation, searching only for vehicles with a vehicle_model__name of "Blazer LT".
After the Prefetch() class, in the same prefetch_related() method that we are using previously, we added two more field lookups, those being the filtered_vehicles__vehicle_model and filtered_vehicles__engine objects. This will prefetch the related objects pertaining to the custom filtered list that we just created.
Next, we need to modify our existing template file in order to work with the filtered_vehicles list of objects.
Modifying the template
Follow these step to modify your existing sellers listing template file to work with the filtered_vehicles list that was created:
- In your existing /chapter_10/sellers.html file, change the two lines where seller.vehicles.all is used to now say seller.filtered_vehicles, as shown:
# /becoming_a_django_entdev/chapter_10/templates/chapter_10/sellers.html
...
{% for seller in sellers %}
...
{% if seller.filtered_vehicles %}
<h2>Seller Vehicles</h2>
{% for vehicle in
seller.filtered_vehicles %}
...
{% endfor %}
{% endif %}
<br /><hr /><br />
{% endfor %}
...
That's all that we need to modify. Let's see how this affected our performance next.
Fourth demo
Follow these steps to view the sellers listing page and inspect its database query performance using the Prefetch() class approach to how a query operation is performed:
- Refresh the URL http://localhost:8000/all-sellers/ in your browser.
- Open the DjDT and look at the SQL tab. You should see at least 4 queries, as shown in the following screenshot:
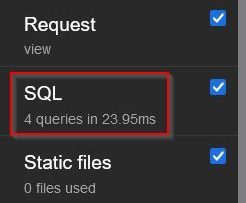
Figure 10.14 – Sellers list page using the Prefetch class
This should also be the same number of queries that we saw in our previous example, shown in Figure 10.12. The only difference in this dataset is that we see five vehicles under the first seller on the page, whereas before, we had seven vehicles shown. The results only display the Blazer LT vehicles now, as shown in the following screenshot:

Figure 10.15 – Sellers list page using the Prefetch class results
While the number of results may differ, the number of queries that are executed remains the same. With this approach, we can define a very granular search query that is performance boosted.
Summary
We were able to conclude our journey in how to use Django to build enterprise-level systems by learning how to import and export data and apply performance-boosting tricks to all query operations. Knowing how to work with data is just as important as building the data siloes that they reside in. When you are working with existing systems, there is always the need to export the existing data from an old system and import that data into your new system. We now know how that is done. We can also combine this knowledge with the skills learned in Chapter 2, Project Configuration, in the subsection titled Heroku database push/pull operations to work with data in your remote testing and production environments as well. Use each tool as needed to perform different tasks throughout your project's life cycle.
The performance-boosting methods that were introduced in this chapter are intended to be applied to any query operation. Refer to the topics discussed throughout Chapter 3, Models, Relations, and Inheritance, to learn more about how to structure your data and perform other query operations. In that same chapter, you can also apply performance boosters where queries are made inside of model managers.
There is a wealth of knowledge, tips, and tricks that relate to the world of Django that were not covered in this book. I hope you enjoyed learning what you have read and practiced so far and I hope that you continue on your journey to learn even more. Use the links, resources, and references to packages and tools scattered throughout this book to expand your learning beyond what has been given to you. Feel free to reach out to me via any of the contact methods provided if you have questions, would like to point out an error in this book, or share a compliment. While I dedicated a lot of time and energy to writing this book and checking and then re-checking my work, we are all human and mistakes are bound to slip through the cracks. I would also love to hear about what marvels you created as a result of reading this book. Thank you all for taking the time to read this!