
Chapter 1
Getting Started with Android Programming
WHAT YOU WILL LEARN IN THIS CHAPTER
- What is Android?
- Android versions and its feature set
- The Android architecture
- The various Android devices on the market
- The Android Market application store
- How to obtain the tools and SDK for developing Android applications
- How to develop your first Android application
Welcome to the world of Android! When I was writing my first book on Android (which was just less than a year ago), I stated that Android was ranked second in the U.S. smartphone market, second to Research In Motion’s (RIM) BlackBerry, and overtaking Apple’s iPhone. Shortly after the book went to press, comScore (a global leader in measuring the digital world and the preferred source of digital marketing intelligence) reported that Android has overtaken BlackBerry as the most popular smartphone platform in the U.S.
A few months later, Google released Android 3.0, code named Honeycomb. With Android 3.0, Google’s focus in the new Software Development Kit was the introduction of several new features designed for widescreen devices, specifically tablets. If you are writing apps for Android smartphones, Android 3.0 is not really useful, as the new features are not supported on smartphones. At the same time that Android 3.0 was released, Google began working on the next version of Android, which can be used on both smartphones and tablets. In October 2011, Google released Android 4.0, code named Ice Cream Sandwich, and that is the focus of this book.
In this chapter you will learn what Android is, and what makes it so compelling to both developers and device manufacturers alike. You will also get started with developing your first Android application, and learn how to obtain all the necessary tools and set them up so that you can test your application on an Android 4.0 emulator. By the end of this chapter, you will be equipped with the basic knowledge you need to explore more sophisticated techniques and tricks for developing your next killer Android application.
Android is a mobile operating system that is based on a modified version of Linux. It was originally developed by a startup of the same name, Android, Inc. In 2005, as part of its strategy to enter the mobile space, Google purchased Android and took over its development work (as well as its development team).
Google wanted Android to be open and free; hence, most of the Android code was released under the open source Apache License, which means that anyone who wants to use Android can do so by downloading the full Android source code. Moreover, vendors (typically hardware manufacturers) can add their own proprietary extensions to Android and customize Android to differentiate their products from others. This simple development model makes Android very attractive and has thus piqued the interest of many vendors. This has been especially true for companies affected by the phenomenon of Apple’s iPhone, a hugely successful product that revolutionized the smartphone industry. Such companies include Motorola and Sony Ericsson, which for many years have been developing their own mobile operating systems. When the iPhone was launched, many of these manufacturers had to scramble to find new ways of revitalizing their products. These manufacturers see Android as a solution — they will continue to design their own hardware and use Android as the operating system that powers it.
The main advantage of adopting Android is that it offers a unified approach to application development. Developers need only develop for Android, and their applications should be able to run on numerous different devices, as long as the devices are powered using Android. In the world of smartphones, applications are the most important part of the success chain. Device manufacturers therefore see Android as their best hope to challenge the onslaught of the iPhone, which already commands a large base of applications.
Android Versions
Android has gone through quite a number of updates since its first release. Table 1-1 shows the various versions of Android and their codenames.
TABLE 1-1: A Brief History of Android Versions
| ANDROID VERSION | RELEASE DATE | CODENAME |
| 1.1 | 9 February 2009 | |
| 1.5 | 30 April 2009 | Cupcake |
| 1.6 | 15 September 2009 | Donut |
| 2.0/2.1 | 26 October 2009 | Eclair |
| 2.2 | 20 May 2010 | Froyo |
| 2.3 | 6 December 2010 | Gingerbread |
| 3.0/3.1/3.2 | 22 February 2011 | Honeycomb |
| 4.0 | 19 October 2011 | Ice Cream Sandwich |
In February 2011, Google released Android 3.0, a tablet-only release supporting widescreen devices. The key changes in Android 3.0 are as follows.
- New user interface optimized for tablets
- 3D desktop with new widgets
- Refined multi-tasking
- New web browser features, such as tabbed browsing, form auto-fill, bookmark synchronization, and private browsing
- Support for multi-core processors
Applications written for versions of Android prior to 3.0 are compatible with Android 3.0 devices, and they run without modifications. Android 3.0 tablet applications that make use of the newer features available in 3.0, however, will not be able to run on older devices. To ensure that an Android tablet application can run on all versions of devices, you must programmatically ensure that you only make use of features that are supported in specific versions of Android.
In October 2011, Google released Android 4.0, a version that brought all the features introduced in Android 3.0 to smartphones, along with some new features such as facial recognition unlock, data usage monitoring and control, Near Field Communication (NFC), and more.
Features of Android
Because Android is open source and freely available to manufacturers for customization, there are no fixed hardware or software configurations. However, Android itself supports the following features:
- Storage — Uses SQLite, a lightweight relational database, for data storage. Chapter 6 discusses data storage in more detail.
- Connectivity — Supports GSM/EDGE, IDEN, CDMA, EV-DO, UMTS, Bluetooth (includes A2DP and AVRCP), Wi-Fi, LTE, and WiMAX. Chapter 8 discusses networking in more detail.
- Messaging — Supports both SMS and MMS. Chapter 8 discusses messaging in more detail.
- Web browser — Based on the open source WebKit, together with Chrome’s V8 JavaScript engine
- Media support — Includes support for the following media: H.263, H.264 (in 3GP or MP4 container), MPEG-4 SP, AMR, AMR-WB (in 3GP container), AAC, HE-AAC (in MP4 or 3GP container), MP3, MIDI, Ogg Vorbis, WAV, JPEG, PNG, GIF, and BMP
- Hardware support — Accelerometer Sensor, Camera, Digital Compass, Proximity Sensor, and GPS
- Multi-touch — Supports multi-touch screens
- Multi-tasking — Supports multi-tasking applications
- Flash support — Android 2.3 supports Flash 10.1.
- Tethering — Supports sharing of Internet connections as a wired/wireless hotspot
Architecture of Android
In order to understand how Android works, take a look at Figure 1-1, which shows the various layers that make up the Android operating system (OS).
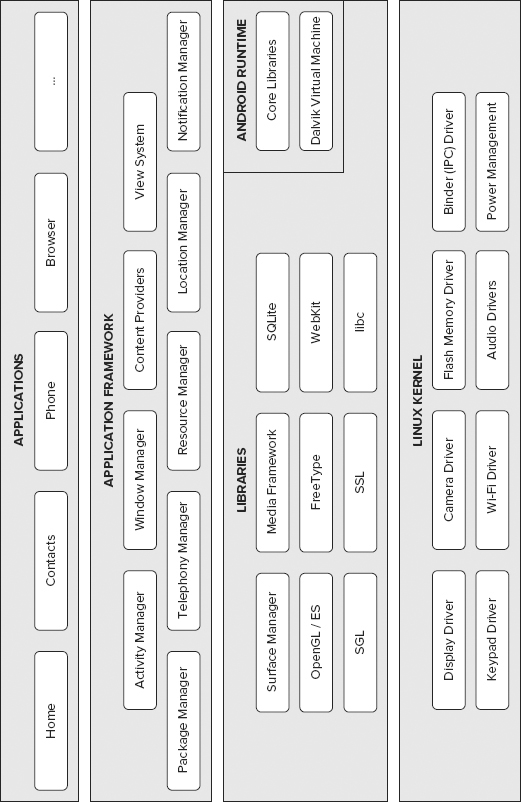
The Android OS is roughly divided into five sections in four main layers:
- Linux kernel — This is the kernel on which Android is based. This layer contains all the low-level device drivers for the various hardware components of an Android device.
- Libraries — These contain all the code that provides the main features of an Android OS. For example, the SQLite library provides database support so that an application can use it for data storage. The WebKit library provides functionalities for web browsing.
- Android runtime — At the same layer as the libraries, the Android runtime provides a set of core libraries that enable developers to write Android apps using the Java programming language. The Android runtime also includes the Dalvik virtual machine, which enables every Android application to run in its own process, with its own instance of the Dalvik virtual machine (Android applications are compiled into Dalvik executables). Dalvik is a specialized virtual machine designed specifically for Android and optimized for battery-powered mobile devices with limited memory and CPU.
- Application framework — Exposes the various capabilities of the Android OS to application developers so that they can make use of them in their applications.
- Applications — At this top layer, you will find applications that ship with the Android device (such as Phone, Contacts, Browser, etc.), as well as applications that you download and install from the Android Market. Any applications that you write are located at this layer.
Android Devices in the Market
Android devices come in all shapes and sizes. As of late November 2011, the Android OS powers the following types of devices:
- Smartphones
- Tablets
- E-reader devices
- Netbooks
- MP4 players
- Internet TVs
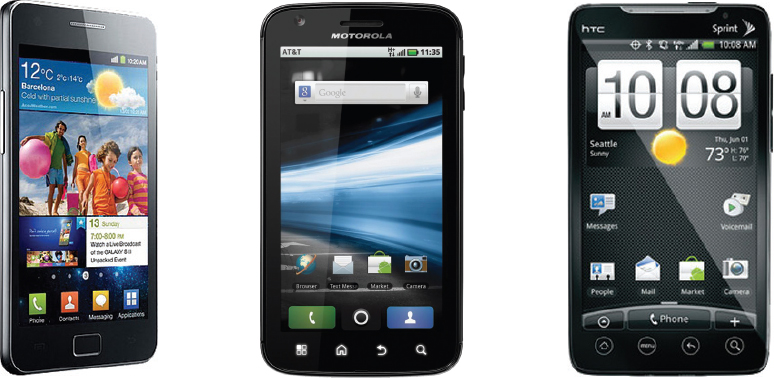
Chances are good that you own at least one of the preceding devices. Figure 1-2 shows (left to right) the Samsung Galaxy S II, the Motorola Atrix 4G, and the HTC EVO 4G smartphones.
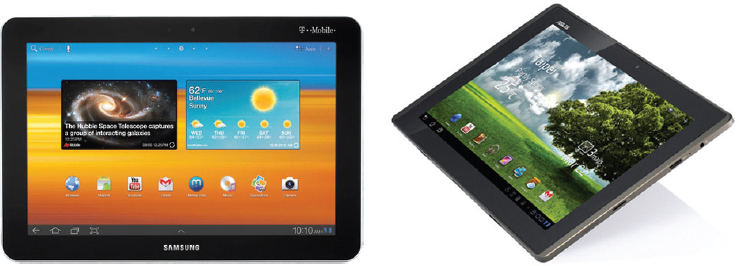
Another popular category of devices that manufacturers are rushing out is the tablet. Tablets typically come in two sizes: seven inches and ten inches, measured diagonally. Figure 1-3 shows the Samsung Galaxy Tab 10.1 (left) and the Asus Eee Pad Transformer TF101 (right), both 10.1-inch tablets. Both the Samsung Galaxy 10.1 and the Asus Eee Pad Transfer TF101 run on Android 3.
Besides smartphones and tablets, Android is also beginning to appear in dedicated devices, such as e-book readers. Figure 1-4 shows the Barnes and Noble’s NOOK Color (left) and Amazon’s Kindle Fire (right), both of which are color e-Book readers running the Android OS.

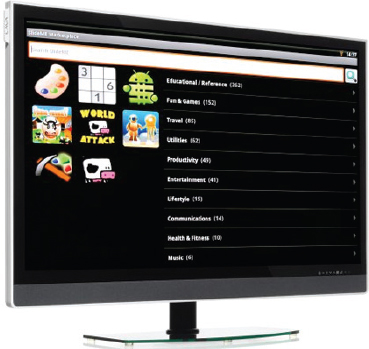
In addition to these popular mobile devices, Android is also slowly finding its way into your living room. People of Lava, a Swedish company, has developed an Android-based TV, called the Scandinavia Android TV (see Figure 1-5).
Google has also ventured into a proprietary smart TV platform based on Android and codeveloped with companies such as Intel, Sony, and Logitech. Figure 1-6 shows Sony’s Google TV.

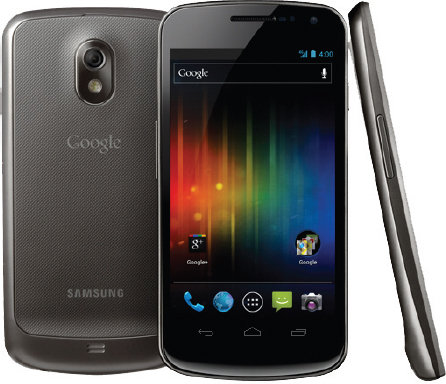
At the time of writing, the Samsung Galaxy Nexus (see Figure 1-7) is the only device running on Android 4.0. However, Google has promised that existing devices (such as the Nexus S) will be able to upgrade to Android 4.0. By the time you are reading this, there should be a plethora of devices running Android 4.0.
The Android Market
As mentioned earlier, one of the main factors determining the success of a smartphone platform is the applications that support it. It is clear from the success of the iPhone that applications play a very vital role in determining whether a new platform swims or sinks. In addition, making these applications accessible to the general user is extremely important.
As such, in August 2008, Google announced Android Market, an online application store for Android devices, and made it available to users in October 2008. Using the Market application that is preinstalled on their Android device, users can simply download third-party applications directly onto their devices. Both paid and free applications are supported on the Android Market, though paid applications are available only to users in certain countries due to legal issues.
Similarly, in some countries, users can buy paid applications from the Android Market, but developers cannot sell in that country. As an example, at the time of writing, users in India can buy apps from the Android Market, but developers in India cannot sell apps on the Android Market. The reverse may also be true; for example, users in South Korea cannot buy apps, but developers in South Korea can sell apps on the Android Market.
NOTE Chapter 12 discusses more about the Android Market and how you can sell your own applications in it.
The Android Developer Community
With Android in its fourth version, there is a large developer community all over the world. It is now much easier to get solutions to problems, and find like-minded developers to share app ideas and exchange experiences.
Here are some developer communities/sites that you can turn to for help if you run into problems while working with Android:
- Stack Overflow (www.stackoverflow.com) — Stack Overflow is a collaboratively edited question and answer site for developers. If you have a question about Android, chances are someone at Stack Overflow is probably already discussing the same question and someone else had already provided the answer. Best of all, other developers can vote for the best answer so that you can know which are the answers that are trustworthy.
- Google Android Training (http://developer.android.com/training/index.html) — Google has launched the Android Training site that contains a number of useful classes grouped by topics. At the time of writing, the classes mostly contain useful code snippets that are very useful to Android developers once they have started with the basics. Once you have learned the basics in this book, I strongly suggest you take a look at the classes.
- Android Discuss (http://groups.google.com/group/android-discuss) — Android Discuss is a discussion group hosted by Google using the Google Groups service. Here, you will be able to discuss the various aspects of Android programming. This group is monitored closely by the Android team at Google, and so this is good place to clarify your doubts and learn new tips and tricks.
Now that you know what Android is and what its feature set contains, you are probably anxious to get your hands dirty and start writing some applications! Before you write your first app, however, you need to download the required tools and SDKs.
For Android development, you can use a Mac, a Windows PC, or a Linux machine. All the tools needed are free and can be downloaded from the Web. Most of the examples provided in this book should work fine with the Android emulator, with the exception of a few examples that require access to the hardware. For this book, I am using a Windows 7 computer to demonstrate all the code samples. If you are using a Mac or Linux computer, the screenshots should look similar; some minor differences may be present, but you should be able to follow along without problems.
Let the fun begin!
JAVA JDK
The Android SDK makes use of the Java SE Development Kit (JDK). If your computer does not have the JDK installed, you should start by downloading it from www.oracle.com/technetwork/java/javase/downloads/index.html and installing it prior to moving to the next section.
Android SDK
The first and most important piece of software you need to download is, of course, the Android SDK. The Android SDK contains a debugger, libraries, an emulator, documentation, sample code, and tutorials.
You can download the Android SDK from http://developer.android.com/sdk/index.html (see Figure 1-8).

The Android SDK is packaged in a zip file. You can download it and unzip its content (the android-sdk-windows folder) into a folder, say C:Android 4.0. For Windows user, Google recommends that you download the installer_r15-windows.exe file instead and use it to set up the tools for you automatically. The following steps walk you through the installation process using this approach.
Installing the Android SDK Tools
When you have downloaded the installer_r15-windows.exe file, double-click it to start the installation of the Android tools. In the welcome screen of the Setup Wizard, click Next to continue.
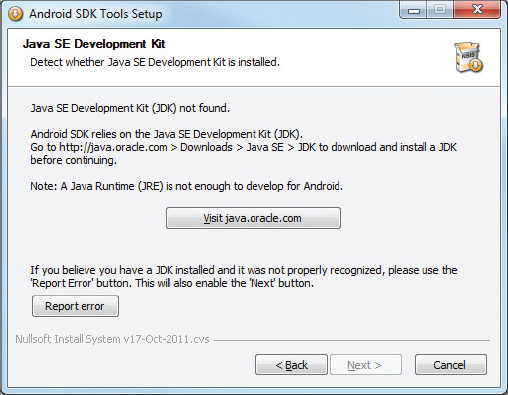
If your computer does not have Java installed, you will see the error dialog shown in Figure 1-9. However, even if you have Java installed, you may still see this error. If this is the case, click the Report error button and then click Next.
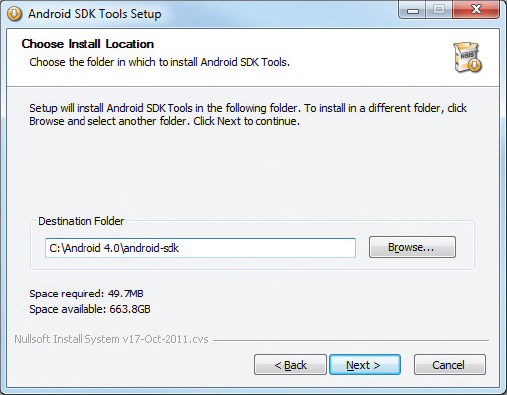
You will be asked to provide a destination folder to install the Android SDK tools. Enter a destination path (see Figure 1-10) and click Next.
When you are asked to choose a Start Menu folder to create the program’s shortcut, take the default “Android SDK Tools” and click Install. When the setup is done, check the “Start SDK Manager (to download system images, etc.)” option and click Finish (see Figure 1-11). This will start the SDK Manager.

Configuring the Android SDK Manager
The Android SDK Manager manages the various versions of the Android SDK currently installed on your computer. When it is launched, you will see a list of items and whether or not they are currently installed on your computer (see Figure 1-12).
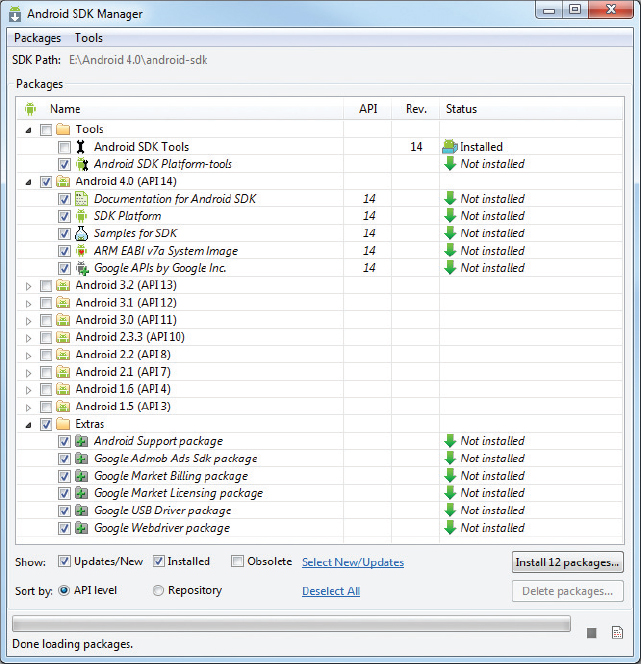
Check the relevant tools, documentation, and platforms you need for your project. Once you have selected the items you want, click the Install button to download them. Because it takes a while to download from Google’s server, it is a good idea to download only what you need immediately, and download the rest when you have more time. For now, you may want to check the items shown in the figure.
NOTE For a start, you should at least select the latest Android 4.0 SDK platform and the Extras. At the time of writing, the latest SDK platform is SDK Platform Android 4.0, API 14.
Each version of the Android OS is identified by an API level number. For example, Android 2.3.3 is level 10 (API 10), while Android 3.0 is level 11 (API 11), and so on. For each level, two platforms are available. For example, level 14 offers the following:
- SDK Platform
- Google APIs by Google Inc.
The key difference between the two is that the Google APIs platform contains additional APIs provided by Google (such as the Google Maps library). Therefore, if the application you are writing requires Google Maps, you need to create an AVD using the Google APIs platform (more on this is provided in Chapter 9, “Location-Based Services.”
You will be asked to choose the packages to install (see Figure 1-13). Check the Accept All option and click Install.
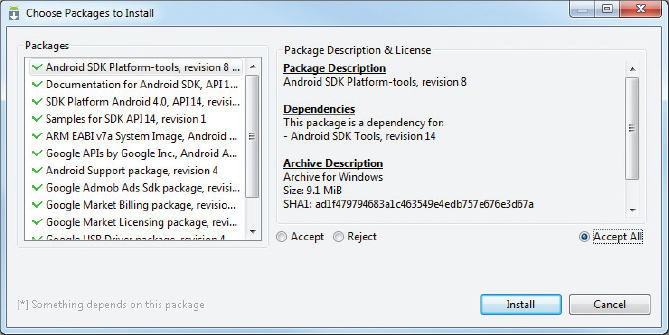
The SDK Manager will proceed to download the packages that you have selected. The installation takes some time, so be patient. When all the packages are installed, you will be asked to restart the ADB (Android Debug Bridge). Click Yes.
Eclipse
The next step is to obtain the integrated development environment (IDE) for developing your Android applications. In the case of Android, the recommended IDE is Eclipse, a multi-language software development environment featuring an extensible plug-in system. It can be used to develop various types of applications, using languages such as Java, Ada, C, C++, COBOL, Python, and others.
For Android development, you should download the Eclipse IDE for Java EE Developers (www.eclipse.org/downloads/). Six editions are available: Windows (32- and 64-bit), Mac OS X (Cocoa 32- and 64), and Linux (32- and 64-bit). Simply select the relevant one for your operating system. All the examples in this book were tested using the 32-bit version of Eclipse for Windows.
Once the Eclipse IDE is downloaded, unzip its content (the eclipse folder) into a folder, say C:Android 4.0. Figure 1-14 shows the content of the eclipse folder.

To launch Eclipse, double-click on the eclipse.exe file. You are first asked to specify your workspace. In Eclipse, a workspace is a folder where you store all your projects. Take the default suggested (or you can specify your own folder as the workspace) and click OK.
Android Development Tools (ADT)
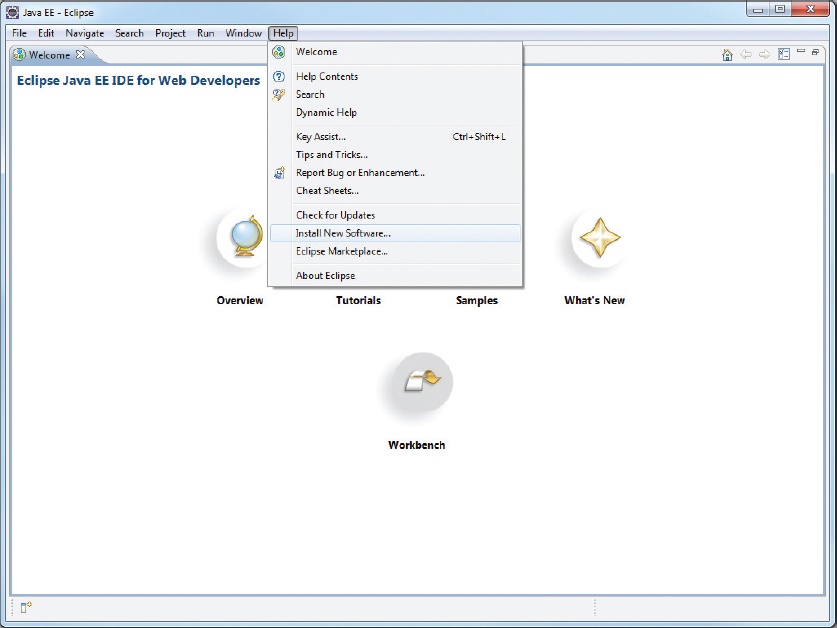
When Eclipse is launched, select Help ⇒ Install New Software (see Figure 1-15) to install the Android Development Tools (ADT) plug-in for Eclipse.
The ADT is an extension to the Eclipse IDE that supports the creation and debugging of Android applications. Using the ADT, you will be able to do the following in Eclipse:
- Create new Android application projects.
- Access the tools for accessing your Android emulators and devices.
- Compile and debug Android applications.
- Export Android applications into Android Packages (APKs).
- Create digital certificates for code-signing your APK.
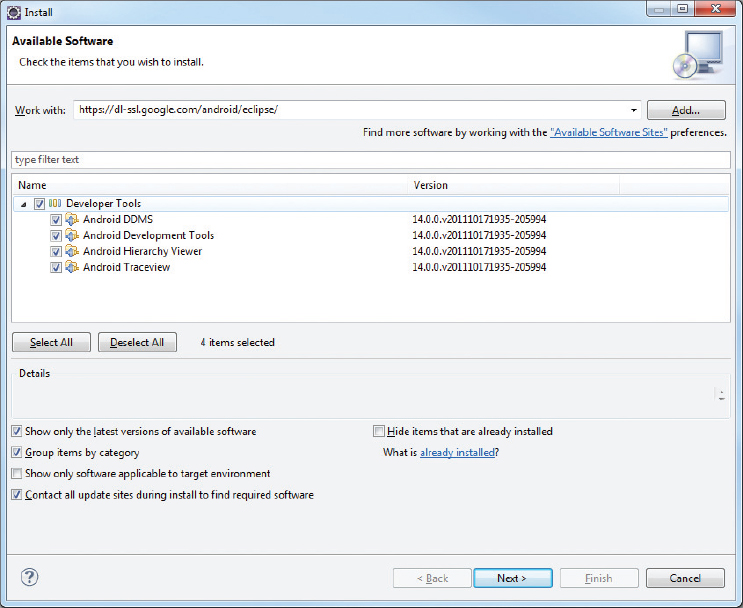
In the Install dialog that appears, specify https://dl-ssl.google.com/android/eclipse/ and press Enter. After a while, you will see the Developer Tools item appear in the middle of the window (see Figure 1-16). Expand it to reveal its content: Android DDMS, Android Development Tools, Android Hierarchy Viewer, and Android Traceview. Check all of them and click Next twice.
NOTE If you have any problems downloading the ADT, check out Google’s help at http://developer.android.com/sdk/eclipse-adt.html#installing.
You will be asked to review and accept the licenses. Check the “I accept the terms of the license agreements” option and click Finish. Once the installation is completed, you will be asked to restart Eclipse. Go ahead and restart Eclipse now.
When Eclipse is restarted, you are asked to configure your Android SDK (see Figure 1-17). As the Android SDK has already been downloaded earlier in the previous section, check the “Use existing SDKs” option and specify the directory where you have installed the Android SDK. Click Next.
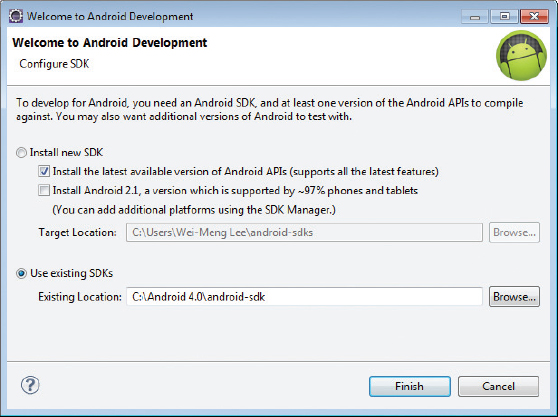
After this step, you are asked to send your usage statistics to Google. Once you have selected your choice, click Finish.
NOTE As each new version of the SDK is released, the installation steps tend to differ slightly. If you do not experience the same steps as described here, don’t worry — just follow the instructions on screen.
Creating Android Virtual Devices (AVDs)
The next step is to create an Android Virtual Device (AVD) to be used for testing your Android applications. An AVD is an emulator instance that enables you to model an actual device. Each AVD consists of a hardware profile; a mapping to a system image; as well as emulated storage, such as a secure digital (SD) card.
You can create as many AVDs as you want in order to test your applications with several different configurations. This testing is important to confirm the behavior of your application when it is run on different devices with varying capabilities.
NOTE Appendix B discusses some of the capabilities of the Android emulator.
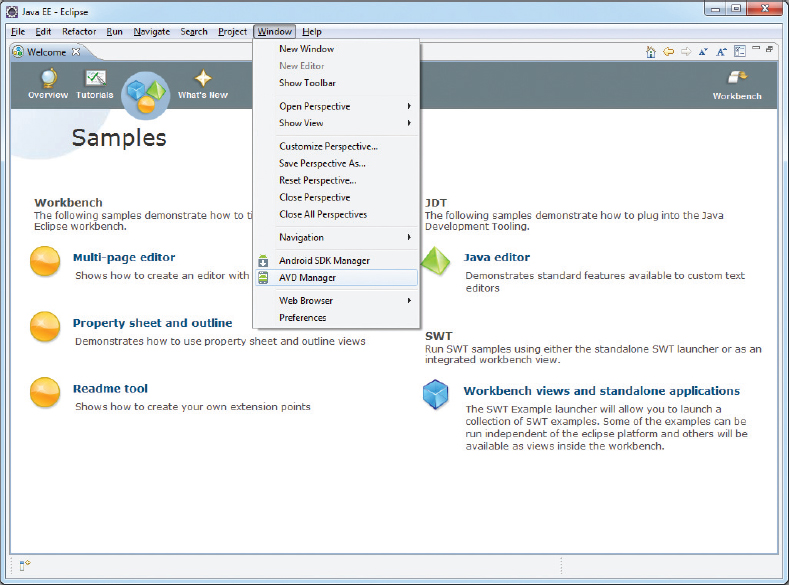
To create an AVD, select Window ⇒ AVD Manager (see Figure 1-18).
In the Android Virtual Device Manager dialog (see Figure 1-19), click the New... button to create a new AVD.

In the Create new Android Virtual Device (AVD) dialog, enter the items as shown in Figure 1-20. Click the Create AVD button when you are done.
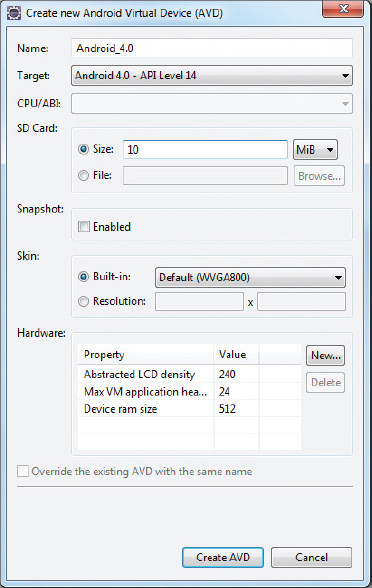
In this case, you have created an AVD (put simply, an Android emulator) that emulates an Android device running version 4.0 of the OS with a built-in 10-MB SD card. In addition to what you have created, you also have the option to emulate the device with different screen densities and resolutions.
NOTE Appendix B explains how to emulate the different types of Android devices.
It is preferable to create a few AVDs with different API levels and hardware configurations so that your application can be tested on different versions of the Android OS.
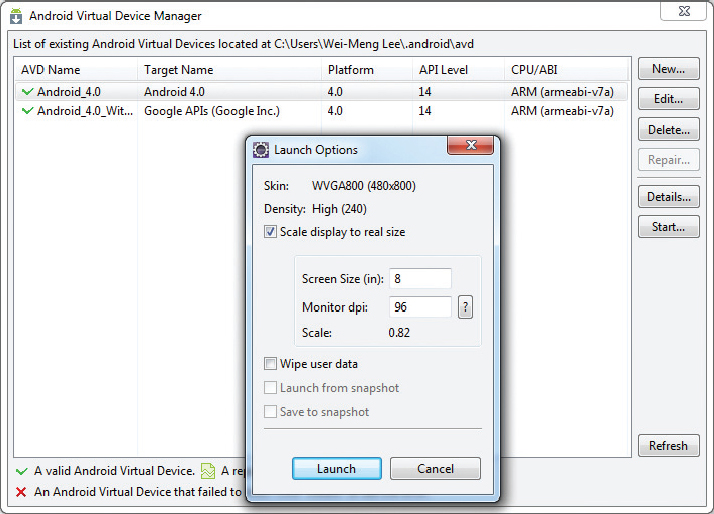
Once your ADV has been created, it is time to test it. Select the AVD that you want to test and click the Start. . . button. The Launch Options dialog will appear (see Figure 1-21). If you have a small monitor, it is recommended that you check the “Scale display to real size” option so that you can set the emulator to a smaller size. Click the Launch button to start the emulator.
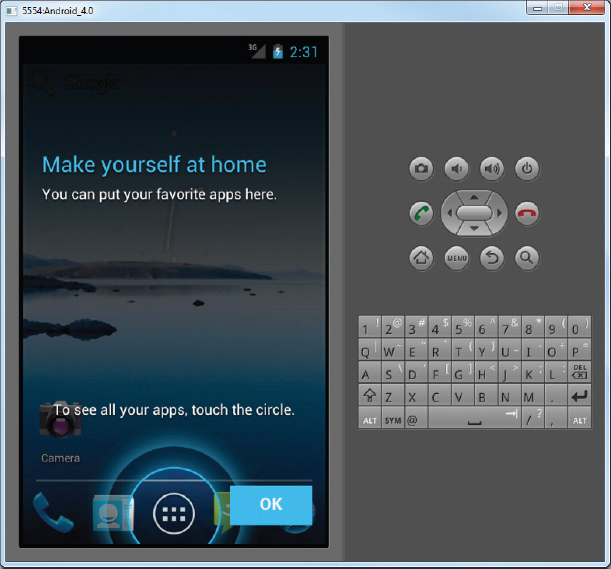
The Android emulator will start, and after a while it will be ready for use (see Figure 1-22). Go ahead and try out the emulator. It will behave just like a real Android device. After that, in the next section you will learn how to write your first Android application!
CREATING YOUR FIRST ANDROID APPLICATION
With all the tools and the SDK downloaded and installed, it is now time to start your engine. As in all programming books, the first example uses the ubiquitous Hello World application. This will give you a detailed look at the various components that make up an Android project.
TRY IT OUT: Creating Your First Android Application
codefile HelloWorld.zip available for download at Wrox.com
1. Using Eclipse, create a new project by selecting File ⇒ New ⇒ Project . . . (see Figure 1-23).

NOTE After you have created your first Android application, subsequent Android projects can be created by selecting File ⇒ New ⇒ Android Project.
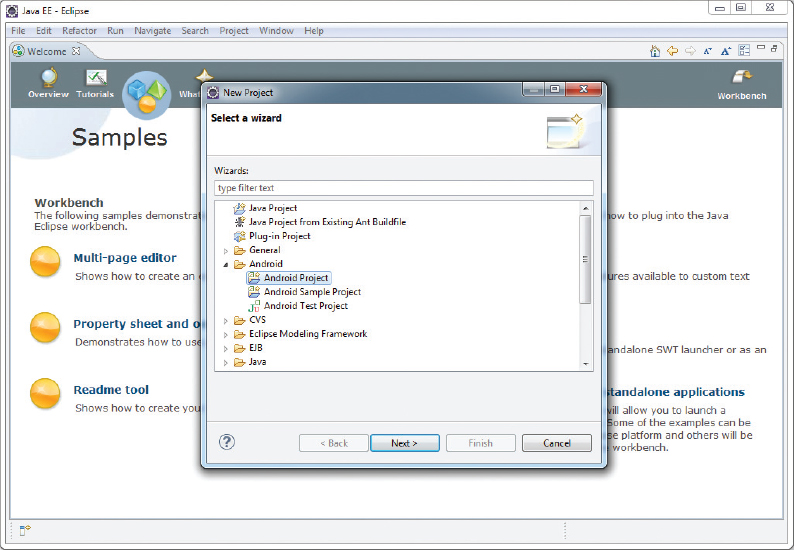
2. Expand the Android folder and select Android Project (see Figure 1-24). Click Next.
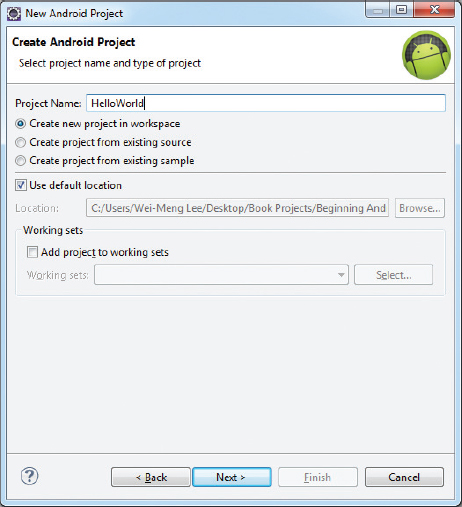
3. Name the Android project HelloWorld, as shown in Figure 1-25, and then click Next.
4. Select the Android 4.0 target and click Next.
5. Fill in the Application Info details as shown in Figure 1-26. Click Finish.
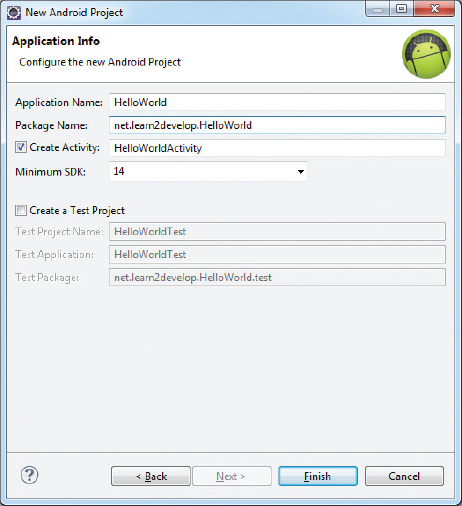
NOTE You need to have at least a period (.) in the package name. The recommended convention for the package name is to use your domain name in reverse order, followed by the project name. For example, my company’s domain name is learn2develop.net ; hence, my package name would be net.learn2develop.HelloWorld.
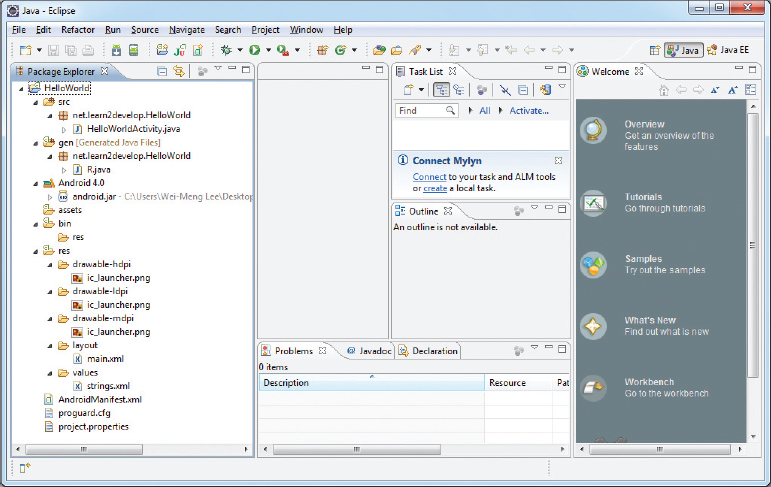
6. The Eclipse IDE should now look like Figure 1-27.

7. In the Package Explorer (located on the left of the Eclipse IDE), expand the HelloWorld project by clicking on the various arrows displayed to the left of each item in the project (see Figure 1-28). In the res/layout folder, double-click the main.xml file.
8. The main.xml file defines the user interface (UI) of your application. The default view is the Layout view, which lays out the activity graphically. To modify the UI by hand, click the main.xml tab located at the bottom (see Figure 1-29).

9. Add the following code in bold to the main.xml file:
<?xml version="1.0" encoding="utf-8"?>
<LinearLayout xmlns:android="http://schemas.android.com/apk/res/
android"
    android:layout_width="fill_parent"
    android:layout_height="fill_parent"
    android:orientation="vertical" >

    <TextView
        android:layout_width="fill_parent"
        android:layout_height="wrap_content"
        android:text="@string/hello" />

    <TextView
        android:layout_width="fill_parent"
        android:layout_height="wrap_content"
        android:text="This is my first Android Application!" />

    <Button
        android:layout_width="fill_parent"
        android:layout_height="wrap_content"
        android:text="And this is a clickable button!" />

</LinearLayout>
10. To save the changes made to your project, press Ctrl+S.
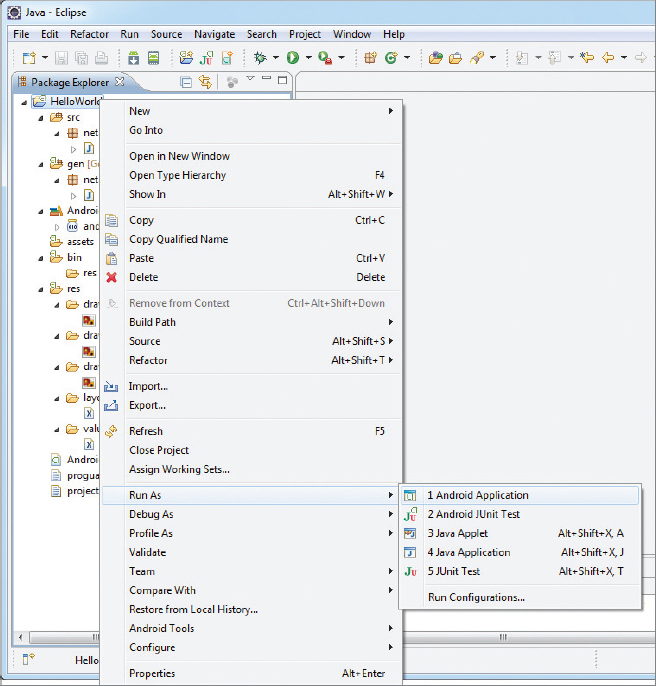
11. You are now ready to test your application on the Android emulator. Right-click the project name in Eclipse and select Run As ⇒ Android Application (see Figure 1-30).
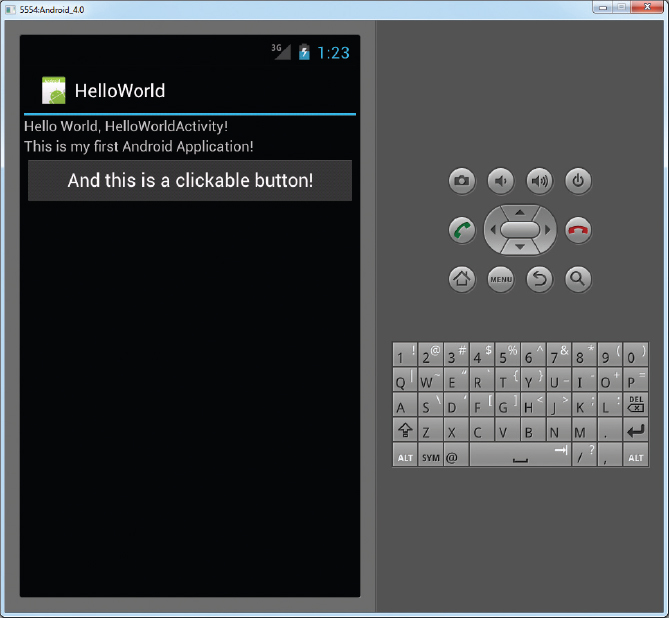
12. If you have not made any mistakes in the project, you should now be able to see the application installed and running on the Android emulator (see Figure 1-31).
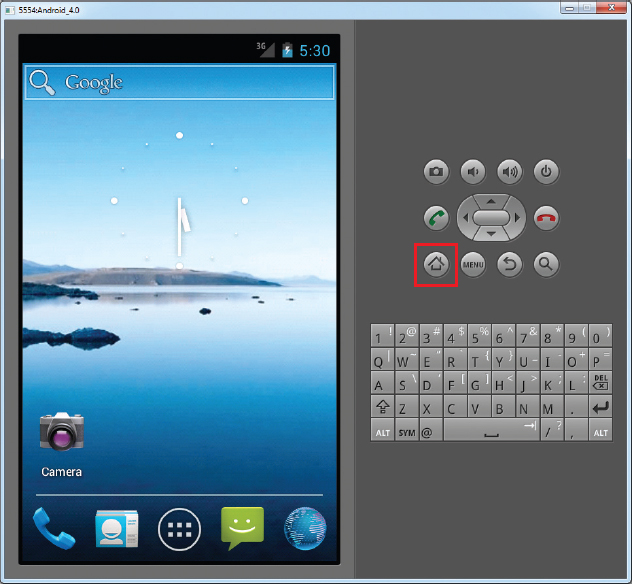
13. Click the Home button (the house icon in the lower-left corner above the keyboard) so that it now shows the Home screen (see Figure 1-32).
14. Click the application launcher icon to display the list of applications installed on the device. Note that the HelloWorld application is now installed in the application launcher (see Figure 1-33).

WHICH AVD WILL BE USED TO TEST YOUR APPLICATION?
Recall that earlier you created a few AVDs using the AVD Manager. So which one will be launched by Eclipse when you run an Android application? Eclipse checks the target that you specified (when you created a new project), comparing it against the list of AVDs that you have created. The first one that matches will be launched to run your application.
If you have more than one suitable AVD running prior to debugging the application, Eclipse will display the Android Device Chooser dialog, which enables you to select the desired emulator/device to debug the application (see Figure 1-34).

How It Works
To create an Android project using Eclipse, you need to supply the information shown in Table 1-2.
TABLE 1-2: Project Files Created by Default
| PROPERTIES | DESCRIPTION |
| Project name | The name of the project |
| Application name | A user-friendly name for your application |
| Package name | The name of the package. You should use a reverse domain name for this. |
| Create Activity | The name of the first activity in your application |
| Min SDK Version | The minimum version of the SDK that your project is targeting |
In Android, an activity is a window that contains the user interface of your applications. An application can have zero or more activities; in this example, the application contains one activity: HelloWorldActivity. This HelloWorldActivity is the entry point of the application, which is displayed when the application is started. Chapter 2 discusses activities in more detail.
In this simple example, you modified the main.xml file to display the string “This is my first Android Application!” and a button. The main.xml file contains the user interface of the activity, which is displayed when HelloWorldActivity is loaded.
When you debug the application on the Android emulator, the application is automatically installed on the emulator. And that’s it — you have developed your first Android application!
The next section unravels how all the various files in your Android project work together to make your application come alive.
ANATOMY OF AN ANDROID APPLICATION
Now that you have created your first Hello World Android application, it is time to dissect the innards of the Android project and examine all the parts that make everything work.
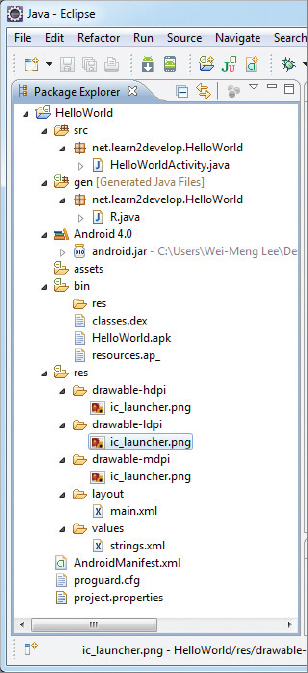
First, note the various files that make up an Android project in the Package Explorer in Eclipse (see Figure 1-35).
The various folders and their files are as follows:
- src — Contains the .java source files for your project. In this example, there is one file, HelloWorldActivity.java. The HelloWorldActivity.java file is the source file for your activity. You write the code for your application in this file. The Java file is listed under the package name for your project, which in this case is net.learn2develop.HelloWorld.
- gen — Contains the R.java file, a compiler-generated file that references all the resources found in your project. You should not modify this file. All the resources in your project are automatically compiled into this class so that you can refer to them using the class.
- Android 4.0 library — This item contains one file, android.jar, which contains all the class libraries needed for an Android application.
- assets — This folder contains all the assets used by your application, such as HTML, text files, databases, etc.
- bin — This folder contains the files built by the ADT during the build process. In particular, it generates the .apk file (Android Package). An .apk file is the application binary of an Android application. It contains everything needed to run an Android application.
- res — This folder contains all the resources used in your application. It also contains a few other subfolders: drawable-<resolution>, layout, and values. Chapter 3 talks more about how you can support devices with different screen resolutions and densities.
- AndroidManifest.xml — This is the manifest file for your Android application. Here you specify the permissions needed by your application, as well as other features (such as intent-filters, receivers, etc.). Chapter 2 discusses the use of the AndroidManifest.xml file in more detail.
The main.xml file defines the user interface for your activity. Observe the following in bold:
    <TextView
        android:layout_width="fill_parent"
        android:layout_height="wrap_content"
        android:text="@string/hello" />
The @string in this case refers to the strings.xml file located in the res/values folder. Hence, @string/hello refers to the hello string defined in the strings.xml file, which is “Hello World, HelloWorldActivity!”:
<?xml version="1.0" encoding="utf-8"?>
<resources>

    <string name="hello">Hello World, HelloWorldActivity!</string>
    <string name="app_name">HelloWorld</string>

</resources>
It is recommended that you store all the string constants in your application in this strings.xml file and reference these strings using the @string identifier. That way, if you ever need to localize your application to another language, all you need to do is make a copy of the entire values folder and modify the values of strings.xml to contain the string in the language that you want to display. Figure 1-36 shows that I have another folder named values-fr with the strings.xml file containing the same hello string in French.

If the user loads the same application on a phone configured to display French as the default language, your application will automatically display the hello string in French.
The next important file in an Android project is the manifest file. Note the content of the AndroidManifest.xml file:
<?xml version="1.0" encoding="utf-8"?>
<manifest xmlns:android="http://schemas.android.com/apk/res/android"
    package="net.learn2develop.HelloWorld"
    android:versionCode="1"
    android:versionName="1.0" >

    <uses-sdk android:minSdkVersion="14" />

    <application
        android:icon="@drawable/ic_launcher"
        android:label="@string/app_name" >
        <activity
            android:label="@string/app_name"
            android:name=".HelloWorldActivity" >
            <intent-filter >
                <action android:name="android.intent.action.MAIN" />

                <category android:name="android.intent.category.LAUNCHER" />
            </intent-filter>
        </activity>
    </application>

</manifest>
The AndroidManifest.xml file contains detailed information about the application:
- It defines the package name of the application as net.learn2develop.HelloWorld.
- The version code of the application is 1 (set via the android:versionCode attribute). This value is used to identify the version number of your application. It can be used to programmatically determine whether an application needs to be upgraded.
- The version name of the application is 1.0 (set via the android:versionName attribute). This string value is mainly used for display to the user. You should use the format <major>.<minor>.<point> for this value.
- The android:minSdkVersion attribute of the <uses-sdk> element specifies the minimum version of the OS on which the application will run.
- The application uses the image named ic_launcher.png located in the drawable folders.
- The name of this application is the string named app_name defined in the strings.xml file.
- There is one activity in the application represented by the HelloWorldActivity.java file. The label displayed for this activity is the same as the application name.
- Within the definition for this activity, there is an element named <intent-filter>:
- The action for the intent filter is named android.intent.action.MAIN to indicate that this activity serves as the entry point for the application.
- The category for the intent-filter is named android.intent.category.LAUNCHER to indicate that the application can be launched from the device’s launcher icon. Chapter 2 discusses intents in more detail.
As you add more files and folders to your project, Eclipse will automatically generate the content of R.java, which currently contains the following:
/* AUTO-GENERATED FILE.  DO NOT MODIFY.
 *
 * This class was automatically generated by the
 * aapt tool from the resource data it found.  It
 * should not be modified by hand.
 */

package net.learn2develop.HelloWorld;

public final class R {
    public static final class attr {
    }
    public static final class drawable {
        public static final int ic_launcher=0x7f020000;
    }
    public static final class layout {
        public static final int main=0x7f030000;
    }
    public static final class string {
        public static final int app_name=0x7f040001;
        public static final int hello=0x7f040000;
    }
}
You are not supposed to modify the content of the R.java file; Eclipse automatically generates the content for you when you modify your project.
NOTE If you delete R.java manually, Eclipse will regenerate it for you immediately. Note that in order for Eclipse to generate the R.java file for you, the project must not contain any errors. If you realize that Eclipse has not regenerated R.java after you have deleted it, check your project again. The code may contain syntax errors, or your XML files (such as AndroidManifest.xml, main.xml, etc.) may not be well-formed.
Finally, the code that connects the activity to the UI (main.xml) is the setContentView() method, which is in the HelloWorldActivity.java file:
package net.learn2develop.HelloWorld;

import android.app.Activity;
import android.os.Bundle;

public class HelloWorldActivity extends Activity {
    /** Called when the activity is first created. */
    @Override
    public void onCreate(Bundle savedInstanceState) {
        super.onCreate(savedInstanceState);
        setContentView(R.layout.main);
    }
}
Here, R.layout.main refers to the main.xml file located in the res/layout folder. As you add additional XML files to the res/layout folder, the filenames will automatically be generated in the R.java file. The onCreate() method is one of many methods that are fired when an activity is loaded. Chapter 2 discusses the life cycle of an activity in more detail.
This chapter has provided a brief overview of Android, and highlighted some of its capabilities. If you have followed the sections on downloading the tools and the Android SDK, you should now have a working system — one that is capable of developing more interesting Android applications other than the Hello World application. In the next chapter, you will learn about the concepts of activities and intents, and the very important roles they play in Android.
EXERCISES
1. What is an AVD?
2. What is the difference between the android:versionCode and android:versionName attributes in the AndroidManifest.xml file?
3. What is the use of the strings.xml file?
Answers to the exercises can be found in Appendix C.
• WHAT YOU LEARNED IN THIS CHAPTER
| TOPIC | KEY CONCEPTS |
| Android OS | Android is an open source mobile operating system based on the Linux operating system. It is available to anyone who wants to adapt it to run on their own devices. |
| Languages used for Android application development | You use the Java programming language to develop Android applications. Written applications are compiled into Dalvik executables, which are then run on top of the Dalvik virtual machine. |
| Android Market | The Android Market hosts all the various Android applications written by third-party developers. |
| Tools for Android application development | Eclipse IDE, Android SDK, and the ADT |
| Activities | An activity is represented by a screen in your Android application. Each application can have zero or more activities. |
| The Android manifest file | The AndroidManifest.xml file contains detailed configuration information for your application. As your example application becomes more sophisticated, you will modify this file, and you will see the different information you can add to it as you progress through the chapters. |