
Chapter 6
Data Persistence
WHAT YOU WILL LEARN IN THIS CHAPTER
- How to save simple data using the SharedPreferences object
- Enabling users to modify preferences using a PreferenceActivity class
- How to write and read files in internal and external storage
- Creating and using a SQLite database
In this chapter, you will learn how to persist data in your Android applications. Persisting data is an important topic in application development, as users typically expect to reuse data in the future. For Android, there are primarily three basic ways of persisting data:
- A lightweight mechanism known as shared preferences to save small chunks of data
- Traditional file systems
- A relational database management system through the support of SQLite databases
The techniques discussed in this chapter enable applications to create and access their own private data. In the next chapter you’ll learn how you can share data across applications.
SAVING AND LOADING USER PREFERENCES
Android provides the SharedPreferences object to help you save simple application data. For example, your application may have an option that enables users to specify the font size of the text displayed in your application. In this case, your application needs to remember the size set by the user so that the next time he or she uses the application again, it can set the size appropriately. In order to do so, you have several options. You can save the data to a file, but you have to perform some file management routines, such as writing the data to the file, indicating how many characters to read from it, and so on. Also, if you have several pieces of information to save, such as text size, font name, preferred background color, and so on, then the task of writing to a file becomes more onerous.
An alternative to writing to a text file is to use a database, but saving simple data to a database is overkill, both from a developer’s point of view and in terms of the application’s run-time performance.
Using the SharedPreferences object, however, you save the data you want through the use of name/value pairs — specify a name for the data you want to save, and then both it and its value will be saved automatically to an XML file for you.
Accessing Preferences Using an Activity
In the following Try It Out, you learn how to use the SharedPreferences object to store application data. You will also learn how the stored application data can be modified directly by the user through a special type of activity provided by the Android OS.
TRY IT OUT: Saving Data Using the SharedPreferences Object
codefile SharedPreferences.zip available for download at Wrox.com
1. Using Eclipse, create an Android project and name it UsingPreferences.
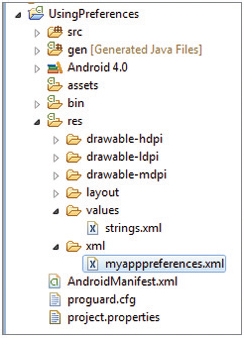
2. Create a new subfolder in the res folder and name it xml. In this newly created folder, add a file and name it myapppreferences.xml (see Figure 6-1).
3. Populate the myapppreferences.xml file as follows:
<?xml version="1.0" encoding="utf-8"?>
<PreferenceScreen
    xmlns:android="http://schemas.android.com/apk/res/android">
    <PreferenceCategory android:title="Category 1">
        <CheckBoxPreference
            android:title="Checkbox"
            android:defaultValue="false"
            android:summary="True or False"
            android:key="checkboxPref" />
        </PreferenceCategory>
    <PreferenceCategory android:title="Category 2">
        <EditTextPreference
            android:summary="Enter a string"
            android:defaultValue="[Enter a string here]"
            android:title="Edit Text"
            android:key="editTextPref" />
        <RingtonePreference
            android:summary="Select a ringtone"
            android:title="Ringtones"
            android:key="ringtonePref" />
        <PreferenceScreen
            android:title="Second Preference Screen"
            android:summary=
                "Click here to go to the second Preference Screen"
            android:key="secondPrefScreenPref" >
            <EditTextPreference
                android:summary="Enter a string"
                android:title="Edit Text (second Screen)"
                android:key="secondEditTextPref" />
        </PreferenceScreen>
    </PreferenceCategory>
</PreferenceScreen>
4. Under the package name, add a new Class file and name it AppPreferenceActivity.
5. Populate the AppPreferenceActivity.java file as follows:
package net.learn2develop.UsingPreferences;

import android.os.Bundle;
import android.preference.PreferenceActivity;

public class AppPreferenceActivity extends PreferenceActivity {
    @Override
    public void onCreate(Bundle savedInstanceState) {
        super.onCreate(savedInstanceState);
        //---load the preferences from an XML file---
        addPreferencesFromResource(R.xml.myapppreferences);
    }
}
6. In the AndroidManifest.xml file, add the new entry for the AppPreferenceActivity class:
<?xml version="1.0" encoding="utf-8"?>
<manifest xmlns:android="http://schemas.android.com/apk/res/android"
    package="net.learn2develop.UsingPreferences"
    android:versionCode="1"
    android:versionName="1.0" >

    <uses-sdk android:minSdkVersion="14" />

    <application
        android:icon="@drawable/ic_launcher"
        android:label="@string/app_name" >
        <activity
            android:label="@string/app_name"
            android:name=".UsingPreferencesActivity" >
            <intent-filter >
                <action android:name="android.intent.action.MAIN" />

                <category android:name="android.intent.category.LAUNCHER" />
            </intent-filter>
        </activity>
        <activity android:name=".AppPreferenceActivity"
                  android:label="@string/app_name">
            <intent-filter>
                <action
                    android:name="net.learn2develop.AppPreferenceActivity" />
                <category android:name="android.intent.category.DEFAULT" />
            </intent-filter>
        </activity>
    </application>

</manifest>
7. In the main.xml file, add the following code in bold (replacing the existing TextView):
<?xml version="1.0" encoding="utf-8"?>
<LinearLayout xmlns:android="http://schemas.android.com/apk/res/android"
    android:layout_width="fill_parent"
    android:layout_height="fill_parent"
    android:orientation="vertical" >

<Button
    android:id="@+id/btnPreferences"
    android:text="Load Preferences Screen"
    android:layout_width="fill_parent"
    android:layout_height="wrap_content"
    android:onClick="onClickLoad"/>

<Button
    android:id="@+id/btnDisplayValues"
    android:text="Display Preferences Values"
    android:layout_width="fill_parent"
    android:layout_height="wrap_content"
    android:onClick="onClickDisplay"/>

<EditText
    android:id="@+id/txtString"
    android:layout_width="fill_parent"
    android:layout_height="wrap_content" />

<Button
    android:id="@+id/btnModifyValues"
    android:text="Modify Preferences Values"
    android:layout_width="fill_parent"
    android:layout_height="wrap_content"
    android:onClick="onClickModify"/>

</LinearLayout>
8. Add the following lines in bold to the UsingPreferencesActivity.java file:
package net.learn2develop.UsingPreferences;

import android.app.Activity;
import android.content.Intent;
import android.os.Bundle;
import android.view.View;

public class UsingPreferencesActivity extends Activity {
    /∗∗ Called when the activity is first created. ∗/
    @Override
    public void onCreate(Bundle savedInstanceState) {
        super.onCreate(savedInstanceState);
        setContentView(R.layout.main);
    }

    public void onClickLoad(View view) {
        Intent i = new Intent("net.learn2develop.AppPreferenceActivity");
        startActivity(i);
    }
}
9. Press F11 to debug the application on the Android emulator. Click the Load Preferences Screen button to see the preferences screen, as shown in Figure 6-2.

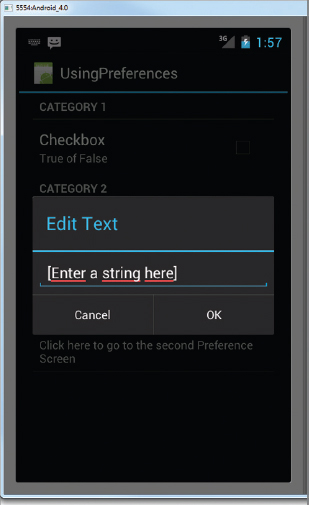
10. Clicking the Checkbox item toggles the checkbox’s value between checked and unchecked. Note the two categories: Category 1 and Category 2. Click the Edit Text item and enter some values as shown in Figure 6-3. Click OK to dismiss the dialog.
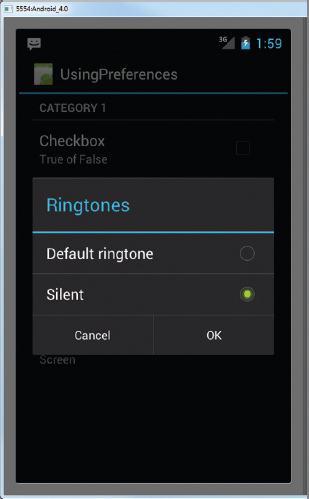
11. Click the Ringtones item to select either the default ringtone or silent mode (see Figure 6-4). If you test the application on a real Android device, you can select from a more comprehensive list of ringtones.
12. Clicking the Second Preference Screen item will navigate to the next screen (see Figure 6-5).

13. To go back to the previous screen, click the Back button. To dismiss the preferences screen, you also click the Back button.
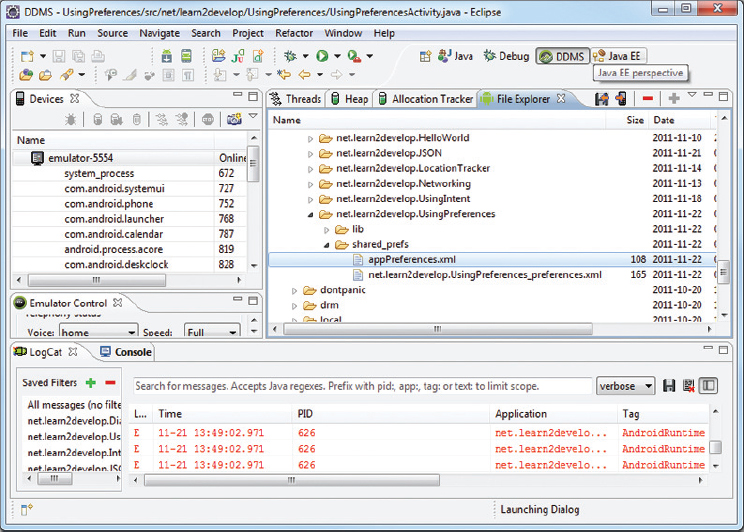
14. Once you have modified the value of at least one of the preferences, a file is created in the /data/data/net.learn2develop.UsingPreferences/shared_prefs folder of the Android emulator. To verify this, switch to the DDMS perspective in Eclipse and look at the File Explorer tab (see Figure 6-6); you will see an XML file named net.learn2develop.UsingPreferences_preferences.xml.

15. If you extract this file and examine its content, you will see something like the following:
<?xml version='1.0' encoding='utf-8' standalone='yes' ?>
<map>
<string name="editTextPref">[Enter a string here]</string>
<string name="ringtonePref"></string>
</map>
How It Works
You first created an XML file named myapppreferences.xml to store the types of preferences you want to save for your application:
<?xml version="1.0" encoding="utf-8"?>
<PreferenceScreen
    xmlns:android="http://schemas.android.com/apk/res/android">
    <PreferenceCategory android:title="Category 1">
        <CheckBoxPreference
            android:title="Checkbox"
            android:defaultValue="false"
            android:summary="True or False"
            android:key="checkboxPref" />
        </PreferenceCategory>
    <PreferenceCategory android:title="Category 2">
        <EditTextPreference
            android:summary="Enter a string"
            android:defaultValue="[Enter a string here]"
            android:title="Edit Text"
            android:key="editTextPref" />
        <RingtonePreference
            android:summary="Select a ringtone"
            android:title="Ringtones"
            android:key="ringtonePref" />
        <PreferenceScreen
            android:title="Second Preference Screen"
            android:summary=
                "Click here to go to the second Preference Screen"
            android:key="secondPrefScreenPref" >
            <EditTextPreference
                android:summary="Enter a string"
                android:title="Edit Text (second Screen)"
                android:key="secondEditTextPref" />
        </PreferenceScreen>
    </PreferenceCategory>
</PreferenceScreen>
In the preceding snippet, you created the following:
- Two preference categories for grouping different types of preferences
- Two checkbox preferences with keys named checkboxPref and secondEditTextPref
- A ringtone preference with a key named ringtonePref
- A preference screen to contain additional preferences
The android:key attribute specifies the key that you can programmatically reference in your code to set or retrieve the value of that particular preference.
To get the OS to display all these preferences for users to edit, you create an activity that extends the PreferenceActivity base class, and then call the addPreferencesFromResource() method to load the XML file containing the preferences:
public class AppPreferenceActivity extends PreferenceActivity {
    @Override
    public void onCreate(Bundle savedInstanceState) {
        super.onCreate(savedInstanceState);
        //---load the preferences from an XML file---
        addPreferencesFromResource(R.xml.myapppreferences);
    }
}
The PreferenceActivity class is a specialized type of activity that displays a hierarchy of preferences to the user.
To display the activity for the preferences, you invoke it using an Intent object:
Intent i = new Intent("net.learn2develop.AppPreferenceActivity");
        startActivity(i);
All the changes made to the preferences are automatically persisted to an XML file in the shared_prefs folder of the application.
Programmatically Retrieving and Modifying the Preferences Values
In the previous section, you saw how the PreferenceActivity class both enables developers to easily create preferences and enables users to modify them during runtime. To make use of these preferences in your application, you use the SharedPreferences class. The following Try It Out shows you how.
TRY IT OUT: Retrieving and Modifying Preferences
1. Using the same project created in the previous section, add the following lines in bold to the UsingPreferencesActivity.java file:
package net.learn2develop.UsingPreferences;
import android.app.Activity;
import android.content.Intent;
import android.content.SharedPreferences;
import android.os.Bundle;
import android.view.View;
import android.widget.EditText;
import android.widget.Toast;

public class UsingPreferencesActivity extends Activity {
    /∗∗ Called when the activity is first created. ∗/
    @Override
    public void onCreate(Bundle savedInstanceState) {
        super.onCreate(savedInstanceState);
        setContentView(R.layout.main);
    }

    public void onClickLoad(View view) {
        Intent i = new Intent("net.learn2develop.AppPreferenceActivity");
        startActivity(i);
    }

    public void onClickDisplay(View view) {
        SharedPreferences appPrefs =
                getSharedPreferences("net.learn2develop.UsingPreferences_preferences",
                        MODE_PRIVATE);
        DisplayText(appPrefs.getString("editTextPref", ""));
    }

    public void onClickModify(View view) {
        SharedPreferences appPrefs =
                getSharedPreferences("net.learn2develop.UsingPreferences_preferences",
                        MODE_PRIVATE);
        SharedPreferences.Editor prefsEditor = appPrefs.edit();
        prefsEditor.putString("editTextPref",
                ((EditText) findViewById(R.id.txtString)).getText().toString());
        prefsEditor.commit();
    }

    private void DisplayText(String str) {
        Toast.makeText(getBaseContext(), str, Toast.LENGTH_LONG).show();
    }
}
2. Press F11 to rerun the application on the Android emulator again. This time, clicking the Display Preferences Values button will display the value shown in Figure 6-7.

3. Enter a string in the EditText view and click the Modify Preferences Values button (see Figure 6-8).

4. Now click the Display Preferences Values button again. Note that the new value is saved.
How It Works
In the onClickDisplay() method, you first used the getSharedPreferences() method to obtain an instance of the SharedPreferences class. You do so by specifying the name of the XML file (in this case it is “net.learn2develop.UsingPreferences_preferences,” using the format: <PackageName>_preferences). To retrieve a string preference, you used the getString() method, passing it the key to the preference that you want to retrieve:
    public void onClickDisplay(View view) {
        SharedPreferences appPrefs =
                getSharedPreferences("net.learn2develop.UsingPreferences_preferences",
                        MODE_PRIVATE);
        DisplayText(appPrefs.getString("editTextPref", ""));
    }
The MODE_PRIVATE constant indicates that the preference file can only be opened by the application that created it.
In the onClickModify() method, you created a SharedPreferences.Editor object through the edit() method of the SharedPreferences object. To change the value of a string preference, use the putString() method. To save the changes to the preferences file, use the commit() method:
    public void onClickModify(View view) {
        SharedPreferences appPrefs =
                getSharedPreferences("net.learn2develop.UsingPreferences_preferences",
                        MODE_PRIVATE);
        SharedPreferences.Editor prefsEditor = appPrefs.edit();
        prefsEditor.putString("editTextPref",
                ((EditText) findViewById(R.id.txtString)).getText().toString());
        prefsEditor.commit();
    }
Changing the Default Name of the Preferences File
Notice that by default the name of the preferences file saved on the device is net.learn2develop.UsingPreferences_preferences.xml, with the package name used as the prefix. However, sometimes it is useful to give the preferences file a specific name. In this case, you can do the following.
Add the following code in bold to the AppPreferenceActivity.java file:
package net.learn2develop.UsingPreferences;

import android.os.Bundle;
import android.preference.PreferenceActivity;
import android.preference.PreferenceManager;

public class AppPreferenceActivity extends PreferenceActivity {
    @Override
    public void onCreate(Bundle savedInstanceState) {
        super.onCreate(savedInstanceState);

        PreferenceManager prefMgr = getPreferenceManager();
        prefMgr.setSharedPreferencesName("appPreferences");

        //---load the preferences from an XML file---
        addPreferencesFromResource(R.xml.myapppreferences);
    }
}
Here, you make use of the PreferenceManager class to set the shared preferences file name to appPreferences.xml.
Modify the UsingPreferencesActivity.java file as follows:
    public void onClickDisplay(View view) {
        /∗
        SharedPreferences appPrefs =
                getSharedPreferences("net.learn2develop.UsingPreferences_preferences",
                        MODE_PRIVATE);
        ∗/
        SharedPreferences appPrefs =
                getSharedPreferences("appPreferences", MODE_PRIVATE);

        DisplayText(appPrefs.getString("editTextPref", ""));
    }

    public void onClickModify(View view) {
        /∗
        SharedPreferences appPrefs =
                getSharedPreferences("net.learn2develop.UsingPreferences_preferences",
                        MODE_PRIVATE);
        ∗/
        SharedPreferences appPrefs =
                getSharedPreferences("appPreferences", MODE_PRIVATE);

        SharedPreferences.Editor prefsEditor = appPrefs.edit();
        prefsEditor.putString("editTextPref",
                ((EditText) findViewById(R.id.txtString)).getText().toString());
        prefsEditor.commit();
    }
When you rerun the application and make changes to the preferences, you will notice that the appPreferences.xml file is now created (see Figure 6-9).
The SharedPreferences object enables you to store data that is best stored as name/value pairs — for example, user ID, birth date, gender, driving license number, and so on. However, sometimes you might prefer to use the traditional file system to store your data. For example, you might want to store the text of poems you want to display in your applications. In Android, you can use the classes in the java.io package to do so.
Saving to Internal Storage
The first way to save files in your Android application is to write to the device’s internal storage. The following Try It Out demonstrates how to save a string entered by the user to the device’s internal storage.
TRY IT OUT: Saving Data to Internal Storage
codefile Files.zip available for download at Wrox.com
1. Using Eclipse, create an Android project and name it Files.
2. In the main.xml file, add the following statements in bold:
<?xml version="1.0" encoding="utf-8"?>
<LinearLayout xmlns:android="http://schemas.android.com/apk/res/android"
    android:layout_width="fill_parent"
    android:layout_height="fill_parent"
    android:orientation="vertical" >

<TextView
    android:layout_width="fill_parent"
    android:layout_height="wrap_content"
    android:text="Please enter some text" />

<EditText
    android:id="@+id/txtText1"
    android:layout_width="fill_parent"
    android:layout_height="wrap_content" />

<Button
    android:id="@+id/btnSave"
    android:text="Save"
    android:layout_width="fill_parent"
    android:layout_height="wrap_content"
    android:onClick="onClickSave" />

<Button
    android:id="@+id/btnLoad"
    android:text="Load"
    android:layout_width="fill_parent"
    android:layout_height="wrap_content"
    android:onClick="onClickLoad" />

</LinearLayout>
3. In the FilesActivity.java file, add the following statements in bold:
package net.learn2develop.Files;

import java.io.FileInputStream;
import java.io.FileOutputStream;
import java.io.IOException;
import java.io.InputStreamReader;
import java.io.OutputStreamWriter;

import android.app.Activity;
import android.os.Bundle;
import android.view.View;
import android.widget.EditText;
import android.widget.Toast;

public class FilesActivity extends Activity {
    EditText textBox;
    static final int READ_BLOCK_SIZE = 100;

    /∗∗ Called when the activity is first created. ∗/
    @Override
    public void onCreate(Bundle savedInstanceState) {
        super.onCreate(savedInstanceState);
        setContentView(R.layout.main);

        textBox = (EditText) findViewById(R.id.txtText1);
    }

    public void onClickSave(View view) {
        String str = textBox.getText().toString();
        try
        {
            FileOutputStream fOut =
                    openFileOutput("textfile.txt",
                            MODE_WORLD_READABLE);
            OutputStreamWriter osw = new
                    OutputStreamWriter(fOut);

            //---write the string to the file---
            osw.write(str);
            osw.flush();
            osw.close();

            //---display file saved message---
            Toast.makeText(getBaseContext(),
                    "File saved successfully!",
                    Toast.LENGTH_SHORT).show();

            //---clears the EditText---
            textBox.setText("");
        }
        catch (IOException ioe)
        {
            ioe.printStackTrace();
        }

    }

    public void onClickLoad(View view) {
        try
        {
            FileInputStream fIn =
                    openFileInput("textfile.txt");
            InputStreamReader isr = new
                    InputStreamReader(fIn);

            char[] inputBuffer = new char[READ_BLOCK_SIZE];
            String s = "";

            int charRead;
            while ((charRead = isr.read(inputBuffer))>0)
            {
                //---convert the chars to a String---
                String readString =
                        String.copyValueOf(inputBuffer, 0,
                                charRead);
                s += readString;

                inputBuffer = new char[READ_BLOCK_SIZE];
            }
            //---set the EditText to the text that has been
            // read---
            textBox.setText(s);

            Toast.makeText(getBaseContext(),
                    "File loaded successfully!",
                    Toast.LENGTH_SHORT).show();
        }
        catch (IOException ioe) {
            ioe.printStackTrace();
        }

    }

}
4. Press F11 to debug the application on the Android emulator.
5. Type some text into the EditText view (see Figure 6-10) and then click the Save button.
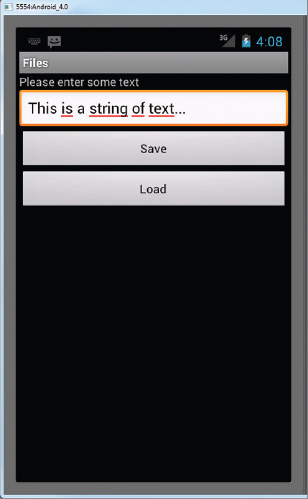
6. If the file is saved successfully, you will see the Toast class displaying the “File saved successfully!” message. The text in the EditText view should disappear.
7. Click the Load button and you should see the string appearing in the EditText view again. This confirms that the text is saved correctly.
How It Works
To save text into a file, you use the FileOutputStream class. The openFileOutput() method opens a named file for writing, with the mode specified. In this example, you used the MODE_WORLD_READABLE constant to indicate that the file is readable by all other applications:
    FileOutputStream fOut =
                    openFileOutput("textfile.txt",
                            MODE_WORLD_READABLE);
Apart from the MODE_WORLD_READABLE constant, you can select from the following: MODE_PRIVATE (the file can only be accessed by the application that created it), MODE_APPEND (for appending to an existing file), and MODE_WORLD_WRITEABLE (all other applications have write access to the file).
To convert a character stream into a byte stream, you use an instance of the OutputStreamWriter class, by passing it an instance of the FileOutputStream object:
    OutputStreamWriter osw = new
                    OutputStreamWriter(fOut);
You then use its write() method to write the string to the file. To ensure that all the bytes are written to the file, use the flush() method. Finally, use the close() method to close the file:
    //---write the string to the file---
            osw.write(str);
            osw.flush();
            osw.close();
To read the content of a file, you use the FileInputStream class, together with the InputStreamReader class:
    FileInputStream fIn =
                    openFileInput("textfile.txt");
            InputStreamReader isr = new
                    InputStreamReader(fIn);
Because you do not know the size of the file to read, the content is read in blocks of 100 characters into a buffer (character array). The characters read are then copied into a String object:
    char[] inputBuffer = new char[READ_BLOCK_SIZE];
            String s = "";

            int charRead;
            while ((charRead = isr.read(inputBuffer))>0)
            {
                //---convert the chars to a String---
                String readString =
                        String.copyValueOf(inputBuffer, 0,
                                charRead);
                s += readString;

                inputBuffer = new char[READ_BLOCK_SIZE];
            }
The read() method of the InputStreamReader object checks the number of characters read and returns -1 if the end of the file is reached.
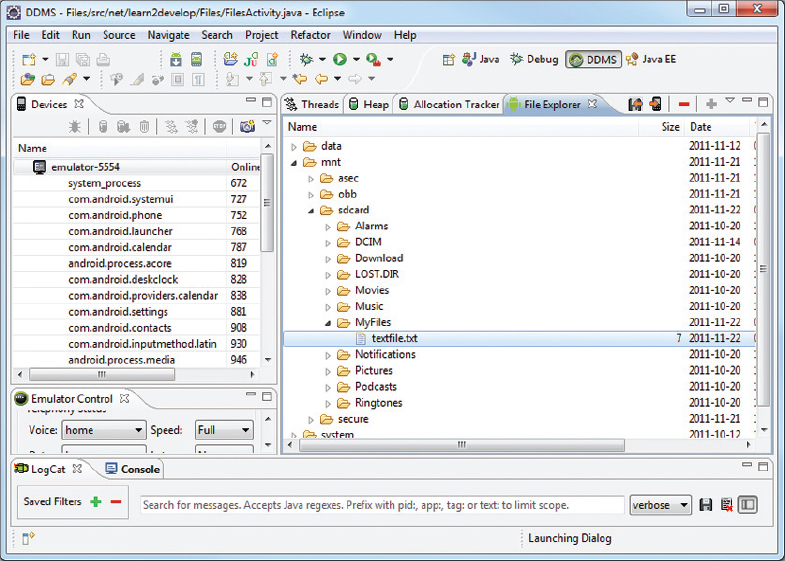
When testing this application on the Android emulator, you can use the DDMS perspective to verify that the application did indeed save the file into the application’s files directory (see Figure 6-11; the entire path is /data/data/net.learn2develop.Files/files)

Saving to External Storage (SD Card)
The previous section showed how you can save your files to the internal storage of your Android device. Sometimes, it would be useful to save them to external storage (such as an SD card) because of its larger capacity, as well as the capability to share the files easily with other users (by removing the SD card and passing it to somebody else).
Using the project created in the previous section as the example, to save the text entered by the user in the SD card, modify the onClick() method of the Save button as shown in bold here:
import java.io.File;
import java.io.FileInputStream;
import java.io.FileOutputStream;
import java.io.IOException;
import java.io.InputStreamReader;
import java.io.OutputStreamWriter;

import android.app.Activity;
import android.os.Bundle;
import android.os.Environment;
import android.view.View;
import android.widget.EditText;
import android.widget.Toast;

    public void onClickSave(View view) {
        String str = textBox.getText().toString();
        try
        {
            //---SD Card Storage---
            File sdCard = Environment.getExternalStorageDirectory();
            File directory = new File (sdCard.getAbsolutePath() +
                "/MyFiles");
            directory.mkdirs();
            File file = new File(directory, "textfile.txt");
            FileOutputStream fOut = new FileOutputStream(file);

            /∗
            FileOutputStream fOut =
                    openFileOutput("textfile.txt",
                            MODE_WORLD_READABLE);
            ∗/

            OutputStreamWriter osw = new
                    OutputStreamWriter(fOut);

            //---write the string to the file---
            osw.write(str);
            osw.flush();
            osw.close();

            //---display file saved message---
            Toast.makeText(getBaseContext(),
                    "File saved successfully!",
                    Toast.LENGTH_SHORT).show();

            //---clears the EditText---
            textBox.setText("");
        }
        catch (IOException ioe)
        {
            ioe.printStackTrace();
        }

    }
The preceding code uses the getExternalStorageDirectory() method to return the full path to the external storage. Typically, it should return the “/sdcard” path for a real device, and “/mnt/sdcard” for an Android emulator. However, you should never try to hardcode the path to the SD card, as manufacturers may choose to assign a different path name to the SD card. Hence, be sure to use the getExternalStorageDirectory() method to return the full path to the SD card.
You then create a directory called MyFiles in the SD card. Finally, you save the file into this directory.
To load the file from the external storage, modify the onClickLoad() method for the Load button:
    public void onClickLoad(View view) {
        try
        {
            //---SD Storage---
            File sdCard = Environment.getExternalStorageDirectory();
            File directory = new File (sdCard.getAbsolutePath() +
                "/MyFiles");
            File file = new File(directory, "textfile.txt");
            FileInputStream fIn = new FileInputStream(file);
            InputStreamReader isr = new InputStreamReader(fIn);

            /∗
            FileInputStream fIn =
                    openFileInput("textfile.txt");
            InputStreamReader isr = new
                    InputStreamReader(fIn);
            ∗/

            char[] inputBuffer = new char[READ_BLOCK_SIZE];
            String s = "";

            int charRead;
            while ((charRead = isr.read(inputBuffer))>0)
            {
                //---convert the chars to a String---
                String readString =
                        String.copyValueOf(inputBuffer, 0,
                                charRead);
                s += readString;

                inputBuffer = new char[READ_BLOCK_SIZE];
            }
            //---set the EditText to the text that has been
            // read---
            textBox.setText(s);

            Toast.makeText(getBaseContext(),
                    "File loaded successfully!",
                    Toast.LENGTH_SHORT).show();
        }
        catch (IOException ioe) {
            ioe.printStackTrace();
        }

    }
Note that in order to write to the external storage, you need to add the WRITE_EXTERNAL_STORAGE permission in your AndroidManifest.xml file:
<?xml version="1.0" encoding="utf-8"?>
<manifest xmlns:android="http://schemas.android.com/apk/res/android"
    package="net.learn2develop.Files"
    android:versionCode="1"
    android:versionName="1.0" >

    <uses-sdk android:minSdkVersion="14" />
    <uses-permission android:name="android.permission.WRITE_EXTERNAL_STORAGE" />

    <application
        android:icon="@drawable/ic_launcher"
        android:label="@string/app_name" >
        <activity
            android:label="@string/app_name"
            android:name=".FilesActivity" >
            <intent-filter >
                <action android:name="android.intent.action.MAIN" />

                <category android:name="android.intent.category.LAUNCHER" />
            </intent-filter>
        </activity>
    </application>

</manifest>
If you run the preceding modified code, you will see the text file created in the /mnt/sdcard/MyFiles/ folder (see Figure 6-12).
Choosing the Best Storage Option
The previous sections described three main ways to save data in your Android applications: the SharedPreferences object, internal storage, and external storage. Which one should you use in your applications? Here are some guidelines:
- If you have data that can be represented using name/value pairs, then use the SharedPreferences object. For example, if you want to store user preference data such as user name, background color, date of birth, or last login date, then the SharedPreferences object is the ideal way to store this data. Moreover, you don’t really have to do much to store data this way; just use the SharedPreferences object to store and retrieve it.
- If you need to store ad-hoc data, then using the internal storage is a good option. For example, your application (such as an RSS reader) may need to download images from the web for display. In this scenario, saving the images to internal storage is a good solution. You may also need to persist data created by the user, such as when you have a note-taking application that enables users to take notes and save them for later use. In both of these scenarios, using the internal storage is a good choice.
- There are times when you need to share your application data with other users. For example, you may create an Android application that logs the coordinates of the locations that a user has been to, and you want to share all this data with other users. In this scenario, you can store your files on the SD card of the device so that users can easily transfer the data to other devices (and computers) for use later.
Using Static Resources
Besides creating and using files dynamically during runtime, it is also possible to add files to your package during design time so that you can use it during runtime. For example, you may want to bundle some help files with your package so that you can display some help messages when users need them. In this case, you can add the files to your package’s res/raw folder (you need to create this folder yourself). Figure 6-13 shows the res/raw folder containing a file named textfile.txt.

To make use of the file in code, use the getResources() method (of the Activity class) to return a Resources object, and then use its openRawResource() method to open the file contained in the res/raw folder:
import java.io.BufferedReader;
import java.io.InputStream;

public class FilesActivity extends Activity {
    EditText textBox;
    static final int READ_BLOCK_SIZE = 100;

    /∗∗ Called when the activity is first created. ∗/
    @Override
    public void onCreate(Bundle savedInstanceState) {
        super.onCreate(savedInstanceState);
        setContentView(R.layout.main);

        textBox = (EditText) findViewById(R.id.txtText1);

        InputStream is = this.getResources().openRawResource(R.raw.textfile);
        BufferedReader br = new BufferedReader(new InputStreamReader(is));
        String str = null;
        try {
            while ((str = br.readLine()) != null) {
                Toast.makeText(getBaseContext(),
                    str, Toast.LENGTH_SHORT).show();
            }
            is.close();
            br.close();
        } catch (IOException e) {
            e.printStackTrace();
        }
    }
The resource ID of the resource stored in the res/raw folder is named after its filename without its extension. For example, if the text file is textfile.txt, then its resource ID is R.raw.textfile.
So far, all the techniques you have seen are useful for saving simple sets of data. For saving relational data, using a database is much more efficient. For example, if you want to store the test results of all the students in a school, it is much more efficient to use a database to represent them because you can use database querying to retrieve the results of specific students. Moreover, using databases enables you to enforce data integrity by specifying the relationships between different sets of data.
Android uses the SQLite database system. The database that you create for an application is only accessible to itself; other applications will not be able to access it.
In this section, you will learn how to programmatically create a SQLite database in your Android application. For Android, the SQLite database that you create programmatically in an application is always stored in the /data/data/<package_name>/databases folder.
Creating the DBAdapter Helper Class
A good practice for dealing with databases is to create a helper class to encapsulate all the complexities of accessing the data so that it is transparent to the calling code. Hence, for this section, you will create a helper class called DBAdapter that creates, opens, closes, and uses a SQLite database.
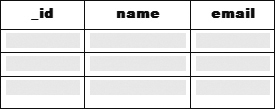
In this example, you are going to create a database named MyDB containing one table named contacts. This table will have three columns: _id, name, and email (see Figure 6-14).
TRY IT OUT: Creating the Database Helper Class
codefile Databases.zip available for download at Wrox.com
1. Using Eclipse, create an Android project and name it Databases.
2. Add a new Java Class file to the package and name it DBAdapter (see Figure 6-15).

3. Add the following statements in bold to the DBAdapter.java file:
package net.learn2develop.Databases;

import android.content.ContentValues;
import android.content.Context;
import android.database.Cursor;
import android.database.SQLException;
import android.database.sqlite.SQLiteDatabase;
import android.database.sqlite.SQLiteOpenHelper;
import android.util.Log;

public class DBAdapter {
    static final String KEY_ROWID = "_id";
    static final String KEY_NAME = "name";
    static final String KEY_EMAIL = "email";
    static final String TAG = "DBAdapter";

    static final String DATABASE_NAME = "MyDB";
    static final String DATABASE_TABLE = "contacts";
    static final int DATABASE_VERSION = 1;

    static final String DATABASE_CREATE =
        "create table contacts (_id integer primary key autoincrement, "
        + "name text not null, email text not null);";

    final Context context;

    DatabaseHelper DBHelper;
    SQLiteDatabase db;

    public DBAdapter(Context ctx)
    {
        this.context = ctx;
        DBHelper = new DatabaseHelper(context);
    }

    private static class DatabaseHelper extends SQLiteOpenHelper
    {
        DatabaseHelper(Context context)
        {
            super(context, DATABASE_NAME, null, DATABASE_VERSION);
        }

        @Override
        public void onCreate(SQLiteDatabase db)
        {
            try {
                db.execSQL(DATABASE_CREATE);
            } catch (SQLException e) {
                e.printStackTrace();
            }
        }

        @Override
        public void onUpgrade(SQLiteDatabase db, int oldVersion, int newVersion)
        {
            Log.w(TAG, "Upgrading database from version " + oldVersion + " to "
                    + newVersion + ", which will destroy all old data");
            db.execSQL("DROP TABLE IF EXISTS contacts");
            onCreate(db);
        }
    }

    //---opens the database---
    public DBAdapter open() throws SQLException
    {
        db = DBHelper.getWritableDatabase();
        return this;
    }

    //---closes the database---
    public void close()
    {
        DBHelper.close();
    }

    //---insert a contact into the database---
    public long insertContact(String name, String email)
    {
        ContentValues initialValues = new ContentValues();
        initialValues.put(KEY_NAME, name);
        initialValues.put(KEY_EMAIL, email);
        return db.insert(DATABASE_TABLE, null, initialValues);
    }

    //---deletes a particular contact---
    public boolean deleteContact(long rowId)
    {
        return db.delete(DATABASE_TABLE, KEY_ROWID + "=" + rowId, null) > 0;
    }

    //---retrieves all the contacts---
    public Cursor getAllContacts()
    {
        return db.query(DATABASE_TABLE, new String[] {KEY_ROWID, KEY_NAME,
                KEY_EMAIL}, null, null, null, null, null);
    }

    //---retrieves a particular contact---
    public Cursor getContact(long rowId) throws SQLException
    {
        Cursor mCursor =
                db.query(true, DATABASE_TABLE, new String[] {KEY_ROWID,
                KEY_NAME, KEY_EMAIL}, KEY_ROWID + "=" + rowId, null,
                null, null, null, null);
        if (mCursor != null) {
            mCursor.moveToFirst();
        }
        return mCursor;
    }

    //---updates a contact---
    public boolean updateContact(long rowId, String name, String email)
    {
        ContentValues args = new ContentValues();
        args.put(KEY_NAME, name);
        args.put(KEY_EMAIL, email);
        return db.update(DATABASE_TABLE, args, KEY_ROWID + "=" + rowId, null) > 0;
    }
}
How It Works
You first defined several constants to contain the various fields for the table that you are going to create in your database:
    static final String KEY_ROWID = "_id";
    static final String KEY_NAME = "name";
    static final String KEY_EMAIL = "email";
    static final String TAG = "DBAdapter";

    static final String DATABASE_NAME = "MyDB";
    static final String DATABASE_TABLE = "contacts";
    static final int DATABASE_VERSION = 1;

    static final String DATABASE_CREATE =
        "create table contacts (_id integer primary key autoincrement, "
        + "name text not null, email text not null);";
In particular, the DATABASE_CREATE constant contains the SQL statement for creating the contacts table within the MyDB database.
Within the DBAdapter class, you also added a private class that extended the SQLiteOpenHelper class, which is a helper class in Android to manage database creation and version management. In particular, you overrode the onCreate() and onUpgrade() methods:
    private static class DatabaseHelper extends SQLiteOpenHelper
    {
        DatabaseHelper(Context context)
        {
            super(context, DATABASE_NAME, null, DATABASE_VERSION);
        }

        @Override
        public void onCreate(SQLiteDatabase db)
        {
            try {
                db.execSQL(DATABASE_CREATE);
            } catch (SQLException e) {
                e.printStackTrace();
            }
        }

        @Override
        public void onUpgrade(SQLiteDatabase db, int oldVersion, int newVersion)
        {
            Log.w(TAG, "Upgrading database from version " + oldVersion + " to "
                    + newVersion + ", which will destroy all old data");
            db.execSQL("DROP TABLE IF EXISTS contacts");
            onCreate(db);
        }
    }
The onCreate() method creates a new database if the required database is not present. The onUpgrade() method is called when the database needs to be upgraded. This is achieved by checking the value defined in the DATABASE_VERSION constant. For this implementation of the onUpgrade() method, you simply drop the table and create it again.
You can then define the various methods for opening and closing the database, as well as the methods for adding/editing/deleting rows in the table:
    //---opens the database---
    public DBAdapter open() throws SQLException
    {
        db = DBHelper.getWritableDatabase();
        return this;
    }

    //---closes the database---
    public void close()
    {
        DBHelper.close();
    }

    //---insert a contact into the database---
    public long insertContact(String name, String email)
    {
        ContentValues initialValues = new ContentValues();
        initialValues.put(KEY_NAME, name);
        initialValues.put(KEY_EMAIL, email);
        return db.insert(DATABASE_TABLE, null, initialValues);
    }

    //---deletes a particular contact---
    public boolean deleteContact(long rowId)
    {
        return db.delete(DATABASE_TABLE, KEY_ROWID + "=" + rowId, null) > 0;
    }

    //---retrieves all the contacts---
    public Cursor getAllContacts()
    {
        return db.query(DATABASE_TABLE, new String[] {KEY_ROWID, KEY_NAME,
                KEY_EMAIL}, null, null, null, null, null);
    }

    //---retrieves a particular contact---
    public Cursor getContact(long rowId) throws SQLException
    {
        Cursor mCursor =
                db.query(true, DATABASE_TABLE, new String[] {KEY_ROWID,
                KEY_NAME, KEY_EMAIL}, KEY_ROWID + "=" + rowId, null,
                null, null, null, null);
        if (mCursor != null) {
            mCursor.moveToFirst();
        }
        return mCursor;
    }

    //---updates a contact---
    public boolean updateContact(long rowId, String name, String email)
    {
        ContentValues args = new ContentValues();
        args.put(KEY_NAME, name);
        args.put(KEY_EMAIL, email);
        return db.update(DATABASE_TABLE, args, KEY_ROWID + "=" + rowId, null) > 0;
    }
Notice that Android uses the Cursor class as a return value for queries. Think of the Cursor as a pointer to the result set from a database query. Using Cursor enables Android to more efficiently manage rows and columns as needed.
You use a ContentValues object to store name/value pairs. Its put() method enables you to insert keys with values of different data types.
To create a database in your application using the DBAdapter class, you create an instance of the DBAdapter class:
    public DBAdapter(Context ctx)
    {
        this.context = ctx;
        DBHelper = new DatabaseHelper(context);
    }
The constructor of the DBAdapter class will then create an instance of the DatabaseHelper class to create a new database:
DatabaseHelper(Context context)
        {
            super(context, DATABASE_NAME, null, DATABASE_VERSION);
        }
Using the Database Programmatically
With the DBAdapter helper class created, you are now ready to use the database. In the following sections, you will learn how to perform the regular CRUD (create, read, update and delete) operations commonly associated with databases.
Adding Contacts
The following Try It Out demonstrates how you can add a contact to the table.
TRY IT OUT: Adding Contacts to a Table
codefile Databases.zip available for download at Wrox.com
1. Using the same project created earlier, add the following statements in bold to the DatabasesActivity.java file:
package net.learn2develop.Databases;

import android.app.Activity;
import android.os.Bundle;

public class DatabasesActivity extends Activity {
    /∗∗ Called when the activity is first created. ∗/
    @Override
    public void onCreate(Bundle savedInstanceState) {
        super.onCreate(savedInstanceState);
        setContentView(R.layout.main);

        DBAdapter db = new DBAdapter(this);

        //---add a contact---
        db.open();
        long id = db.insertContact("Wei-Meng Lee", "[email protected]");
        id = db.insertContact("Mary Jackson", "[email protected]");
        db.close();
    }
}
2. Press F11 to debug the application on the Android emulator.
How It Works
In this example, you first created an instance of the DBAdapter class:
DBAdapter db = new DBAdapter(this);
The insertContact() method returns the ID of the inserted row. If an error occurs during the operation, it returns -1.
If you examine the file system of the Android device/emulator using DDMS, you can see that the MyDB database is created under the databases folder (see Figure 6-16).

Retrieving All the Contacts
To retrieve all the contacts in the contacts table, use the getAllContacts() method of the DBAdapter class, as the following Try It Out shows.
TRY IT OUT: Retrieving All Contacts from a Table
codefile Databases.zip available for download at Wrox.com
1. Using the same project created earlier, add the following statements in bold to the DatabasesActivity.java file:
package net.learn2develop.Databases;

import android.app.Activity;
import android.database.Cursor;
import android.os.Bundle;
import android.widget.Toast;

public class DatabasesActivity extends Activity {
    /∗∗ Called when the activity is first created. ∗/
    @Override
    public void onCreate(Bundle savedInstanceState) {
        super.onCreate(savedInstanceState);
        setContentView(R.layout.main);

        DBAdapter db = new DBAdapter(this);

        /∗
        //---add a contact---
        db.open();
        ...
        db.close();
        ∗/

        //---get all contacts---
        db.open();
        Cursor c = db.getAllContacts();
        if (c.moveToFirst())
        {
            do {
                DisplayContact(c);
            } while (c.moveToNext());
        }
        db.close();
    }

    public void DisplayContact(Cursor c)
    {
        Toast.makeText(this,
                "id: " + c.getString(0) + "n" +
                "Name: " + c.getString(1) + "n" +
                "Email:  " + c.getString(2),
                Toast.LENGTH_LONG).show();
    }
}
2. Press F11 to debug the application on the Android emulator. Figure 6-17 shows the Toast class displaying the contacts retrieved from the database.

How It Works
The getAllContacts() method of the DBAdapter class retrieves all the contacts stored in the database. The result is returned as a Cursor object. To display all the contacts, you first need to call the moveToFirst() method of the Cursor object. If it succeeds (which means at least one row is available), then you display the details of the contact using the DisplayContact() method. To move to the next contact, call the moveToNext() method of the Cursor object.
Retrieving a Single Contact
To retrieve a single contact using its ID, call the getContact() method of the DBAdapter class, as the following Try It Out shows.
TRY IT OUT: Retrieving a Contact from a Table
codefile Databases.zip available for download at Wrox.com
1. Using the same project created earlier, add the following statements in bold to the DatabasesActivity.java file:
    @Override
    public void onCreate(Bundle savedInstanceState) {
        super.onCreate(savedInstanceState);
        setContentView(R.layout.main);

        DBAdapter db = new DBAdapter(this);

        /∗
        //---add a contact---
        ...
        //--get all contacts---
        ...
        db.close();
        ∗/

        //---get a contact---
        db.open();
        Cursor c = db.getContact(2);
        if (c.moveToFirst())
            DisplayContact(c);
        else
            Toast.makeText(this, "No contact found", Toast.LENGTH_LONG).show();
        db.close();
    }
2. Press F11 to debug the application on the Android emulator. The details of the second contact will be displayed using the Toast class.
How It Works
The getContact() method of the DBAdapter class retrieves a single contact using its ID. You passed in the ID of the contact; in this case, you passed in an ID of 2 to indicate that you want to retrieve the second contact:
Cursor c = db.getContact(2);
The result is returned as a Cursor object. If a row is returned, you display the details of the contact using the DisplayContact() method; otherwise, you display a message using the Toast class.
Updating a Contact
To update a particular contact, call the updateContact() method in the DBAdapter class by passing the ID of the contact you want to update, as the following Try It Out shows.
TRY IT OUT: Updating a Contact in a Table
codefile Databases.zip available for download at Wrox.com
1. Using the same project created earlier, add the following statements in bold to the DatabasesActivity.java file:
    @Override
    public void onCreate(Bundle savedInstanceState) {
        super.onCreate(savedInstanceState);
        setContentView(R.layout.main);

        DBAdapter db = new DBAdapter(this);

        /∗
        //---add a contact---
        ...
        //--get all contacts---
        ...
        //---get a contact---
        ...
        db.close();
        ∗/

        //---update contact---
        db.open();
        if (db.updateContact(1, "Wei-Meng Lee", "[email protected]"))
            Toast.makeText(this, "Update successful.", Toast.LENGTH_LONG).show();
        else
            Toast.makeText(this, "Update failed.", Toast.LENGTH_LONG).show();
        db.close();
    }
2. Press F11 to debug the application on the Android emulator. A message will be displayed if the update is successful.
How It Works
The updateContact() method in the DBAdapter class updates a contact’s details by using the ID of the contact you want to update. It returns a Boolean value, indicating whether the update was successful.
Deleting a Contact
To delete a contact, use the deleteContact() method in the DBAdapter class by passing the ID of the contact you want to update, as the following Try It Out shows.
TRY IT OUT: Deleting a Contact from a Table
codefile Databases.zip available for download at Wrox.com
1. Using the same project created earlier, add the following statements in bold to the DatabasesActivity.java file:
    @Override
    public void onCreate(Bundle savedInstanceState) {
        super.onCreate(savedInstanceState);
        setContentView(R.layout.main);

        DBAdapter db = new DBAdapter(this);

        /∗
        //---add a contact---
        ...
        //--get all contacts---
        ...
        //---get a contact---
        ...
        //---update contact---
        ...
        db.close();
        ∗/

        //---delete a contact---
        db.open();
        if (db.deleteContact(1))
            Toast.makeText(this, "Delete successful.", Toast.LENGTH_LONG).show();
        else
            Toast.makeText(this, "Delete failed.", Toast.LENGTH_LONG).show();
        db.close();
    }
2. Press F11 to debug the application on the Android emulator. A message is displayed if the deletion was successful.
How It Works
The deleteContact() method in the DBAdapter class deletes a contact using the ID of the contact you want to delete. It returns a Boolean value, indicating whether the deletion was successful.
Upgrading the Database
Sometimes, after creating and using the database, you may need to add additional tables, change the schema of the database, or add columns to your tables. In this case, you need to migrate your existing data from the old database to a newer one.
To upgrade the database, change the DATABASE_VERSION constant to a value higher than the previous one. For example, if its previous value was 1, change it to 2:
public class DBAdapter {
    static final String KEY_ROWID = "_id";
    static final String KEY_NAME = "name";
    static final String KEY_EMAIL = "email";
    static final String TAG = "DBAdapter";

    static final String DATABASE_NAME = "MyDB";
    static final String DATABASE_TABLE = "contacts";
    static final int DATABASE_VERSION = 2;
NOTE Before you run this example, be sure to comment out the block of delete statements described in the previous section. If not, the deletion will fail as the table in the database will be dropped (deleted).
When you run the application one more time, you will see the following message in the LogCat window of Eclipse:
DBAdapter(8705): Upgrading database from version 1 to 2, which
will destroy all old data
In this example, for simplicity you simply drop the existing table and create a new one. In real life, you usually back up your existing table and then copy it over to the new table.
Pre-Creating the Database
In real-life applications, sometimes it would be more efficient to pre-create the database at design time rather than runtime. For example, you want to create an application to log the coordinates of all the places that you have been to. In this case, it is much easier to pre-create the database during the design time and simply use it during runtime.
To pre-create a SQLite database, you can use many of the free tools available on the Internet. One such tool is the SQLite Database Browser, which is available free for different platforms (http://sourceforge.net/projects/sqlitebrowser/).
Once you have installed the SQLite Database Browser, you can create a database visually. Figure 6-18 shows that I have created a contacts table with the fields indicated.

Populating the table with rows is also straightforward. Figure 6-19 shows how you can fill the table with data using the Browse Data tab.

With the database created at design time, the next thing you should do is bundle it together with your application so that you can use it in your application. The following Try It Out shows you how.
TRY IT OUT: Bundling a Database
1. Using the same project created earlier, drag and drop the SQLite database file that you have created in the previous section into the assets folder in your Android project in Eclipse (see Figure 6-20).

NOTE Note that a filename for files added to the assets folder must be in lowercase letters. As such, a filename such as MyDB is invalid, whereas mydb is fine.
2. Add the following statements in bold to the DatabasesActivity.java file:
package net.learn2develop.Databases;

import java.io.File;
import java.io.FileNotFoundException;
import java.io.FileOutputStream;
import java.io.IOException;
import java.io.InputStream;
import java.io.OutputStream;

import android.app.Activity;
import android.database.Cursor;
import android.os.Bundle;
import android.widget.Toast;

public class DatabasesActivity extends Activity {
    /∗∗ Called when the activity is first created. ∗/
    @Override
    public void onCreate(Bundle savedInstanceState) {
        super.onCreate(savedInstanceState);
        setContentView(R.layout.main);

        DBAdapter db = new DBAdapter(this);
        try {
            String destPath = "/data/data/" + getPackageName() +
                "/databases";
            File f = new File(destPath);
            if (!f.exists()) {
                f.mkdirs();
                f.createNewFile();

                //---copy the db from the assets folder into
                // the databases folder---
                CopyDB(getBaseContext().getAssets().open("mydb"),
                    new FileOutputStream(destPath + "/MyDB"));
            }
        } catch (FileNotFoundException e) {
            e.printStackTrace();
        } catch (IOException e) {
            e.printStackTrace();
        }

        //---get all contacts---
        db.open();
        Cursor c = db.getAllContacts();
        if (c.moveToFirst())
        {
            do {
                DisplayContact(c);
            } while (c.moveToNext());
        }
        db.close();
    }

    public void CopyDB(InputStream inputStream,
    OutputStream outputStream) throws IOException {
        //---copy 1K bytes at a time---
        byte[] buffer = new byte[1024];
        int length;
        while ((length = inputStream.read(buffer)) > 0) {
            outputStream.write(buffer, 0, length);
        }
        inputStream.close();
        outputStream.close();
    }

    public void DisplayContact(Cursor c)
    {
        Toast.makeText(this,
                "id: " + c.getString(0) + "n" +
                "Name: " + c.getString(1) + "n" +
                "Email:  " + c.getString(2),
                Toast.LENGTH_LONG).show();
    }
}
3. Press F11 to debug the application on the Android emulator. When the application runs, it will copy the mydb database file into the /data/data/net.learn2develop.Databases/databases/ folder with the name MyDB.
How It Works
You first defined the CopyDB() method to copy the database file from one location to another:
    public void CopyDB(InputStream inputStream,
    OutputStream outputStream) throws IOException {
        //---copy 1K bytes at a time---
        byte[] buffer = new byte[1024];
        int length;
        while ((length = inputStream.read(buffer)) > 0) {
            outputStream.write(buffer, 0, length);
        }
        inputStream.close();
        outputStream.close();
    }
Note that in this case you used the InputStream object to read from the source file, and then wrote it to the destination file using the OutputStream object.
When the activity is created, you copy the database file located in the assets folder into the /data/data/net.learn2develop.Databases/databases/ folder on the Android device (or emulator):
try {
            String destPath = "/data/data/" + getPackageName() +
                "/databases";
            File f = new File(destPath);
            if (!f.exists()) {
                f.mkdirs();
                f.createNewFile();

                //---copy the db from the assets folder into
                // the databases folder---
                CopyDB(getBaseContext().getAssets().open("mydb"),
                    new FileOutputStream(destPath + "/MyDB"));
            }
        } catch (FileNotFoundException e) {
            e.printStackTrace();
        } catch (IOException e) {
            e.printStackTrace();
        }
You copy the database file only if it does not exist in the destination folder. If you don’t perform this check, every time the activity is created you will overwrite the database file with the one in the assets folder. This may not be desirable, as your application may make changes to the database file during runtime, and this will overwrite all the changes you have made so far.
To ensure that the database file is indeed copied, be sure to delete the database file in your emulator (if it already existed) prior to testing the application. You can delete the database using DDMS (see Figure 6-21).

In this chapter, you learned the different ways to save persistent data to your Android device. For simple unstructured data, using the SharedPreferences object is the ideal solution. If you need to store bulk data, then consider using the traditional file system. Finally, for structured data, it is more efficient to store it in a relational database management system. For this, Android provides the SQLite database, which you can access easily using the APIs exposed.
Note that for the SharedPreferences object and the SQLite database, the data is accessible only by the application that creates it. In other words, it is not shareable. If you need to share data among different applications, you need to create a content provider. Content providers are discussed in more detail in the next chapter.
EXERCISES
1. How do you display the preferences of your application using an activity?
2. Name the method that enables you to obtain the path of the external storage of an Android device.
3. What is the permission you need to declare when writing files to external storage?
Answers to the exercises can be found in Appendix C.
• WHAT YOU LEARNED IN THIS CHAPTER
| TOPIC | KEY CONCEPTS |
| Saving simple user data | Use the SharedPreferences object. |
| Sharing data among activities in the same application | Use the getSharedPreferences() method. |
| Saving to a file | Use the FileOutputStream and OutputStreamReader classes. |
| Reading from a file | Use the FileInputStream and InputStreamReader classes. |
| Saving to external storage | Use the getExternalStorageDirectory() method to return the path to the external storage. |
| Accessing files in the res/raw folder | Use the openRawResource() method in the Resources object (obtained via the getResources() method). |
| Creating a database helper class | Extend the SQLiteOpenHelper class. |