
Chapter 9. Determining Locations and Using Maps
One of the chief benefits of building any mobile application is the ability to provide location-aware data to users. Android is no exception. Taking advantage of your user’s location to help them make informed decisions should always be in the back of your mind. There is, however, a little to know about the basics of determining and using the device’s location. I will show you a few tricks for speedy acquisition and then quickly show you how to display Android’s built-in Google Maps view.
Location Basics
All location information on Android’s systems is reached through Android’s LocationManager class. There is, as you might have guessed, a permission requirement before you can access the user’s location field.
Mother May I?
If you want to get the location of a user’s device, you’ll need to add the location permission to your manifest. Depending on the level of location data you want to acquire, you’ll need to declare one of the following permissions:
<uses-permission
android:name="android.permission.ACCESS_COARSE_LOCATION"/>
<uses-permission
android:name="android.permission.ACCESS_FINE_LOCATION" />
The <uses-permission> tag should be declared inside the manifest but outside the <application> section.
Be Careful What You Ask For
Some users, bless their paranoid cotton socks, pay very close attention to the permissions you request in your manifest (each permission generates a warning when the app is purchased or downloaded from Google Play). Several high-profile applications have been hit by negative reviews and user outrage for adding a location permission that didn’t make sense. If you’re going to use the location services on the device, make sure it’s for the direct benefit of your users. Do otherwise, and your users will find out. Further, it’s always a good idea to have a webpage that explains each permission you use. Those who care about it will find their way to it—and if they’re informed, they will be less likely to complain.
Finding a Good Supplier
Your first step in using the location service, after you’ve added the permission of course, is finding a good supplier. Each device could have several different location services beyond the time- and power-consuming GPS system. Android allows you to specify criteria for the eventual provider you’ll use. You do this by building a list of features you’d like and then asking Android for the one that best suits your needs. Here’s a rather idealistic example I’ve put together using the getBestProvider method:
public static String getBestProvider(LocationManager locationManager){
Criteria criteria = new Criteria();
criteria.setAccuracy(Criteria.ACCURACY_COARSE);
criteria.setPowerRequirement(Criteria.POWER_LOW);
criteria.setCostAllowed(false);
return locationManager.getBestProvider(criteria, true);
}
Before calling the getBestProvider method, you’ll need to obtain a LocationManager object, which you can do with the following code:
LocationManager mLocationManager;
@Override
public void onCreate(Bundle savedInstanceState) {
super.onCreate(savedInstanceState);
setContentView(R.layout.activity_main);
mLocationManager = (LocationManager)
getSystemService(Context.LOCATION_SERVICE);
}
Typically, I’ll stash this reference away somewhere so I never have to find it again.
Getting the Goods
Once you’ve received the string ID for your ideal provider, you can register and start receiving location updates from the provider. Here’s the code to register for updates using the getBestProvider function that we wrote earlier:
@Override
public void onCreate(Bundle savedInstanceState) {
super.onCreate(savedInstanceState);
setContentView(R.layout.activity_main);
mLocationManager = (LocationManager)
getSystemService(Context.LOCATION_SERVICE);
String provider = getBestProvider(mLocationManager);
mLocationManager.requestLocationUpdates(
provider, 60000, 100, this);
}
Calling this requestLocationUpdates method will result in the onLocationChanged method being invoked every time the user’s location is changed according to the criteria you set. Along with the provider string, you’ll need to tell the system the minimum time between updates (in my case, 60 seconds—the documentation suggests not having it poll any faster than that), the minimum distance between intervals (in my case, 1000 meters), and the object that implements the LocationListener interface you want to receive callbacks. Here are the methods you’re required to override:
public void onLocationChanged(final Location location) {}
@Override
public void onProviderDisabled(String provider) {}
@Override
public void onProviderEnabled(String provider) {}
@Override
public void onStatusChanged(String provider, int status, Bundle extras) {}
The method I’m most interested in, in this case, is the onLocationChanged method. It will pass me that all-important location object. With that data, I can then call getLatitude and getLongitude. And with that, I know—with as much accuracy as possible—where in the world the device is.
Further, the LocationManager object contains an important static helper method named distanceBetween, which will calculate the distance between geographic points. I point out this helper because I find myself using it all the time.
The Sneaky Shortcut
It can sometimes take many seconds for the location manager to spit out a user’s location. There’s a solution you can take advantage of to at least display an old value while the real location is being determined. You can, either before or after registering your listener, call getLastKnownLocation on your location manager using the provider you want.
mLocationManager.getLastKnownLocation(provider);
This can provide some interesting results (especially if the device has spent a long time aloft in an airplane without an Internet connection), but it can often give the user something to look at or laugh at while you find their real location. To use this trick, you must define the android.permission.ACCESS_FINE_LOCATION permission.
That’s It!
As much as I would like to say that this is an incredibly complex operation, it’s about as hard as tying your shoelaces. Given what you’ve been through up to this point, getting the location from the LocationManager should be a cakewalk. That said, I had my fair share of issues in writing the code for this chapter. If you are stumped, check the documentation and press on!
Show Me the Map!
Determining your user’s location is one thing, but actually putting those two indecipherable numbers (longitude and latitude) into context is where software gets a little more complex. Interestingly enough, the configuration needed to get a map onscreen is far more complex than the code to manipulate it. If you want to follow along, go ahead and create a new Android project.
Before We Get Started
The Google Maps SDK gives us a component named MapFragment. Even though we haven’t covered fragments before, I’m confident that you can handle it! I am going to cover fragments in depth in the next chapter, so now is a great time to briefly see them in action before you learn exactly how they work.
Getting the Library
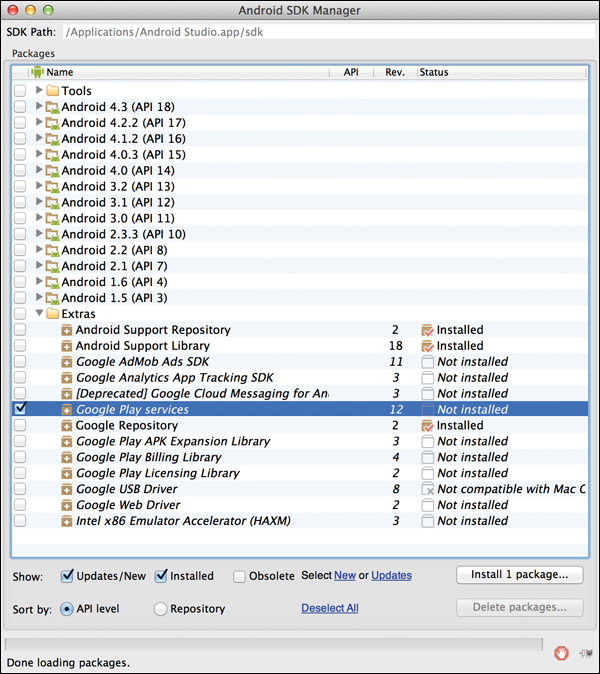
The MapFragment component is available only in the Google Play Services API, which is a superset of the Android SDK. To use these APIs, you’ll need to download the Play Services library using the SDK manager (the same way you got the Ice Cream Sandwich and Gingerbread SDKs back in Chapter 1). Figure 9.1 shows what SDK manager options you’ll want to download.
If you haven’t done so already, also grab the Android Support Repository, the Android Support Library, and the Google Repository. Your IDE will use these pieces for the rest of the projects covered in this book, so it’s a good idea to grab them now.
Our IDEs are going to slightly diverge in the setup for this project, but the code will ultimately be the same.
Eclipse
Create a new project in Eclipse. After it’s created, right-click the project and select Properties. In the Properties dialog, look for Android on the left. In the Android menu, select the Google API that corresponds with the version of Android you’re targeting. To make it easy, select the Google APIs for 4.3. Figure 9.2 shows what your settings should look like.

Android Studio
Android Studio is a little more complicated, but also a little more exciting. This will be our first foray into adding a property to the Gradle build file. I won’t go into all the details of the contents of the build file yet; I’ll cover that in depth in Chapter 13.
Open your project’s inner Gradle file. In the example code, this is located in MapsDemoProject/MapsDemo/build.gradle; in your code it should be in the same location.
In this file, look for two sections called dependencies. In the second dependencies section, add the following highlighted line:
dependencies {
compile 'com.android.support:appcompat-v7:18.0.0'
compile 'com.google.android.gms:play-services:3.2.25'
}
Now that the Gradle file has a new dependency, sync the Gradle file with your project by selecting Tools > Android > Sync Project with Gradle Files. Then rebuild by selecting Build > Rebuild.
That’s it! The libraries are now added to your project.
Once you’ve set up your SDK values correctly, there are a few things in the manifest I need to talk with you about.
Adding to the Manifest
There are a few critical things that, through the manifest, you need to tell the system.
<manifest> <!--Rest of the manifest omitted here for brevity.-->
...
<uses-permission android:name="com.google.android.providers.gsf.permission. READ_GSERVICES">
<uses-permission android:name="android.permission.INTERNET"/>
<uses-permission android:name="android.permission.ACCESS_NETWORK_STATE"/>
<uses-permission android:name="android.permission.WRITE_EXTERNAL_STORAGE"/>
<application>
...
</application>
</manifest>
![]() Even if you can compile, the application will crash unless you explicitly have permission to use Play services.
Even if you can compile, the application will crash unless you explicitly have permission to use Play services.
![]() The
The MapFragment will download its map from the network, so it needs to be able to access the Internet.
![]() The
The MapFragment also needs access to the network state as an optimization to better recover from gaining network connectivity. This, unfortunately, is not optional.
![]() The
The MapFragment needs the ability to write to external storage. All the map tiles that it downloads will be saved into an external storage cache to speed up future requests and cut down on data usage.
Now, with that out of the way, it’s time to start playing with some maps!
Adjusting the Activity
Using the MapFragment is surprisingly simple, and it only requires making a couple of small modifications to your base project. The first is to change your Activity class to a FragmentActivity:
public class MapsExampleProjectActivity extends FragmentActivity {
@Override
public void onCreate(Bundle savedInstanceState) {
super.onCreate(savedInstanceState);
setContentView(R.layout.activity_main);
}
}
A FragmentActivity means that this activity is going to be used to manage fragments—in our case, a MapFragment. Now that you have your Activity class switched over to the FragmentActivity class, you can add the MapFragment to your activity_main.xml layout file.
Creating a MapFragment
This is where Android will draw its map tiles. It basically behaves exactly like any other view, except it is using a fragment tag instead of an ImageView or a TextView.
Here’s what my simple activity_main.xml file looks like right now:
<?xml version="1.0" encoding="utf-8"?>
<RelativeLayout xmlns:android="http://schemas.android.com/apk/res/android"
android:layout_width="match_parent"
android:layout_height="match_parent">
<fragment
android:id="@+id/map_fragment"
class="com.google.android.gms.maps.SupportMapFragment"
android:layout_width="match_parent"
android:layout_height="match_parent" />
</RelativeLayout>
As you can see, I’ve placed my MapFragment as the only thing onscreen. You can actually place it anywhere you want, just as you would position any other view. Further, it doesn’t require, as the ListActivity does, a special reserved Android ID.
You should be able to run your project now—hooray! But there’s one small problem. Everything is gray, and there are no maps (Figure 9.3). We have zoom buttons, but where is the globe? This is what your maps will look like if there was a problem connecting with the Google Maps servers, which most likely is indicative of an error in your API key. Where do you get a maps API key? I’m so glad you asked.

Figure 9.3 Without an API key, your application cannot receive any map data from the Google Maps servers.
Google Maps API Key
Google is nice and all, but it doesn’t just give away map API calls for free. Well, technically it does, since an API key doesn’t cost you any money, but you still need to sign up for one.
Signing up for a map key
Getting a map key isn’t as easy as it could be, but I’m going to give you a few pointers to help you make it through the process.
1. Go to https://code.google.com/apis/console and sign in with your Google account. From there, follow the instructions to create a new API project.
Once you’ve created your new API project, you should see a long list of toggle switches, as in Figure 9.4. About halfway down the list is a toggle for Google Maps Android API v2. That’s the switch you want.

2. Go ahead and turn it on.
3. On the left menu, select the API Access page. At the bottom of the API access page, you will see a section named Simple API Access, and a button right below labeled Create New Android Key. As you can imagine, this is where we are going to get the key!
4. Click the Create New Android Key button and take a look at the dialog. It’s asking for a string of characters that contains the SHA (Secure Hash Algorithm) of your signing key, and the name of your application package. This sounds complicated, but it’s easy.
5. Open a Terminal window, type the following into the command line, and press Enter:
keytool -list -keystore ~/.android/debug.keystore
It should then prompt you for a password. The default debug keystore password is android, but it’s not required, and you can just press Enter and still get the information you need.
What you’re looking for is all the characters printed after Certificate fingerprint (SHA1):.
6. Enter the string that displays into the dialog.
7. After that, append a colon (:) followed by your application’s package name. For the example code, it looks like this:
54:1B:29:89:9A:87:36:43:GG:LL:92:26:5A:42:64:com.peachpit.mapsdemo
(This SHA has been shortened and changed for brevity.)
This will generate an API key that will work specifically while debugging. When you release your application to the market, you will have to do this again for a new key, but we will cover that in Chapter 12.
8. Click OK.
Whew, we did it. Generating API keys is never fun, and it’s always easy to run into trouble. If you have any issues, try checking out https://developers.google.com/maps/documentation/android. There’s lots of great information there that will help you troubleshoot any problems you run into.
Using your Maps API key
The last piece of the puzzle is to put your API key into your application. Open your AndroidManifest file, and make a new entry for the API key metadata within the application tag:
<manifest><!--Rest of the manifest omitted here for brevity.-->
. <application>
<meta-data
android:name="com.google.android.maps.v2.API_KEY"
android:value="Your api key"/>
. </application>
</manifest>
Run, Baby, Run
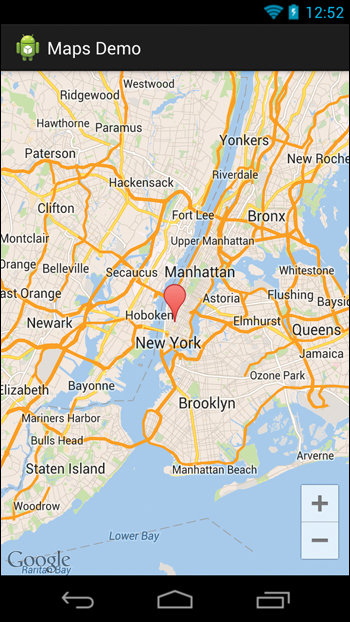
You’ve configured everything, dotted all your i’s, and crossed all your t’s. It’s time to take this map view out for a spin. When it comes time to move and render the map, you’ll primarily be interfacing with CameraUpdates and MarkerOptions. With these two pieces, you can accomplish a lot of amazing things and leverage all the work that Google has already done for you. The simple work for my example is all done in my sample code’s onCreate method:
@Override
protected void onCreate(Bundle savedInstanceState) {
super.onCreate(savedInstanceState);
setContentView(R.layout.activity_main);
SupportMapFragment fragment = (SupportMapFragment)
getSupportFragmentManager().findFragmentById(
R.id.map_fragment);
// A position on the globe
LatLng latLng = new LatLng(40.734641, -73.996181);
// the desired zoom level, in the range of 2.0 to 21.0
// 2.0 being all the way out and 21.0 being all the way in
float zoomLevel = 10.0f;
CameraUpdate cameraUpdate =
CameraUpdateFactory.newLatLngZoom(latLng, zoomLevel);
fragment.getMap().animateCamera(cameraUpdate);
// Marker options are how we can get markers onto the map
MarkerOptions marker = new MarkerOptions();
marker.position(latLng);
fragment.getMap().addMarker(marker);
}
In this code, I’m doing a few important things:
1. Retrieving the MapView from my layout with the inimitable findViewById method.
2. Obtaining a reference to my MapFragment.
3. Creating a new LatLng on which to center the map.
4. Panning and zooming the camera to the desired location.
5. Dropping a marker on the location that we are moving toward.
The location listed in the example happens to be New York City (where I’m currently writing this book), and I’ve set the zoom level high enough that you can almost see my house—all right, maybe not! Figure 9.5 shows what all your hard work thus far has yielded.
Wrapping Up
In this chapter, I showed you the very basics for finding a device’s location and displaying a map onscreen. As always, be very careful what kind of location services you use, especially while the user is not in your application. Nothing will drain a user’s battery faster—and make them angrier—than heavy locational lookups in the background. If you’re planning a very location-heavy application, be sure to do lots of battery-draw testing before you release it. Your users and your application’s ratings will be much happier for it.