
![]()
From Start to Finish: A Complete App Example
Now that we have run through the core Backbone concepts, it’s time to put everything together to create a fully functional app. This chapter will bring you through the various stages required to build an application powered by Backbone, starting at the design stages and resulting in a high-quality Twitter application. We will also introduce a more structured way of writing your application code, rather than simply inserting it between <script> tags as we have done in the previous chapters.
Before diving into the code, it’s important to take a step back and identify the core functionality of the application. This allows a more structured approach to JavaScript development. Understanding the data that is being represented will inform your decisions on defining a model. Knowing which parts of the screen need to be dynamically updated, for instance, informs what views going to be required.
Our example is a Twitter-based application that will show an overview of the authenticated user’s account, including the following:
- Recent tweets in the user’s timeline
- The number of followers and following
- The ability to search Twitter
The wireframe diagram in Figure 6-1 identifies the main views that will be present.

Figure 6-1. A simple wireframe illustrating main views
As you can see from Figure 6-1, there is one main view for the application, along with a number of subviews. It’s clear that on the main page there are at least three separate view parts.
- The timeline
- The user profile data
- The search view
Although the search box is static, the functionality behind it will require building a view for the results and possibly using a router to make the search bookmarkable.
CSS Styles
To save myself from needing to work with CSS to style the application, I used the MetroUI CSS library (http://metroui.org.ua/), which gives a sharp Windows 8 look to the app. However, you can use your own custom style or another UI library such as Bootstrap (https://github.com/twbs/bootstrap).
Application Domain
I chose Twitter as the example domain for this application so that we could avoid worrying too much about the back-end service and hook into an existing API easily. The principles illustrated through this chapter hold true for any application, so don’t let the focus on Twitter distract you. The main thing is to understand the interactions between views, collections, models, and routers.
Defining a clean structure to your application at the outset is essential for any nontrivial Backbone project. While it’s obviously good to keep your HTML, JavaScript, and CSS in separate directories, it’s also worth splitting the groups of Backbone object types. This means you would have the following type of structure for your application JavaScript, within the js/app directory.
app.js
view/
model/
collection/
router/
util/
The app.js file acts as the main entry point for the application, and the folders act as a type of package structure for the rest of your project. If you have developed in other languages such as Java or C#, this approach to structuring your code will be familiar.
Each of the objects within these folders should also be namespaced to make the code more readable and to avoid naming conflicts. For example, the TimelineView that we will create later in this chapter defines the following namespace:
var com = com || {};
com.apress = com.apress || {};
com.apress.view = com.apress.view || {};

com.apress.view.TimelineView = Backbone.View.extend({
This means when we create a new instance of the TimelineView, we can use the following code:
var timelineView = new com.apress.view.TimelineView();
As the main entry point of the application, app.js is responsible for creating the initial state of the application. Typically this will involve creating a number of views, creating a router, and starting the Backbone history.
Everything will need to be loaded in the page before the code in app.js is executed, so you will usually put the code in a block, such as jQuery’s $(function(){ });. This is illustrated in the following code snippet:
$(function() {
         var timelineView = new com.apress.view.TimelineView(),
          router = new com.apress.router.AppRouter();
      Backbone.history.start();
});
External Dependencies
This project will have a number of external dependencies. As we’ve already seen, to use Backbone we’ll be including Backbone.js, Underscore.js, and jQuery. You can also choose a templating library if you want. I usually choose Handlebars for my applications because I find the expressiveness and extensibility to be the most useful. All these external libraries are placed in the js/external directory of the application.
On the styling side, the application will also utilize modern.css from the MetroUI project. This will be included in the css directory.
Figure 6-2 shows the folder structure of the application.

Figure 6-2. The structure of a typical Backbone application
Bringing It All Together
Your main HTML page will be responsible for bringing it all together, by including the stylesheets, templates, and external JavaScript libraries.
The following code shows how the code in your index page might look. You’ll notice that each of the JavaScript artifacts are included individually. Later we’ll look at how all these files can be merged to create one script to include. However, you’ll find it’s a lot easier to debug your code by including the files in their uncompressed form.
<html>
<head>
    <title>Beginning Backbone Twitter Example</title>
     <link rel='stylesheet' href='css/modern.css'>
     <link rel="stylesheet" href="css/style.css">
     <!-- any other CSS here-->
</head>
<body class='metrouicss'>
<!-- HTML content and div placeholders-->
<div id='timeline' class='timeline-view'>
     <h2>My Tweets</h2>
</div>

<!-- Handlebars templates -->
<script type="text/x-handlebars-template" id="timeline-template">
 <ul class='listview'>
        {{#each tweet}}
        <li>
          <div class='icon'>
                  <img src='{{user.profile_image_url}}'></img>
          </div>
            <div class='data'>
                <h4>{{user.name}}</h4>

                <p>{{text}}</p>
            </div>
        </li>
        {{/each}}
    </ul>
 </script>

<!-- External library Includes -->
<script src="js/external/jquery-1.10.2.js"></script>
<script src="js/external/underscore.js"></script>
<script src="js/external/backbone.js"></script>
<script src="js/external/handlebars.js"></script>

<!-- Model -->
<script src="js/app/model/Tweet.js"></script>
...
<!-- Collections -->
<script src="js/app/collection/Timeline.js"></script>
.....
<!-- View -->
<script src="js/app/view/TimelineView.js"></script>
.....

<!-- Router -->
<script src="js/app/router/AppRouter.js"></script>
.....

<!-- The 'main' for this app -->
<script src="js/app/app.js"></script>
</body>
</html>
First Steps: Dealing with Authentication
When dealing with any API, it’s likely that you’ll have to be able to cope with some security requirements, such as authorization on connection. This section will help you get started with authentication for clients using the Twitter API.
Before we can have our app utilize the Twitter API, we need to do a little work on https://dev.twitter.com/apps and set up authorization for our client.
![]() Note For simplicity, our app will use application-level authentication, meaning that the developer account you run the following steps with will be seen as the current user when using the Twitter API. This means we don’t need to worry about having a login flow in our client-side application.
Note For simplicity, our app will use application-level authentication, meaning that the developer account you run the following steps with will be seen as the current user when using the Twitter API. This means we don’t need to worry about having a login flow in our client-side application.
Assuming that you already have a Twitter account, simply sign in and click the Create New Application button to start defining the details for your app. On the first page, you will just need to fill out some straightforward details about the application. Make sure you set up the application to use Read, Write, and Direct Messages permissions.
The next page (shown in Figure 6-3) is where you will provide the most important details for your application: the consumer key and the consumer secret.

Figure 6-3. OAuth settings from the Twitter application
Figure 6-3 has the consumer secret blocked out because this should be kept secret. Just as I have been careful to hide the secret key in this image, you should keep it secret in your JavaScript. Anyone can view the source of a web page, so you should never have the key included in JavaScript. By selecting the “OAuth tool” tab, you’ll get access to all four keys that are required for your client application to connect.
For this application, we will have an intermediate node server running that will accept all calls from the client-side application and forward these requests to Twitter. This ensures that the secret key is stored on the server side. Figure 6-4 illustrates this pipeline.

Figure 6-4. Illustration of the role of the node.js server
The node.js server source will be similar to that which we created in previous chapters. However, to make dealing with the Twitter API more straightforward, I utilized Tolga Tezel’s node package for Twitter (https://github.com/ttezel/twit). You can install the package simply by using npm install twit.
You’ll need to include this library in your project using the require() function and then follow the authentication steps as listed next in the connectToTwitter() function.
var Twit = require('twit')
var client = null;

function connectToTwitter(){
   client = new Twit({
        consumer_key:         '<your consumer key>',
        consumer_secret:      '<your consumer secret>',
        access_token:         '<your access token>',
        access_token_secret:  '<your access token secret>'
  });
}
//get the app to connect to twitter.
connectToTwitter();
Once this code has executed, the twitterClient object will be set up to interact with the full Twitter API. For completeness, here is the full source code for server.js so far, without any handlers added for client GET and POST methods:
/**
 * A simple API hosted under localhost:8080/books
 */
var express = require('express'),
var app = express();

var Twit = require('twit')

var client = null;

function connectToTwitter(){
   client = new Twit({
        consumer_key:         '<your consumer key>',
        consumer_secret:      '<your consumer secret>',
        access_token:         '<your access token>',
        access_token_secret:  '<your access token secret>'

});
}
//get the app to connect to twitter.
connectToTwitter();

//additional setup to allow CORS requests
var allowCrossDomain = function(req, response, next) {
    response.header('Access-Control-Allow-Origin', "http://localhost");
    response.header('Access-Control-Allow-Methods', 'OPTIONS, GET,PUT,POST,DELETE'),
    response.header('Access-Control-Allow-Headers', 'Content-Type'),

    if ('OPTIONS' == req.method) {
      response.send(200);
    }
    else {
      next();
    }
};

app.configure(function() {
    app.use(allowCrossDomain);
  //Parses the JSON object given in the body request
    app.use(express.bodyParser());
});

//start up the app on port 8080
app.listen(8080);
We can now begin to build extra functionality on the server for the client application to hook into.
Showing the Twitter Timeline
The first thing we’ll do is create a simple model and view that will allow us to see the Twitter timeline for the current user.
For a start, we’ll need to set up an end point on our node.js server to respond to the timeline request. This will utilize the Twitter library to retrieve a number of “tweet objects.” The following code should be placed in server.js for the node server:
/**
 * Returns the twitter timeline for the current user
 **/
app.get('/timeline', function (request, response) {

    response.header('Access-Control-Allow-Origin', '*'),
     client.get('statuses/home_timeline', { },  function (err, reply) {
      if(err){
response.send(404);
      }
      if(reply){
        response.json(reply);
      }
  });
    });
Let’s focus on the model and collection that will be used to access the timeline information from our server. The model doesn’t need to have any default attributes set because they will all come from the Twitter API response. This results in the simplest possible model class for now, although it is likely that more detail will be added to this as we progress. The following code should be placed in Tweet.js under the model directory:
var com = com || {};
com.apress = com.apress || {};
com.apress.model = com.apress.model || {};

com.apress.model.Tweet = Backbone.Model.extend({

});
The collection will deal with connection to the server, retrieving a list of tweets, each of which will be represented by a Tweet object. The following code should be placed in Timeline.js in the collection directory:
var com = com || {};
com.apress = com.apress || {};
com.apress.collection = com.apress.collection || {};

com.apress.collection.Timeline = Backbone.Collection.extend({

    //the model that this collection uses
    model: com.apress.model.Tweet,
    //the server side url to connect to for the collection
    url: 'http://localhost:8080/timeline',

    initialize: function(options){
        //anything to be defined on construction goes here
    },
});
The key parts of the collection are the model attribute, which states which Backbone model object to use within this collection, and the url attribute, which defines which REST service will provide the timeline information.
Before going any further, you can test this collection by creating a new instance of it and invoking the fetch function. For now, the following code can be placed in app.js:
var timeline = new com.apress.collection.Timeline();
timeline.fetch();
If you look at the Network tab in Chrome Developer Tools and observe the XHR requests, you’ll see that the timeline collection invoked the correct service and that the service responded with data.

Figure 6-5. An example of the XHR request invoked from the timeline collection
It’s worth noting the structure of the response in the Preview pane. You will receive an array of entries, and each one of these will be marshaled into the Tweet model. In Figure 6-6 you can see a listing of all the attributes that are returned.
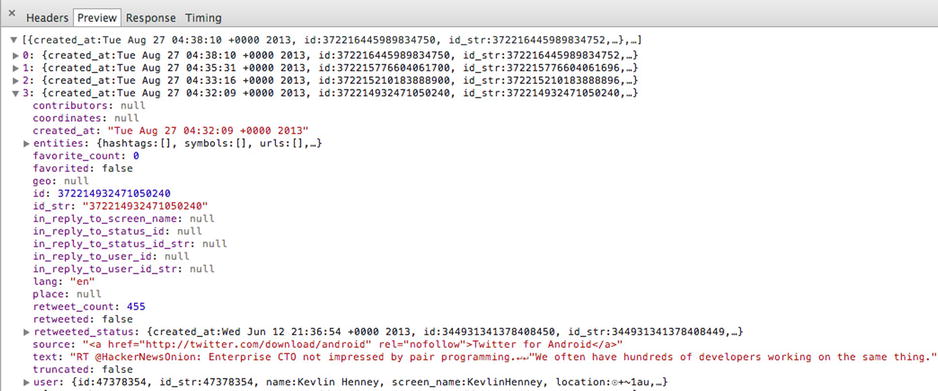
Figure 6-6. The structure of the timeline response
Building a View for the Timeline
With the data layer under control, now it’s time to build a view for this data. We’ll start with getting some of the HTML ready so that we can list all the tweets in our timeline. You will usually create a div for each of your views, and the ID of this div will be used as the el variable in the Backbone view. All the following HTML code should be placed in index.html:
<div id='timeline' class='timeline-view'>
     <h2>My Tweets</h2>
</div>
We’ll also create a Handlebars template for the collection. Rather than having a for loop in our JavaScript code to render each tweet individually, we can utilize Handlebars built-in helpers to iterate through the collection.
<script type="text/x-handlebars-template" id="timeline-template">
 <ul class='listview'>
        {{#each tweet}}
        <li>
          <div class='icon'>
                  <img src='{{user.profile_image_url}}'></img>
            </div>
            <div class='data'>
                <h4>{{user.name}}</h4>

                <p>{{text}}</p>
            </div>
        </li>
        {{/each}}
    </ul>
 </script>
Now we can create a view that deals with the timeline. First we will hook the view in with the items that we have defined in our HTML: the div element for the view and the template that will render the collection data. The following code should be placed in TimelineView.js under the view directory.
var com = com || {};
com.apress = com.apress || {};
com.apress.view = com.apress.view || {};

com.apress.view.TimelineView = Backbone.View.extend({

    el: '#timeline',

    template: Handlebars.compile($("#timeline-template").html()),

    initialize:  function(options){
    },
    render: function(){
    },

});
As we’ve already stated, Backbone is not an opinionated framework, which means you have a few options when using a collection with a view.
- You can initialize the collection inside your view.
- You can initialize the collection in an outer app.js, or even in your router, passing it through to the view as a parameter.
For this example, we’ll actually create the collection within the view’s initialize function. The collection, in this case timeline, is added as a class variable to the view so that it can be shared with different functions.
initialize:  function(options){
    var self = this;

    //create a collection for this view to render
    self.timeline = new com.apress.collection.Timeline();
    //initial render
    self.render();

    //force the fetch to fire a reset event
    self.timeline.fetch({reset:true});

    self.listenTo(self.timeline, 'reset', self.render);
},
The last two lines are critical in this initialize function. We force a fetch operation for the collection and pass through a boolean flag indicating that fetch should trigger a reset event.
The view listens for any changes to the timeline, and when it does change, the render function will be run.
The render function is quite simple; provided there are models present in the timeline collection, they are passed to the template.
render: function(){
    var self = this;
    if(self.timeline.models.length > 0){
        var output = self.template({tweet: self.timeline.toJSON()});

        self.$el.append(output);
    }
    return self;
},
Handlebars iterates through each tweet, {{#each tweet}}, so it’s essential that the JSON passed to the template is named tweet. The complete code listing of this view follows:
var com = com || {};
com.apress = com.apress || {};
com.apress.view = com.apress.view || {};

com.apress.view.TimelineView = Backbone.View.extend({

    el: '#timeline',

    template: Handlebars.compile($("#timeline-template").html()),

    timeline: null,

    initialize:  function(options){
        var self = this;

        //create a collection for this view to render
        self.timeline = new com.apress.collection.Timeline();
        //initial render
        self.render();

        //force the fetch to fire a reset event
        self.timeline.fetch({reset:true});

        self.listenTo(self.timeline, 'reset', self.render);

    },

    render: function(){
        var self = this;
        if(self.timeline.models.length > 0){
            var output = self.template({tweet: self.timeline.toJSON()});

            self.$el.append(output);
        }
        return self;
    },

});
Next we will set up our app.js to simply create this view. Because the view looks after the creation of the collection, there is no need to define it in the view. Also, we have no application routes set up, so we don’t need to worry about the history or any routers yet.
var timelineView = new com.apress.view.TimelineView();
Provided you have included all the JavaScript created to date, navigating to your index.html page will run the entire application, showing output similar to that in Figure 6-7.

Figure 6-7. Result of rendering the Twitter timeline collection with TimelineView
View Improvement: Show Timestamp
Let’s look at how to improve the appearance of each tweet in our application. One thing that would be worth adding is the timestamp of each entry. However, if you look at the model, you’ll see that you get a long, verbose timestamp under the created_at attribute. It would be much nicer to use the same approach as on the Twitter.com web site, where you see how long ago the tweet was created.
To do this, we can use the Moment.js (http://momentjs.com) library, which provides a user-friendly way to parse, manipulate, and format dates. First, you’ll need to download the library and reference it in index.html. In this example, I have downloaded the complete Moment.js library, so it is referred to as moment.js. The default package is actually the minified version.
<script src="js/external/moment.js"></script>
Rather than adding code that will format the data within the JavaScript responsible for rendering, we can add a new attribute to the model when it is being parsed by Backbone on return from the server.
To do this, we’ll extend the Tweet model with a parse function, in Tweet.js.
parse: function(model){

//model.created_at "Wed Aug 28 06:32:07 +0000 2013"
        var friendly = moment(model.created_at, "ddd MMM DD HH:mm:ss ZZ YYYY").fromNow();

        model.friendlyDate = friendly;

        return model;
}
If you inspect the model, you’ll see that the format of the created_at data follows a pattern like Wed Aug 28 06:32:07 +0000 2013. To read this date, you will need to instruct Moment.js on the format, which will be ddd MMM DD HH:mm:ss ZZ YYYY. Once a valid date is created, Moment.js will generate a friendly strong by using its fromNow function, which can be added to the model before the parse function returns.
One important thing to remember: if you are adding a parse implementation to you model, ensure that you always return the model at the end.
View Improvement: Highlight Usernames
Another improvement would be to take any @username sections out of the tweet and make them links to view the user’s profile. As this will be an enhancement to how we display the tweet, rather than a change to the data, it is acceptable to have this code present in the rendering side.
We can do this by adding a helper function to Handlebars. This allows us to have the highlighting as an expression in the template.
First, create a new JavaScript file to contain your helper functions and save it in the util directory. Now, create a new helper in here using the Handlebars.registerHelper function, passing through the name of helper that you will use in the template and the parameter that it will deal with. Don’t forget to include the file that you create for the helpers in your main HTML page. In this case, I have named the file helpers.js under the utils directory.
I found a useful piece of JavaScript code that provides a regular expression for replacing @username parts with links on Simon Whatley’s blog (www.simonwhatley.co.uk/parsing-twitter-usernames-hashtags-and-urls-with-javascript).
Note that once the string is parsed, it needs to be returned as a SafeString. Any time that you add a helper that creates its own HTML, you will probably want to use this type because it will escape the HTML code and make it appear as expected.
$(function() {

    Handlebars.registerHelper('format', function (str) {
        if(str){
            //highlight the @part
            //Thanks
            str = str.replace(/[@]+[A-Za-z0-9-_]+/g,
 function(u) {
                 var username = u.replace("@","");
                 return u.link("http://twitter.com/"+username);
            });
           return new Handlebars.SafeString(str);
        }else{
            return str;
        }

    });

});
Now the template in the HTML page can be extended to deal with this simply by replacing the instance of {{text}} with {{format text}}.
<script type="text/x-handlebars-template" id="timeline-template">
 <ul class='listview'>
        {{#each tweet}}
        <li>
          <div class='icon'>
                  <img src='{{user.profile_image_url}}'></img>
            </div>
            <div class='data'>
                <h4>{{user.name}}</h4>

                <p>{{format text}}</p>
                <p class="timestamp"><i>{{friendlyDate}}</i></p>
            </div>
        </li>
        {{/each}}
    </ul>
 </script>
Adding the Profile View
The timeline is just one view in our overall application. The purpose of this example is to show how a number of views can be put together and interact to provide a better user experience. This section will show how to add more views to the application and how to deal with a single model rather than using a collection.
The profile view will be quite simple. All we want to do is show your own profile details—full name, bio, and the number of followers—from the Twitter API. As we’ll be getting just one entry, there will be no need for a collection in this instance; a model will suffice.
As with the Tweet model, the following should be placed in the model directory and have a namespace prefix of com.apress.model:
var com = com || {};
com.apress = com.apress || {};
com.apress.model = com.apress.model || {};

com.apress.model.Profile = Backbone.Model.extend({

    urlRoot: 'http://localhost:8080/profile',

    parse: function(model){

        return model;
    }

});
There is nothing more that you’ll need to do with this model, as it will just return the data that is retrieved from the end point.
On your node.js server, in server.js, you will need to include a function that responds to the /profile request.
/**
 * Get the account settings for the user with the id provided.
 **/
app.get('/profile', function(request, response){

     response.header('Access-Control-Allow-Origin', '*'),

     client.get('users/show', {screen_name: 'sugrue'},  function (err, reply) {

      if(err){
        console.log('Error: ' + err);
        response.send(404);

      }
      if(reply){
       /// console.log('Reply: ' + reply);
        response.json(reply);
      }

  });
});
To get profile details from the Twitter API, you will need to utilize the users/show API end point and pass a screen name. As we just want to get the details for your own profile, so pass your own Twitter handle here.
The main page will need to be altered to make space for the profile view on the right side. We’ll just use some of the grid CSS rules that are provided by MetroUI to lay out the page in a better manner.
<div id="app" class="grid">
        <div class="row">
            <div class="span8">

                <div id='timeline' class='timeline-view'>
                 <h2>My Tweets</h2>
              </div>
            </div>

            <div class="span4">
                   <div id="profile" class="profile-view">
                     <!-- Profile view here -->
                 </div>
            </div>
        </div>
    </div>
As the timeline is the most essential part of the page, that is given a span of eight columns, while the sidebar that will contain the profile view needs only four columns. We’ll also make a minor change to the template used for timeline details, adding the fluid class to the <ul> list in order to use the extra space in the grid.
<script type="text/x-handlebars-template" id="timeline-template">
 <ul class='listview fluid'>
     .....
</script>
Before we leave index.html, we’ll add a template to hold the profile details. The outline of this container will look something like Figure 6-8.

Figure 6-8. Outline of profile view
MetroUI has a tile class that fits this requirement well, so the template will use some of those CSS styles to achieve this appearance.
<!-- Template for profile -->
<script type="text/x-handlebars-template" id="profile-template">
 <div class='tiles clearfix'>
    <div class="tile double bg-color-orangeDark">
      <div class="tile-content">
          <img src="{{user.profile_image_url}}" class="place-left">
          <h3 style="margin-bottom: 5px;">{{user.name}}</h3>
          <p>{{user.description}}</p>
          <div class="brand">
              <div class="badge">{{user.followers_count}} Followers</div>
          </div>
      </div>
    </div>
  </div>
</script>
The badge style does need a little change: it will be too narrow for the amount of text that we want to display for followers. As in any HTML application, we can simple extend the CSS definition in style.css.
.badge{
    width: 200px!important;
    height: 24px;
}
This leads to the final part in the definition of the profile within the app, the Backbone view to represent the details. The code for this view is much the same as the TimelineView. Even though the ProfileView will be dealing with a model rather than a collection, the differences in the view level are minimal.
The initialize function will create a new instance of the Profile model and then request the contents from the server by invoking the fetch function. The following code should be placed in ProfileView.js under the view directory:
var com = com || {};
com.apress = com.apress || {};
com.apress.view = com.apress.view || {};

com.apress.view.ProfileView = Backbone.View.extend({

    el: '#profile',
    template: Handlebars.compile($("#profile-template").html()),
    model: null,

    initialize:  function(options){
        var self = this;
        //create a collection for this view to render
        self.model = new com.apress.model.Profile();

        //force the fetch to fire a reset event
        self.model.fetch({});
        self.listenTo(self.model, 'change', self.render);
    },

    render: function(){
        var self = this;
            var output = self.template({user: self.model.toJSON()});

            self.$el.html(output);

        return self;
    },
});
The render function resets the entire HTML for the div element that is to contain the profile template content, marked with the profile ID.
Putting It All Together
Just a few more steps are required in order to get the profile view properly incorporated into the application. First, index.html will need to be extended to include the new JavaScript source.
<script src="js/app/model/Profile.js"></script>
<script src="js/app/view/ProfileView.js"></script>
And app.js will need to create a new instance of the ProfileView when the page loads.
var timelineView = new com.apress.view.TimelineView(),
        profileView = new com.apress.view.ProfileView();
Reloading the application should now render a page similar to that in Figure 6-9.
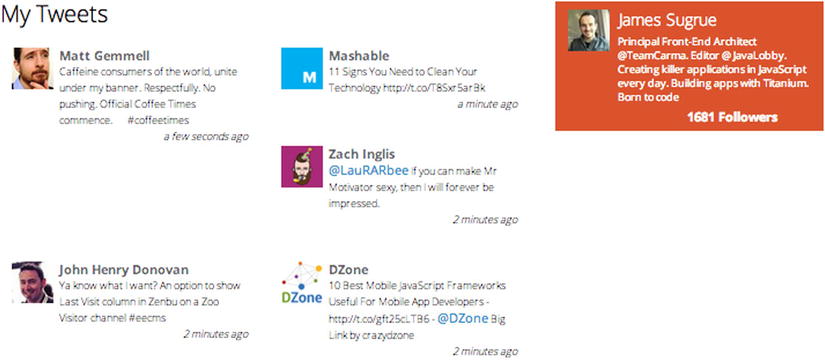
Figure 6-9. Twitter application with timeline and profile views
Reusing the Profile View
Now that we have a neat view for viewing user profile details, we could improve the link that’s provided on the timeline view for each mention of an @username. As well as showing how to reuse views, this section will illustrate how to add events to one of the views.
Making the Profile Model Reusable
First we’ll need to parameterize the request for profile details rather than hard-coding to one particular user. This requires a change to the handler function on the server side: adding to server.js the code to handle a request parameter with the name id.
/**
 * Get the account settings for the user with the id provided.
 **/
app.get('/profile/:id', function(request, response){

     response.header('Access-Control-Allow-Origin', '*'),

     client.get('users/show', {screen_name: request.params.id},  function (err, reply) {

      if(err){
        console.log('Error: ' + err);
        response.send(404);

      }
      if(reply){
       /// console.log('Reply: ' + reply);
        response.json(reply);
      }

  });
});
In Backbone, when a model has an id attribute, it is appended to the end of the urlRoot that is used to retrieve the information from the server. This means we simply need to set the id parameter for the profile model when it is created. This can be passed all the way from app.js to the constructor of the ProfileView, which then creates an instance of the Profile model.
You’ll recall that any Backbone object can accept parameters to the constructor that are then used in the initialize function. In app.js, when the ProfileView is created, pass the username as follows:
profileView = new com.apress.view.ProfileView({user: 'sugrue'}),
Now the initialize function in the ProfileView class can use this new parameter.
initialize:  function(options){
        var self = this;
        //create a collection for this view to render
        self.model = new com.apress.model.Profile({id: options.user});
        ......
The application will behave the same as before, but we’re now in a position where we can reuse the model to render profile details for any user.
Changing the Behavior on the Timeline
Previously, when parsing the usernames from the tweets, we created a simple link to the user’s profile page. Now we’ll want to detect when a profile link is clicked and display a dialog.
The Handlebars helper, helper.js, that provides this formatting will need to be updated. The link doesn’t need to go to any location, but by applying a class to the link (in this case, profile), there is a way to distinguish a profile link from any other type of href.
Handlebars.registerHelper('format', function (str) {
        if(str){
            str = str.replace(/[@]+[A-Za-z0-9-_]+/g, function(u) {
                        var username = u.replace('@','')
                       return '<a href="#" data-user="' + username +'" class="profile">@'+username+'</a>';
            });}
});
When we click a profile link, we’ll want to get the username to use for the profile. To get this passed through, we can use custom data attributes. These are attributes with prefixed with data-that allow HTML authors to add metadata to describe HTML elements further. More importantly, this can be parsed later in the JavaScript code for the view.
Adding Events to the Timeline View
Every tweet in the timeline that renders an @username link will now be identified with the profile class. We can add event handling by adding an events hash to the view.
events: {
        'click .profile': 'showDialog'
    },
Now when the profile is clicked, the showDialog function will be invoked. Any view event in Backbone will include an options object, which includes a reference to the HTML element that was the source of the event. With this reference, we can get the username by using the .data() function.
showDialog: function(options){

        var self =this,
            $target = $(options.currentTarget),
            username = $target.data('user'),
        var profileView = new com.apress.view.ProfilePopupView({user: username});

    }
You’ll notice that this creates an instance of a new view object, ProfilePopupView. We’ll create this next.
Creating a Pop-up Dialog for Profiles
The source for the dialog is almost the same as that in the ProfileView. In fact, the initialize function is a direct copy, and it even reuses the same Handlebars template. The only difference is in the render function, which will create a new dialog and present that on the screen rather than appending the detail on the main page. The following code should be placed in ProfilePopupView.js in the view directory:
var com = com || {};
com.apress = com.apress || {};
com.apress.view = com.apress.view || {};

com.apress.view.ProfilePopupView = Backbone.View.extend({

    template: Handlebars.compile($("#profile-template").html()),
    model: null,

    initialize:  function(options){
        var self = this;

        //create a collection for this view to render
        self.model = new com.apress.model.Profile({id: options.user});
        //force the fetch to fire a reset event
        self.model.fetch({});
        self.listenTo(self.model, 'change', self.render);
    },
    render: function(){
        var self = this;

        if(self.model.get('screen_name')){
            var output = self.template({user: self.model.toJSON()});

            $.Dialog({
                'title'       : '@'+self.model.get('screen_name') + 's Profile',
                'content'     : output,
                'draggable'   : true,
                'overlay'     : true,
                'closeButton' : true,
                'buttonsAlign': 'center',
                'keepOpened'  : true,
                'position'    : {
                    'zone'    : 'left'
                },
                'buttons'     : {
                    'OK'      : {
                'action'      : function(){}
                    }
                }
            });
        }

        return self;
    },
});
MetroUI provides a some JavaScript for dialog creation that you will also need to include for this to function. This is hosted on GitHub at https://raw.github.com/olton/Metro-UI-CSS/master/javascript/dialog.js. To get around other errors on your page, you should also include the fonts directory.
Again, you’ll need to update the includes in index.html:
<script src="js/external/dialog.js"></script>
<script src="js/app/view/ProfilePopupView.js"></script>
You should now see a screen similar to Figure 6-10 when you click an @username link.

Figure 6-10. Reuse of the profile view in a pop-up
You should now be seeing the benefits of splitting models and views and the templates that are used in the HTML. We’ve added extra functionality to the application with minimal effort. The same template and styling that was done for the profile in the sidebar is available for other portions of the application that are dealing with the same model. This leads to more consistent user interfaces, along with code that is easy to follow.
The final part to our application screen is the addition of a search box, allowing us to run queries against the Twitter search API and render these results. In this section, we will introduce a router to the application to make the searches bookmarkable.
Once again, we’ll need to create an end point to serve search requests on the node.js server, in the server.js file. The path to the Twitter API for searching is search/tweets, and it takes a search term parameter (q) along with a count for the maximum number of results to return.
/**
 * Runs a search given a query
 **/
app.get('/search/:query', function (request, response) {

    response.header('Access-Control-Allow-Origin', '*'),
    //search term is
    var searchTerm = request.params.query;

    client.get('search/tweets', { q: searchTerm, count: 100 }, function(err, reply) {

      if(err){
        console.log('Error: ' + err);
        response.send(404);

      }
      if(reply){
       // console.log('Reply: ' + reply);
        response.json(reply);
      }

  });

});
This time we’ll do something different with the model for the search. Because the search term is included as a parameter in the search URL, it will be necessary to reconstruct the end point for the model each time results are requested. To deal with this, we can override the sync method, allowing execution of some custom code before continuing to call the default Backbone sync function.
var com = com || {};
com.apress = com.apress || {};
com.apress.model = com.apress.model || {};

com.apress.model.Search = Backbone.Model.extend({

    url : 'http://localhost:8080/search',

    sync: function(method, model, options){
        if(this.get('query')){
            this.url = this.url + '/' + this.get('query'),
        }
        Backbone.sync.call(this, method, model, options);
    },
});
The sync function checks whether there is a query attribute available in the mode and appends it to the URL if it exists.
Adding the Search View
The HTML representation of the search will be in a simple form. In this case, a template would be overkill because it is essentially static content.
We’ll add the HTML for the search view just underneath the profile box in index.html.
<div class="span4">
                <div id="profile" class="profile-view">
                </div>

                  <div id="search" class="search-view">
                    <form>
                          <div class="input-control text">
                               <input type="text" id="searchbox" autofocus="" placeholder="I'm looking for..">
                            </div>
                              <button class="bg-color-blue" id="searchbutton">Search</button>
                    </form>
                </div>
            </div>
We can now create a Backbone view to deal with the search. This is required only to add a listener for the search button. This could be done in a higher-level view, but as all our views so far have had a clear division of responsibility, it makes sense to maintain the current pattern.
As you can see in the declaration of the events hash, the single event that is being dealt with is the click on the element with the ID of searchbutton. Note that we could also have a key listener for the text field that could execute the runSearch method.
Another important item to note is that the Search model object is passed to this view as a parameter, rather than having the view create the model as in previous examples. The reason for this is that the model needs to be shared between a number of objects. This will be explained in the next few paragraphs. The following code should be placed in SearchView.js in the view directory. Don’t forget to include this file in your main HTML page.
var com = com || {};
com.apress = com.apress || {};
com.apress.view = com.apress.view || {};

com.apress.view.SearchView = Backbone.View.extend({

    el: '#search',
    model: null,
    events: {
         'click #searchbutton': 'runSearch'
    },

    initialize:  function(options){
        var self = this;
        self.model = options.model;
    },

    runSearch: function(e){
        var self = this;
            query = $('#searchbox').val();

        e.preventDefault();

        console.log('Run search against  ' +  query);

        //a trick to force a reset of the attribute
        self.model.set('query', '', {silent: true});
        self.model.set('query', query);
    }

});
There are a few points to note about the runSearch function. First, the function includes a call to e.preventDefault(), a jQuery event that will stop the default function from executing. This prevents the entire page from refreshing.
The other thing is that the view does nothing more than set the model value. The execution of search will rely on the change event for the model object. Because of this, we clear the value in the model silently first, before setting the attribute. This is purely to ensure that the change event gets fired after clicking the button. If the query value was the same as previously, the change event would not get fired.
Sharing Models Between Backbone Objects
We’ve already set up the SearchView to accept the search model as a parameter. The reason I have done that is so that we can have a router to deal with search URLs, making them bookmarkable. This router will also accept the model as a parameter. The changing of this shared model is what will trigger a navigation function.
The initialize function sets up the appropriate listener for changes in the query attribute of the search model. This is how the router hooks into the SearchView created in the previous section. The following code should be placed in AppRouter.js in the router directory:
var com = com || {};
com.apress = com.apress || {};
com.apress.router = com.apress.router || {};

com.apress.router.AppRouter = Backbone.Router.extend({

    searchModel : null,

    initialize:  function(options){

        var self = this;
        self.searchModel = options.searchModel;
        self.listenTo(self.searchModel, 'change:query', self.navigateToSearch)

    },

    navigateToSearch: function(model, options){
        //manually navigate to the search url
        this.navigate("search/" + model.get('query'), {trigger: true});
    },
});
The navigateToSearch function simply creates a URL that can be reused at any stage. This allows two ways to search: one from the search button and one from the URL in the browser address bar. When calling navigate, using {trigger:true} causes the route setup for this URL to be invoked.
Next we need to create the route and handler for the search. The routes hash needs to include the query parameter and will call a function named search.
routes: {'search/:query' : 'search'},
When the search function is executed, it checks whether the model already has a value set for the query attribute. When running the search from the UI, when the button is clicked, this will always be set. However, if you use the URL bar, the route will be entered without setting any attributes in the search model. This allows the function to cater for both cases.
search: function(query){
        var self = this;

        console.log('search for ' + query);
        if(self.searchModel.get('query') !== query){
            self.searchModel.set('query', query, {silent:true});
        }

    //now go the that view
        self.searchModel.fetch(
            {
                success: function(model){
                    //create the results view
                    var resultsView = new com.apress.view.ResultsView({model:model});

                },
                error: function(e){
                    alert('No results available'),
                }
            });
}
Provided that the call to the search end point is successful, the router will then create a ResultsView object to present the results.
The construction of the ResultsView class is actually similar to that of the ProfilePopupView. It’s just another dialog that will reuse a Handlebars template, in this case the template for the TimelineView, to present the search results.
The search model is passed to this view before the call is made to fetch the results from the server. Once a change is detected in the model, the render function is invoked, which builds the dialog after populating the template. The results are actually stored in an array called statuses. To reuse the template, this array needs to be tagged with the name tweet. The following code should be placed in ResultsView.js in the view directory, and the file should be included with a script tag from the main HTML page:
var com = com || {};
com.apress = com.apress || {};
com.apress.view = com.apress.view || {};

com.apress.view.ResultsView = Backbone.View.extend({

    el: '#results',

    model: null,

    template: Handlebars.compile($("#timeline-template").html()),

    initialize:  function(options){
        var self = this;
        self.model = options.model;

        self.model.fetch();

        self.listenTo(self.model,'change', self.render);

        self.render();
    },

    render: function(){

        var self = this,
             output = self.template({tweet: self.model.get('statuses')});

            $.Dialog({
                'title'       : 'Search Results',
                'content'     : output,
                'draggable'   : true,
                'overlay'     : true,
                'closeButton' : true,
                'buttonsAlign': 'center',
                'keepOpened'  : true,
                'position'    : {
                    'zone'    : 'left'
                },
                'buttons'     : {
                    'OK'      : {
                'action'      : function(){}
                    }
                }
            });


    }

});
app.js will require some updates so that the search model is created at the beginning and shared between the router and the search view. All of the scripts that we have created should be included in the main HTML page using script tags.
$(function() {

var timelineView = new com.apress.view.TimelineView(),
profileView = new com.apress.view.ProfileView({user: 'sugrue'}),
searchModel = new com.apress.model.Search(),
searchView = new com.apress.view.SearchView({model: searchModel}),
appRouter = new com.apress.router.AppRouter({searchModel: searchModel});

       Backbone.history.start();

});
Now when you invoke a search, you will be presented with a dialog, as in Figure 6-11.
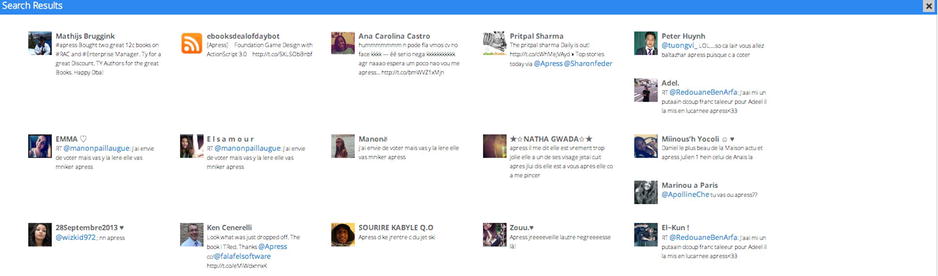
Figure 6-11. A portion of the search results dialog
All of our code so far has assumed that the calls to the server will be successful, returning results. However, it’s important that you add error handling code to any of the calls to fetch data from the server.
You can do this by enhancing the calls to fetch to include both success and error callbacks. When an error happens, it would be useful to fire an event that can then be dealt with by an overall listener.
This listener could be added to any part of the application. Because we don’t have a single view that rules over the entire app, the AppRouter class is probably best suited for this. However, the AppRouter would need to have an object shared between the views to listen for events on.
The search example allows us to do this because it is a shared object. In the initialize, the AppRouter would listen for error events.
self.searchModel.on('app:error', function(error){
            alert(error.message);
        });
And in the search, when the call is made to fetch, the error handler would fire the event, along with additional parameters for the listener to use (that is, message).
self.model.fetch({
        error: function(e){
                    self.model.trigger("app:error", {message: 'Error retrieving timeline information'});
                },

        });
You’ll find that having a single application model to share across the application will help make the tracking of errors in application state a lot easier.
Summary
This example application has brought all the concepts that we have gone through in the previous three chapters together. You saw how to create views based on collections and models that interact with back-end services. You also saw how you can reuse models and templates across your app, reducing the amount of code necessary. External libraries were used along with Handlebar templates, and extended helper functions are added for these templates.
Finer details, such as customizations to parse and sync methods, were also made clearer, with concrete examples of where it is useful to extend this functionality in your own apps. We also built in a router and used events throughout the application.
Most importantly, you learned how to structure your Backbone application, with namespaces and directories separating concerns. This structure should provide you with a framework to use for your own apps. This chapter alone covers enough ground to show you how to create professional-quality pages powered by Backbone.