
In this chapter, you’ll learn how you can repeat a block of statements until some condition is met. The programming mechanism for this is called a loop . The number of times that a loop is repeated can be controlled simply by a count—repeating the statement block a given number of times—or it can be more complex, repeating a block until some condition is met, such as the user entering "quit", for instance. The latter would enable you to program the calculator example in the previous chapter to repeat as many times as required without having to use a goto statement.
How you can repeat a statement, or a block of statements, as many times as you want
How you can repeat a statement or a block of statements until a particular condition is fulfilled
How you use the for, while, and do-while loops
What the increment and decrement operators do and how you can use them
How you can write a program that plays a Simple Simon game
How Loops Work
The loop is a fundamental programming tool with the ability to compare items. A comparison of some kind is always implicit in a loop because it provides the way for the loop to end. A typical loop would repeat a block of statements a given number of times. This kind of loop maintains a count of the number of times the loop block has been executed. The count is compared with the required number of loop block iterations, and the result decides when the loop should end.
Logic of a typical loop
More often than not, you’ll find that you want to apply the same calculation to different sets of data values; a payroll program is an obvious example. Without loops, you would need to write out the instructions to be performed as many times as there were sets of data values to be processed, which is not very practical. A loop allows you to use the same program code for any number of sets of data to be entered.
Before I discuss the first type of loop, I’ll introduce two more arithmetic operators that you’ll encounter frequently: the increment operator and the decrement operator . These operators are often used with loops, which is why I’ll discuss them now. I’ll start with a brief introduction and then go straight into an example of how you can use them in a loop. Once I have explained the basics of how the loop works, I’ll return to the increment and decrement operators to explain some of their idiosyncrasies.
Introducing the Increment and Decrement Operators
These operators are different from the other arithmetic operators you have encountered. When you use any of the other arithmetic operators, you create an expression that will result in a value that you can store in a variable or use as part of a more complex expression. They do not directly modify the value stored in a variable. The increment and decrement operators do modify the value of their operand. The expression --number modified the value in number by subtracting 1 from it. The expression ++number adds 1 to the value stored.
The for Loop

Control expressions in a for loop
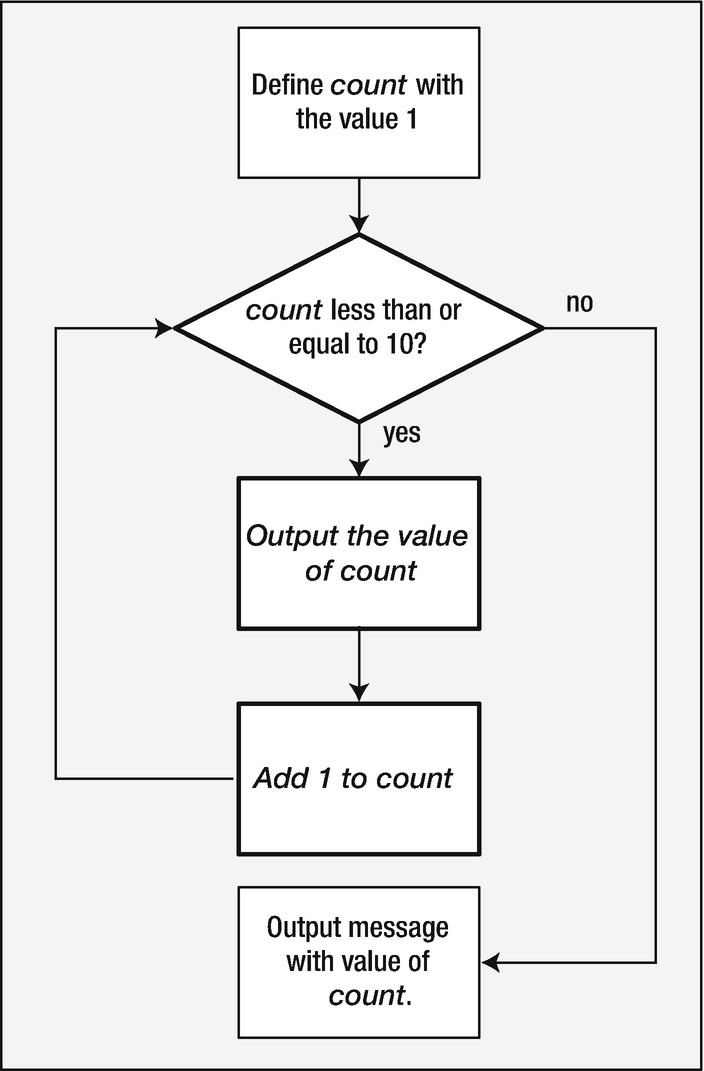
The first control expression, int count = 1, is executed only once, when the loop starts. In the example, this creates a variable, count, with the initial value 1. This variable is local to the loop and does not exist outside the loop. If you attempt to reference count after the loop, your code will not compile.
The second control expression must be a logical expression that ultimately can result in true or false. In this case, it’s the expression count <= 10, which will evaluate to true as long as count is not greater than ten. The second expression is evaluated at the beginning of each loop iteration. If the expression evaluates to true, the loop continues, and if it’s false, the loop ends and execution of the program continues with the first statement following the loop block or loop statement. Remember that false is a zero value and any nonzero value is true. Thus, the loop will execute the printf() statement as long as count is less than or equal to ten. The loop will end when count reaches 11.
The third control expression, ++count in this case, is executed at the end of each loop iteration. Here you use the increment operator to add 1 to the value of count. On the first iteration, count will be 1, so the printf() will output 1. On the second iteration, count will have been incremented to 2, so the printf() will output the value 2. This will continue until the value 10 has been displayed. At the start of the next iteration, count will have been incremented to 11, and because the second control expression will then be false, the loop will end.
The logic of Program 4.1
The steps with a bold outline are within the for loop. Let’s try a slightly different example.
How It Works
This increments the loop counter and is executed at the end of each loop iteration. The loop statement that outputs the sides of the box will therefore be executed eight times. After the eighth iteration, count will be incremented to 9 and the continuation condition will be false, so the loop will end.
This outputs the bottom of the box on the screen.
General Form of the for Loop
The statement to be repeated is represented by loop_statement . In general, this could equally well be a block of several statements enclosed between braces.
The starting_condition usually (but not always) sets an initial value to a loop control variable. The loop control variable is typically, but not necessarily, a counter of some kind that tracks how often the loop has been repeated. You can also declare and initialize several variables of the same type here with the declarations separated by commas; in this case, all the variables will be local to the loop and will not exist once the loop ends.
The continuation_condition is a logical expression evaluating to true or false. This determines whether the loop should continue to be executed. As long as this condition has the value true, the loop continues. It typically checks the value of the loop control variable, but you can put any logical or arithmetic expression here as long as you know what you’re doing.
As you’ve already seen, the continuation_condition is tested at the beginning of the loop rather than at the end. This obviously means that the loop_statement will not be executed at all if the continuation_condition starts out as false.
The action_per_iteration is executed at the end of each loop iteration. It is usually (but again, not necessarily) an increment or decrement of one or more loop control variables. Where several variables are modified, you separate the expressions that modify the variables by commas. At each loop iteration, loop_statement is executed. The loop is terminated, and execution continues with next_statement as soon as the continuation_condition is false.
The output produced by this fragment will be the values 2, 8, 18, 32, and 50 on a single line.
More on the Increment and Decrement Operators
Now that you’ve seen an increment operator in action, let’s delve a little deeper and find out what else these increment and decrement operators can do. They’re both unary operators , which means that they’re used with only one operand. You know they’re used to increment (increase) or decrement (decrease) a value stored in a variable of one of the integer types by 1.
The Increment Operator
Each statement increments count by 1. The last form is clearly the most concise.
The variable count will be incremented to 6, and this value will be used in the evaluation of the expression on the right of the assignment. Consequently, total will be assigned the value 12, so the one statement modifies two variables, count and total.
The Prefix and Postfix Forms of the Increment Operator
Note, however, that when you use the increment operator in a statement by itself (as in the preceding second statement, which increments count), it doesn’t matter whether you write the prefix or the postfix version of the operator. They both have the same effect.
Where you have an expression such as a++ + b—or, worse, a+++b—it’s less than obvious what is meant to happen or what the compiler will achieve. The expressions are actually the same, but in the second case you might really have meant a + ++b, which is different because it evaluates to one more than the other two expressions.
x will be assigned the value 15 (from 10 + 5) because a is incremented after the expression is evaluated. The next time you use the variable a, however, it will have the value 11.
y will be assigned the value 16 (from 10 + 6) because b is incremented before the statement is evaluated.
The Decrement Operator
They each decrement the variable count by 1.
The variable total will be assigned the value 15 (from 9 + 6). The variable count, with the initial value of 10, has 1 subtracted from it before it is used in the expression so that its value will be 9.
total will be assigned the value 11 (from 6 + 5).
Both the increment and decrement operators can only be applied to integer types, but this does include integer types that store character codes.
The for Loop Revisited
Now that you understand a bit more about the ++ and -- operators, let’s look at another example that uses a loop.
How It Works
You use sum to hold the final result of your calculations. You declare it as type unsigned long long to allow the maximum total you can deal with to be as large an integer as possible. The variable count stores the integer that’s entered as the number of integers to be summed, and you’ll use this value to control the number of iterations in the for loop.
After the prompt, you read in the integer that will define the sum required. If the user enters 4, for instance, the program will compute the sum of 1, 2, 3, and 4.
The loop variable i is declared and initialized to 1 by the starting condition in the for loop. On each iteration, the value of i is added to sum. Because i is incremented on each iteration, the values 1, 2, 3, and so on, up to the value stored in count, will be added to sum. The loop ends when the value of i exceeds the value of count.
As I’ve hinted by saying “not necessarily” in my descriptions of how the for loop is controlled, there is a lot of flexibility about what you can use as control expressions. The next program demonstrates how this flexibility might be applied to shortening the previous example slightly.
How It Works
The loop statement is empty: it’s just the semicolon after the closing parenthesis. This expression adds the value of i to sum and then increments i for the next iteration. It works this way because you’ve used the postfix form of the increment operator. If you use the prefix form here, you’ll get the wrong answer because count+1 will be added to sum on the last iteration of the loop, instead of just count.
Modifying the for Loop Control Variable
This produces the same output as the previous example. The only change is in the loop control expressions. The loop counter is initialized to count, rather than to 1, and it’s decremented on each iteration. The effect is to add the values count, count-1, count-2, and so on to sum, down to 1. Again, if you used the prefix form, the answer would be wrong, because you would start by adding count-1 instead of count.
Just to keep any mathematically inclined readers happy, I should mention that it’s quite unnecessary to use a loop to sum the first n integers. The tidy little formula  for the sum of the integers from 1 to n will do the trick much more efficiently (just as Gauss did being a kid). However, it wouldn’t teach you much about loops, would it?
A for Loop with No Parameters
The loop body could be a single statement, but when there are no loop parameters, it is usually a block of statements. Because the condition for continuing the loop is absent, the loop will continue indefinitely. Unless you want your computer to be indefinitely doing nothing, the loop body must contain the means of exiting from the loop. To stop the loop, the loop body must contain two things: a test of some kind to determine when the condition for ending the loop has been reached and a statement that will end the current loop iteration and continue execution with the statement that follows the loop.
The break Statement in a Loop
Here you have a loop that will potentially execute indefinitely. The scanf() function reads a character into answer, and if the character entered is n or N, the break statement will be executed. The effect is to stop executing the loop and to continue with the first statement following the loop. Let’s see this in action in another example.
How It Works
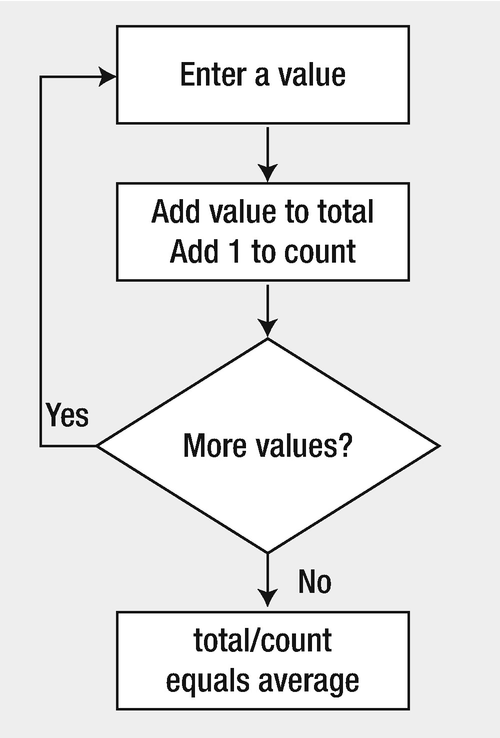
Therefore, so far as the loop control is concerned, the block of statements enclosed between the braces will be repeated indefinitely.
This statement calculates the average of the values entered by dividing the value in total by the count of the number of values. The result is then displayed.
Limiting Input Using a for Loop
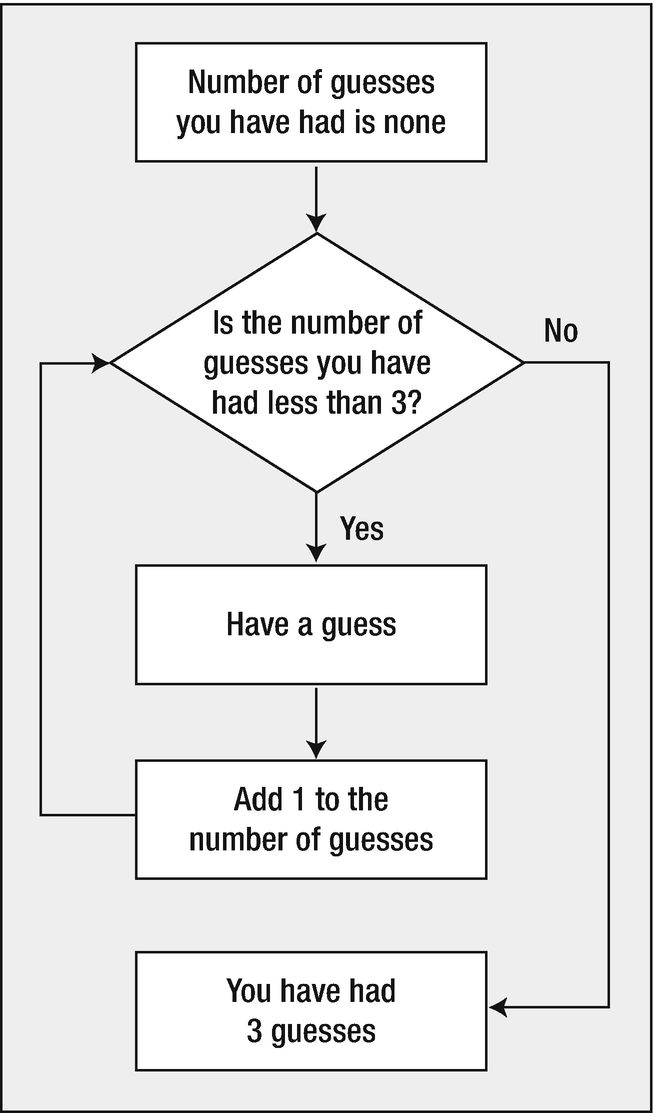
You can use a for loop to limit the amount of input from the user. Each iteration of the loop will permit some input to be entered. When the loop has completed a given number of iterations, the loop ends so no more data can be entered. You can write a simple program to demonstrate how this can work. The program will implement a guessing game.
How It Works
These store the number that’s to be guessed, the user’s guess, and the number of guesses the user is permitted, respectively.
All the operational details of the game are within this loop, which will continue as long as count is positive, so the loop will repeat count times.
The first printf() looks a little complicated, but all it does is insert "y" after "tr" in the output when count is 1 and "ies" in all other cases. It’s important to get your plurals right.
If the guess is correct, you display a suitable message and execute the return statement. This ends the function main(), so the program ends. You’ll learn more about the return statement when I discuss functions in greater detail in Chapter 8.
This group of statements first tests whether the value entered is within the prescribed limits. If it isn’t, a message is displayed reiterating the limits. If it’s a valid guess, a message is displayed to the effect that it’s incorrect, and that gives a clue as to where the correct answer is.
This will be executed only if all three guesses were wrong. It displays an appropriate message, revealing the number to be guessed, and then the program ends.
The program is designed so that you can easily change the value of the variable chosen and have endless fun. Well, endless fun for a short while, anyway.
Generating Pseudo-random Integers
Each time you call the rand() function, it will return a random integer. The value will be from zero to a maximum of RAND_MAX, the value of which is defined in stdlib.h. The integers generated by the rand() function are described as pseudo-random numbers because truly random numbers can arise only in natural processes and can’t be generated algorithmically.
The sequence of numbers that’s generated by the rand() function uses a starting seed number, and for a given seed, the sequence will always be the same. If you use the function with the default seed value, as in the previous snippet, you’ll always get exactly the same sequence, which won’t make the game very challenging but is useful when you are testing a program. However, stdlib.h provides another standard function, srand(), which you can call to initialize the sequence with a particular seed that you pass as an argument to the function.
At first sight, this doesn’t seem to get you much further with the guessing game, as you now need to generate a different seed each time the program executes. Yet another library function can help with this: the time() function that’s declared in the time.h header file. The time() function returns the number of seconds that have elapsed since January 1, 1970, as an integer. (This is called an epoch that is commonly a representation of time in a 32-bit integer that starts counting from the mentioned date above. It is a de facto standard because it is not defined in the standard and follows POSIX specification.) Be aware these are seconds since 1970; so if you are trying to execute the same program at the same time, it will be necessary to handle micro- or nanoseconds in the seed. Otherwise, the sequence of pseudo-random numbers will be repeated (or use a different seed like PID), and because time always marches on, you get a different value returned by the time() function each time the program executes. The time() function requires an argument to be specified, which you’ll specify here as NULL. NULL is a symbol that’s defined in stdlib.h that represents a memory address that doesn’t refer to anything. I’ll discuss the use and significance of NULL further in Chapter 7.
This works reasonably well with the implementation of rand() in my compiler and library. However, this isn’t a good way in general of limiting the range of numbers produced by a pseudo-random number generator. This is because you’re essentially chopping off the high-order bits in the value that’s returned and implicitly assuming that the bits that are left will also represent random values. This isn’t necessarily the case.
This version of the program should give you a different number to guess most of the time.
More for Loop Control Options
Now the third loop control expression increments n by 7 at the end of each iteration, so you’ll get the sum 1 + 8 + 15 + 22 +…up to 1,000.
Now the third control expression consists of two expressions separated by a comma. These will execute in sequence at the end of each loop iteration. So first the expression sum += n will add the current value of n to sum. Next, the second expression n += 2 will increment n by 2. Because these expressions execute in sequence from left to right, you must write them in the sequence shown. If you reverse the sequence, the result will be incorrect.
You aren’t limited to just two expressions either. You can have as many expressions here as you like, as long as they’re separated by commas. Of course, you should make use of this only when there is a distinct advantage in doing so. Too much of this can make your code hard to understand. The first and second control expressions can also consist of several expressions separated by commas, but the need for this is quite rare .
Floating-Point Loop Control Variables
This loop is supposed to output the values of x from 0.0 to 2.0 in steps of 0.2, so there should be 11 lines of output. Because 0.2 doesn’t have an exact representation as a binary floating-point value, x may never have the value 2.0. The loop will take over your computer and run indefinitely when this is the case (until you stop it; press Ctrl+C under Microsoft Windows).
Chars loop Control Variables
Float is not the only new data type that can be handled in a for loop; although there is a trick, we can use char to iterate in a for loop too. For C, char's are integers underneath. Thus, its use is straightforward.
Your compiler converts decimal floating-point values to binary. Even though 0.2 has no exact representation in binary, it is still possible that the previous loop may end normally. This is because the precise binary value for 0.2 depends on the algorithm used to generate it.
The while Loop
This means that you ask yourself “Am I hungry?” before eating the next sandwich. If the answer is yes, then you eat a sandwich and then ask yourself “Am I still hungry?” You keep eating sandwiches until the answer is no, at which point you go on to do something else—drink some coffee maybe. One word of caution: Enacting a loop in this way yourself is probably best done in private.
As always, statement1 and statement2 could each be a block of statements.
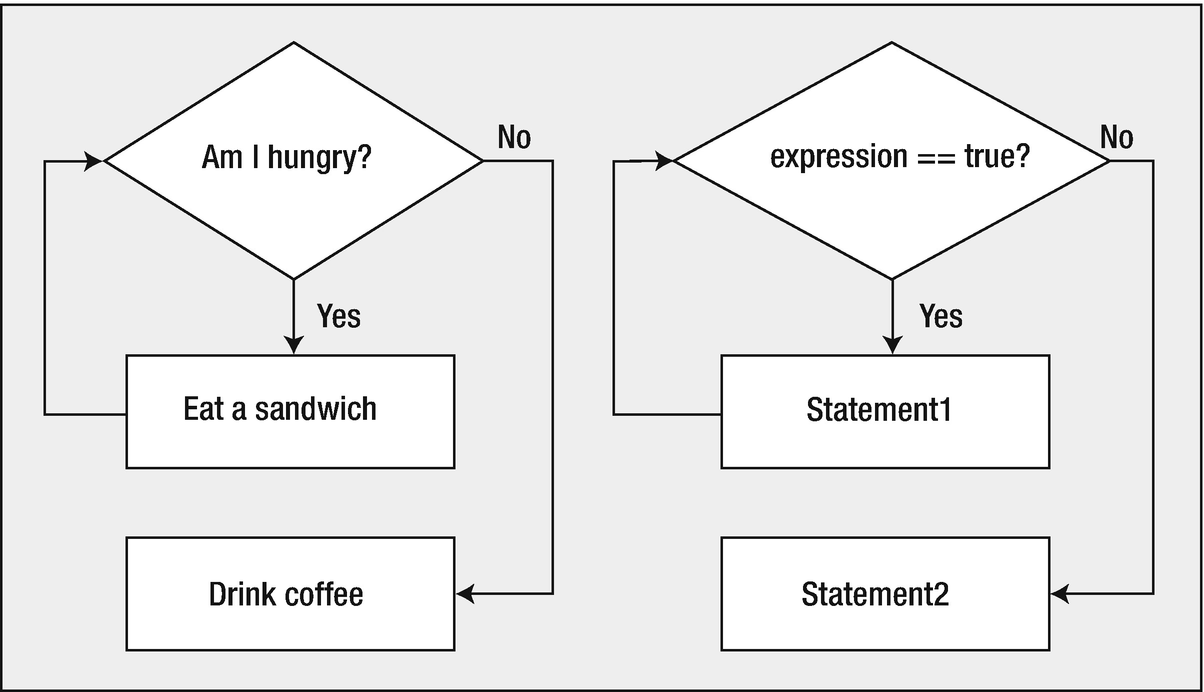
Just like the for loop, the condition for continuation of the while loop is tested at the start, so if expression starts out false, none of the loop statements will be executed. If you answer the first question with “No, I’m not hungry,” then you don’t get to eat any sandwiches at all, and you move straight to the coffee. Clearly, if the loop condition starts out as true, the loop body must contain a mechanism for changing this if the loop is to end.
Be careful. A typical beginner error is that the expression of the while loop could be an assignment such as while (value = 1) instead of a correct comparison while (value == 1).
Using an assignment, the value always will be the number that is being set (this means true, unless we assign zero), and the while loop will become indefinite.
How It Works
So the value of sum isn’t affected by the incremented value of i until the next loop iteration.
This example uses the increment operator as postfix. How could you change the preceding program to use the prefix form of the ++ operator? Have a try and see whether you can work it out before looking at the answer in the next section.
This is because the ++ operator is adding 1 to the value of i before it stores the value in sum. The variable i starts at 1 and is increased to 2 on the first iteration, whereupon that value is added to sum.
Now the program will produce the correct answer. This example should help you understand better the effects of postfixing and prefixing these operators.
Nested Loops
Sometimes you may want to place one loop inside another. You might want to count the number of occupants in each house on a street. You step from house to house, and for each house you count the number of occupants. Going through all the houses could be an outer loop, and for each iteration of the outer loop, you would have an inner loop that counts the occupants.
You can assemble this into a complete example.
How It Works
The top and bottom of the box are created by simple identical loops. The number of iterations is the number of asterisks in each line. You generate the interior rows of output in a nested loop. The outer loop with the control variable j repeats height - 2 times. There are height rows in the box, so you subtract 2 for the top and bottom rows, which are created outside this loop. The inner loop with the control variable i outputs width - 2 spaces after a newline followed by an asterisk, which is written to the output. When the inner loop ends, another asterisk is written to the output to complete the line. Thus, a newline, followed by a complete execution of the inner loop, followed by another newline, occurs for every iteration of the outer loop. We can try a nested loop performing some calculations next.
As you can see, if you enter 5, the program calculates the sums of the integers from 1 to 1, from 1 to 2, from 1 to 3, from 1 to 4, and from 1 to 5.
How It Works
The outer loop starts off by initializing i to 1, and the loop is repeated for successive values of i up to count. For each iteration of the outer loop, and therefore for each value of i, sum is initialized to 0, the inner loop is executed, and the result is displayed by the printf() statement. The inner loop accumulates the sum of all the integers from 1 to the current value of i.
Each time the inner loop finishes, the printf() to output the value of sum is executed. Control then goes back to the beginning of the outer loop for the next iteration.
You use variables of unsigned integer types throughout because none of the values can be negative. It would still work with signed integer types, but using unsigned type ensures that a negative value cannot be stored and also provides for values of greater magnitude.
Look at the output again to see the action of the nested loop. The first loop simply sets sum to 0 each time around, and the inner loop accumulates all the integers from 1 to the current value of i. You could modify the nested loop to use a while loop for the inner loop and to produce output that would show what the program is doing a little more explicitly.
How It Works
The differences are inside the outer loop. The outer loop control is exactly the same as before. What occurs during each iteration has been changed. The variable sum is initialized to 1 within the outer loop, because the while loop will add integers to sum starting with 2. The value to be added is stored in j, which is also initialized to 1. The first printf() in the outer loop just outputs a newline character followed by 1, the first integer in the set to be summed. The inner loop adds the integers from 2 up to the value of i. For each integer value in j that’s added to sum, the printf() in the inner loop outputs + j on the same line as the initial value, 1. Thus, the inner loop will output + 2, then + 3, and so on for as long as j is less than i. Of course, for the first iteration of the outer loop, i is 1, so the inner loop will not execute at all, because j < i (1 < 1) is false from the beginning.
When the inner loop ends, the last printf() statement is executed. This outputs an equal sign followed by the value of sum. Control then returns to the beginning of the outer loop for the next iteration.
Nested Loops and the goto Statement
The inner loop controlled by j will execute once for each iteration of the outer loop that is controlled by i. The innermost loop controlled by k will execute once for each iteration of the loop controlled by j. Thus, the body of the innermost loop will be executed 6,000 times.
This fragment presumes that must_escape can be altered within the innermost loop to signal that the whole nested loop should end. If the variable must_escape is true, you execute the goto statement to branch directly to the statement with the label out. So you have a direct exit from the complete nest of loops without any complicated decision making in the outer loop levels.
As we declared in the last chapter, the goto statement is a very "dangerous" statement that will create a spaghetti code that highly probably will finish in problems; please use goto with moderation.
The do-while Loop
Here, you would never output anything. The control expression number < 4 is false from the start, so the loop block is never executed.
Now when you execute this loop, you get Number = 4 displayed. This is because the expression number < 4 is checked after the loop body executes.
If the loop body is just one statement, you can omit the braces. Notice the semicolon after the parentheses in a do-while loop. There isn’t one in the while loop. In a do-while loop, if the value of expression is true (nonzero), the loop continues. The loop will exit only when the value of expression becomes false (zero). You can see how this works more clearly in Figure 4-6.

Operation of the do-while loop
How It Works
This is necessary because the process of reversing the digits destroys the original value, and you want to output the original integer along with the reversed version.
The do-while loop is most appropriate here because any positive number will have at least one digit. You get the rightmost decimal digit from the value stored in temp using the modulus operator, %, to obtain the remainder after dividing by 10. Because temp originally contains 43, temp%10 will be 3. You assign the value of the expression 10*rebmun + temp%10 to rebmun. Initially, the value of rebmun is 0, so on the first iteration, 3 is stored in rebmun.
You’ve now stored the rightmost digit of the input in rebmun so you remove this digit from temp by dividing temp by 10. Because temp contains 43, temp/10 will be 4.
At the end of the loop, the condition is checked, which is just the value of temp. Because temp contains the value 4, the condition is true and another iteration begins.
Note Remember, any nonzero integer will convert to true. The Boolean value false corresponds to zero.
This time, the value stored in rebmun will be 10 times rebmun, which is 30, plus the remainder when temp is divided by 10, which is 4, so the result is that rebmun becomes 34. You again divide temp by 10, so it will contain 0. Now temp is 0 at the end of the loop iteration, which is false, so the loop finishes and you have reversed the digits from number. You should be able to see that this works just as well with values with more decimal digits.
This form of loop is used relatively rarely, compared with the other two forms. Keep it in the back of your mind, though; when you need a loop that always executes at least once, the do-while loop delivers the goods.
The continue Statement
I used an enumeration here to remind you that it is an integer type and you can use a variable of an enum type to control for a loop. This loop will execute with values of day from Monday to Sunday (which will correspond to 0–6 by default). When day has the value Wednesday, however, the continue statement will execute and the rest of the current iteration is skipped. The loop continues with the next iteration when day will be Thursday.
You’ll see more examples that use the continue statement later in the book.
Designing a Program
It’s time to try your skills on a bigger programming problem and to apply some of what you’ve learned so far. I’ll introduce a few more standard library functions that you’re sure to find useful.
The Problem
The problem that you’re going to solve is to write a program to play a game of Simple Simon. Simple Simon is a memory test game. In this game, the computer displays a sequence of digits on the screen for a short period of time. You then have to memorize them, and when the digits disappear from the screen, you must enter exactly the same sequence of digits. Each time you succeed, the process repeats with a longer sequence of digits for you to try. The objective is to continue the process for as long as possible.
The Analysis
The logic of the program is quite straightforward. The program must generate a sequence of integers between 0 and 9 and display the sequence on the screen for one second before erasing it. The program should then read the player’s pathetic attempt to enter the identical sequence of digits. If the player is lucky enough to get the sequence correct, the computer should repeat with another sequence of the same length. If the player’s luck holds out for three successive sequences of a given length, the program should continue by displaying a longer sequence for the player to try. This continues until the player’s luck runs out and they get a sequence wrong. The program will then calculate a score based on the number of successful tries and the time taken and invite the player to play again.

The basic logic of the Simple Simon program
Each box describes an action in the program, and the diamond shapes represent decisions. It’s reasonable to assume that at least one game will be played so the check for a new game is at the end of the game loop. Three successful sequence entries trigger an increase in the length of the next sequence. Entering an incorrect sequence ends the game. Let’s use the flow chart as the basis for coding the program.
The Solution
This section outlines the steps you’ll take to solve the problem. In the context of this program, I’ll introduce some additional aspects to managing input from the keyboard. I’ll also explain how you can time operations within a program.
Step 1
The another_game variable that you define at the beginning of main() controls whether or not another game is started when the current game finishes. A character is read from the keyboard at the end of the main game loop into this variable, and its value is checked in the loop condition. If y or Y is entered, the loop continues for another game. Otherwise, the program ends. By converting another_game to uppercase, you avoid having to check for either y or Y.
The DELAY variable is a fixed integer value that specifies the number of seconds the digit sequence will be displayed before it is erased. You’ll use this to control how long the program waits before erasing a sequence of digits. It is 1 here, but you can increase this to make the game easier.
This is a convenient way of splitting a long string over two or more lines. You just put each piece of the string between its own pair of double quote characters, and the compiler takes care of assembling them into a single string. This statement also uses the conditional operator to append "s!" to the output instead of "!" when DELAY is more than 1 second.
Step 2
You are using the _Bool variable correct here. Because you have added an #include directive for the stdbool.h header , you can use bool as the type name. The stdbool.h header also defines the symbols true and false to correspond to 1 and 0, respectively. The while loop continues as long as correct has the value true. You will set it to false when the player enters a sequence incorrectly.
The code will compile as it is, and you should compile it to check it out, but you should not run it yet. If you run this as it is, program execution will never end because it contains an indefinite loop—the inner while loop. The condition for this loop is always true because the loop doesn’t change the value of correct. However, you’ll be adding that bit of the program shortly.
As you develop a program, it’s a good approach to make sure that the code will at least compile at each step. If you write all the code in one attempt, you are likely to end up with larger numbers of errors to correct, and as you correct one problem, more may appear. This can be very frustrating. If you develop and check out the code incrementally, the errors will be easier to identify and development will be faster. This brings me back to our current program.
Step 3
You have a slightly trickier task next: generating the sequence of random digits. There are two problems to be solved. The first is how you generate the sequence of random digits. The second is how you check the player’s input against the computer-generated sequence.
The digits in the sequence that you generate have to be random. You’ll use the functions rand() , srand() , and time() , which you used earlier in this chapter, to do this. These require the standard library headers stdlib.h and time.h to be included in the source file. You can get a random digit by using the % operator to obtain the remainder after dividing the integer that rand() returns by 10.
You call the srand() function with a seed value produced by the time() function as the argument to initialize the sequence of values produce by rand(). By passing the value returned by time() to srand(), you ensure that the sequence produced by rand() will be different each time.
The time() function accepts the address of a variable as an argument in which the time value is to be stored, and it also returns the same value. If you store the return value, you may not want to supply the address of a variable as the argument. In this case, you specify the argument as NULL, which is an address that doesn’t refer to anything. In the game program, you will pass the address of a variable to time() in which the time value will be stored as well as make use of the value returned.
Now let’s consider how creating and checking the sequence is going to work. You’ll need a given sequence of random digits twice: first to output it for a limited time and second to check the player’s input against it. You could consider saving the sequence of digits as an integer value. The problem with this is that the sequence could get very long if the player is good, and it could exceed the upper limit for the digits in integer values of type unsigned long long. Ideally the program should allow sequences to be of unlimited length. There is a simple approach you can adopt that will allow this.
The sequence of integers that the rand() function produces is determined by the seed value. Each time you pass a given seed value to srand() , rand() will return the same sequence of integers. If you store the seed value you use when you call srand() to initialize the sequence that you output, you can use this a second time to reinitialize the sequence when you are checking the user’s input. Calls to rand() will then generate the same sequence again.
You’ve declared four new variables that you need to implement the inner while loop that continues to execute as long as the player is successful. Each loop iteration displays a sequence of digits that the player must memorize and enter when it is no longer shown: tries records the number of times that the player is successful, and digits records the current length of the sequence of digits. Although you initialize these variables when you declare them, you must also initialize them in the do-while loop before the nested while loop to ensure that the correct initial conditions are set for each game. You declare a variable, seed, of type time_t, that you use to record the value produced by the time() function. You’ll use this to initialize the random number sequence returned by the function rand(). The value for seed is set in the while loop by passing its address to the standard library function time(). The same seed value is returned by the time() function, and you use this as the argument to the first call of srand() to initialize the random sequence from which you obtain the digits for display.
At the beginning of the while loop , you increase the value stored in tries because a new attempt occurs on each loop iteration. At the end of the loop, you increment digits each time three correct attempts have been entered.
You obtain a digit between 0 and 9 by taking the remainder after dividing the random integer returned by rand() by 10. This isn’t the best method for obtaining random digits, but it’s a very easy way and is adequate for our purposes. Although the numbers that rand() generates are randomly distributed, the low-order decimal digit for numbers in the sequence is not necessarily random. To get properly random digits, you should be dividing the entire range of values produced by rand() into ten segments and associating a different decimal digit with each segment. The digit corresponding to a given pseudo-random number is then selected based on the segment in which the number lies.
The sequence of digits is displayed by the for loop . The loop just outputs the low-order decimal digit of the value returned by rand(). You then have some comments indicating the other code that you still have to add that will delay the program for 1 second and then erase the sequence from the screen. This is followed by the code to check the sequence that was entered by the player. This reinitializes the random number–generating process by calling srand() with the seed value that you stored in seed. Each digit that is entered is compared with the low-order digit of the value returned by rand(). If there’s a discrepancy, the player got it wrong so you set correct to false and execute a break statement, which will cause the for loop to end. When the value of correct is false, the outer while loop will also end.
Of course, if you try to run this code as it is, the sequence won’t be erased, so it isn’t usable yet. The next step is to add the code to the while loop that will erase the sequence.
Step 4
This loop executes repeatedly until the condition is false, whereupon the program will continue.
You record the time that clock() returns before you output the sequence. The for loop that’s executed after the sequence has been displayed and continues until the value returned by clock() exceeds the time recorded in wait_start by DELAY*CLOCKS_PER_SEC.
Because you did not output a newline character when you displayed the sequence, the same output line is still current. You can move the cursor back to the start of the current line by executing a carriage return without a linefeed; outputting " " does just that. You then output two spaces for each digit that was displayed, thus overwriting each of them. You then output a prompt for the player to enter the sequence that was displayed. You output this message only once; otherwise, it gets rather tedious. On subsequent tries, you just back up to the beginning of the now blank line, ready for the user’s input.
Step 5
The digits value is the length of the current sequence. If the player failed on the first attempt at a sequence of digits length, the value in digits is 1 too many for scoring purposes. On the first try for a sequence of a given length, tries will have a value of the form 3*n+1 because three tries are necessary at each sequence length. Thus, the expression (tries % 3 == 1) will be 1 (true) when the player fails at the first try for a sequence of a given length, so the effect in the statement is to reduce the digits value by 1 when this is the case.
To work out the points scored for a faster time, you need to define a standard time for entry of a digit and find out how long the game took. You can allow 1 second as the standard time to enter a digit. You can award a further ten points for each second less than the standard that the player needed to enter all the digits in a complete game. To calculate this, you must figure out how many digits were entered. You can start by calculating the number of digits entered for the sequence length when the player failed.
You now need to work out the number of digits entered for all sequence lengths less than the current length. These sequences have lengths from 2 to digits-1, and there must have been three successful tries at each length.
 . You can obtain the count of all digits entered for sequences prior to the current length as three times the sum of the integers from 2 to digits-1. You can get this value by using the formula to sum the digits from 1 to digits-1 and then subtracting 1 from the result. Finally, you need to multiply by 3 because there are three tries at each length. Thus, you can increment total_digits
to include this with the following if statement:
. You can obtain the count of all digits entered for sequences prior to the current length as three times the sum of the integers from 2 to digits-1. You can get this value by using the formula to sum the digits from 1 to digits-1 and then subtracting 1 from the result. Finally, you need to multiply by 3 because there are three tries at each length. Thus, you can increment total_digits
to include this with the following if statement:The value in total_digits is also the number of seconds required as standard for all the input because each digit is allowed 1 second. You must get the actual time for digit entry and compare it to this. You recorded the time when the game started in start_time as a number of clock ticks. The overall elapsed time for the game in seconds will therefore be (clock() - start_time )/CLOCKS_PER_SEC. Each sequence is displayed for DELAY seconds, so to be fair to the player, you must subtract the total delay time for all sequences. This will be tries*DELAY.
Unfortunately, the program is still not quite correct. The program starts to read and check digits after the player presses Enter at the end of a sequence. If an incorrect digit is entered and it isn’t the last in the sequence, the reading of digits stops and the remaining digits will be left in the keyboard buffer. This will result in the next digit being read as the answer to the prompt for another game. You need to remove any information that’s still in the keyboard buffer before prompting for the next game for the program to work correctly. This implies that you need a way to clear the keyboard buffer.
The keyboard buffer is memory that’s used by the operating system to store input characters from the keyboard. The scanf() function reads input from the keyboard buffer rather than getting it directly from the keyboard itself.
With standard input and output—that is, input from the keyboard and output to the command line on the screen—there are two buffers: one that holds input characters and one for holding output. The operating system manages the transfer of data between these buffers and the physical devices. The standard input and output streams are identified by the names stdin and stdout, respectively.
Summary
The for loop, which you typically use for counting loops where the value of a control variable is incremented or decremented by a given amount on each iteration until some final value is reached.
The while loop, which you use when the loop continues as long as a given condition is true. If the loop condition is false at the outset, the loop block will not be executed at all.
The do-while loop, which works like the while loop except that the loop condition is checked at the end of the loop block. Consequently, the loop block is always executed at least once.
Before you start programming, work out the logic of the process and computations you want to perform, and write it down—preferably in the form of a flow chart. Try to think of lateral approaches to a problem; there may be a better way than the obvious approach.
Understand operator precedence in order to get complex expressions right. Whenever you are not sure about operator precedence, use parentheses to ensure expressions do what you want. Use parentheses to make complex expressions more readily understood.
Comment your programs to explain all aspects of their operation and use. Assume the comments are for the benefit of someone else reading your program with a view to extend or modify it. Explain the purpose of each variable as you declare it.
Program with readability foremost in your mind.
In complicated logical expressions, avoid using the operator ! as much as you can.
Use indentation to visually indicate the structure of your program.
Prepared with this advice, you can now move on to the next chapter—after you’ve completed all the exercises, of course!
The following exercises enable you to try out what you’ve learned in this chapter. If you get stuck, look back over the chapter for help. If you’re still stuck, you can download the solutions from the Source Code/Download section of the Apress website (www.apress.com), but that really should be a last resort.
Exercise 4-1. Write a program that will generate a multiplication table of a size entered by the user. A table of size 4, for instance, would have four rows and four columns. The rows and columns would be labeled from 1 to 4. Each cell in the table will contain the product of the corresponding row and column numbers, so the value in the position corresponding to the third row and the fourth column would contain 12.
Exercise 4-2. Write a program that will output the printable characters for character code values from 0 to 127. Output each character code along with its symbol with two characters to a line. Make sure the columns are aligned. (Hint: You can use the isgraph() function that’s declared in ctype.h to determine when a character is printable.)
Exercise 4-3. Extend the previous program to output the appropriate name, such as “newline,” “space,” “tab,” and so on, for each whitespace character.
Exercise 4-4. Modify Program 4.13 to determine the random digits by selecting a digit based on where the number returned by rand() lies within the entire range of possible values.
Exercise 4-5. Modify the Simple Simon game implemented in Program 4.7A so that the program will continue with an option to play another game when the player fails to guess the number correctly and will allow as many games as the player requires.
Exercise 4-6. Calculate number Pi by using the Leibniz Formula:

This formula has low convergence rate; then please use at least 500,000 iterations to have an accurate Pi approximation.