© Eric Vogel 2021
E. VogelBeginning Entity Framework Core 5https://doi.org/10.1007/978-1-4842-6882-7_15

15. Authentication on the Web

Eric Vogel1  
(1)
Okemos, MI, USA
 

In this chapter, I will cover how to set up authentication on our ASP.NET Core MVC application. Our users will be stored in our SQL Server database, and Entity Framework Core 5 will be used to access it.

Install Identity NuGet Packages

The first thing we need to get out of the way is to install the needed NuGet packages for Entity Framework Core 5 Identity and AspNetCore.Identity.UI. Right-click the web project and click Manage NuGet Packages. Then install the Microsoft.AspNetCore.Identity.UI package as seen in Figure 15-1.
../images/499766_1_En_15_Chapter/499766_1_En_15_Fig1_HTML.jpg
Figure 15-1

Install the ASP.NET Core Identity UI Package

The next step is to install the Microsoft.AspNetCore.Identity.EntityFrameworkCore NuGet package as seen in Figure 15-2.
../images/499766_1_En_15_Chapter/499766_1_En_15_Fig2_HTML.jpg
Figure 15-2

Install the Entity Framework Core 5 Identity Package

Initialize Identity on App Startup

The next step is to update the Startup class to wire up ASP.NET Core Identity management using EF Core 5. To get started, we are going to update the ConfigureServices method . First, we add a using statement for ASP.NET Core Identity:
using Microsoft.AspNetCore.Identity;
Next, we add an IEmailSender implementation that is needed by the scaffolded Login view we will be generating later:
public class EmailSender : IEmailSender
 {
     public Task SendEmailAsync(string email, string subject, string message)
     {
         return Task.CompletedTask;
     }
 }
Then we wire up ASP.NET Core Identity to use Entity Framework Core 5 in the ConfigureServices method:
services.AddIdentity<IdentityUser,IdentityRole>(options => options.SignIn.RequireConfirmedAccount = true)
               .AddEntityFrameworkStores<AppDbContext>();
Next, we want to use the baked-in UI code for authentication, so we call
 services.AddRazorPages();
 services.AddControllersWithViews();
After that, we configure the ASP.NET Core Identity password, username, and lockout settings:
services.Configure<IdentityOptions>(options =>
{
    // Password settings.
    options.Password.RequireDigit = true;
    options.Password.RequireLowercase = true;
    options.Password.RequireNonAlphanumeric = true;
    options.Password.RequireUppercase = true;
    options.Password.RequiredLength = 6;
    options.Password.RequiredUniqueChars = 1;
    // Lockout settings.
    options.Lockout.DefaultLockoutTimeSpan = TimeSpan.FromMinutes(5);
    options.Lockout.MaxFailedAccessAttempts = 5;
    options.Lockout.AllowedForNewUsers = true;
    // User settings.
    options.User.AllowedUserNameCharacters =
    "abcdefghijklmnopqrstuvwxyzABCDEFGHIJKLMNOPQRSTUVWXYZ0123456789-._@+";
    options.User.RequireUniqueEmail = false;
});
Next, we configure the authentication cookie to use a five-minute sliding expiration and use the built-in login and access denied URLs:
services.ConfigureApplicationCookie(options =>
{
    // Cookie settings
    options.Cookie.HttpOnly = true;
    options.ExpireTimeSpan = TimeSpan.FromMinutes(5);
    options.LoginPath = "/Identity/Account/Login";
    options.AccessDeniedPath = "/Identity/Account/AccessDenied";
    options.SlidingExpiration = true;
});
Next, we wire up a test email sender:
services.AddSingleton<IEmailSender, EmailSender>();
Then we need to update the Configure method to enable authentication. Go to the Configure method and add this line after app.UseRouting():
app.UseAuthentication();
Your StartUp class should now look like Listing 15-1.
using EFCOre5WebApp.DAL;
using Microsoft.AspNetCore.Builder;
using Microsoft.AspNetCore.Hosting;
using Microsoft.AspNetCore.Identity;
using Microsoft.AspNetCore.Identity.UI.Services;
using Microsoft.EntityFrameworkCore;
using Microsoft.Extensions.Configuration;
using Microsoft.Extensions.DependencyInjection;
using Microsoft.Extensions.Hosting;
using System;
using System.Threading.Tasks;
namespace EFCore5WebApp
{
    public class EmailSender : IEmailSender
    {
        public Task SendEmailAsync(string email, string subject, string message)
        {
            return Task.CompletedTask;
        }
    }
    public class Startup
    {
        public Startup(IConfiguration configuration)
        {
            Configuration = configuration;
        }
        public IConfiguration Configuration { get; }
        // This method gets called by the runtime. Use this method to add services to the container.
        public void ConfigureServices(IServiceCollection services)
        {
            services.AddDbContext<AppDbContext>(options =>
            options.UseSqlServer(Configuration.GetConnectionString("connection")));
            services.AddIdentity<IdentityUser, IdentityRole>()
            .AddEntityFrameworkStores<AppDbContext>();
            services.AddRazorPages();
            services.AddControllersWithViews();
            services.Configure<IdentityOptions>(options =>
            {
                // Password settings .
                options.Password.RequireDigit = true;
                options.Password.RequireLowercase = true;
                options.Password.RequireNonAlphanumeric = true;
                options.Password.RequireUppercase = true;
                options.Password.RequiredLength = 6;
                options.Password.RequiredUniqueChars = 1;
                // Lockout settings.
                options.Lockout.DefaultLockoutTimeSpan = TimeSpan.FromMinutes(5);
                options.Lockout.MaxFailedAccessAttempts = 5;
                options.Lockout.AllowedForNewUsers = true;
                // User settings.
                options.User.AllowedUserNameCharacters =
                "abcdefghijklmnopqrstuvwxyzABCDEFGHIJKLMNOPQRSTUVWXYZ0123456789-._@+";
                options.User.RequireUniqueEmail = false;
            });
            services.ConfigureApplicationCookie(options =>
            {
                // Cookie settings
                options.Cookie.HttpOnly = true;
                options.ExpireTimeSpan = TimeSpan.FromMinutes(5);
                options.LoginPath = "/Identity/Account/Login";
                options.AccessDeniedPath = "/Identity/Account/AccessDenied";
                options.SlidingExpiration = true;
            });
            services.AddSingleton<IEmailSender , EmailSender>();
        }
        // This method gets called by the runtime. Use this method to configure the HTTP request pipeline.
        public void Configure(IApplicationBuilder app, IWebHostEnvironment env)
        {
            if (env.IsDevelopment())
            {
                app.UseDeveloperExceptionPage();
            }
            else
            {
                app.UseExceptionHandler("/Home/Error");
                // The default HSTS value is 30 days. You may want to change this for production scenarios, see https://aka.ms/aspnetcore-hsts.
                app.UseHsts();
            }
            app.UseHttpsRedirection();
            app.UseStaticFiles();
            app.UseRouting();
            app.UseAuthentication();
            app.UseAuthorization();
            app.UseEndpoints(endpoints =>
            {
                endpoints.MapControllerRoute(
                    name: "default",
                    pattern: "{controller=Home}/{action=Index}/{id?}");
                endpoints.MapRazorPages();
            });
        }
    }
}
Listing 15-1

Updated StartUp Class with Identity Management Added

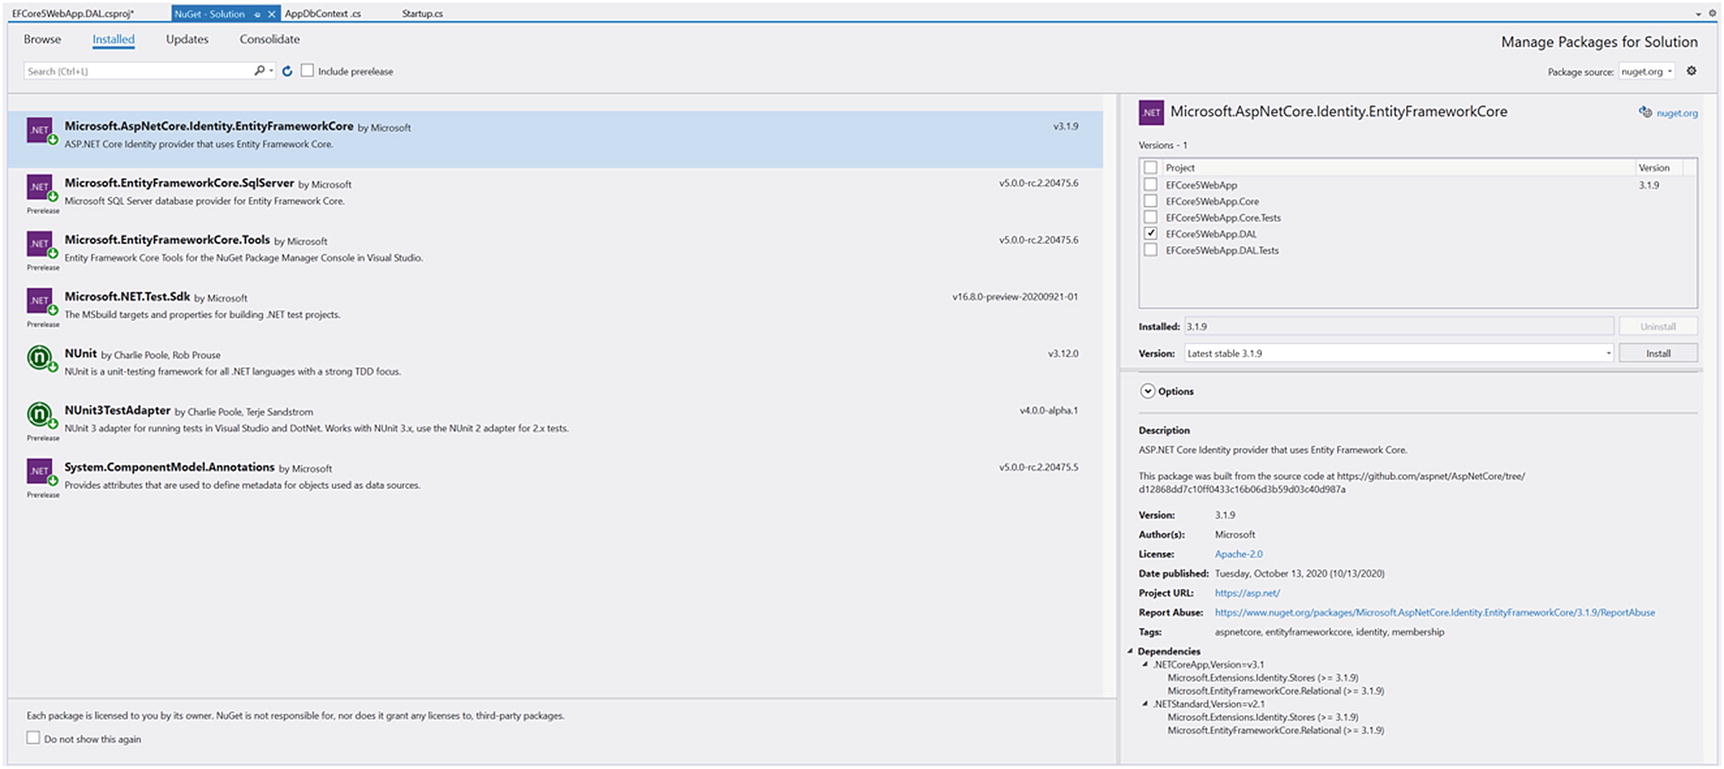
Next, we need to update our AppDbContext class to inherit from IdentityDbContext so that it can be scaffolded in the next section. We do this so to tell Entity Framework Core 5 to manage our users, roles, and claims in our SQL Server database. To do this, we first need to install the Microsoft.AspNetCore.Identity.EntityFrameworkCore NuGet package to our DAL project. To do this, click Manage NuGet Packages on the main solution node. Then go to Installed and select the Microsoft.AspNetCore.Identity.EntityFrameworkCore package and click the DAL project checkbox as seen in Figure 15-3.
../images/499766_1_En_15_Chapter/499766_1_En_15_Fig3_HTML.jpg
Figure 15-3

Install the Identity EF Core 5 Package into the DAL Project

Click the Install button to finish the installation. Now we can update our AppDbContext class to inherit from IdentityDbContext. To do this, add the following namespace first:
using Microsoft.AspNetCore.Identity.EntityFrameworkCore;
Then update the AppDbContext class declaration to match:
public class AppDbContext : IdentityDbContext

Scaffold UI

Now we are going to use Visual Studio to scaffold our Identity UI. We are doing this so we get pre-built authentication UI pages like login and user registration. To do this, right-click the web project and select “Add New Scaffolded Item”. Then select Identity as seen in Figure 15-4.
../images/499766_1_En_15_Chapter/499766_1_En_15_Fig4_HTML.jpg
Figure 15-4

Add an Identity Scaffolded Item

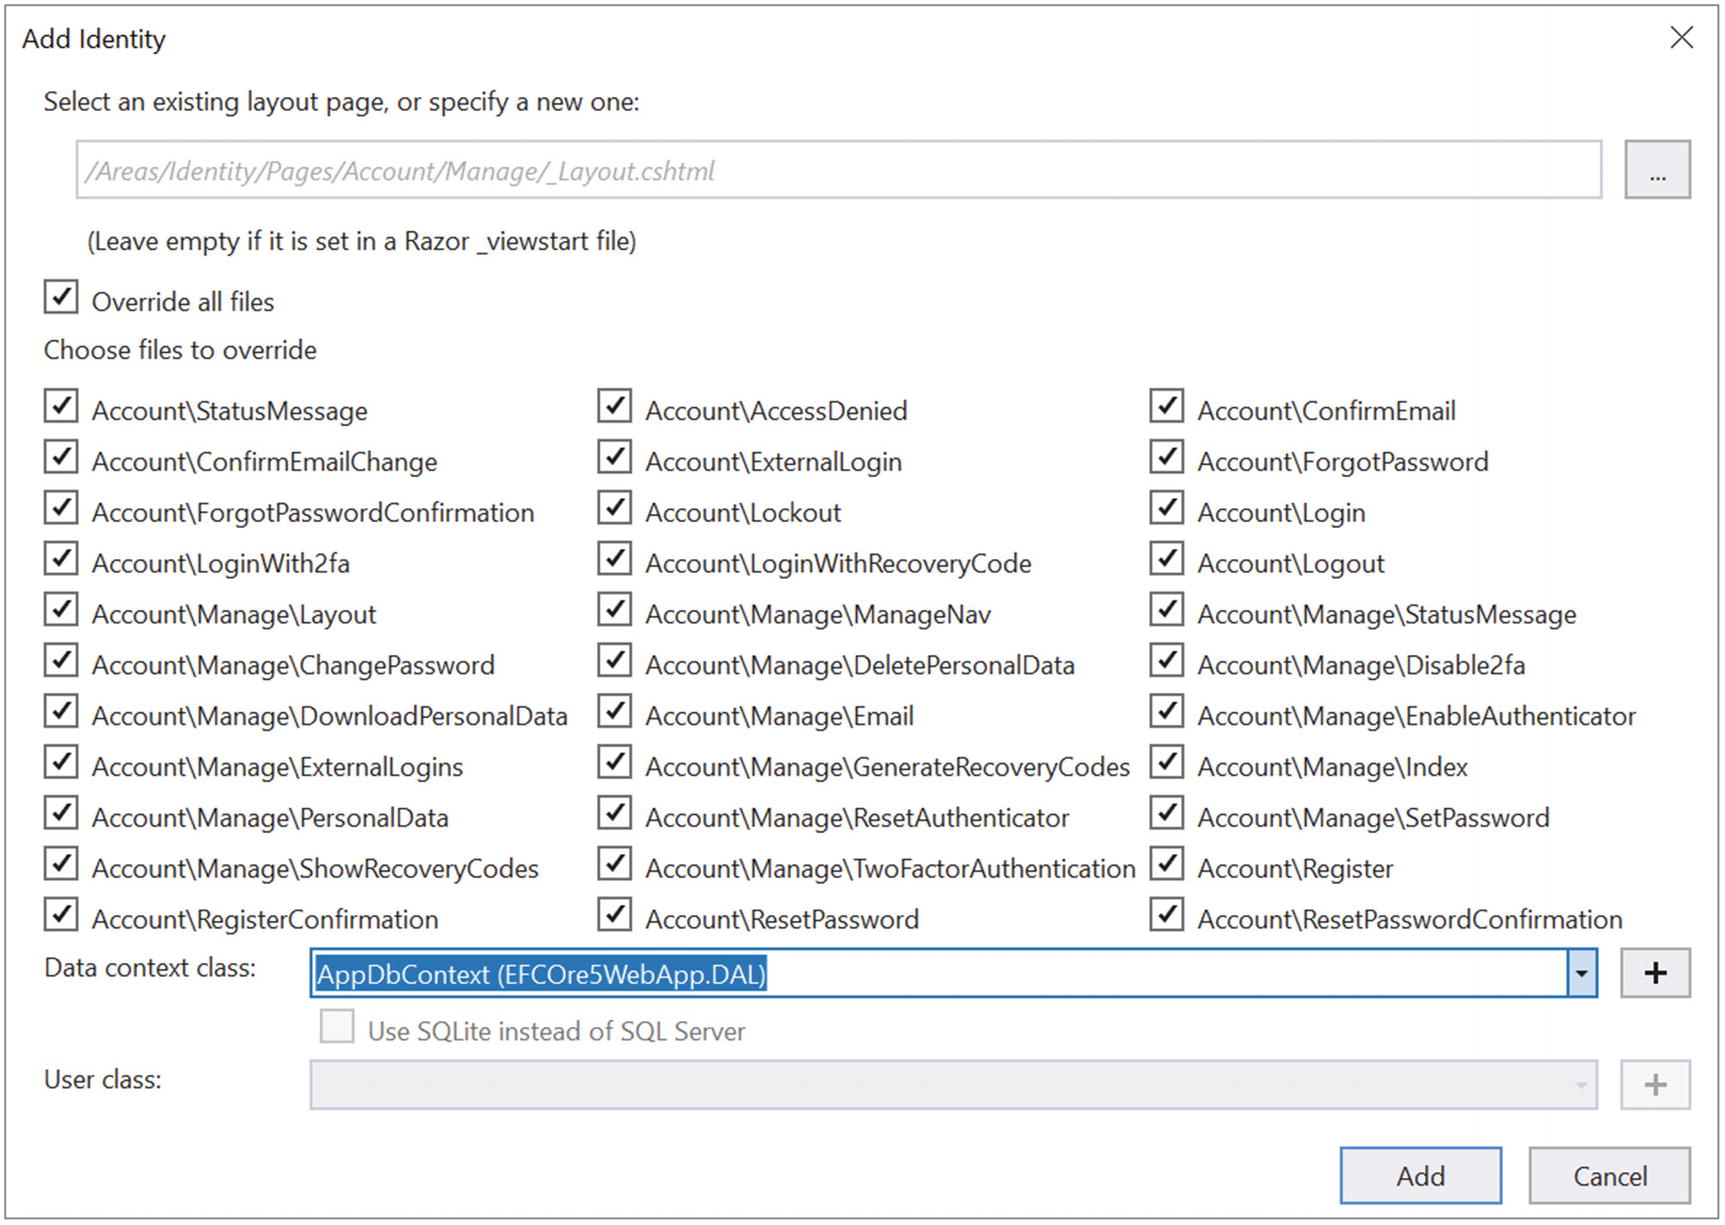
Then click the “Add” button. Next, select our AppDbContext class in the Data context class section and click the Override all files checkbox as seen in Figure 15-5.
../images/499766_1_En_15_Chapter/499766_1_En_15_Fig5_HTML.jpg
Figure 15-5

Select AppDbContext for Identity UI Scaffold

Then click the Add button.

Update Database

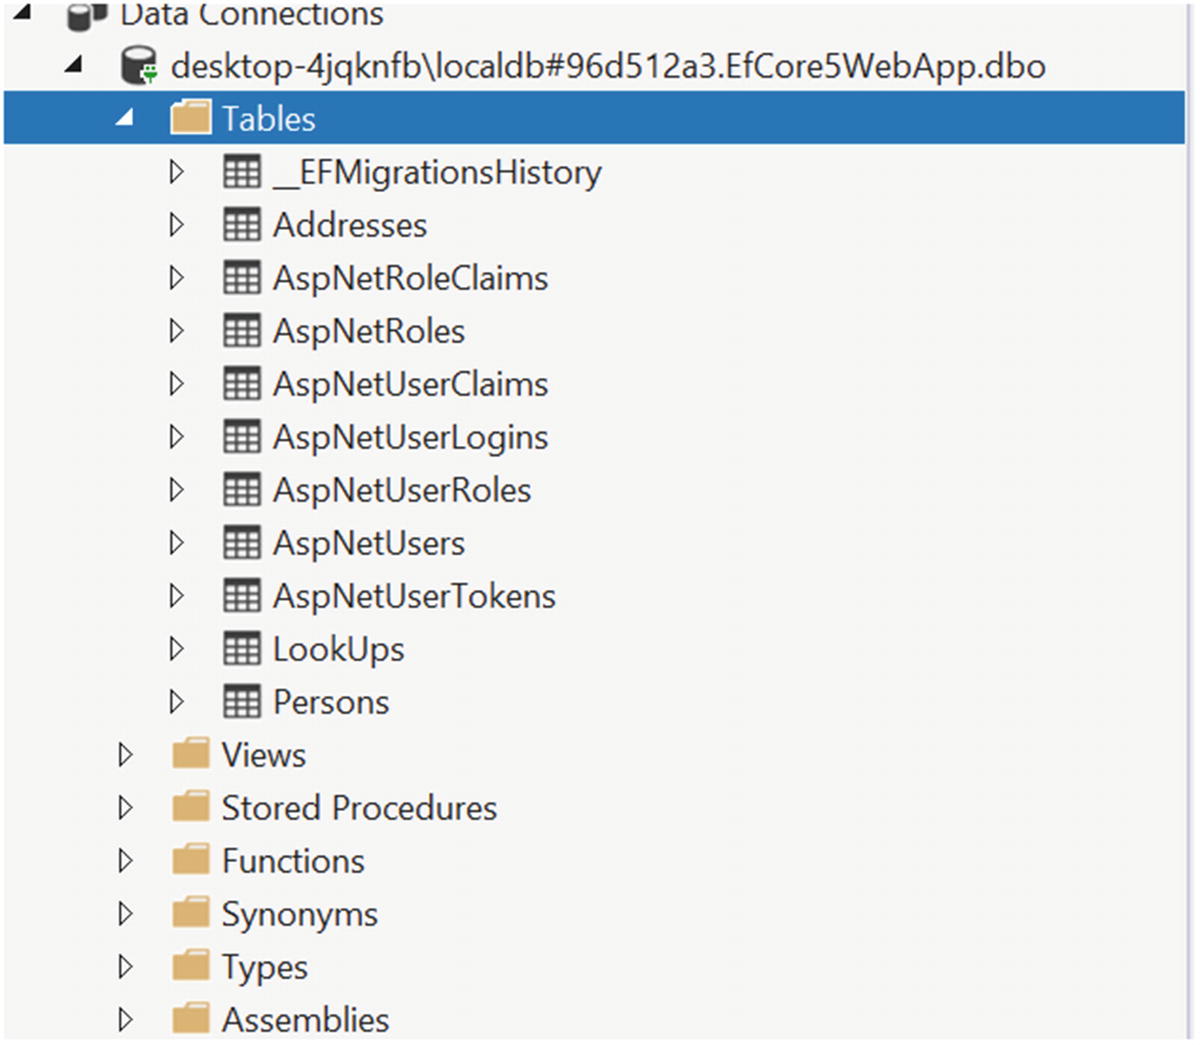
Now we need to create and run a migration to add the Identity tables. First, create a new migration named “InitialIdentity” by running “Add-Migration InitialIdentity” in the Package Manager Console. Now run the migration by running “Update-Database” from the Package Manager Console. You can now see there are a bunch of added AspNet tables into our database as seen in Figure 15-6.
../images/499766_1_En_15_Chapter/499766_1_En_15_Fig6_HTML.jpg
Figure 15-6

Added AspNet Identity Tables

Updating UI

Now it is time to update the UI to call into the scaffolded register and login functionality. We are going to simply render the LoginPartial Razor in the top nav bar by adding the following markup to the Layout Razor view:
<partial name="_LoginPartial" />
Open Views/Shared/_Layout.cshtml and make it match Listing 15-2.
<!DOCTYPE html>
<html lang="en">
<head>
    <meta charset="utf-8" />
    <meta name="viewport" content="width=device-width, initial-scale=1.0" />
    <title>@ViewData["Title"] - EFCore5WebApp</title>
    <link rel="stylesheet" href="~/lib/bootstrap/dist/css/bootstrap.min.css" />
    <link rel="stylesheet" href="~/css/site.css" />
</head>
<body>
    <header>
        <nav class="navbar navbar-expand-sm navbar-toggleable-sm navbar-light bg-white border-bottom box-shadow mb-3">
            <div class="container">
                <a class="navbar-brand" asp-area="" asp-controller="Home" asp-action="Index">EFCore5WebApp</a>
                <button class="navbar-toggler" type="button" data-toggle="collapse" data-target=".navbar-collapse" aria-controls="navbarSupportedContent"
                        aria-expanded="false" aria-label="Toggle navigation">
                    <span class="navbar-toggler-icon"></span>
                </button>
                <div class="navbar-collapse collapse d-sm-inline-flex flex-sm-row-reverse">
                    <partial name="_LoginPartial" />
                    <ul class="navbar-nav flex-grow-1">
                        <li class="nav-item">
                            <a class="nav-link text-dark" asp-area="" asp-controller="Home" asp-action="Index">Home</a>
                        </li>
                        <li class="nav-item">
                            <a class="nav-link text-dark" asp-area="" asp-controller="Home" asp-action="Privacy">Privacy</a>
                        </li>
                    </ul>
                </div>
            </div>
        </nav>
    </header>
    <div class="container">
        <main role="main" class="pb-3">
            @RenderBody()
        </main>
    </div>
    <footer class="border-top footer text-muted">
        <div class="container">
            &copy; 2020 - EFCore5WebApp - <a asp-area="" asp-controller="Home" asp-action="Privacy">Privacy</a>
        </div>
    </footer>
    <script src="~/lib/jquery/dist/jquery.min.js"></script>
    <script src="~/lib/bootstrap/dist/js/bootstrap.bundle.min.js"></script>
    <script src="~/js/site.js" asp-append-version="true"></script>
    @await RenderSectionAsync("Scripts", required: false)
</body>
</html>
Listing 15-2

Updated _Layout Partial with Login Partial Render Added

You should now be able to see the Register and Login links on your web app as seen in Figure 15-7.
../images/499766_1_En_15_Chapter/499766_1_En_15_Fig7_HTML.jpg
Figure 15-7

App with Register and Login Functionality

You can now access the Register page as seen in Figure 15-8.
../images/499766_1_En_15_Chapter/499766_1_En_15_Fig8_HTML.jpg
Figure 15-8

Register User Page

You should now also be able to access the Login page as seen in Figure 15-9.
../images/499766_1_En_15_Chapter/499766_1_En_15_Fig9_HTML.jpg
Figure 15-9

Login Page

You should now be able to register a user and log in with that user after you will see a greeting on the home page and a Logout link as seen in Figure 15-10.
../images/499766_1_En_15_Chapter/499766_1_En_15_Fig10_HTML.jpg
Figure 15-10

Logged-In User

Summary

In this chapter, I covered how to set up user authentication using ASP.NET Core Identity with Entity Framework Core 5. We first installed the needed NuGet packages and then updated our code. We then created and ran a migration to update our database. After that, we scaffolded an Identity UI and tested that it worked successfully. In the next chapter, I will cover how to retrieve and display data from our SQL Server on our ASP.NET MVC Core web app.

..................Content has been hidden....................

You can't read the all page of ebook, please click here login for view all page.
Reset
3.16.66.206