Chapter 3
New Structural Elements
As we saw in the exercises at the end of Chapter 1, it’s all about the semantics. The mistaken idea of choosing our markup solely for its presentation, as epitomized by <table>-based layouts and spacer.gifs, has been thoroughly shown the door by the “standardista” movement. Instead, our rallying cry is
“Use the most semantically appropriate element.”
Happily, most of the time the default browser presentation of each element closely maps to its semantic meaning. This gives us accessibility benefits, as semantic markup provides a foundation of meaning regardless of presentation. It also has the benefit of future-proofing our content, allowing it to generally “just work” on new and alternative devices. Given the bright future of the so-called Open Web Stack as a ubiquitous platform, this is a pretty big plus.
In this chapter we’ll look at HTML5’s new elements for indicating structure, which are perhaps some of the most noticeable (and potentially confusing) additions to our toolkit. We’ll also look at how they are used with related elements from earlier versions of HTML, the outlining algorithm that HTML5 introduces, and HTML5-style heading element levels. We’ll then take what we’ve learned and apply it, comparing it to pre-HTML5 coding patterns. Finally, we’ll look at other ways of adding the semantic meaning of these new elements for older browsers and address accessibility changes in HTML5.
But first, let’s digress with a brief look at workflow…
Workflow practices, evolving?
Traditionally, web designers created beautiful pixel-perfect mockups using flowing lorem ipsum, then painstakingly tried to fit the real content in after the design was approved. Sadly, presenting flat mockups to clients is doomed to failure—if “pixel-perfect” was ever possible, with the current multitude of mobile devices, that age is long gone. Another thing that dooms this process is the interactivity of web sites. Without being able to even test link rollovers, these mockups are waxworks, uncannily lifelike but most certainly dead.
Instead, we prefer a workflow generally referred to as “designing in the browser.” As the name implies, this involves creating mockups based on HTML and CSS, starting with content semantics and layout, and then moving on to details like color. For commercial work, this occurs after establishing the project’s scope and goals with the client and deciding on a general design via sketches and mood boards. The mockups are then shared with the client during the process for feedback, rather than only the finished version. Naz Hamid succinctly sums up the benefits of this approach in this tweet:
You can prototype and fail faster than you would in a static environment. You get the feel quickly (http://j.mp/fail-faster1).
The standard of our preferred workflow is waved aloft most prominently by Andy Clarke, whose “Walls Come Tumbling Down” presentation (http://j.mp/in-the-browser2) helped bring this workflow revolution to prominence. While critics have argued that HTML and CSS can fundamentally limit your potential creativity, we think the same argument applies to any tool. Recent advances in CSS3 are starting to make Photoshop look fairly (dare we say it?) ordinary as a web design tool, and we trust that you begin your designs the right way with paper and pencil, before moving to the computer.
Some of you may be working in large organizations and are thus unable to influence your workflow. We encourage you to try this method for a personal project and see how it compares. You may find that your enthusiasm plus the mention of cost and time savings interests your manager. Others among you may have no knowledge of HTML and CSS, producing designs for others to implement. We hope that, having made it this far into a book on HTML and CSS, you are encouraged to continue learning. The more knowledge you have of how your designs are implemented, the better your work will be. By the end of this book you will know enough HTML and CSS to make web sites.
__________
2 www.stuffandnonsense.co.uk/blog/about/walls_come_tumbling_down_presentation_slides_and_transcript/
While designing in HTML can initially be scary, discussing your progress (even when very rough) with your client helps both to include them in the process and to prevent any disastrous surprises upon reveal. Adding progressively more detail naturally focuses the client’s feedback, avoiding comments like “I don’t like that color” when you’re discussing the layout (we find designing in shades of gray during the layout stage helps, too). Of course, you can also demonstrate interactivity and show the mockups working, including how different browsers display things differently, giving the client a much better idea of how the finished product feels. This is a big help in countering the “must look the same in every browser” fallacy and explaining the joys of progressive enhancement. Finally, you won’t be constrained to a fixed-width layout because your client signed off on an inflexible mockup.
Note: This is our preferred workflow for the moment; however, we also look forward to the day when someone creates an application that really is better than hand-coding. We are not alone, as indicated by the mass of comments following Jason Santa Maria’s “A Real Web Design Application” article (http://j.mp/webdesign-app3).
Once your research, planning, sketching, and iterating are done, the next step—as in the Chapter 1 exercise—is to start identifying and marking up the content. In doing so, the onus is on us to know and understand the full range of markup at our disposal—a fundamental toolset of our craft. Let’s start with the new structural elements of HTML5.
A brave new semantic dawn
In HTML 4 and XHTML 1, our markup choices were somewhat limited. While <div> is far more appropriate than <table> for layout, it’s still just a generic container for flow content. We can add CSS styles using classes and IDs, and if we use names that describe the element’s content (rather than its presentation), we can also use them to add additional, ad hoc semantics. However, while <ul class="nav"> and <div class="sidebar"> work just fine, the extra semantics we’ve added aren’t accessible for users, and they’re not even recognized by browsers (except for styling). We might just as well use <ul class="naomi"> and <div class="mike">.
__________
Note: HTML 4 referred to block elements and inline elements. This becomes rather confusing when CSS is added to the mix, so in HTML5 these are referred to as flow elements and phrasing elements, respectively.
So what’s changed in HTML5? Well, one of the first things you’ll notice once you start using HTML5 are the new elements for sections of a page (http://j.mp/html5-structural4), which we’ll refer to as structural elements. These elements are replacements for the common ad hoc semantics for parts of the page that we applied using class and id attributes before, only this time with standardized media-independent semantics. These new structural elements are
<section>
<article>
<header>
<footer>
<hgroup>
<nav>
<aside>
Note: Media-independent just means it should work across different platforms, devices, and media. For more information, refer to the “Accessibility and HTML5” section later in this chapter.
This chapter covers several other elements, including our old friends <div> and <h1>–<h6>, plus newcomers <figure> and its child <figcaption>, to aid us in comparing and contrasting the structural elements.
__________
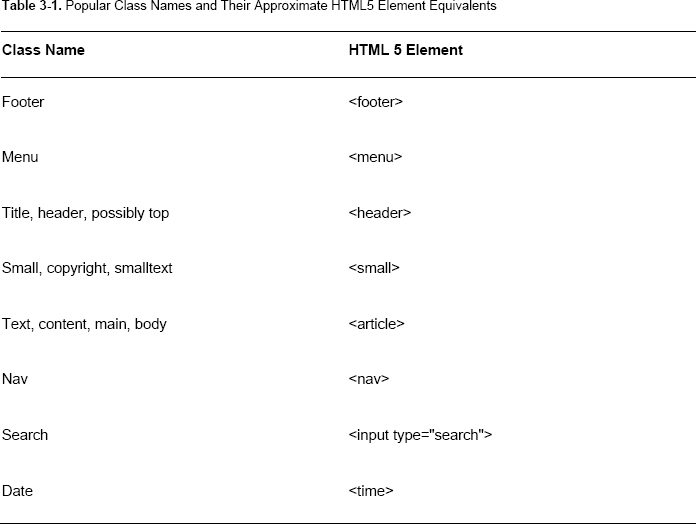
You might be wondering where the names of these new elements came from. In December 2005, Ian Hickson, the HTML5 specification editor, organized the Web Authoring Statistics study. This study analyzed the real-world use of class names, elements, attributes, and related metadata of about a billion documents. The findings on popular class names (http://j.mp/class-names5) revealed some common semantic patterns used by authors. While not using the class attribute was by far the most common practice, the most popular class names were as follows:
footermenutitlesmalltextcontentheadernavcopyrightbuttonmainsearchmsonormaldatesmalltextbodystyle1topwhitelink
In this list, we can see several semantic indicators that map closely to new HTML5 elements, as outlined in Table 3-1.
So if you’ve been a good standardista and used meaning-based class names, you have helped choose these new HTML5 element names. Bravo! There are some that are a little more abstract, such as <aside> (which we’ll meet soon) over class="sidebar", but in these cases the popular class name would have been too specific, limiting the element’s possible use.
__________
5 code.google.com/webstats/2005-12/classes.html
Structural building blocks: <div>, <section>, and <article>
Let’s start by comparing three easily confused elements used to structure a page.
<div>: The generic container we all know and love. It’s a flow content element with no additional semantic meaning (http://j.mp/html5-div6).<section>: A generic document or application section, almost always with a heading (maybe in a<header>) and sometimes a<footer>,too. It’s a chunk of related content, like a subsection of a long article, a major part of the page (like the news section on the home page), or a page in a web application’s tabbed interface (http://j.mp/html5-section7).<article>: An independent section of a document or site. This means it should be able to stand alone and still make sense if you encounter it somewhere else (e.g., in an RSS feed). Examples include a weblog article (duh), a forum post, or a comment. Like<section>, these should have a heading and may have a header and/or footer (http://j.mp/html5-article8).
The difference between <div>, <section>, and <article>
Those definitions initially sound pretty similar, so let’s compare and contrast them, starting with <div>.
The <div> element
In writing POSH (plain old semantic HTML), we should use the most suitable or semantically accurate element. While <div> has the semantics of a general flow container element, it doesn’t have any semantic meaning beyond this, and it’s used when there are no elements that are more appropriate (i.e., all the time in HTML 4). There is no requirement for the contents of a <div> to be related to each other.
__________
The <section> element
The new HTML5 <section> element is similar to <div> as a general container element, but it does have some additional semantic meaning—the things it contains are a logical group of related content.
Note: The <section> element represents a generic section of a document or application. A section, in this context, is a thematic grouping of content, typically with a heading.
<section> is also a sectioning content element. Along with <article>, <nav>, and <aside>, it indicates a new section in the document. Imagine making your page into a nested list of related parts, or using a word processor’s outline view: the heading of each sectioning content element is a new item and indentation reflects nesting.
1. Example list item
2. Another item
1. A nested item
i. You get the idea
We’ll cover how sectioning content elements creates HTML5 document outlines in “The HTML5 outlining algorithm” section later in this chapter, but the important thing to note is that <div> isn’t a sectioning content element.
The <article> element
The new HTML5 <article> element is like a specialized kind of <section>; it has the more specific semantic meaning that it is an independent, self-contained part of the page. We could use <section>, but using <article> gives more semantic meaning.
Which one to choose?
To think about HTML 4, we can compare this choice to the choice between <p> and <pre>. Both are flow content elements for text, but <pre> is like a specialized kind of <p> with a more specific meaning (“this is a block of preformatted text”). The same is true with <section> and <article>; <section> means “related content,” whereas <article> means “one piece of related content that makes sense on its own,” even outside the context of the page (the page’s header and footer, etc.).
The potentially confusing part of this is that <section> can be used for parts of a page and can contain <article>s (like the “Recent Articles” section of a home page) and can also be used for sections of a long <article> (inside an <article>).
So, to decide whether <article>, <section>, or <div> is appropriate, choose the first suitable option.
- Would the enclosed content make sense on its own in a feed reader? If so, use
<article>. - Is the enclosed content related? If so, use <section>.
- If there’s no semantic relationship, use <div>.
Except for occasional use to provide a hook for styles where there isn’t already one, we expect the humble <div> will often be superseded by <section>, <article>, and the other new structural elements—where appropriate—in semantic HTML5. However, don’t be afraid to use <div> where appropriate; it is still valid HTML5.
<section> and <article> are used like <div> is used in HTML 4; for example, these elements can’t be used inside <blockquote> or <address>. Also, in general, avoid nesting an <article> inside another <article>. Use <section>s for indicating logical parts of an <article> instead. A notable exception to this is comments on a weblog article. Finally, the cases where <section> and <article> don’t need a heading are in web applications (think of an e-mail application’s main list view), but it’s better to add a heading, even if you then hide it via CSS.
Basic structures using these elements
Here are a couple of examples showing the use of <section> and <article>.
A weblog article
Here’s the structure we are working with:
Weblog article
Heading
In HTML 4, we’d probably wrap the article in <div class="article">, etc. Obviously, we should use <article> instead in HTML5.
A long article with subsections (like a thesis)
Here is the article structure we are working with:
Again, the article would generally be wrapped in a <div> in HTML 4, and the subsections would only be suggested by <h1>–<h6> elements. In HTML5, the article should be wrapped in <article>, and the subsections of the <article> should be explicitly indicated by wrapping them in <section> elements, perhaps in ordered list items if you’d like section numbering.
<article>

  <h1>Heading</h1>

  <section>

    <h2>Section heading</h2>

    <p>Content</p>

  </section>

  <section>

    <h2>Section heading</h2>

    <p>Content</p>

  </section>

  <section>

    <h2>Section heading</h2>

    <p>Content</p>
  </section>

</article>
These are somewhat simplistic examples, so toward the end of the chapter we’ll look at the structure of a basic weblog home page.
Headings: <header>, <hgroup>, and <h1>–<h6>, plus <footer>
Next, let’s look at the new <header>, <footer>, and <hgroup> elements in detail.
Note: Sectioning elements include <section>, <article>, <aside>, and <nav>, and also <blockquote>, <body>, <details>, <fieldset>, <figure>, and <td>. We’ll cover this concept in “The HTML5 outlining algorithm” section later in this chapter.
<header>: Used for introductory and navigational content of a sectioning element. This typically includes the heading (an<h1>–<h6>element or an<hgroup>element), but can also contain other content, such as a<nav>element or navigational links, a table of contents, a search form, or any relevant logos. It can’t contain<footer>or another<header>(seehttp://j.mp/html5-header).<footer>: Used for additional information about the content, such as who wrote it, links to related documents, copyright data, a link to the top of the page, etc., and usually appears at the end of the content. Like<header>, it can’t contain<header>or<footer>elements (seehttp://j.mp/html5-footer).<hgroup>: A specialized form of<header>that can contain only<h1>–<h6>elements. It is for grouping a heading with subheading(s) (seehttp://j.mp/html5-hgroup9).<h1>–<h6>: The heading elements from HTML 4 are back and basically unchanged, except for HTML5’s stronger guidance on using them correctly (generally, don’t skip levels), and the interesting addition of HTML5-style heading levels, which we cover later in this chapter. (http://j.mp/html5-h1-h6).
__________
<header>’s defining purpose is to contain introductory or navigational aids, rather than define their placement (headers are usually at the top of a section, but not necessarily).
<footer> is for related links, copyright, and author information. A <footer> is usually at the end of a section but can appear at the top and more than once (for example, a “Top of page” link). For some content, there is some crossover in which of these elements to use—author information would be fine in either.
<header> and <footer> seem to suggest the page header and footer familiar to designers. Don’t let first impressions fool you, however, as these elements apply to the current sectioning element. If that element is <body>, then the <header> or <footer> does apply to the whole page. But if it’s another sectioning element, then <header> or <footer> only applies to that element. Think Russian nested dolls…in cute little angle brackets.
Note: The <address> element has changed from supplying contact information for the page (only one per page) to being “scoped” by context. In HTML5, <address> contact information is for the nearest <article> or <body> element ancestor. As in HTML 4, it’s not for literal addresses, unless the address is also contact information—a rare occurrence (for marking up normal postal addresses, refer to “Microformats” in Chapter 4). A list of recent articles on a home page could use <address> for each article’s author name and bio link (or other contact information), assuming each post was an <article>.
A <header> or <footer> can itself contain sectioning content elements—for example, in a <footer>, this could be an appendix, index, long colophon, or license agreement. However, don’t get too carried away because they can’t contain <header> or <footer>. For a complex page header or footer that requires nested sectioning content elements with their own <header>s and <footer>s, use a <section> instead.
While <header> and <hgroup> are initially easy to confuse, remember that <hgroup> can only contain a heading group of <h1>–<h6> elements and is for subtitles, alternative titles, or taglines. <header> can contain an <h1>–<h6> element or <hgroup> in addition to other elements that introduce the section. If there’s no other <header> content, only one heading (so no need for <hgroup>), and no need for a style hook, just use the relevant <h1>–<h6> element.
Let’s look at some examples.
An article with one heading
This has a heading <h1> only. No <hgroup> or <header> is needed.
An article <header> with heading and metadata
Now we wrap a heading and metadata in <header>.
<article>

  <header>

    <h1>Article heading</h1>

    <p>(<time datetime="2009-07-13" pubdate>13th July, 2009</time>)</p>

  </header>

  <p>Content…</p>

</article>
An article with an <hgroup>-enclosed subheading
This example has a heading <h1> and subheading <h2> in <hgroup>.
<article>

  <hgroup>

    <h1>Article heading</h1>

    <h2>Article subheading</h2>

  </hgroup>

  <p>Content…</p>

</article>
An article with heading, subheading, and metadata
Finally, here’s an example of a heading that uses <header> and <hgroup>.
<article>

  <header>
    <hgroup>

      <h1>Article heading</h1>

      <h2>Article subheading</h2>

    </hgroup>

    <p>(<time datetime="2009-07-13" pubdate>13th July, 2009</time>)</p>

  </header>

  <p>Content…</p>

</article>
Some examples of <hgroup> use
In this section, you can visualize the effect of using <hgroup>. Here is an article heading with an alternative heading.
Here is a site name with a tagline (branding phrase).

Here is a long article heading split into a heading and a subheading.
![]()
Now, you may be wondering why you need to have both <header> and <hgroup>—they both appear to be a wrapper for <h1>–<h6> elements. Well, <hgroup> actually performs another function: hiding subheadings from the outlining algorithm. Let’s take an exciting dive into the world of HTML5 outlines to work out what that actually means.
The HTML5 outlining algorithm
Being able to make a page outline automatically is a useful trick for browsers and robots alike. It could, for example, be used to generate a table of contents for a blind user, enabling them to quickly skim the page. To make a page outline from an HTML 4 or XHTML 1 document, we could find all the <h1>–<h6> elements and use each heading’s number to indicate the level of nesting. However, subtitles would increase nesting, and many less-semantic pages skip levels for the sake of presentation, both of which would give an inaccurate outline. Also, an outlining tool would not be able to tell which titles are part of the main content and which are in the sidebar, for example, as both sets of headings are generally inside generic <div> elements.
HTML5 addresses this via a new outlining algorithm (http://j.mp/html5-outline10), which we touched on when mentioning sectioning content elements (a “plain old nested list”). While this may not sound exciting, it’s a boon in making our content more accessible and usable. In addition, understanding the creation of outlines will explain a couple of otherwise confusing things. These outlines are formed from headings in sectioning content elements, such as <section> and <article>, which we’ve met, plus <nav> and <aside>, which define the major chunks of related content on a page.
The first <h1>–<h6> in each sectioning content element is used as the heading of that section in the outline, and any subsequent headings create an implicit enclosing section in the outline (http://j.mp/headings-sections11); that is, it’s not in your code or the DOM, but the outlining algorithm pretends it is. Heading elements of a lower level make a nested implicit section, whereas the same or higher levels make a new implicit section after the current one and at the same level.
Note: Implicit enclosing sections are how HTML5’s outlining copes with errors and pre-HTML5 content.
The exception to this is the <hgroup> element, which hides all but the first child <h1>–<h6> from the outlining algorithm and which we’ll meet soon. Note that <header> is not a heading content element (spec-speak for <h1>–<h6> and <hgroup>) or sectioning content element, and it does not affect the outline algorithm.
__________
Outlining in action
That’s all very well in theory, but what does it all mean? Well, let’s have a look at some outlining in action to get a feel for what’s going on. You can play along at home with an outliner such as h5o (http://j.mp/html5-outliner12) or (http://j.mp/gsnedders-outliner13).
The following is a basic HTML 4 example and its outline:
<body>

  <h1>Article heading</h1>

  <h3>Article subheading</h3>

  <p>Some text</p>

  <h2>Section heading</h2>

  <p>More text</p>

  <h2>Another section heading</h2>

  <p>A little more text</p>

</body>
Note that the article subheading shows up in the outline as the equivalent of a section heading because its heading is lower. However, its heading level (<h3>) doesn’t affect the outline—it’s only indented one level, not two.
1. Article heading (implicit section)
1. Article subheading (implicit section)
2. Section heading (implicit section)
3. Another section heading (implicit section)
__________
Here is the same example in HTML5, using explicit sectioning elements and <hgroup>.
<body>

  <article>

    <hgroup>

      <h1>Article heading</h1>

      <h2>Article subheading</h2>

    </hgroup>

    <p>Some text</p>

    <section>

      <h2>Section heading</h2>

      <p>More text</p>

    </section>

    <section>

      <h2>Another section heading</h2>

      <p>A little more text</p>

    </section>

  </article>

</body>
No more article subheading, but a mystery “Untitled section” appears. Read on to find out why.
2. Untitled section
1. Article heading
1. Section heading
2. Another section heading
Sectioning root elements
In addition to sectioning content elements, there’s another group of elements that can have their own outlines.
<blockquote><body><details><fieldset><figure><td>
These sectioning root elements don’t contribute to the outlines of their ancestors. In general, this means they hide things from the outlining algorithm that wouldn’t be useful to include. While <body> is also on this list, it’s the base element of the document outline. Like sectioning content elements, sectioning root elements define the scope of contained <header> and <footer> elements, and they’re never children of implicit sections.
The scourge of the untitled section
So what happens when we have a sectioning element without a heading? As you may have guessed, we get a section in the outline called “untitled section.” We saw this in the previous outline example—in that case, the untitled section came from <body>. Of course, “untitled section” isn’t particularly helpful, so in general <section>, <article>, and <body> should always have a heading. For other sectioning elements such as <aside>, check the page with CSS disabled and see if the content still makes sense. If you don’t want a heading to appear in the finished design, you can add one and hide it via CSS. This makes sure the heading is still available to screen readers and robots, and is sometimes done for accessibility in HTML 4 and XHTML 1 with <div class="nav">, for example. When in doubt, we recommend you add one—blind users (including Google) will thank you for it.
Note: Sectioning element is our shorthand for “sectioning content and sectioning root elements,” because that’s quite a mouthful.
Here’s another outline example showing how the outlines of sectioning root elements (<blockquote>, <body>, <details>, <fieldset>, <figure>, and <td>) are excluded from the outlines of their ancestors.
<body>

  <h1>Exciting simian adventures</h1>

  <article>

    <h1>Article heading</h1>

    <p>Some text</p>

    <!-- woops! we forgot the section -->

    <h2>Section heading</h2>

    <p>More text</p>

    <blockquote>

      <h3>Quote heading</h3>

      …

    </blockquote>

    <h3>Subsection heading</h3>

    …

    <section>

      <!-- woops! we forgot the heading -->

      <p>A little more text</p>

    </section>

  </article>

</body>
Here is the outline, showing sectioning root elements, implicit sections, and untitled sections in action.
3. Exciting simian adventures
1. Article heading
1. Section heading (note there’s no
<blockquote>heading)1. Subsection heading (implicit section based on heading level)
2. Untitled section (
<section>without heading)
In addition we can see that the implicit section creates a nested section due to its relatively lower header—<h2>Subsection heading</h2> would have made it the same level as “Section heading,” but an <h4> header wouldn’t have further indented the heading in the outline. Finally, the explicit “Untitled section” closes the previous implicit sections.
This outlining algorithm, and the creation of implicit sections for it, explains why we should always use a heading content element for at least <section> and <article>, why subheadings should be wrapped in <hgroup>, and why every heading element should be in its own sectioning element. However, it also has an interesting side effect: decoupling heading levels from the document outline.
HTML5-style heading element levels
In HTML authors are encouraged to use the heading elements <h1>–<h6> rationally—using the levels to indicate nesting, and not skipping levels—but this can be a problem in long or complex documents. There are some documents that actually need more than six levels of headings! (Actually, we always wondered what became of poor <h7>–<h9>.) Due to the outlining algorithm, there are now two ways we can use headings in HTML5.
- As in HTML 4, where the heading element (
<h1>–<h6>) dictates the level of the content’s importance (think of making an outline).<h1>is used for the page or article title, and subsequent headings increase rationally as required to indicate the outline. - A new way introduced in HTML5, where the nesting of explicit sectioning content elements dictates the document outline. This means the highest-ranking heading element (
<h1>–<h6>or<hgroup>) inside a sectioning content element (<section>,<article>,<nav>, or<aside>) becomes that section’s header, regardless of whether this skips levels.
This new way is potentially much easier because heading levels in the document’s outline become separate from the heading element used (and how the heading is styled using CSS). As most sections will only need one heading element, you could just use <h1> (almost) everywhere, styling based on number of <section> parents. However, current browsers won’t interpret this correctly (e.g., when CSS is disabled), and this requires advanced CSS selector support to style, so for now we recommend that you don’t do this.
Alternatively, because the use of explicit sectioning elements allows us to skip heading levels, you can use whatever headings you want (e.g., based on CSS styles) without worrying about using <h1>–<h6> rationally. Stylistic exceptions such as subtitles can be addressed via styles for <hgroup> or classes when needed.
Example of nesting heading element levels
This is a standard nesting of heading elements (uses <h1> to <h4>).
<article>

  <hgroup>

    <h1>Article heading</h1>

    <h2>Article subheading</h2>

  </hgroup>

  <section>

    <h3>Section heading</h3>

    <p>Content…</p>

      <section>

        <h4>Subsection heading</h4>

        <p>Content…</p>

      </section>

  </section>

</article>
Example of the new style for heading element levels
This example uses HTML5-style heading levels—new section resets (<h3> is skipped intentionally so that the subsection’s heading uses <h4> styles).
<article>

  <hgroup>

    <h1>Article heading</h1>

    <h2>Article subheading</h2>

  </hgroup>
  <section>

    <h2>Section heading</h2>

    <p>Content…</p>

      <section>

        <h4>Subsection heading</h4>

        <p>Content…</p>

      </section>

  </section>

</article>
Both of these will produce the same HTML5 outline.
4. Article title
1. Section title
1. Subsection title
As mentioned, in HTML5 all but the first heading element in a sectioning content element generate an implied section in the document outline. Because of this, it’s recommended to add explicit sectioning wrappers. If you don’t, make sure you don’t skip heading levels.
Even more structural elements: <nav>, <aside>, <figure> (and <figcaption>)
Now we’ll look at the other two sectioning content elements, <nav> and <aside>. We’ll also touch on <figure> and its child <figcaption>, and compare them with <aside>.
<nav>: A section of navigational links, either to other pages (generally site navigation) or to sections on the same page (such as a table of contents for long articles). This is for major navigation blocks, not just for any group of links. A rule of thumb is that you would add a “skip navigation” link for it (http://j.mp/html5-nav14).<aside>: A section of a page that consists of content that is tangentially related to—but separate from—the surrounding content. In print, this would be a sidebar, pull quote, or footnote. In a weblog article, this could be related information about the article, extra information in the margin, or the comments section (http://j.mp/html5-aside15).<figure>: For content that is essential to understanding but can be removed from the document’s flow (moved to a different place) without affecting the document’s meaning. This can be used for images or video, but it can also be used for any other content including a graph, code sample, or other media. Use the optional (and delicious) child<figcaption>to provide a label (http://j.mp/html5-figure16).
You’re probably already using a <ul class="nav"> or something similar for site navigation. The <nav> element allows us to explicitly mark up groups of navigational links. This has accessibility benefits; for example, it allows users of assistive technology like screen readers to skip the navigation and go straight to the content, or skip to the navigation. We can use this as another way to decide if something is a major navigation block—would a blind user be helped by having that navigation accessible via a hotkey? While site and in-page navigation are obviously essential, content highlights in the page’s footer probably aren’t. The search box? Well, it depends…would the site’s users think so? Note you’ll still need the <ul> or <ol> element if you are using a list for your navigation (and you should be—it’s the most appropriate element), but you can also include a heading or other relevant content. Here is an example of <nav> in use, with a heading (most probably hidden via CSS).
<nav>

  <h2 class="a11y">Main navigation</h2>

  <ul>
    <li><a href="/">Home</a></li>

    <li><a href="/blog/">Weblog</a></li>

    <li><a href="/about/">About</a></li>

    <li><a href="/contact/">Contact</a></li>

  </ul>

</nav>
__________
<aside> content should be additional to (but not essential to the understanding of) the main content; that is, any related content. While print design can provide inspiration, don’t stop at pull quotes. For example, a footnote provides extra but unessential information, and a pull quote (while essential content) is a quoted copy of text from the main content. However, keep in mind the <aside> must be related. Having your site’s sidebar in an <aside> as a child of <body> is fine, but site-wide information shouldn’t appear in an <aside> that is the child of an <article>, for example. Also, <aside> would be appropriate for advertising, as long as it was related to the parent sectioning element. Here is an example <aside> providing extra information in the margin of an article.
<aside class="sidenote">
<p><em>Sectioning root</em> elements are <code><blockquote></code>,
<code><body></code>, <code><details></code>, <code><fieldset></code>,
<code><figure></code>, and <code><td></code></p>
</aside>
<p><code><header></code> and <code><footer></code> apply to the current sectioning
content or 'sectioning root' element…</p>
<figure> content is essential, but its placement is not. Any part of a section that you’d currently use CSS positioning for would be a good candidate. Generally this would be referred to from the text, as shown next, but this is not required.
<p>… Here is an example of using <code>hgroup</code> for a subtitle.</p>

<figure>

  <img src="img/hgroup-subtitle.png" width="500" height="136" alt="hgroup example usage; an

article heading with an alternative heading" />

</figure>
You can also provide an optional caption for the <figure> using <figcaption>, as shown next, as either the first or the last child element.
<figure>

  <figcaption>An article heading with an alternative heading</figcaption>

  <img src="img/hgroup-subtitle.png" width="500" height="136" alt="hgroup example usage; an

article heading with an alternative heading" />

</figure>
Finally, <figure> can contain more than one piece of content, as shown next.
<figure>
<pre><ruby><strong>cromulent</strong>
<rp>(</rp><rt>crôm-yü-
lənt</rt><rp>)</rp></ruby></pre>
<img src="img/cromulent.png" width="570" height="80" alt="Displaying ruby text after the
base text for an English dictionary">
<figcaption>Using ruby text for a dictionary definition by displaying the ruby text inline
after the base text</figcaption>
</figure>
Choose between <aside> or <figure> by asking yourself if the content is essential to the section’s understanding. If the content is just related and not essential, use <aside>. If the content is essential but its position in the flow of content isn’t important (could it be moved to an appendix?), use <figure>. Of course, if its position relates to previous and subsequent content, use something else more appropriate! Remember too that <nav> and <aside> are sectioning content elements, so their headings will be added to the document outline. <figure> is a sectioning root element, so any child headings will be hidden from the outline.
Putting it all together
We’ve covered a lot of ground. To recap, HTML5 has several new elements for chunks of related content—basically a logical section of the document. Using these elements instead of <div> is more semantically meaningful and gives us added benefits (such as improved accessibility) for free. Let’s review what we’ve covered so far and see how we can use these new elements in practice by converting a simple page to HTML5. We’ll also look at a couple of alternatives to help you think about the new semantics without committing to using the new semantic elements.
New sectioning content elements in a nutshell
Here is a summary of the new elements we have discussed.
<section>: A chunk of related content.<article>: An independent, self-contained chunk of related content that still makes sense on its own (e.g., in an RSS feed).<aside>: A chunk of content that is tangentially related to the content that surrounds it but isn’t essential for understanding that content.- (cf.
<figure>: A chunk of content that is essential for understanding surrounding content but which could be moved (e.g., to an appendix). <nav>: A major navigation block (generally site or page navigation).<div>: A chunk of content with no additional semantics (e.g., for CSS styling hooks).
With very few exceptions (generally in web applications), <section> and <article> elements should have a heading, possibly in a <header> element with any other introductory information. We can use the following comment posted on the HTML5 Doctor website (following the article “The section element”) (http://j.mp/section-heading17) as a rule of thumb for deciding between <section> and <div>:
[C]onsciously add a title for each
<section>, even if you then hide the title with CSS (as is generally the case with<nav>for accessibility). If it seems like content that shouldn’t have a title when CSS is disabled, then it’s most probably not a<section>.Oli Studholme
Remember, a heading with one or more subheadings should be in an <hgroup>. In addition to <header>, sectioning elements can also contain one or more <footer> elements with additional information, such as author (<address>) or copyright (<small>) content, related links, etc. It’s important to note that <header> and <footer> apply to the sectioning element they’re in (this is <body> for a page header or footer). Also, remember <header> and <footer> can’t contain <header> or <footer> themselves.
__________
Note: Sectioning elements include the sectioning content elements <section>, <article>, <aside>, and <nav> as well as the sectioning root elements <blockquote>, <body>, <details>, <fieldset>, <figure>, and <td>.
Finally, while the words “header,” “footer,” and “aside” all come with preconceptions, their semantic meaning comes from the types of content they contain, not from their presentation or relative placement. For example, <aside> could contain a footnote, and a <footer> containing a “Top of Page” link could appear at both the top and bottom of a section.
Now let’s look at example structures for an idealized article page, using the standard layout of a page header (with logo, etc.), site navigation, a main column, a side column, and a page footer.
Converting a simple page to HTML5
Here’s the outline of the parts of our page.
Figure 3-1 illustrates the page.

Figure 3-1. Article page layout
So let’s write it in standard POSH (XHTML 1.0 style).
<!DOCTYPE html PUBLIC "-//W3C//DTD XHTML 1.0 Strict//EN"

  "http://www.w3.org/TR/xhtml1/DTD/xhtml1-strict.dtd">

<html lang="en" xml:lang="en">

  <head>

    <title>Article (XHTML 1)</title>

    <meta http-equiv="Content-Type" content="text/html; charset=utf-8" />

  </head>

  <body>

    <div id="branding">

      <h1>Site name</h1>

      <!-- other page heading content -->

    </div>

    <ul id="nav"><li>Site navigation</li></ul>
    <div id="content">

      <div id="main"> <!-- main content (the article) -->

        <h1>Article title</h1>

        <p class="meta">Article metadata</p>

        <p>Article content…</p>

        <p class="article-footer">Article footer</p>

      </div>

      <div id="sidebar"> <!-- secondary content -->

        <h2>Sidebar title</h2>

        <p>Sidebar content…</p>

      </div>

    </div>

    <div id="footer">Footer</div>

  </body>

</html>
Now let’s convert that to HTML5 using the new structural elements.
Note: We’ll leave out the CSS and JavaScript for browser support covered in Chapter 2 for brevity. Remember to add them if you’re coding along at home.
<!-- 'HTML-style' HTML5 -->

<!DOCTYPE html>

<html lang="en">

  <head>

    <meta charset="utf-8">

    <title>Article (HTML5)</title>
  </head>

  <body>

    <header id="branding"><!-- page header (not in section etc) -->

      <h1>Site name</h1>

      <!-- other page heading content -->

    </header>

    <nav>

      <ul><li>Main navigation</li></ul>

    </nav>

    <div id="content"> <!-- wrapper for CSS styling and no title so not section -->

      <article> <!-- main content (the article) -->

        <header>

          <h1>Article title</h1>

          <p>Article metadata</p>

        </header>

        <p>Article content…</p>

        <footer>Article footer</footer>

      </article>

      <aside id="sidebar"> <!-- secondary content for page (not related to article) -->

        <h3>Sidebar title</h3> <!-- ref: HTML5-style heading element levels --

>

        <p>Sidebar content</p>

      </aside>

    </div>

    <footer id="footer">Footer</footer> <!-- page footer -->
  </body>

</html>

<!-- 'XHTML-style' HTML5 -->

<!DOCTYPE html>

<html lang="en">

  <head>

    <meta charset="utf-8" />

    <title>Article (HTML5)</title>

  </head>

  <body>

    <header id="branding"> <!-- page header (not in section etc) -->

      <h1>Site name</h1>

      <!-- other page heading content -->

    </header>

    <nav>

      <ul><li>Main navigation</li></ul>

    </nav>

    <div id="content"> <!-- wrapper for CSS styling and no title so not

section -->

      <article> <!-- main content (the article) -->

        <header>

          <h1>Article title</h1>

          <p>Article metadata</p>

        </header>

        <p>Article content…</p>
        <footer>Article footer</footer>

      </article>

      <aside id="sidebar"> <!-- secondary content for page (not related to article) -->

        <h3>Sidebar title</h3> <!-- ref: HTML5-style heading element levels --

>

        <p>Sidebar content</p>

      </aside>

    </div>

    <footer id="footer">Footer</footer> <!-- page footer -->

  </body>

</html>
The changes we’ve made almost seem like a code spring cleaning. We’ve changed to the simple HTML5 DOCTYPE and charset introduced in Chapter 2 and swapped the <div>s being used for semantic parts of the page for the new HTML5 structural elements. Our code is different, but the “evolution, not revolution” aspect of HTML5 is obvious.
Note here we assume that the sidebar contains content that’s not related to the article (such as recent articles, etc.), so it’s a descendent of <body> (a page sidebar) not <article>. If it contained only content tangentially related to the article, we could make <aside> a child of <article>. Also, we assume that the page header and footer don’t contain nested <header> or <footer> elements, as in that case we’d have to use <section> instead (remember that <header> and <footer> can’t themselves contain <header> or <footer>).
So what about web sites where you’re concerned about Internet Explorer users with JavaScript turned off, or your boss is the cautious type? Does this mean the exciting HTML5 elements we’ve covered are but a pipe dream? Fear not, gentle reader.
Introducing “HTML4.5”: Adding HTML5’s semantics via <div class=””>
One aspect of HTML5 we keep coming back to is that it’s a sliding scale, not all or nothing. In this spirit, we’ve invented a whole new meta-specification for you and we call it “HTML4.5”. Rather than a W3C-style specification, this is more of an idea—we can use the parts of HTML5 we want without needing to go all out. In this case, we want the semantic goodness of HTML5’s new elements, but without the fear of Internet Explorer breaking everything. We can do this by using HTML5’s new element names (and implied semantics) as <div> class names.
Of course, we don’t get any of the benefit of built-in semantics. However, just thinking about HTML5’s structural elements will make our code more logical and semantic. If you think you might convert to HTML5 in the future, the HTML5-elements-as-class-names approach should remove a lot of the pain of converting, especially with a little regexp magic.
Here’s the XHTML 1 version using HTML5 element class names.
<!DOCTYPE html PUBLIC "-//W3C//DTD XHTML 1.0 Strict//EN"

  "http://www.w3.org/TR/xhtml1/DTD/xhtml1-strict.dtd">

<html lang="en" xml:lang="en">

  <head>

    <title>Article (XHTML 1), with HTML5 class names</title>

    <meta http-equiv="Content-Type" content="text/html; charset=utf-8" />

  </head>

  <body>

    <div id="page-header" class="header"> <!-- page header -->

      <h1>Site name</h1>

      <!-- other page heading content -->

    </div>

      <ul id="main-nav" class="nav">

        <li>Site navigation</li>

      </ul>

    <div id="content">

      <div id="main" class="article"> <!-- main content -->

        <div class="header">

          <h1>Article title</h1>
          <p>Article metadata</p>

        </div>

        <p>Article content…</p>

        <p class="footer">Article footer</p>

      </div>

      <div id="sidebar" class="aside"> <!-- secondary content -->

        <h2>Sidebar title</h2>

        <p>Sidebar content…</p>

      </div>

    </div>

    <div id="page-footer" class="footer">Footer</div>

  </body>

</html>
Here it is in HTML5, again using <div> with HTML5 element class names rather than the new HTML5 elements.
<!-- 'HTML-style' HTML5 -->

<!DOCTYPE html>

<html lang="en">

  <head>

    <title>Article (HTML5), with HTML5 class names</title>

    <meta charset="utf-8">

  </head>

  <body>

    <div id="page-header" class="header"> <!-- page header -->

      <h1>Site name</h1>
      <!-- other page heading content -->

    </div>

      <ul id="main-nav" class="nav">

        <li>Site navigation</li>

      </ul>

    <div id="content">

      <div id="main" class="article"> <!-- main content -->

        <div class="header">

          <h1>Article title</h1>

          <p>Article metadata</p>

        </div>

        <p>Article content…</p>

        <p class="footer">Article footer</p>

      </div>

      <div id="sidebar" class="aside"> <!-- secondary content -->

        <h2>Sidebar title</h2>

        <p>Sidebar content…</p>

      </div>

    </div>

    <div id="page-footer" class="footer">Footer</div>

  </body>

</html>


<!-- 'XHTML-style' HTML5 -->
<!DOCTYPE html>

<html lang="en">

  <head>

    <title>Article (HTML5), with HTML5 class names</title>

    <meta charset="utf-8" />

  </head>

  <body>

    <div id="page-header" class="header"> <!-- page header -->

      <h1>Site name</h1>

      <!-- other page heading content -->

    </div>

      <ul id="main-nav" class="nav">

        <li>Site navigation</li>

      </ul>

    <div id="content">

      <div id="main" class="article"> <!-- main content -->

        <div class="header">

          <h1>Article title</h1>

          <p>Article metadata</p>

        </div>

        <p>Article content…</p>

        <p class="footer">Article footer</p>

      </div>

      <div id="sidebar" class="aside"> <!-- secondary content -->
        <h2>Sidebar title</h2>

        <p>Sidebar content…</p>

      </div>

    </div>

    <div id="page-footer" class="footer">Footer</div>

  </body>

</html>
You may be wondering why these two examples are so similar—after all, only the DOCTYPE and charset differ! The answer is that one of HTML5’s core principles is compatibility (http://j.mp/html-design18, and <div> is still a perfectly cromulent HTML5 element.
Adding semantics to “HTML4.5” and HTML5 via ARIA landmark roles
Having just said that browsers won’t get any semantic benefits if we use <div class="">, there is a way that we can bolt on semantics—via ARIA landmark roles (http://j.mp/landmark-roles19). The Web Accessibility Initiative-Accessible Rich Internet Applications specification (WAI-ARIA) is a W3C accessibility specification that provides a framework for adding attributes to identify features for user interaction, how they relate to each other, and their current state. For example, if you styled a link to act as a button, you could use role="button" to apply button semantics to the link. This makes a big difference to screen readers, for example, allowing users to more easily navigate and interact with our content.
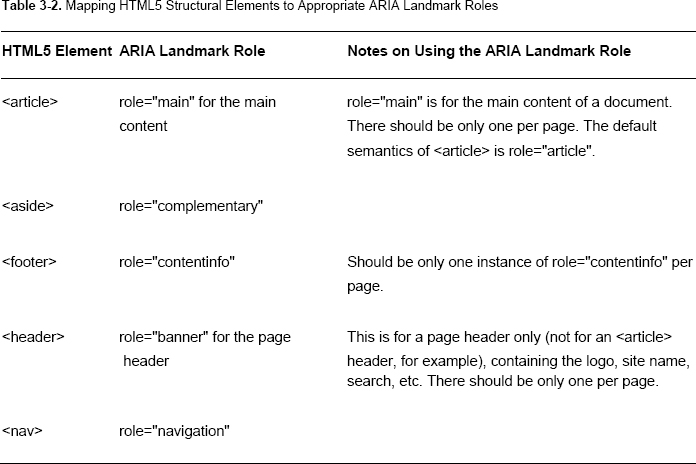
The good news is that as long as we don’t try to change the strong native semantics of HTML5 elements, it’s fine to use ARIA in HTML5 (http://j.mp/html5-semantics20). Using the appropriate roles will convey our semantics, making those elements navigational landmarks for supporting screen readers. As screen readers have been slow to implement HTML5 support, for now this applies just as much to the new HTML5 elements that already have these semantics (the belt-and-suspenders approach) as to our <div class=""> style. An added bonus is that we can validate our code when using ARIA with HTML5, something that wasn’t possible in HTML 4 with the W3C Validator. Table 3-2 shows the default implied ARIA roles for HTML5 structural elements.
__________
18 dev.w3.org/html5/html-design-principles/#compatibility
Reality rains on our accessible parade
But now for the bad news—at least one popular screen reader (Window-Eyes v7.5 in Internet Explorer) has significant problems when using ARIA roles on new HTML5 elements (http://j.mp/aria-support21). Despite this, we still think it’s worthwhile to include landmark roles where appropriate, as there are other popular screen readers that do support this, while not yet supporting HTML5’s native semantics.
__________
Thankfully, most people using screen readers use more than one, and at worst the semantics will be the same as a standard HTML 4 page. Until the happy day when HTML5’s native semantics are recognized, support the noble cause of increasing accessibility by adding these roles to your code when possible. After that day, a well-coded HTML5 page (using the new structural elements) will in general not need ARIA roles, thanks to HTML5’s native semantics.
Accessibility and HTML5
Since we’ve mentioned that it’s possible to use WAI-ARIA in HTML5, it’s a good time to briefly touch on HTML5 accessibility in general. Unfortunately, accessibility is a topic of poor support, worse application, and passionate politics (otherwise known as flame wars), but at least the fireworks are pretty.
Luckily, the W3C HTML Design Principles are both accessibility-friendly and pragmatic. The “universal access” principles mention media independence and access by everyone regardless of ability (http://j.mp/html-design22). Media independence means that HTML5 features should work on a variety of platforms, not just in visual browsers. We’ll see examples of this in the realigning of HTML 4’s presentational elements in Chapter 4.
However, access by everyone hints at a more fundamental change in how HTML5 approaches accessibility. Traditionally, making content accessible has depended heavily on using accessibility-specific features, such as <img alt=""> and <table summary="">. Unfortunately, in the real world, such hidden metadata is hardly ever added, and poorly or incorrectly done when it is added. Because it’s hidden, it also often becomes out of sync when the main content is updated. HTML5’s underlying philosophy has been to expose this information by moving it into the main content, as it’s often beneficial to all users. This has led to detailed guidance in the HTML5 specification about how we should ensure images, tables, etc. are sufficiently described, and that this should be done in preference to hiding the information inside attributes. This philosophy could be summarized as follows:
__________
“Where possible, trick authors into writing accessible content without realizing it.” (
http://j.mp/trick-authors23)
While this is somewhat sardonic, the new elements in this chapter (which all have “built-in” semantics) are obvious examples of how HTML5 sneakily encourages us to create accessible content by default. While great accessibility will always require extra work, we welcome this new approach, which should significantly increase baseline accessibility.
Accessibility techniques, evolving
It’s important to note that not everyone is enthusiastic about the “pragmatic” stance HTML5 currently takes on accessibility staples like longdesc on <img> (“obsolete”!), and summary on <table> (“authors should use a different technique instead”!). However, as long as we stick to HTML5’s design principles and focus on access by everyone regardless of ability, we can ignore the fracas.
The changes affect some of our standard techniques for making our content accessible, so let’s cover the basics.
The alt attribute on <img>
HTML5 more clearly defines alt as “the <img> element’s fallback content” (emphasis added), rather than just alternate text. The specification also states that (except in a few specific cases) alt text is required, and must be an appropriate replacement for the image. However, what is appropriate depends on the image’s purpose.
- Provides useful information: The
alttext should convey the same information. - Performs a function: The
alttext should convey the functionality. - Enhances aesthetics (e.g., a decorative image that doesn’t add any information): While this depends on the case, most decorative images should have blank
alttext (alt="").
Figure 3-2 shows an image with descriptive alt text, providing an appropriate textural replacement for the image.
__________

Figure 3-2. An image with alt text that describes the image’s content
Figure 3-3 is an image where the alt text contains the button’s content—“Log in”—to convey its functionality.

Figure 3-3. A functional image with alt text describing the image’s function
The image in Figure 3-4 is only for decoration, and because it doesn’t convey any information, an empty alt="" is appropriate.
Figure 3-4. A decorative image with empty alt text
In some specific cases, the HTML5 specification states we should use blank alt text (alt="").
- When the image is already described in the surrounding content, such as a
<figcaption>(to avoid repetition). - When the image is a part of a larger image, where another image contains appropriate
alttext for all the images.
And in the following situations, as demonstrated in Figure 3-4, HTML5 says we must use alt="":
- When an image is solely for decoration (it isn’t content; it provides no function or information beyond aesthetics).
- When an image isn’t visible; for example, a stats counter (
widthandheightmust be set to 0). - When an icon or logo appears beside text with the same meaning.
This means that the same image can have completely different alt text (or even alt="") depending on where it’s used and what it’s intended to convey.
“The intent is that replacing every image with the text of its
altattribute not change the meaning of the page.” (http://j.mp/alt-guidelines24)
We can use the ARIA attribute aria-describedby="" to make an explicit semantic connection between the image and its description in content, but in general context makes this unnecessary. Remember that alt text is fallback content and not an image caption or title. Use <figure> with <figcaption> (which have the same native semantics as aria-labelledby), or the title attribute, for an image’s caption or other extra information.
Here is an example of an image with fallback content provided in alt and a caption in <figcaption>. We could add aria-labelledby="albert" to <img> to explicitly associate it with <figcaption> (via id="albert") until user agents understand the native semantics of <figcaption>, but given the context, this probably isn’t necessary.
<figure>

  <img src="http://famousprimates.com/images/albert.jpg" alt="A close-up in profile of

 the rhesus monkey Albert I, looking intently to the right. The background is out of

 focus and the photo is in black and white.">

  <figcaption id="albert">Albert I before his historic trip to space on 14th
 June, 1949.</figcaption>

</figure>
__________
When writing alt text, imagine describing the page to someone over the phone. Refer to the HTML5 specification for more detailed advice (http://j.mp/html5-alt25).
The obsolete longdesc attribute on <img>
The longdesc attribute was intended to provide a link to a separate page with more information about the image. Because this was basically hidden content that was almost never used, and was almost always used incorrectly, it’s now obsolete in HTML5. That means if it’s already in your content, there’s no change in (the lack of) browser support, but the HTML5 specification is encouraging you not to use longdesc, and you’ll get an error from an HTML5 validator.
The recommended HTML5 alternative is to add this content to the current page, perhaps explicitly connected using aria-describedby="", which we just met and which allows us to move the description away from the image. If the content can’t be included in the current page (for example, because it describes a very detailed chart and is too long), we can make a link to a descriptive page using <a>, which is basically the function of longdesc anyway. This makes the content accessible to all users, not just those with assistive technology browsers.
The obsolete but conforming summary attribute on <table>
First off, what does that even mean? Well, obsolete features give an error in validation, whereas obsolete but conforming features only give a warning. So it’s a less severe way of saying “don’t use this,” but the message is unchanged.
The summary attribute was meant to allow a detailed description of a <table> specifically for users of assistive technology. Real-world use closely mirrors that of longdesc. HTML5 advocates moving this explanatory text into the main content and recommends that we should introduce any table that might be difficult to understand. This can be done in a variety of ways, such as in surrounding content, in <caption>, in <details> inside <caption>, via <figure>, etc. The ideal solution is to adjust the <table> layout and headings to make it easy to understand, so that an explanation isn’t needed.
The following is an example of Table 3-2 (“HTML5 Element and ARIA Landmark role Comparison” table), which uses <caption>, <thead>, and scope, and is clear enough to not need additional explanation:
__________
<table id="mapping-html5-to-aria-landmark">

  <caption>Mapping HTML5 Structural Elements to Appropriate <abbr>ARIA</abbr>

 Landmark Roles</caption>

  <thead>

    <tr>

      <th scope="col">HTML5 Element</th>

      <th scope="col"><abbr>ARIA</abbr> Landmark role</th>

      <th scope="col">Notes</th>

    </tr>

  </thead>

  <tbody>

  …
The obsolete axis attribute on <th> and <td>
The axis attribute allowed authors to place cells into conceptual categories that could be considered to form axes in an n-dimensional space. If that makes sense to you, well…
Moving right along, it was basically intended to be used by some future browser with a “table query language,” presumably in a similar way to SQL accessing database information by allowing users to filter a table. It works by applying categories to header cells…at least in theory. More than ten years after HTML 4 was finalized, the axis attribute still has zero browser support and almost as little tool support. Luckily, in practice the scope attribute combined with a clear, well-coded <table> is generally enough to duplicate this functionality. You can see scope in use in the previous code example.
Other HTML5 accessibility issues
Several other areas of HTML5 accessibility are still being actively worked on, most notably the new elements <video>, <audio> (now with <track>), and <canvas>. We’ll cover these in more detail in Chapter 5.
HTML5 accessibility: A new hope
Despite the challenges of accessibility issues, as the W3C HTML Design Principles state “access by everyone regardless of ability is essential” (http://j.mp/html-design26). For us as much as HTML5’s creators, the important part is achieving this aim, rather than the specific techniques we use. With the greatly enhanced built-in semantics of the new elements, and media independence as a basic principle, HTML5 is already more accessible than its predecessors by default. And although it should generally be unnecessary in well-coded HTML5, having the ability to use WAI-ARIA as well lets us supplement accessibility when required—as long as we don’t try to override HTML5’s built-in semantics. Now all we need is for user agent support to catch up!
Summary
We’ve met a bunch of new, more semantic replacements for HTML 4’s <div>, such as the sectioning content elements (<section>, <article>, <aside>, and <nav>). We’ve also discovered the algorithmic fun of outlines, which are based on sectioning content elements and headings (<h1>–<h6>). We’ve seen how outlines are affected by <hgroup>, implicit sections, and sectioning root elements (<blockquote>, <body>, <details>, <fieldset>, <figure>, and <td>). We’ve also covered how <header> and <footer> are used in (and scoped by) sectioning elements, had a look at HTML5-style headings, and learned about <figure> and <figcaption>. Putting all of this together, we’ve seen how to make HTML5 and “HTML4.5” pages, plus we’ve had a brief overview of accessibility in HTML5. All in all, that’s quite some progress.
While HTML5 is evolutionary, these new semantics require us to rethink past habits while providing a new perspective. You can start using HTML5 just by changing the DOCTYPE, as covered in Chapter 2, and probably should make the transition a little at a time as you learn more. However, to really benefit from HTML5’s new mindset, we recommend rethinking any current site from an HTML5 perspective. It’s also a great chance to reevaluate your techniques and workflow and to replace now outdated ideas.
__________
Homework
We’ve been working on pages for Gordo and Miss Baker, so choose one and add HTML5’s semantic elements where appropriate. As you do this, try forgetting your HTML 4- and XHTML 1-based assumptions of what elements to use, and more importantly any assumptions of what elements should look like. Focus on semantics when applying what you’ve learned in this chapter. If you feel yourself starting to slip down a semantic rabbit hole, take a deep breath and remember that semantic hair-splitting is not required. Sometimes there is more than one way to mark things up, and that’s fine. If in doubt, remember that <div> is still perfectly fine to use.
Check your homework by doing the following:
- Validate your pages.
- Install and use the HTML5 Outliner (h5o) bookmarklet. Are the results as you expected?
- View the page in a browser. While our page might look a little chunky, there should still be a clear visual hierarchy even with browser default styles, and everything should still make sense.
For extra credit, try doing this with another page you’ve made and see if your new semantic goggles have you seeing things differently.
Further Reading
There are articles on HTML5 Doctor for each of the elements covered in this chapter, which you can find links to at http://html5doctor.com/article-archive. If you found the outline algorithm section confusing, the HTML5 Doctor article on Document Outlines by Mike Robinson will help (http://html5doctor.com/outlines). Make sure to read the comments on each article!