
The concept of having pipelines as a code brings convenience and handiness in maintaining and designing CI/CD pipelines. I need not speak about its advantages, because by now they are already apparent to you. It all came with Jenkins 2.0 and helped everyone write complex and flexible CI/CD pipelines with ease.
It is a significant improvement over the massive, GUI-based CI/CD pipelines comprised of multiple freestyle pipeline jobs. Blue Ocean further made things better by allowing users to design CI/CD pipeline with ease using its so-called Visual Pipeline Editor. The Declarative Pipeline Syntax used by Blue Ocean also needs some applause.
So most of us now who follow CI/CD in our organizations have got a few pipelines projects running; some of us may even have hundreds of pipelines projects. So what’s next? How do you avoid repeating the same common code across different pipelines? Shared Libraries is the answer, and the current chapter is all about it.
Why Use Shared Libraries?
How Do Shared Libraries Work?
Retrieving Shared Libraries
Using Shared Libraries Inside Your Pipeline
Creating Shared Libraries
Using Shared Libraries, you can take additional advantage of having pipeline as a code. The idea behind Shared Libraries is to whip out the re-usable code carefully and store them as separate pipeline libraries that can be re-used by multiple pipelines on demand. In the following section, you’ll learn in detail about Jenkins Shared Libraries. So let’s begin.
Why Use Shared Libraries?
Let’s say there are multiple CI/CD pipelines projects in your organization, all of which have a static code analysis stage in them (using SonarQube).
Instead of writing pipeline code (Declarative/Scripted Pipeline) for static code analysis for each pipeline, it makes more sense to separate the common code out intelligently, store it as a piece of pipeline library in a common place (that acts more like a function), and summon it on demand in all your CI/CD pipelines projects. In this way, it becomes possible to re-use a piece of code and avoid redundancy in your CI/CD infrastructure.
In the SonarQube example, I have assumed that we use the project configuration file (sonar-project.properties), one for every pipeline project to describe their static code analysis configuration.
There are many such examples that you can imagine. Anything that you feel could be re-used should be put into a Shared Library. Over time, you’ll have a collection of these reusable functions in your library. Shared Libraries make your code more readable and shareable.
How Shared Libraries Work?
Following are the four simple steps that describe how Shared Libraries work with your Pipeline.
Step 1: First, you initiate a Git Repository meant only to store Shared Libraries files.
Step 2: You then create a few Groovy scripts and add them to your Git Repository. In the upcoming section, Creating Jenkins Shared Libraries, you’ll see how to write Groovy scripts that serve as Shared Libraries.
Step 3: Next, you configure your Shared Library’s repository details inside Jenkins. In the upcoming section, Retrieving Shared Libraries, you’ll see all the possible ways of configuring a Shared Library into Jenkins.
Step 4: Finally, you summon the Shared Library into your Pipeline. In the upcoming section, Calling Shared Libraries Inside your Pipeline, you’ll see all possible ways of calling your Shared Library from your Pipeline.
The Directory Structure for Shared Libraries
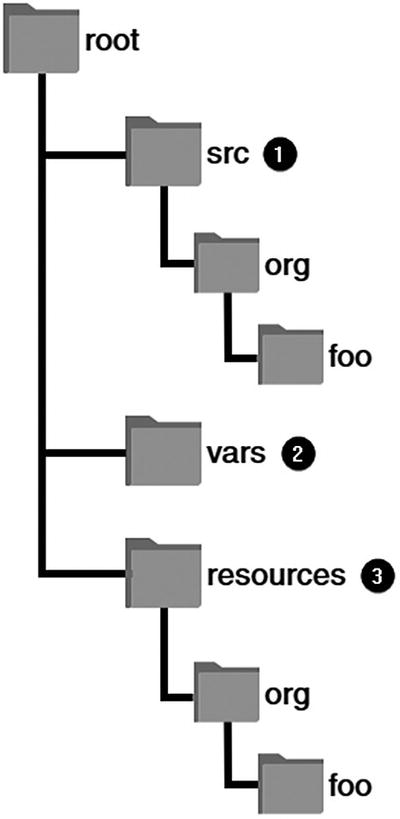
The directory structure for a Jenkins Shared Library
Let’s learn about the directory structure.
The src directory [1] looks more like a standard Java source directory structure. This directory is added to the classpath when executing Pipelines. The available classes get loaded with an import statement.
The vars directory [2] can contain multiple Groovy files that define global variables. These global variables are accessible from your Pipeline using the script {} block. Similarly, the vars directory can hold your custom steps, where each of these steps get defined inside a Groovy script. The basename of each Groovy file should be a Groovy (~ Java) identifier that follows camelCase.1
When a Pipeline that uses a Jenkins Shared Library, comprising such elements, finishes running, the steps from the vars directory get listed under <jenkins-url>/pipeline-syntax/globals page. It’s also possible to add a corresponding .txt file inside the library’s vars directory, presenting additional documentation about it. In this way, you can provide extra info to the other members of your team about the step.
A resources directory [3] allows you to store additional non-Groovy/Java files that get loaded using the libraryResource step . The stuff from the resources directory is used from an external library.
Retrieving Shared Libraries
In the following section, you’ll learn multiple ways to retrieve Shared Libraries. The first one is using the pre-configured settings inside Jenkins, and the other is through directly retrieving it from the Pipeline during runtime. Let’s see both the methods in detail.
Retrieving Shared Libraries Using Pre-Configured Settings in Jenkins
In the following method, you tell Jenkins the name, location, credentials, and other parameters for retrieving a Shared Library. You can either do this at a global level by making necessary configurations inside the Jenkins global settings or at the Folder/Pipeline Project level. Nevertheless, the settings and configuration options remain the same at both levels.
- 1.
From the Jenkins Blue Ocean Dashboard, click on the Administration link from the top menu bar. Once, you are on the Manage Jenkins page, click on the Configure System link.
- 2.
On the Configure System page, scroll all the way down until you see the section Global Pipeline Libraries.
- 3.Click on the Add button to add a new library (see Figure 6-2). You can add as many Shared Libraries as you want.
 Figure 6-2
Adding Global Pipeline Libraries
- 4.
After clicking the Add button, you’ll see a few settings that you must configure (see Figure 6-3). Let’s understand them one by one.
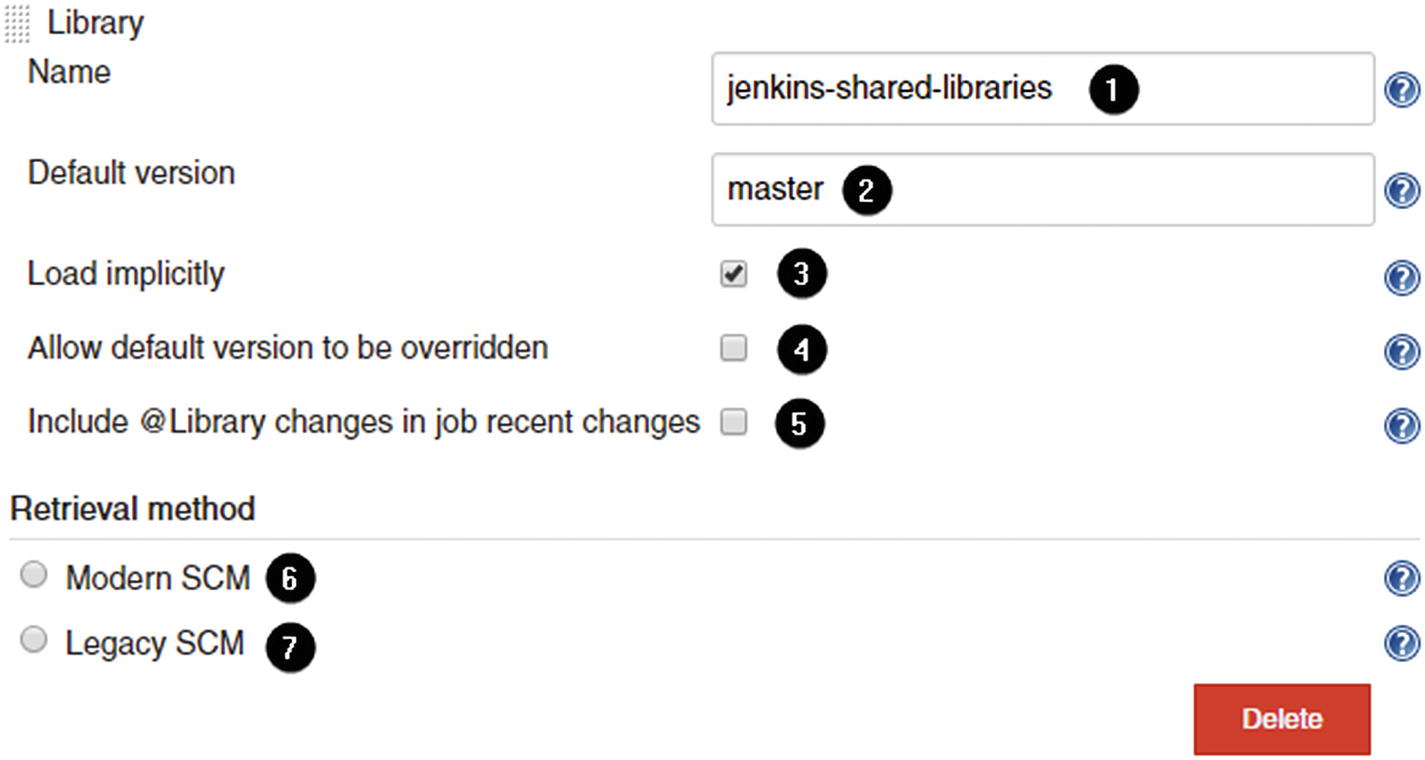
Global Pipeline Libraries basic settings
The Name field [1] is an identifier you pick for this library, to be used in the @Library annotation later inside your pipeline.
The Default version [2] field allows you to specify a branch name, tag, and commit hash of the Shared Libraries repository. In Figure 6-3, I have specified master (branch). As a result, my pipeline during runtime should load the latest version of my Shared Library from the master branch.
An environment variable library.THIS_NAME.version is set to the version loaded for a build (whether that comes from the Default version [2], or from an annotation after the @ separator).
The Load implicitly [3] setting is a critical thing that must be selected when using Jenkins Blue Ocean and otherwise. If checked, scripts inevitably have access to your Shared Library without needing to request it via @Library.
The Allow default version to be overridden option [4]; if checked, it allows you to select a custom version of your Shared Library by using @someversion in the @Library annotation. By default, you’re restricted to use the version that you specify using the Default version field.
The Include @Library changes in job recent changes option [5] allows you to include changes on the Shared Library, if any, in the changesets of your build. You can also override this setting during the Pipeline runtime by specifying the following inside your Jenkinsfile: @Library(value="name@version", changelog=true|false).
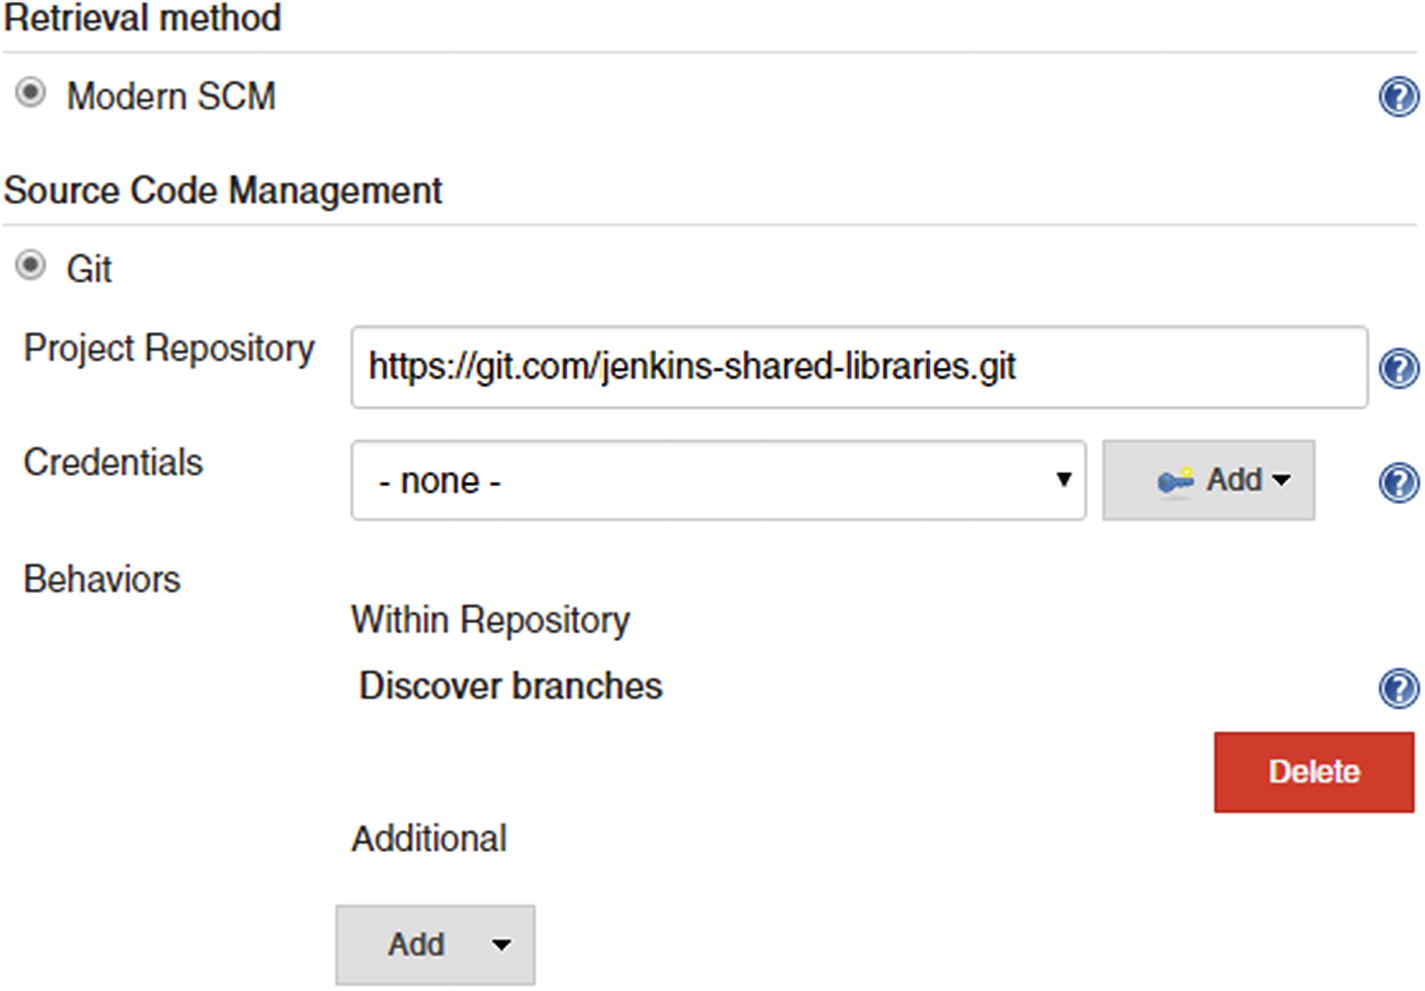
There are two retrieval methods: Modern SCM [6] and Legacy SCM [7]. Both of them allow you to connect to a Git/Mercurial/Subversion repositories to retrieve your Shared Library. The difference lies in the prevalidation of versions. When you are using Legacy SCM option, no prevalidation of versions is available, and you must manually configure the SCM to refer to ${library.THISLIBNAME.version}. Also, the Legacy SCM option does not allow you to connect to GitHub.
Global Pipeline Libraries retrieval methods
So, this is how you retrieve Shared Libraries using Jenkins global settings. I am going to skip the other method that is about retrieving Shared Libraries at the Folder/Pipeline Project level, because in the current book our focus is on using Jenkins Blue Ocean and not Classic Jenkins.
Retrieving Shared Libraries Directly During the Pipeline Runtime
You can further refer to the Pipeline Syntax to know the precise syntax for your SCM. Note that you must specify the library version.
Calling Shared Libraries Inside Your Pipeline
In the following section, you’ll learn to summon Shared Libraries in your Pipeline. You do this by using the @Library annotation inside your Jenkinsfile.
Following is an example of a Jenkinsfile that’s calling a function test() from the test.groovy script, which is inside the Shared Library: jenkins-shared-libraries.
In this code, in place of <version>, you can add a branch name, a tag, or a commit hash.
For you to use a specific version of Jenkins Shared Library, it’s crucial to select the option Allow default version to be overridden, see Figure 6-3.
Shared Libraries that are marked as Load implicitly (see Figure 6-3) are automatically available for your Pipelines. You need not use the @Library annotation inside your Pipeline code.
Creating Shared Libraries
Creating Shared Libraries is easy. If you know how to write a Groovy script, then you know how to write Shared Libraries since, at the ground level, any Groovy code can serve as a legitimate library for use in your Pipeline. Following is an example:
Using Global Variables with Shared Libraries
Groovy scripts coming from the vars directory are incorporated on-demand as individual elements. This makes it possible to define multiple methods in a single Groovy file.
Using Custom Steps with Shared Libraries
In the following section, you’ll learn to write custom steps with Shared Libraries. Shown here is a Groovy script for sending automatic build status e-mails.
This function from the Shared Library can be used inside a Pipeline as shown here.
Reusable Pipeline Code
The following exercise assumes a hypothetical use case that may be well-suited for many of you. In this exercise, we assume a modularized software project. When I say modularized, I mean a large software product that’s made up of multiple small components.
Every individual component of our software project must build, test, and publish individually. Moreover, we would like to take advantage of Shared Libraries.
- 1.Initiate a new empty Git Repository. This new repo is going to serve as your Shared Library.mkdir reusable-pipeline-librarycd reusable-pipeline-librarygit init
- 2.
Create the necessary directory structure for your Shared Library. See the section The Directory Structure for Shared Library. You are required to create only the vars directory.
mkdir vars
- 3.Now, inside the vars directory, create a new Groovy file named pipeline.groovy using your favorite text editor and paste the following code inside it. You can also download the file directly from: https://github.com/Apress/beginning-jenkins-blue-ocean/tree/master/Ch06/pipeline.groovy.def call() {pipeline {agent nonestages {stage('Build & Test') {agent {node {label 'docker'}}steps {sh 'mvn -Dmaven.test.failure.ignore clean package'stash(name: 'build-test-artifacts',includes: '**/target/surefire-reports/TEST-*.xml,target/*.jar')}}stage('Report & Publish') {parallel {stage('Report & Publish') {agent {node {label 'docker'}}steps {unstash 'build-test-artifacts'junit '**/target/surefire-reports/TEST-*.xml'archiveArtifacts(onlyIfSuccessful: true, artifacts: 'target/*.jar')}}stage('Publish to Artifactory') {agent {node {label 'docker'}}steps {script {unstash 'build-test-artifacts'def server = Artifactory.server 'Artifactory'def uploadSpec = """{"files": [{"pattern": "target/*.jar","target": "example-repo-local/${JOB_NAME}/${BRANCH_NAME}/${BUILD_NUMBER}/"}]}"""server.upload(uploadSpec)}}}}}}}}
- 4.
Save the changes made to the pipeline.groovy file.
- 5.
Execute the following command to add the new files to Git:
git add .
- 6.Commit your changes.git commit -m "Added initial files to the Shared Library."
- 7.Next, push your changes to the remote Git Repository on GitHub or wherever it delights you.git remote add origin <Remote Git Repository URL>git push -u origin master
- 8.
You now have your Shared Library repository on a remote Git Repository (I assume its GitHub).
- 9.
Next, you’ll make the necessary configurations inside Jenkins to retrieve your new Shared Library. To do so, follow the section Retrieving Shared Libraries Using Pre-Configured Settings in Jenkins. Give a unique name to your Shared Library configuration inside Jenkins global settings.
- 10.
If you have successfully made the necessary settings inside Jenkins, then let’s move forward. For this exercise to work, let’s create three maven projects named component-1, component-2, and component-3.
- 11.To do so, create three separate Git Repositories. Follow this command:mkdir component-1 component-2 component-3cd component-1git initcd ../component-2git initcd ../component-3git init
- 12.
Now download the source code from the following GitHub Repository folder: https://github.com/Apress/beginning-jenkins-blue-ocean/tree/master/Ch06/example-maven-project , and add it to all the three component repositories that you created in step 11.
- 13.Next, you’ll add a Jenkinsfile to all three component repositories. To do so, create a new file using your favorite text editor and add the following content inside it. Or you can download it directly from: https://github.com/Apress/beginning-jenkins-blue-ocean/blob/master/Ch06/Jenkinsfile.@Library('my-shared-library') _call()
- 14.
I assume that you have named your Shared Library configuration inside Jenkins as my-shared-library. However, feel free to replace my-shared-library with whatever name you have given to your Shared Library configuration inside Jenkins.
- 15.Next, execute the following commands inside all the three component repositories:git add .git commit -m "Added initial files to the source code repository."
- 16.Next, push the changes for all three component repositories to their respective remote Git Repositories on GitHub or wherever it delights you.git remote add origin <Remote Git Repository URL>git push -u origin master
- 17.
Now, you have three remote Git Repositories for the three example components projects (I assume it’s on GitHub).
- 18.
For this exercise to work, make sure you have an Artifactory server up and running. It should also contain a local repository named example-repo-local inside it. For more information refer to the sections Run an Artifactory Server, Installing the Artifactory Plugin for Jenkins, and Configuring the Artifactory Plugin in Jenkins from Chapter 3.
- 19.At this point, you should have the following things ready with you:
A Shared Library hosted on a Git server that contains the required Groovy script inside the vars directory.
Three component repositories hosted on a Git server that contain the example maven source code and the necessary Jenkinsfile inside them.
An Artifactory server, hosting a local generic repository named example-repo-local with all the necessary configuration and settings inside your Jenkins server.
- 20.
Next, open the Jenkins Blue Ocean Dashboard and create three new pipelines, one for every component, using the Pipeline Creation Wizard.
You should see all the three pipelines projects running, with some green and some yellow (depending on the test results). You now have a common pipeline code for all your components source code that’s coming from the shared library.
The maven source code used in this exercise is puny and does not represent a real-world project. However, the idea behind this exercise is to demonstrate how Shared Libraries can be used to centralize all the common Pipeline code in the form of libraries that could be used across multiple Jenkins Blue Ocean Pipelines.
Summary
The idea behind this chapter was to introduce you to the concept of Shared Libraries in Jenkins. In this chapter you learned the basic concepts of Shared Libraries. You also learned to use it through an exercise at the end of this chapter.
The exercise REUSABLE PIPELINE CODE was one simple hypothetical use-case. Nevertheless, the things that you can do with Shared Libraries is limited only by your imagination.
With this, we end our book. I hope the things discussed in this book serve you well.