© Sanjib Sinha 2019
S. SinhaBeginning Laravel https://doi.org/10.1007/978-1-4842-4991-8_8

8. Authentication, Authorization, and Middleware

Sanjib Sinha1 
(1)
Howrah, West Bengal, India
 

The Internet is an open gateway, and ideally data should be able to travel on it freely. However, to be secure, this free flow of data has to be monitored and blocked sometimes. In today’s world, the Web reaches into almost every part of our lives, so we need the proper security in place, and your Laravel applications are no exception.

Today, most applications need to authenticate users, at least in some areas. In other areas, your application might need to implement authorization, because authentication by itself is not enough. That’s why most applications have layers of security and several different roles, such as administrators, moderators, and general members.

It usually takes time to create proper authentication and authorization classes, but not in Laravel. Implementing the functionality to authenticate users is simple. Further, it is simple to add authorization to work seamlessly with the authentication process.

To make this all possible, you need to understand the filtering process that Laravel adopts while it allows requests to enter the application. Laravel ships with several prebuilt authentication controllers. You can view them in the AppHttpControllersAuth namespace. There are controllers such as RegisterController, which handles new user registration; LoginController, which handles authentication; ForgotPasswordController, which manages e-mailing links for resetting passwords; and ResetPasswordController, which contains the logic to reset passwords. For most applications, you will not need to even tweak these controllers.

You learned earlier in the book that a single command, php artisan make:auth, solves the authentication problem for developers. At the same time, Laravel provides a quick way to scaffold all the routes and views you need for authentication using that single command.

This make:auth command creates a HomeController and resources/views/layouts directory containing a base layout for your application (although you are free to customize the layout).

Different Authentication Methods in the Company/Project/Task Management Application

Before learning about the role-based methods of authentication in Laravel, let’s take a quick look at the new application you are going to build in this chapter.

In Chapter 6, I discussed why we need a new application to learn these different methods of role-based authentication. The previous news application was managed by a single administrator. Here, in the company/project/task management application, you will have different types of users who will manage different types of resources.

For example, a project manager or moderator cannot view the administrator’s dashboard. A general user cannot penetrate the moderator’s dashboard. You can create a workflow like this in various ways. For example, you can use middleware, you can customize the roles through the users table, or you can authorize a user by applying gates and policies. In this chapter, you will see each implementation separately.

Now, for brevity, I cannot show you all the code for all implementations in this chapter, because it would add thousands of lines of code to the book. What I can do is show the basic code snippets so that you can understand the workflow. The entire application code is available with the download for the book; I suggest you download the files to connect the dots as necessary.

To get started, let’s think about the companies resource first. In your application structure, it sits at the top, and only the administrators can add projects to that resource. Here is the routes/web.php code:
//routes/web.php
<?php
/*
|--------------------------------------------------------------------------
| Web Routes
|--------------------------------------------------------------------------
|
| Here is where you can register web routes for your application. These
| routes are loaded by the RouteServiceProvider within a group which
| contains the "web" middleware group. Now create something great!
|
*/
//use AppHttpMiddlewareCheckRole;
Route::group(['middleware' => ['web', 'auth']], function(){
  Route::get('/adminonly', function () {
    if(Auth::user()->admin == 0){
      return view('restrict');
    }else{
      $users['users'] = AppUser::all();
      return view('adminonly', $users);
    }
  });
});
Route::get('/admin', function () {
  if (Gate::allows('admin-only', Auth::user())) {
        // The current user can view this page
        return view('admin');
    }
    else{
      return view('restrict');
    }
});
Route::get('/mod', function () {
  if (Gate::allows('mod-only', Auth::user())) {
        // The current user can view this page
        return view('mod');
    }
    else{
      return view('restrict');
    }
});
Auth::routes();
Route::resource('home', 'HomeController');
Route::resource('users', 'UserController');
Route::resource('companies', 'CompanyController');
Route::resource('projects', 'ProjectController');
Route::resource('roles', 'RoleController');
Route::resource('tasks', 'TaskController');
Route::resource('comments', 'CommentController');
Route::resource('articles', 'ArticleController');
Route::get('/users/{id}/articles', 'ArticleController@articles');
Route::resource('reviews', 'ReviewController');
Route::get('/users/{id}/reviews', 'ReviewController@reviews');
Route::get('companies/destroy/{id}', ['as' => 'companies.get.destroy',
        'uses' => 'CompanyController@getDestroy']);
In the routes/web.php code, you use middleware and role-based authentication; specifically, you’ll find that code in this part:
Route::group(['middleware' => ['web', 'auth']], function(){
  Route::get('/adminonly', function () {
    if(Auth::user()->admin == 0){
      return view('restrict');
    }else{
      $users['users'] = AppUser::all();
      return view('adminonly', $users);
    }
  });
});

You will learn how this works in a minute.

In the second part, you are using gates and policies, like this:
Route::get('/admin', function () {
  if (Gate::allows('admin-only', Auth::user())) {
        // The current user can view this page
        return view('admin');
    }
    else{
      return view('restrict');
    }
});
Route::get('/mod', function () {
  if (Gate::allows('mod-only', Auth::user())) {
        // The current user can view this page
        return view('mod');
    }
    else{
      return view('restrict');
    }
});

This separates the administrator from the moderators, giving them the freedom to work on their own pages. I will discuss them in detail in this chapter.

Next take a look at the CompanyController.php file , as shown here:
//app/Http/Controllers/CompanyController.php
<?php
namespace AppHttpControllers;
use AppUser;
use AppCompany;
use IlluminateHttpRequest;
use IlluminateSupportFacadesAuth;
class CompanyController extends Controller
{
    /**
     * Display a listing of the resource.
     *
     * @return IlluminateHttpResponse
     */
    public function index()
    {
        if( Auth::check() ){
            $companies = Company::where('user_id', Auth::user()->id)->get();
            if(Auth::user()->role_id == 1){
                return view('companies.index', ['companies'=> $companies]);
            }
        }
        return view('auth.login');
    }
    /**
     * Show the form for creating a new resource.
     *
     * @return IlluminateHttpResponse
     */
    public function create()
    {
      if( Auth::check() ){
        if(Auth::user()->role_id == 1){
                return view('companies.create');
        }
      }
        return view('auth.login');
    }
    /**
     * Store a newly created resource in storage.
     *
     * @param  IlluminateHttpRequest  $request
     * @return IlluminateHttpResponse
     */
    public function store(Request $request)
    {
        if(Auth::check()){
            $company = Company::create([
                'name' => $request->input('name'),
                'description' => $request->input('description'),
                'user_id' => Auth::user()->id
            ]);
            if($company){
                return redirect()->route('companies.show', ['company'=> $company->id])
                        ->with('success' , 'Company created successfully');
            }
        }
            return back()->withInput()->with('errors', 'Error creating new company');
    }
    /**
     * Display the specified resource.
     *
     * @param  AppCompany  $company
     * @return IlluminateHttpResponse
     */
    public function show(Company $company)
    {
      if( Auth::check() ){
        if(Auth::user()->role_id == 1){
            $company = Company::find($company->id);
            return view('companies.show', ['company' => $company]);
        }
      }
        return view('auth.login');
    }
    /**
     * Show the form for editing the specified resource.
     *
     * @param  AppCompany  $company
     * @return IlluminateHttpResponse
     */
    public function edit(Company $company)
    {
      if( Auth::check() ){
        if(Auth::user()->role_id == 1){
        $company = Company::find($company->id);
        return view('companies.edit', ['company' => $company]);
      }
    }
    }
    /**
     * Update the specified resource in storage.
     *
     * @param  IlluminateHttpRequest  $request
     * @param  AppCompany  $company
     * @return IlluminateHttpResponse
     */
    public function update(Request $request, Company $company)
    {
        $updateCompany = Company::where('id', $company->id)->update(
                [
                    'name'=> $request->input('name'),
                    'description'=> $request->input('description')
                ]
        );
      if($updateCompany){
          return redirect()->route('companies.show', ['company'=> $company->id])
          ->with('success' , 'Company updated successfully');
      }
      //redirect
      return back()->withInput();
    }
    /**
     * Remove the specified resource from storage.
     *
     * @param  AppCompany  $company
     * @return IlluminateHttpResponse
     */
    public function destroy(Company $company)
    {
    }
    public function getDestroy($id)
    {
        $company = Company::findOrFail($id);
        if($company->destroy($id)){
            return redirect()->route('companies.index')->with('success' , 'Company deleted successfully');
        }
    }
}
You learn about some of these concepts when you created the news application. For example, you have already learned about the model relations, and the Company model follows the same rules.
//app/Company.php
<?php
namespace App;
use IlluminateDatabaseEloquentModel;
class Company extends Model
{
  /**
   * The attributes that are mass assignable.
   *
   * @var array
   */
  protected $fillable = [
      'name', 'description', 'user_id'
  ];
  public function user() {
      return $this->belongsTo('AppUser');
  }
  public function project() {
      return $this->belongsTo('AppProject');
  }
  public function projects() {
      return $this->belongsToMany('AppProject');
  }
  public function reviews() {
      return $this->belongsToMany('AppReview');
  }
  public function comments()
  {
      return $this->morphMany('AppComment', 'commentable');
  }
}

In this new application, the database seeder code is a little different from the previous news application. To give you an idea, let’s take a look at both UserFactory.php and DatabaseSeeder.php.

First, here’s the database/factories/UserFactory.php code:
// database/factories/UserFactory.php
<?php
use FakerGenerator as Faker;
/*
|--------------------------------------------------------------------------
| Model Factories
|--------------------------------------------------------------------------
|
| This directory should contain each of the model factory definitions for
| your application. Factories provide a convenient way to generate new
| model instances for testing / seeding your application's database.
|
*/
$factory->define(AppUser::class, function (Faker $faker) {
    return [
        'name' => $faker->name,
        'email' => $faker->unique()->safeEmail,
        'password' => '$2y$10$TKh8H1.PfQx37YgCzwiKb.KjNyWgaHb9cbcoQgdIVFlYg7B77UdFm', // secret
        'remember_token' => str_random(10),
    ];
});
$factory->define(AppCompany::class, function (Faker $faker) {
    return [
        'user_id' => 21,
        'name' => $faker->sentence,
        'description' => $faker->paragraph(random_int(3, 5))
    ];
});
$factory->define(AppProject::class, function (Faker $faker) {
    return [
      'name' => $faker->sentence,
      'description' => $faker->paragraph(random_int(3, 5)),
      'company_id' => AppCompany::all()->random()->id,
      'user_id' => 21,
      'days' => $faker->biasedNumberBetween($min = 1, $max = 20, $function = 'sqrt')
    ];
});
$factory->define(AppRole::class, function (Faker $faker) {
    return [
        'name' => $faker->word
    ];
});
$factory->define(AppTask::class, function (Faker $faker) {
    return [
        'name' => $faker->word,
        //'user_id' => AppUser::all()->random()->id,
        'user_id' => 21,
        'project_id' => AppProject::all()->random()->id,
        'company_id' => AppCompany::all()->random()->id,
        'days' => $faker->biasedNumberBetween($min = 1, $max = 20, $function = 'sqrt')
    ];
});
$factory->define(AppProfile::class, function (Faker $faker) {
    return [
        'user_id' => AppUser::all()->random()->id,
        'city' => $faker->city,
        'about' => $faker->paragraph(random_int(3, 5))
    ];
});
$factory->define(AppCountry::class, function (Faker $faker) {
    return [
      'name' => $faker->country
    ];
});
$factory->define(AppComment::class, function (Faker $faker) {
    return [
      'user_id' => $faker->biasedNumberBetween($min = 1, $max = 10, $function = 'sqrt'),
        'body' => $faker->paragraph(random_int(3, 5)),
        'commentable_id' => $faker->randomDigit,
        'commentable_type' => function(){
          $input = ['AppTask', 'AppProfile', 'AppArticle', 'AppReview'];
          $model = $input[mt_rand(0, count($input) - 1)];
          return $model;
        }
    ];
});
$factory->define(AppArticle::class, function (Faker $faker) {
    return [
        'user_id' => AppUser::all()->random()->id,
        'title' => $faker->sentence,
        'body' => $faker->paragraph(random_int(3, 5))
    ];
});
$factory->define(AppTag::class, function (Faker $faker) {
    return [
        'tag' => $faker->word
    ];
});
$factory->define(AppReview::class, function (Faker $faker) {
    return [
        'user_id' => AppUser::all()->random()->id,
        'company_id' => AppCompany::all()->random()->id,
        'title' => $faker->sentence,
        'body' => $faker->paragraph(random_int(3, 5))
    ];
});
Here is the seeder code:
//database/seeds/DatabaseSeeder.php
<?php
use IlluminateDatabaseSeeder;
class DatabaseSeeder extends Seeder
{
    /**
     * Seed the application's database.
     *
     * @return void
     */
    public function run()
    {
      // $this->call(UsersTableSeeder::class);
      factory(AppUser::class, 20)->create()->each(function($user){
          $user->profile()->save(factory(AppProfile::class)->make());
      });
        factory(AppCompany::class, 10)->create()->each(function($company){
          $ids = range(1, 50);
          shuffle($ids);
          $sliced = array_slice($ids, 1, 20);
          $company->projects()->attach($sliced);
        });
        factory(AppProject::class, 30)->create()->each(function($project){
          $ids = range(1, 50);
          shuffle($ids);
          $sliced = array_slice($ids, 1, 20);
          $project->users()->attach($sliced);
        });
        factory(AppRole::class, 4)->create()->each(function($role){
          $ids = range(1, 5);
          shuffle($ids);
          $sliced = array_slice($ids, 1, 20);
          $role->users()->attach($sliced);
        });
        factory(AppTask::class, 100)->create()->each(function($task){
          $ids = range(1, 50);
          shuffle($ids);
          $sliced = array_slice($ids, 1, 20);
          $task->users()->attach($sliced);
        });
        factory(AppCountry::class, 30)->create();
        factory(AppComment::class, 60)->create();
        factory(AppArticle::class, 50)->create()->each(function($article){
          $ids = range(1, 50);
          shuffle($ids);
          $sliced = array_slice($ids, 1, 20);
          $article->tags()->attach($sliced);
        });
        factory(AppTag::class, 20)->create();
        factory(AppReview::class, 50)->create()->each(function($review){
          $ids = range(1, 50);
          shuffle($ids);
          $sliced = array_slice($ids, 1, 20);
          $review->tags()->attach($sliced);
        });
    }

Now you will proceed to learn about various authentication methods in the next sections. What you learned while building the news application will come in handy with this new application. In fact, if you study the code snippets I have shared in this chapter already, you will find they have many things in common.

How Auth Controller Works and What Auth Middleware Is

A proper authentication and authorization process should go through the filtering examinations first, it filters users along with other credentials. If the filtering examination passes, only then can authenticated users enter your application. Laravel introduces the concept of middleware in between filtering processes so that the proper filtering takes place before anything starts. You can think of middleware as a series of layers that HTTP requests must pass through before they actually hit your application. The more advanced an application becomes, the more layers that can examine the requests in different stages, and if a filtering test fails, the request is rejected entirely.

More simply, the middleware mechanism verifies whether the user is authenticated. If the user is not authenticated, the middleware sends the user back to the login page. If the middleware is happy with the user’s authentication, it allows the request to proceed further into the application.

There are also other tasks that middleware has been assigned. For example, the logging middleware might log all incoming requests to your application. Since I will discuss the authentication and authorization processes in detail, you will look at the middleware that is responsible for these particular tasks later in this chapter.

In this section, you are interested in the middleware that handles authentication and CSRF protection. All of these middleware components are located in the app/Http/Middleware directory.

Creating middleware is easy. Open your terminal and type the following:
//code 8.1
$ php artisan make:middleware CheckRole
Middleware created successfully.
The artisan command creates your middleware, called CheckRole . To verify, let’s go to the app/Http/Middleware directory and see whether it has been created. Yes, it has. The code generated at the time of creation looks like this:
//code 8.2
// app/Http/Middleware/CheckRole.php
<?php
namespace AppHttpMiddleware;
use Closure;
class CheckRole
{
    /**
     * Handle an incoming request.
     *
     * @param  IlluminateHttpRequest  $request
     * @param  Closure  $next
     * @return mixed
     */
    public function handle($request, Closure $next)
    {
        return $next($request);
    }
}

As you can see, the namespace points to the directory structure mentioned earlier. Another interesting thing is that the method handle() passes two arguments: one is $request, and the second one is the Closure object $next.

This means you need to define the method actions in your route where you will request a URI (like /adminonly) and return a view using the closure (the anonymous function).

You need to use this middleware in a way so that only the administrator can go to the URI /adminonly; no one else, such as moderators, editors, and other members, should be able to access it.

To make this happen, you have to organize three files, listed here:
  • app/Http/Middleware/CheckRole.php

  • app/Http/Kernel.php

  • routes/web.php

In app/Http/Middleware/CheckRole.php, you have to add some logic first so that if in the users table the admin property is set to 0, the users will be redirected to the “restricted” page. Otherwise, the next requests will follow one after the other. Therefore, your app/Http/Middleware/CheckRole.php code changes to this:
//code 8.3
//'app/Http/Middleware/CheckRole.php'
    public function handle($request, Closure $next)
    {
      if(auth()->check() && $request->user()->admin == 0){
        return redirect()->guest('home');
      }
      return $next($request);
    }
}

The home page is under the auth middleware, and it has been defined in the resourceful HomeController.php, so it actually takes the guest to the login page. So far, you have seen how you can successfully build a news application with the help of model relations. You have also seen different categories, articles, the relationships with the users, and so on. However, that application was purely based on one administrator, and you did not implement the concepts of roles there. But now you want an administrator dashboard, where the administrator can log in and create, retrieve, and update the records successfully.

Specifically, in the company/project/task management application, you will see how different roles handle different segments of the application.

In this application, a company administrator will act as a super-admin, who has all the privileges to create, retrieve, update, or delete any resource. But a project manager (also called a moderator or editor) cannot do that. The moderator’s role is limited to the projects and tasks only. A general user can only write articles, add some comments, and do things like that.

The goal is to understand the concepts so that you can implement these features in any dynamic application in the future. You want to make sure that the moderator, editor, and general users will also not be able to view the administrator dashboard. You can facilitate this process in your route. Add this piece of code in your routes/web.php file:
//code 8.4
//'routes/web.php'
Route::group(['middleware' => ['web', 'auth']], function(){
  Route::get('/adminonly', function () {
    if(Auth::user()->admin == 0){
      return view('restrict');
    }else{
      $users['users'] = AppUser::all();
      return view('adminonly', $users);
    }
  });
});

As you see, you create middleware first. The code clearly mentions that if the user is not admin, the application should take the user to the home page; otherwise, listen to the next request.

What will be the next request? That is defined in the previous code.

First, you add a request and through the closure again add your main request and the closure. Since in your first request you mention the middleware options, you need to add that functionality to the app/Http/Kernel.php file. Before checking that, let’s check your main request objects where you state that if the user’s admin property is set to 0, the user must be redirected to the “restricted” page. Otherwise, the user is welcome to the /adminonly URI where it returns a view Blade template page called adminonly.blade.php in the resources/views directory. At the same time, you have sent all users’ data there along with the editing facilities.
//code 8.5
// resources/views/adminonly.blade.php
@extends('layouts.app')
@section('content')
<div class="container">
    <div class="row">
        <div class="col-md-12 col-md-offset-2">
            <div class="panel panel-default">
                <div class="panel-heading">
                </div>
                <div class="panel-body">
                    @if (session('status'))
                        <div class="alert alert-success">
                            {{ session('status') }}
                        </div>
                    @endif
<h1 class="blog-post">THIS IS ADMIN PAGE</h1>
<h1 class="blog-post">ADMIN CAN ALSO DO</h1>
<h1 class="blog-post">SOMETHING ELSE HERE</h1>
<a href="/home">HOME</a>
<h1 class="blog-post">PLEASE VISIT ABOVE HOME LINK FOR FURTHER EDITING</h1>
<ul class="list-group">
     @foreach ($users as $user)
     <li class="list-group-item"><h2 class="blog-post-title">
             <a href="/users/{{ $user->id }}">{{ $user->name }}</a>
         </h2>
     </li><li><a href="/users/{{ $user->id }}/edit">Edit</a></li>
     @endforeach
</ul></div></div></div></div></div>
@endsection
This code basically gives you the output of all users with the editing facilities available to the administrator. You have, at the same time, worked on the app/Http/Kernel.php file and have an additional line here:
//code 8.6
//'app/Http/Kernel.php'
    protected $middleware = [
        AppHttpMiddlewareCheckForMaintenanceMode::class,
        IlluminateFoundationHttpMiddlewareValidatePostSize::class,
        AppHttpMiddlewareTrimStrings::class,
        IlluminateFoundationHttpMiddlewareConvertEmptyStringsToNull::class,
        AppHttpMiddlewareTrustProxies::class,
        AppHttpMiddlewareCheckRole::class
    ];
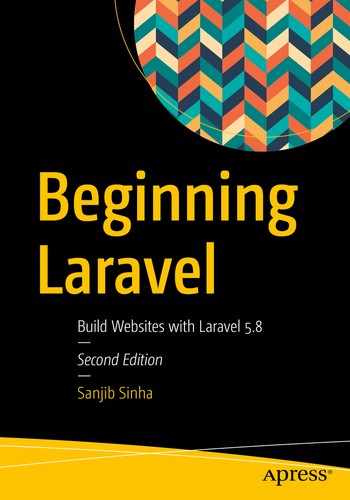
See that last line? You add the CheckRole class to the global HTTP middleware stack. The advantage of this middleware is that it runs during every request to your application. Altogether, you have successfully tied three files together that are needed for your middleware to work for the administrator. Figure 8-1 shows where the administrator logs in.
../images/435350_2_En_8_Chapter/435350_2_En_8_Fig1_HTML.jpg
Figure 8-1

Administrator dashboard through middleware

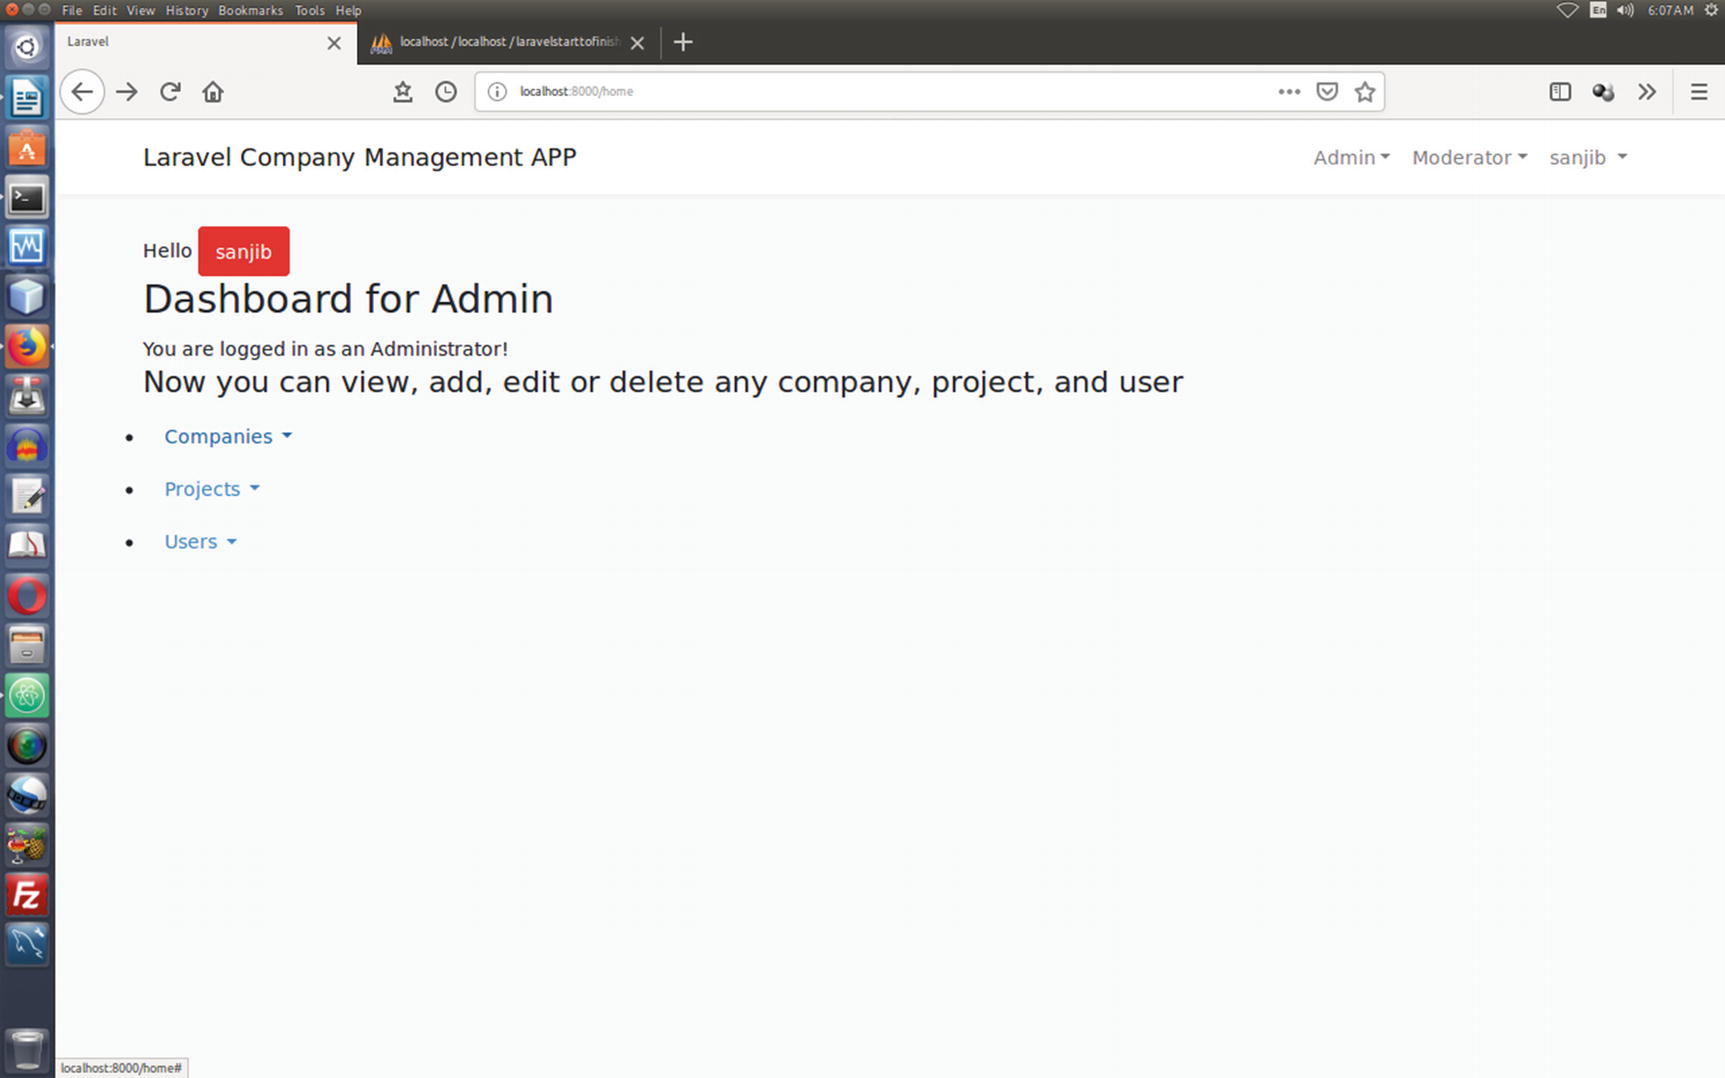
If the moderator wants to log in, the moderator is redirected to the “restricted” page, as shown in Figure 8-2.
../images/435350_2_En_8_Chapter/435350_2_En_8_Fig2_HTML.jpg
Figure 8-2

Administrator dashboard refusing to display when the user is a moderator

Middleware has taught us one thing for certain: authentication plays a vital role in this filtering process. Beside authentication services, Laravel provides a simple way to authorize user actions. There are two primary ways to authorize users: gates and policies. They act like this: you need a certain policy for a certain gate. If the policy is a controller, you may think of the gate as your associated route.

In the next sections, you will see how to build an authorization process. You can build the authorization process using other ways too such as the Role model; it is not mandatory that you have to force the authorization process on an application only through gates and policies. You will learn about them in the next sections.

Middleware, Authentication, and Authorization in One Place

Let’s first see the routes/web.php code so that you can understand how you came to these pages. You will get the full code of the company/project/task management application in the source code section. I am going to share only the code snippets that you need for the authentication and authorization services here.
//code 8.7
//routes/web.php
Route::get('/', function () {
    return view('welcome');
});
/*
Route::get('/test', function () {
        //
        return view('test');
})->middleware(CheckRole::class);
*/
Route::group(['middleware' => ['web', 'auth']], function(){
  Route::get('/adminonly', function () {
    if(Auth::user()->admin == 0){
      return view('restrict');
    }else{
      $users['users'] = AppUser::all();
      return view('adminonly', $users);
    }
  });
});
Route::get('/admin', function () {
  if (Gate::allows('admin-only', Auth::user())) {
        // The current user can view this page
        return view('admin');
    }
    else{
      return view('restrict');
    }
});
Route::get('/mod', function () {
  if (Gate::allows('mod-only', Auth::user())) {
        // The current user can view this page
        return view('mod');
    }
    else{
      return view('restrict');
    }
});
Auth::routes();
Route::resource('home', 'HomeController');
Route::resource('users', 'UserController');
Route::resource('companies', 'CompanyController');
Route::resource('projects', 'ProjectController');
Route::resource('roles', 'RoleController');
Route::resource('tasks', 'TaskController');
Route::resource('comments', 'CommentController');
Route::resource('articles', 'ArticleController');
Route::get('/users/{id}/articles', 'ArticleController@articles');
Route::resource('reviews', 'ReviewController');
Route::get('/users/{id}/reviews', 'ReviewController@reviews');
Route::get('companies/destroy/{id}', ['as' => 'companies.get.destroy',
        'uses' => 'CompanyController@getDestroy']);
The first few lines are important, as they tell you about the welcome page and how the login mechanism works.
Route::get('/', function () {
    return view('welcome');
});
Auth::routes();
Route::resource('home', 'HomeController');
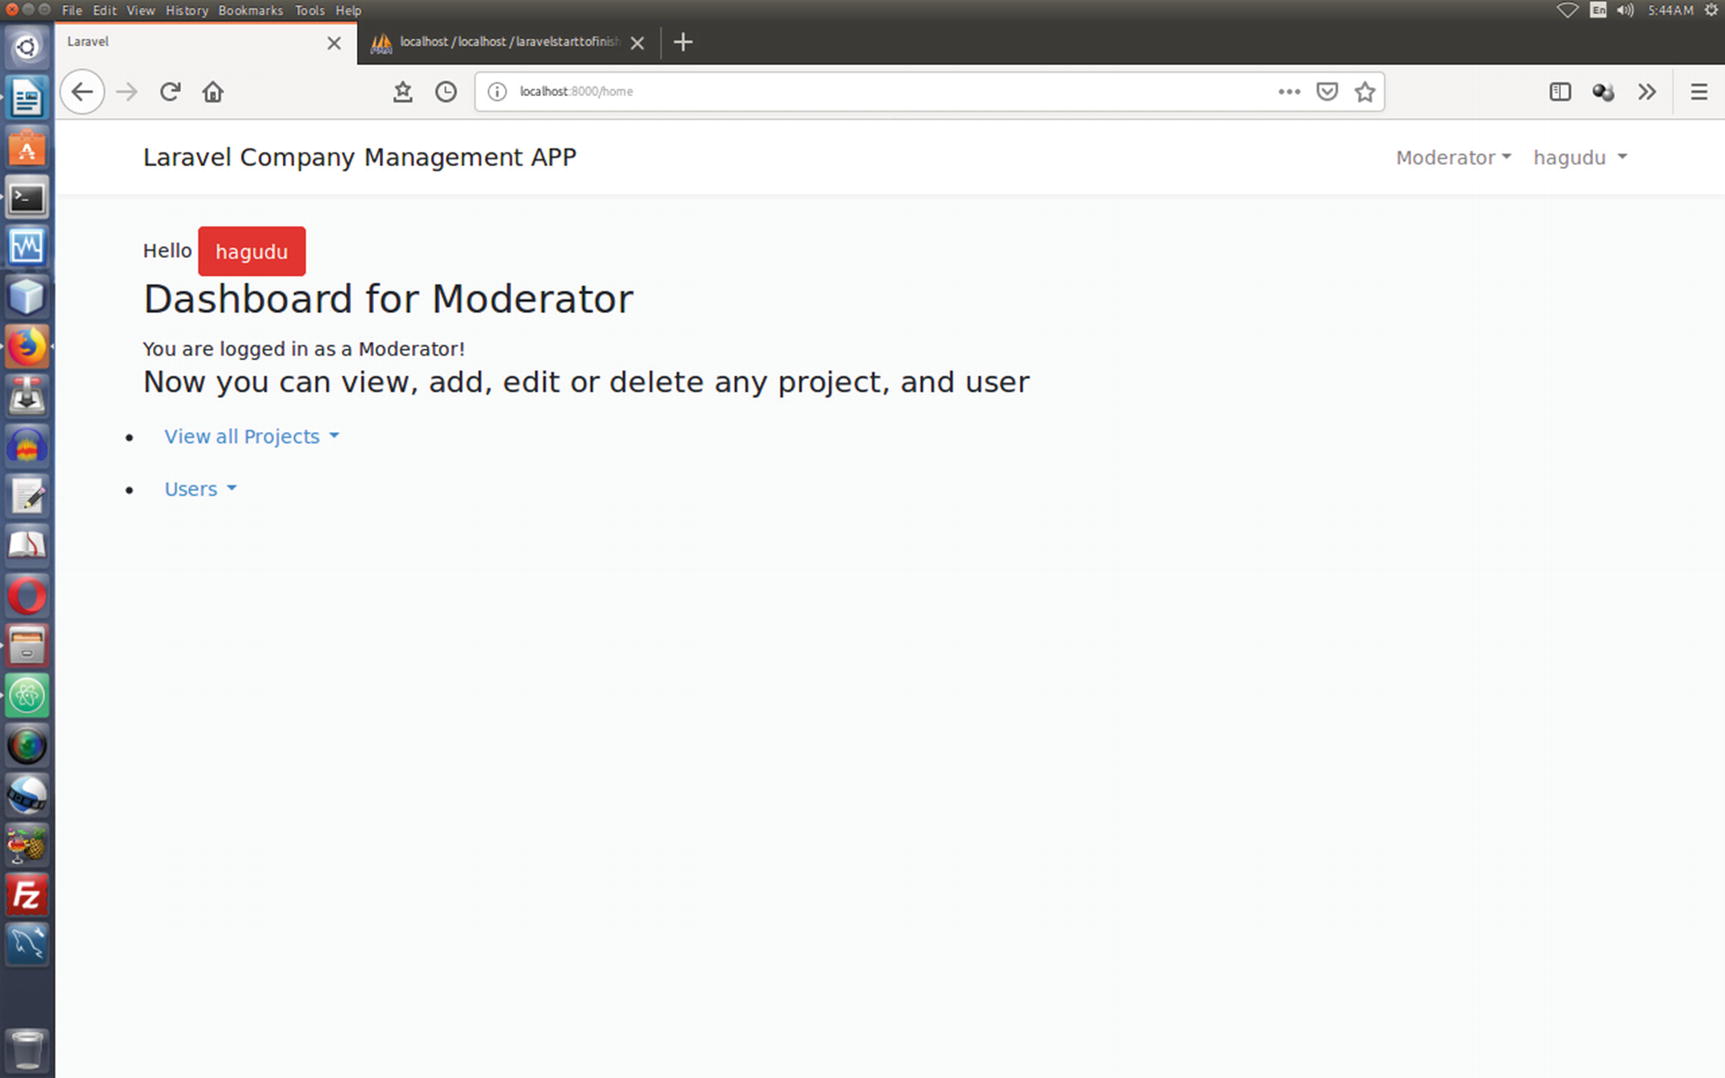
You will look at the home page code along with the HomeController to understand the logic of authentication. But before that, I need to clear up a few things. First, the welcome page is not under authentication, so anyone can view it, and the welcome page has two sections: public and private. The private sections are meant for the members, and the public sections are open to the guests. Figure 8-3 shows the welcome page.
../images/435350_2_En_8_Chapter/435350_2_En_8_Fig3_HTML.jpg
Figure 8-3

Welcome page of company management application for public viewing

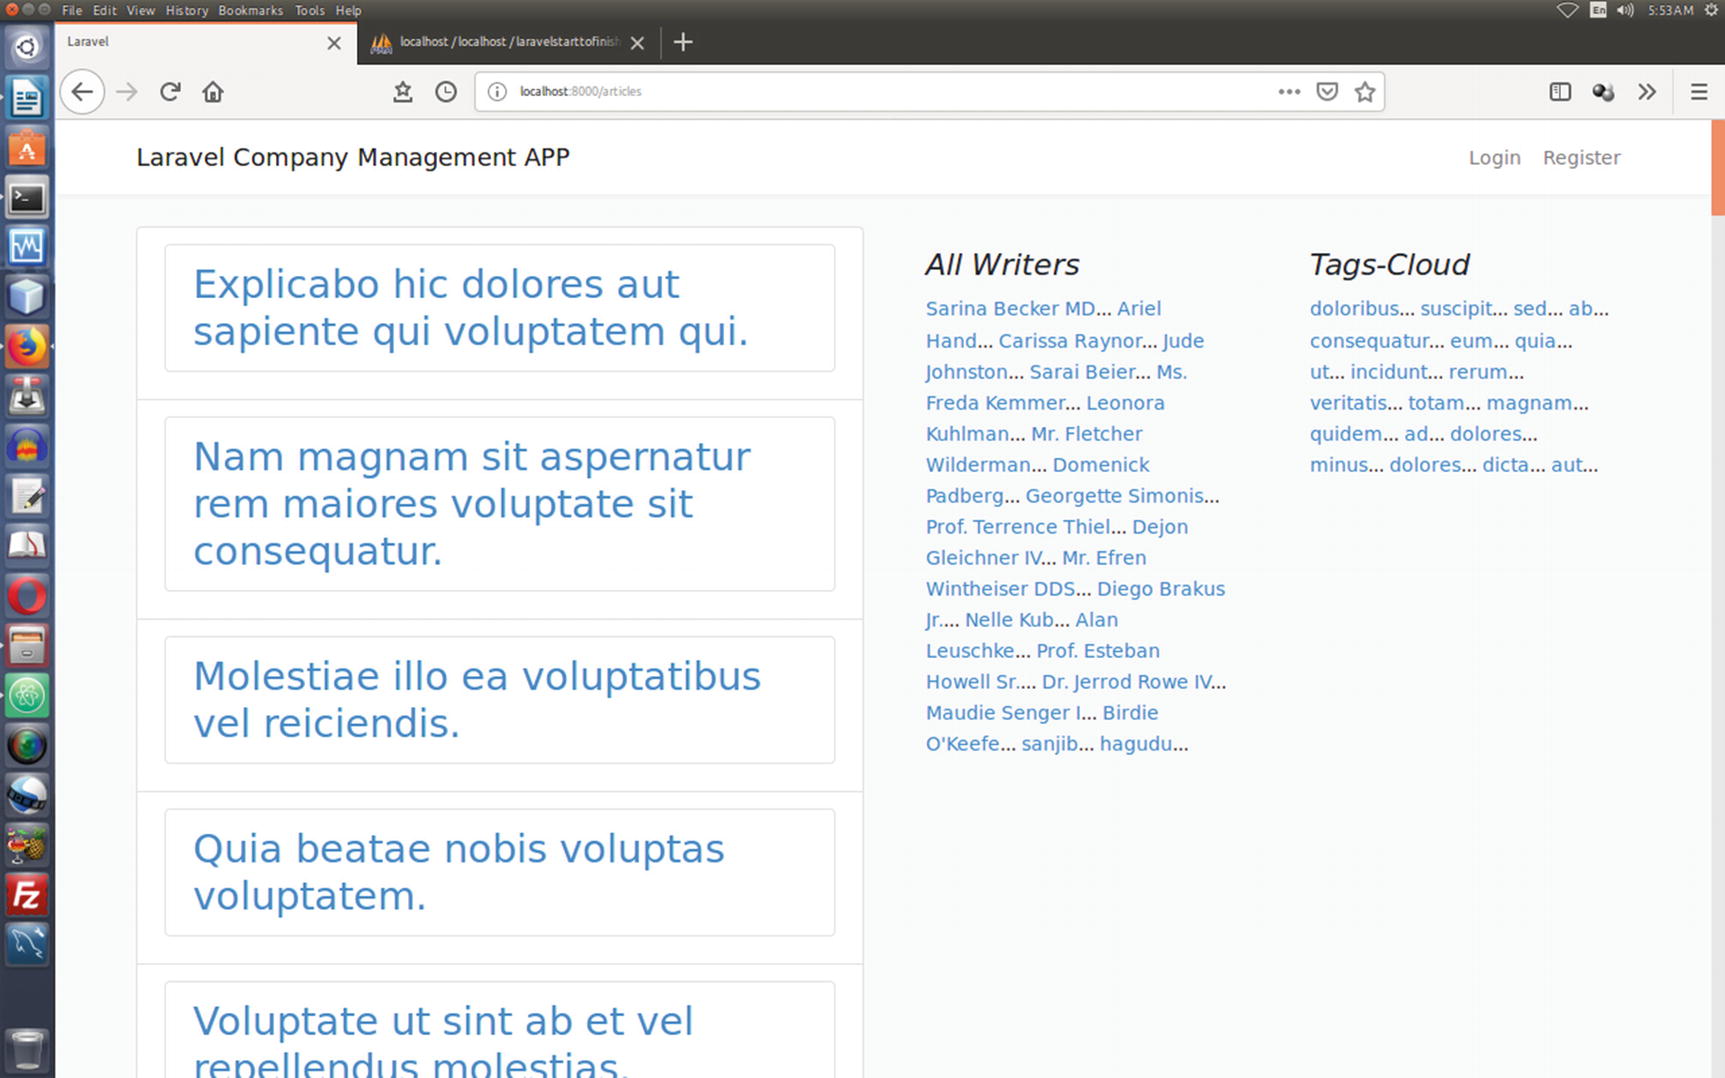
The guests can read the blogs and reviews posted by the registered users; however, some parts inside the blog section are covered by authentication, and the same is true for the reviews section. Let’s click the blog link to see all the blogs first; see Figure 8-4.
../images/435350_2_En_8_Chapter/435350_2_En_8_Fig4_HTML.jpg
Figure 8-4

The blogs by the users along with their names and tags

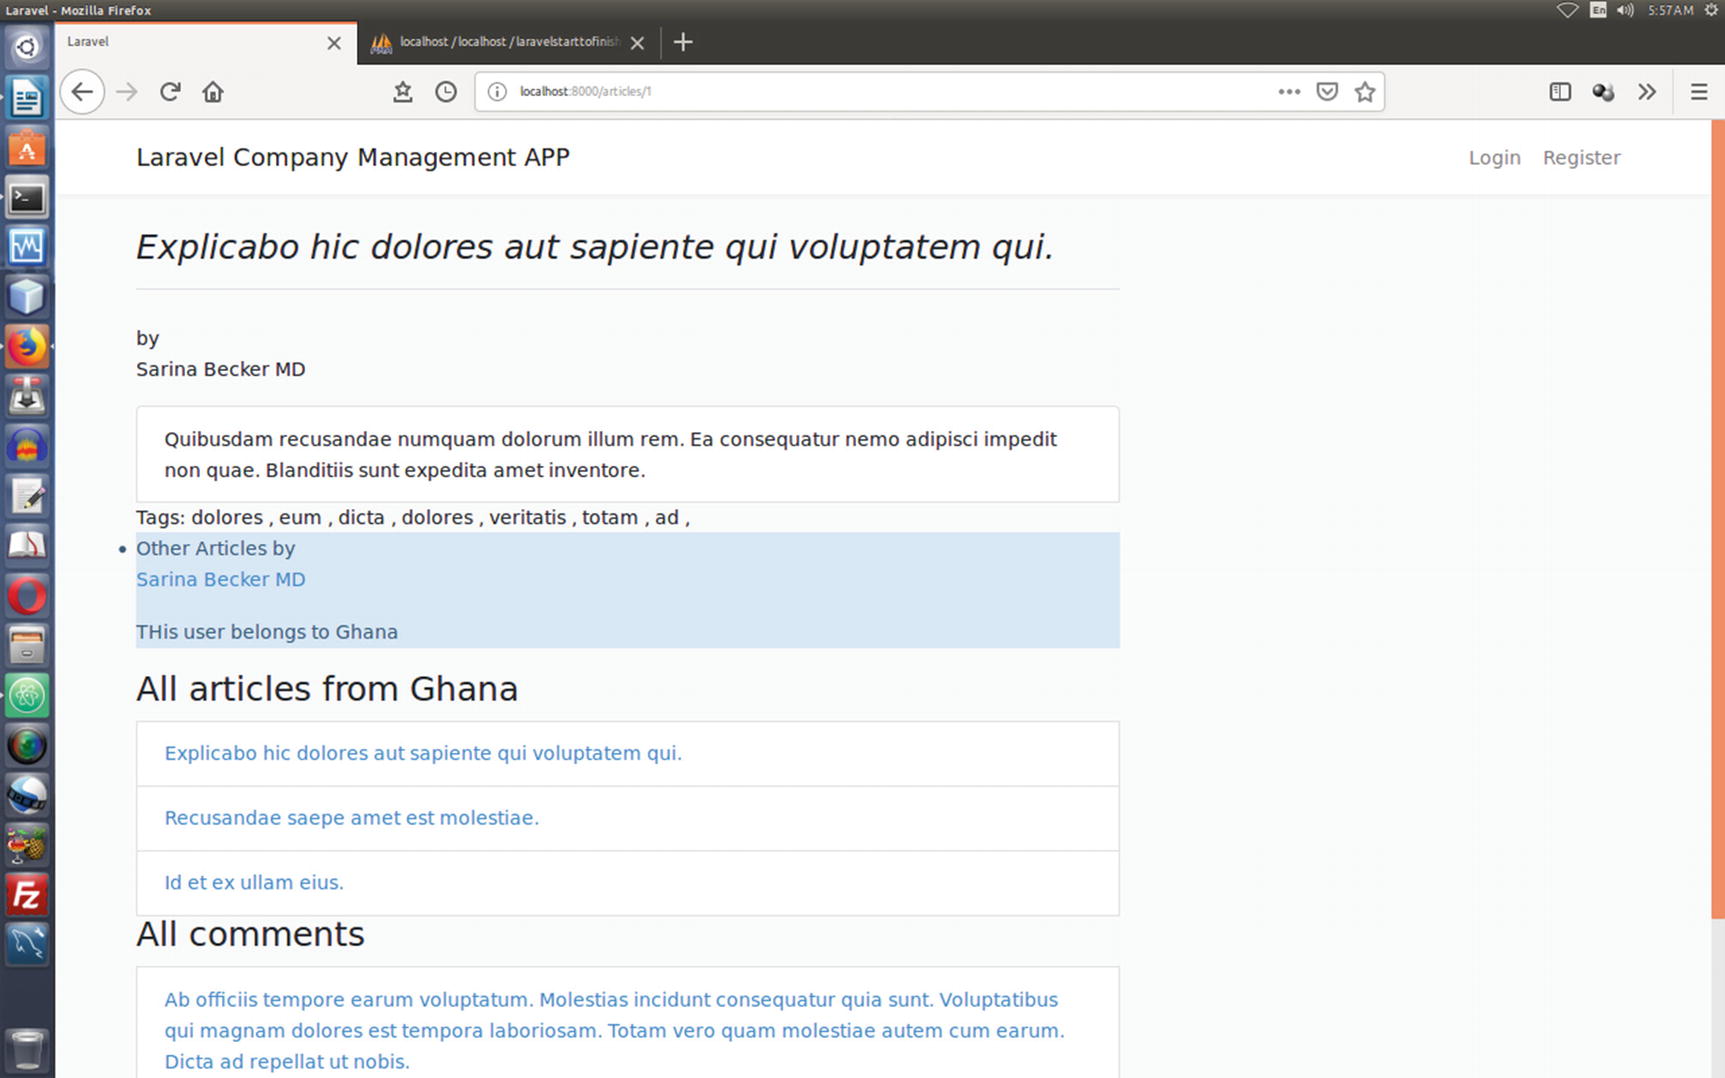
Here the URI is http://localhost/articles. Now let’s click the first article and see how it looks; see Figure 8-5.
../images/435350_2_En_8_Chapter/435350_2_En_8_Fig5_HTML.jpg
Figure 8-5

The first article

The URI is quite simple to follow: http://localhost/articles/1.

However, this page has many layers; for example, you can also read other articles by the user. Since this user is from Ghana (the faker object has chosen this country for this user), you can also view other articles written by members from the same country. You can also view all the comments posted on this page against this article.

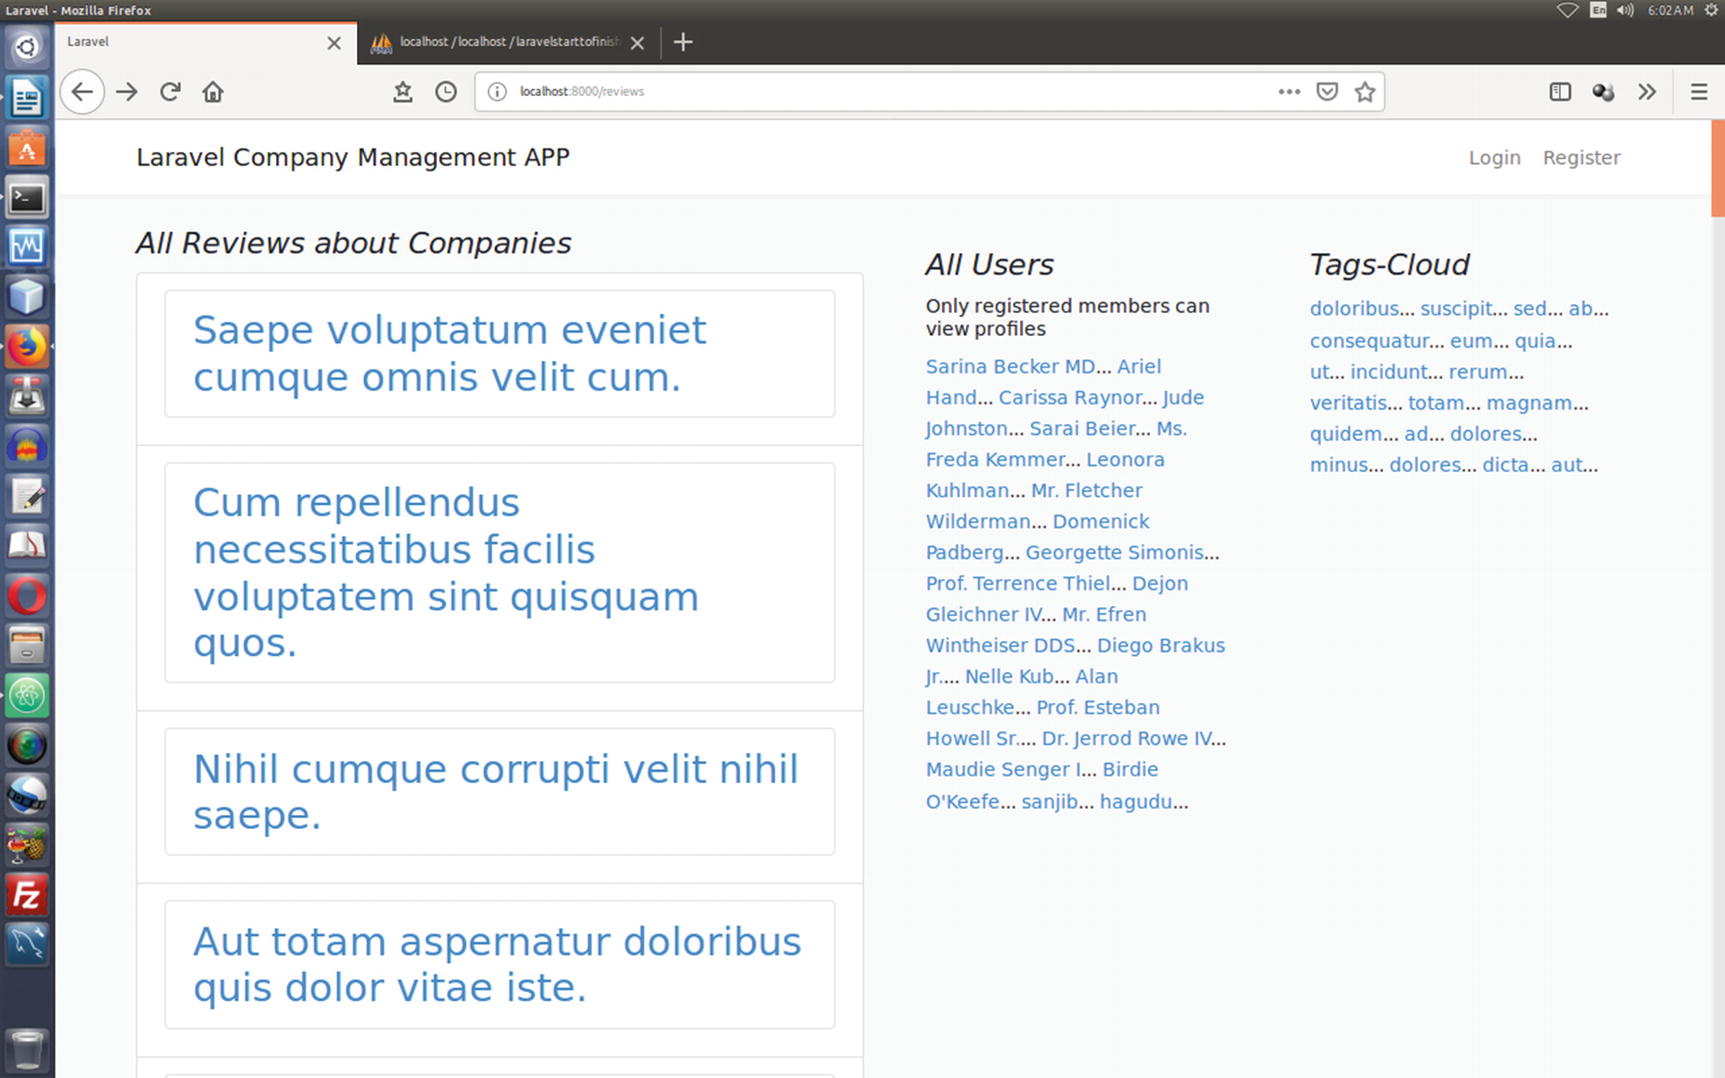
On the welcome page, the link to the reviews section works the same way.

On the welcome page, when you click the reviews link, it takes you to the page shown in Figure 8-6.
../images/435350_2_En_8_Chapter/435350_2_En_8_Fig6_HTML.jpg
Figure 8-6

The reviews page

The functioning of this reviews page is almost same as the articles page except that the content is different. Let’s click the first review and see what you can find inside.

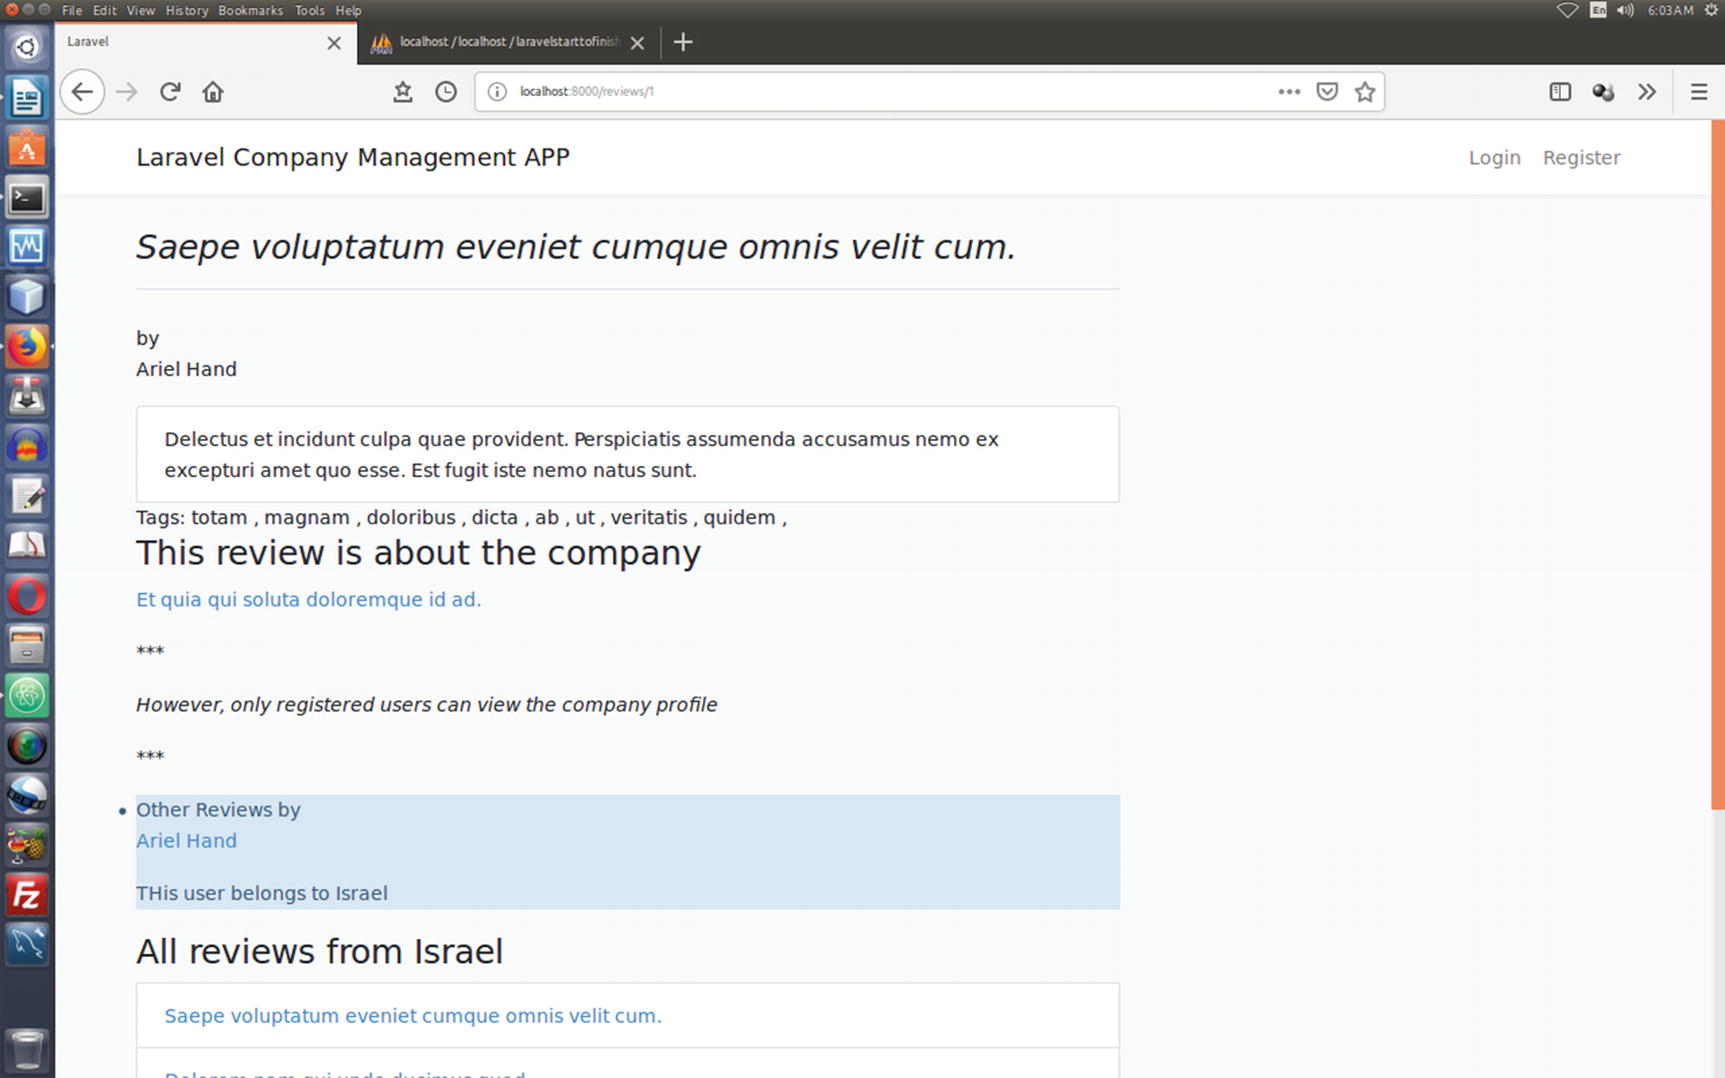
The main difference is any review says something about a company, so the model relationship changes in the business layer.

A review is related to a company, and one article is related to a single user. In both cases, this application allows you to read the articles and the reviews but never allows you to read the information about the companies or the user. See Figure 8-7.
../images/435350_2_En_8_Chapter/435350_2_En_8_Fig7_HTML.jpg
Figure 8-7

The first review

Here the URI is simple: http://localhost/reviews/1. This page also lists many other things such as the company name and the link for this review, other reviews by the same user, the country name the user belongs to, and all the reviews from that country.

The Company App’s Model-View-Controller

Let’s go back to the article section again and try to understand the workflow between the model, view, and controller.

Here is the code of ArticleController, the Article model , and all the view page of the articles:
//code 8.9
//app/HTTP/Controllers/ArticleController.php
<?php
namespace AppHttpControllers;
use AppArticle;
use AppCountry;
use AppUser;
use AppTag;
use IlluminateHttpRequest;
class ArticleController extends Controller
{
    /**
     * Display a listing of the resource.
     *
     * @return IlluminateHttpResponse
     */
    public function index()
    {
      $articles = Article::all();
      //$articles = Article::where('active', 1)->orderBy('title', 'desc')->take(10)->get();
      $users = User::all();
      $tags = Tag::all();
      return view('articles.index', compact('articles', 'users', 'tags'));
    }
    /**
     * Show the form for creating a new resource.
     *
     * @return IlluminateHttpResponse
     */
    public function create()
    {
        //
    }
    /**
     * Store a newly created resource in storage.
     *
     * @param  IlluminateHttpRequest  $request
     * @return IlluminateHttpResponse
     */
    public function store(Request $request)
    {
        //
    }
    /**
     * Display the specified resource.
     *
     * @param  int  $id
     * @return IlluminateHttpResponse
     */
    public function show(Article $article)
    {
      $tags = Article::find($article->id)->tags;
      $article = Article::find($article->id);
      $comments = $article->comments;
      $user = User::find($article->user_id);
      $country = Country::where('id', $user->country_id)->get()->first();
      return view('articles.show', compact('tags','article',
      'country', 'comments', 'user'));
    }
    /**
     * Display the specified resource.
     *
     * @param  AppArticle  $article
     * @return IlluminateHttpResponse
     */
    public function articles($id)
    {
      $user = User::find($id);
      return view('articles.articles', compact('user'));
    }
    /**
     * Show the form for editing the specified resource.
     *
     * @param  int  $id
     * @return IlluminateHttpResponse
     */
    public function edit($id)
    {
        //
    }
    /**
     * Update the specified resource in storage.
     *
     * @param  IlluminateHttpRequest  $request
     * @param  int  $id
     * @return IlluminateHttpResponse
     */
    public function update(Request $request, $id)
    {
        //
    }
    /**
     * Remove the specified resource from storage.
     *
     * @param  int  $id
     * @return IlluminateHttpResponse
     */
    public function destroy($id)
    {
        //
    }
}
As you can see, I have left a few methods blank, but you will use them in near future for inserting and updating your application. Currently, you are concerned about only three methods: index(), show(), and articles().
    //index method
public function index()
    {
      $articles = Article::all();
      $users = User::all();
      $tags = Tag::all();
      return view('articles.index', compact('articles', 'users', 'tags'));
    }
    //show method
public function show(Article $article)
    {
      $tags = Article::find($article->id)->tags;
      $article = Article::find($article->id);
      $comments = $article->comments;
      $user = User::find($article->user_id);
      $country = Country::where('id', $user->country_id)->get()->first();
      return view('articles.show', compact('tags','article',
      'country', 'comments', 'user'));
    }
//articles method
public function articles($id)
{
   $user = User::find($id);
   return view('articles.articles', compact('user'));
}
Let us take a close look at the index() method first. Think about this line:
$articles = Article::all();

Eloquent has made querying relationships quite easy. Now through the Article model, you can retrieve all the records related to articles. As you learned earlier, Facade provides a static interface to classes that are available in the application’s service container. Laravel 5.8 ships with many facades that provide access to almost all of Laravel’s features. The DB Facade also does the same in all types of database queries. The DB Facade provides methods for each type of query: select, update, insert, and delete.

Tip

You can also get all the records by using the table() method on DB facade to retrieve the same records. You could have written it directly using the DB facade instead of using the model, as sin $articles = DB::table('articles')->get();. Here, you have used the table method on the DB facade to begin the query, and the table method returns a fluent query builder instance for the given table. The advantage of using DB facade is it allows you to chain more constraints onto the query and then finally get the results using the get method.

These three methods are related to three view pages: articles.articles, articles.index, and articles.show. However, before taking a look at the view page code, you will see how in the Article model you establish the relationship between different records, as shown here:
//code 8.10
//app/Article.php
<?php
namespace App;
use IlluminateDatabaseEloquentModel;
class Article extends Model
{
  protected $fillable = [
      'user_id', 'title', 'body',
  ];
  public function user() {
      return $this->belongsTo('AppUser');
  }
  public function users() {
      return $this->belongsToMany('AppUser');
  }
  public function tags() {
      return $this->belongsToMany('AppTag');
  }
  /**
  * Get all of the articles' comments.
  */
  public function comments(){
    return $this->morphMany('AppComment', 'commentable');
  }
}

Each article does not have a complicated relation with the other records as one article has three components attached to it. The first is the user who writes them, the second is the tags the user uses, and the third one is the comments section that has a polymorphic relation with the articles.

Here is the code for the three views of the articles; later, you will add more view pages for inserting or updating records:
// resources/views/articles/articles.blade.php
@extends('layouts.app')
@section('content')
<div class="container">
    <div class="row">
        <div class="col-md-8 blog-main col-lg-8 blog-main col-sm-8 blog-main">
          <div class="blog-post">
    <ul class="list-group">
         <div class="panel-heading">All Articles by <a href="/users/{{ $user->id }}">{{ $user->name }}</a> </div>
                @foreach($user->articles as $article)
                <li class="list-group-item">
                    <h2 class="blog-post-title">
                        <a href="/articles/{{ $article->id }}">{{ $article->title }}</a>
                    </h2>
                </li>
                @endforeach
    </ul>
            </div>
          <nav class="blog-pagination">
            <a class="btn btn-outline-primary" href="#">Older</a>
            <a class="btn btn-outline-secondary disabled" href="#">Newer</a>
          </nav>
        </div>
        <aside class="col-md-4 blog-sidebar">
          <div class="p-3">
              <h3 class="blog-post-title">Know about {{ $article->user->name }}
              </h3>
              <hr class="linenums" color="red">
              <div class="panel panel-default">
                <div class="panel-heading">{{ $article->user->name }}'s Profile</div>
                <div class="panel-body">
                    <li class="list-group-item-info">Name : {{ $article->user->name }}</li>
                    <li class="list-group-item-info">Email: {{ $article->user->email }}</li>
                    <li class="list-group-item-info">City: {{ $article->user->profile->city }}</li>
                    <li class="list-group-item-info">About: {{ $article->user->profile->about }}</li>
                </div>
            </div>
          </div>
        </aside>
    </div>
</div>
@endsection
Here is the code for the index page of articles:
// resources/views/articles/index.blade.php
@extends('layouts.app')
@section('content')
<div class="container">
    <div class="row">
        <div class="col-md-6 blog-main col-lg-6 blog-main col-sm-6 blog-main">
            <div class="blog-post">
    <ul class="list-group">
         @foreach($articles as $article)
         <li class="list-group-item"><h2 class="blog-post-title">
                 <li class="list-group-item"><a href="/articles/{{ $article->id }}">{{ $article->title }}</a>
             </h2>
         </li>
         @endforeach
    </ul>
            </div>
          <nav class="blog-pagination">
            <a class="btn btn-outline-primary" href="#">Older</a>
            <a class="btn btn-outline-secondary disabled" href="#">Newer</a>
          </nav>
        </div>
        <aside class="col-md-3 blog-sidebar">
          <div class="p-3">
              <h4 class="font-italic">All Writers</h4>
            @foreach($users as $user)
                 <a href="/users/{{ $user->id }}">{{ $user->name }}</a>...
         @endforeach
          </div>
        </aside>
        <aside class="col-md-3 blog-sidebar">
          <div class="p-3">
              <h4 class="font-italic">Tags-Cloud</h4>
            @foreach($tags as $tag)
                 <a href="/tags/{{ $tag->id }}">{{ $tag->tag }}</a>...
         @endforeach
          </div>
        </aside>
    </div>
</div>
@endsection
Finally, here is the show.blade.php code ; it is important because it will show a particular article:
// resources/views/articles/show.blade.php
@extends('layouts.app')
@section('content')
<div class="container">
    <div class="row">
        <div class="col-md-8 col-md-offset-2">
            <div class="panel panel-default">
                <div class="panel-heading">
                    <h3 class="pb-3 mb-4 font-italic border-bottom">{{ $article->title }}</h3>  by
                    <p>{{ $article->user->name }}</p>
                </div>
                <div class="panel-body">
                    <li class="list-group-item">{{ $article->body }}</li>
                    Tags:
                    @foreach($article->tags as $tag)
                    {{ $tag->tag }} ,
                    @endforeach
                    <li class="list-group-item-info">Other Articles by
                        <p>
                            <a href="/users/{{ $article->user_id }}/articles">{{ $article->user->name }}</a>
                        </p>
                        THis user belongs to {{ $country->name }}<p></p>
                    </li>
                    <h3 class="blog-post">
                      All articles from {{ $country->name }}
                    </h3>
                    @foreach($country->articles as $article)
                    <li class="list-group-item">
                      <a href="/articles/{{ $article->id }}">
                        {{ $article->title }}
                      </a>
                    </li>
                    @endforeach
                    <h3 class="blog-post">
                      All comments
                    </h3>
                    @foreach($comments as $comment)
                    <li class="list-group-item">
                      <a href="/comments/{{ $comment->id }}">
                        {{ $comment->body }}
                      </a>
                    </li>
                    @endforeach
                </div>
            </div>
        </div>
    </div>
</div>
@endsection

In this show.blade.php page , you will find many Eloquent relationship queries where you don’t have to add additional constraints; instead, you access the relationship as if it consisted of properties.

For example, in the ArticleController show($id) method , you can access them as properties as follows:
$tags = Article::find($article->id)->tags;
      $article = Article::find($article->id);
      $comments = $article->comments;
      $user = User::find($article->user_id);
      $country = Country::where('id', $user->country_id)->get()->first();
You access all of an article’s tags like this:
$tags = Article::find($article→id)→tags;

This was originally defined in the Article and Tag models.

Since you have defined the relationship between Articles and Tags and you have accessed article tags using Eloquent queries, now you can get the related tags in your show.blade.php page like this:
<li class="list-group-item">{{ $article->body }}</li>
                    Tags:
                    @foreach($article->tags as $tag)
                    {{ $tag->tag }} ,
                    @endforeach

Once you get the idea of how the Eloquent queries work and how model relations work, the rest is simple, and any type of complicated tasks can easily be handled.

Likewise, you can now build the Reviews part the same way. For brevity, I have not included all the code like with Articles. Here I am showing only the code of the show($id) method of ReviewController , and I show the code for show.blade.php:
//code 8.11
//app/HTTP/Controllers/ ReviewController.php
    public function show(Review $review)
    {
        $tags = Review::find($review->id)->tags;
        $review = Review::find($review->id);
        $comments = $review->comments;
        $user = User::find($review->user_id);
        $company = Company::find($review->company_id);
        $country = Country::where('id', $user->country_id)->get()->first();
        return view('reviews.show', compact('tags','review',
        'country', 'comments', 'user', 'company'));
    }
And you get the values in the resources/views/reviews/show.blade.php page, like this:
//resources/views/reviews/show.blade.php
@extends('layouts.app')
@section('content')
<div class="container">
    <div class="row">
        <div class="col-md-8 col-md-offset-2">
            <div class="panel panel-default">
                <div class="panel-heading">
                    <h3 class="pb-3 mb-4 font-italic border-bottom">{{ $review->title }}</h3>  by
                    <p>{{ $review->user->name }}</p>
                </div>
                <div class="panel-body">
                    <li class="list-group-item">{{ $review->body }}</li>
                    Tags:
                    @foreach($review->tags as $tag)
                    {{ $tag->tag }} ,
                    @endforeach
                    <li class="list-inline">
                      <h3>This review is about
                      the company</h3>
                        <p>
                            <a href="/companies/{{ $review->company_id }}">
                              {{ $company->name }}</a>
                        </p>
                        <p>
                        ***
                        </p>
                        <p>
                          <cite>
                        However, only registered users can view
                          the company profile
                        </cite>
                        </p>
                        <p>
                          ***
                        </p>
                    </li>
                    <li class="list-group-item-info">Other Reviews by
                        <p>
                            <a href="/users/{{ $review->user_id }}/review">
                              {{ $review->user->name }}</a>
                        </p>
                        THis user belongs to {{ $country->name }}<p></p>
                    </li>
                    <h3 class="blog-post">
                      All reviews from {{ $country->name }}
                    </h3>
                    @foreach($country->reviews as $review)
                    <li class="list-group-item">
                      <a href="/reviews/{{ $review->id }}">
                        {{ $review->title }}
                      </a>
                    </li>
                    @endforeach
                    <h3 class="blog-post">
                      All comments
                    </h3>
                    @foreach($comments as $comment)
                    <li class="list-group-item">
                      <a href="/comments/{{ $comment->id }}">
                        {{ $comment->body }}
                      </a>
                    </li>
                    @endforeach
                </div>
            </div>
        </div>
    </div>
</div>
@endsection

These are basically the public sections of your application for anyone to view. I have not covered the inserting and editing parts here. As you progress, you will learn about those parts, but before that, you will see how you can create the companies, projects, and users section, allowing the designated users to insert or edit data.

Home Page, Redirection, and Authentication

Implementing authentication in Laravel is super simple. You have already learned it: you just run the php artisan make:auth and php artisan migrate commands one after other. These two commands will take care of scaffolding the entire authentication system. Since the authentication process has been configured by default, you need not worry about the registration and login processes that follow it immediately.

Can you tweak the behavior of the authentication service? Yes, you can. The authentication configuration file is config/auth.php. However, in most cases, you don’t have to customize it. The retrieval of users is done with the help of default providers, and Laravel ships with support for retrieving users using Eloquent and the database query builder.

If this sounds confusing, don’t worry. I will again discuss it in a minute.

Let’s try to understand the authentication process, step-by-step, first. Laravel comes with two types of authentication drivers: the Eloquent authentication driver and the database authentication driver. If you don’t use the Eloquent authentication driver, you need to use the database authentication driver. By default, Laravel includes a User model in the app directory so that you can get an idea of how to use it with either Eloquent or a database.

If the default database schema works for you, you don’t have to change it or add more functionalities in your users table. The default database schema looks like this:
    public function up()
    {
        Schema::create('users', function (Blueprint $table) {
            $table->increments('id');
            $table->string('name');
            $table->string('email')->unique();
            $table->string('password');
            $table->rememberToken();
            $table->timestamps();
        });
    }
Now, for your company/project/task management application, I have changed it to this:
         Schema::create('users', function (Blueprint $table) {
             $table->increments('id');
             $table->integer('country_id')->nullable();
              $table->integer('role_id')->nullable();
             $table->string('name');
             $table->string('email')->unique();
             $table->timestamp('email_verified_at')->nullable();
             $table->string('password');
             $table->rememberToken();
             $table->timestamps();
         });
     }
Let’s view the code of HomeController , as shown here:
//code 8.12
//app/HTTP/Controllers/HomeController.php
<?php
namespace AppHttpControllers;
use IlluminateHttpRequest;
class HomeController extends Controller
{
    /**
     * Create a new controller instance.
     *
     * @return void
     */
    public function __construct()
    {
        $this->middleware('auth');
    }
    /**
     * Show the application dashboard.
     *
     * @return IlluminateHttpResponse
     */
    public function index()
    {
        return view('home');
    }
}
The first part of the code is extremely important.
public function __construct()
    {
        $this->middleware('auth');
    }

This means once you create a HomeController instance, the instance invokes a method called middleware() and passes an argument called auth. Therefore, whatever method follows this constructor method will come under the umbrella of middleware and authentication.

First, the middleware filters the requests, and then authentication starts its workflow, making the application authenticated.

Now, if a guest types the http://localhost/home URI in a browser, they will be redirected to the login page. At the same time, all the login-related views are placed in the resources/views/auth directory. The resources/views/layouts directory is also created at the same time. Although all of these views use the Bootstrap CSS framework, you can tweak them according to your needs.

By default, once a user is authenticated, they are redirected to the /home URI. However, you can change this by redefining the redirectTo property in the controllers LoginController, RegisterController, and ResetPasswordController.

For brevity, I am showing only the LoginController code here. But you need to change the same thing in the two others. Since these three controller classes come under the Auth namespace, the redirectTo method applies to each one individually.
//app/HTTP/Controllers/Auth/LoginController.php
<?php
namespace AppHttpControllersAuth;
use AppHttpControllersController;
use IlluminateFoundationAuthAuthenticatesUsers;
class LoginController extends Controller
{
    /*
    |----------------------------------------------------------------------
    | Login Controller
    |----------------------------------------------------------------------
    |
    | This controller handles authenticating users for the application and
    | redirecting them to your home screen. The controller uses a trait
    | to conveniently provide its functionality to your applications.
    |
    */
    use AuthenticatesUsers;
    /**
     * Where to redirect users after login.
     *
     * @var string
     */
    //protected $redirectTo = '/home';
//You can comment out the original one and in the next line change it to something else
    /**
     * The new redirection of users after login.
     *
     * @var string
     */
      protected $redirectTo = '/';
    /**
     * Create a new controller instance.
     *
     * @return void
     */
    public function __construct()
    {
        $this->middleware('guest')->except('logout');
    }
}
Next, you need to modify the handle method in the RedirectIfAuthenticated file in app/HTTP/Middleware/RedirectIfAuthenticated.php to use your new URI (which is / here) while you redirect the user.
//code 8.13
<?php
namespace AppHttpMiddleware;
use Closure;
use IlluminateSupportFacadesAuth;
class RedirectIfAuthenticated
{
    /**
     * Handle an incoming request.
     *
     * @param  IlluminateHttpRequest  $request
     * @param  Closure  $next
     * @param  string|null  $guard
     * @return mixed
     */
    public function handle($request, Closure $next, $guard = null)
    {
        if (Auth::guard($guard)->check()) {
            //return redirect('/home');
// we have commented out the default redirection and change it to the new one
             return redirect('/');
        }
        return $next($request);
    }
}

In this case, the redirectTo method will override the redirectTo attribute that you changed in the LoginController.php code. Before, it was redirected to the /home URI; now it goes to the document root, /. Both redirect to the same URI (here, /).

Before concluding this section, let’s see the code of resources/views/home.blade.php. Laravel creates it by default.
//code 8.14
//resources/views/home.blade.php
@extends('layouts.app')
@section('content')
<div class="container">
    <div class="row justify-content-center">
        <div class="col-md-8">
            <div class="card">
                <div class="card-header">Dashboard</div>
                <div class="card-body">
                    @if (session('status'))
                        <div class="alert alert-success" role="alert">
                            {{ session('status') }}
                        </div>
                    @endif
                    You are logged in!
                </div>
            </div>
        </div>
    </div>
</div>
@endsection

The original code is not very long, and it displays a simple message, such as “you are logged in.” In this application, I have designed this page in a way so that the user can view the page according to their role.

So, there are many differences between the default home.blade.page code , shown next, and the application’s home page:
//code 8.15
//resources/views/home.blade.php
@extends('layouts.app')
@section('content')
<div class="container">
    <div class="row">
        <div class="col-md-12 col-md-offset-2">
            <div class="panel panel-default">
                <div class="panel-heading">
                <h2 class="blog-post">  Dashboard for Admin </h2>
                </div>
                <div class="panel-body">
                    @if (session('status'))
                        <div class="alert alert-success">
                            {{ session('status') }}
                        </div>
                    @endif
                    Hello <li class="btn btn-danger">{{ $user->name }}</li>
                    You are logged in!
                </div>
                <div class="panel-body">
                  <h4 class="blog-title">
                    Now you can view, add, edit or delete
                    any company, project, and user
                  </h4>
                </div>
            </div>
        </div>
    </div>
    <div class="row">
        <aside class="col-md-4 blog-sidebar">
          <div class="p-3">
              <h3 class="pb-3 mb-4 font-italic border-bottom">
           Add New Companies
          </h3>
            <a href="/companies/create" class="btn btn-primary" role="button">Create Companies</a>
            <h4 class="font-italic"><a href="/companies">View All Companies</a></h4>
           </div>
        </aside>
         <aside class="col-md-4 blog-sidebar">
          <div class="p-3">
          <h3 class="pb-3 mb-4 font-italic border-bottom">
              Add New Projects
          </h3>
            <a href="/projects/create" class="btn btn-primary" role="button">Create Projects</a>
            <h4 class="font-italic"><a href="/projects">View All Projects</a></h4>
           </div>
        </aside>
        <aside class="col-md-4 blog-sidebar">
          <div class="p-3">
              <h3 class="pb-3 mb-4 font-italic border-bottom">
              Add New Users
          </h3>
            <a href="/users/create" class="btn btn-primary" role="button">Create Users</a>
            <h4 class="font-italic"><a href="/users">View All Users</a></h4>
          </div>
        </aside>
    </div>
</div>
@endsection

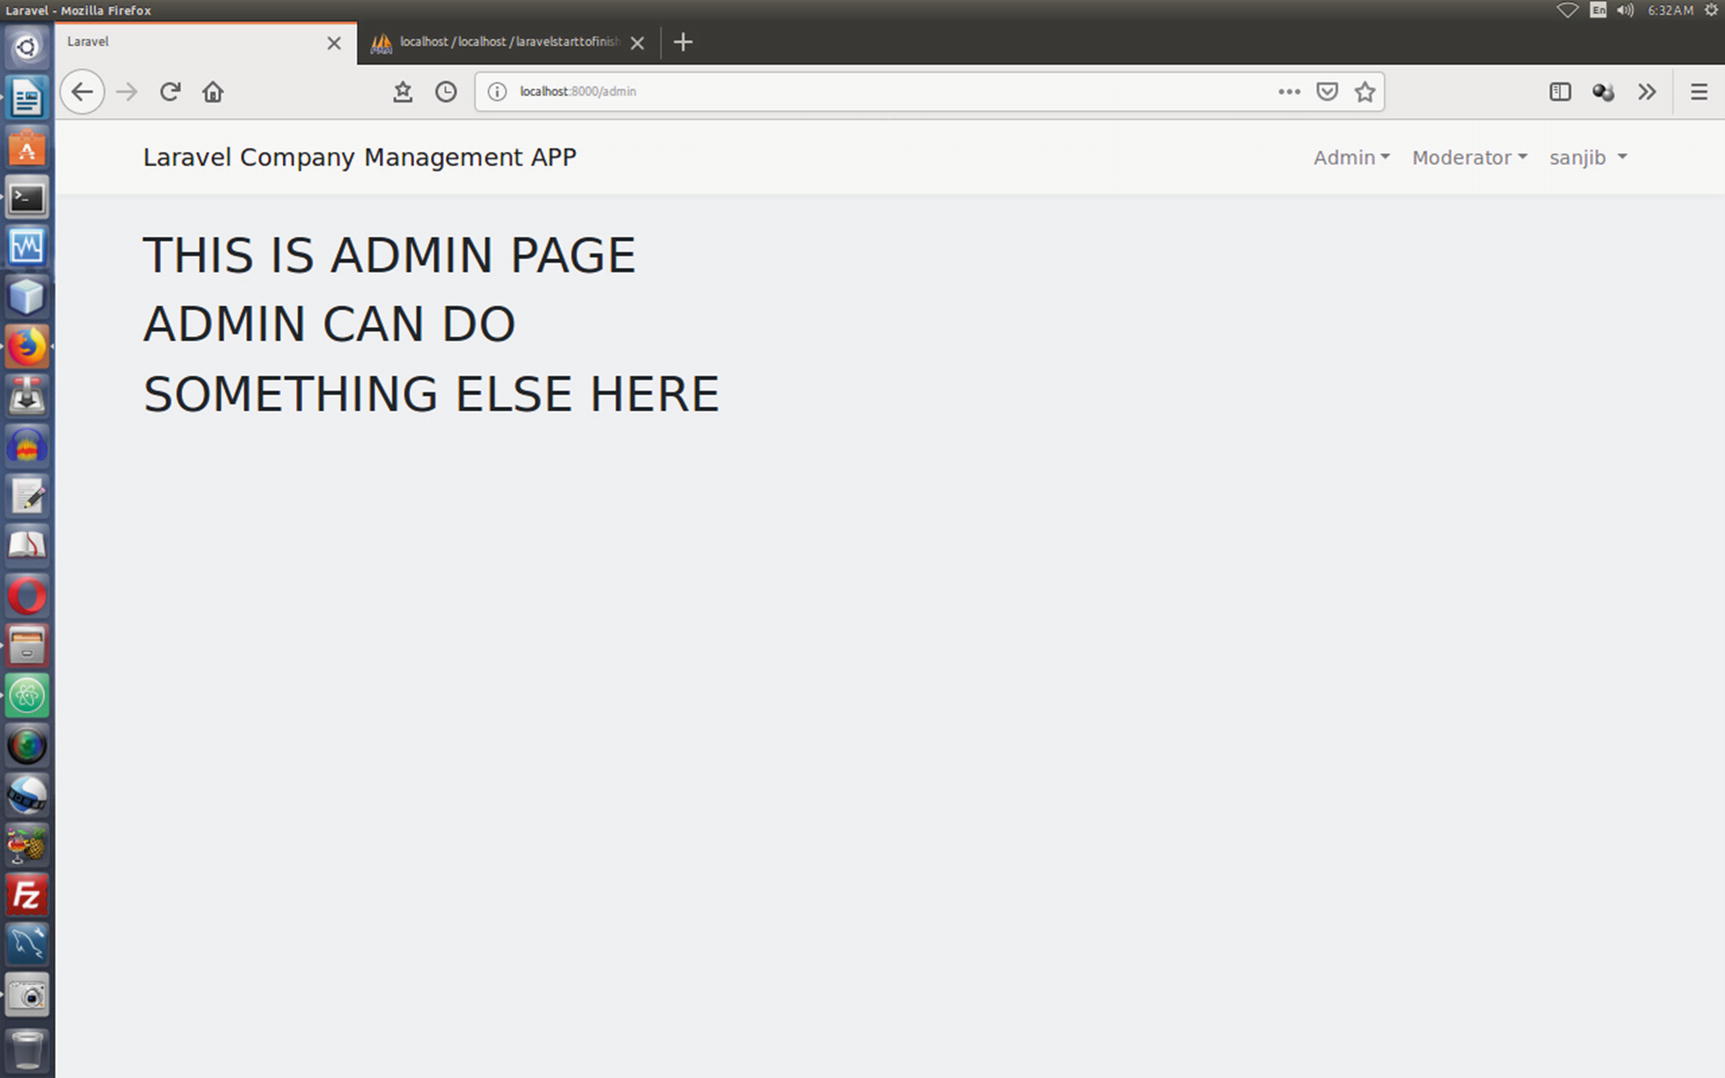
You saw this page in Figure 8-1. This home page should allow a registered user to view the dashboard panel. According to the designated role, the user can view, create, edit, or delete data.

There are several ways to handle this task. You will learn about them in the “Role of a User and Authorization” section. In the next section, you will learn about how you can do authorization for a specific role.

Role of a User and Authorization

You have defined a few specific roles, such as administrator, moderator, editor, and member. Each role has specific tasks, such as the administrator can view/create/edit/delete everything including companies, projects, users, reviews, and comments.

You have moderators who can view/create/edit/delete everything except companies. Next, think about the editor. You have decided to let the editors view/create/edit/delete everything, except companies and projects. Finally, consider the task of the general members. They can view/create/edit/delete only reviews and comments.

Keeping every role in mind, now you can attain all these functionalities through home.blade.php.

Consider this part of code from the home Blade page:
//code 8.16
//resources/views/home.blade.php
<div class="panel-body">
                    @if (session('status'))
                        <div class="alert alert-success">
                            {{ session('status') }}
                        </div>
                    @endif
                    Hello <li class="btn btn-danger">{{ $user->name }}</li>
                    @if(Auth::user()->role_id === 1)
                    <h2 class="blog-post">  Dashboard for Admin </h2>
                    You are logged in as an Administrator!
                    <h4 class="blog-title">
                      Now you can view, add, edit or delete
                      any company, project, and user
                    </h4>
                    <li class="nav-item dropdown">
                        <a id="navbarDropdown" class="nav-link dropdown-toggle" href="#" role="button" data-toggle="dropdown" aria-haspopup="true" aria-expanded="false" v-pre>
                            Companies <span class="caret"></span>
                        </a>
                        <div class="dropdown-menu dropdown-menu-right" aria-labelledby="navbarDropdown">
                            <a href="/companies" class="btn btn-primary" role="button">
                              View All Companies</a>
                            <a href="/companies/create" class="btn btn-primary" role="button">
                              Create Companies</a>
                        </div>
                    </li>
                    <li class="nav-item dropdown">
                        <a id="navbarDropdown" class="nav-link dropdown-toggle" href="#" role="button" data-toggle="dropdown" aria-haspopup="true" aria-expanded="false" v-pre>
                            Projects <span class="caret"></span>
                        </a>
                        <div class="dropdown-menu dropdown-menu-right" aria-labelledby="navbarDropdown">
                            <a href="/projects" class="btn btn-primary" role="button">
                              View All Projects</a>
                            <a href="/projects/create" class="btn btn-primary" role="button">
                              Create Projects</a>
                        </div>
                    </li>
                    <li class="nav-item dropdown">
                        <a id="navbarDropdown" class="nav-link dropdown-toggle" href="#" role="button" data-toggle="dropdown" aria-haspopup="true" aria-expanded="false" v-pre>
                            Users <span class="caret"></span>
                        </a>
                        <div class="dropdown-menu dropdown-menu-right" aria-labelledby="navbarDropdown">
                            <a href="/users" class="btn btn-primary" role="button">
                              View All Users</a>
                        </div>
//code is incomplete

It assures that the administrator can now do every operation, and once the user logs in, according to the assigned role of an administrator, the page looks like Figure 8-1.

Note

You can add reviews and comments here on your own. Create the models first and then define the model relations. Next, create controllers and views accordingly, as you’ve learned here.

If the user is a moderator, as I have pointed out before, the moderator can do every operation except the “companies” part. When the moderator signs in, the look of the dashboard looks like Figure 8-2.

I have limited the functionalities of the moderator or editor to projects and users; by following the same rule, you can add reviews and comments for them.

In the home.blade.php code, this logic is important as it defines the main logic of separations:
@if(Auth::user()->role_id === 1);
It is clear that if the user doesn’t have the role ID 1 (that is, if the user is not an administrator), they cannot access this part. And this section of logic has been followed by this conditional:
@elseif(Auth::user()->role_id === 2)

This states that the user must have role ID 2; that is, they need to be a moderator.

Continuing this logic, you can continue developing your application and define and separate the activities of editors and general members by adding some extra functionality here and there.

Authorization Through the Blade Template

When you build a web application, forms and HTML play important roles.

The administrator should be able to create companies and edit any company. The moderator should have the same ability to create or edit any project.

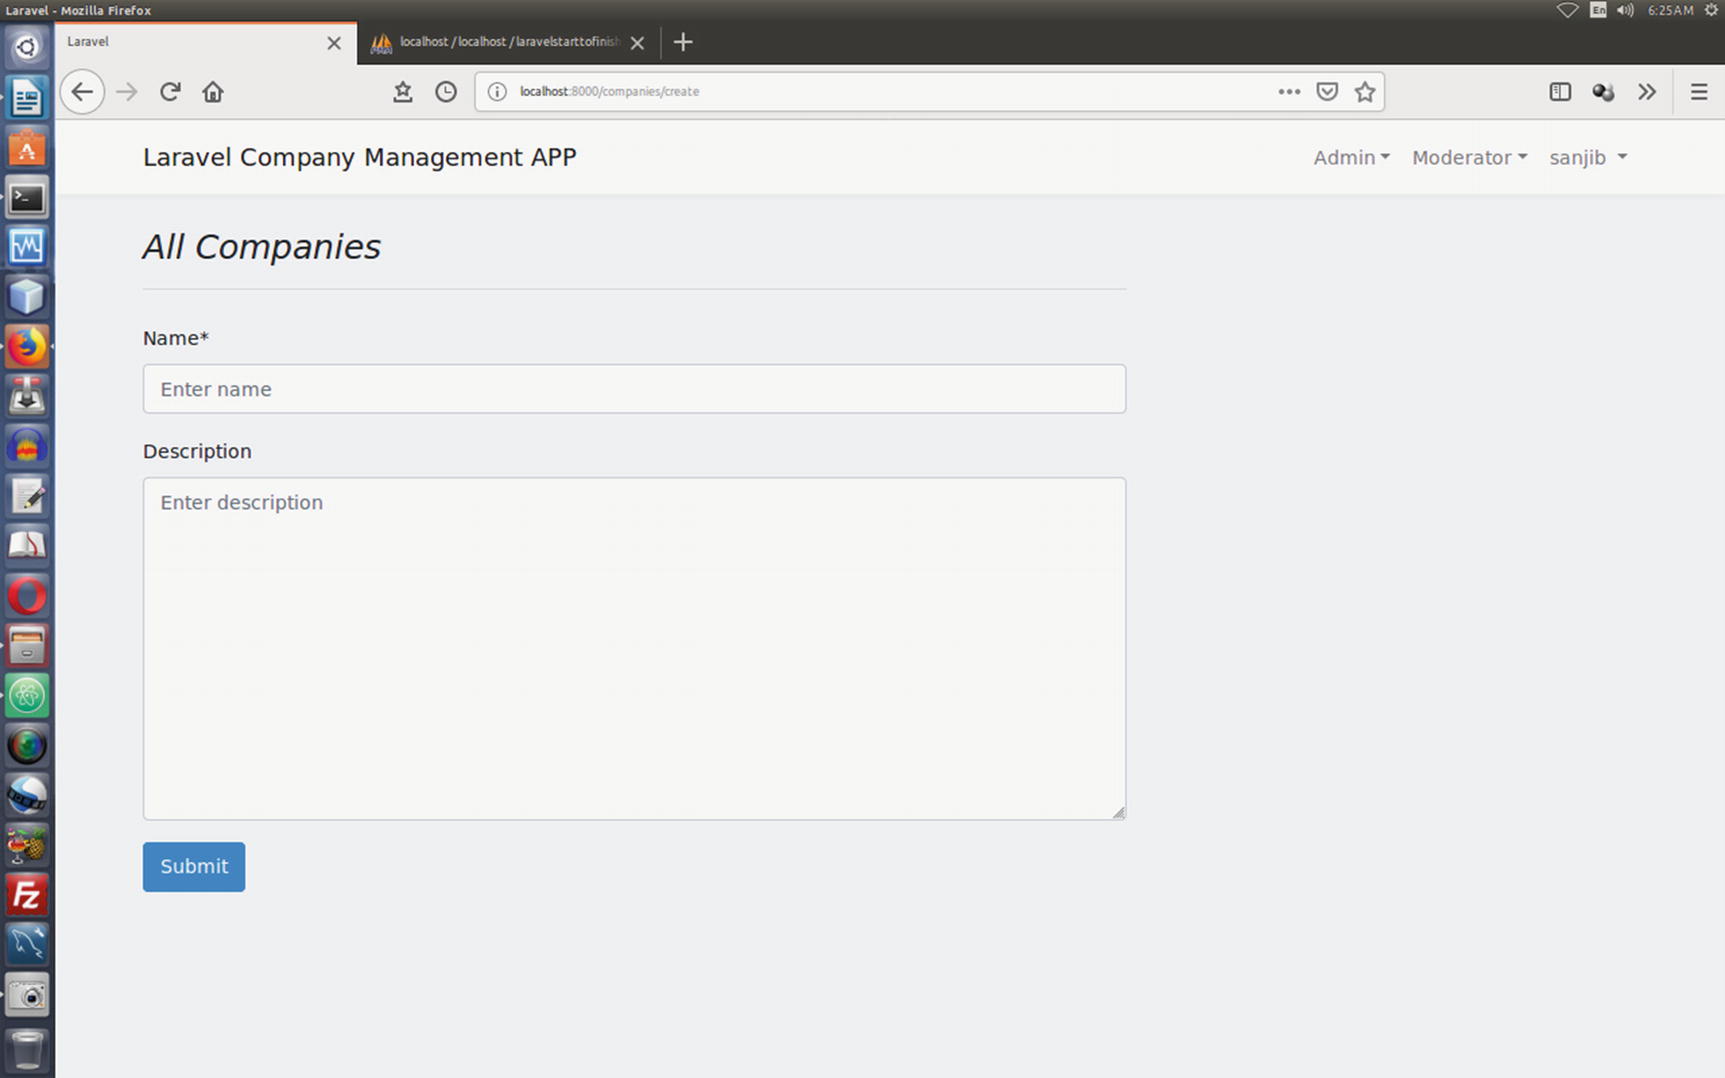
To create this functionality, you need to have necessary forms and HTML elements in the view Blade pages. Figure 8-8 shows what it looks like when the administrator logs in and tries to insert data.
../images/435350_2_En_8_Chapter/435350_2_En_8_Fig8_HTML.jpg
Figure 8-8

The dashboard for administrator to insert data in companies page

First, let’s see how you can add functionality to the company controller so that you can insert, edit, or delete data into the companies’ database with the help of the company model and view pages.

Before creating a companies page to show, edit, and delete data, you need to fill in the companies table with some data. In the final application, the administrators would do this. Currently, you can either use your terminal or, if you want, use the phpMyAdmin interface. Or you can use Tinker to view or manipulate your data. In this application, I have already used Faker and have inserted data for about 20 fake companies. As you saw earlier, you can use Faker to add any kind of data, be it articles, users, or anything that you need to test your application; now you can add some company data the same way.

You have to create a folder called companies inside the resources/views first. The question is, what types of Blade pages are required? You can guess it from the company controller. Since I have discussed how HTTP verbs, URIs, action methods, and route names are linked together, you can guess which action methods you should use to reach your destination view pages. The following company controller is a blank page. You need to add functionalities here so that you can continue.

There are seven methods that your make:controller –resource command has created. They are self-explanatory. Through the index() method, you can show the front page of any company. You can use the show() method for any other purposes. There are create() and store() methods for inserting new companies’ data. The edit() method will take you to the update() method where the administrators can update any company data. Finally, there is the delete() method to remove any data permanently.

So, inside the companies view page, you will create four pages now: index.blade.php, show.blade.php, edit.blade.php, and create.blade.php. To start with, let’s concentrate on index.blade.php . This page will show every company name to everyone. You don’t want any administrator actions here. However, you want only registered visitors to be able to click each company name and see the details on another page. You will use the show.blade.php page for that purpose; however, you don’t want any guest viewer to be able to view those pages. You also want the administrator to be able to handle all operations regarding all the companies’ pages. There are four roles you have set so far: administrator, moderator, editor, and general members or users who are assigned tasks either by the administrator or moderator. The editor’s role should be restricted to only editing; in other words, an editor can edit a user’s blogs and comments.

In the next section, you will take a look at all the view pages. Before that, you need to understand how you should make resourceful controllers restrict the movement inside the company pages. Here is the code for that:
// code 8.17
// app/HTTP/Controllers/CompanyController.php
<?php
namespace AppHttpControllers;
use AppUser;
use AppCompany;
use IlluminateHttpRequest;
use IlluminateSupportFacadesAuth;
class CompanyController extends Controller
{
    /**
     * Display a listing of the resource.
     *
     * @return IlluminateHttpResponse
     */
    public function index()
    {
        if( Auth::check() ){
            $companies = Company::where('user_id', Auth::user()->id)->get();
            if(Auth::user()->role_id == 1){
                return view('companies.index', ['companies'=> $companies]);
            }
        }
        return view('auth.login');
    }
    /**
     * Show the form for creating a new resource.
     *
     * @return IlluminateHttpResponse
     */
    public function create()
    {
      if( Auth::check() ){
        if(Auth::user()->role_id == 1){
                return view('companies.create');
        }
      }
        return view('auth.login');
    }
    /**
     * Store a newly created resource in storage.
     *
     * @param  IlluminateHttpRequest  $request
     * @return IlluminateHttpResponse
     */
    public function store(Request $request)
    {
        if(Auth::check()){
            $company = Company::create([
                'name' => $request->input('name'),
                'description' => $request->input('description'),
                'user_id' => Auth::user()->id
            ]);
            if($company){
                return redirect()->route('companies.show', ['company'=> $company->id])
                        ->with('success' , 'Company created successfully');
            }
        }
            return back()->withInput()->with('errors', 'Error creating new company');
    }
    /**
     * Display the specified resource.
     *
     * @param  AppCompany  $company
     * @return IlluminateHttpResponse
     */
    public function show(Company $company)
    {
      if( Auth::check() ){
        if(Auth::user()->role_id == 1){
            $company = Company::find($company->id);
            return view('companies.show', ['company' => $company]);
        }
      }
        return view('auth.login');
    }
    /**
     * Show the form for editing the specified resource.
     *
     * @param  AppCompany  $company
     * @return IlluminateHttpResponse
     */
    public function edit(Company $company)
    {
      if( Auth::check() ){
        if(Auth::user()->role_id == 1){
        $company = Company::find($company->id);
        return view('companies.edit', ['company' => $company]);
      }
    }
    }
    /**
     * Update the specified resource in storage.
     *
     * @param  IlluminateHttpRequest  $request
     * @param  AppCompany  $company
     * @return IlluminateHttpResponse
     */
    public function update(Request $request, Company $company)
    {
        $updateCompany = Company::where('id', $company->id)->update(
                [
                    'name'=> $request->input('name'),
                    'description'=> $request->input('description')
                ]
        );
      if($updateCompany){
          return redirect()->route('companies.show', ['company'=> $company->id])
          ->with('success' , 'Company updated successfully');
      }
      //redirect
      return back()->withInput();
    }
    /**
     * Remove the specified resource from storage.
     *
     * @param  AppCompany  $company
     * @return IlluminateHttpResponse
     */
    public function destroy(Company $company)
    {
    }
    public function getDestroy($id)
    {
        $company = Company::findOrFail($id);
        if($company->destroy($id)){
            return redirect()->route('companies.index')->with('success' , 'Company deleted successfully');
        }
    }
}
Let’s take a look at the index method. It takes users to the companies.index page.
        public function index()
    {
        if( Auth::check() ){
            $companies = Company::where('user_id', Auth::user()->id)->get();
            if(Auth::user()->role_id == 1){
                return view('companies.index', ['companies'=> $companies]);
            }
        }
        return view('auth.login');
    }
The Auth class uses two static methods, check() and user(). I have used the necessary namespace so that it can do that. At the top of this file, you will find these lines of code:
namespace AppHttpControllers;
use AppUser;
use AppCompany;
use IlluminateHttpRequest;
use IlluminateSupportFacadesAuth;

You need two models primarily: User and Company. You will learn about the Auth facade in the next chapter. However, primarily, you need to keep one thing in mind. The first condition uses Auth::check();. If the viewer is not a registered user, this checking process restricts the user’s movement. In the second condition, you check whether the user has a role_id value of 1, which belongs only to an administrator. Regarding every operation concerning companies, you always keep checking that these two conditions are true. If not, the application will take the visitor to the login page.

Let’s see the companies.create Blade code now:
//code 8.18
//resources/views/companies/create.blade.php
@extends('layouts.app')
@section('content')
<div class="container">
    <div class="row">
        <div class="col-md-8 blog-main col-lg-8 blog-main col-sm-8 blog-main">
          <h3 class="pb-3 mb-4 font-italic border-bottom">
            All Companies
          </h3>
            <div class="blog-post">
            <h2 class="blog-post-title"></h2>
             <form method="post" action="{{ route('companies.store') }}">
             {{ csrf_field() }}
             <div class="form-group">
             <label for="company-name">Name<span class="required">*</span></label>
             <input   placeholder="Enter name"  
             id="company-name"
             required
             name="name"
             spellcheck="false"
             class="form-control"
             />
             </div>
             <div class="form-group">
             <label for="company-content">Description</label>
             <textarea placeholder="Enter description"
             style="resize: vertical"
             id="company-content"
             name="description"
             rows="10" spellcheck="false"
             class="form-control autosize-target text-left">
             </textarea>
             </div>
             <div class="form-group">
             <input type="submit" class="btn btn-primary"
             value="Submit"/>
             </div>
             </form>
             </div>
        </div>
    </div>
</div>
@endsection
Opening and closing a form in any Laravel’s application is quite easy.
{{ Form::open(array('url' => 'companies/create')) }}
    //
{{ Form::close() }}
A POST method will be assumed by default; however, you are always free to add other functionalities like PUT or PATCH.
echo Form::open(array('url' => 'companies/create', 'method' => 'put'))
Here I have followed the conventional method:
<form method="post" action="{{ route('companies.store') }}">
             {{ csrf_field() }}
You are always free to choose your own method. However, in the previous line, the route() method is important because it points to the store() method of CompanyController.php file, as shown here:
    //app/HTTP/Controllers/CompanyController.php
public function store(Request $request)
    {
        if(Auth::check()){
            $company = Company::create([
                'name' => $request->input('name'),
                'description' => $request->input('description'),
                'user_id' => Auth::user()->id
            ]);
            if($company){
                return redirect()->route('companies.show', ['company'=> $company->id])
                        ->with('success' , 'Company created successfully');
            }
        }
            return back()->withInput()->with('errors', 'Error creating new company');
    }
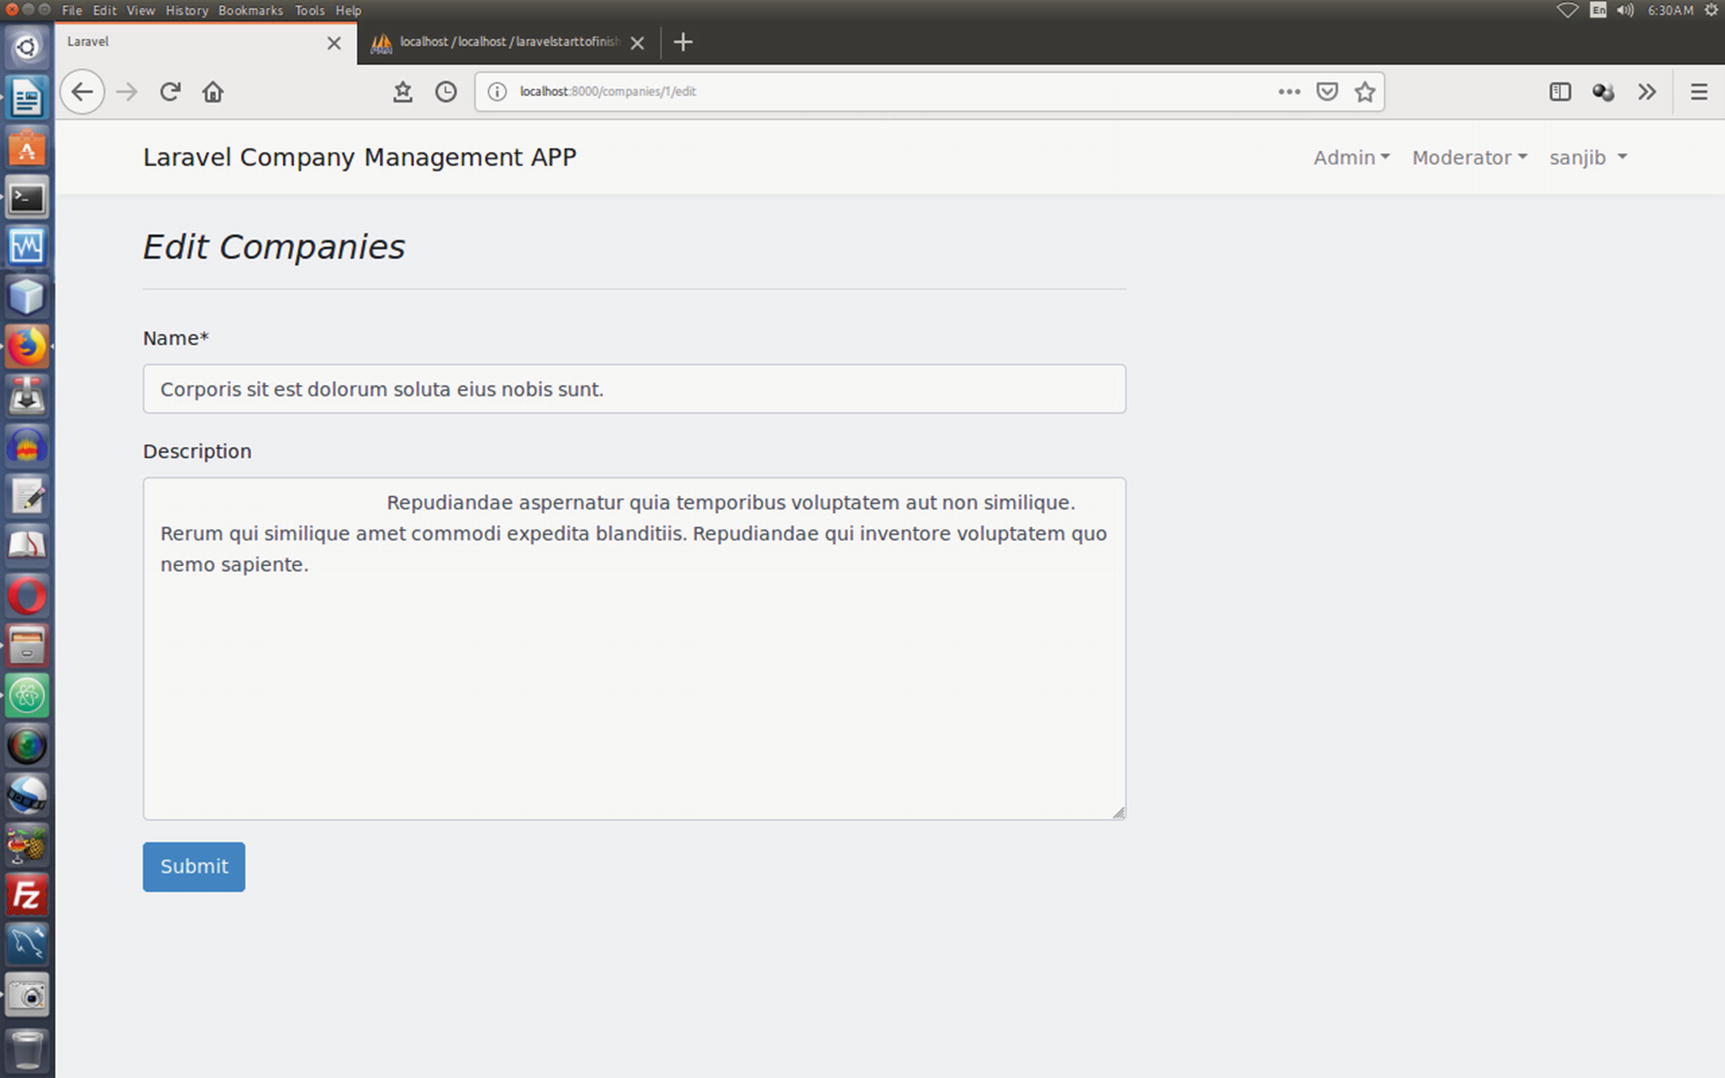
This completes the whole insertion process. The editing part is almost the same, except a few changes. Let’s see what the edit.blade.php page code looks like:
// resources/views/companies/edit.blade.php
@extends('layouts.app')
@section('content')
<div class="container">
    <div class="row">
        <div class="col-md-8 blog-main col-lg-8 blog-main col-sm-8 blog-main">
          <h3 class="pb-3 mb-4 font-italic border-bottom">
            Edit Companies
          </h3>
            <div class="blog-post">
    <ul class="list-group">
         <form method="post" action="{{ route('companies.update',[$company->id]) }}">
                            {{ csrf_field() }}
                            <input type="hidden" name="_method" value="put">
                            <div class="form-group">
                                <label for="company-name">Name<span class="required">*</span></label>
                                <input   placeholder="Enter name"
                                          id="company-name"
                                          required
                                          name="name"
                                          spellcheck="false"
                                          class="form-control"
                                          value="{{ $company->name }}"
                                           />
                            </div>
                            <div class="form-group">
                                <label for="company-content">Description</label>
                                <textarea placeholder="Enter description"
                                          style="resize: vertical"
                                          id="company-content"
                                          name="description"
                                          rows="10" spellcheck="false"
                                          class="form-control autosize-target text-left">
                                          {{ $company->description }}</textarea>
                            </div>
                            <div class="form-group">
                                <input type="submit" class="btn btn-primary"
                                       value="Submit"/>
                            </div>
</form>
    </ul>
            </div>
        </div>
    </div>
</div>
@endsection
Here the following line is extremely important:
<form method="post" action="{{ route('companies.update',[$company->id]) }}"> {{ csrf_field() }}
The route() method passes the update() method of CompanyController.php, and that code looks like this:
    //app/HTTP/Controllers/CompanyController.php
public function update(Request $request, Company $company)
    {
        $updateCompany = Company::where('id', $company->id)->update(
                [
                    'name'=> $request->input('name'),
                    'description'=> $request->input('description')
                ]
        );
      if($updateCompany){
          return redirect()->route('companies.show', ['company'=> $company->id])
          ->with('success' , 'Company updated successfully');
      }
      //redirect
      return back()->withInput();
    }
The edit companies page looks like Figure 8-9. On this edit page, only the administrator has the power to enter and edit anything.
../images/435350_2_En_8_Chapter/435350_2_En_8_Fig9_HTML.jpg
Figure 8-9

Edit companies page

Based on the same techniques, you can edit and update any data using controller, model, and view pages.

If you want to insert or edit data, you need to make yourself authorized to do that. You have seen how Laravel has helped you achieve your goal in a simple way, without writing hundreds of lines of code.

Laravel has another authorization technique that you can also utilize. In the next section, you will learn about it.

Implementing Authorization Using Gates and Policies

You have seen how authentication services come out of the box, and in this section I will discuss authentication in more detail. Laravel provides a simple way to authorize user actions against a given resource. To authorize actions, you use gates and policies. Let’s first see them in action, and after that you will learn how to use them. In Figure 8-1, at the beginning of the chapter, you saw what the home page looks like after the administrator has logged in.

In the top-right corner, you can see another Admin link. It does not show up when other users log in. I have used a simple authorization technique to make it possible. In the cases of moderators, editors, or general members, you can also have similar things in place. For example, when a moderator logs in, you can display a Moderator link to take the moderator to a destination that is reserved for their own consumption. Other users won’t see that link.

Let’s see what happens when the administrator clicks the Admin link; see Figure 8-10.
../images/435350_2_En_8_Chapter/435350_2_En_8_Fig10_HTML.jpg
Figure 8-10

The dashboard for administrator after authorization takes place

As you can see, you can use this administrator page for different tasks than just inserting and updating companies, projects, tasks, and user data. The next pages will show some other types of administrator pages that I created with gates and policies.

In Figure 8-10, the URI is http://localhost:8000/admin. Whenever the administrator signs in, they are taken to this particular destination.

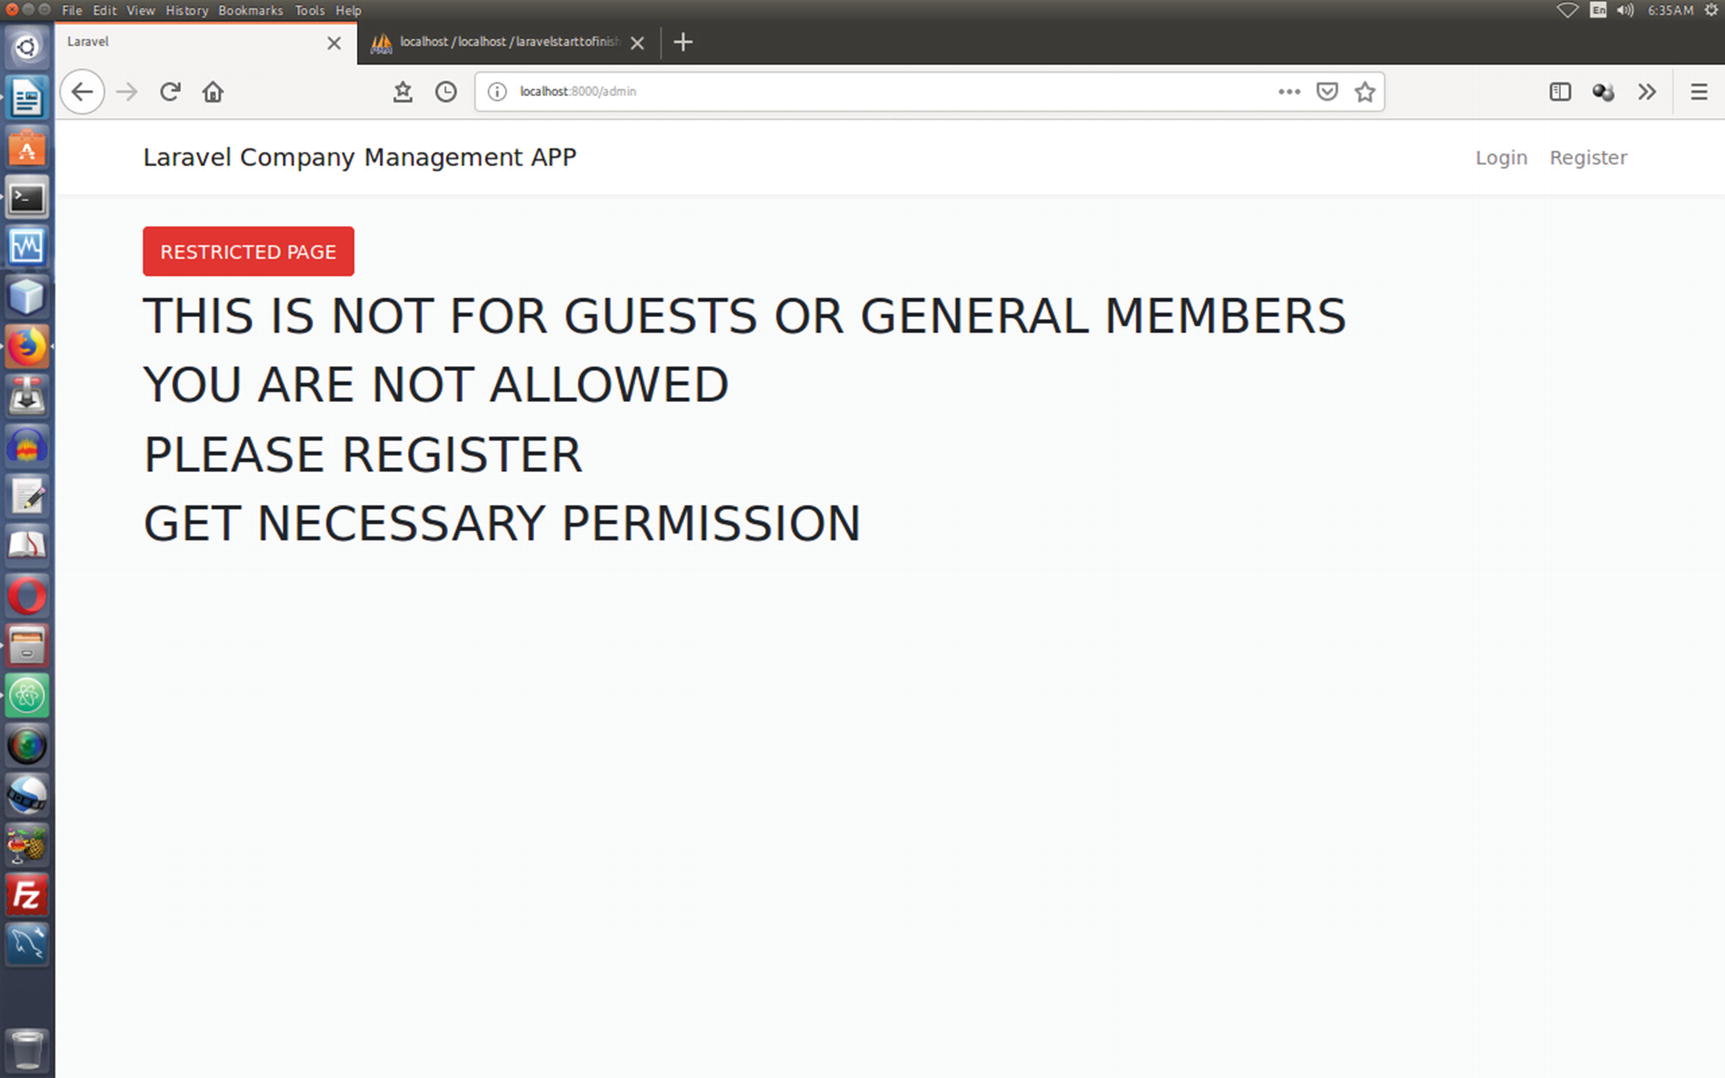
What happens when someone who is not an administrator tries to type the same URI in the browser and wants to penetrate the site?

Well, Figure 8-11 shows the result.
../images/435350_2_En_8_Chapter/435350_2_En_8_Fig11_HTML.jpg
Figure 8-11

When someone other than administrator wants to view admin page

This means the URI has been filtered automatically, and a restriction has taken place. Therefore, by applying simple authorization techniques, you have achieved many things in one go. You have created a system where only the administrator can view the Admin link and where only administrators can reach the administrator page meant for them. Moreover, the administrator page has been filtered automatically.

Let’s see how to do this.

How Authorization Works

First, you need to add one column in your users table. I have added a column called admin (tinyint) and made its default value 0 so that I can change it to 1 for the administrator.

The SQL query that you can run is this:
ALTER TABLE `users` ADD `admin` TINYINT NOT NULL DEFAULT '0' AFTER `updated_at`;

Now you can think of gates and policies as your routes and controllers. While gates gives you a closure-based approach toward authorization, the policies provide a controller like logic handling. However, I would like to add one important statement here. It is not mandatory that you have to follow this approach for building an authorization mechanism. You could have taken the role-based approach as well even using the Blade template.

So, as mentioned, your first step is to add a column in your users table. You can name it anything (I’ve named it admin), but whatever name you assign, you need to use that name in your gates and policies.

Next, open the app/Providers/AuthServiceProvider.php file and add this line:
//code 8.19
//app/Providers/AuthServiceProvider.php
    /**
     * Register any authentication / authorization services.
     *
     * @return void
     */
    public function boot()
    {
        $this->registerPolicies();
        Gate::define('admin-only', function ($user) {
          if($user->admin == 1){
            return TRUE;
          }
          return FALSE;
        });
    }

As I said earlier, gates work as routes; hence, the closure defines that if the user object that accesses the admin property (remember, you have added the column admin in users table, so the name matters) equals 1, it will return TRUE. Otherwise, it returns FALSE.

Next, you need to fix that gates in the route file, which is routes/web.php.
//code 8.20
//routes/web.php
Route::get('/admin', function () {
  if (Gate::allows('admin-only', Auth::user())) {
        // The current user can view this page
        return view('admin');
    }
    else{
      return view('restrict');
    }
});

Here you should keep one thing in mind. I have added the admin column in the users table, so the gates will allow admins only. If you had named the column something else, such as isadmin, then your gates would have allowed “isadmin” only. That is the rule.

Now, the user who has their admin column set to 1 can view the http://localhost/admin URI. Anybody else will land at the http://localhost/restrict page. Through the gates closures, you can easily determine whether a user is authorized to perform a given action. Here, in this company/project/task management application, since the user sanjib is the administrator, his role has been defined in the AppProvidersAuthServiceProvider class using the Gates facade. As gates always receive a user instance as their first argument, it is easy to determine whether $user->admin == 1.

Once the gates have been defined, you can use the allows or denies method. Laravel will automatically take care of passing the user into the gate closures. If you want to update a post, you can write it like this:
    if (Gate::allows('update-post', $post)) {
        // The current user can update the post...
    }
/* or you can deny any user from doing it */
    if (Gate::denies('update-post', $post)) {
        // The current user can't update the post...
    }

Now you’re left with another task. How you can determine the role of the user in your Blade template? How you can use this Gates facade so that the administrator alone can view the admin link?

Since the right side of the “navigation bar” has been defined in the resource/views/layouts/app.blade.php file, you can use a three-line code inside this navigation bar.
//code 8.21
// resource/views/layouts/app.blade.php
<!-- Right Side Of Navbar -->
                    <ul class="navbar-nav ml-auto">
                        <!-- Authentication Links -->
                        @guest
                            <li class="nav-item">
                                <a class="nav-link" href="{{ route('login') }}">{{ __('Login') }}</a>
                            </li>
                            <li class="nav-item">
                                @if (Route::has('register'))
                                    <a class="nav-link" href="{{ route('register') }}">{{ __('Register') }}</a>
                                @endif
                            </li>
                        @else
                        <li class="nav-item dropdown">
                          @can('admin-only', Auth::user())
                                <a id="navbarDropdown" class="nav-link dropdown-toggle" href="/admin">Admin</a>
                          @endcan
                        </li>
                        <li class="nav-item dropdown">
                                <a id="navbarDropdown" class="nav-link dropdown-toggle"
                                href="#" role="button" data-toggle="dropdown" aria-haspopup="true" aria-expanded="false" v-pre>
                                    {{ Auth::user()->name }} <span class="caret"></span>
                                </a>
                                <div class="dropdown-menu dropdown-menu-right" aria-labelledby="navbarDropdown">
                                    <a class="dropdown-item" href="{{ route('logout') }}"
                                       onclick="event.preventDefault();
                                                     document.getElementById('logout-form').submit();">
                                        {{ __('Logout') }}
                                    </a>
                                    <form id="logout-form" action="{{ route('logout') }}" method="POST" style="display: none;">
                                        @csrf
                                    </form>
                                </div>
                            </li>
                        @endguest
                    </ul>
This code determines what a guest would view in the upper-right navigation and what the registered administrator could view. This simple logic has been handled by this line:
<li class="nav-item dropdown">
                          @can('admin-only', Auth::user())
                                <a id="navbarDropdown" class="nav-link dropdown-toggle" href="/admin">Admin</a>
                          @endcan
                        </li>

In the Blade templates, you are displaying a portion of the page only if the user is authorized to perform a given action. If you want the users to update the post, you can use the @can and @cannot family of directives, as you can see in the previous code.

How Policies Work

You have so far been able to make the administrator view the restricted pages designated for administrators only. Now you will learn to enhance this capacity. An administrator will view the designated page for the moderator as well. Not only that, you will see how to add the same facility for the moderator so that the moderator can view the link of the restricted page for the moderators.

You can apply the same technique as you have adopted for the administrator. So, in the //app/Providers/AuthServiceProvider.php file, you can add the same functionalities, as shown here:
 /**
     * Register any authentication / authorization services.
     *
     * @return void
     */
    public function boot()
    {
        $this->registerPolicies();
        Gate::define('admin-only', function ($user) {
          if($user->admin == 1){
            return TRUE;
          }
          return FALSE;
        });
         Gate::define('mod-only', function ($user) {
          if($user->mod == 1){
            return TRUE;
          }
          return FALSE;
        });
    }
In your routes/web.php file, you should define the closure this way:
Route::get('/mod', function () {
  if (Gate::allows('mod-only', Auth::user())) {
        // The current user can view this page
        return view('mod');
    }
    else{
      return view('restrict');
    }
});

As expected, now this mechanism works fine for your application. The administrator (here sanjib) now can view the Admin link and the Moderator link in the top-right navigation bar.

This action was caused by a little change of code in the source layout page, resources/views/layouts/app.blade.php, as shown here:
<li class="nav-item dropdown">
                          @can('admin-only', Auth::user())
                                <a id="navbarDropdown" class="nav-link dropdown-toggle" href="/admin">Admin</a>
                          @endcan
                        </li>
                        <li class="nav-item dropdown">
                          @can('mod-only', Auth::user())
                                <a id="navbarDropdown" class="nav-link dropdown-toggle" href="/mod">Moderator</a>
                          @endcan
                        </li>

I have also added a new column mod in the users table and turned it on by changing the default value from 0 to 1.

Now if a moderator signs in, they can also view the moderator link in the top-right navigation bar (Figure 8-2).

The specialty of this page is that the moderator cannot view the Admin link, of course. At the same time, the administrator can view everything and access everything.

Now as far as your application logic works, everything goes perfectly. However, you could have made the same functionalities much tidier using policies. So far you have added more functionalities in our //app/Providers/AuthServiceProvider.php file and it works. However, this is not wise to have crowded all the application logic in your //app/Providers/AuthServiceProvider.php file, making it unnecessary long and clumsy.

Laravel comes with policies that might define the gates in advance so that you can just register your policies in your gates and get the same result.

Why Are Policies Needed?

To answer this question, you need some classes where you can organize your authorization logic around a particular model or resource. You want to create separate authorization logic for the administrator and the moderator. Both belong to the user model. In your route, you are not going to use any resource for them because you want to keep them separate through closure.

So for the administrator, you have admin policies, and for the moderator you need mod policies. Creating the policies is simple.
$ php artisan make:policy admin
Policy created successfully.
$ php artisan make:policy mod
Policy created successfully.
Now you have two files created automatically, App/Policies/admin.php and App/Policies/mod.php, by the artisan commands. You could have associated the policies with a model also.
php artisan make:policy admin --model=User

In both cases, the generated policies will be placed in the app/Policies directory . If this directory does not exist in your application, Laravel will create it.

The generated policy class would be an empty class if you hadn’t used the model associated with it. If you had specified the particular --model, the basic CRUD policy methods would already be included in the class.

Now in the App/Policies/admin.php class, you are going to organize the application logic for the user who is the administrator. At the same time in the App/Policies/mod.php, you will organize the application logic for the user who is the moderator.

Let’s look at the App/Policies/admin.php code here:
//code 8.22
//App/Policies/admin.php
<?php
namespace AppPolicies;
use AppUser;
use IlluminateAuthAccessHandlesAuthorization;
class admin
{
    use HandlesAuthorization;
    /**
     * Create a new policy instance.
     *
     * @return void
     */
    public function __construct()
    {
        //
    }
    public function admin_only($user)
    {
        if($user->admin == 1){
            return TRUE;
          }
          return FALSE;
    }
}

You have taken the authorization logic from your gates and kept it inside the admin_only method. You have also passed the user object so that you can use the User model and its table attributes.

The same thing happens in the case of the mod policies , as shown here:
//code 8.23
//App/Policies/mod.php
<?php
namespace AppPolicies;
use AppUser;
use IlluminateAuthAccessHandlesAuthorization;
class mod
{
    use HandlesAuthorization;
    /**
     * Create a new policy instance.
     *
     * @return void
     */
    public function __construct()
    {
        //
    }
    public function mod_only($user)
    {
        if($user->mod == 1){
            return TRUE;
          }
          return FALSE;
    }
}

Now the time has come to register the policies. The app/Policies/ AuthServiceProvider is included with the fresh Laravel installation. This AuthServiceProvider maps the Eloquent models to the corresponding policies. Once you have registered the policies in AuthServiceProvider , the application will start instructing Laravel which policy to utilize while authorizing actions against a given model.

In AuthServiceProvider, you will map the policies in this way:
protected $policies = [
        'AppModel' => 'AppPoliciesModelPolicy',
        'AppUser' => admin::class,
        'AppUser' => mod::class
    ];
After that, you will register the services.
    public function boot()
    {
        $this->registerPolicies();
        Gate::define('admin-only', 'AppPoliciesadmin@admin_only');
        Gate::define('mod-only', 'AppPoliciesmod@mod_only');
    }
The full app/Policies/AuthServiceProvider.php code looks like this:
//code 8.24
//app/Policies/ AuthServiceProvider.php
<?php
namespace AppProviders;
use AppPoliciesadmin;
use AppPoliciesmod;
use AppUser;
use IlluminateSupportFacadesGate;
use IlluminateFoundationSupportProvidersAuthServiceProvider as ServiceProvider;
class AuthServiceProvider extends ServiceProvider
{
    /**
     * The policy mappings for the application.
     *
     * @var array
     */
    protected $policies = [
        'AppModel' => 'AppPoliciesModelPolicy',
        'AppUser' => admin::class,
        'AppUser' => mod::class
    ];
    /**
     * Register any authentication / authorization services.
     *
     * @return void
     */
    public function boot()
    {
        $this->registerPolicies();
        Gate::define('admin-only', 'AppPoliciesadmin@admin_only');
        Gate::define('mod-only', 'AppPoliciesmod@mod_only');
    }
}

Once the policies have been mapped, you have registered the methods that will be responsible for each action this ‘policy’ authorizes.

Tips

Laravel provides authentication services out of the box. In fact, you can manage the whole authorization process through the roles assigned to the corresponding users. However, it is always wise to utilize the advantages of Laravel’s default authorization services also by using gates and policies. Authorizing given actions against a resource is simple and does not take much time.

Before using gates and policies, you need to alter your users table with a SQL query like the following because you have used a different users table so far. However, now you need two new columns, admin and mod for the administrator and moderators, respectively.

ALTER TABLE `users` ADD `admin` TINYINT NOT NULL DEFAULT '0' AFTER `updated_at`;

ALTER TABLE `users` ADD `mod` TINYINT NOT NULL DEFAULT '0' AFTER `admin`;

This means you can set the default 0 value to 1 for the desired candidates.

..................Content has been hidden....................

You can't read the all page of ebook, please click here login for view all page.
Reset
3.145.102.249