What allows a third party to easily interact with a Laravel application’s data? The answer is an API.
Usually the API is based on JSON and REST or is REST-like. You can easily work with JSON in your Laravel application, which gives Laravel a big advantage over other PHP frameworks. Without an API you cannot interact with any third-party software that is written in a different language and that works on different platforms. So, writing APIs is a common task that Laravel developers do in their jobs.
Another advantage of Laravel is that its resource controllers are already structured around REST verbs and patterns. This makes Laravel developers’ lives much easier.
In this chapter, you will learn to write an API.
What Is REST?
Representational State Transfer (REST) is an architectural style for building APIs.
There are some heated arguments over the definition of REST in the computer world. Please do not get overwhelmed by the definition or get caught in the crossfire. With Laravel, when I talk about REST-like APIs, I generally mean they have a few common characteristics; for example, they are structured around resources, and the APIs can be represented by simple URIs.
The URI http://localhost:8000/articles is a representation of all articles. The URI http:://localhost:8000/article/2 represents the second article. The representation of second article goes on just like normal URI representation.
The stateless condition of APIs makes a big difference. Between requests, there is no persistent session authentication, which means that each request needs to authenticate itself. Finally, the major advantage is it can return JSON, which the server understands. That is the reason why a third party can easily interact with a Laravel application.
The main purpose of building an API is to enable another application to communicate with your application without any issues. The server knows XML and JSON; however, JSON is the most popular choice now. So, when you return your data in JSON, the ease of communication increases.
Creating an API
To create an API, you need controllers and models as usual. But, at the same time, you need to transform your models and model collections into JSON. For that, you want Laravel’s resource classes. They allow you to transform data into JSON.
You can imagine your resource classes as a transformation layer that sits between your Eloquent models and the JSON responses.
Let’s start from scratch. The first step is to create a fresh Laravel project.
Next, you need an Article model and a database table, as shown here:
//code 12.3
$ php artisan make:model Article -m
The database table should have two fields, title and body, as shown here:
//code 12.4
<?php
use IlluminateSupportFacadesSchema;
use IlluminateDatabaseSchemaBlueprint;
use IlluminateDatabaseMigrationsMigration;
class CreateArticlesTable extends Migration
{
/**
* Run the migrations.
*
* @return void
*/
public function up()
{
Schema::create('articles', function (Blueprint $table) {
$table->bigIncrements('id');
$table->string('title');
$table->text('body');
$table->timestamps();
});
}
/**
* Reverse the migrations.
*
* @return void
*/
public function down()
{
Schema::dropIfExists('articles');
}
}
Before building an API, you should fill the Article table with some fake data with the help of a database seeder. To do this, you need to create ArticlesTableSeeder and ArticleFactory, as shown here:
//code 12.5
$ php artisan make:seeder ArticlesTableSeeder
Seeder created successfully.
//code 12.6
$ php artisan make:factory ArticleFactory
Factory created successfully
Let’s change the code of both ArticlesTableSeeder and ArticleFactory, as shown here:
//code 12.7
//database/seeds/ ArticlesTableSeeder.php
<?php
use IlluminateDatabaseSeeder;
use AppArticle;
class ArticlesTableSeeder extends Seeder
{
/**
* Run the database seeds.
*
* @return void
*/
public function run()
{
factory(Article::class, 30)->create();
}
}
This will create 30 articles. Next, you need to prepare your factory class to fill up the articles table, as shown here:
//code 12.8
// database/factories/ArticleFactory.php
<?php
use FakerGenerator as Faker;
$factory->define(AppArticle::class, function (Faker $faker) {
return [
'title' => $faker->text(50),
'body' => $faker->text(300)
];
});
The title property will have a maximum of 50 characters, and for the body you will be content with 300 characters for demonstration purposes.
Let’s fill the database table, as shown here:
//code 12.9
$ php artisan db:seed
Seeding: ArticlesTableSeeder
Database seeding completed successfully.
After the completion of database seeding, you will generate the resource class. To do that, you will use the make:resource Artisan command.
//code 12.10
$ php artisan make:resource Article
Resource created successfully.
These resources are created to transform the individual models. You may want to generate resources that are responsible for transforming collections of models. This allows you to include links and other meta information in your response.
To create a resource collection, either you can use the --collection flag or you can include the word Collection in the resource name. The word Collection will indicate to Laravel that it should create a collection resource. Collection resources extend the IlluminateHttpResourcesJsonResourceCollection class. The relevant artisan command will look like this:
//code 12.13
$ php artisan make:resource Article --collection
$ php artisan make:resource ArticleCollection
Later in this chapter I will discuss collections and show how they work.
So, you have created a resource called Article. You can find it in the app/Http/Resources directory of your application. Resources extend the IlluminateHttpResourcesJsonJsonResource class.
//code 12.14
//app/Http/Resources/Article.php
<?php
namespace AppHttpResources;
use IlluminateHttpResourcesJsonJsonResource;
class Article extends JsonResource
{
/**
* Transform the resource into an array.
*
* @param IlluminateHttpRequest $request
* @return array
*/
public function toArray($request)
{
return parent::toArray($request);
}
}
As you can see in the previous code, every resource class defines a toArray method, which returns the array of attributes that should be converted to JSON when sending the response. Laravel takes care of that in the background.
You are not ready yet. You need to register your API routes in the routes/api.php file, like this:
You see the URI, method, and action parts of your routes. If you want a full list, you can issue this artisan command in your terminal:
$ php artisan route:list
Now you can see the full route list (Figure 12-1).
Figure 12-1
The API route list in your terminal
After starting the local server, you can open Postman to get the response (Figure 12-2). Postman is a tool that can send requests to an API and show you the response. In other words, it is a fancy version of cURL.
Figure 12-2
The JSON response of the Article API in Postman
You can get the same output in your regular web browser also. The URL is http://localhost:8000/api/articles. See Figure12-3.
Figure 12-3
The same JSON response in reply to a GET request in a normal browser
Let’s take a look at the ArticleController index method, as shown here:
//code 12.16
//app/Http/Controllers/ArticleController.php
<?php
namespace AppHttpControllers;
use IlluminateHttpRequest;
use AppHttpRequests;
use AppArticle;
use AppHttpResourcesArticle as ArticleResource;
class ArticleController extends Controller
{
/**
* Display a listing of the resource.
*
* @return IlluminateHttpResponse
*/
public function index()
{
//get articles
$articles = Article::paginate(15);
//return collection of articles as resource
return ArticleResource::collection($articles);
}
/**
* Display the specified resource.
*
* @param int $id
* @return IlluminateHttpResponse
*/
public function show($id)
{
//get article
$article = Article::findOrFail($id);
//returning single article as a resource
return new ArticleResource($article);
}
}
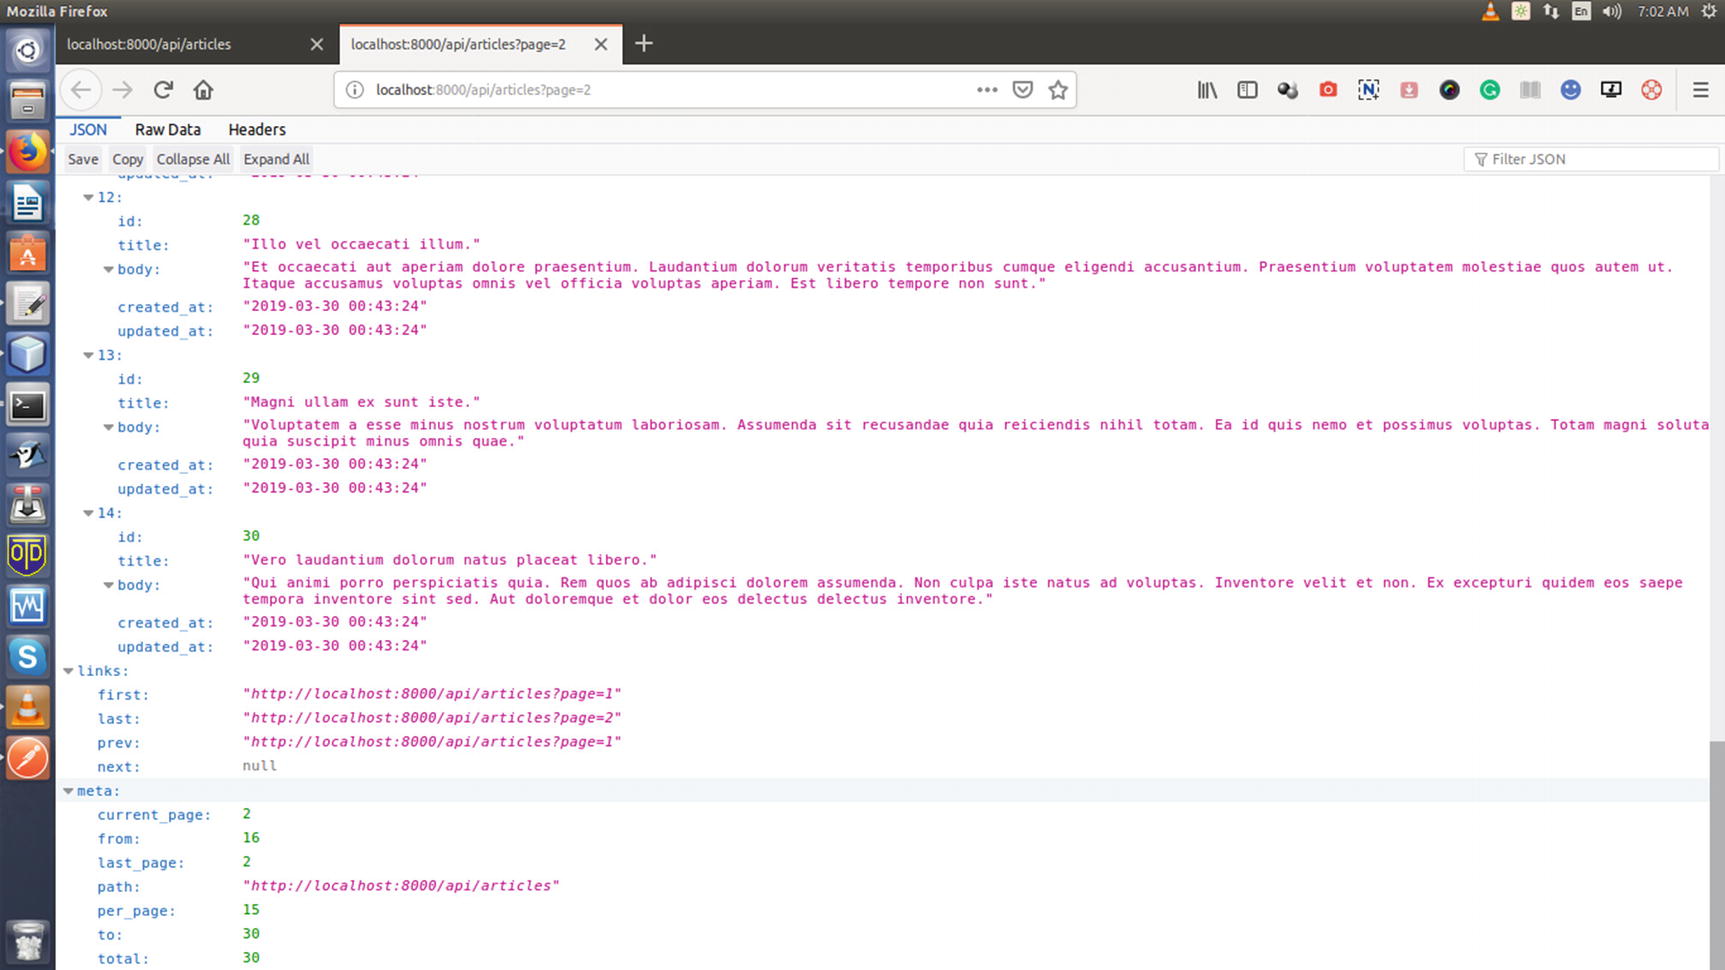
For demonstration purposes, I have shown only two methods here: index and show. Since I have used the paginate() method, each page shows you 15 articles. Figure 12-4 shows the second page.
Figure 12-4
The view of page 2 of the JSON response
The URL is http://localhost:8000/api/articles?page=2.
Now you may not want to give your application user every output. You may want to omit created_at and updated_at. Laravel allows you to customize the JSON output. In that case, you can return the selected records like this:
//code 12.17
//app/Http/Resources/Article.php
<?php
namespace AppHttpResources;
use IlluminateHttpResourcesJsonJsonResource;
class Article extends JsonResource
{
/**
* Transform the resource into an array.
*
* @param IlluminateHttpRequest $request
* @return array
*/
public function toArray($request)
{
return [
'id' => $this->id,
'title' => $this->title,
'body' => $this->body
];
}
}
So, you are returning only id, title, and body and giving a customized look (Figure 12-5).
Figure 12-5
The customized JSON response
You can use the show method to have one article display at a time, as shown in Figure 12-6.
Figure 12-6
JSON response of article number 9
Notice that for the customized version, you access the model properties directly from the $this variable.
How does this work?
This is because a resource class is able to automatically proxy properties and methods, and it accesses the underlying model. Once the resource is defined, it may be returned from a route or controller, as in the ArticleController show method in the example.
//code 12.18
public function show($id)
{
//get article
$article = Article::findOrFail($id);
//returning single article as a resource
return new ArticleResource($article);
}
Here you are returning a single article as a resource. Suppose, in case of the User resource, you return a newUserResource like this:
//code 12.19
use AppUser;
use AppHttpResourcesUser as UserResource;
Route::get('/user', function () {
return new UserResource(User::find(1));
});
In the customized version, you can add some more elements with the help of the with method in app/Http/Resources/Article.php.
The changed code looks like this:
//code 12.20
//app/Http/Resources/Article.php
<?php
namespace AppHttpResources;
use IlluminateHttpResourcesJsonJsonResource;
class Article extends JsonResource
{
/**
* Transform the resource into an array.
*
* @param IlluminateHttpRequest $request
* @return array
*/
public function toArray($request)
{
// return parent::toArray($request);
return [
'id' => $this->id,
'title' => $this->title,
'body' => $this->body
];
}
public function with($request) {
return [
'version' => '1.0.0',
'author_url' => url('https://sanjib.site')
];
}
}
The JSON response changes to the screen shown in Figure 12-7 in Postman.
Figure 12-7
You have added the version and author URL link, shown in Postman
Next, you will see how API collection works. Let’s first create a UserCollection class.
//code 12.21
$ php artisan make:resource UserCollection
Resource collection created successfully.
I have added a few dummy users to the application. In the resource UserCollection, when you have this line of code:
Once the resource collection class has been generated, you can easily define any metadata that should be included with the response. To do that, you need to change the code of UserCollection in this way:
//code 12.23
//app/Http/Resources/UserCollection.php
public function toArray($request)
{
return [
'data' => $this->collection,
'links' => [
'author_url' => 'https://sanjib.site',
],
];
}
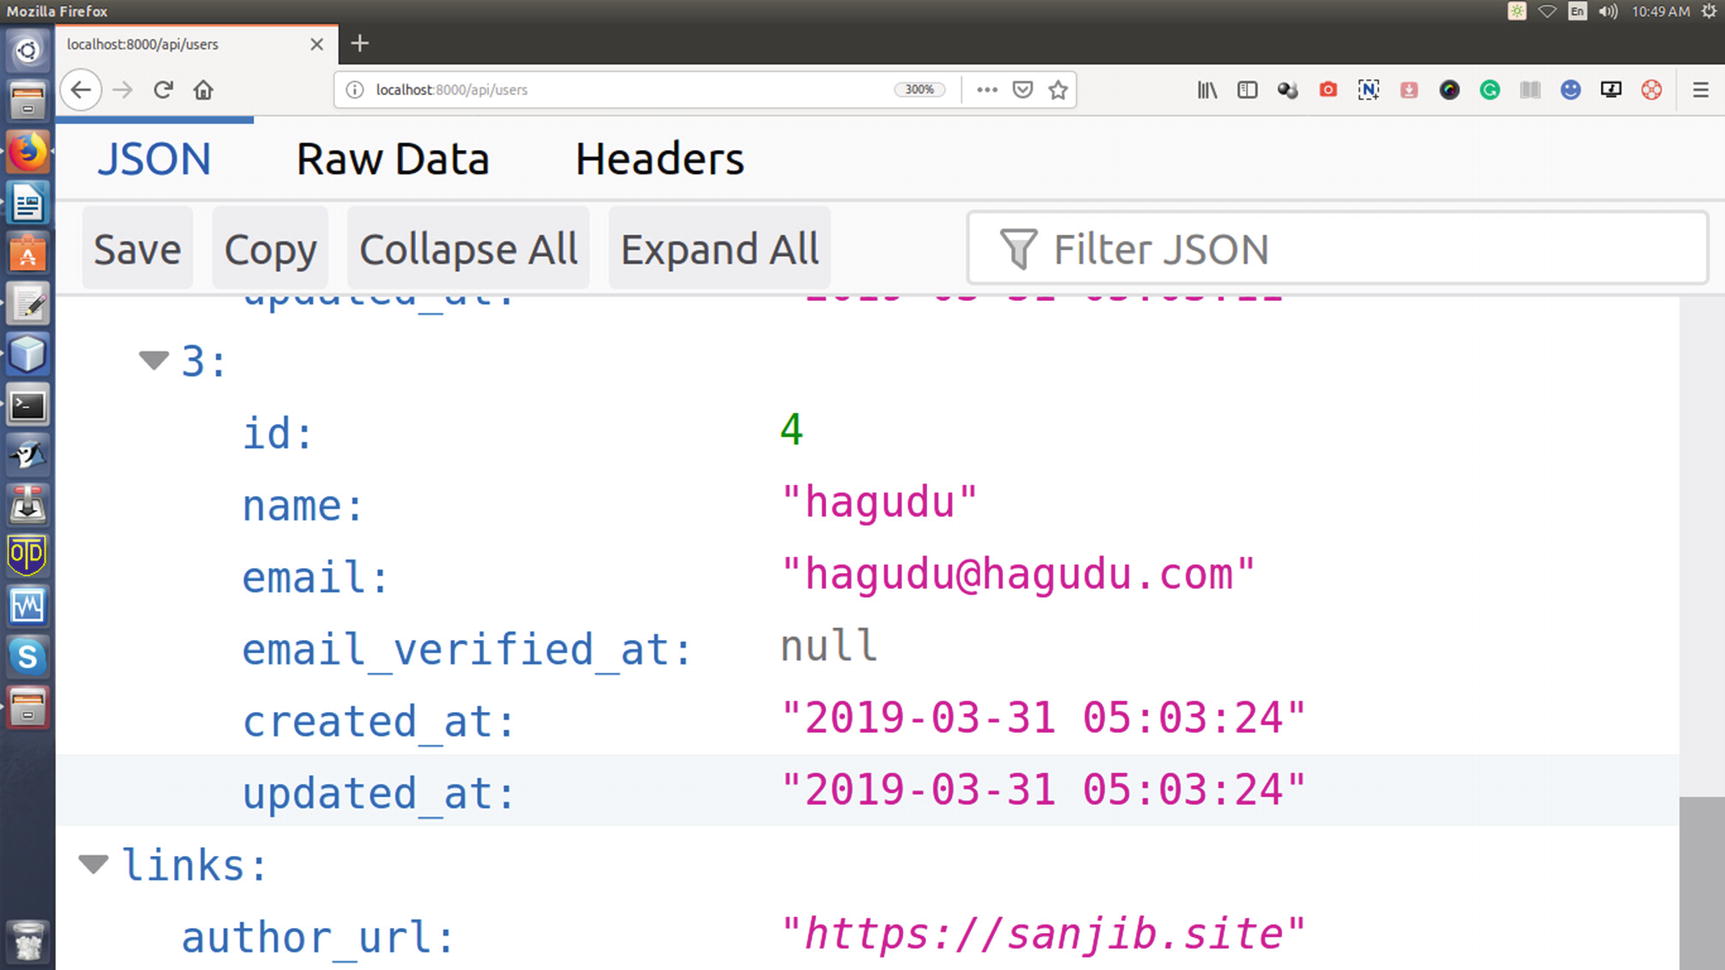
Now you have added extra metadata, and in the output it has been included at the bottom of your JSON response.
In your browser display, it also has been included at the bottom (Figure 12-9).
Figure 12-9
The extra metadata that you have added in the collection
To get all those new UserCollection JSON responses, you can register your route in this way:
//code 12.24
//routes/api.php
use AppUser;
use AppHttpResourcesUserCollection;
Route::get('/users', function () {
return new UserCollection(User::all());
});
Working with Laravel Passport
You now have authentication in place. As you can see, performing authentication via traditional login forms can easily be done in Laravel.
But API authentication is different. APIs use tokens to authenticate users and do not maintain the session state between requests. Laravel Passport is something that makes developers’ lives much easier because it handles the API authentication.
In fact, it does not take much time to implement API authentication when using Laravel Passport. You will see that in a minute. Moreover, you will learn how the OAuth2 server implementation is done, which Laravel Passport also supports.
If you are not familiar with OAuth2 server implementation, then this will be a small introduction for you. OAuth2 is an open standard for access delegation. Many web sites give you a chance to log in via the GitHub, Google, or Facebook APIs. In such cases, GitHub, Amazon, Google, Microsoft, Twitter, and Facebook give permission to those web sites to access their login information without giving them the passwords. This is known as secured delegated access. These companies authorize the third-party access to their server resources but never share their credentials.
You are going to do the same thing with a local Laravel application and a remote site called https://sanjib.site for demonstration purposes.
To start with, install Passport via the Composer package manager, as shown here:
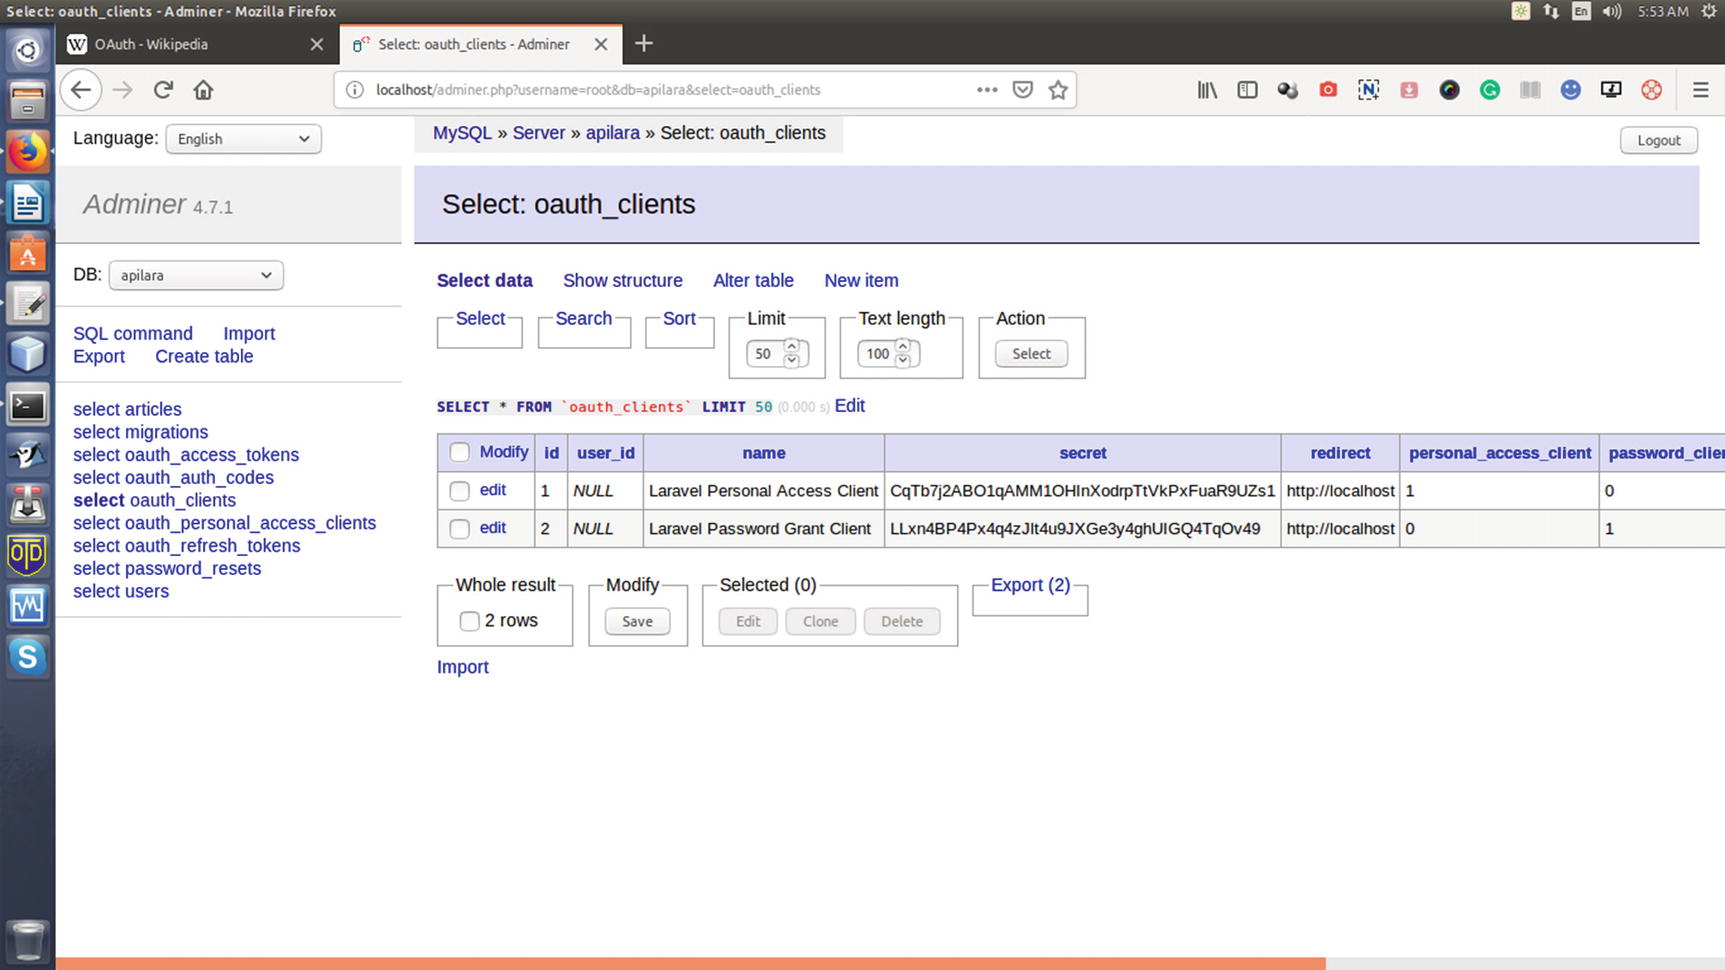
As you can see in the previous code, two records, the client ID and the client secret, have been generated (Figure 12-10).
Figure 12-10
oauth_clients in your local database
At this point, you need to check one more thing: whether you have a recent version of Node.js. If not, you need to install it first by running this command:
$ npm install
It will take some time for the Node modules to be installed. You can take a look at your terminal while they are being installed (Figure 12-11).
Figure 12-11
The npm install command is running
Now that you have the Node modules in place, you can tweak some code in your AppUser model. You need to add the LaravelPassportHasApiTokens trait in the User model. This will be required for your API authentication. Replace your User model with this code:
//code 12.28
//app/User.php
<?php
namespace App;
use LaravelPassportHasApiTokens;
use IlluminateNotificationsNotifiable;
use IlluminateContractsAuthMustVerifyEmail;
use IlluminateFoundationAuthUser as Authenticatable;
class User extends Authenticatable
{
use HasApiTokens, Notifiable;
/**
* The attributes that are mass assignable.
*
* @var array
*/
protected $fillable = [
'name', 'email', 'password',
];
/**
* The attributes that should be hidden for arrays.
*
* @var array
*/
protected $hidden = [
'password', 'remember_token',
];
/**
* The attributes that should be cast to native types.
*
* @var array
*/
protected $casts = [
'email_verified_at' => 'datetime',
];
}
Next, you will call the Passport::routes method within the boot method of your AuthServiceProvider. This method will register the routes necessary to issue access tokens and revoke access tokens, clients, and personal access tokens. Replace your old code with this:
//code 12.29
//app/Providers/ AuthServiceProvider.php
<?php
namespace AppProviders;
use LaravelPassportPassport;
use IlluminateSupportFacadesGate;
use IlluminateFoundationSupportProvidersAuthServiceProvider as ServiceProvider;
class AuthServiceProvider extends ServiceProvider
{
/**
* The policy mappings for the application.
*
* @var array
*/
protected $policies = [
// 'AppModel' => 'AppPoliciesModelPolicy',
];
/**
* Register any authentication / authorization services.
*
* @return void
*/
public function boot()
{
$this->registerPolicies();
Passport::routes();
}
}
Finally, in your config/auth.php configuration file, you should set the driver option of the api authentication guard to passport. This will instruct your application to use Passport’s TokenGuard when authenticating incoming API requests.
//code 12.30
//config/auth.php
'guards' => [
'web' => [
'driver' => 'session',
'provider' => 'users',
],
'api' => [
'driver' => 'passport',
'provider' => 'users',
],
],
Now the time has come to use Vue.js for your application API authentication.
Specifically, you are going to create some Vue components. To do that, you have to publish the Passport Vue components, as shown here:
Now you are ready to have your users create their own OAuth API clients. Once a user is signed in, they will be greeted by the new look shown in Figure 12-12.
Figure 12-12
The user has not created any client yet
Now the user is going to create the first OAuth client (Figure 12-13).
Figure 12-13
The user is going to create the new OAuth client
After the first OAuth client has been created, it will immediately be reflected on the page (Figure 12-14).
Figure 12-14
The first OAuth client has been created
Now you have come to the final stage, which is API authentication.
API Authentication
You have seen how a user has added an OAuth client on their own home page. But a user with administrative privileges can add many clients for other users. Suppose you have a user who has an ID of 2.
In that case, the administrator can issue the following commands in the terminal to create the OAuth client for that user:
//code 12.34
$ php artisan passport:client
Which user ID should the client be assigned to?:
> 2
What should we name the client?:
> sanjib
Where should we redirect the request after authorization? [http://localhost/auth/callback]:
This will redirect the page to the login screen of http://localhost:8000/login, as shown in Figure 12-16.
Figure 12-16
Redirected to the login screen of http://localhost:8000/login
Remember, the remote site (https://sanjib.site) asks for your permission to allow the user with ID 5. This happens because this route has already been registered in the web.php file of https://sanjib.site.
For that reason, only the fifth user can view this login page. If some other users want to log in, an error will be thrown.
However, once the fifth user logs in, they will be greeted with the page in Figure 12-17.
Figure 12-17
sanjib.site is requesting permission to access the account of the user with an ID of 5
Now, if you look at the URL in the browser, you will see something similar to this: