You can interact with databases using Laravel 5.8 in a simple and expressive way. Either you can use the DB facade, using raw SQL to query your databases, or you can use Eloquent ORM.
Laravel supports four databases.
MySQL
PostgreSQL
SQLite
SQL Server
You have learned how to configure a database for any application you want to build. The database configuration file is config/database.php. If you want, you can define all your database connections; you can also specify which one will be the default one.
Introduction to Migration
You can easily create and modify your database tables with the help of Laravel’s schema builders. Migrations are typically paired with the schema builders. You can also easily share database tables with your team members.
How easy is it? Let’s see an example first.
To create a migration, you use the command make:migration create_tests_table.
Suppose you are going to create a tests table. The command is simple, as shown here:
//code 5.1
php artisan make:migration create_tests_table
Every database table represents a particular resource. In this case, the create_tests_table table also connects to the Test model. You can create the same table at the same time as the model, or you can create table separately.
You saw earlier that a new migration was placed in the database/migrations directory, and each migration file contains a timestamp that helps Laravel to maintain the order of the migrations.
To return to the previous subject, there are two options that are used to indicate the name of the table and to indicate whether the migration is new. It is necessary to modify some functionality of any table. Another important aspect is that the name of the table always relates to the model name. If the model name is Test, for example, then Laravel guesses that the table name will be create_tests_table; Laravel adds a prefix of the timestamp before the table name, as in 2019_05_18_013613_create_tests_table.
Depending on the number of your resources, you can create as many tables as you need to create for your application. Later, through Eloquent ORM, you can build relationships between those tables. Laravel makes this extremely easy for developers.
Introduction to Eloquent
Working with a database is not always easy. Eloquent ORM provides a simple ActiveRecord implementation for working with a database. As I mentioned earlier, each database table has a corresponding model that represents a particular resource.
These models are used to interact with the corresponding database table. Each model allows you to query the data in the database table and insert, update, and delete data.
To start with, you can create any Eloquent model by issuing a simple command: –make:model. You will find that model in the app directory. All Eloquent models extends the IlluminateDatabaseEloquentModel class. Through the artisan commands, you can create models in this way:
//code 5.3
php artisan make:model Test
To generate a database migration, you can add either the --migration or --m option, as shown here:
//code 5.4
php artisan make:model Test --migration
php artisan make:model Test -m
Once your model is created, you can start building the relationships between the database tables.
Introduction to Eloquent Relations
A good application rests on well-defined relationships between database tables. Considering each table and model as separate resources, you can define how they will interact with each other.
Suppose an article post has many comments or it has been associated with a particular username. In that case, you can say each article has one-to-one relation with the user. This relation is defined in the models Article and User. This is the same for comments also. Eloquent helps manage and work with these relationships, and it supports several different types of relationships. You will see them in a minute.
In the Eloquent model classes, the relationships are defined as methods. Actually, based on these relationships, you can make your queries. Therefore, these methods provide powerful method chaining and querying capabilities.
How can you chain your methods? Here is an example of adding additional constraints:
You’ll now learn how to define each type separately. Let’s start with one-to-one relationships. Then you will examine the others.
One-to-One
A one-to-one relationship is typically related to the basic algebraic function. One input passes through a function and gives one output, and they have one-to-one relation. At the same time, the inverse is also true.
This concept is old and hugely popular among scientists, as it defines one key root of mathematical operations.
Now, in our case, an article can belong to one user. In that scenario, the relationship I am talking about is one-to-one, and the inverse is also true. One user can write at least one article. But at the same time, one user can write many articles. So, the statement “many articles belong to one user“ is also true. You will see those concepts in a minute.
Recall from Chapter 4 that the Article model class looks like this:
In the Article model class, you have probably noticed that relationships have been defined not only as methods but also as powerful query builders. When you define relationships, the methods provide powerful method chaining and querying capabilities.
{{ $article->user->name }}
So, from the Article model, you get the respective username of the author of that particular article. In the app/User.php file, you’ll see this line of code:
public function article() {
return $this->hasOne('AppArticle');
}
The first argument passed to the hasOne('AppArticle') method is the name of the related model. You have seen this line of code in app/Article.php:
public function user() {
return $this->belongsTo('AppUser');
}
The relationship has been defined in both models, and once it has been defined, you can retrieve the affiliated record using Eloquent’s dynamically defined properties. These dynamically defined properties in Eloquent are so powerful that accessing relationship methods is a cakewalk. It seems as if they were defined in the model. You have seen the following example before:
{{ $article->user->name }}
You couldn’t have the username from the Article model if Eloquent had not determined the foreign key of the relationship based on the model name. In this case, the Article model mechanically assumes that it has a user_id foreign key. Here the parent is the User model, and it has a users table that has a custom $primaryKey column (id). So, user_id of the Article model matches the ID of the parent User model.
Based on this assumption, you can take your application’s functionalities further. You can grab the first article written by the user using the Article model. Consider this line of code:
It is same as User::find(1)->article->title. However, if you wanted to grab the user’s first-ever written article this way, you would have to go back to the related Controller class and add this line of code there. The flexibility of Eloquent ORM allows you to get the same result using the Article model. So, let’s first look at the welcome.blade.php code:
In the lower part of the file welcome.blade.php, you should change a segment to accommodate a one-to-one relation between the article and user, as shown here:
// code 5.7
// resources/views/welcome.blade.php
<aside class="col-md-4 blog-sidebar">
<div class="p-3">
<h3 class="blog-post-title">This week we showcase the articles
Remember, a user has many articles, and an article has many tags. A user also has many tags. A user has many comments, and these relations between them go on and on. These all indicate a type of Eloquent relationship: one-to-many.
On the home page of the application, you have a link to all the articles written by the user. In the top-left sidebar of the home page, you can click the user’s name and read all the articles and a short profile also.
The URI is very expressive; it reads like this: users/1/articles. This means you want to read all the articles by the user with an ID of 1. This is an ideal candidate for a one-to-many relationship. On this page, you can also show the user’s profile.
Let’s work on registering the web routes. Here is the routes/web.php code as a whole:
In routes/web.php, you define the relationship in this way: Route::get('/users/{id}/articles', 'ArticleController@articles'). This means you should create the articles() method in the ArticleController. Let’s look at the code of ArticleController as a whole first; after that, you will take a look at the articles method individually:
Here you pass the user ID, and using the Eloquent method find(id), you get the respective user. After that, you pass the user object to the resource/views/articles/articles.blade.php file. Next, you should look at both the User and Article models to recall how to define the one-to-many relationship. A user has many articles.
At the same time, you need to look at the inverse model relationship in the Article model. Say you want to access all of a user’s articles. You have already defined a relationship to allow an article to access its parent user as part of the one-to-one relationship. This is enough to define the inverse of a hasMany relationship, as shown here:
// code 5.11
// app/Article.php
public function user() {
return $this->belongsTo('AppUser');
}
Let’s see how you can access all the articles written by one particular user. In the top-left sidebar of the home page of your application, you have the link that takes users to the desired page. I’m not going to show every line of articles.blade.php anymore. For brevity, you will look at the vital portions, starting with this:
Look at this line: @foreach($user->articles as $article). Since the User model has a one-to-many relationship with the Article model, you can access all the articles by any particular user quite easily.
As you have probably noticed, I have chained conditions onto the query. Since the relationship has been defined, you can access the collection of articles by accessing the articles property. This is the magic of Eloquent: it provides “dynamic properties.” Therefore, you can access relationship methods as if they were defined as properties on the model. Go to http://localhost:8000/users/1/articles in your browser (see Figure 5-2).
Figure 5-2
All articles by a single user along with the profile
The one-to-one relationship between User and Profile allows you to get the profile data of any particular user as well (Figure 5-2). The magic of Eloquent dynamic properties is happening splendidly. You define them in the models and later access them in the controller. The controller transports that data to the views.
Before explaining many-to-many relationship, I’ll discuss one more important concept: dependency injection and separation of concerns.
Separation of Concerns
The previous pieces of code in the controllers are concise, but you are unable to test them without hitting the database directly. Your Eloquent ORM is tightly coupled with your controller. This is not desirable because this is violating the design principle known as separation of concerns that demands that every class should have a single responsibility and that should be encapsulated by the class itself. In other words, your controller should not know the data source. In this case, your web layer and the data access layer are tightly coupled. To decouple them, you can inject a user repository class that can be coupled with Eloquent ORM, making your Controller class free.
To do that, you can add one Repositories folder in app. Inside the Repositories folder, you can add two more folders: DBRepositories and Interfaces. Inside the Interfaces folder, you can add an interface called UserRepositoryInterface.
use RepositoryInterfaceUserRepositoryInterface as UserRepositoryInterface;
use AppUser;
use IlluminateHttpRequest;
class DBUserRepository implements UserRepositoryInterface {
public function all() {
return User::all();
}
}
Now, you want to inject this database repositories class into your controller. However, to make it work, you need to update your composer.json file a little bit.
Now you can modify your UserController in this way:
// code 5.18
//app/HTTP/Controllers/UserController.php
<?php
namespace AppHttpControllers;
use AppUser;
use IlluminateHttpRequest;
use RepositoryDBDBUserRepository as DBUserRepository;
//use RepositoryInterfaceUserRepositoryInterface as UserRepositoryInterface;
class UserController extends Controller {
public $users;
public function __construct(DBUserRepository $users) {
$this->users = $users;
}
public function index(){
$users = $this->users->all();
return view('users.index', compact('users'));
}
}
Your controller does not know the database source. It is completely ignorant of the data access layer. It only transports the database repositories objects to the view. The resources/views/users/index.blade.php code will look like this:
Now type http://localhost:8000/users in your browser, and you will get the output in Figure 5-3.
Figure 5-3
Output of all users
This dependency injection is good for testability. At the same time, it gives you ample chance to decouple your classes and keep the principle of separation of concerns intact.
Many-to-Many
An example of many-to-many relations here is articles and tags. It is slightly more complicated than the one-to-one and one-to-many relations. When the many-to-many relationship exists between articles and tags, the tags are shared by other articles. Many articles may have one particular tag.
You have already created three tables: articles, tags, and article_tag.
Tip
There is one thing to remember here. Whenever you create a pivot table (here article_tag), the naming must be in alphabetical order of the related model names. Alphabetically, Article comes before Tag. So, you name this table as article_tag. This table must contain the article_id and role_id columns.
I will discuss Tag and Comment later in detail; before that, I’d like to point out one key concept carefully. It is obvious, from the relationships between models, that an article has many tags, or vice versa. In plain words, this is perfectly logical. An article has many tags indeed. Inversely, a tag may belong to many articles too. Keeping this logic in mind, you can add the following code to your Article model:
// code 5.12
// app/Article.php
/**
* Get the tags for the article
*/
public function tags(){
return $this->hasMany('AppTag');
}
Now you should get all tags that the article has. You can use this line of code in the show() method of ArticleController.php:
Although this looks perfectly sane, it will produce errors like this:
“SQLSTATE[42S22]: Column not found: 1054 Unknown column ‘tags.article_id’ in ‘where clause’ (SQL: select * from `tags` where `tags`.`article_id` = 14 and `tags`.`article_id` is not null) ◀”
Why did this happen? You used the same properties before in the User model. There you accessed user ➤ articles quite easily without any trouble. Then why can’t you get articles ➤ tags in the same manner?
Here, you need to understand one key concept. In this case, the one-to-many relationship should allow Eloquent to assume that the foreign key in the Tag model is article_id. That you don’t have in the tags table. Instead, you have a pivot table called article_tag where you have two foreign keys: article_id and tag_id. So, if you wrote it like this:
// code 5.13
// app/Article.php
class Article extends Model
{
/**
* Get the tags for the article.
*/
public function tags()
{
return $this->hasMany('AppTag');
}
}
it would throw an error. And that’s exactly what happens here.
Eloquent has the ability to determine the proper foreign key column on the Tag model. It is a convention that Eloquent will take the snake_case name of the parent model (here Article) and add the suffix _id. This means, in this case, Eloquent will assume the foreign key on the Tag model is article_id. In this case, Eloquent didn’t find the column tags.article_id and says that it is an unknown column.
Therefore, in the case of a one-to-many relationship, a foreign key should explicitly be defined. Before migration, when you created the articles table, you added this line:
$table->integer('user_id');
So, be careful about using one-to-many relationships and keep this in mind. Here the relationship between articles and tags is many-to-many. And for that you have a pivot table between them. I will discuss this in detail in the next section.
Now you should define the many-to-many relationship by writing a method that returns the result of the belongsToMany method. First, you define the tags method on your Article model, as shown here:
// code 5.20
// app/Article.php
/**
* Get the tags for the article
*/
public function tags() {
return $this->belongsToMany('AppTag');
}
Once the relationship is defined, you can access the article’s tags through the dynamic property of tags. In resources/views/articles/show.blade.php, you have accessed the article’s tags in this way:
@foreach($article->tags as $tag)
{{ $tag->tag }} ,
@endforeach
The same is true for the role_user table. Here, role comes before the user. And in the respective Role and User models, you have already defined the many-to-many relationships by using the belongsTo and belongsToMany methods. Now, you want three types of users: Administrator, Moderator, and Member. Since you have used Faker to create three arbitrary words for the roles table, you need to change the name manually. Another important thing is you don’t need too many administrators. So in the database/seeds/DatabaseSeeder.php file, I have limited the number of rows to three by using this code:
Now, except for user 1, other users have no role at present. But user 1 has been assigned to three roles by the Faker object. But for other users it would be different. Since you have assigned a role to user 1, the other users have no roles to show up. These users belong to the general member category.
I am trying to keep things simple so that you can understand the model relations. You want users to have some types of restrictions on their movements. Every user can post, but unless the administrator gives permission, the post will not be published. The same is true for the comments. You want your moderators to have some responsibilities, such as the ability to edit any post.
Everything depends on the model relations you define in your models and respective tables. By using them judiciously, you can build an awesome content management application.
Has-Many-Through
A distant relationship looks simple, but in reality, when you want to create one via an intermediary table, it can be complicated.
In the example content management application, you have already seen many interesting relationships. However, you have not found any distant relationship yet. For an example, let’s suppose you have a table called countries. It has only an Id and Name. Now let’s add an extra column in the users table; suppose it is country_id. As the articles table has already been assigned user_id, it is possible to establish a distant relationship between the Country and Article models (or, in other words, between the countries and articles tables). A particular user belongs to a country; because of that, you can grab all articles written by the users belonging to the same country.
Let’s continue developing the application to see how this has-many-through relation works.
First create a Country model and a countries table using one command, as shown here:
Let me explain this code. A Country model will probably have many users. The second method, articles, returns a special has-many-through relationship between two models, Article and User, as I have mentioned. Because of this method, you can access all the articles for any given country.
In the countries table, you must have this method ready before you populate the table with Faker.
// code 5.22
// database/migrations/countries table
public function up()
{
Schema::create('countries', function (Blueprint $table) {
$table->increments('id');
$table->string('name');
$table->timestamps();
});
}
You also need to update your users table like this:
// database/migrations/users table
public function up()
{
Schema::create('users', function (Blueprint $table) {
As you have seen, you have accessed articles by the Country model and got all the articles for a given country. So, the first argument passed to the hasManyThrough method is the name of the final model (here, Article) you want to access. The second argument is the name of the intermediate model (here, User).
To run this mechanism without any problems, typical Eloquent foreign key conventions are used. Why are they needed? Basically, they perform the relationship’s queries. You can customize the keys of the relationship. To do that, you can follow this convention where you may pass them as the third, fourth, fifth, and sixth arguments:
class Country extends Model
{
public function articles()
{
return $this->hasManyThrough(
'AppArticle',
'AppUser',
'country_id', // Foreign key on users table...
'user_id', // Foreign key on articles table...
'id', // Local key on countries table...
'id' // Local key on users table...
);
}
}
This has-many-through relationship is one of the strongest features of Laravel. So, be adventurous and use it to make your application truly awesome.
In the next section, I will discuss another great feature of Laravel model relations: polymorphic relationships that handle more complex relations.
Polymorphic Relations
Think about a model that belongs to more than one other model on a single association. Suppose you have a model called Comment. The users of your application can comment on articles written by other users. This is not at all difficult to build. Now, you also want one user to be able to comment on the profile of more than one other user. You can always bridge the Comment model either with the Article model or with the Profile model. You have seen how one-to-one, one-to-many, and many-to-many relations work.
However, it is difficult to imagine users of your application commenting on both articles and profiles using a single comment table. Polymorphic relations can handle this; with them, you can use a single comment table for both cases.
Moreover, you don’t need any assistance from a pivot table to make it happen. All you need are two tables like articles and profiles, which have no direct relations with the comment table. Articles may have three simple columns, such as id, title, and body; and the profiles table may have two or three simple columns such as id, name, and location. Here the most interesting part is played by the comments table. It has columns like this: id, body, commentable_id, and commentable_type.
The all-important columns to note are the last two: commentable_id and commentable_type. The commentable_id column will contain the ID value of either articles or profiles. On the other hand, the commentable_type column will contain the class name of the owning model. When you post a comment on an article, the commentable_type column will contain a value like AppArticle that represents the owning model. Eloquent ORM decides which type of owning model to return while accessing the commentable relation.
You have had enough theory! Let’s start coding and see how you can apply this polymorphic relationship in the content management application.
The Problem
Say you want your application to reflect this polymorphic relationship between the articles, profiles, and comments table. You should do this in such a way that each article page will show how many commentators have posted comments on that particular article. You also want to show the user’s name who has posted that comment. The same rule applies to the profiles table also. Any user can come and post on any profile page.
Since you want each comment to have a username associated with it, let’s add another column called user_id.
You should plan your database seeder class in a new way so that it will populate the database tables like you want. The other tables were settled before, but the user_id column of the comments table should have different user ID. You have another great challenge ahead: the commentable_type column of the comments table should shuffle the class name of the two owning models: Article and Profile. You need to design your database seeder file in that way. You’ll see how in the next section.
The Solution
Create the Comment model and comments table by issuing a single command, as shown here:
$ php artisan make:model Comment -m
Let’s first start with the comments table code:
//code 5.24
//database/migrations/comments table
class CreateCommentsTable extends Migration
{
/**
* Run the migrations.
*
* @return void
*/
public function up()
{
Schema::create('comments', function (Blueprint $table) {
$table->increments('id');
$table->integer('user_id');
$table->text('body');
$table->integer('commentable_id');
$table->string('commentable_type');
$table->timestamps();
});
}
/**
* Reverse the migrations.
*
* @return void
*/
public function down()
{
Schema::dropIfExists('comments');
}
}
Next you will see the full code snippets of the models: Comment, Article, and Profile. Let’s start with the Comment model code, and the other two will follow it.
You also need to update the User model a little bit. Here is the full code snippet:
// app/User.php
<?php
namespace App;
use IlluminateNotificationsNotifiable;
use IlluminateFoundationAuthUser as Authenticatable;
class User extends Authenticatable
{
use Notifiable;
/**
* The attributes that are mass assignable.
*
* @var array
*/
protected $fillable = [
'name', 'email', 'password',
];
/**
* The attributes that should be hidden for arrays.
*
* @var array
*/
protected $hidden = [
'password', 'remember_token',
];
public function profile() {
return $this->hasOne('AppProfile');
}
public function article() {
return $this->hasOne('AppArticle');
}
public function articles() {
return $this->hasMany('AppArticle');
}
public function role() {
return $this->hasOne('AppRole');
}
public function roles() {
return $this->hasMany('AppRole');
}
public function country() {
return $this->belongsTo('AppCountry');
}
public function comment() {
return $this->hasOne('AppComment');
}
public function comments() {
return $this->hasMany('AppComment');
}
}
Now you have the models in place, ready to interact with each other. Let’s populate all the tables by designing a User factory and database seeder files properly.
First, here is the user factory’s full code snippet:
It is strongly recommended that you visit the GitHub repositories of the PHP faker. This will give you an idea of how you can use different attributes or methods to populate your application with fake data.
In the previous code snippet (code 5.26), the last section is interesting, as you have dealt with the Comment model before. Let’s see that part again and try to understand what you have actually done.
$factory->define(AppComment::class, function (Faker $faker) {
The first line deals with user_id, and you know that you have ten users so far. You could have made it bigger, but that would not serve the purpose here of understanding model relations. You use a special faker method that will check for a range (1 to 10) and populate the table accordingly.
Populating the commentable_type column has been a real challenge as you want to populate it with both the AppArticle and AppProfile model class names randomly. So, you use an anonymous function that returns an array and shuffles out two values.
Next, you will see the database seeder file. Although you are updating only the comment part, you should take a look at the full code snippet, shown here:
Now you are ready to refresh the seed data with the following command that will populate all the tables:
$ php artisan migrate:refresh –seed
You have successfully seeded your tables with fake data, so now you are also ready to test your applications. Before moving on to that final part, let’s see how your database tables look. First, let’s open your phpMyAdmin interface and select the database you have used to test this application (Figure 5-5).
Figure 5-5
Your full database in PHPMyAdmin
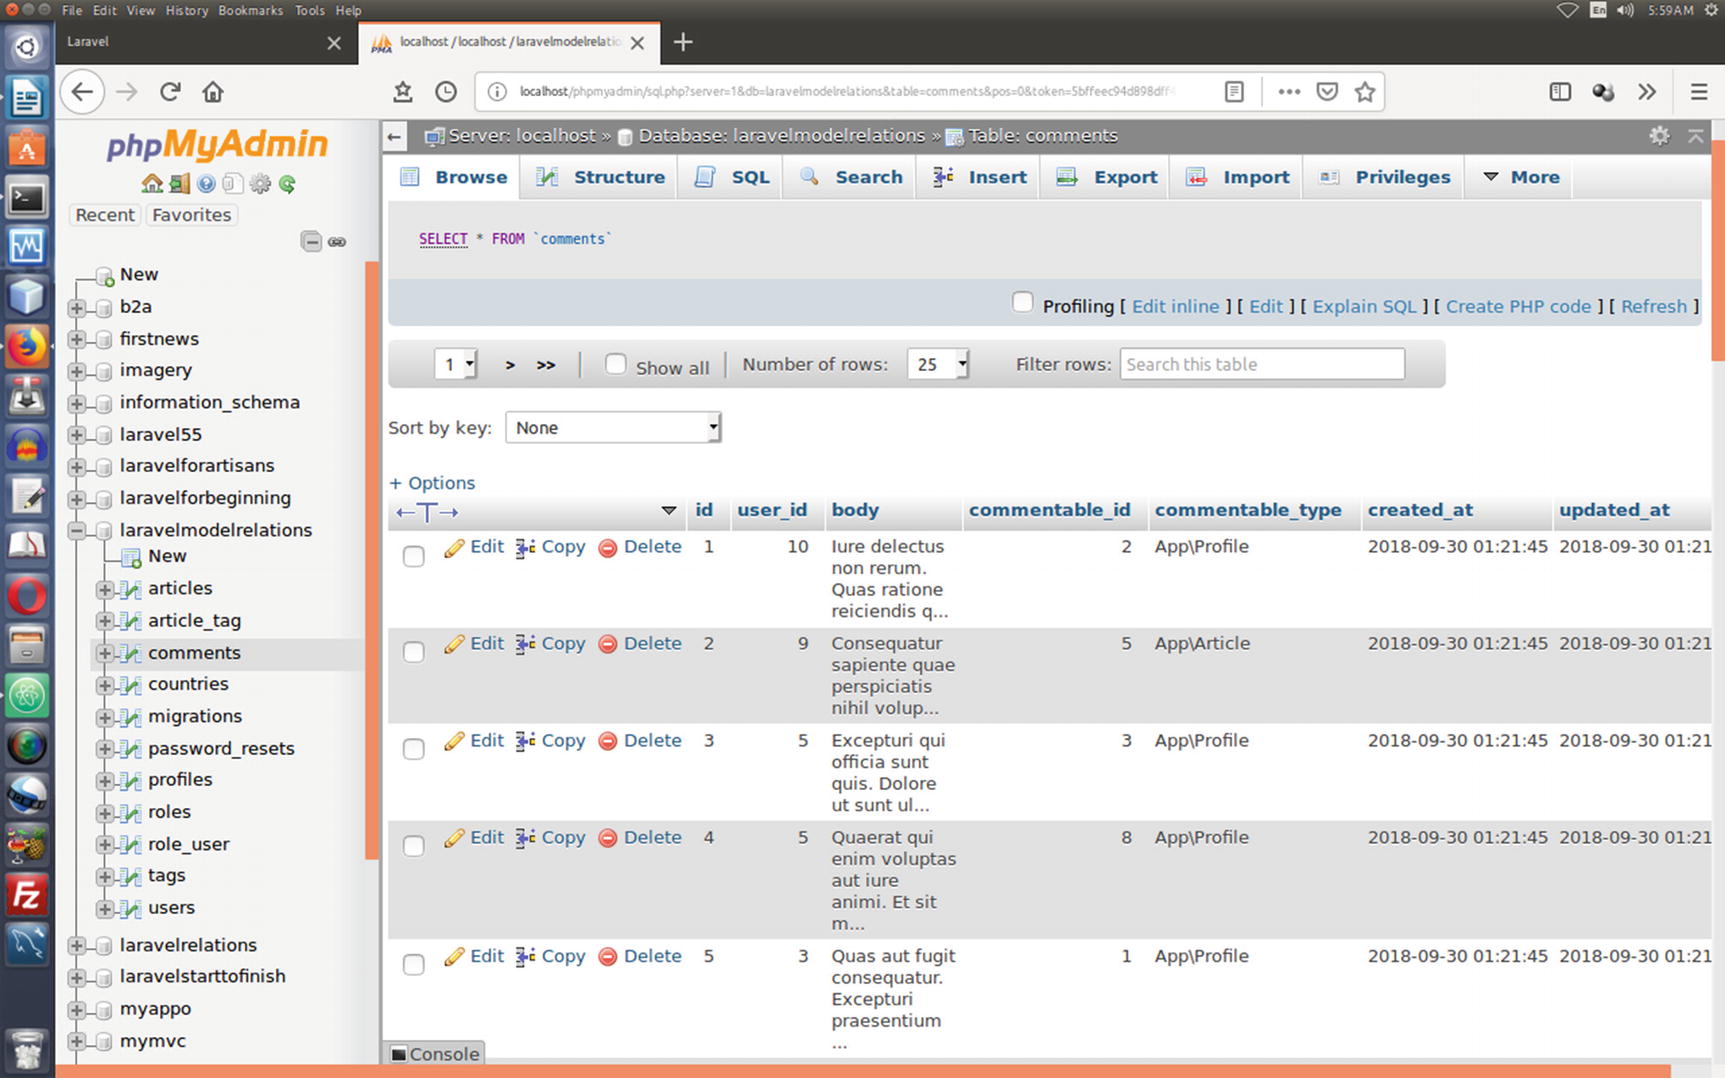
Next, let’s see how your comments table looks in phpMyAdmin. You will also look at it in a terminal using the MySQL prompt. But before that, you can take a look at phpMyAdmin, as shown in Figure 5-6.
Figure 5-6
The comments table has been populated with fake data
You can use the database laravelmodelrelations in your terminal, and by issuing the SELECT * FROM COMMENTS command, you can view how your tables have been populated with the fake data.
//code 5.28
mysql> USE laravelmodelrelations
Reading table information for completion of table and column names
You can turn off this feature to get a quicker startup with -A
Database changed
mysql> SHOW TABLES;
+---------------------------------+
| Tables_in_laravelmodelrelations |
+---------------------------------+
| article_tag |
| articles |
| comments |
| countries |
| migrations |
| password_resets |
| profiles |
| role_user |
| roles |
| tags |
| users |
+---------------------------------+
11 rows in set (0.00 sec)
mysql> SELECT * FROM COMMENTS;
By issuing such commands, you can also view the corresponding database tables in the terminal. So now you have successfully built all your database tables, and you can concentrate on building your application through controller and views.
Summarizing All Relations
Let’s check all the relations one after another. The Article controller should be the first candidate, where you will use the show() method to display a certain article that has many functionalities attached to it.
You will find out who is the writer of the article and what country the article belongs to. At the same time, you will grab all the articles representing that country. Another important part is the comments section, where you will show all the comments associated with a particular article. Who has written that comment? The username and a link to the user’s profile page will also be given.
So, with this article page, you are going to use many features of model relations. One-to-one, one-to-many, many-to-many, has-many-through, and finally polymorphic relationships have been used in this page in one way or other.
You are going to view the full code snippets of ArticleController.php (although we have avoided the insert and update parts so far).
Now you can view the main articles page, which shows you every feature you have incorporated in your application successfully. From the main articles page, you can go to any particular article page and see how it is chained to the comments, users, and countries.
You get everything in this page. The article’s title shows up on the top of the page. Next comes the writer’s name and the body of the article. After that you have a link that can take you to the other articles written by that writer. After that you have comments. On the right side, you have the writer’s name, and you can see to which country the writer belongs. You also have all other articles from that country (Figure 5-5).
You can emulate almost the same techniques to get one user’s profile page and show the comments that have been written over time.
// code 5.31
// app/HTTP/Controllers/UserController.php
<?php
namespace AppHttpControllers;
use AppUser;
use AppProfile;
use IlluminateHttpRequest;
use IlluminateSupportFacadesAuth;
use RepositoryDBDBUserRepository as DBUserRepository;
class UserController extends Controller
{
public $users;
public function __construct(DBUserRepository $users) {
$this->users = $users;
}
/**
* Display a listing of the resource.
*
* @return IlluminateHttpResponse
*/
public function index()
{
$users = $this->users->all();
return view('users.index', compact('users'));
}
/**
* Show the form for creating a new resource.
*
* @return IlluminateHttpResponse
*/
public function create()
{
//
}
/**
* Store a newly created resource in storage.
*
* @param IlluminateHttpRequest $request
* @return IlluminateHttpResponse
*/
public function store(Request $request)
{
//
}
/**
* Display the specified resource.
*
* @param AppUser $user
* @return IlluminateHttpResponse
*/
public function show(User $user)
{
//$roles = User::find($user->id)->roles;
$user = User::find($user->id);
return view('users.show', compact('user'));
}
/**
* Show the form for editing the specified resource.
*
* @param AppUser $user
* @return IlluminateHttpResponse
*/
public function edit(User $user)
{
//
}
/**
* Update the specified resource in storage.
*
* @param IlluminateHttpRequest $request
* @param AppUser $user
* @return IlluminateHttpResponse
*/
public function update(Request $request, User $user)
{
//
}
/**
* Remove the specified resource from storage.
*
* @param AppUser $user
* @return IlluminateHttpResponse
*/
public function destroy(User $user)
{
//
}
}
The code snippets of UserController.php are simple enough, although you have passed only one user object to show.blade.php, through the show() method. This handles many complex queries like getting all the comments that have been posted on that particular page.
You set up a user profile by using a one-to-one relationship, and afterward you connect that profile object to all the comments that have been posted to that page. Using the comment object, you again go back to fetch the username associated with it.
Now you can display any user’s profile page in a unique way (Figure 5-7).