
Just as desktop software development often uses an integrated development environment (IDE) with a compiler, linker, headers, and libraries, so does development for mobile terminals. Nokia provides such an IDE for performing Qt development. The Carbide.c++ IDE is still available for C++ development as well.
In this chapter we provide a tutorial that shows you how to get, install, and use the free IDE for Qt software development. After reading this chapter, you will be able to install the Nokia Qt software development kit (SDK) for your work, begin using the tools and designers available to create your application's user interface, and compile and load your application on to a Nokia device.
While desktop and mobile platforms share the common need for a tool chain, including an editor, compiler, linker, headers, libraries, and debugger, there's a key difference: choice. Depending on the desktop platform you're familiar with, you may have a wide array of tool chains (think Qt Creator, GNU, Microsoft Visual Studio, and so on). This choice may have some benefits — one tool chain may provide a better debugger, for example, or a faster compiler — but forces you to actively choose (or simply accept the decision made by your peers or manager). By contrast, Nokia provides the equivalent of one-stop-shopping: the IDE you choose for developing on Nokia platforms depends solely on the technology your application will use. If you plan to use Qt to build your application, you will use the Nokia Qt SDK.
For some time, Qt has provided its own IDE, including an excellent source code editor, integration with existing compiler, debugger, and linker tools. Called Qt Creator, it is itself written in Qt, although it has some features that make using the environment quite comfortable for anyone familiar with Eclipse. More recently, Nokia began providing its own mobile-centric version of Qt Creator, called the Nokia Qt SDK. Available on Macintosh, Windows, and Linux, the Nokia SDK provides the standard suite of services for an IDE, as well as:
A run-time simulator of the handset GUI, simulating display size, soft keys, GPS, and other device features.
Cross-compiling to Symbian, Maemo, MeeGo, the Qt simulator, and Qt on the host platform (the Linux and Macintosh versions of the tool require remote compilation for Symbian, however).
Source-level debugging on the Qt simulator, native Qt, and device.
A visual GUI builder derived from Qt Creator.
Usage of Qt's project files for meta-makefile management.
In practice, most IDEs today offer the same set of features, and learning to use an IDE is mostly a matter of figuring out which menu contains which commands, and learning (or rebinding) which function keys do what. The Nokia Qt SDK is no different; if you've used Eclipse or Visual Studio, you will feel right at home in a matter of hours.
The Nokia Qt SDK is truly cross-platform, running on Mac OS X 10.6 or later, Linux (Nokia recommends Ubuntu), or Windows (Windows XP Service Pack 2, Windows Vista, or Windows 7). The installation is not small. Expect it to consume about 4 GB of disk space, and it'll happily consume all the RAM and processor you can throw its way. There are some limitations on the Linux and Mac OS X version of the SDK, so be sure to check the documentation; these limitations center on the ability to cross-compile for Symbian and the SDK's use of a Nokia-hosted compilation cloud to enable cross-platform development to Symbian on these platforms. (One of us is happily running the Nokia Qt SDK in a virtualized Windows XP machine on his Mac OS X workstation, so virtualization is also an option.)
The Nokia Qt simulator is an essential part of the SDK that is written as a Qt runtime, emulating key device features. These include device status (such as battery, network access, and screen orientation) and device data (including device location and contacts data), as well as a device's specific Qt implementation of the screen and user interface. Not a device emulator and not a device skin, the simulator provides a fine balance between start-up and debugging performance with the ability to do things such as script device data with JavaScript to enable most debugging right on your development workstation. This eliminates much of the need for source-level debugging on your hardware target, which is still supported for the occasional pesky bug that materializes only on hardware.
If you've used Qt Creator in the past, you will find the Nokia Qt SDK very easy to work with. Folks familiar with other IDEs — say, Microsoft Visual Studio — may suffer moments of disorientation at first, but at its heart, the Nokia Qt SDK is simple enough that you can become proficient in a manner of hours. Here's a screen-by-screen walkthrough of the Nokia Qt SDK 1.0 to get you started.
Nokia provides web-based and full installs of the Nokia Qt SDK at /www.forum.nokia.com/Develop/Qt/Tools/. (If it's not there, click the Develop tab, then the Qt item in the dropdown menu; once there, choose Tools, and follow the links to the Nokia Qt SDK's download page.) The online installers are pretty small (on the order of 20 megabytes or so), but what you save in the initial download you pay later when the installer downloads the half-gigabyte to gigabyte of tools, headers, and libraries you need for a full installation. The installer itself is easy to use, but budget ten or twenty minutes for the installation; as you might imagine, there are a lot of files and tools to install.
Once you complete the installation and run the Qt SDK for the first time, you see a screen that looks like Figure 3-1. Before you dive in and begin cutting code, however, let's take a few minutes and configure your test hardware. In the discussion that follows, we assume you're working with a PC running a variant of Microsoft Windows; Mac OS X and Linux instructions can be found with the Nokia Qt SDK for those platforms and are similar in substance:
Install Ovi Suite so that your device and workstation can talk if necessary (not required for Mac OS X or Linux, or Maemo devices).
Install Qt for Symbian on Symbian devices.
Install a debugging shim on all devices.
Enable the connection between your workstation and phone.

While the process sounds complicated, it takes only a few minutes.
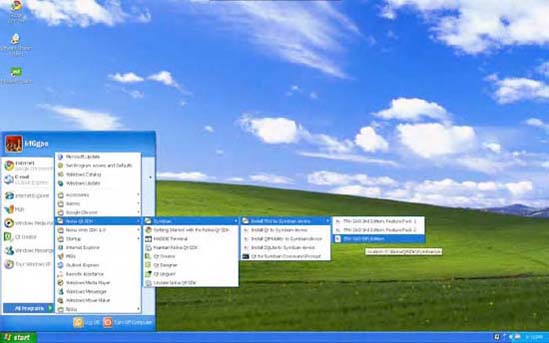
With your Symbian device should have come a copy of Ovi Suite, the software that enables a Symbian phone to communicate with your PC. Assuming you've installed it, you need only follow the links in the Nokia Qt SDK folder in your Start Menu to install SQLite, Qt for Symbian, and TRK, the Symbian debugger, and you're set (Figure 3-2). With the Nokia SDK installed, go to the Start menu and choose Start
As you do this, you should have about 20MB free on your Symbian device. As I write this, commercially available devices don't have Qt installed, so it's important that you install everything. By the time this book reaches you, newer devices will have Qt installed, and you need to install only TRK. If you're unsure, check Forum Nokia for specifics about the hardware that you have.
TRK is the debugging stub for Symbian development, and you'll need to have it running anytime you want to debug your application (including just downloading your app more quickly than packaging the application and installing via the application installer). Connect your device to your workstation using USB, and then launch TRK on the device. Choose "Settings," and then choose "USB."
Tip
TRK also supports a Bluetooth connection, but the support may or may not be available with the version of the Nokia Qt SDK you have. It's worth checking into, although for long debugging sessions, we recommend that you stick with USB, which usually keeps your handset powered as well.
With MeeGo, the work is a little more involved, because you're going to use MeeGo's networking stack to connect via TCP/IP over USB or WiFi to your development workstation. Follow the steps included with the SDK, which should show you how to:
Install the latest Ovi Suite or PC Connectivity Suite from Nokia for USB support on Microsoft Windows.
On the MeeGo device, select the Application Manager, then Download, then Development, then find Mad Developer and install it. This client application lets you configure a network connection to your development workstation.
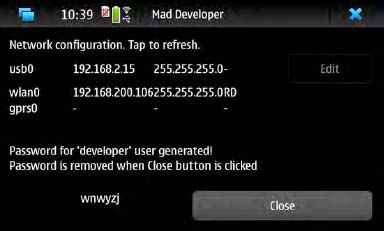
Launch Mad Developer. You will see a screen similar to Figure 3-3.
To connect using WiFi, activate WiFi on your MeeGo device, and make sure you're connected to the same network as your development workstation. Note the IP address in the wlan0 row of Mad Developer.
To connect using USB, touch "Edit" on the USB row and confirm by touching "Configure." Note the IP address in the usb0 row.
You'll use Mad Developer any time you want to connect your device to the Qt Creator SDK. Later, in the section titled "Compiling and Running Your Code on a Device," we show you how to complete the workstation half of the connection in the Nokia Qt SDK. Figure 3-3 shows Mad Developer in action.
Tip
Wireless debugging via WiFi is really cool, and works as long as you can ping between your development workstation and the device (that is, they need to be on the same logical network, but not necessarily the same physical network). However, USB is often a trifle faster, and connecting to USB usually powers your handset, too.
Returning to Figure 3-1 for a minute, let's get oriented with how the IDE is organized. When you first start the SDK, the large empty area with the Qt Creator box in the middle is a content area, where you spend most of your time editing visual layouts, source files, debugging, and so forth. Along the left hand side are selectors to different views the IDE can provide. (If you've used workspaces in Eclipse, the purpose is the same.) From top to bottom, the views are:
Welcome lets you pick a tutorial, a recent project with which you've worked, an example project, or create a project from scratch. This view actually has three panes: one for getting started, one to let you quickly load recent projects, and one that provides news and support from the Qt Labs blog, Forum Nokia, and other sources.
Edit lets you do just that: edit the text of a file with a syntax-highlighting text editor.
Design lets you create the visual layouts for your screens with a drag-and-drop editor that lets you build arbitrarily complex widget hierarchies. You do this using the Qt Designer, an integral part of the Nokia Qt SDK.
Debug lets you start and debug your application in simulation or on a tethered device.
Projects lets you work with the build configuration and other packaging for your application
Help provides help not just for the IDE, but also for all of Qt, including Qt Mobility.
At the bottom of the left-hand side are progress annunciators for things like source code indexing, as well as four buttons:
The target selector, which lets you choose the build target (device, simulator, and so on).
The run button, which triggers a compilation if necessary and executes your application.
The debug button, which triggers a compilation if necessary and executes your application in the source level debugger.
The build button, which lets you trigger a compilation of your package.
Let's create our first Qt application — "Hello World," Qt style.
In the Welcome view, click "Create Project..."
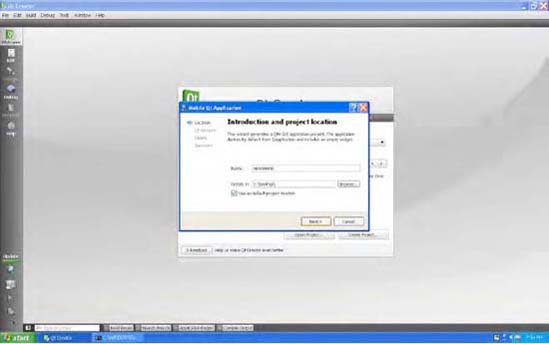
In the dialog that appears (Figure 3-4), choose "Mobile Qt Application" and click "Choose...".
In the next dialog (the first of the creation wizard, Figure 3-4), name your project and choose a directory where it should be stored.
Warning
Historically, some of these tools have not dealt well with spaces in paths. For best results, place your projects in directories with no spaces in the paths. Although it seems somewhat crude these days, one of us prefers just dropping new projects in a clean set of folders on the root of the boot or a secondary drive. It's easy to do, easy to find, and easy to back up or take with you if necessary, and it's guaranteed to work with just about any source-code control system you can find.
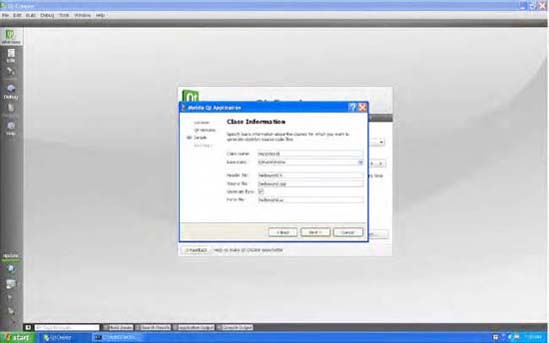
After naming your project, choose the targets for your application — simulation, Symbian, and MeeGo — from the next panel
If you want, rename the main class and files, as we did (Figure 3-5).
Configure source-code control for your project if you want it, and click "Finish." You will see the Design view, as Figure 3-6 shows.
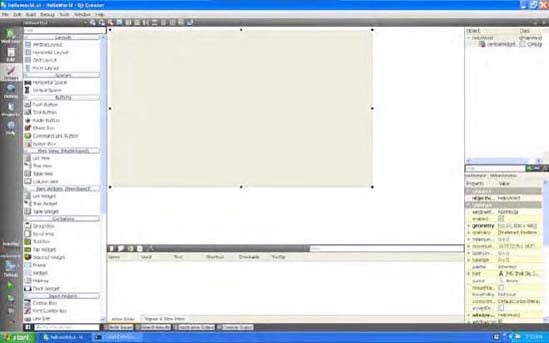
Let's add a label containing the text "Hello World" and a button, stacked vertically.
From the bottom of the palette on the left side of the window, drag a Label to the grey content window.
Right click the label, choose "Change plain text..." and type "Hello World".
Drag a push button from the middle of the palette on the left side of the window and drop it on the gray content window.
Right click the button, choose "Change text..." and type "Hello to you too!"
Right click the large gray rectangle on which you've been dropping controls and choose "Lay Out Vertically." You've just assigned a layout manager to the widget that the IDE provided when it created your window.
Tip
There's a big difference between having the layout assigned to the main window's widget and putting a layout manager (one of the layouts at the top of the palette on the left) on the widget! The former works wonders, generally doing what you'd expect. The latter doesn't, and leads to endless frustration when the layout doesn't appear to do what you want. Worse, the layout options in the right-click menu only appear once you've started putting child widgets in a widget, which is usually about the time you're getting very confused because the layout doesn't seem to be working. Don't panic, and remember the sequence: first, add child widgets, then right-click the containing widget. and choose the desired layout.
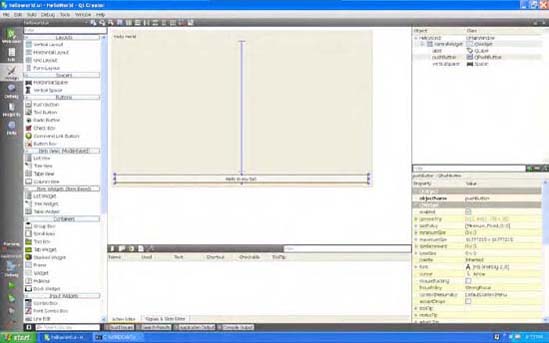
From the palette, drag a vertical spacer and drop it between the label and button.
You should now see something like the contents of Figure 3-7.
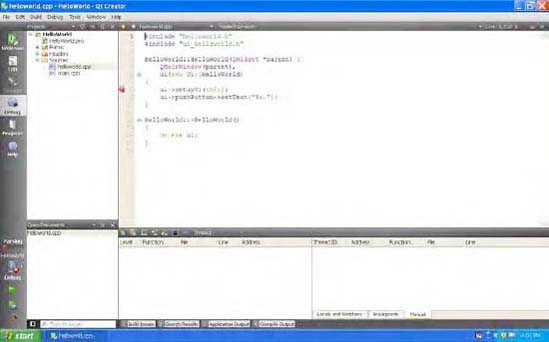
Before continuing, let's see what the IDE has put together for us behind the scenes. Choose the edit view, and double-click "HelloWorld.pro" from the left hand column. You should see something like the contents of Listing 3-1.
Example 3.1. The application's project file
#-------------------------------------------------
#
# Project created by QtCreator 2010-08-04T19:40:08
#
#-------------------------------------------------

QT       += core gui

TARGET = HelloWorld
TEMPLATE = app


SOURCES += main.cpp
        helloworld.cpp

HEADERS += helloworld.h

FORMS   += helloworld.ui

CONFIG += mobility
MOBILITY =

symbian {
    TARGET.UID3 = 0xec6083f7
    # TARGET.CAPABILITY +=
    TARGET.EPOCSTACKSIZE = 0x14000
    TARGET.EPOCHEAPSIZE = 0x020000 0x800000
}
This is your application's project file (also called a pro file, because its suffix is .pro), and defines the libraries your application links to, the source files that need to be compiled, and so forth. As we go along in the book, you'll learn to make small, targeted changes to this file (say, to add a library or an application icon), but in general, you probably won't need to edit it much, because the IDE does most of the heavy lifting. The project file is the input to qmake, Qt's metamake utility is responsible for analyzing project dependencies and coming up with a make file used by a specific platform's SDK, such as MinGW, the Symbian build chain, or the GNU cross-compilation tools for MeeGo. It's declarative in that you specify values for variables (such as SOURCES, a list of the source files from which your application builds), and qmake figures out the rest.
Next up is the "Forms" folder, which contains one file: the file you've been working on in the Qt Designer. The Qt Designer creates the XML you see in the form files that bear the .ui extension. The Qt Designer represents the interface as XML, so you shouldn't edit the XML directly. At compile time, these files get converted to C++ class declarations for your UI. That gives you the flexibility of a visual designer at development time and the performance of carefully tuned C++ at run time, so that there's no latency in setting up a complicated application UI.
Tip
The IDE won't let you edit the XML directly, but of course with Emacs and caffeine, you can do whatever you want. We don't advise it.
The class header file "helloworld.h" defines a single QObject, extending Qt's QMainWindow class (Listing 3-2).
Example 3.2. The application's HelloWorld class.
#ifndef HELLOWORLD_H
#define HELLOWORLD_H

#include <QMainWindow>

namespace Ui {
    class HelloWorld;
}

class HelloWorld : public QMainWindow
{
    Q_OBJECT

public:
    explicit HelloWorld(QWidget *parent = 0);
    ~HelloWorld();

private:
    Ui::HelloWorld *ui;
};

#endif // HELLOWORLD_H
The application's main window contains a central widget, which holds the controls for your application's user interface. (As you'll see in Chapter 6, you can actually swap in and out different collections of widgets, letting you show different screens in the same window.) The Qt Designer constructs this widget from the controls you've drawn out, using the XML and the automatically generated C++ we mentioned previously. This declaration of the user interface is done in your application's Ui namespace; as you see in Listing 3-3, you can access the compile-time-generated user interface components in that namespace.
Example 3.3. The implementation of the helloworld class
#include "helloworld.h"
#include "ui_helloworld.h"

HelloWorld::HelloWorld(QWidget *parent) :
    QMainWindow(parent),
    ui(new Ui::HelloWorld)
{
    ui ->setupUi(this);
}

HelloWorld::~HelloWorld()
{
    delete ui;
}
There's a direct binding between the Designer's controls and your source code; if you return to the Designer, select a widget (say, the push button) and look at the right-hand side of the window (Figure 3-7). You'll see a list of properties for the widget you've selected, including the object's name. You can access the widgets in the Ui:HelloWorld class directly just by referencing their name, like this:
ui ->pushButton ->setText("Yo.");Try this in helloworld.cpp, just after the call to ui ->setupUi(this). (You may need to compile your application first, if you're relying on name completion in the source editor.)
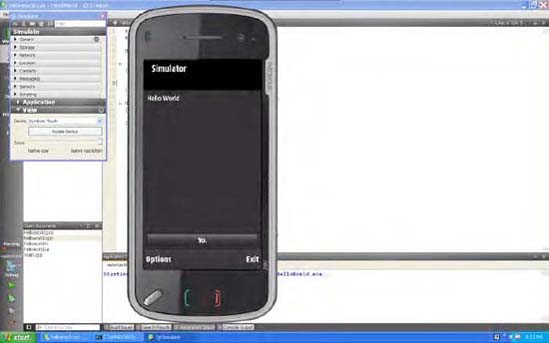
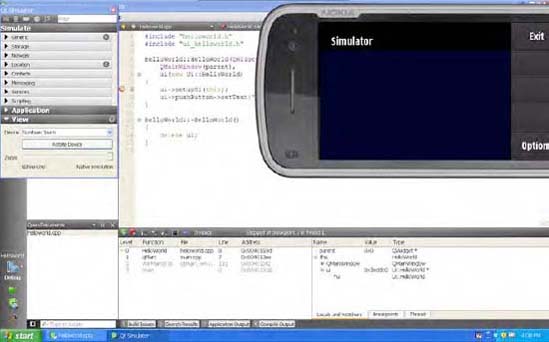
At this point, it's worth a quick compile-build cycle, just to see what you've created. Click the green Run button (the green arrow) at the bottom of the left-hand pane, and the IDE will compile your application and start it in the Qt simulator (Figure 3-8).
Before you continue, we urge you to stop, put down the book, and spend an hour or so experimenting with Qt Designer and this sample application. Try:
Adding more widgets to the main window.
Adding an empty widget to the main window, and then dropping widgets on it.
On the empty widget, set different layouts and see how things are positioned.
Using the property inspector or source code completion in the editor, look at the properties different widgets bear. Try changing some of them, either at compile- or run-time.
Place a breakpoint in
HelloWorld's constructor by clicking next to the line numbers, and run the debugger by clicking the run arrow with the superimposed bug on the left.Anything else that comes to mind.
The Qt Creator is a powerful tool, and with it you can accomplish an awful lot right out of the box — without writing a line of code. Think of the time you spend playing with it now as a small investment that will reap rewards later when you sketch out or build your killer application's user interface.
Before we get to the nitty-gritty of running your code on a device, let's spend a couple more minutes looking at the Qt Simulator. The simulator has two windows — the window showing what your application will look like on the device, and a second window that lets you control the behavior of the simulator itself. This second view is divided into several auto-hiding panes; choose the View pane, open it, and try choosing a different device or adjusting the zoom level. As we write this, you can simulate Maemo, Symbian touch-enabled devices, and non-touch devices, which together span Nokia's platforms that support Qt. Other panes let you simulate various properties of the device, such as its battery level, position, network availability, contacts in the contacts database, and so forth. Much of this is important when testing applications that use Qt Mobility, which we discuss in Chapter 5.
Returning to the IDE, choose the Projects icon from the left-hand pane, and see the different build configurations for your project (shown in Figure 3-9).
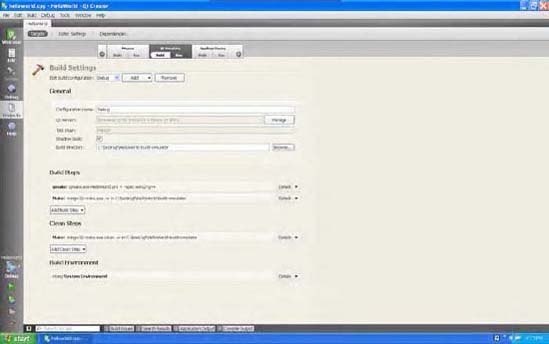
You configure a specific build target here; for example, let's look at getting your code up and running on a MeeGo device. (First, be sure you've installed Mad Developer on your MeeGo device.)
In the Project view, choose "Maemo."[2] You can also choose this from the build target selector below the view buttons in the left-hand pane.
Start Mad Developer on your target device.
Press "Developer Password" in Mad Developer.
In the Nokia Qt SDK, go to the Tools menu and select Tools

Click "Add," and name your configuration meaningfully (perhaps "WiFi").
Enter your device's IP address (from Mad Developer) in the Host Name field.
Enter the password shown in Mad Developer in the Password field.
Click "Test" to test the connection.
Click "OK" to save the settings.
Click the "Run" button.
After a short pause while the IDE rebuilds your application for MeeGo, you'll see the application running on the device.
The device's developer account and password work well if you're only going to do a quick test with a device, but for regular work, you're much better off creating a secure shell (SSH) key pair and installing the key on the device. To do this:
Return to the Tools menu's Maemo Emulator options.
Create a new configuration and ensure that the "Key" authentication type is selected.
Click "Generate SSH key... " and save the public and private keys somewhere. (You'll want to guard the private key, of course).
Choose "Deploy Public Key..." and choose the public key file you just created.
Change the configuration to use the one you just created.
Running your application on Symbian devices is even easier:
Choose "Symbian Device" in the Projects view or target selector.
Connect your device to your development workstation using a USB cable.
When the device prompts for USB mode, select "PC Suite" or "Ovi Suite" mode.
On the device, launch TRK. Ensure that the screen reads "Status: Connected" over USB.
Click the "Run" button.
The Qt IDE will recompile your application for Symbian, copy the application to the device, and start it.
For developers today, support for debugging is as important as cross-compilation or any other aspect of the tool chain. While mobile developers have long used tricks such as logging to memory, reserving a few pixels on the display for status, or playing sounds at critical points in code to determine code flow, the Nokia Qt SDK relegates these tricks to the past with a state-of-the-art source-level debugger you've probably used in desktop development or on other mobile platforms. You can place breakpoints where execution stops, examine memory and variables, and step into or through routines, letting you inspect program state a source line at a time. Debugging works across all hardware targets; if you've configured the Nokia Qt SDK to download and launch your application on your target device (see the previous section), you've done the necessary work for on-device debugging.
To begin, you need to enter the Debug view in the Nokia Qt SDK by clicking the Debug icon on the left hand side of the display. You'll see the Debug view, as you see in Figure 3-10. In this view, the code editor shares space with debugging information. The two additional panes below the code editor display the stack trace and variable or memory information, breakpoints, or other information.
To place a breakpoint, click the line of source code where you'd like to stop execution. Do this on the left side of the margin, just to the left of the source code line number. You'll see a red circle with an hourglass appear in that space; that is the breakpoint indicator. You can place as many breakpoints as you'd like; in Figure 3-10, we've placed one at line 8 of helloworld.cpp, in the constructor just before the user interface is set up.
To launch a debug session, click the run icon that has the bug overlaid at the bottom of the left pane, just above the hammer icon that represents the build operation. The SDK will build and start your application and the target (either the simulator or device) will execute your application until it reaches the first breakpoint, at which time execution stops.
With execution stopped you can do several things (Figure 3-11). Using the additional panes below your source code, you can:
View the stack trace, seeing precisely where execution in your application has stopped (in the left hand pane).
View variables in the current stack context, or add global watchers that show the values of global and static variables elsewhere in memory (in the right hand pane using the first tab) in the watch window.
View a list of breakpoints (in the right hand pane using the second tab).
View a list of running threads (in the right hand pane using the third tab).
You can add additional breakpoints by clicking additional lines of code, or add variables to the watch window by right-clicking the variable and choosing "Add to watch window". Using the row of small buttons above the left hand pane (the pane with the stack trace), you can:
Continue execution from the current point by pressing the green continue button.
Stop execution of a running application by pressing the stop button.
Execute a single line, possibly executing a function in its entirety.
Step into the next function call.
Continue a function until it exits and returns to the caller, stopping execution immediately after the target executes the return.
Switch from source-code debugging to viewing individual assembly-level instructions and stepping on an instruction-by-instruction level.
Reverse execution flow to rerun a statement. (Of course, depending on application state, your application may not behave well after this operation!)
You can also right-click a source line in the editor and choose "Run to line" to continue execution and run to the specified line, a handy way to skip a bunch of code you know that works and stop at a potentially troublesome spot without placing another breakpoint. In the Locals and Watchers pane of the watch window you can also edit variable contents; this is handy if you see a variable is uninitialized and you want to fix it at once and continue without having to stop execution, edit your code, recompile, and debug until you get to the same point again. Double-click the corresponding value in the value column and enter a new value (string, hexadecimal, or text). Right-clicking a line in the watch window gives you additional ways to view a variable's contents, including:
Opening a memory editor at a specified address, letting you view and edit individual words in memory.
Add a permanent watch point to a variable or location in memory, so it's always visible in the watch window regardless of execution context.
Change the display format of strings from ASCII to Unicode or other representations.
In this chapter, you've seen the Nokia Qt SDK, the tool chain Nokia provides for you to build Qt applications. You've used the Qt Designer capacity to draw full user interfaces, written and compiled a bit of code, and even built an application and ran it on the device. In the next chapter, we build on the experience you've gained in this chapter to see how to add that business logic that sets your application apart.