In this chapter, you will learn how to build a stories app in ReactJS. Stories apps are quite popular nowadays, and every big social media platform has the capability for users to add stories, which are short videos, to their platforms. In our app, we will be able to scroll short videos that will be stored in the Firebase Firestore database. The final app will look like Figure 3-1.
Figure 3-1
Final app in use
The hosting and the database will be in Firebase. We will also be using Material UI for the icons in the project.
So, use the create-react-app command to create a new app called stories-firebase-app. Specifically, open any terminal and run the following command:
npx create-react-app stories-firebase-app
Initial Firebase Setup
Since our front-end site will also be hosted through Firebase, we will create the basic settings while the create-react-app command creates our React app. Go ahead and follow the steps listed in Chapter 1 to create the app. I have created an app named stories-firebase-app (Figure 3-2).
Figure 3-2
Creating the app
Now, click the Settings icon at the top-left corner of the screen. After that, click the Project settings button (Figure 3-3).
Figure 3-3
Settings
Now, scroll down, click the Config radio button, and then copy all the code for the firebaseConfig section (Figure 3-4).
Figure 3-4
. firebaseConfig code
Basic React Setup
Our React setup should be completed by this time. So, go back to the terminal and cd into the newly created stories-firebase-app directory.
After that, open the directory in VS Code, create a file called firebase.js inside the src folder, and paste the content from the previous Firebase screen there. The code is shown here:
const firebaseConfig = {
apiKey: "AIxxxxxxxxxxxxxxxxxxxxxxxxxxKT4",
authDomain: "stories-xxxxxx.xxxxxxxx.com",
projectId: "stories-xxxxxx",
storageBucket: "stories-fxxxxxxxx.com",
messagingSenderId: "50xxxxxxxx63",
appId: "1:507xxxxxxx63:web:0c9xxxxxxxxxxda8e"
};
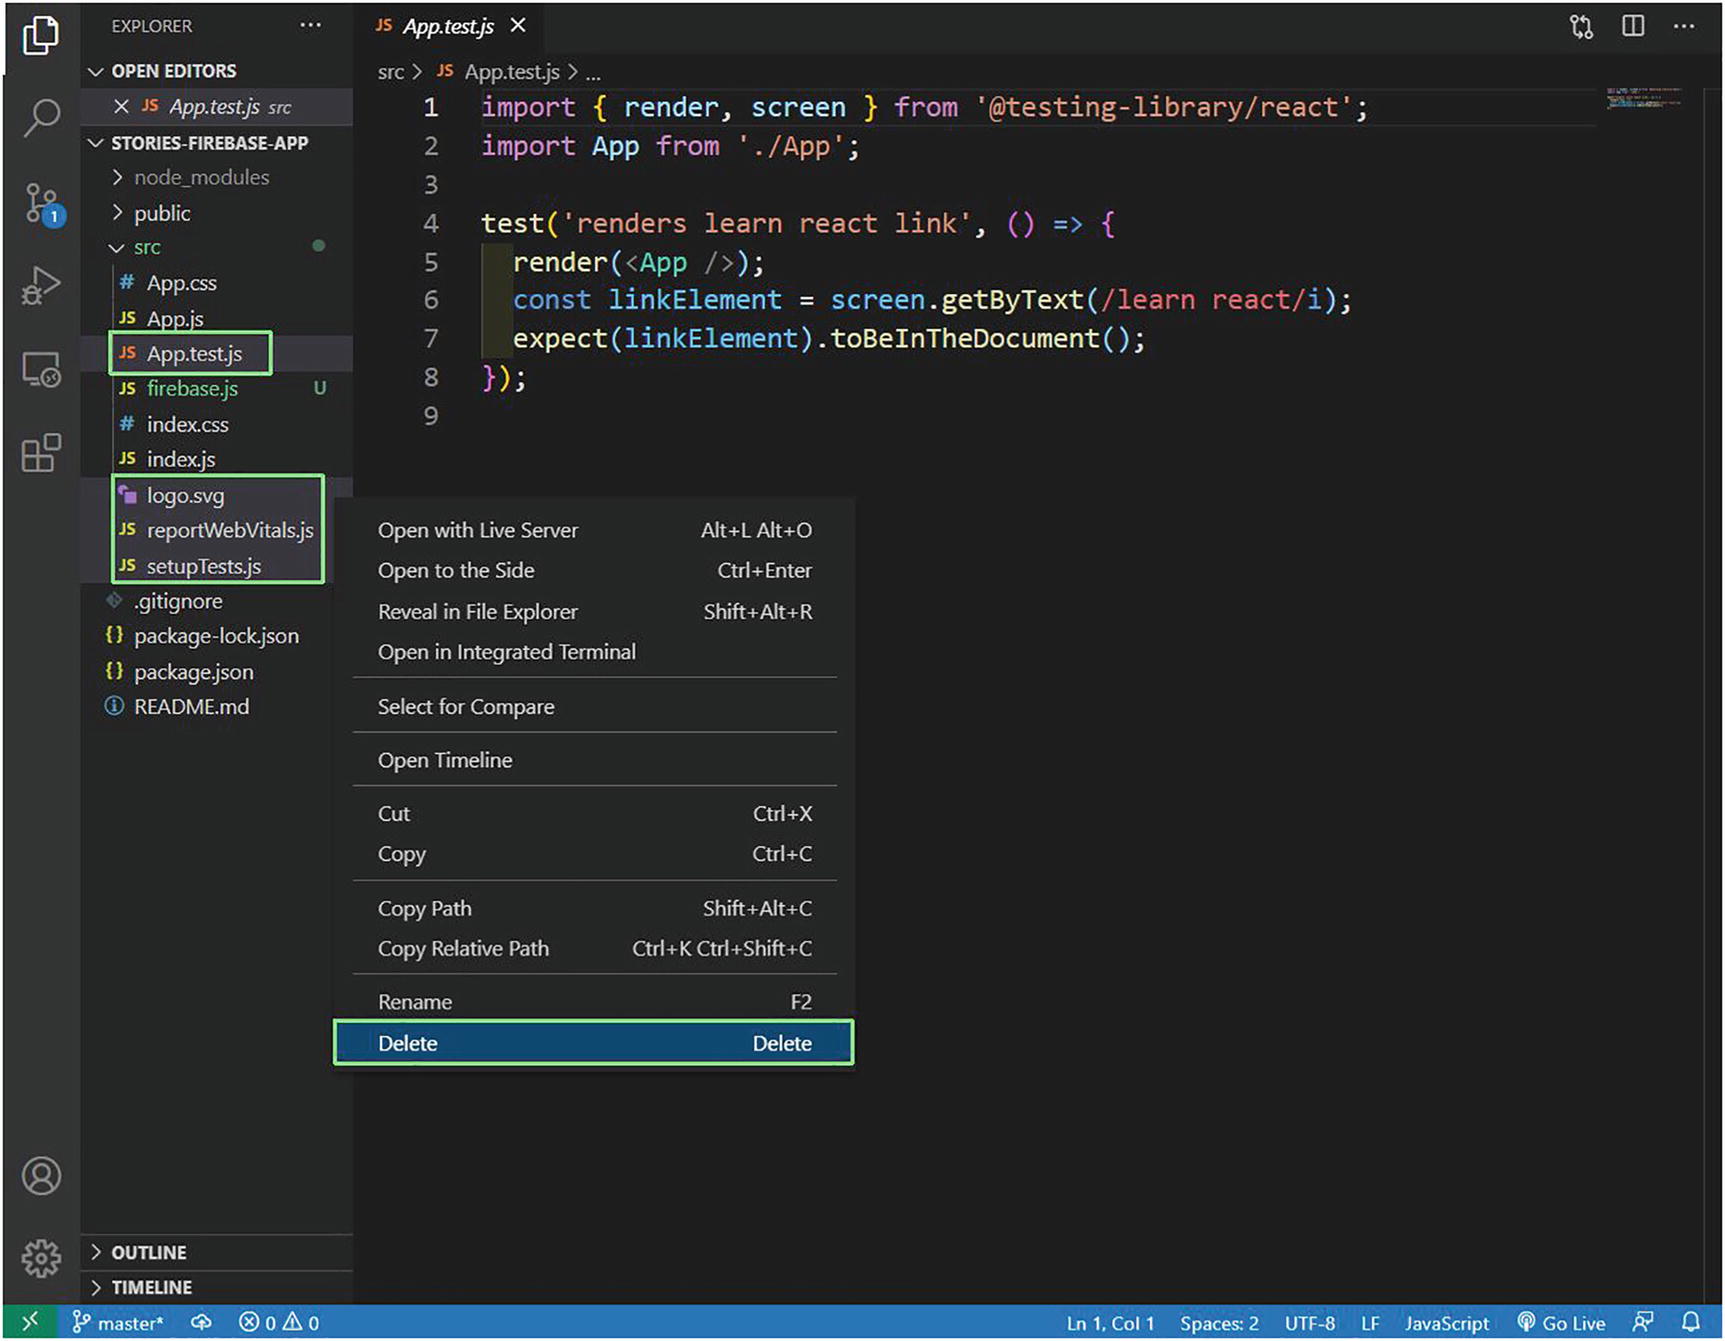
In the stories-firebase-app directory, start the React app with npm start. Next, we will delete some of the files, as shown in Figure 3-5, because we don’t need them.
Figure 3-5
Deleting some code
We will remove all the unnecessary boilerplate code, so our index.js file will look like this:
import React from 'react';
import ReactDOM from 'react-dom';
import './index.css';
import App from './App';
ReactDOM.render(
<React.StrictMode>
<App />
</React.StrictMode>,
document.getElementById('root')
);
The App.js file contains only the “Stories app React” text. We have removed all the other content from the App.css file. The updated code for the App.css file is shown here:
import './App.css';
function App() {
return (
<div className="app">
<h1>Stories app React</h1>
</div>
);
}
export default App;
In the index.css file, update the CSS to use margin: 0 throughout. Specifically, add the following code at the top:
* {
margin: 0;
}
Basic Structure of the App
We will now create the basic structure in our app. So, update App.js with the following content. We are adding the image and heading first. Here, we have created two divs: app__top and app__videos. Now, the app__top contains an image and an h1.
Next, we will add new content in the App.css file. Here, we are placing everything in the center using a grid. We also have a style of scroll-snap-type: y mandatory at two places. It is used to give the scroll feature in our app for smooth scrolling.
html{
scroll-snap-type: y mandatory;
}
.app{
display: grid;
place-items: center;
height: 100vh;
background-color: black;
}
.app__top {
margin-bottom: -150px;
}
.app__top > h1 {
text-align: center;
color: white;
}
.app__logo {
height: 12vh;
}
.app__videos {
position:relative;
height: 65vh;
background-color: white;
width: 70%;
border-radius: 20px;
max-width: 450px;
max-height: 1200px;
overflow: scroll;
scroll-snap-type: y mandatory;
}
.app__videos::-webkit-scrollbar{
display: none;
}
.app__videos{
-ms-overflow-style: none;
scrollbar-width: none;
}
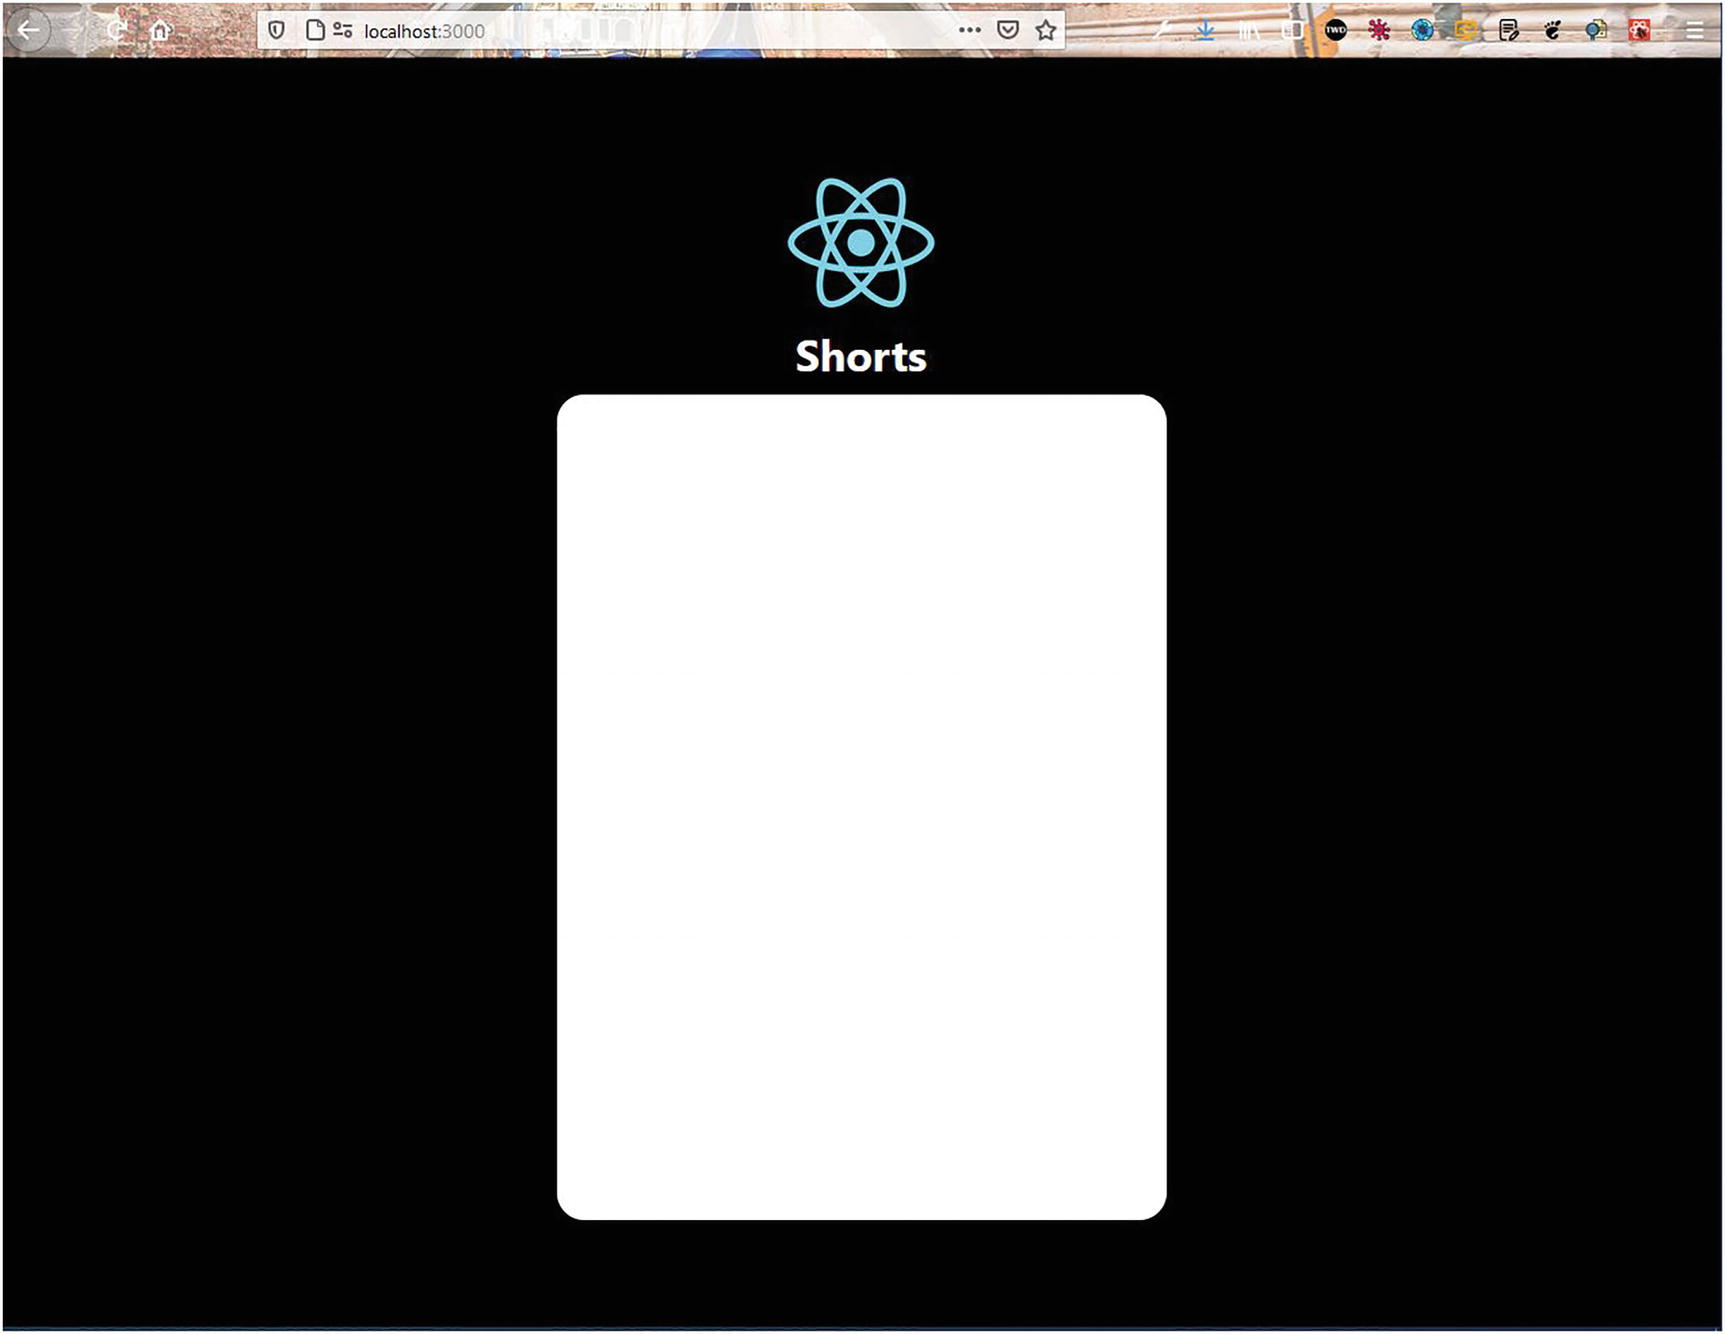
Now, our app will look like Figure 3-6 in localhost.
Figure 3-6
App outline
Showing Short Videos in the App
After setting up the basic layout in the previous section, we will now start creating the functionality to show short videos in our app.
To start, create a components folder inside the src folder and create two files called VideoCard.js and VideoCard.css inside the src folder.
Next, in the VideoCard.js file, put the video tag and a vertical video link. I copied the link from a short YouTube video on my channel.
Now, we will add the following code in the VideoCard.css file. Here, we again need to add scroll-snap-align: start to have the smooth scroll feature in the videos.
.videoCard{
position: relative;
background-color: white;
width: 100%;
height:100%;
scroll-snap-align: start;
}
.videoCard__player{
object-fit: fill;
width: 100%;
height: 100%;
}
Now, in App.js, add two VideoCard components, because we are need more than one video to see the snapping feature. The updated code is shown in bold here:
import './App.css';
import VideoCard from './components/VideoCard';
function App() {
return (
<div className="app">
<div className="app__top">
...
</div>
<div className="app__videos">
<VideoCard />
<VideoCard />
</div>
</div>
);
}
export default App;
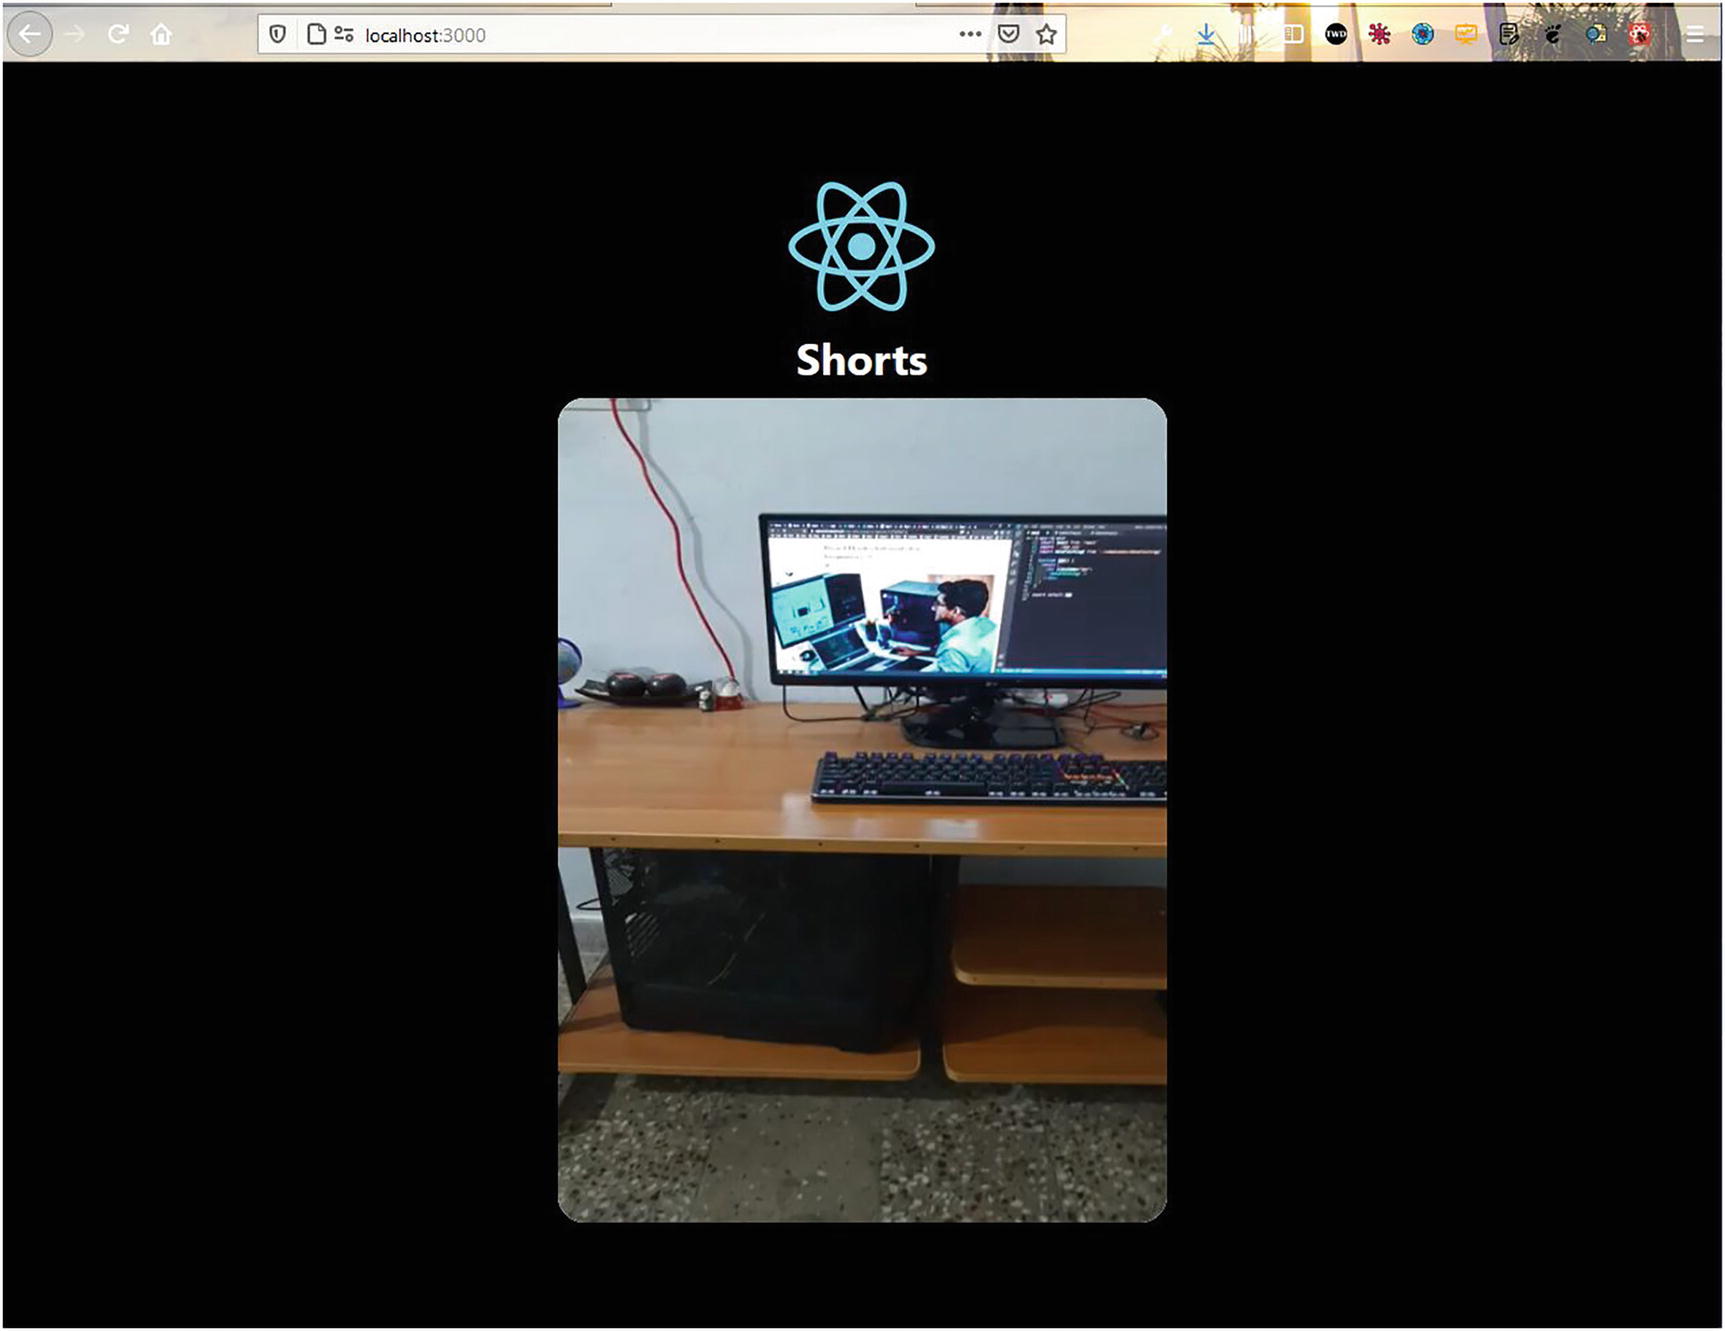
Now, videos are showing perfectly with the snapping feature (Figure 3-7).
Figure 3-7
Video snapping
Right now our videos don’t play, because we have not implemented the onClick functionality. To make them play, we will need to use a reference (or ref). A ref is required because we will be implementing the pause and play functions for when the user clicks the mouse on the screen. We will first import the useRef and useState hooks, and then we will add a videoRef variable. We are using videoRef inside the video element, where we also created an onClick handler that fires the function handleVideoPress.
Inside the handleVideoPress function, we are using a state variable called playing to check whether the video is playing. We are setting it to pause with videoRef.current.pause() and also changing the playing state to false. We are doing the reverse in the else part. The updated code is marked in bold here:
import React, { useRef, useState } from 'react'
import './VideoCard.css'
const VideoCard = () => {
const [playing, setPlaying] = useState(false)
const videoRef = useRef(null)
const handleVideoPress = () => {
if(playing){
videoRef.current.pause()
setPlaying(false)
} else {
videoRef.current.play()
setPlaying(true)
}
}
return (
<div className="videoCard">
<video
...
loop
ref={videoRef}
onClick={handleVideoPress}
/>
</div>
)
}
export default VideoCard
Now, in localhost, just click the video and it will play. Click again to pause it.
Creating the Header Component
We will be using Material UI for the icons, which we will use next. So, we need to do two npm installs per the documentation. We will install core and icons through the terminal by using the following command:
npm i @material-ui/core @material-ui/icons
We will now create the header for our video component. So, create files called VideoHeader.js and VideoHeader.css inside the components folder.
import React from 'react'
import './VideoHeader.css'
const VideoHeader = () => {
return (
<div className="videoHeader">
</div>
)
}
export default VideoHeader
Now, in the VideoHeader.js file, put the following content. Here, we are using material-ui to show two icons: ArrowBackIos and CameraAltOutlined. The updated content is marked as bold here:
import React from 'react'
import './VideoHeader.css'
import ArrowBackIosIcon from '@material-ui/icons/ArrowBackIos'
import CameraAltOutlinedIcon from '@material-ui/icons/CameraAltOutlined'
const VideoHeader = () => {
return (
<div className="videoHeader">
<ArrowBackIosIcon />
<h3>Shorts</h3>
<CameraAltOutlinedIcon />
</div>
)
}
export default VideoHeader
Next, we will style these in the VideoHeader.css file.
.videoHeader {
display: flex;
justify-content: space-between;
align-items: center;
position: absolute;
width: 100%;
color: white;
}
.videoHeader > * {
padding: 20px;
}
Now, include this VideoHeader component in the VideoCard.js file. The updated content is marked as bold here:
import VideoHeader from './VideoHeader'
const VideoCard = () => {
...
...
return (
<div className="videoCard">
<VideoHeader />
<video
...
/>
</div>
)
}
export default VideoCard
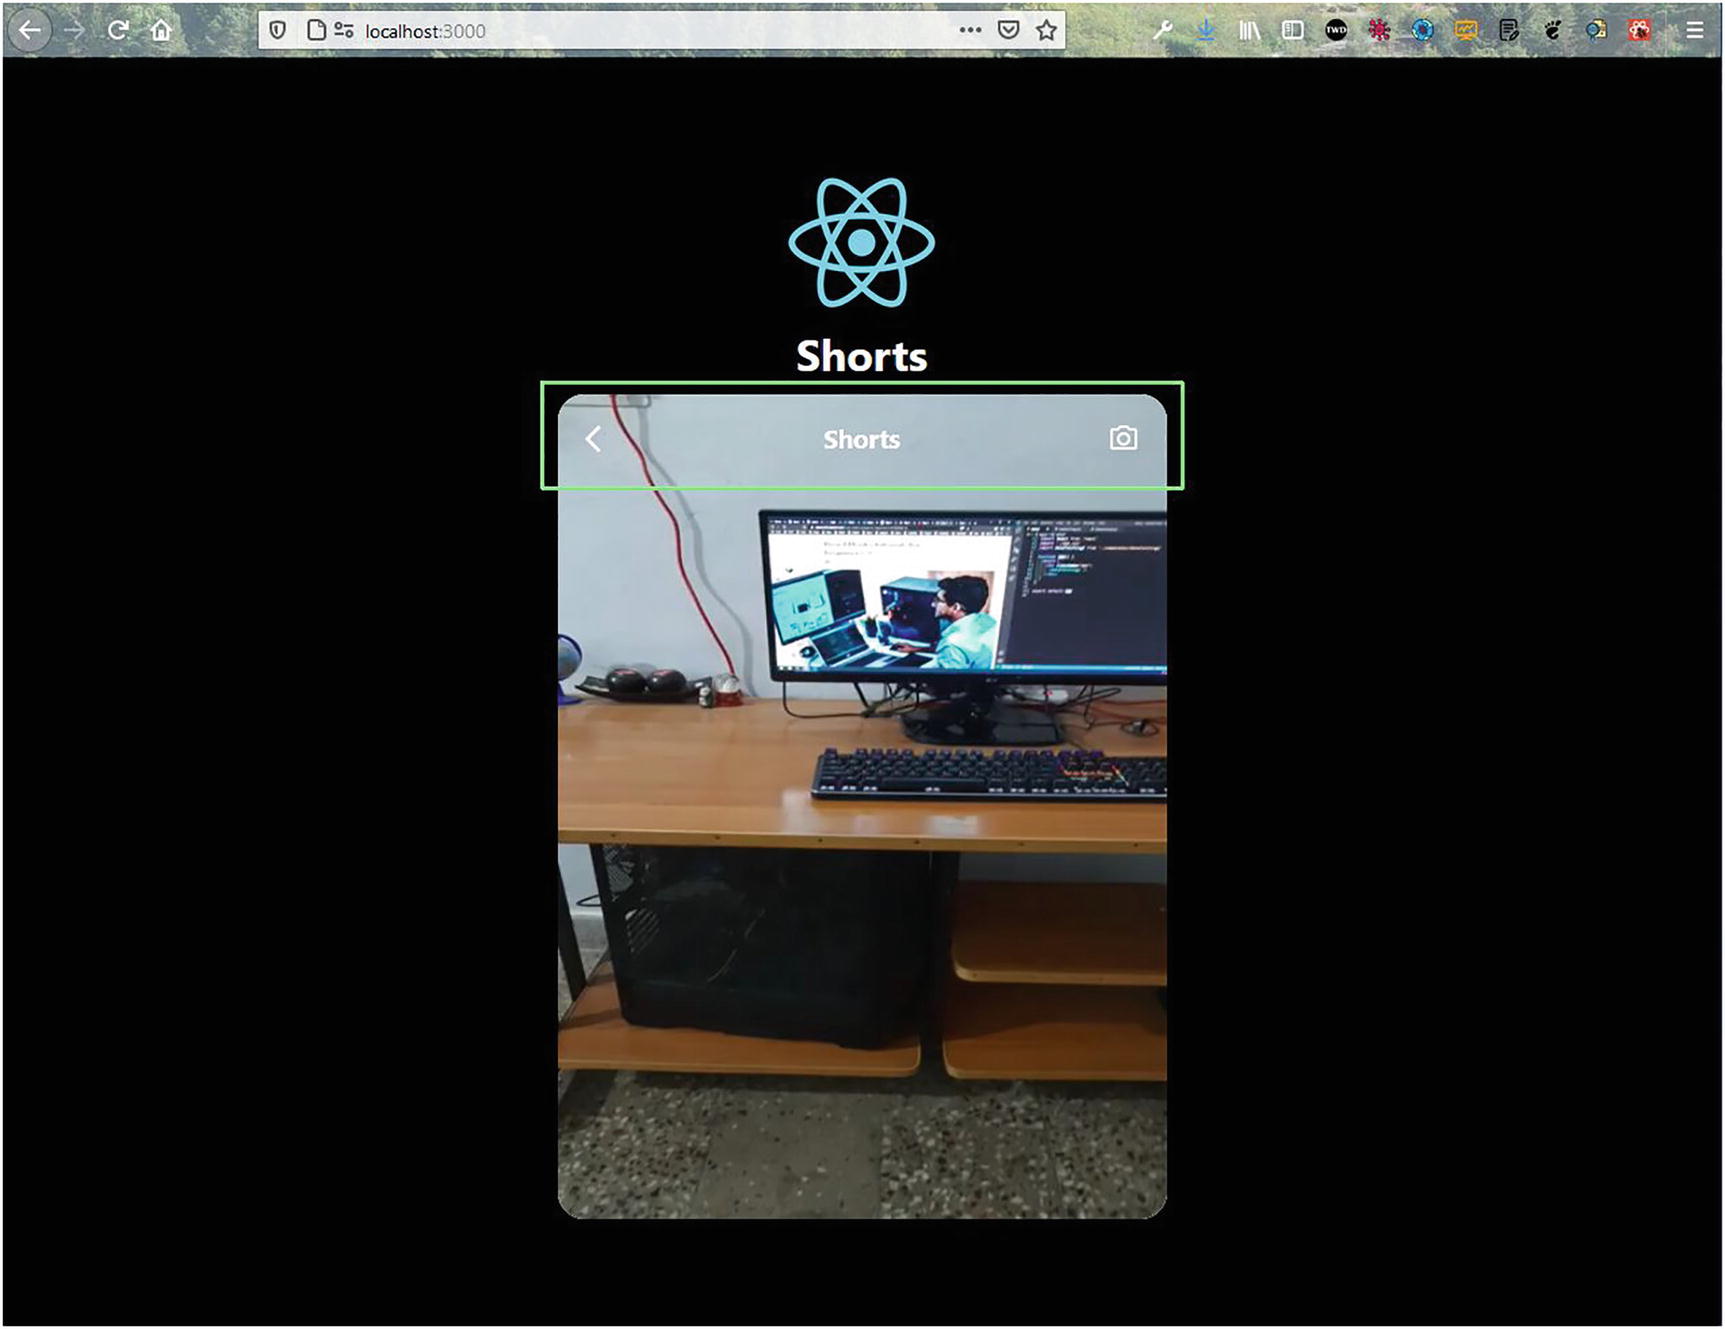
Now, in localhost we see our nice header component (Figure 3-8).
Figure 3-8
Header
Creating the Footer Component
We will now create a footer for our video component. The footer component will show some icons in the footer of the app. So, create two files called VideoFooter.js and VideoFooter.css inside the components folder.
Also, we are doing a bit of optimization by passing props from the App.js file in the VideoCard component. We are passing two different set of props, in two VideoCard components. The updated content is marked in bold here:
Then in the VideoCard.js file, we will first use the prop called url in video. Also, call the new VideoFooter component, where we will pass the rest of the props. The updated content is marked in bold here:
Now, our VideoFooter.js file will contain the following content. We are using the channel and avatarSrc props and showing an avatar and a channel name.
import React from 'react'
import './VideoFooter.css'
import { Button, Avatar } from '@material-ui/core'
Next, we will add the styles for these in the VideoFooter.css file.
.videoFooter__text{
position: absolute;
bottom: 0;
color: white;
display: flex;
margin-bottom: 20px;
}
.videoFooter__text > h3 {
margin-left: 10px;
padding-bottom: 20px;
}
.videoFooter__text > h3 > button {
color: white;
font-weight: 900;
text-transform: inherit;
}
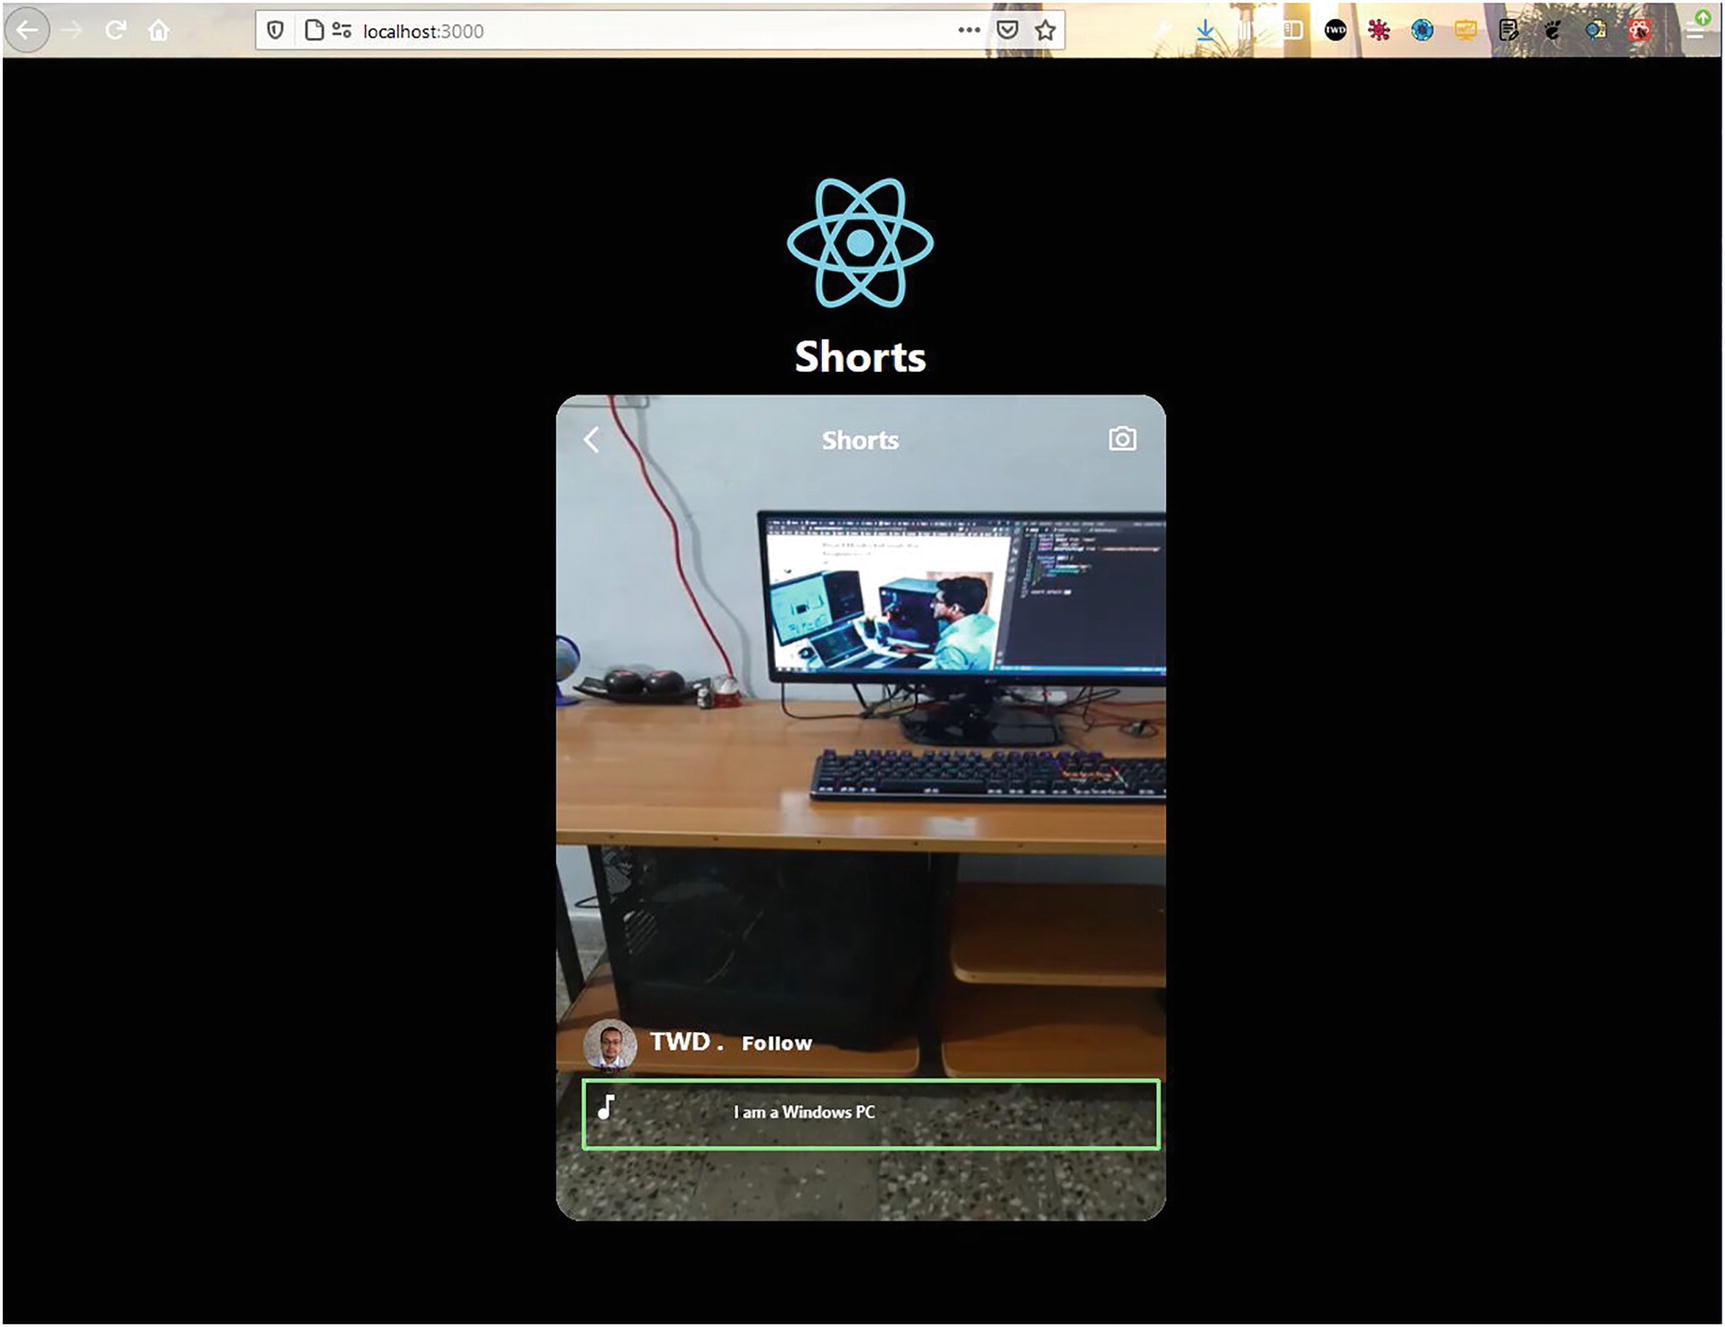
Now, in localhost we will start setting the footer component (Figure 3-9).
Figure 3-9
Footer
Now, let’s create a nice ticker in our project. For that we will install a package called react-ticker in our project. This package allows us to show moving text, like a news feed. We can use the integrated terminal to do the installation with the following command:
npm i react-ticker
Next, we will include Ticker as per the documentation, along with MusicNoteIcon, in our VideoFooter.js file, as shown here:
import MusicNoteIcon from '@material-ui/icons/MusicNote'
Next, we will include the following styles in the VideoFooter.css file:
.videoFooter{
position: relative;
bottom: 100px;
margin-left: 20px;
}
.videoFooter__ticker > .ticker{
height: fit-content;
margin-left: 30px;
margin-bottom: 20px;
width: 60%;
}
.videoFooter__ticker h1{
padding-top: 7px;
font-size: 12px;
color: white;
}
.videoFooter__icon{
position: absolute;
left: 5px;
color: white;
}
Now, we will see this nice ticker scrolling across our screen in localhost (Figure 3-10).
Figure 3-10
Ticker
Now, we will add some remaining elements in the VideoFooter.js file to finish our app. Here, we are adding some more icons and using the likes and shares props:
import Ticker from 'react-ticker'
import { Favorite, ModeComment, MoreHoriz, Send } from '@material-ui/icons'
Next, we will add some new styles in the VideoFooter.css file, as shown here:
.videoFooter__actions{
display: flex;
position: absolute;
width: 95%;
color: white;
justify-content: space-between;
}
.videoFooter__actionsLeft > .MuiSvgIcon-root{
padding: 0 10px;
}
.videoFooter__actionsRight{
display: flex;
}
.videoFooter__stat{
display: flex;
align-items: center;
margin-right: 10px;
}
.videoFooter__stat > p{
margin-left: 3px;
}
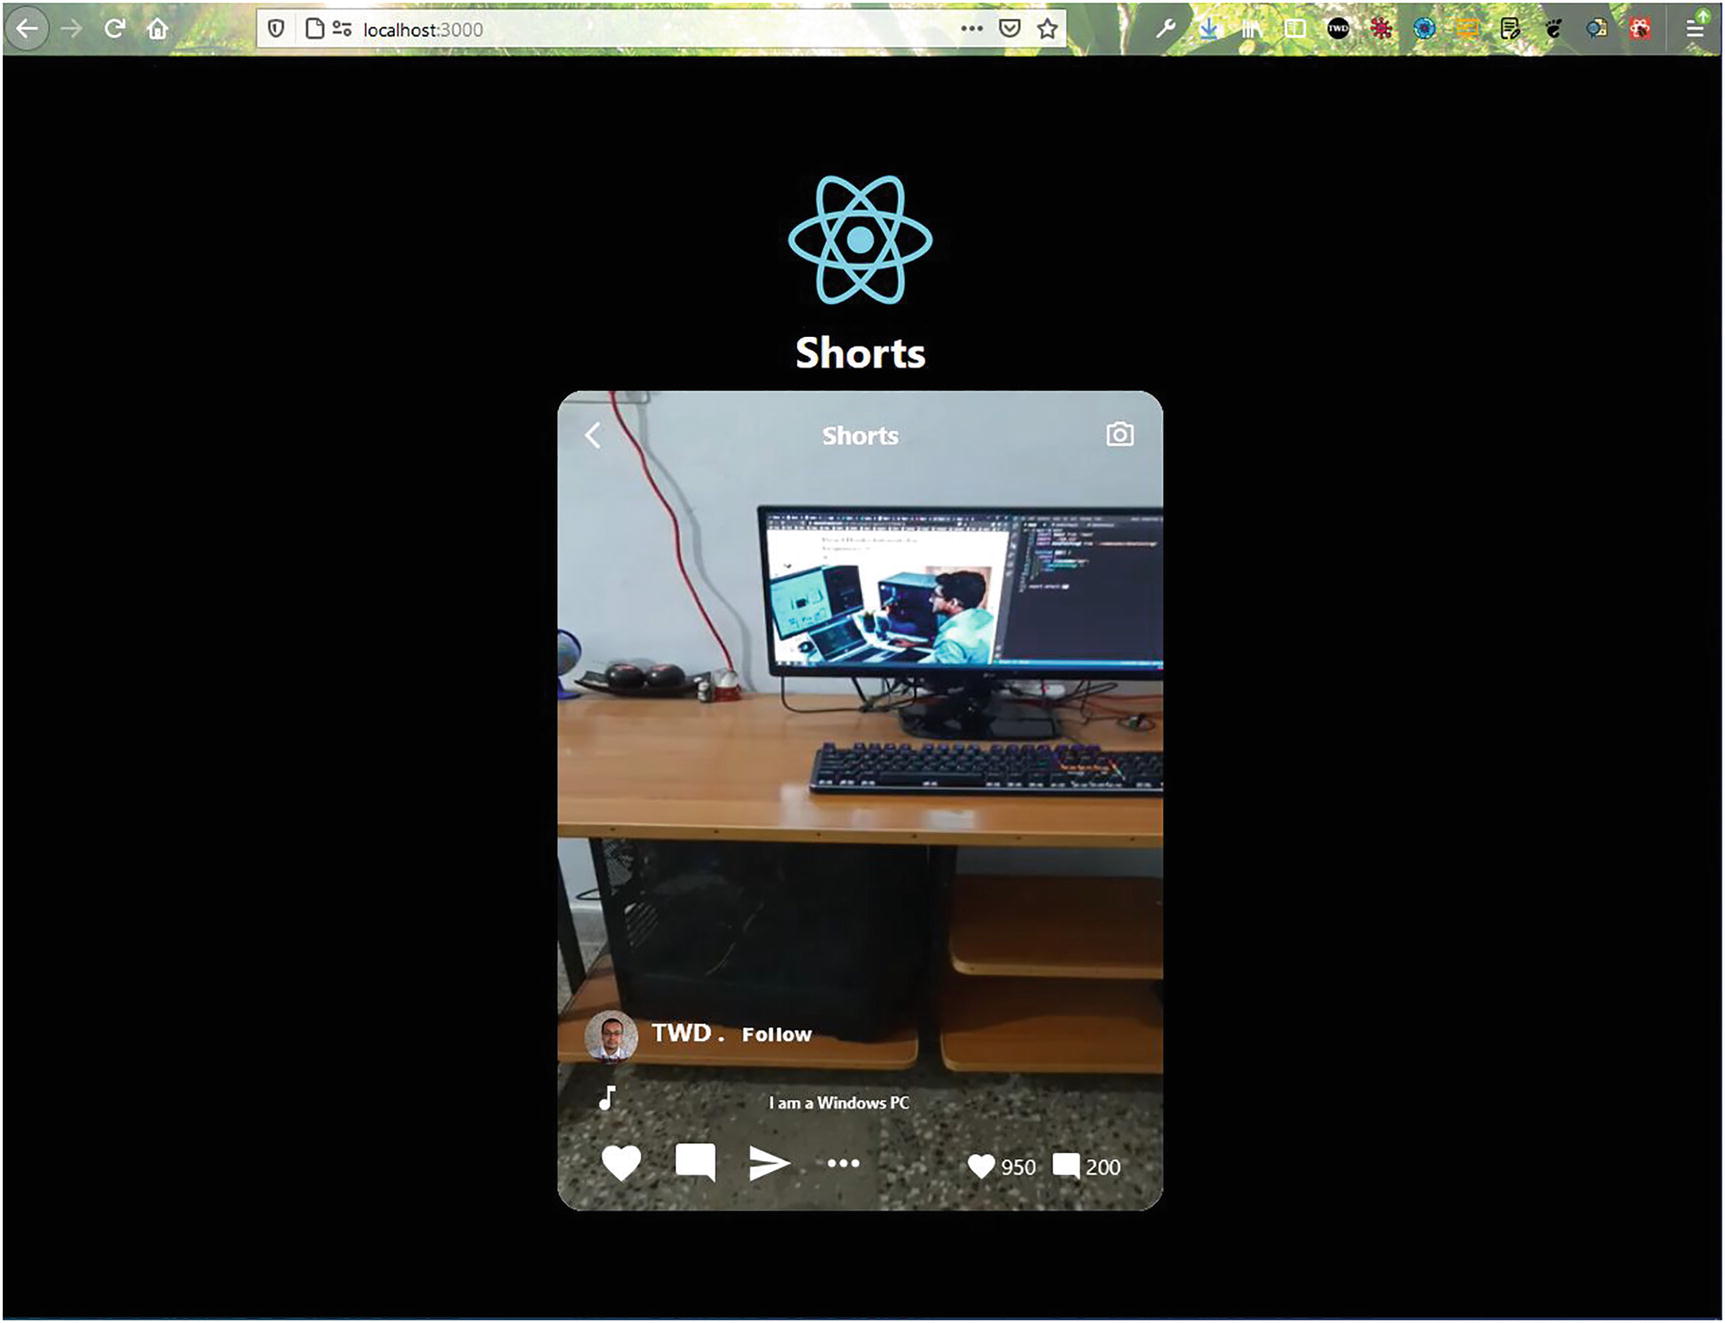
Now, our app is complete with the additional elements we just added (Figure 3-11).
Figure 3-11
App complete
Setting Up the Firebase Database
We will now be setting up Firebase. The first thing to do is install Firebase in our project by running the following command from the terminal:
npm i firebase
Next, we will update our firebase.js file to use the config to initialize the app. After that, we can use Firestore as the database. The updated content for this is marked in bold here:
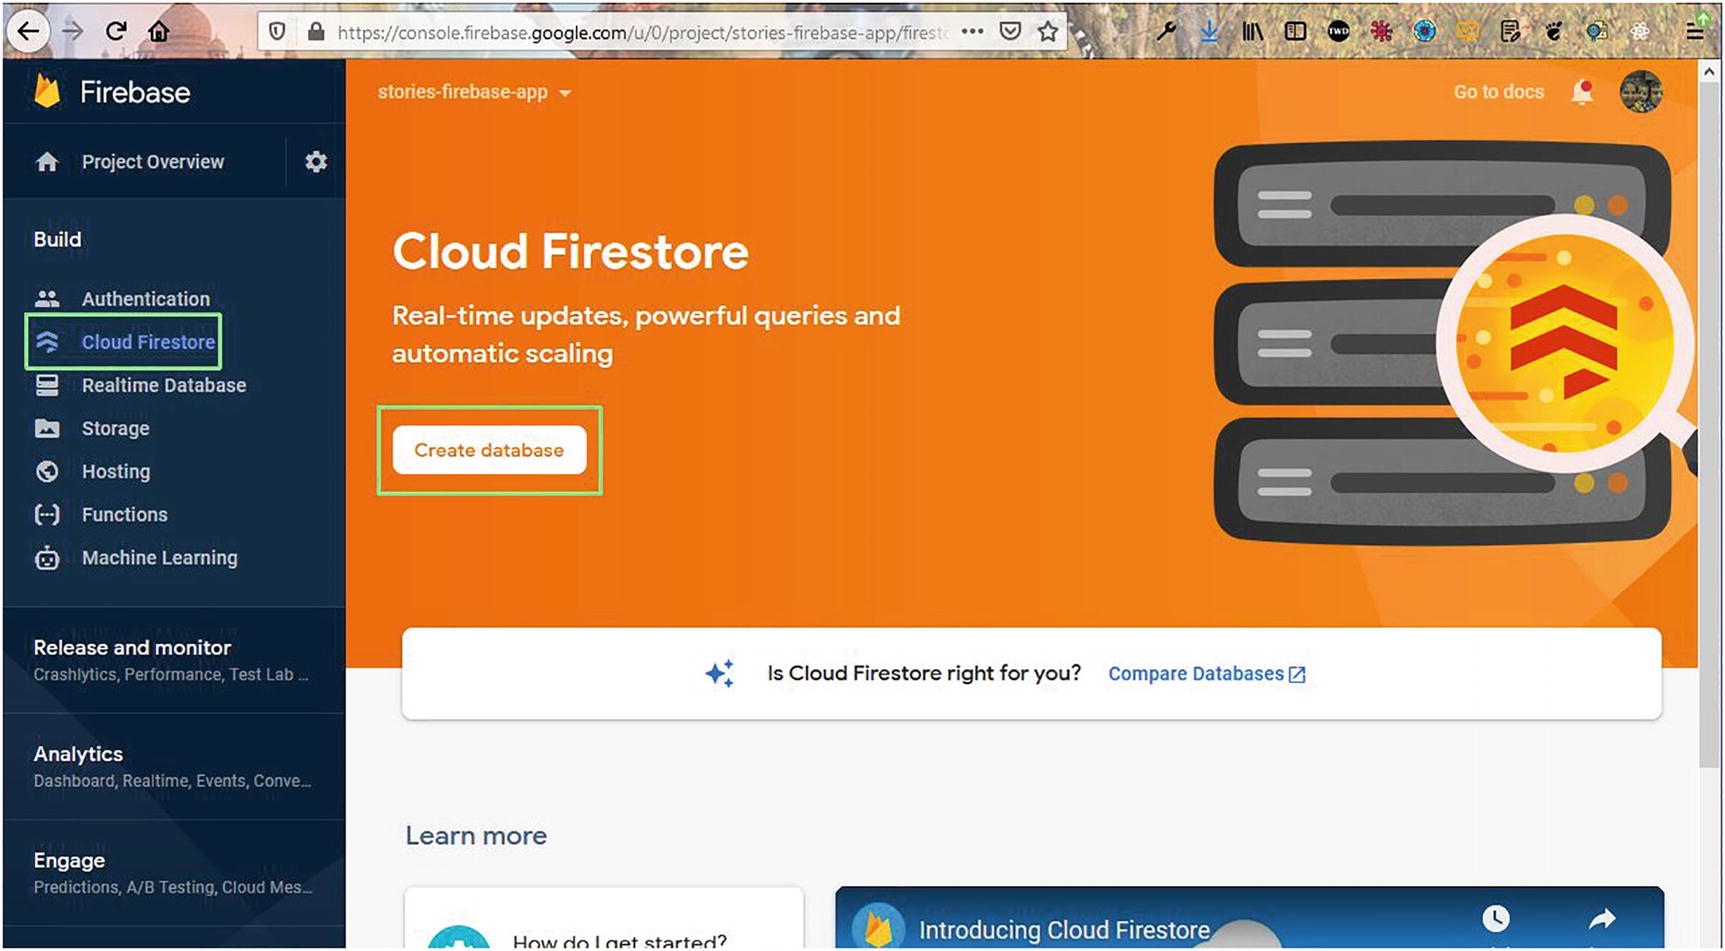
Now, we will go back to Firebase and click Cloud Firestore and then the Create database button (Figure 3-12).
Figure 3-12
Creating a database
On the next screen, select Start intest mode and then click the Next button (Figure 3-13).
Figure 3-13
Test mode
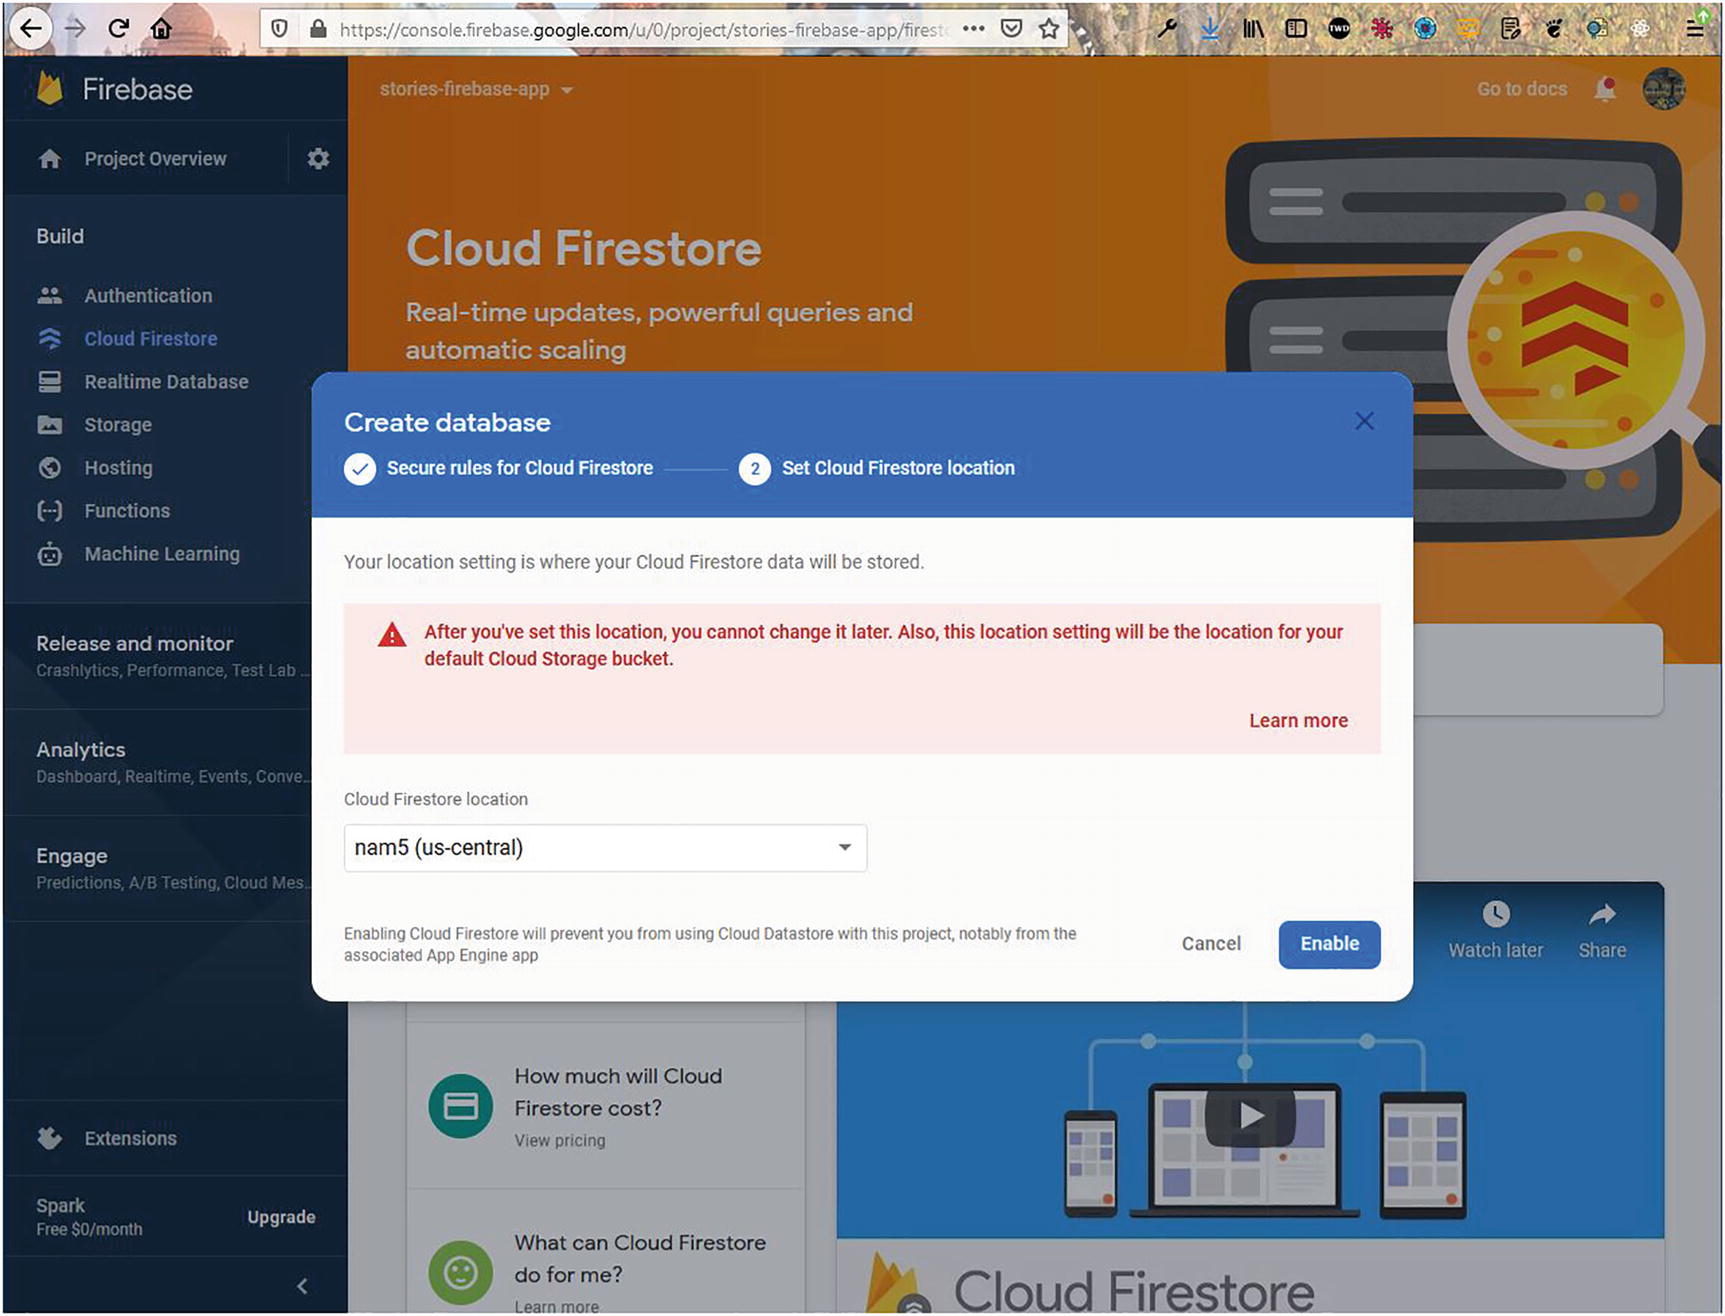
On the next screen, click the Enablebutton (Figure 3-14).
Figure 3-14
Enable button
On the next screen, click Start collection (Figure 3-15).
Figure 3-15
Starting the collection
This will open the pop-up shown in Figure 3-16. We need to give the collection ID, so enter videos in the Collection ID field and then click the Next button.
Figure 3-16
Entering the collection ID
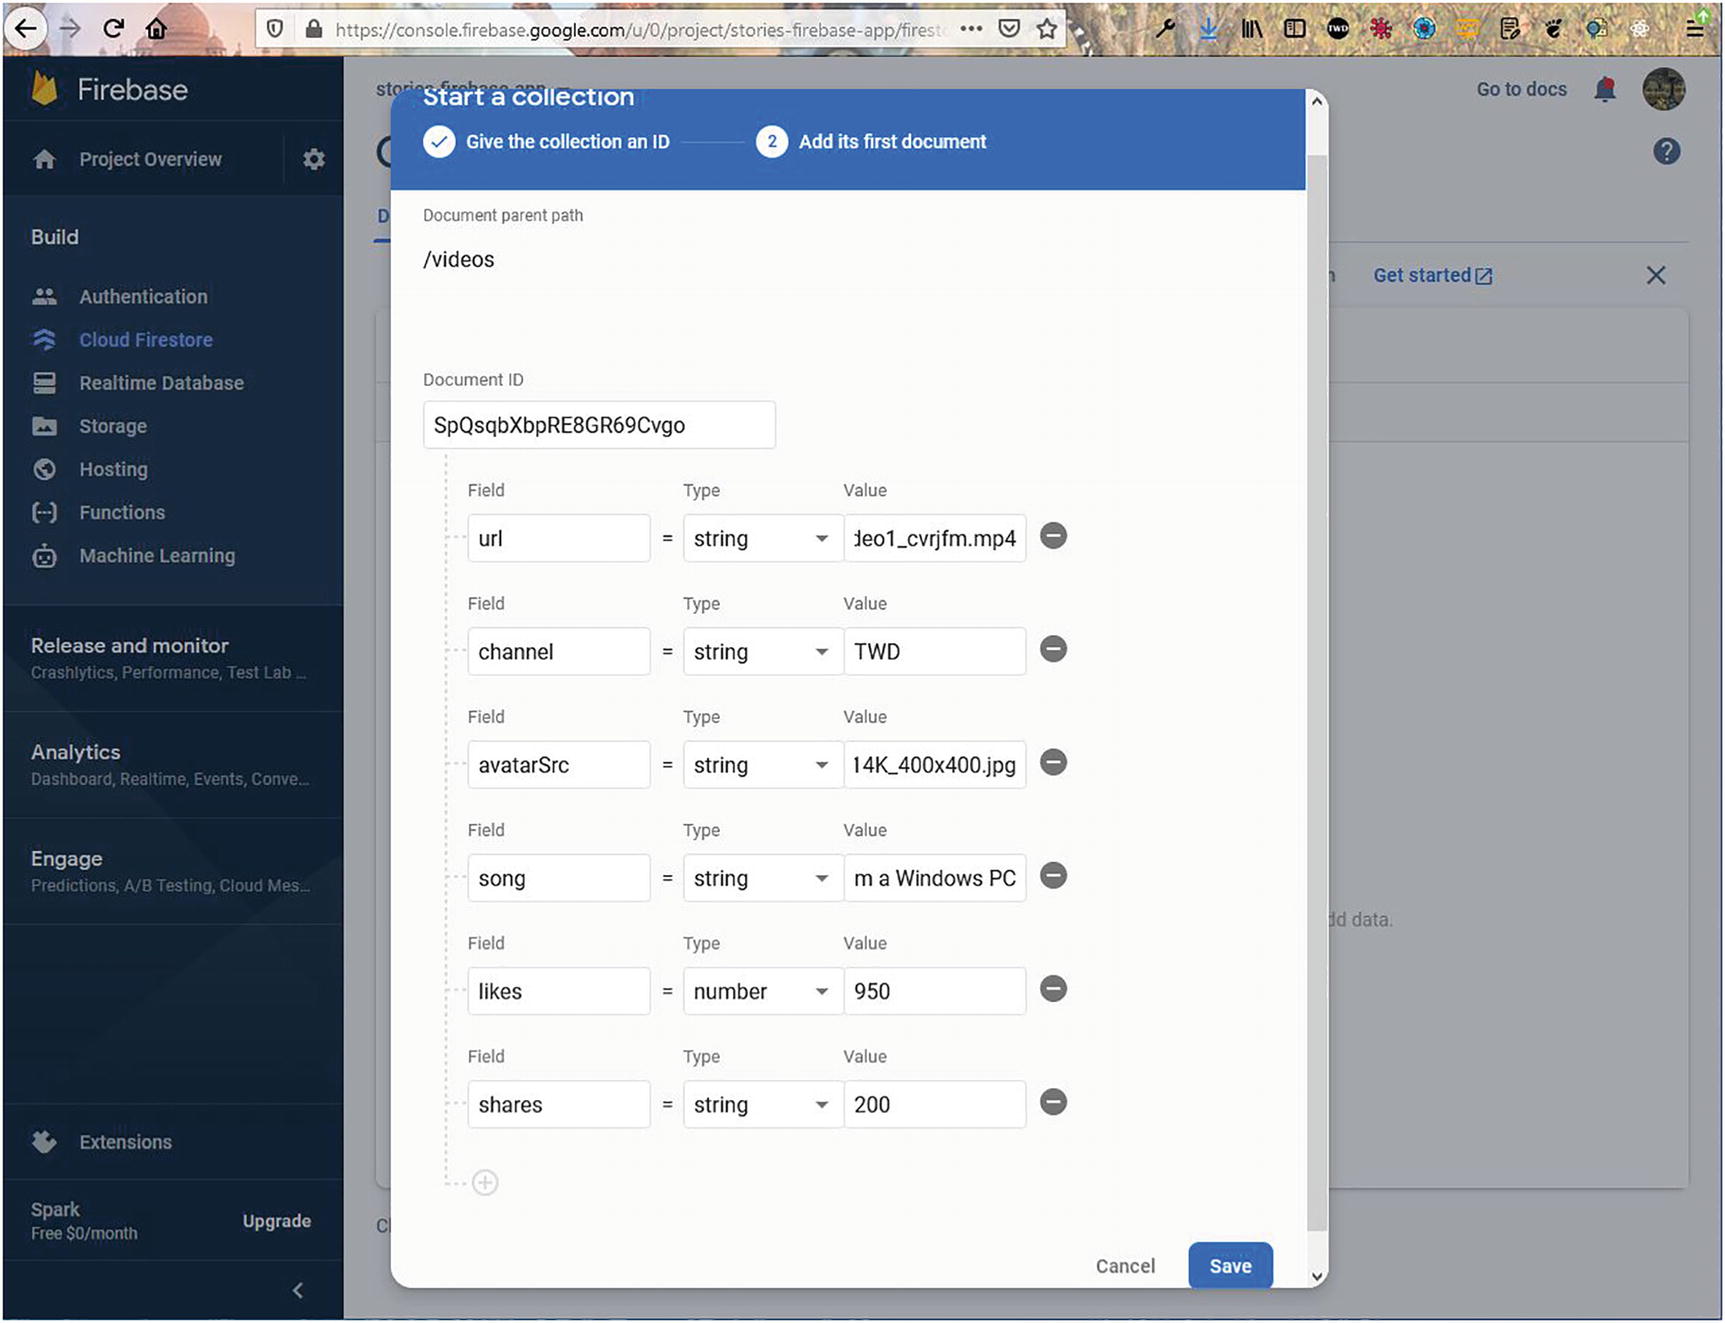
On the next screen, create the document ID by clicking Auto ID. Also add the fields url, channel, avatarSrc, song, likes, and shares. Put all the values from the App.js file in the Value fields. Also, note that the likes, shares, and messages are the number type and the rest are the string type. After that, click the Save button (Figure 3-17).
Figure 3-17
Creating a collection
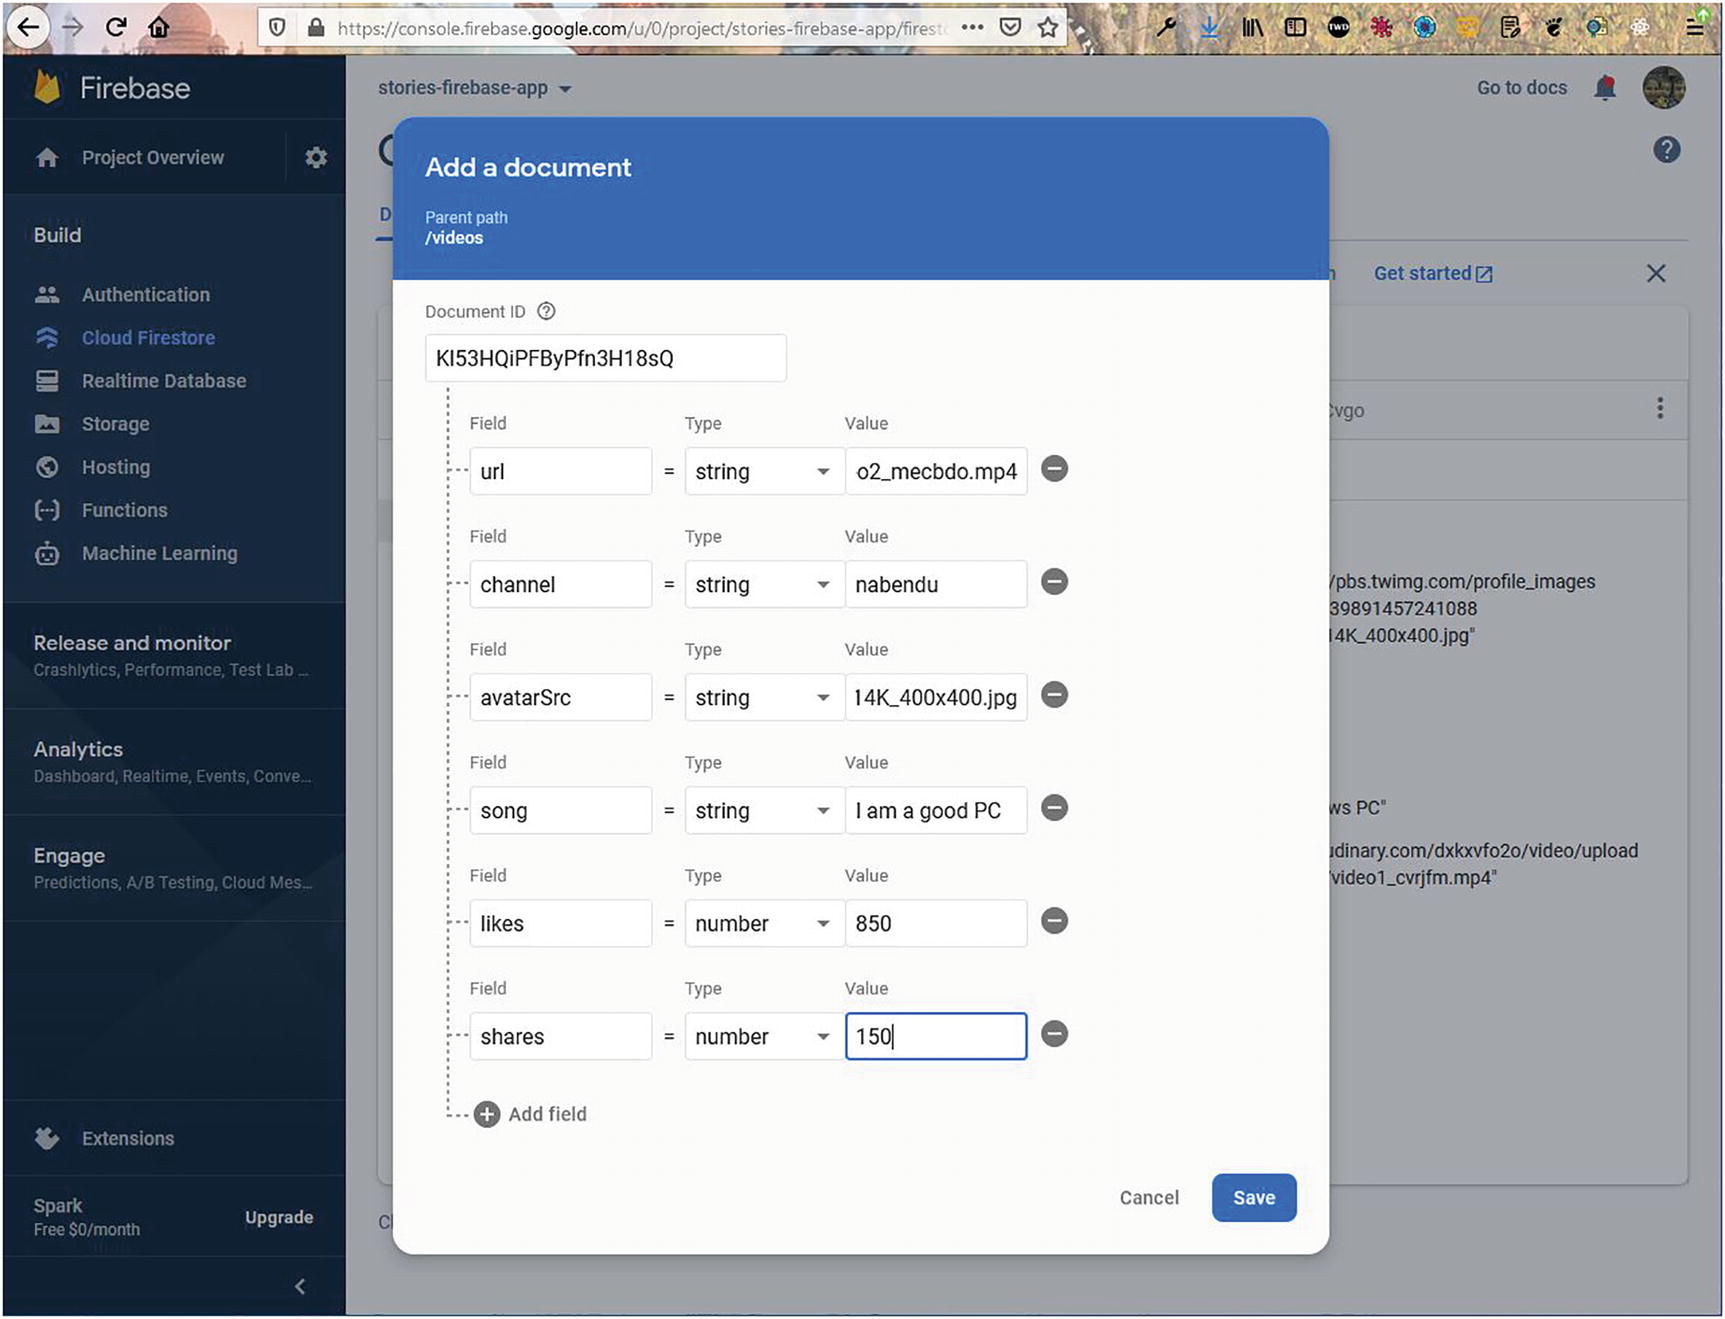
This will take us back to the main screen. Now click the Add documentlink. This will again open the same pop-up we saw earlier, where we will add the details of another video from the App.js file (Figure 3-18).
Figure 3-18
Another collection
Now, we have two videos in our database (Figure 3-19).
Figure 3-19
Two videos
Integrating the Firebase Database with React
Now, go back to App.js and create a new state called videos using the useState hook. We will then map over it and pass the parameters to the VideoCard component. Notice that we have removed the hard-coded stuff, as we will not get this data from the database. The updated content is marked in bold here:
Now, we will use the data stored in the local Firebase file in our app. After that, within useEffect, we are calling the collection videos and then taking a snapshot. In Firebase terms, this is the live data, which we will get instantly. We will then set this data in a video array, via setVideos().
Also, notice that useEffect has videos inside the array. So, anytime a new video is added in the Firebase database, it will instantly display in our app. The updated content is marked in bold here:
import { useEffect, useState } from 'react';
import './App.css';
import VideoCard from './components/VideoCard';
import db from './firebase';
function App() {
const [videos, setVideos] = useState([])
useEffect(() => {
db.collection('videos').onSnapshot(snapshot => {
setVideos(snapshot.docs.map(doc => doc.data()))
})
}, [videos])
return (
...
)
Now, our app is complete, and we are getting the data from the Firebase back end (Figure 3-20).
Figure 3-20
Getting data from database
Deploying and Hosting Through Firebase
Now, we can deploy our app in Firebase. We just follow the same steps as described earlier.
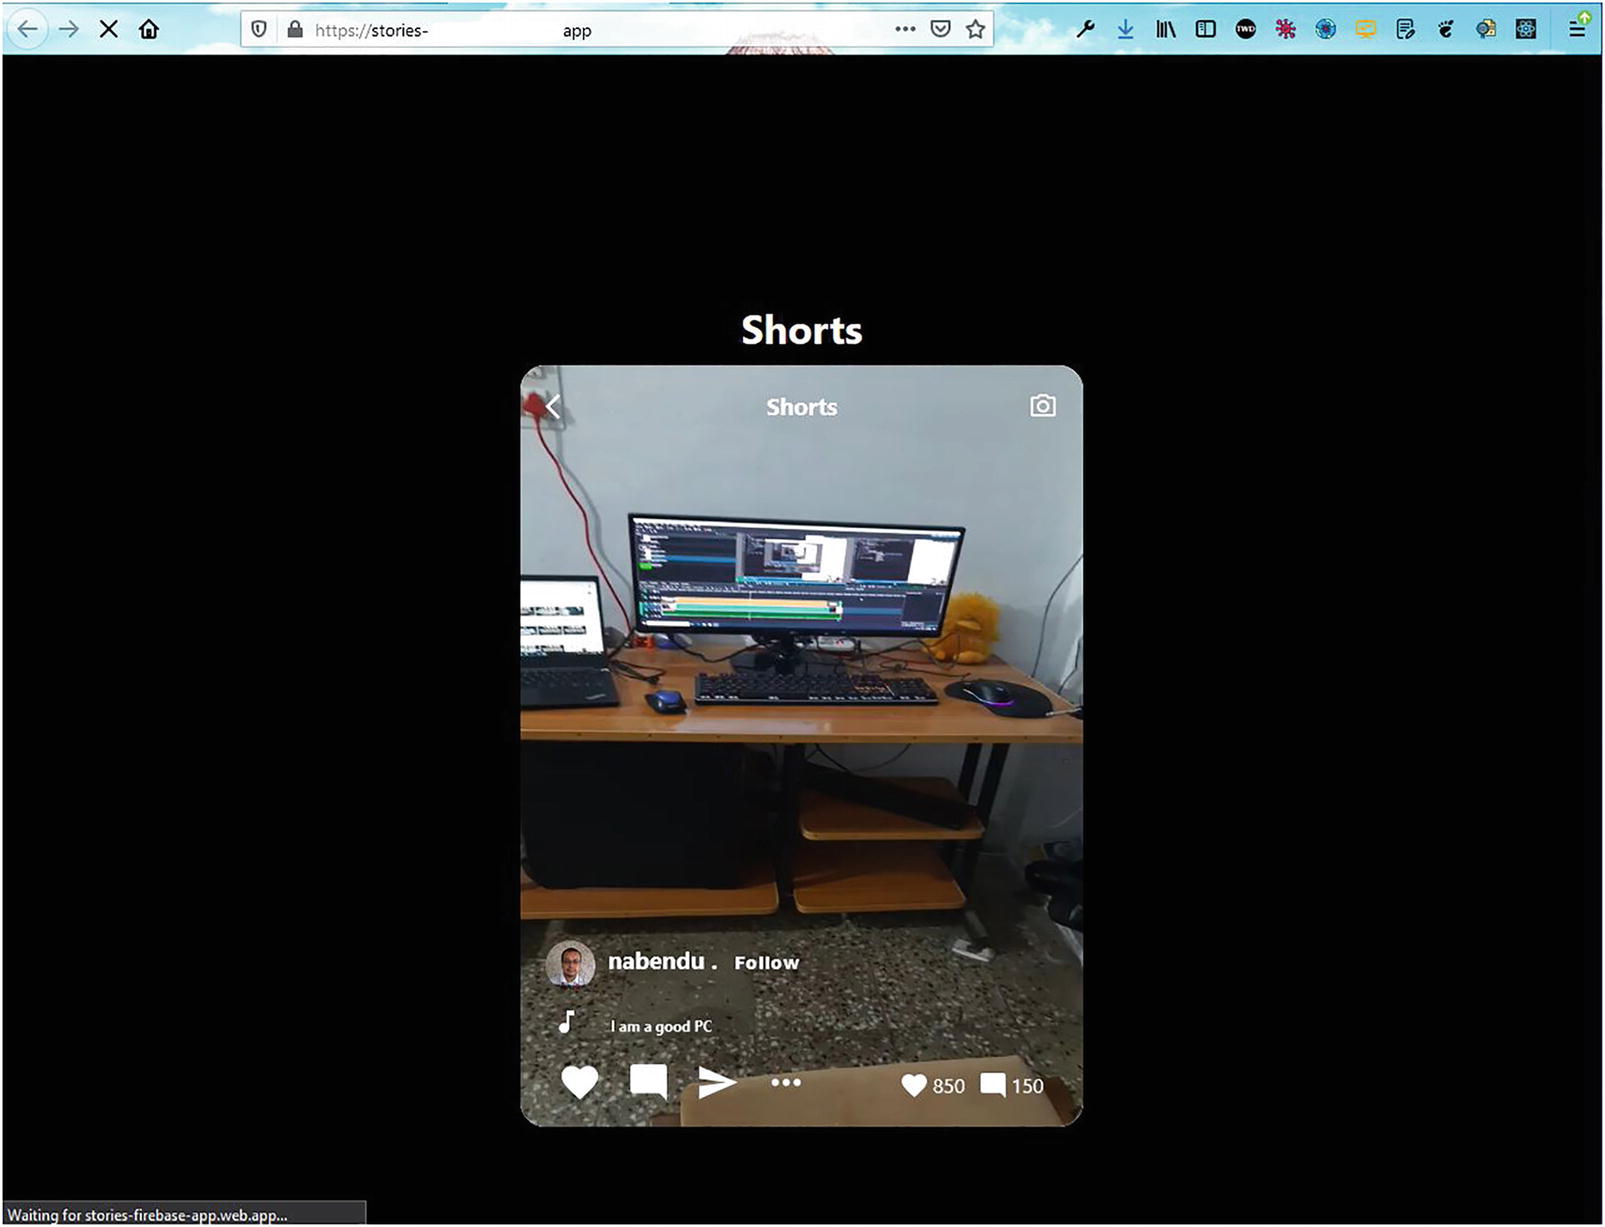
The deployment was successful, and our app is working properly (Figure 3-21).
Figure 3-21
Deployed app
Summary
In this chapter, you learned how to create a stories video app. The data for the app is stored in the Firebase Firestore database, and it also has a nice scroll feature.