
![]()
Setting Up the Fiori Landscape
The latest version of the SAP software comes with the Fiori launchpad and Gateway services preinstalled. For older versions, you need to install Gateway and back-end Fiori components separately. This chapter covers this process, including the prerequisites and how to set up the Fiori landscape.
Older versions of SAP (ECC6 with EHP version less than 7) require two primary types of add-ons before you can set up the Fiori landscape:
- SAP NetWeaver Gateway and user interface add-ons
- The NetWeaver Gateway version for SAP ERP with NetWeaver 7.31 or less should be NetWeaver Gateway 2.0 SP 06 with add-on IW_DEP 200 and SAP Notes 1799722 and 1805831. (You can check this link to find out how to search for SAP Notes relevant to your system version: https://scn.sap.com/community/mobile/blog/2013/06/25/sap-fiori-ll03--apply-all-sap-notes-before-implementation.)
- You should also have SAP NetWeaver AS ABAP 7.00 SPS21 or above with SAP Note 1774246 (prerequisites for this note are 1799549, 1805986, 1754533, and 1809628).
- Back-end system add-ons (for ECC, SRM, CRM, and so on).
You can configure the Fiori landscape as an embedded or hub-based system. SAP Gateway is on a separate system that is connected to the respective back-end system. This chapter covers the hub-based system configuration.
Prerequisites for the Front-End Server (SAP NetWeaver Gateway)
Table 2-1 shows the SAP NetWeaver Gateway 2.0 components for the SAP NetWeaver installation.
Table 2-1. SAP Gateway Components
|
Prerequisite |
NetWeaver Product Version |
Software Components |
|---|---|---|
|
SAP NetWeaver 7.0 for SAP EhP1 |
Gateway Server Core NW 700/701 |
GW_CORE 190 SAP IWFND 240 |
|
Gateway PGW |
IW_PGW 100 IW_PGW 200 | |
|
SAP NetWeaver 7.0 for SAP EhP2 |
Gateway Server Core NW 702 |
GW_CORE 200 SAP IW FND 250 SAP WEB UIF 7.01 |
|
Gateway PGW |
IW_PGW 100 IW_BEP 200 | |
|
SAP NetWeaver 7.0 for SAP EhP3 |
Gateway Server Core NW 703/731 |
GW_CORE 200 SAP IW FND 250 SAP WEB UIF 7.31 |
|
Gateway PGW |
IW_PGW 100 IW_BEP 200 | |
|
SAP NetWeaver 7.4 |
Gateway Server is a built-in part of NetWeaver 7.4. |
GW_FND 740 |
|
Gateway PGW |
IW_PGW 100 |
User Interface Add-on Components
Table 2-2 lists user interface add-on components for the SAP NetWeaver installation. These components are relevant only for NetWeaver versions prior to SAP NetWeaver 7.4.
Table 2-2. UI Add-On Components for SAP NetWeaver
|
SAP NetWeaver Version |
Required UI Software Components |
Support Package Level |
|---|---|---|
|
All installations prior to SAP NetWeaver 7.4 |
UI_INFRA 100 UI2_700 100 UI2_FND 100 UI2_SRVC 100 UISAPUI5 100 |
SP06 |
|
SAP EhP1 for SAP NetWeaver 7.0 or higher |
UI2_701 100 UI2_702 100 |
SP06 |
|
SAP EhP3 for SAP NetWeaver 7.1 or higher SAP EhP1 for SAP NetWeaver 7.3 or higher |
UI2_731 100 |
SP06 |
Prerequisites for the Back-End Server for SAP ERP
Table 2-3 lists the SAP NetWeaver Gateway 2.0 components for the SAP NetWeaver installation.
Table 2-3. SAP NetWeaver Gateway 2.0 Components
|
Prerequisites |
|---|
|
SAP NetWeaver 7.0 SPS 21 or higher |
|
For SAP Fiori apps based on SAP ERP:
|
|
ERP installations prior to SAP NetWeaver 7.4:
|
Initial Configuration
After you set up the SAP Gateway, UI add-ons, and the back-end server add-ons, you can begin your Fiori configuration:
- Create Fiori users, and assign authorizations.
- Connect the SAP NetWeaver Gateway with the back-end SAP suite.
- Configure Web Dispatcher (required only for fact sheets and analytical apps).
- Set up the Fiori launchpad and the launchpad designer.
Creating Fiori Users and Assigning Authorizations
Before you can start using Fiori, you need to set up two primary types of users: admin users and end users. These users must be created in both the front-end server and the respective back-end SAP suite. Follow these steps:
- Log in to the front-end server (SAP Gateway server).
- Execute the following transaction: SU01.
- In this example, you create two users named FIORI_ADMIN (see Figure 2-1) and FIORI_USER. Log in to the SAP back-end suite (SAP ECC, SRM, CRM, and so on), and create these users.
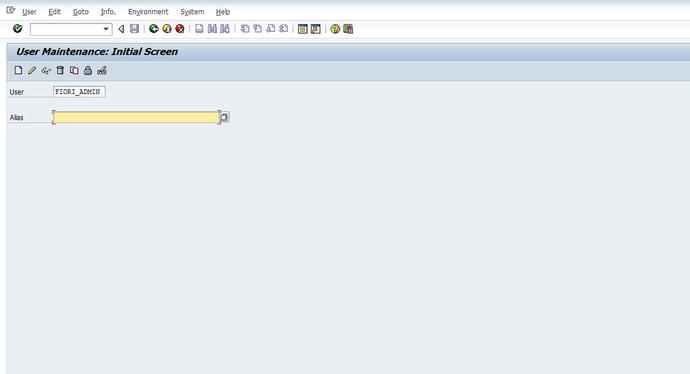
Figure 2-1. SAP transaction User Maintenance SU01
Once you’ve created the users, you need to give them the authorizations that make them admin and end users:
- Log in to the front-end server (SAP Gateway server).
- Execute the transaction PFCG (see Figure 2-2).
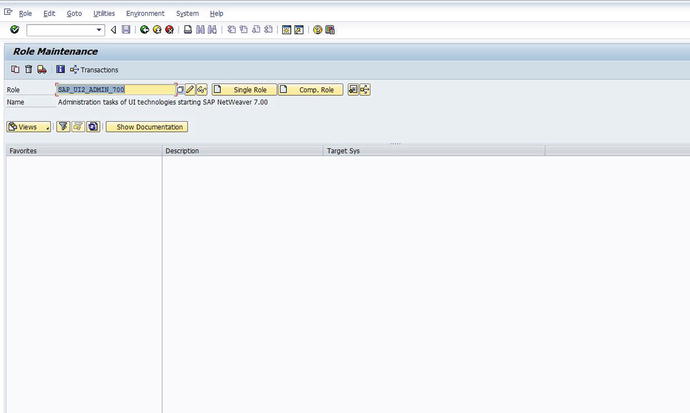
Figure 2-2. Role Maintenance PFCG transaction
- Under Role Maintenance, make a copy of the role SAP_UI2_ADMIN_700 (see Figure 2-3).
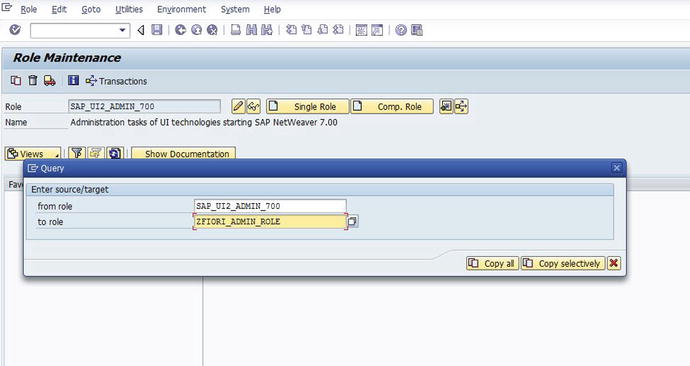
Figure 2-3. Making a custom role for the admin user
- On the Menu tab, click Authorization Default (see Figure 2-4). On the pop-up screen, select TADIR Service from the drop-down list.
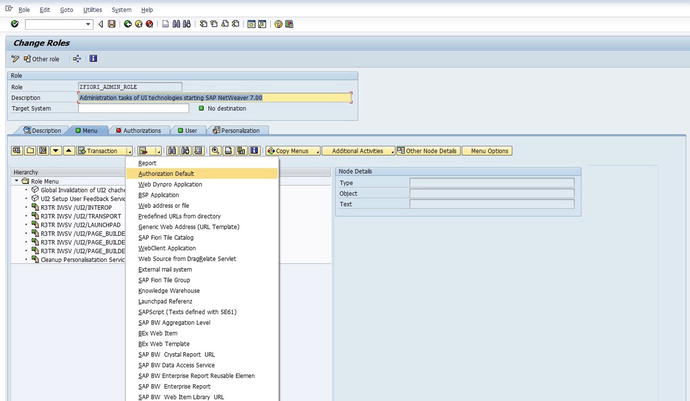
Figure 2-4. Click Authorization Default
- Make the following entries, as shown in Figure 2-5:
- Program ID: R3TR
- Object Type: IWSG Gateway: Service Groups Metadata
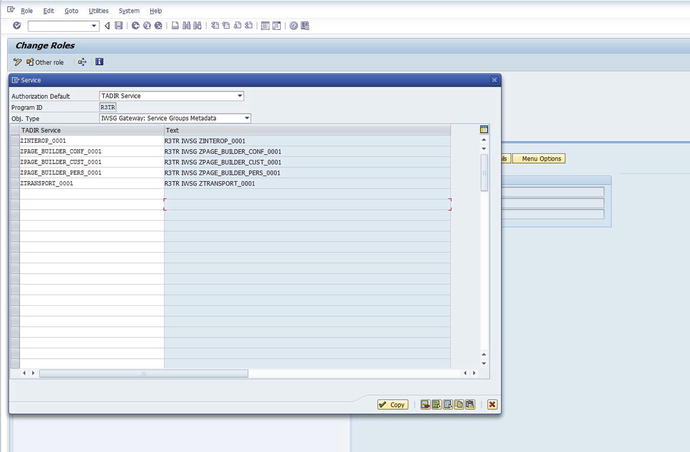
Figure 2-5. TADIR Service pop-up screen
Add the following TADIR service values:
- ZINTEROP_0001
- ZPAGE_BUILDER_CUST_0001
- ZPAGE_BUILDER_PERS_0001
- ZPAGE_BUILDER_CONF_0001
- ZTRANSPORT_0001
- Click the Copy button. On the Authorizations tab (see Figure 2-6), click Change Authorization Data. Then, click Generate (see Figure 2-7).

Figure 2-6. Authorizations tab
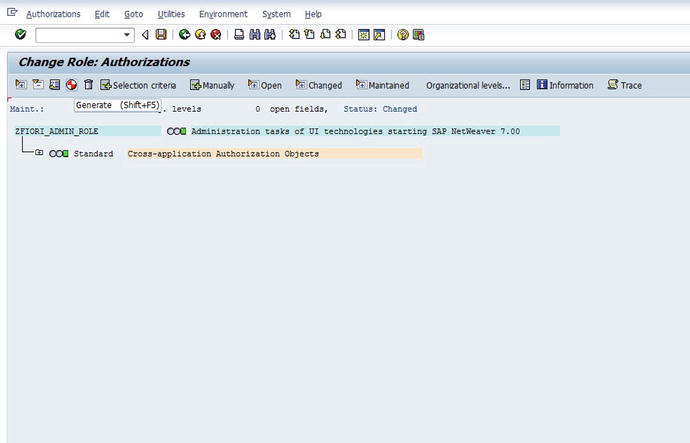
Figure 2-7. Generating authorizations
- Similarly, for the end user, copy the SAP_UI2_USER_700 role and add the TADIR service with the following values (see Figure 2-8):
- ZINTEROP_0001
- ZPAGE_BUILDER_PERS_0001
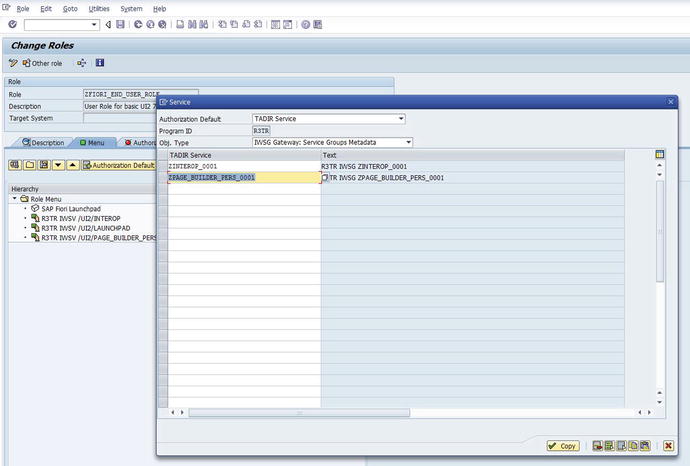
Figure 2-8. TADIR service for the end user
Once you’ve created these roles, you need to assign them to FIORI_ADMIN and FIORI_USER:
- Execute the transaction PFCG.
- Under Role Maintenance, give the custom role name you created: ZFIORI_ADMIN_ROLE.
- Go to the User tab, add the FIORI_ADMIN user to the list, and click Save (see Figure 2-9).
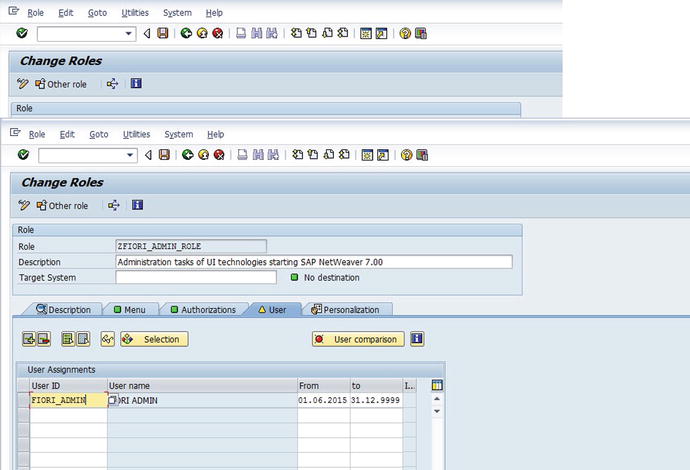
Figure 2-9. Assigning a role to the admin user
- Follow the same steps to assign ZFIORI_END_USER_ROLE to FIORI_USER (see Figure 2-10).
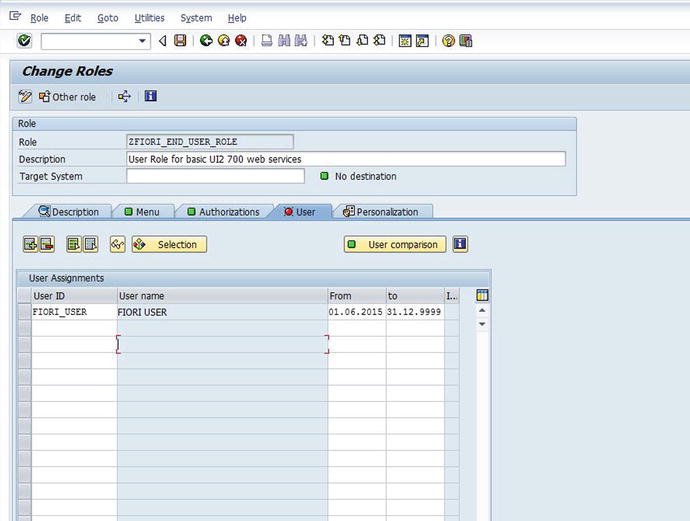
Figure 2-10. Assigning a role to the end user
Connecting SAP NetWeaver Gateway with the Back-End SAP Suite
In order to make SAP Gateway communicate with your back-end SAP system, you need to assign a few roles and set up a trusted RFC connection between the two systems.
Assigning a Role Template for Administrators (SAP Gateway System)
Here are the steps:
- Execute the transaction PFCG.
- Create a new custom role: in this example, Z_TMPL_ADMIN.
- Click Single Role.
- On the Authorizations tab, click Change Authorization Data.
- In the dialog box, select /IWFND/RT_ADMIN, and click the Adopt Reference button (see Figure 2-11).
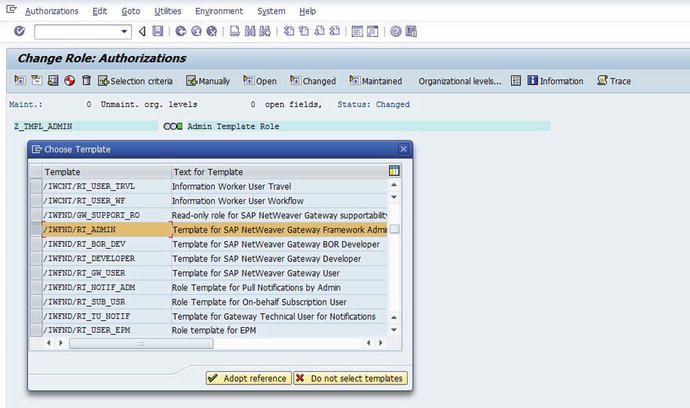
Figure 2-11. Creating an admin role template
- Click the Generate button.
- On the Users tab, add the administrative user ID.
Creating Trusted RFCs in SAP Gateway to Connect with the SAP Back-End System
In order for Fiori apps to communicate between SAP Gateway and SAP back-end systems, a trust relationship must be maintained between the systems. You can do this by configuring the SAP Gateway system as the trusting system and the SAP back-end system as the trusted system. Here are the steps:
- Execute the transaction SM59.
- Click the Create button.
- Under RFC Destination, give the destination name (preferably in the format <system id>CLNT<client>).
- In the Connection Type field, enter the value 3.
- Enter a description for the connection in the Description 1 field.
- Click Save.
- On the Technical Settings tab (see Figure 2-12), enter the values listed in Table 2-4.
Table 2-4. Technical Settings for the RFC Destination
|
Name |
Value |
|---|---|
|
Load Balancing Status |
No |
|
Target Host |
abcd.myserver.corp (server name of the back-end system) |
|
Instance No. |
00 (system number of the back-end system) |
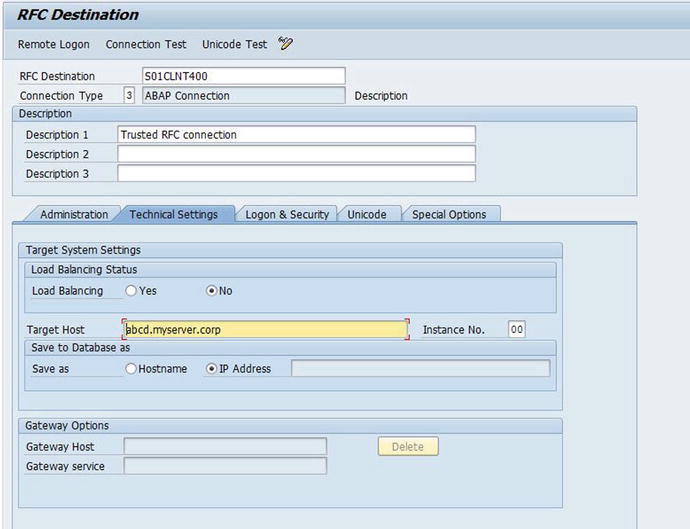
Figure 2-12. Trusted RFC technical settings
On the Logon & Security tab (see Figure 2-13), enter the values listed in Table 2-5, and then click Save.
Table 2-5. Logon & Security Settings for the RFC Destination
|
Name |
Value |
|---|---|
|
Language |
EN |
|
Client |
400 (client of the back-end system) |
|
User |
Select the Current User check box. |
|
Trust Relationship |
Yes |

Figure 2-13. Trusted RFC Logon & Security settings
Defining a Trusted Connection between the SAP Back-End System and the SAP Gateway System
Similar to the previous step, a trusted connection must be maintained in the opposite direction. In this case, you have to configure the SAP back-end system to be the trusting system and SAP Gateway as the trusted system:
- Execute the transaction SM59.
- Click Create.
- Under RFC Destination, give the destination name (preferably in the format <system id>CLNT<client>).
- In the Connection Type field, enter the value 3.
- Enter a description for the connection in the Description 1 field.
- Click Save.
- On the Technical Settings tab, enter the values listed in Table 2-6.
Table 2-6. Technical Settings for the RFC Destination between the SAP Back End and SAP Gateway
Name
Value
Load Balancing Status
No
Target Host
abcd.mygatewayserver.corp (server name of the SAP Gateway system)
Instance No.
00 (system number of the SAP Gateway system)
- On the Logon & Security tab, enter the values listed in Table 2-7, and click Save.
Table 2-7. Logon & Security Settings for the RFC Destination between the SAP Back End and SAP Gateway
Name
Value
Language
EN
Client
200 (client of the SAP Gateway system)
User
Select the Current User check box.
Trust Relationship
Yes
Now do the following in the SAP back-end system:
- Execute the transaction SMT1.
- Click Create.
- Proceed with the wizard (see Figure 2-14), and give the RFC destination name that you created to connect to the SAP gateway system. An RFC logon occurs, and the required information is exchanged between the two systems.
- Click Save.
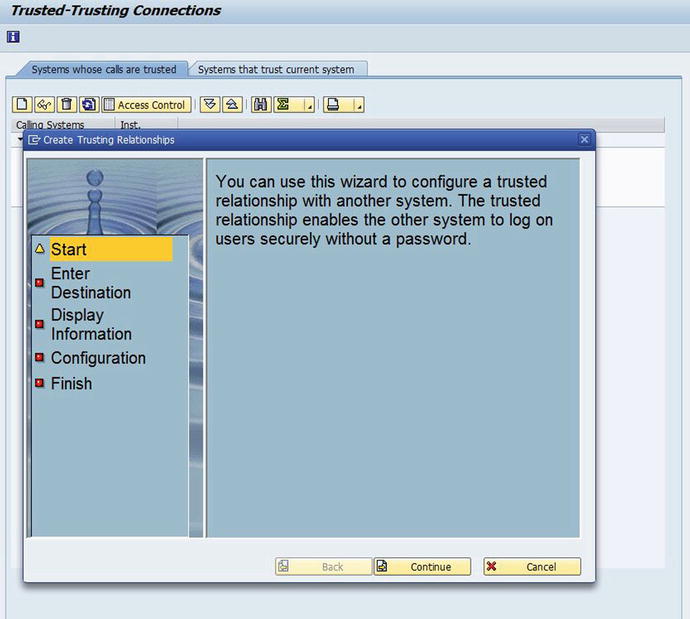
Figure 2-14. Create Trusting Relationships Wizard
A system alias is a unique name you give a system that points to other systems. You’re required to maintain system aliases so you can activate a service that resides on another system by connecting to the system based on its system alias. Follow these steps:
- Execute the transaction SPRO.
- Go to the path SAP NetWeaver
 Gateway OData Channel Configuration Connection Settings SAP NetWeaver Gateway to SAP System Manage SAP System Aliases, as shown in Figure 2-15.
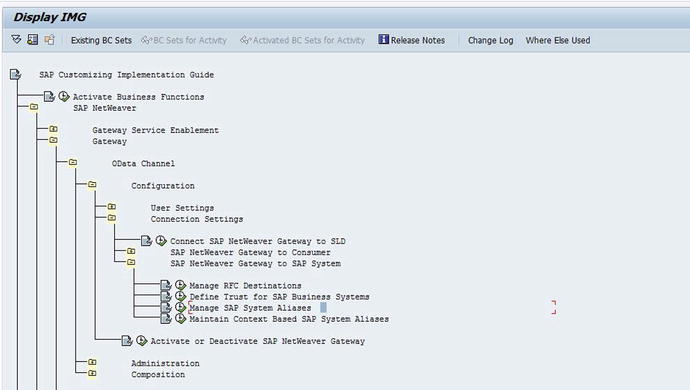
Figure 2-15. SPRO path for maintaining system aliases
- On the screen showing the list of existing entries, click New Entry (see Figure 2-16).

Figure 2-16. Creating a system alias
- Add the entry shown in Table 2-8.
Table 2-8. System Alias Settings on the SAP Gateway System to Connect with the SAP ERP System
|
Setting |
Value |
|---|---|
|
SAP System Alias |
ECCCLNT201 (RFC destination name) |
|
Description |
Description of the RFC destination |
|
RFC Destination |
ECCCLNT201 (RFC destination name) |
|
Software Version |
DEFAULT |
If the Local system alias for SAP Gateway does not exist, add the entry shown in Table 2-9 (see Figure 2-17).
Table 2-9. Settings for the Local System Alias
|
Name |
Value |
|---|---|
|
SAP System Alias |
LOCAL |
|
Description |
Local System Alias |
|
Local GW |
Select the Local GW check box. |
|
RFC Destination |
NONE |
|
Software Version |
DEFAULT |

Figure 2-17. Creating a default local system alias
Activating SAP Gateway
In the Gateway front-end server, you need to activate Gateway. Follow these steps:
- Execute the transaction SPRO.
- Go to path SAP NetWeaver Gateway OData Channel Configuration Connection Settings Activate or Deactivate SAP NetWeaver Gateway (see Figure 2-18).
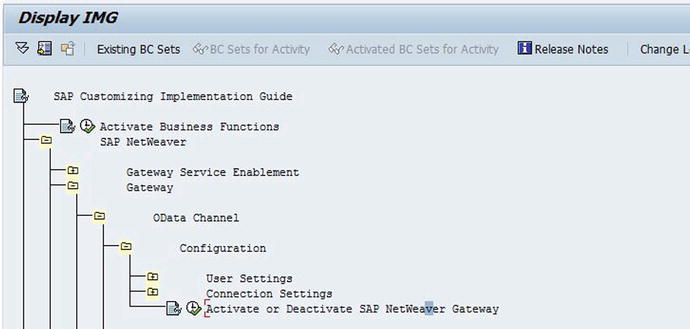
Figure 2-18. Activating SAP Gateway
Configuring SAP Web Dispatcher
SAP Fiori apps connect to multiple SAP back-end systems. But these apps are based on the HTML5 framework and JavaScript. When they access multiple back-end systems, the apps are blocked by a same-origin-policy error. To overcome this issue, you can use SAP Web Dispatcher to combine all the back-end hostnames/IPs, ports, and so on in a single origin. Doing so also provides a certain level of security. SAP Web Dispatcher is not mandatory for Fiori transactional apps, but it is mandatory for fact sheets and analytical apps. Web Dispatcher must be configured as an SSL client.
Because Web Dispatcher is a big topic, this section covers only the parts of the configuration that are related to Fiori. Follow these steps:
- Edit the instance profile of the Web Dispatcher: WDP_W<InstanceNumber>_<hostname>.
- To enable the HTTPS protocol for Web Dispatcher, install the sapcrypto.dll file. Make the entries listed in Table 2-10 in the Web Dispatcher instance profile.
Table 2-10. Settings for Web Dispatcher
Parameter
Value
DIR_INSTANCE
<SECUDIR_Directory>
ssl/ssl_lib
<Location_of_SAP_Cryptographic_Library>
ssl/client_pse
<Location_of_SSL_server_PSE>
ssl/server_pse
< Location_of_SSL_client_PSE >
wdisp/ssl_encrypt
1
wdisp/ssl_auth
1
wdisp/add_client_protocol_header
1
wdisp/ping_protocol
https
icm/HTTPS/verify_client
1
Enter the values listing in Table 2-11 in the ICM ports.
Table 2-11. ICM Port Settings
|
Parameter |
Value |
|---|---|
|
icm/server_port_0 |
PROT=HTTPS,PORT=<Web Dispatcher Port>,TIMEOUT=120 |
Include the parameters from Table 2-12 in the Web Dispatcher routes profile.
Table 2-12. Routes Profile Settings
|
Parameter |
Value |
|---|---|
|
wdisp/system_0 |
SID=<Front-End SID>, MSHOST=<Front-End Hostname>, MSPORT=<Front-End Messaging Port>, SRCSRV=*:<Web Dispatcher Port>,SRCURL=/sap/opu/;/sap/public/;/sap/bc/;/sap/saml2/;/ui2/nwbc/, CLIENT=<Front-End client> |
|
wdisp/system_1 |
SID=<Back-End SID>, MSHOST=<Back-End Hostname>, MSPORT=<Back-End Messaging Port>, SRCSRV=*:<Web Dispatcher Port>,SRCURL=/sap/es/, CLIENT= <Back-End client> |
|
wdisp/system_2 |
SID=<HANA SID>, EXTSRV=<HANA XS URL>,SRCSRV=*:<Web Dispatcher Port>,SRCURL=/sap/hba/;/sap/hana/;/sap/bi/;/sap/viz/;/sap/vi/;/sap/ui5/ |
After making these changes, you can test the Web Dispatcher using the following URL in your browser: https://<Web Dispatcher Hostname> :<Web Dispatcher Port>/sap/admin/public/default.html.
Setting Up the Fiori Launchpad, Fiori Launchpad Designer, and Fiori Admin Page
You need to activate the OData services required for the launchpad to communicate with and fetch business data from the SAP back-end servers. Follow these steps:
- Log on to the SAP Gateway Server (front-end server).
- Execute the transaction SPRO.
- Go to the path SAP NetWeaver Gateway OData Channel Administration General Settings Activate and Maintain Services (see Figure 2-19).

Figure 2-19. Activating OData services for the launchpad
- Click the Add Service button.
- Select Local as the System Alias.
- From the list of services displayed, select the technical service /UI2/LAUNCHPAD.
- In the Add Service dialog box, enter the package name and choose ICF Node as Standard Mode.
- Add the technical services listed in Table 2-13.
Table 2-13. Settings for the ICF Node
|
Technical Service Name |
Description |
|---|---|
|
/UI2/PAGE_BUILDER_CONF |
Page Builder - Configuration Level |
|
/UI2/PAGE_BUILDER_CUST |
Page Builder - Customizing Level |
|
/UI2/PAGE_BUILDER_PERS |
Page Builder - Personalization Level |
|
/UI2/INTEROP |
Gateway Service of Interoperability |
|
/UI2/TRANSPORT |
UI2: Transport Service |
You need to activate the ICF nodes related to Fiori in order to access the relevant Fiori URLs. Here are the steps:
- Execute the Transaction SICF.
- Select the services in Tables 2-14, 2-15, and 2-16; click Maintain Service; and activate each of those services (see Figure 2-20).
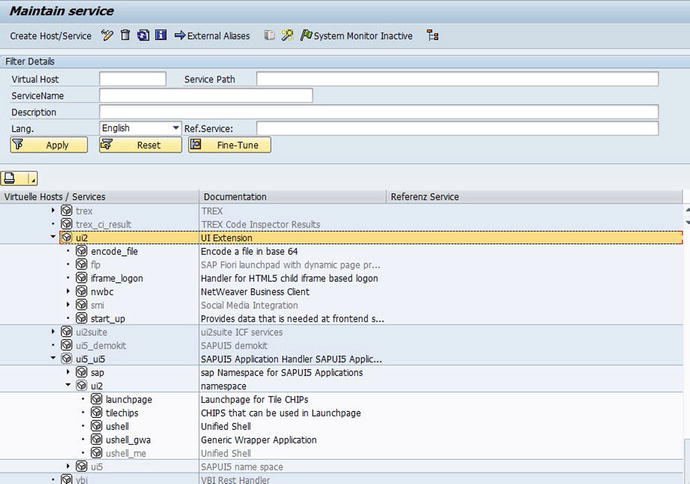
Figure 2-20. The SICF transaction
- Go to /default_host/sap/bc/, and activate the nodes listed in Table 2-14.
Table 2-14. Nodes to Activate for the Fiori Launchpad
ICF Node Path
/sap/bc/ui2/start_up
/sap/bc/ui2/nwbc/
- Go to /default_host/sap/bc/ui5_ui5/, and activate the nodes listed in Table 2-15.
Table 2-15. Nodes to Activate for the Fiori Launchpad
ICF Node Path
/sap/bc/ui5_ui5/ui2/ushell
/sap/bc/ui5_ui5/sap/arsrvc_upb_admn
/sap/bc/ui5_ui5/sap/ar_srvc_news
/sap/bc/ui5_ui5/sap/ar_srvc_launch
- Go to /default_host/sap/public/bc/, and activate the nodes listed in Table 2-16.
Table 2-16. Nodes to Activate for the Fiori Launchpad
|
ICF Node Path |
|---|
|
/sap/public/bc/ui5_ui5/ |
|
/sap/public/bc/ui2/ |
|
/sap/public/bc/icf/logoff |
Configuring the Logon Screen for the Fiori Launchpad and Fiori Launchpad Designer (Admin page)
Initially, the Fiori logon page does not have a default background image or theme. To make the Fiori logon page appear as shown in Figure 2-21, you need to do some configuration in SICF. Follow these steps:
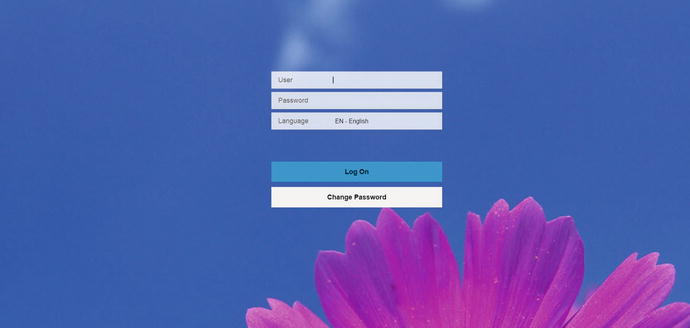
Figure 2-21. Fiori logon screen
- Log in to SAP Gateway (front-end server).
- Execute the transaction SICF.
- Go to the path /sap/bc/ui5_ui5/ui2/ushell, and double-click ushell.
- Click the Error Pages tab (see Figure 2-22).
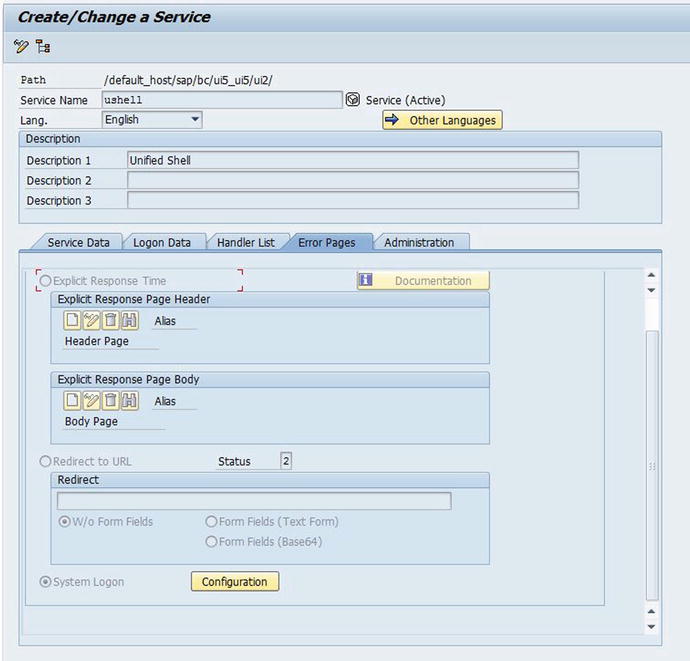
Figure 2-22. Fiori launchpad page configuration
- Choose System Logon, and then click the Configuration button.
- In the dialog box, select Custom Implementation. In the ABAP Class field, enter the value /UI2/CL_SRALOGIN (see Figure 2-23).
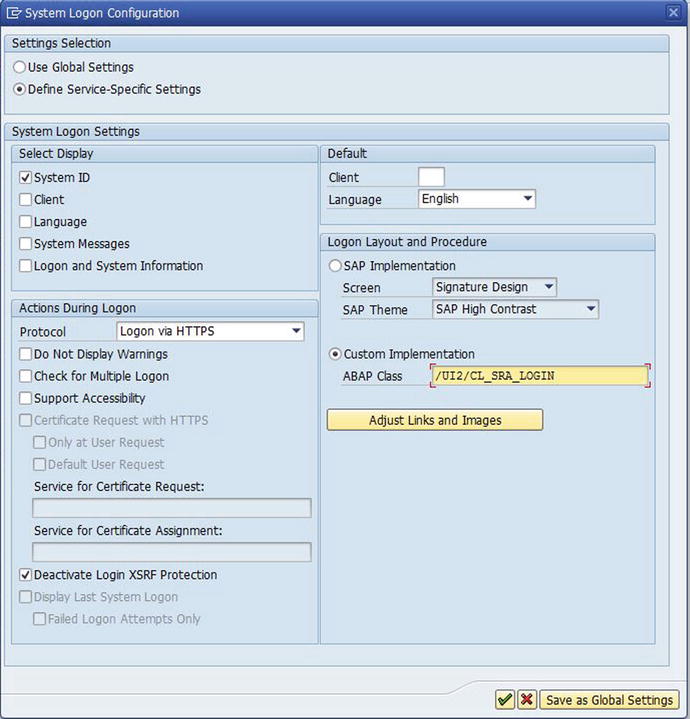
Figure 2-23. Fiori launchpad logon configuration
- Click Save.
- For the Admin page and Fiori Launchpad Designer page, go to the path /sap/bc/ui5_ui5/sap/arsrvc_upb_admn and perform the same configuration steps.
When a user logs out from the Fiori launchpad, a logoff page is displayed. This particular page can be replaced with any custom page you wish. Here are the steps:
- Execute the transaction SICF.
- Go to the path /default_host/sap/public/bc/icf/logoff.
- Double-click the logoff service.
- Click the Change icon.
- On the Error Pages tab, select the Logoff Page tab.
- Select the option Redirect to URL, and enter the custom logoff page URL (see Figure 2-24).
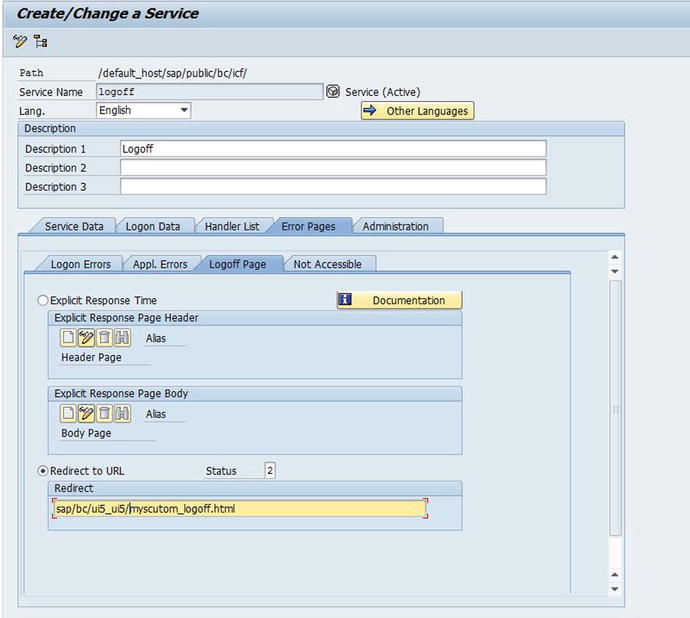
Figure 2-24. Customizing the Fiori logoff page
In NetWeaver 7.4, you can automate some of the manual configuration steps by using a predefined task list. The task list must be carried out in the order shown in Table 2-17.
Table 2-17. Predefined Task List for NetWeaver 7.4
|
Task List |
Manual Configuration Steps Automated Using the Task List |
|---|---|
|
SAP_GATEWAY_BASIC_CONFIG |
Activating SAP NetWeaver Gateway |
|
SAP_FIORI_LAUNCHPAD_INIT_SETUP |
Activating the launchpad OData services |
|
Configuring ICF nodes | |
|
SAP_SAP2GATEWAY_TRUSTED_CONFIG |
Creating trusted RFCs in NetWeaver Gateway to the SAP business suite |
|
Defining trust RFCs between the SAP business suite and SAP NetWeaver Gateway | |
|
SAP_GATEWAY_ADD_SYSTEM |
Creating system aliases |
|
SAP_BASIS_SSL_CHECK |
No equivalent manual step |
You can download Fiori app-specific add-ons from the SAP Service Marketplace at http://service.sap.com/support and install them using the SAINT t-code. From the SAP Service Marketplace, navigate to Software Download ![]() Installation and Upgrades
Installation and Upgrades ![]() A-Z Index
A-Z Index ![]() F
F ![]() SAP Fiori
SAP Fiori ![]() SAP Fiori for Suite. Here, you can download all the Fiori apps for ERP, CRM, SRM, EHS, and so on.
SAP Fiori for Suite. Here, you can download all the Fiori apps for ERP, CRM, SRM, EHS, and so on.
The most common Fiori apps are the transactional apps for ERP (found under FIORI ERP APPLICATIONS X2, as shown in Figure 2-25). You can find further details for configuring these add-ons at https://fioriappslibrary.hana.ondemand.com/sap/fix/externalViewer/.

Figure 2-25. Fiori app-specific add-ons
The next chapter discusses the Fiori launchpad and Fiori app configuration in detail.