
![]()
Customizing and Extending Standard Fiori Applications
Fiori standard apps are not always accepted by customers as is. Sometimes developers need to extend or modify an application according to meet the customer’s requirements. SAP Fiori has an enhancement framework that makes this task easier. In this chapter, you learn how to customize and extend the standard Fiori apps.
Installing Eclipse and UI5 Add-Ons
This chapter looks at the steps involved in extending and customizing a standard SAP Fiori app. The two primary IDEs currently used for Fiori development and customization are as follows:
- Eclipse-based IDEs (Juno, Kepler, or Luna)
- Web IDEs (on premises or cloud-based)
To extend a standard app, you need to use the Eclipse Juno 32-bit or 64-bit version. You can go to this web page to download Eclipse:
www.eclipse.org/downloads/packages/eclipse-ide-java-ee-developers/marsr
After installing Eclipse, you need to install the SAP UI5 add-ons to Eclipse. To do so, open Eclipse and then follow these steps.
- Go to Help
 Install New software, and enter the URL https://tools.hana.ondemand.com/juno to install the UI add-on as shown in Figure 4-1.
 - Select the UI Development Toolkit For HTML5 check box.
- Click Next, and install the add-on.
- Eclipse prompts you to restart after installing the add-ons. Restart Eclipse, and the add-ons will be successfully added.
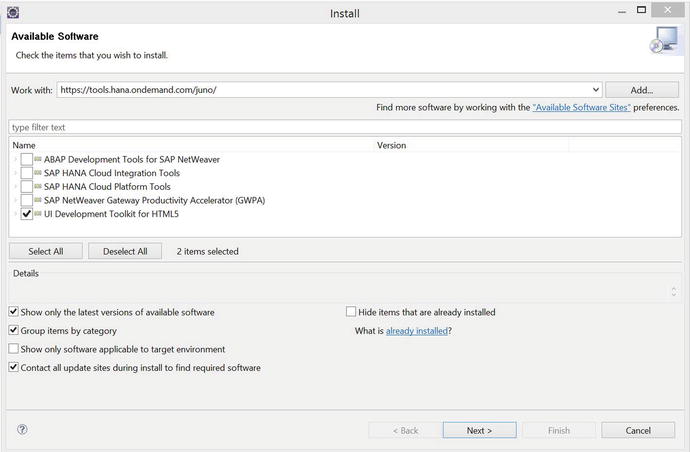
Figure 4-1. UI5 add-on screen in Eclipse
To extend the Fiori applications, we need to add the Fiori Toolkit plugin into eclipse. The fiori toolkit can be downloaded from the below site http://scn.sap.com/docs/DOC-50114. (Click on the "I Agree & Download" link on the page to start the download). Once the plugin has been downloaded open the eclipse and do the following steps to install it :
- Go to Help Install New Software.
- Click the Add button, and then click Archive.
- Navigate to the folder where you downloaded the Fiori toolkit, and click OK.
- Select the SAP Fiori Toolkit check box.
- Click Next, accept the warning and license agreement, and click Finish.
- Restart Eclipse to complete the installation
Since SAP released Web IDE, the Fiori toolkit add-on version 1.1.4 for Eclipse is no longer being updated. Currently, Eclipse Luna gets the latest Fiori UI5 library add-ons. Detailed steps for downloading and configuring Eclipse and Web IDE are presented in Chapter 6.
Downloading the Standard Fiori Application Code
This scenario uses the Track Purchase Orders standard app, as shown in Figure 4-2.
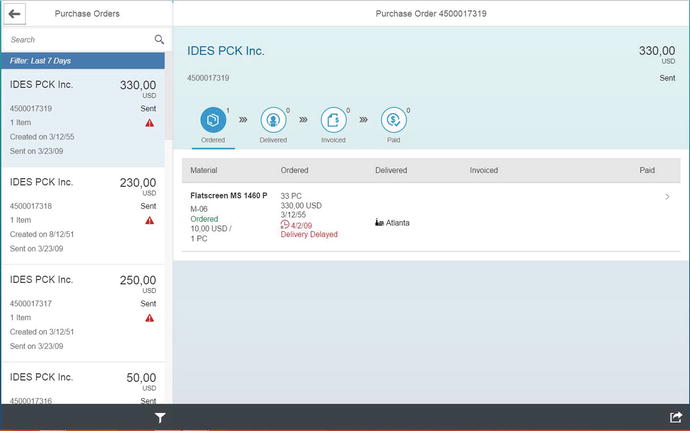
Figure 4-2. Screenshot of the standard Track Purchase Orders app
First you need to find the BSP app of the Track Purchase Order app to extend it. There are two ways to find the app source code in the system.
First, you can execute the transaction SICF, navigate to /default_host/sap/bc/ui5_ui5/sap, and search for the app manually. In this scenario, the BSP app name is mm_purord_tpo (see Figure 4-3).
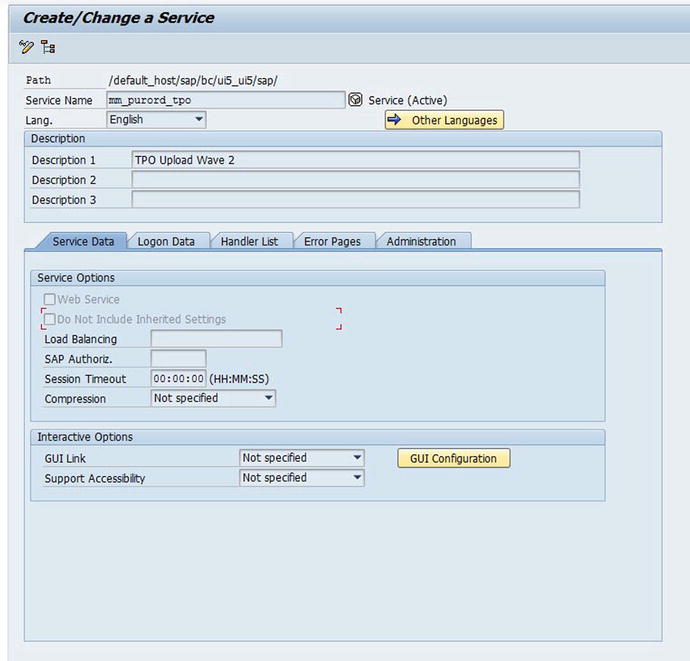
Figure 4-3. Manually searching for the BSP app
Or second, you can open the launchpad designer, and search for the Track Purchase Order app in the business catalog (see Figure 4-4). Then follow these steps:
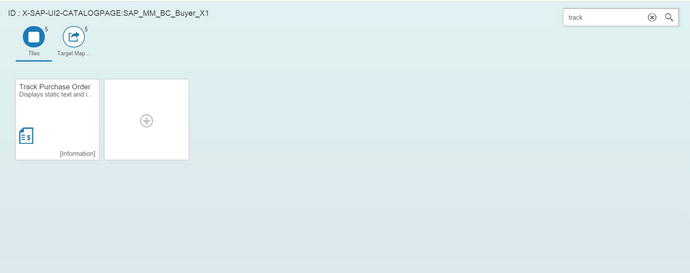
Figure 4-4. Launchpad designer catalog tiles
- Click the target-mapping icon, select the relevant target mapping, and click Configure at the bottom of the launchpad designer (see Figure 4-5).
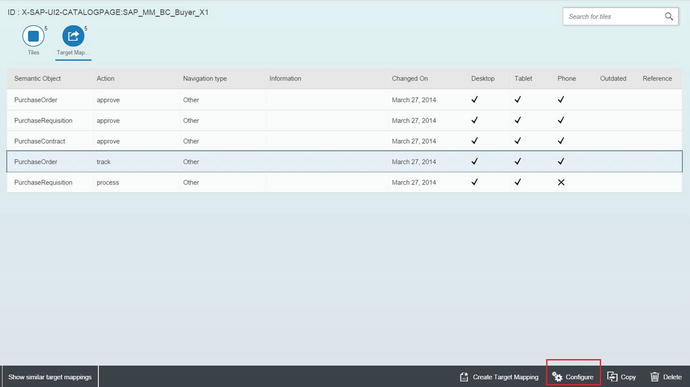
Figure 4-5. Select the target mapping
- On the target mapping configuration page, you can find the launchpad role (see Figure 4-6).
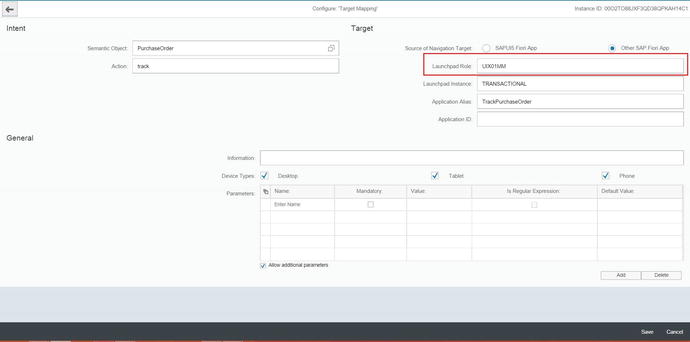
Figure 4-6. Find the launchpad role
- Go to the Gateway system, execute the transaction LPD_CUST, and search for the launchpad role (see Figure 4-7).
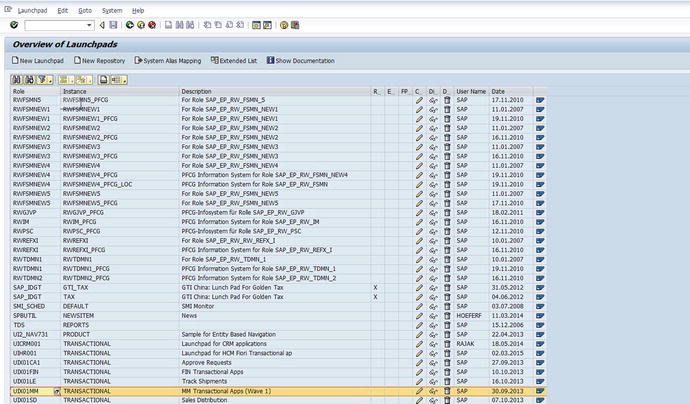
Figure 4-7. Search for the role
- Open the launchpad. In the right pane, under Application Parameter, you see the full path of the app (see Figure 4-8).
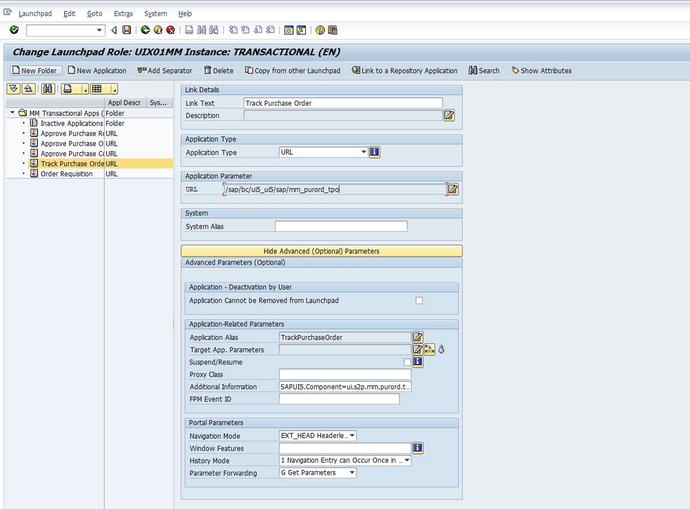
Figure 4-8. LPD_CUST launchpad settings for Track Purchase Order app
After you’ve found the app name, you need to download the app’s source code into Eclipse. SAP provides the app /UI5/UI5_REPOSITORY_LOAD to download and upload Fiori apps (both standard and custom). Follow these steps:
- Go to transaction SE38, and execute the app /UI5/UI5_REPOSITORY_LOAD (see Figure 4-9). Give your UI5 app name in the input field, select Download, and execute the app.
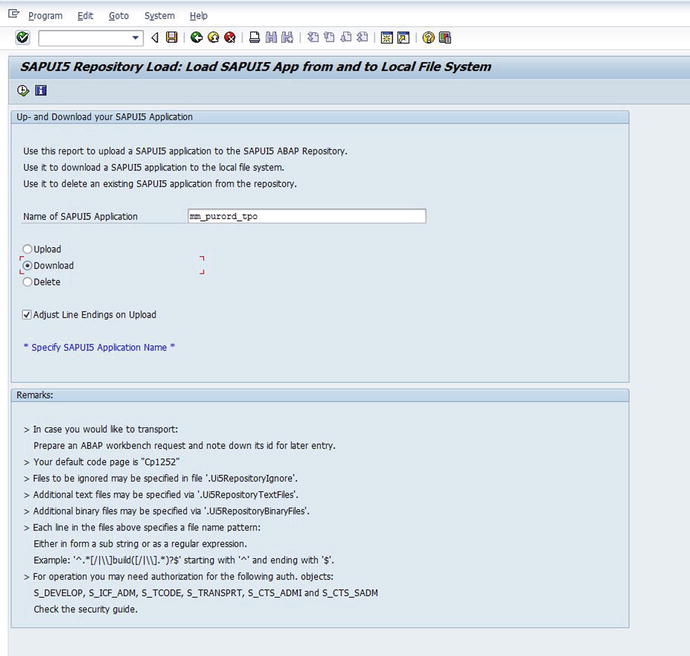
Figure 4-9. Downloading the Track Purchase Order app source code
- Select a folder on your system where you want to download the code, as shown in Figure 4-10.
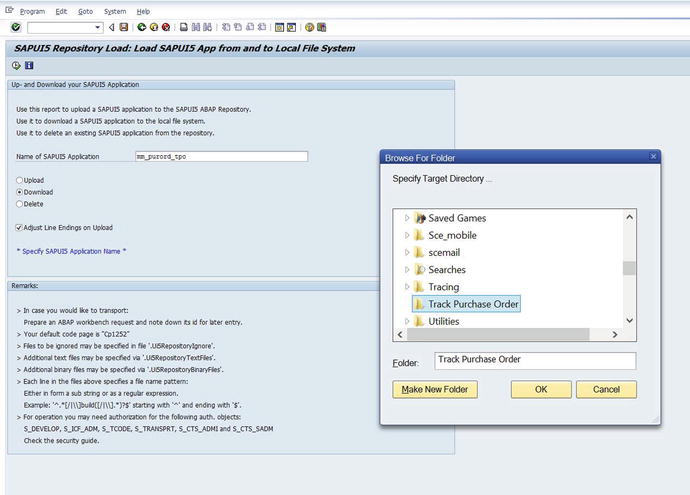
Figure 4-10. Select a destination directory
- The system asks for permission to access the folder; click Yes to allow access (see Figure 4-11). The system lists all the files that will be downloaded. Click the Click Here To Download link at the bottom of the page.
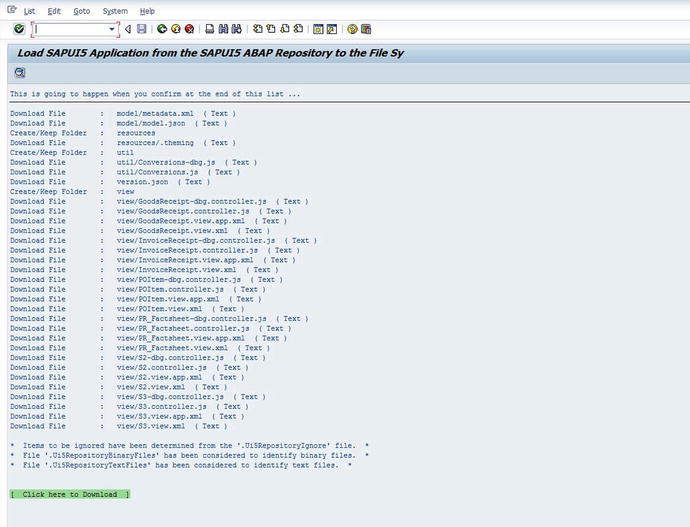
Figure 4-11. Click the Click Here To Download link
- In the pop-up, leave the External Codepage field blank, and click the checkmark button (see Figure 4-12).
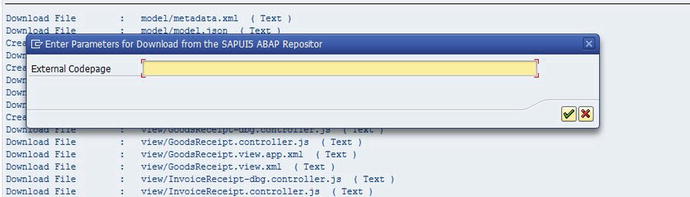
Figure 4-12. Leave this field blank
- You get a confirmation after the source code has been downloaded, as shown in Figure 4-13.
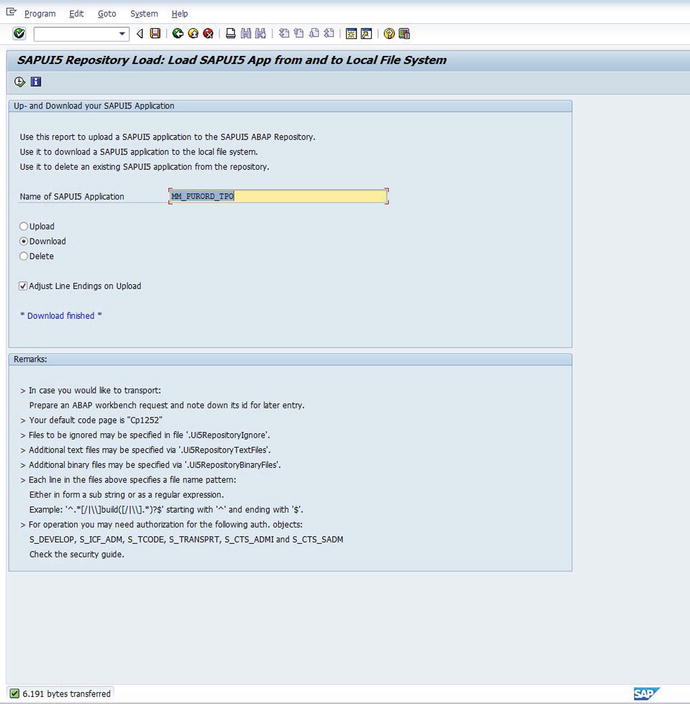
Figure 4-13. Download confirmation
Now that the app has been downloaded to your local PC, you need to import the source code into Eclipse.
Importing Fiori Standard Application Code into Eclipse
Before creating an extension Fiori extension project, you have to import into Eclipse the standard code you downloaded from the server. Here are the steps:
- Open Eclipse, and click New Other (see Figure 4-14).
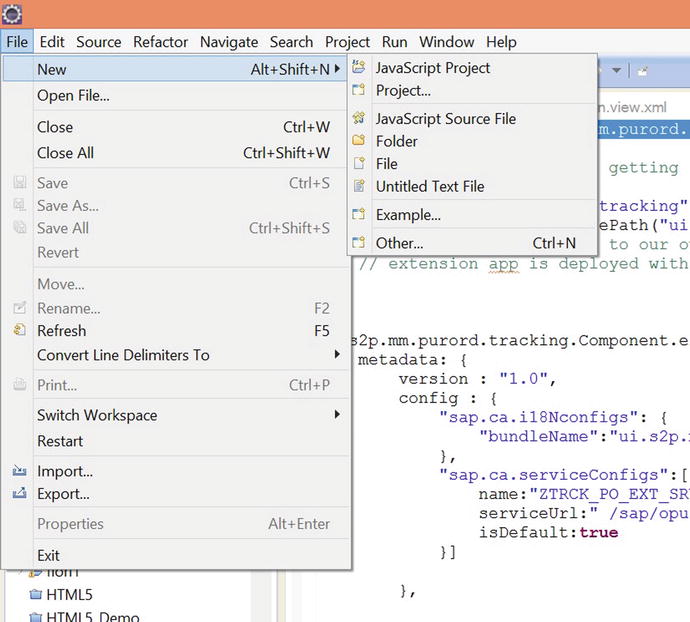
Figure 4-14. Creating a UI5 project in Eclipse
- Select Application Project in the SAPUI5 Application Development folder (see Figure 4-15).
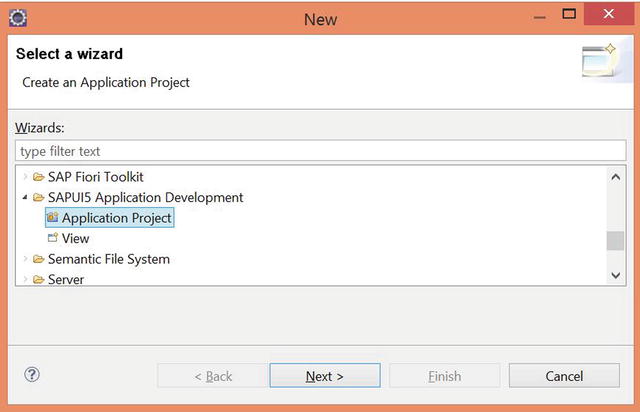
Figure 4-15. Select Application Project
- Click “Next”, on the second screen give a name for your project and uncheck the “Create an Initial View” check box and click on Finish (Refer Figure 4-16).
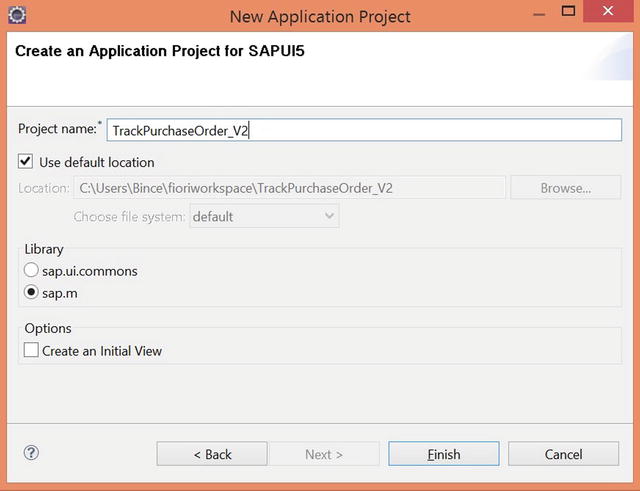
Figure 4-16. Deselect Create An Initial View
- The new project is created on the left side of Eclipse in the project explorer pane (see Figure 4-17).
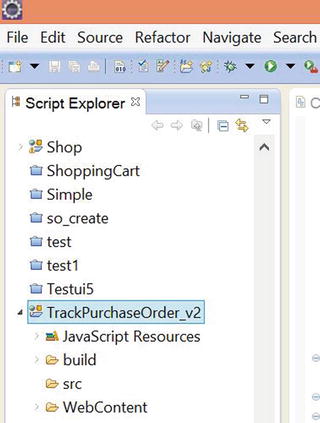
Figure 4-17. Project Explorer
- Copy the contents of the WebContent folder of the source code for the standard Fiori Track Purchase Order app you downloaded earlier (see Figure 4-18).

Figure 4-18. Standard Track Purchase Order UI5 source code
- In Eclipse, right-click the WebContent folder, and paste in the copied code (see Figure 4-19). Select Yes to All in the pop-up screen to overwrite the folder’s contents.
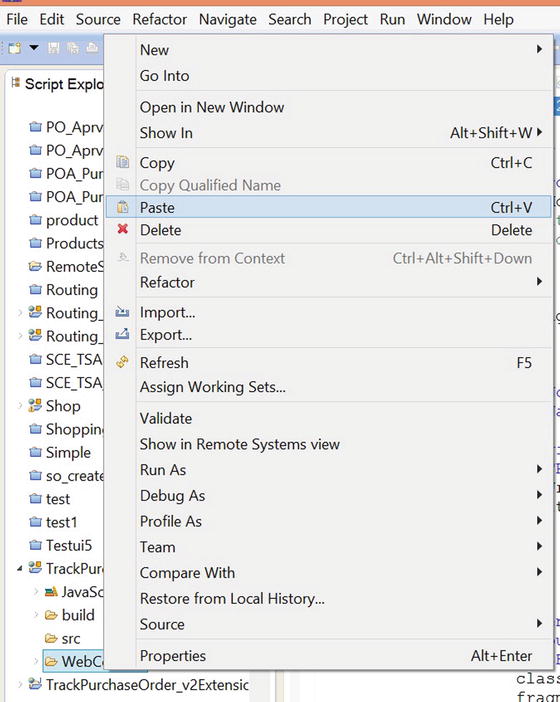
Figure 4-19. Overwriting the UI5 Eclipse Project WebContent folder with the downloaded code
- The standard app is imported into Eclipse. You can see the source code in the WebContent folder (see Figure 4-20).
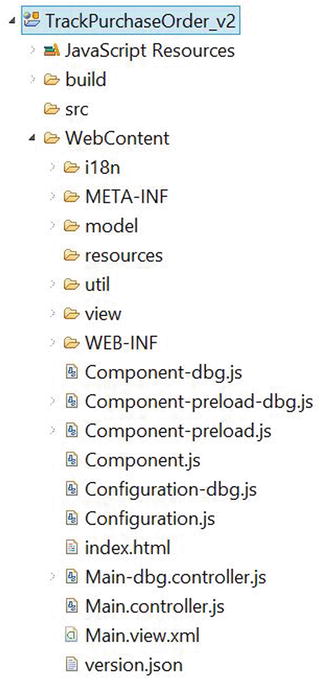
Figure 4-20. Eclipse project with the standard code
If you check one of the standard code’s views, such as S2.view.xml, you see a <core:ExtensionPoint/> tag (see Figure 4-21). This is basically a flag for the Fiori toolkit or Web IDE to find extension points where you can insert custom code into the standard code. Usually, extension points are available for Header, Maint Content, and Footer, but they may differ from view to view. Some views don’t have extension points, in which case you have the option to replace the entire view with custom code.
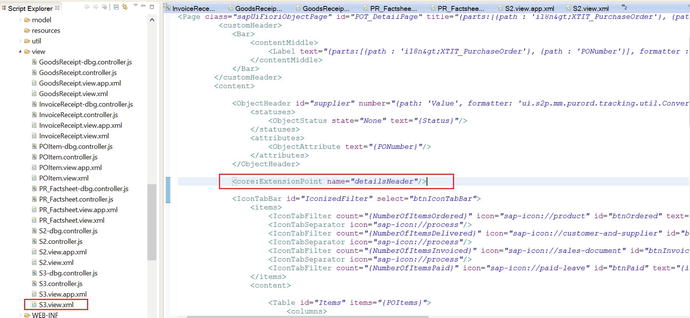
Figure 4-21. Extension points in the standard code
Similarly, you can see the *.controller.js and a *.-dbg.controller.js files for every controller of each view (see Figure 4-22). Files ending with *-dbg.controller.js are the expanded versions of the same code in the *.controller.js files. At runtime, the Fiori apps only load *.controller.js, unless you change the debugger settings to load *.-dbg.controller.js manually.
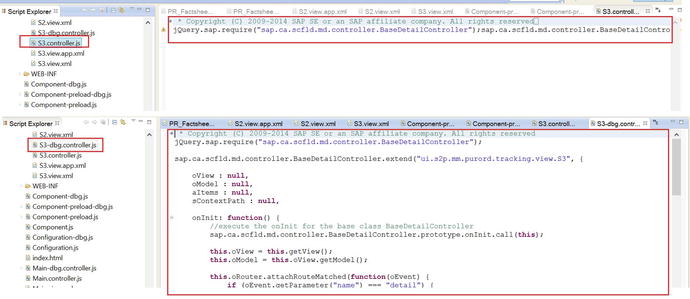
Figure 4-22. Standard app code
Also, you see Component-preload.js as well as a -dbg version (see Figure 4-23). Component-preload.j is basically a summary of all the code in controller.js for each view, configuration.js, and the component controller in the standard app project. This feature is extremely useful for Fiori client apps running on mobile devices, where space and loading time are critical.
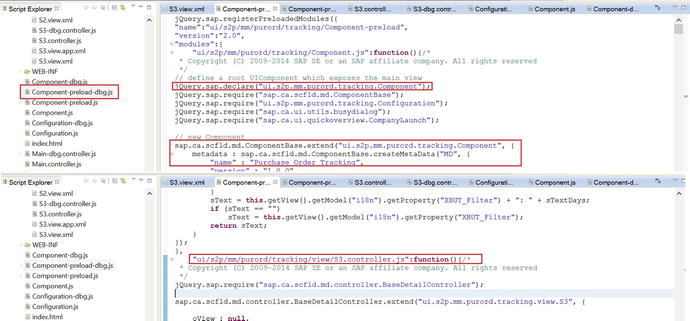
Figure 4-23. Component-preload.js
Before you create an extension project, you need a custom OData service to help bring your custom data from the back end into the extended app. To check the standard OData service that is being used by the standard app, open the Configuration-dbg.js file: the OData service name is in the service list (see Figure 4-24).
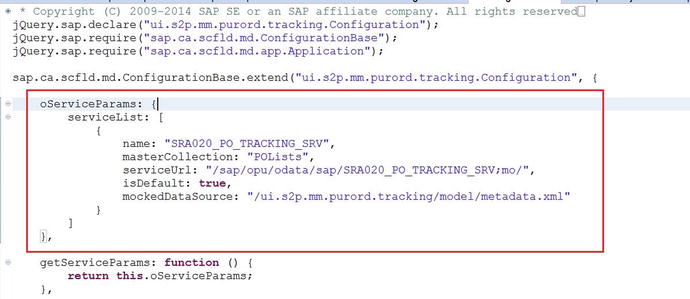
Figure 4-24. OData service name
You need to create a custom OData service for the extended app. There are two ways to do it. First, you can create a completely custom OData service for the extended app, but this is not recommended because you have to adapt all the UI code to work with the new OData service entity fields. Second, you can create a new OData project, redefine the standard OData service that’s being used by the app you want to extend, and add custom entities or add fields to existing entities.
Redefining a Standard OData Service
In this example, you redefine a standard OData service and add custom fields to the existing entity:
- Log on to the Gateway server, and execute the transaction SEGW. OData service definitions may reside on the Gateway server, but the actual class implementation for fetching the back-end business data is implemented in the respective back-end system: ECC, SRM, CRM, and so on. Click the New icon to create a new project. Name the project: in this case, name it ZTRCK_PO_EXT. Click the check mark button to create the project (see Figure 4-25).
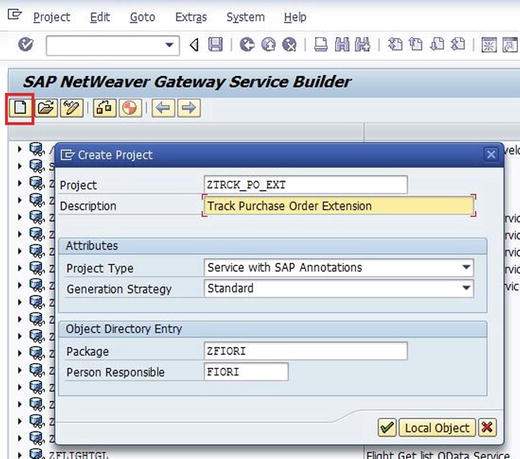
Figure 4-25. Creating a new OData project
- Right-click the data model, and navigate to Redefine OData Service (GW) (see Figure 4-26).
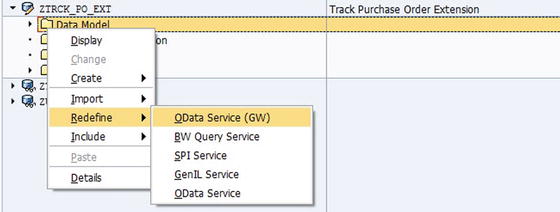
Figure 4-26. Redefining the standard OData service
- Enter the OData service name that you found in the standard app source code (see Figure 4-27). (Alternatively, you can check for OData services in /IWFND/MAINT_SERVICE).
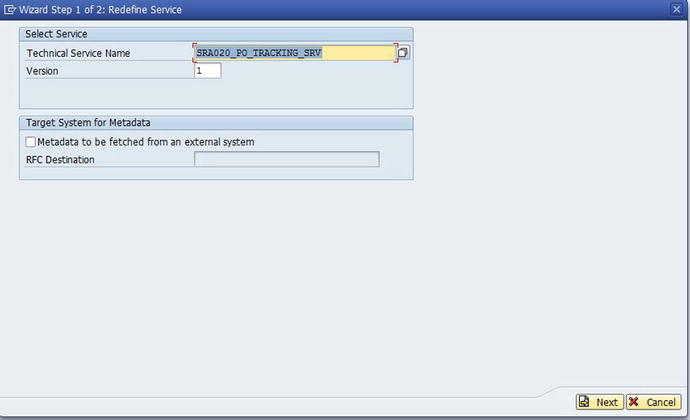
Figure 4-27. Enter the OData service name
Instead of creating a completely new OData service, you can append additional fields onto the DDIC structure the entities are using. Then use the BAdls to update the OData model provider and data provider classes to add the fields to the standard OData service (see Figure 4-28).
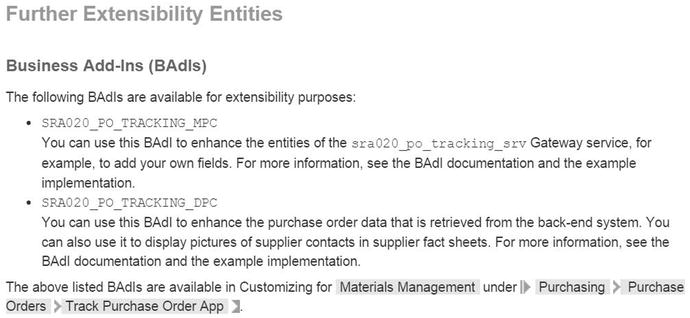
Figure 4-28. Standard BAdls for extending OData model provider and data provider classes
- In this example you don’t want change the standard app’s functionality and do want to create a custom OData service for the extended app, so you use approach that redefines the OData service. Select the entities you want to use; in this case, select all the entities so you don’t have to adapt the UI5 code to work with the limited entity sets in the custom OData service (see Figure 4-29). This way, you only need to add fields to the extended app.
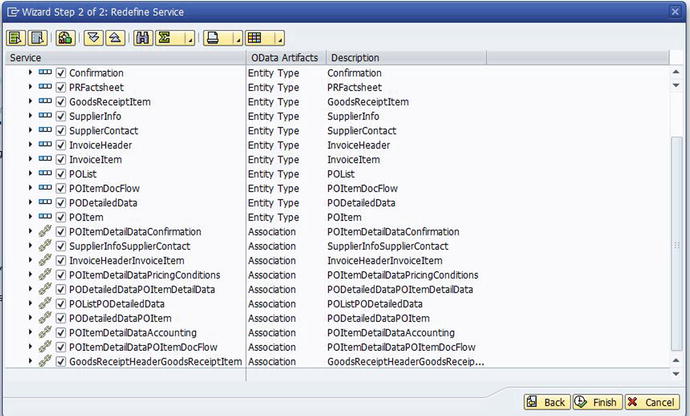
Figure 4-29. Importing entity sets from the standard OData service
- For this example, you add your custom fields to the POList entity. To find the DDIC structure associated with the entity, go to SE80, and, under Package, enter the package name P_SRA020_ODATA. In the Structures folder, you see the SRA20_S_PO_LIST structure. Double-click the structure, click the GoTo button, and select Append Structure, as shown in Figure 4-30.
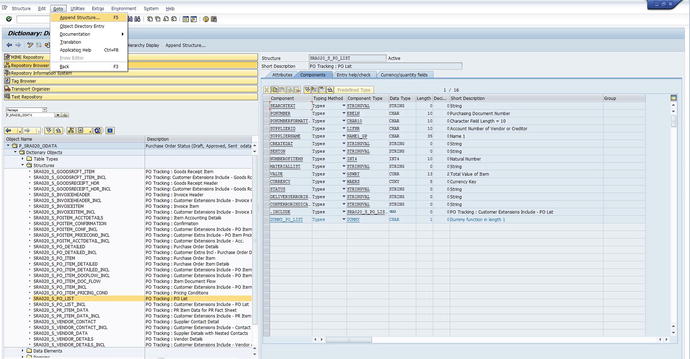
Figure 4-30. Appending custom fields to the standard DDIC structure
- In the pop-up, give a name for the structure to append (see Figure 4-31).
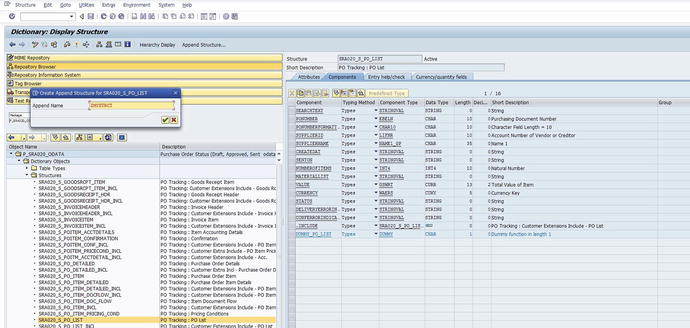
Figure 4-31. Give a name for the structure to append
- Create two fields in which to add your custom data. Save and activate the structure (see Figure 4-32).

Figure 4-32. Add your custom fields to the structure
- Go back to the SEGW transaction, open the POList entity, and double-click the Properties folder. Click the New button to append rows for your custom fields, as shown in Figure 4-33.
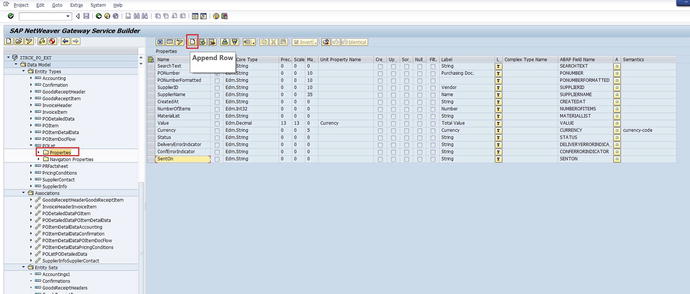
Figure 4-33. Add your custom fields to the OData entity
- Click the F4 help icon in the ABAP Field Name column of your new row, and add the fields (see Figure 4-34).
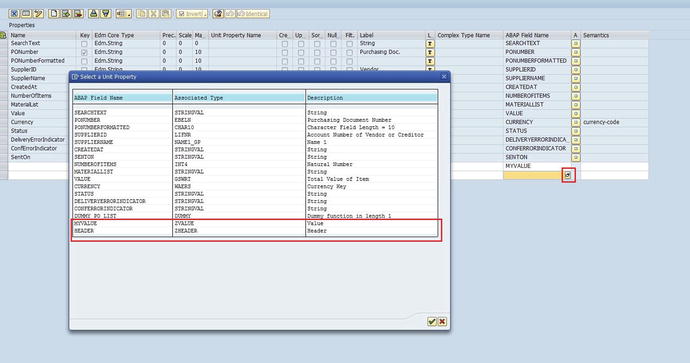
Figure 4-34. Fields are now available in the property list
Now you can see the two new fields appended to your entity (see Figure 4-35).
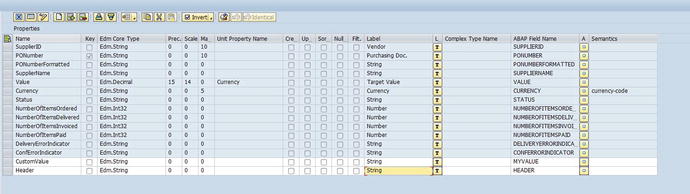
Figure 4-35. The new fields are appended to the entity
- Click the Generate button to commit the changes to the OData service. Open the Runtime Artifacts folder, double-click ZCL_ZTRCK_PO_EXT_DPC_EXT, and then double-click the same class name in the right pane (see Figure 4-36).
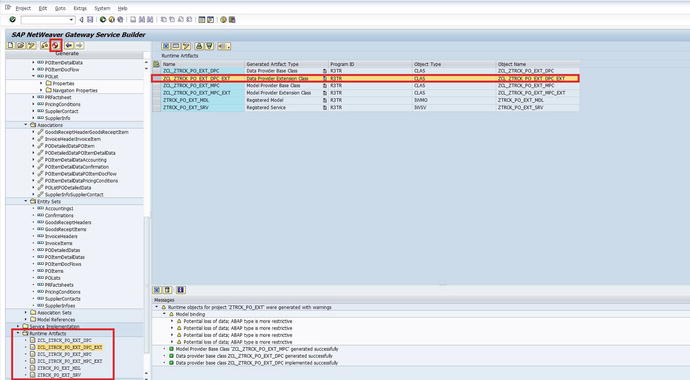
Figure 4-36. You can see the data provider and model provider class on the right
- You need to write the logic to fill the two additional fields in the entity to add your custom data to the OData stream. Choose Methods Inherited Method, and find the entity named POLISTS_GET_ENTITYSET. Right-click the entity set, and select Redefine, as shown in Figure 4-37.
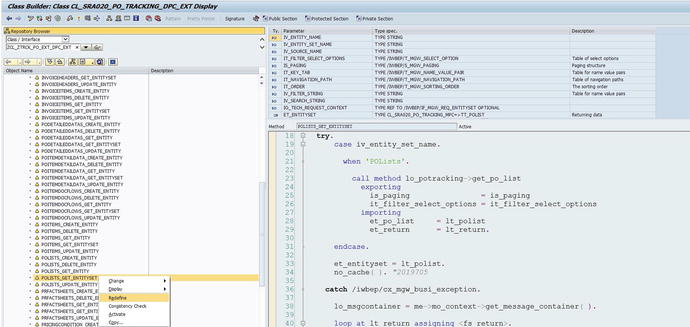
Figure 4-37. Redefining the inherited method
- You can see the redefined method in the Redefinitions folder. Copy and paste the original code in the POLISTS_GET_ENTITYSET method (see Figure 4-38).
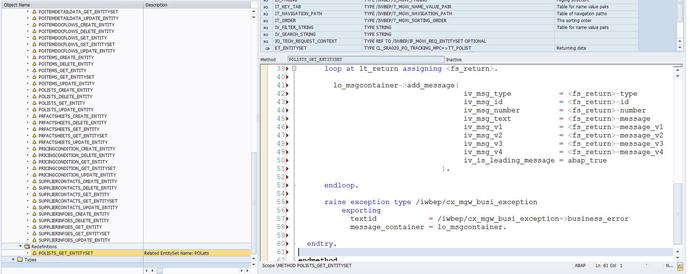
Figure 4-38. Redefined method POLIST_GET_ENTITYSET
- Add your custom code to append the two new fields. Here you are just appending two hard-coded values into the internal table that is returned to the OData stream when the Track Purchase Order app calls the entity to retrieve the list of all purchase orders for the list control on the main page. You can see ET_ENTITYSET on the signature tab, which returns the table to the OData stream (see Figure 4-39).
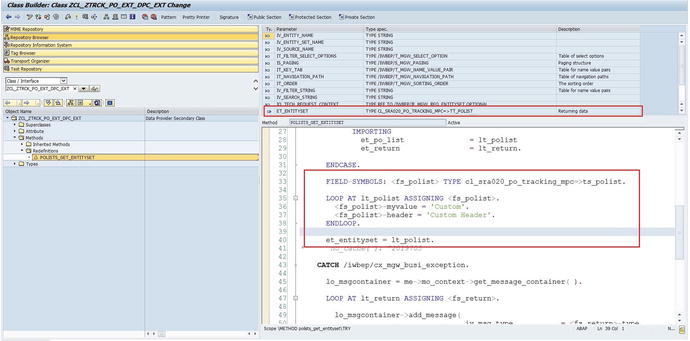
Figure 4-39. Custom code to fill the additional fields in the OData service
Test the OData service either from /IWFND/MAINT_SERVICE or directly in the browser (see Figure 4-40). Your code has appended the two new fields to the entity, and the data is updated in the response.
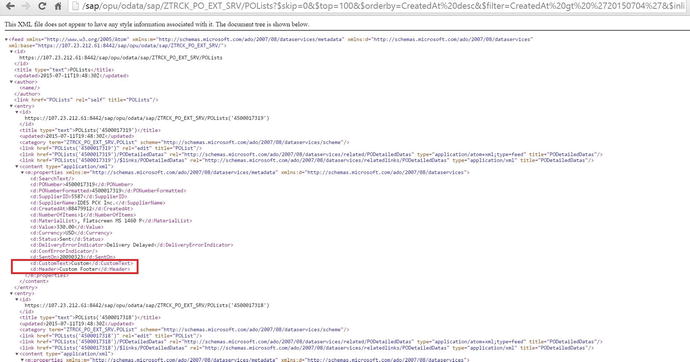
Figure 4-40. OData service response with the new fields and values
To learn more about standard Fiori apps such as packages, OData services, BAdl implementations, and UI5 component names, you must either manually search SICF, SEGW, /IWFND/MAINT_SERVICE, and so o n or—the easy way—go to Fiori online apps reference library at https://fioriappslibrary.hana.ondemand.com/sap/fix/externalViewer. Here you can search for any of the Fiori UI5 apps to find the details required for configuring and extending the app (see Figure 4-41).
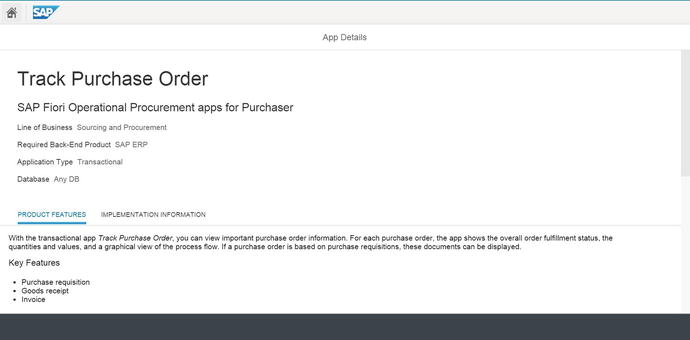
Figure 4-41. Fiori reference library entry for Track Purchase Order
On the Configuration tab, you can see the BSP name for Track Purchase Order (see Figure 4-42).
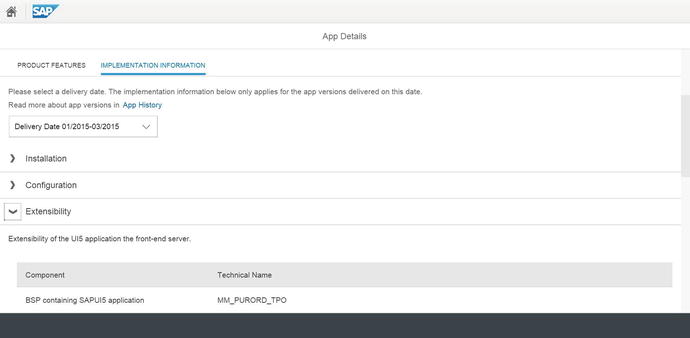
Figure 4-42. BSP name
Similarly, you can see all the extension point names for the app. To view the extensibility documentation, click the Read More link (see Figure 4-43).
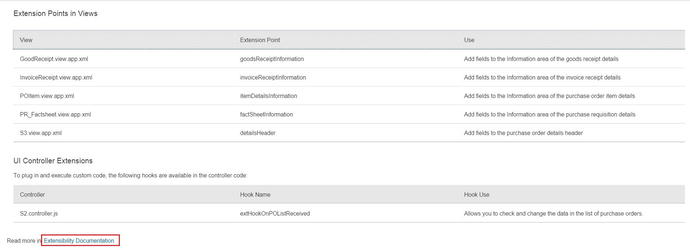
Figure 4-43. Extension details for the Track Purchase Order app
Here you find even more detailed information about the BAdls, extension points, and so on (see Figure 4-44). Basically, the Fiori reference library is a combination of the SAP Help page and the generic information about each standard Fiori app, all in one place. Because the total number the Fiori apps is growing every month, manually searching for the details of each app’s configuration in the Gateway and back-end server is no longer an easy task.
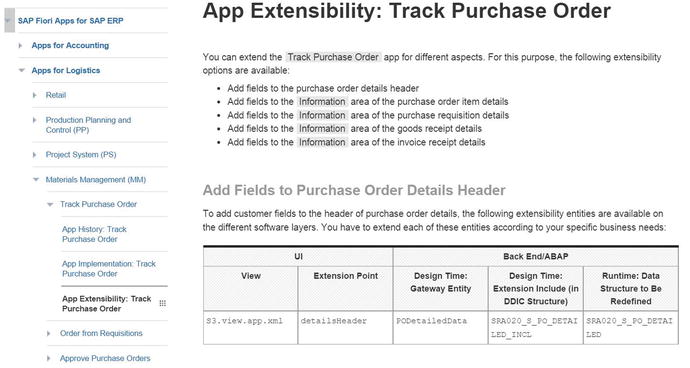
Figure 4-44. Detailed extension document
Extending the Fiori Standard Application UI in Eclipse
Now that you have a custom OData service, it’s time to create a Fiori extension project from your previously imported standard app. Wave 1 of the Fiori apps did not include the extension project concept. So, in Wave 1, you had to modify the standard code according to your needs and then upload it—a tedious task. From Wave 2 on, SAP Fiori has an enhancement framework implemented in the app source code that lets you enhance, modify or replace any view or controller of the standard app. Here are the steps:
Creating a Fiori Extension Project
- Open Eclipse, right-click on the project which we imported earlier in this chapter, and click Create SAP Fiori Extension Project (see Figure 4-45). You do not see this option if the Fiori toolkit plug-in has not been added to Eclipse.
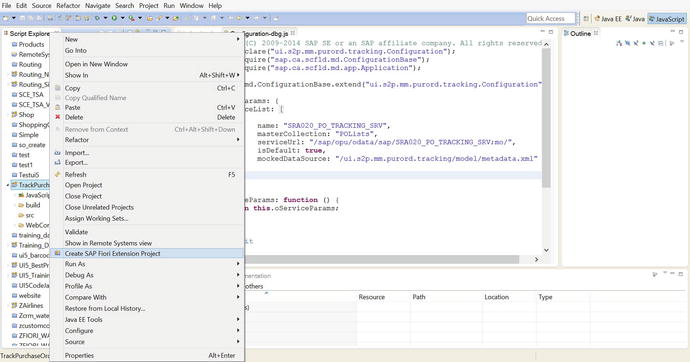
Figure 4-45. Creating an extension project
- Give the extension project a new name, and click Next. You can also replace the standard OData service using this wizard by selecting the check box (see Figure 4-46). But if your OData service is not on the same network, you may want to maintain some certificates so you can access it. In this example, you manually add the new OData URL directly in the extension project after it is created.
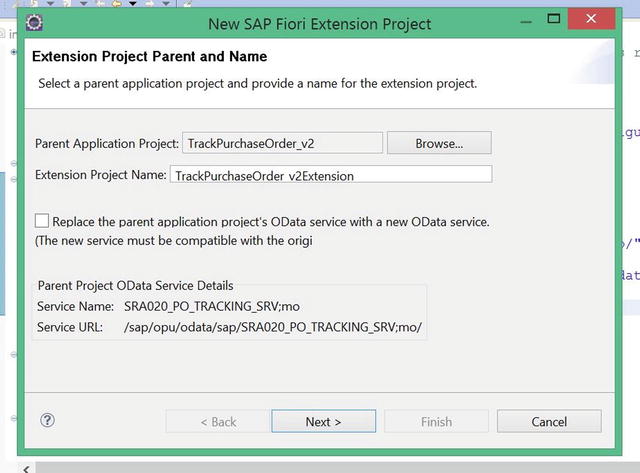
Figure 4-46. Give the extension project a name
- Click Component.js. The code extends the i18n files that contain the language support. If you examine the code, you can recognize a JSON structure starting with metadata: (see Listing 4-1 and Figure 4-47). This structure basically tells the app at runtime what customizations you have made to the standard apps.
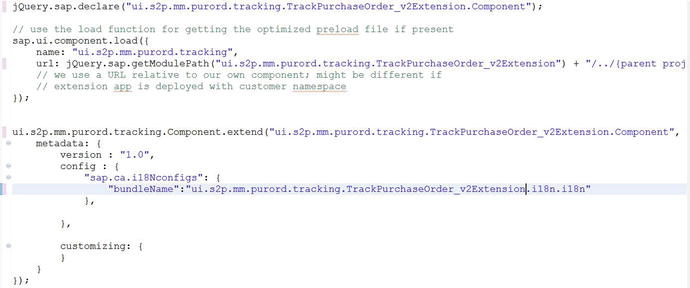
Figure 4-47. Metadata structure
At runtime, how does an extended app recognize its parent app? If you look closely at the extended app’s folders, you don’t see any of the standard app’s views or code. The idea behind the extended app is that at runtime, it loads the parent app’s source code; and wherever you have extended the app with custom code, it adds that custom code to the <Core:ExtensionPoint/> tag in the standard code or replaces the entire view with your custom view. In order for the extension app to get the parent app’s source code, you need to specify the path of the standard app in the extended app’s Component.js file under jQuery.sap.getModulePath. For example, the name of the BSP app of your standard app is mm_purord_tpo (see Listing 4-2); you must include that name so the extended app can load the parent app at runtime.
- You have to add your custom OData URL to the extended app. You specify the custom OData URL in the same metadata JSON structure under sap.ca.serviceConfigs (see Figure 4-48).
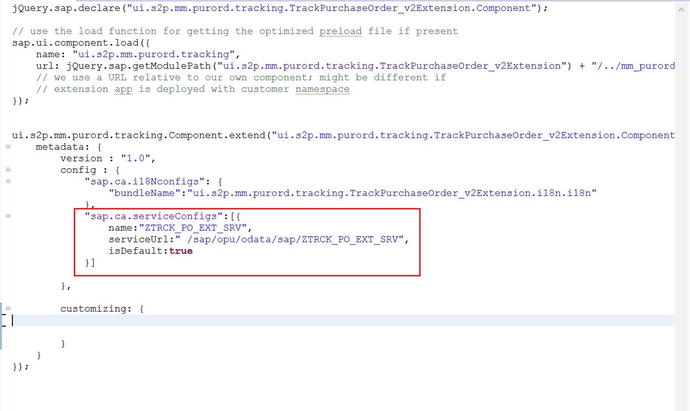
Figure 4-48. OData service configuration
Adding Extensions to the Project
- To add extensions to the views where you want to make changes, right-click the newly created extended app and choose Add SAP Fiori Extension (see Figure 4-49).
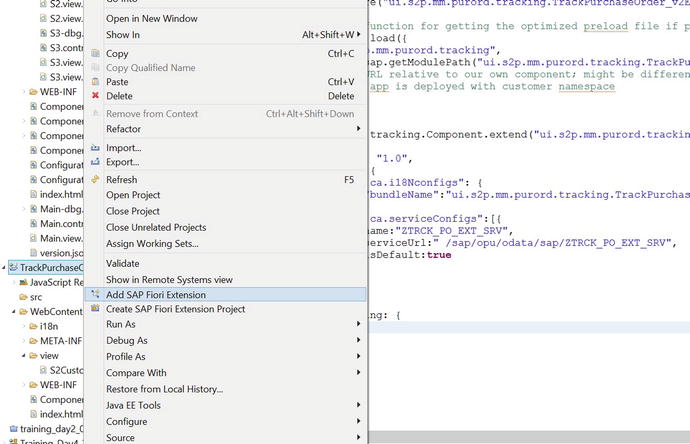
Figure 4-49. Creating an extension in the project
- From the drop-down, select which view to extend. In this case, select S2.view (see Figure 4-50).
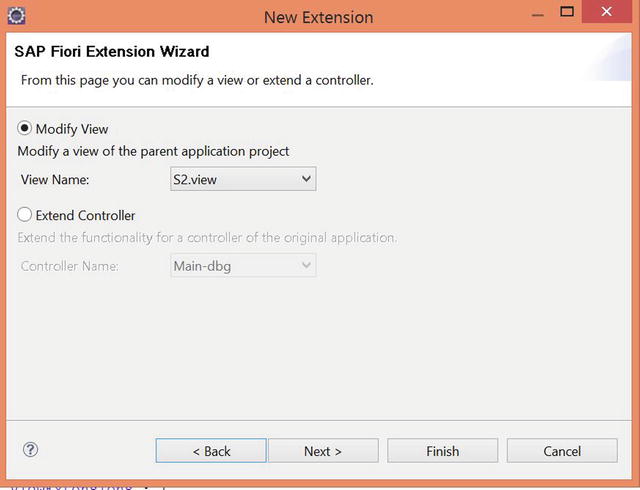
Figure 4-50. Modifying thef S2 view
- On the next page, select whether to replace the view, extend the view, or modify the view (Hide Control). In this case, select Replace View (see Figure 4-51).
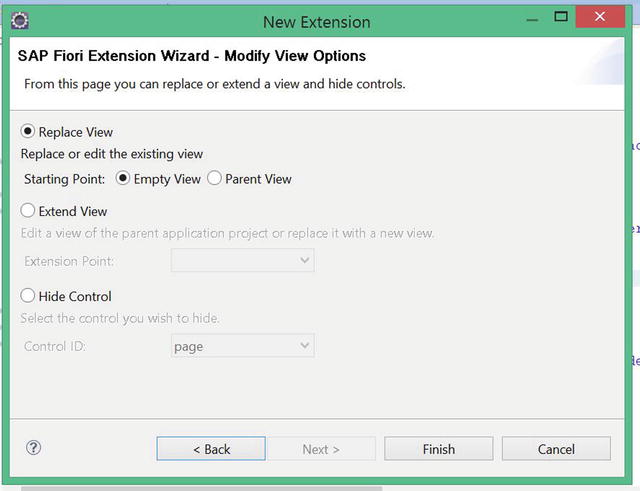
Figure 4-51. Replacing the view code
- After the extension is created, in Component.js, you’ll notice a change in the metadata: JSON structure: an addition under Customizing:. The name sap.ui.viewReplacements indicates that it’s a view replacement, not a modification. If it were a modification, the name would be something like sap.ui.viewModifications; and in the case of an extension, the name would be sap.ui.ViewExtensions (see Figure 4-52). You can also make these changes manually rather than using the wizard.
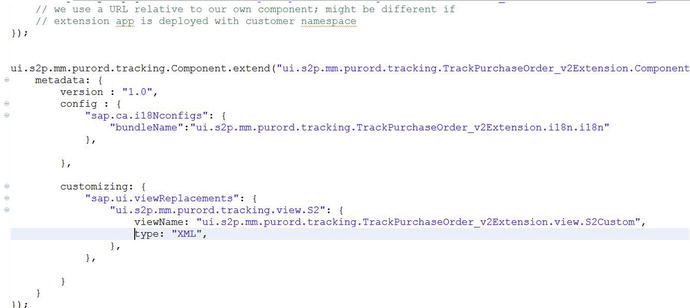
Figure 4-52. Component.js file with view-replacement code
In addition to the change in Compnent.js, you can see that an additional file has been created in the view folder, named S2Custom.view.xml (see Figure 4-53). In the case of a view extension, the file that’s created is a fragment. Fragments can be dynamically called into the <CoreExtensionPoint/> tag of the view you wants to extend. In S2Custom.view.xml, you add the two fields you get from the OData stream to the existing List control in the UI.

Figure 4-53. Extended a view for the standard S2 view
- Now you modify a view—in this case, POItem.view, as shown in Figure 4-54.
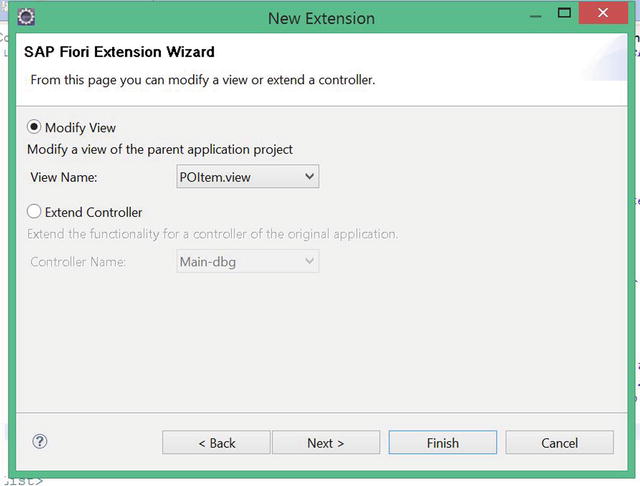
Figure 4-54. Modifying POItem.view
- On the next page, select Hide Control, and choose delivery_form (see Figure 4-55).
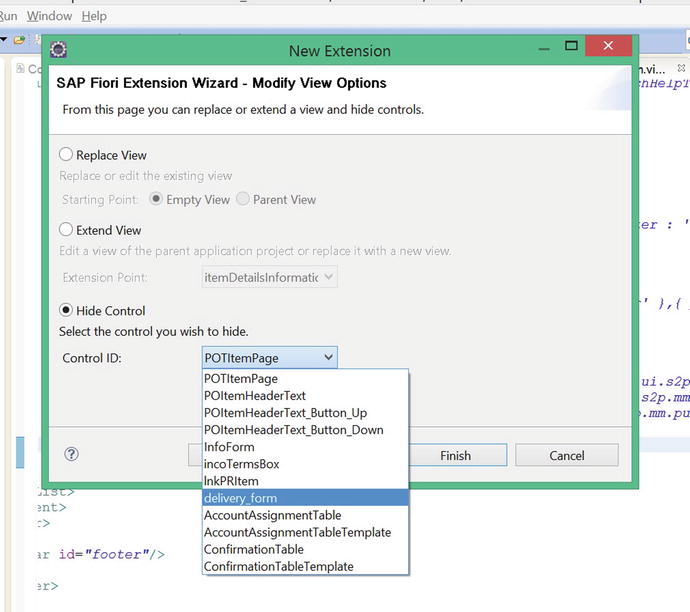
Figure 4-55. Hiding delivery_form from the view
You can see the changes being made in Component.js. If you modify a control, a separate file is not generated; instead, the property of the control to be modified is defined in Component.js. In this case, it is under sap.ui.ViewModifications, and the form’s Visible property is made false (see Figure 4-56).
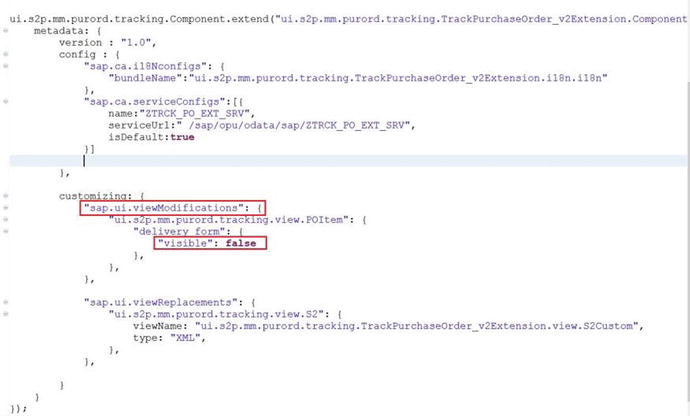
Figure 4-56. Component.js updated with the view-modification code
- To extend a view, select S3.view (see Figure 4-57).
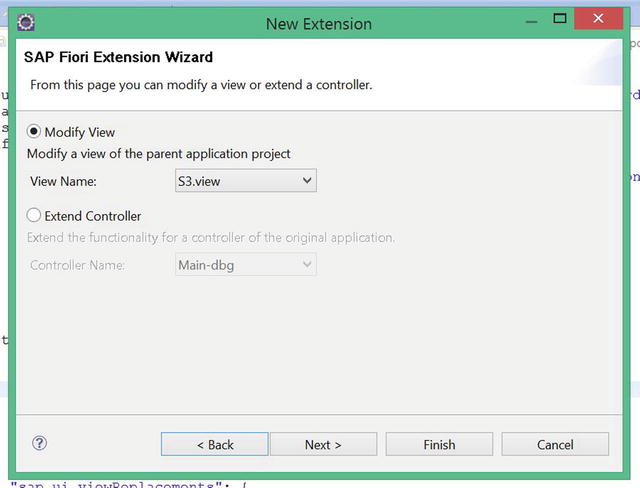
Figure 4-57. Modifying the S3 view
- Extend detailsHeader (see Figure 4-58).
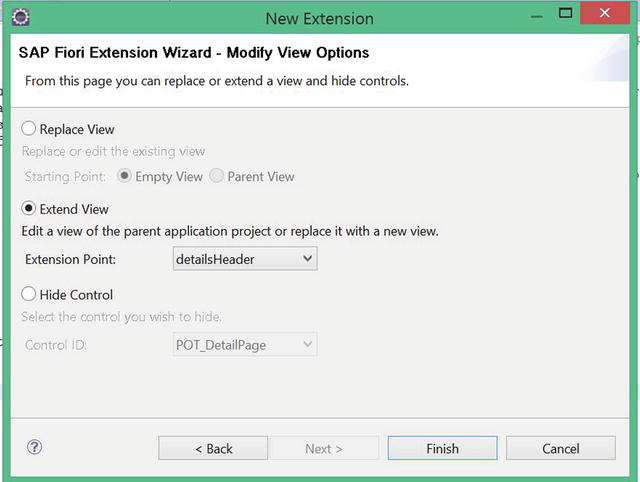
Figure 4-58. Extending the detailsHeader of the S3 view
For the extension, the Component.js file is modified (see Figure 4-59).
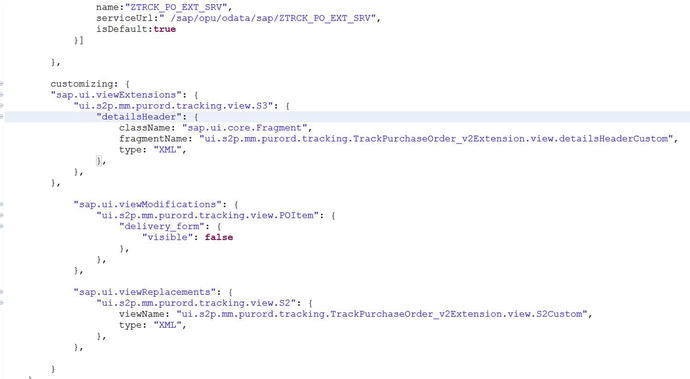
Figure 4-59. Component.js updated with the view-extension code
- Additionally, a fragment file is created under the view folder. In the fragment, add a Text control by entering the code <Text text="Custom Text"></Text> between the <Core:FragmentDefinition></code:FragmentDefinition> tags, as shown in Figure 4-60.
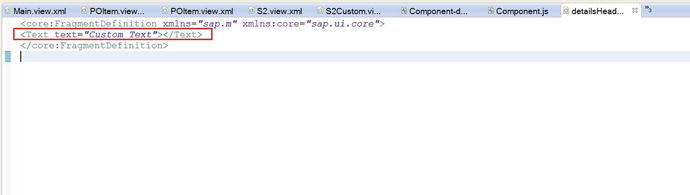
Figure 4-60. detailsHeader fragment file
Uploading the Extension Project to the Gateway Server
You have now made all the modifications. It’s time to upload the file to the front-end server. Follow these steps:
- Log on to the Gateway server, and execute the /UI5/UI5_REPOSITORY_LOAD program in SE38. In the input field, give a name for the BSP app you are uploading (see Figure 4-61).
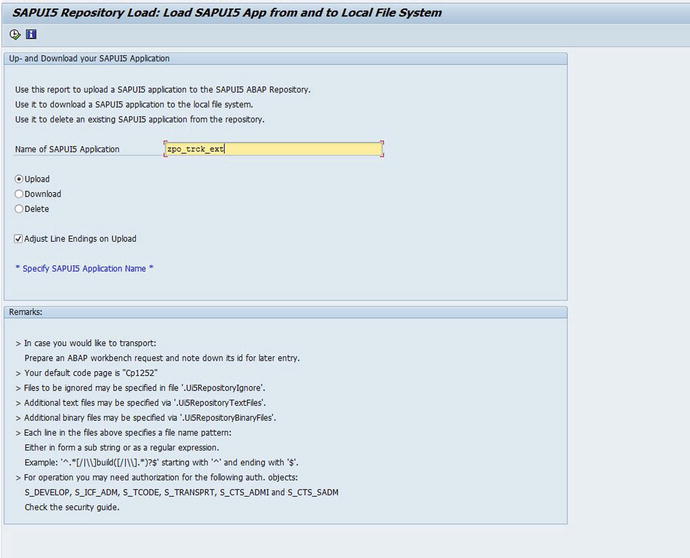
Figure 4-61. Enter the name of the app you are uploading
- Click the Click Here To Upload button. The program uploads the files and registers the BSP app as a UI5 app (see Figure 4-62).
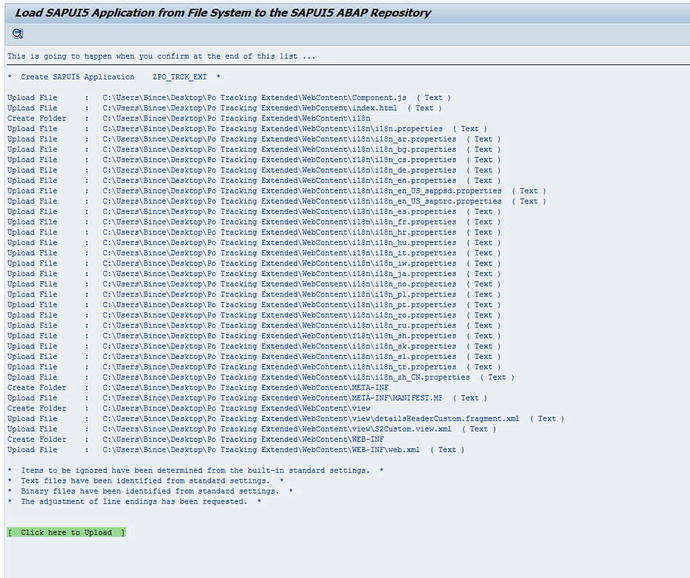
Figure 4-62. Uploading the UI5 code to the Gateway server
- Give a description for the app and the package name, and click the check mark button (see Figure 4-63).
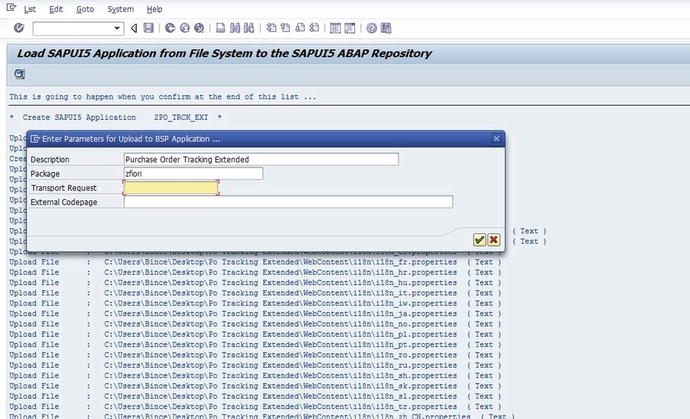
Figure 4-63. Specify the package for the app
- Enter a workbench request, or create a new one if necessary (see Figure 4-64).
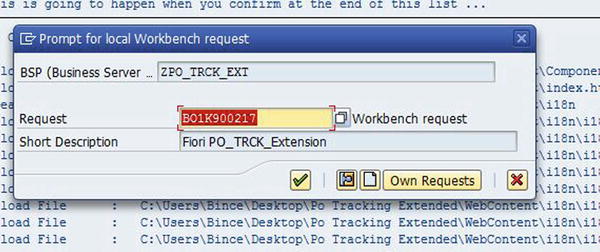
Figure 4-64. Enter a workbench request for creating the BSP app
- Give the app permission to access your system files (see Figure 4-65). You can disable this pop-up by making changes in the SAP GUI configuration in the control panel.
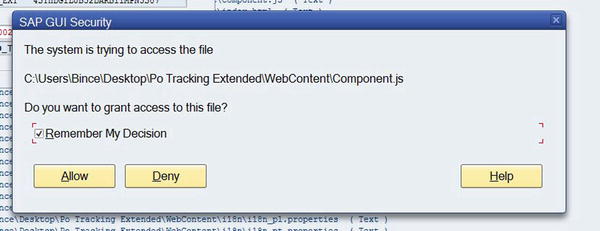
Figure 4-65. Security warning from the system regarding accessing system files
Now you can see the uploaded app service in the SICF t-code (see Figure 4-66).
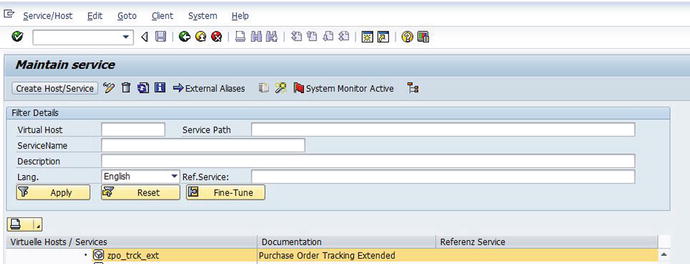
Figure 4-66. SICF with the service activated for the BSP app
- You need to create a custom launchpad using the LPD_CUST t-code. Execute LPD_CUST, and enter the role name ZLPD_PO_TR (you can enter any name you want). For Instance, enter TRANSACTIONAL; and enter the description PO Track Extended (see Figure 4-67).
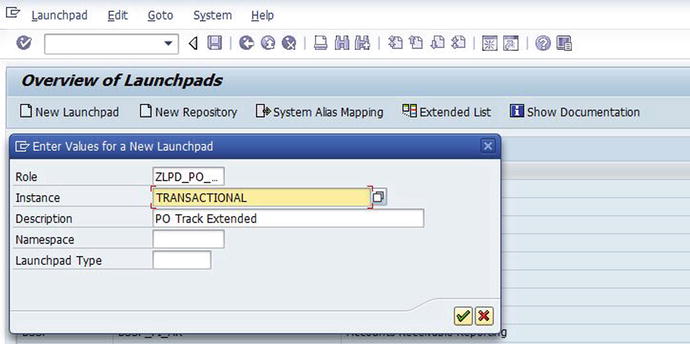
Figure 4-67. Creating a new launchpad in LPD_CUST
- Click Yes in the pop-up screen (see Figure 4-68).
Figure 4-68. Ignore the namespace warning
- Click the New Application button, and enter the parameter values from Table 4-1 in the fields. Click Show Advanced (Optional) Parameters to expand the fields (see Figure 4-69).
Table 4-1. Parameter Values to Create a New Launchpad in LPD_CUST
Field
Value
Link Text
PO Track Extended
Description
Purchase Order Tracking Extended
Application Type
URL
URL
/sap/bc/ui5_ui5/sap/zpo_trck_ext
Application Alias
zpo_trck_ext (any name you want)
Additional Information
SAPUI5.Component=ui.s2p.mm.purord.tracking.TrackPurchaseOrder_v2Extension
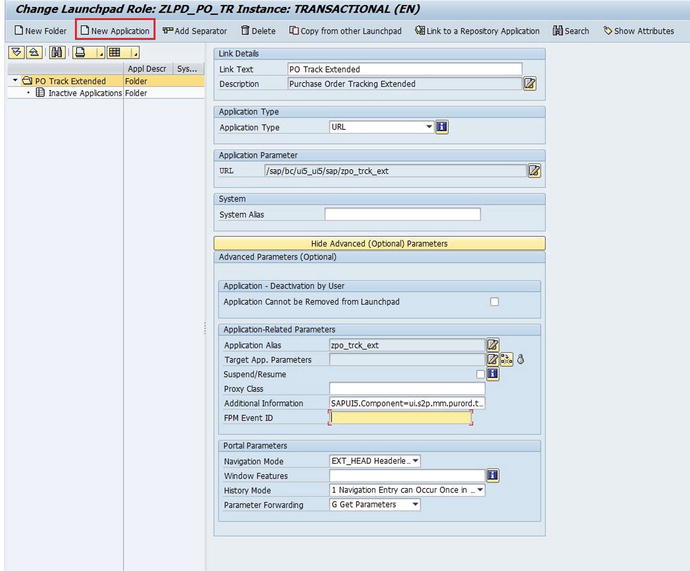
Figure 4-69. Creating a new app in the new launchpad
You can get the value for the Additional Information field from the app source code (see Figure 4-70).
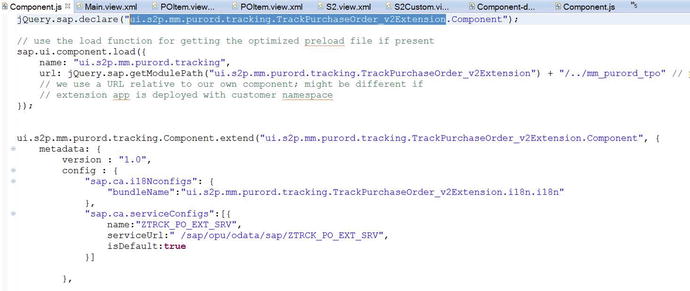
Figure 4-70. Value for the Additional Information field in the LPD_CUST app
Creating a Custom Tile in the Fiori Launchpad
Log in to the Fiori launchpad designer (see Figure 4-71). To add a custom tile to the launchpad, you need to create a new catalog and add your custom app. Follow these steps:
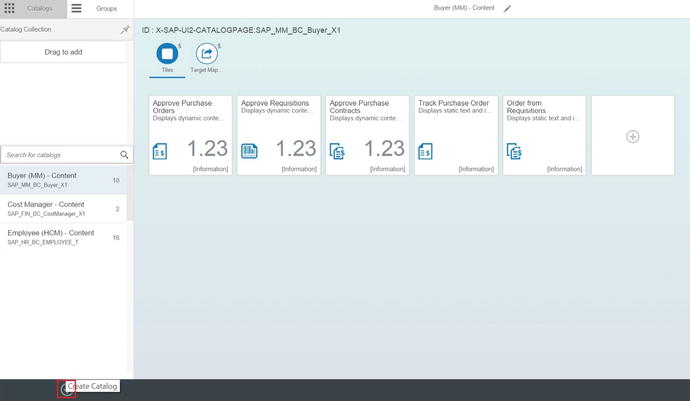
Figure 4-71. Creating a new catalog in the launchpad designer
- Click the Create Catalog icon at lower-left.
- Give the catalog a name and ID in the pop-up (see Figure 4-72).

Figure 4-72. Assign a unique ID for the catalog
- Click the + sign to create a new tile in your catalog (see Figure 4-73).
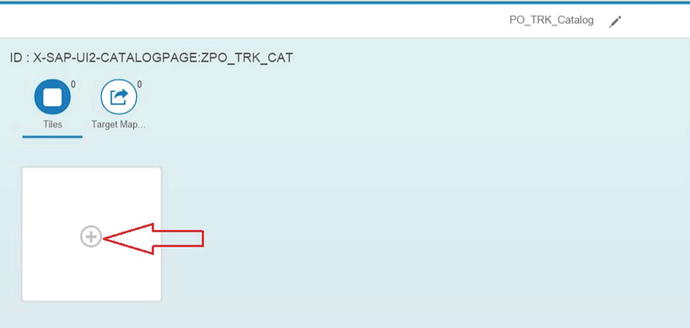
Figure 4-73. Creating a tile for the new catalog
- Because your tile does not show data dynamically, select App Launcher – Static, as shown in Figure 4-74.
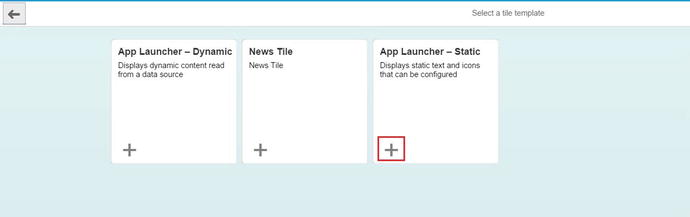
Figure 4-74. Choose App Launcher – Static
- Give the General and Navigation details for your app (see Figure 4-75). In the Navigation area, enter the same semantic object and action as the standard app; because it’s an extension of the standard app, you don’t need to create a custom semantic object. Click Save.
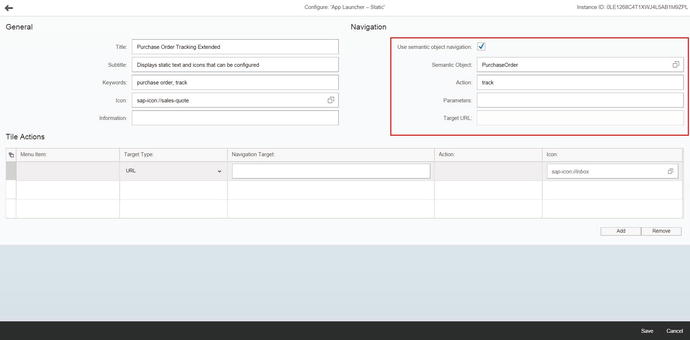
Figure 4-75. Static tile configuration for the extended Track Purchase Order app
- Click the target mapping icon at upper-left, and then click Create Target Mapping at lower-right (see Figure 4-76).

Figure 4-76. Creating a target mapping
- In the Intent area, specify the same semantic object and action that you specified for the app launcher static tile, so that the visible static tile and the target-mapping tile are linked. In the Target area, enter the custom launchpad role you created earlier using LPD_CUST, the Launchpad Instance value TRANSACTIONAL, and the Application Alias zpo_trck_ext (see Figure 4-77).
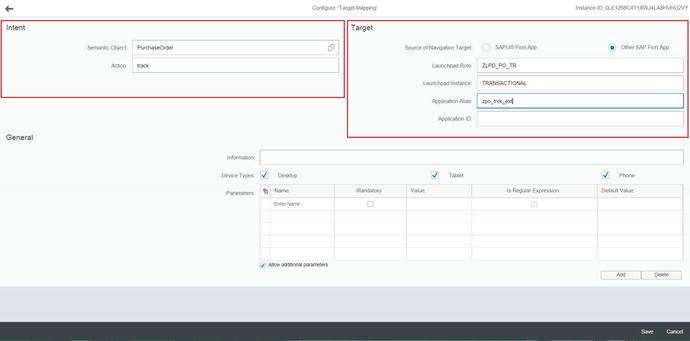
Figure 4-77. Target-mapping configuration for the extended Track Purchase Order app
The catalog setup is complete in the Fiori launchpad, but in order for end users to access these tiles, you must assign them the catalog ID that you specified when you created the catalog in the launchpad designer. To assign the catalog role to the user, follow these steps:
- Log on to the Gateway server, and execute the PFCG transaction. Create a new role called zpo_TRCK_ROLE by clicking the Single Role button (see Figure 4-78).
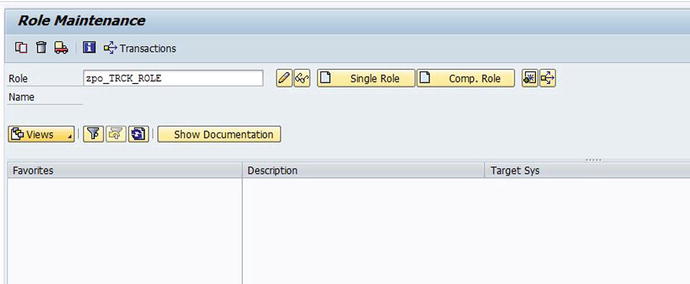
Figure 4-78. Create a new role for the user, to assign the catalog
- On the Menu tab, click the Transaction button, and select SAP Fiori Tile Catalog (see Figure 4-79).
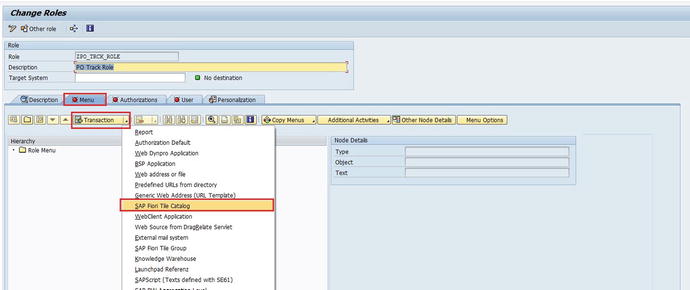
Figure 4-79. Adding the catalog ID to the new role
- From the pop-up select the catalog ID ZZPO_TRK_CAT that you created in the Fiori launchpad designer (see Figure 4-80).
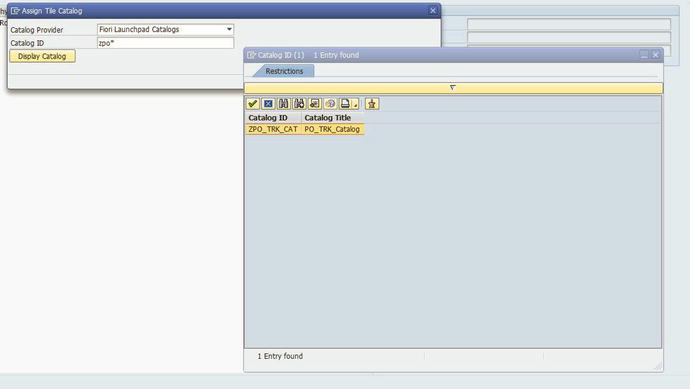
Figure 4-80. Enter the Catalog ID created in the launchpad designer
- On the User tab, enter the user ID of the end user you want to give access to the catalog (see Figure 4-81).
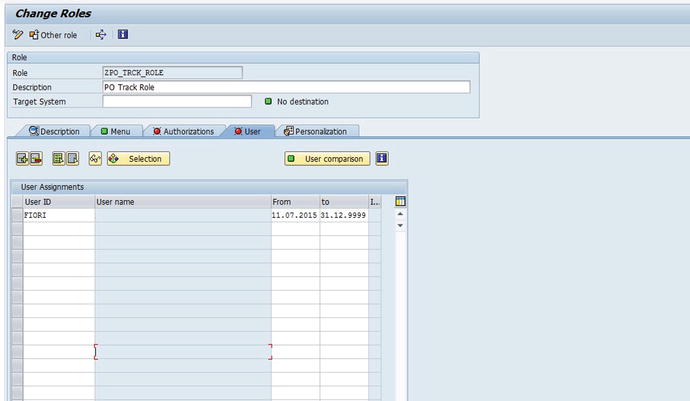
Figure 4-81. Map the role to the end user
Adding a Custom Tile to the Home Page
When the user logs in to the Fiori launchpad (see Figure 4-82), they need to be able to access the tile you added to the catalog assigned to the user. To add the tile to the home page, follow these steps:
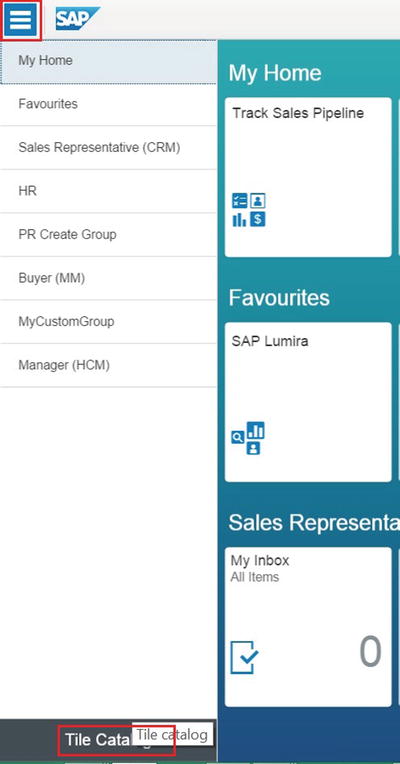
Figure 4-82. Tile Catalog on the end user’s home page
- Click the icon at upper-left on the home page, and then click the Tile Catalog button at lower-left.
The new tile appears in the catalog you assigned to the user (see Figure 4-83).
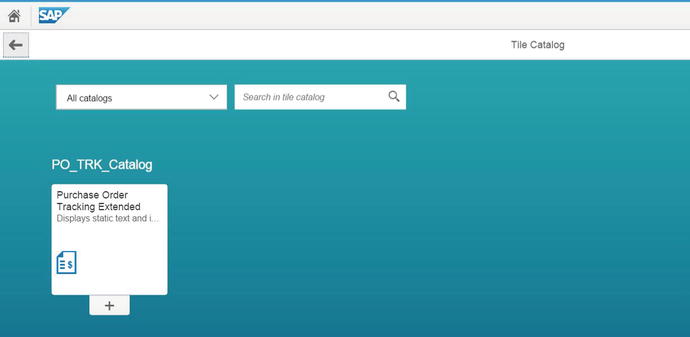
Figure 4-83. Selecting the custom tile for the home page
- Click the + icon at the bottom of the tile and add it to an existing group on the home page, or add a new group specifically for this tile. To create a group, click the New Group button on the list (see Figure 4-84).
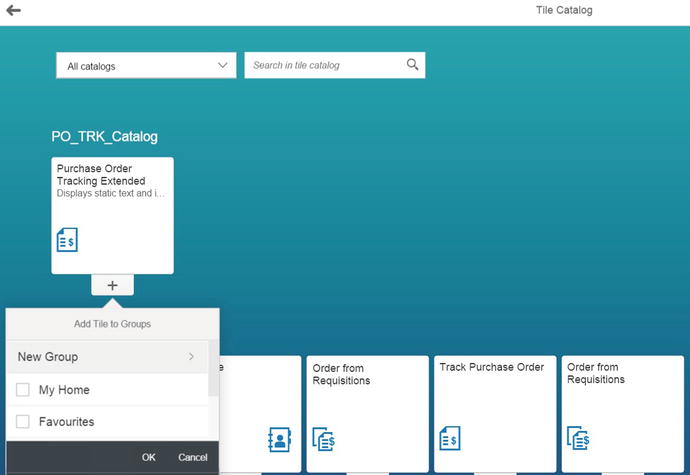
Figure 4-84. Select the group to which you want to add the tile
- Give the group a name, and click OK (see Figure 4-85).
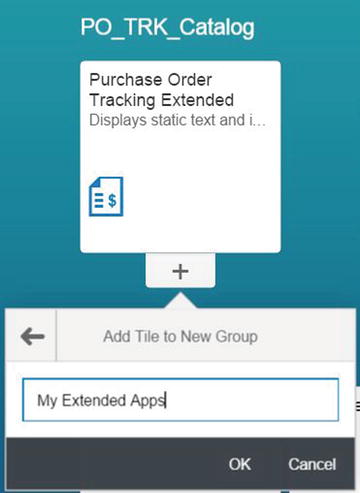
Figure 4-85. Creating a new group for the tile
- On the home page, you can see your new tile (see Figure 4-86).
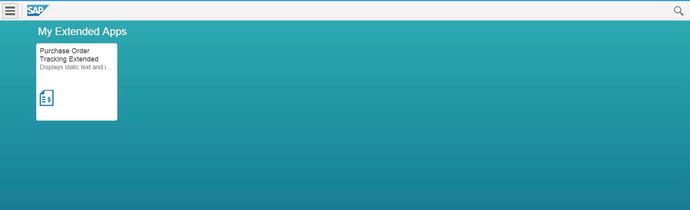
Figure 4-86. Extended tile on the end user’s home page
- Click the tile to launch the extended app. The custom data appears in the Track Purchase Order app (see Figure 4-87).
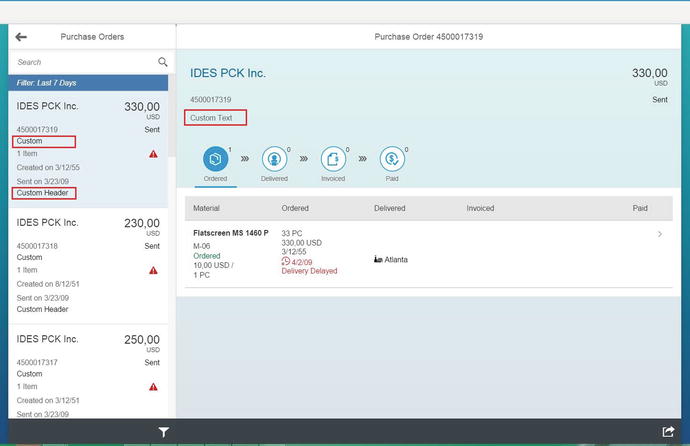
Figure 4-87. Extended Track Purchase Order app
The delivery form is hidden on the Item Details screen (see Figure 4-88).
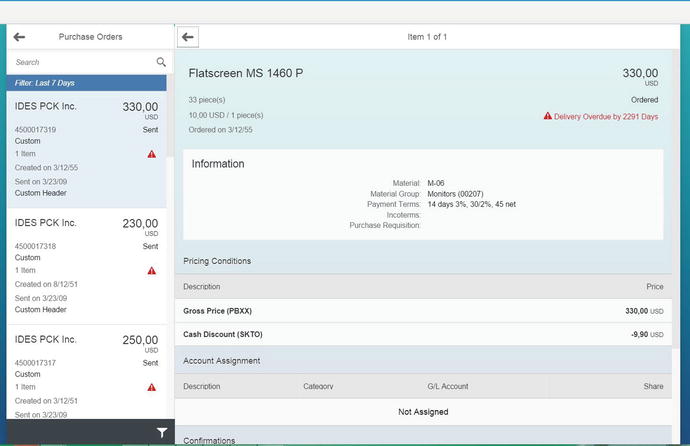
Figure 4-88. Extended Track Purchase Order app’s S3 view
In Figure 4-89, the original screen is on the left, and the modified screen is on the right. The Delivery form is hidden on the modified app.
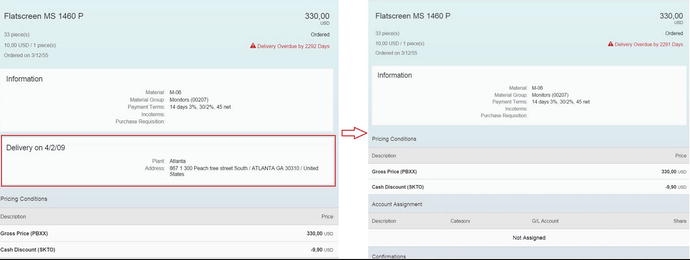
Figure 4-89. S3 view with delivery_form hidden
Extending a Fiori Standard Application in Web IDE
Now, let’s look at how to extend the Track Purchase Order app using Web IDE. You can get a trial version of Web IDE by registering on the SAP Hana Cloud Platform at https://account.hanatrial.ondemand.com/register. Once you have registered and logged in to Hana Cloud Platform, you can access Web IDE at /subscriptions/webide. You can also install an on-premises version of Web IDE (Chapter 6 covers Web IDE in more detail).
Connecting Web IDE to Back-End Systems
Because you are using a Web IDE that is deployed on Hana Cloud Platform, you need to do two things to connect Web IDE to your SAP back-end systems:
- Install the HANA Cloud connector on your system (you can download the cloud connector installation file from https://tools.hana.ondemand.com/#cloud). Installation details for the cloud connector can be found at https://help.hana.ondemand.com/help/frameset.htm?204aaad4270245f3baa0c57c8ab1dd60.html.
- Create a new service in your Hana Cloud Platform cockpit.
Let’s get on with creating a new service:
- Log on to Hana Cloud Platform at https://account.hanatrial.ondemand.com.
- Click Destinations. At right, click the New Destination link.
- Enter the data from Table 4-2 in the input fields.
Table 4-2. Hana Cloud Destination Parameter Values
Field Name
Value
Name
<ServerName>
Type
HTTP
Description
MyServer
URL
Your local SAP system URL, which you configured while installing the cloud connector in step 1
ProysType
OnPremise
Cloud Connector Version
2
Authentication
NoAuthentication
- Click the New Property button next to the input fields, and add the parameter values from Table 4-3.
Table 4-3. Hana Cloud Destination Additional Parameter Values
Field Name
Value
WebIDEEnabled
True
WebIDEUsage
odata_abap,dev_abap,ui5_execute_abap
WebIDESystem
<ServerName>
Creating a New Extension Project in Web IDE
One of the advantages of Web IDE is that you can download and upload standard UI5 apps directly from the Web IDE interface. You can download apps directly in Eclipse; but when you upload apps, the app folder structure is not exactly the same, because the Fiori architecture is designed to run standard apps. To create an extension project, open Web IDE in the browser and then follow these steps:
- Click New Extension Project (see Figure 4-90).
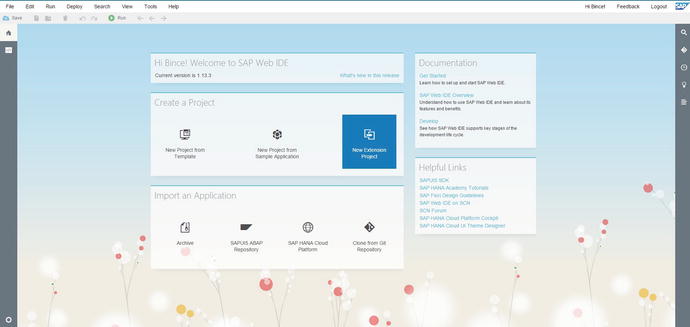
Figure 4-90. Web IDE home page
- Click the Remote button, and select SAPUI5 ABAP Repository (see Figure 4-91).
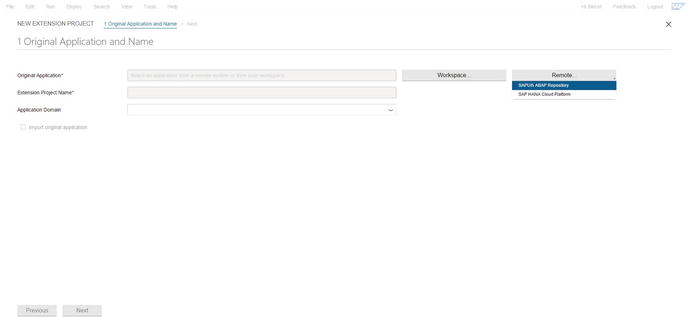
Figure 4-91. Creating an extension project using Web IDE
- Select the Gateway server from the list, enter the standard app’s name, and click OK (see Figure 4-92).
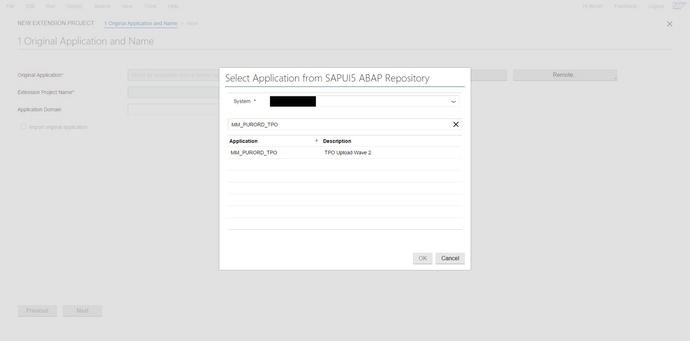
Figure 4-92. Selecting the back-end system to choose a standard app for extension
- Select the check box to import the original app (see Figure 4-93).
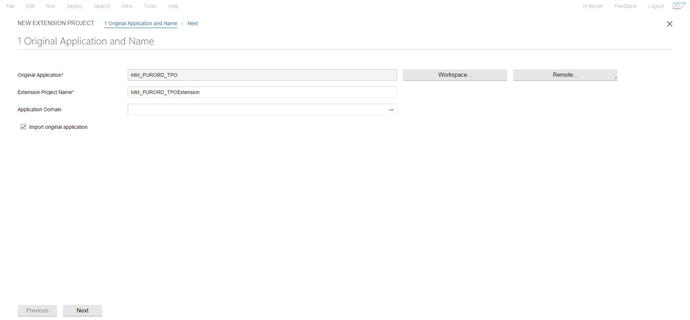
Figure 4-93. Give the details for the extension project
- Click Finish to create the extension project (see Figure 4-94).
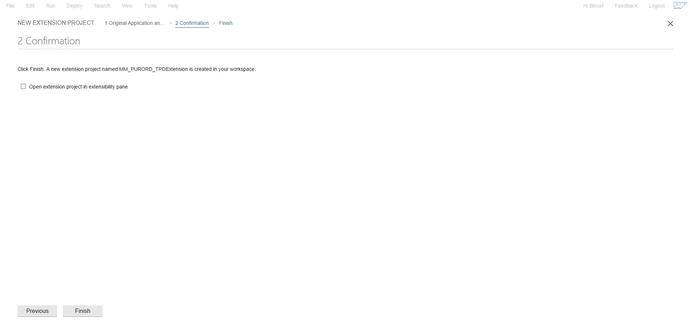
Figure 4-94. Completing the creation of the extension project
Adding Extensions to the Project
After the standard app is downloaded, just as in the Eclipse version, you can create extensions. Here are the steps:
- Right-click the project, and create an extension on it (see Figure 4-95). The phrases extension project and adding an extension may be confusing: the extension project you created previously is just a blank project with the standard source code imported into it. After you import the code, you can tell Web IDE what type of extensions you want to add to this standard app.
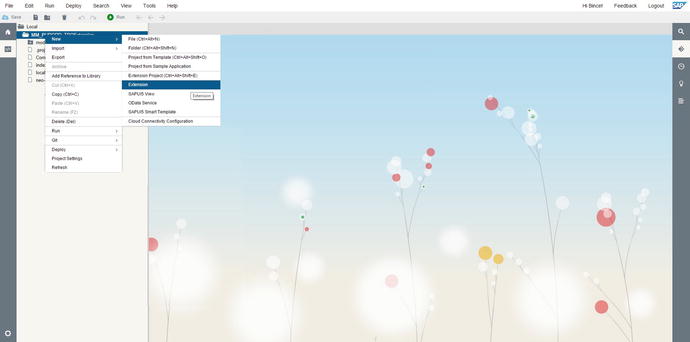
Figure 4-95. Creating an extension for the custom app
- Give your extension project a name (see Figure 4-96).
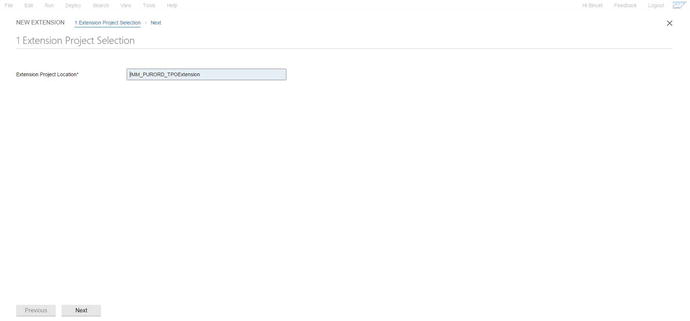
Figure 4-96. Give the extension project a name
- Define the type of extension you want to perform on the standard app. In this case, select Replace View (see Figure 4-97).
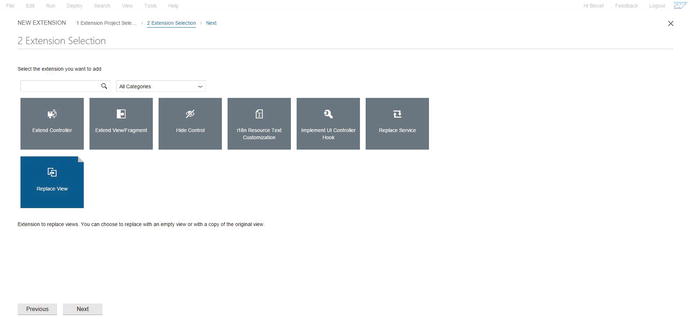
Figure 4-97. Select the Replace View extension
- To replace the S2 view, copy the code of the original view into your replacement view; then you can modify it (see Figure 4-98).
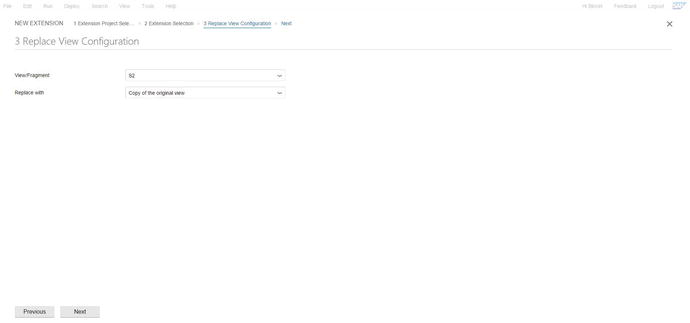
Figure 4-98. Creating an extension for the S2 view
- Click Finish to create the extension project (see Figure 4-99).
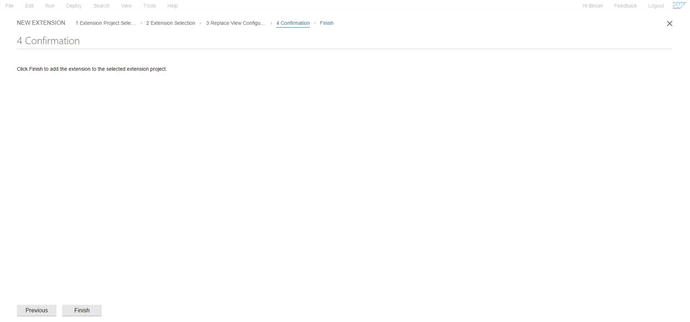
Figure 4-99. Completing the extension
- Open the S2Custom view in the view folder, and add the custom fields as you did earlier in Eclipse (see Figure 4-100).
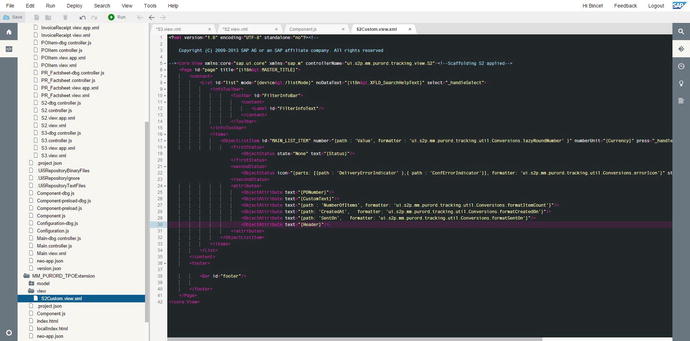
Figure 4-100. Extension view for the S2 view
- In addition to manual coding, Web IDE has a drag-and-drop feature you can use to add controls to views. To add controls via drag-and-drop, right-click the view, select Open With, and select Layout Editor (see Figure 4-101).
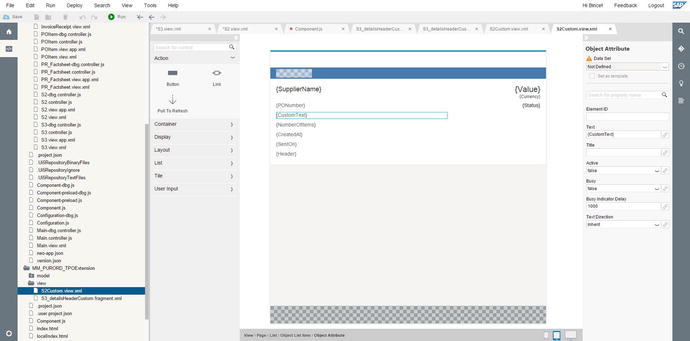
Figure 4-101. Layout editor for the S2Custom view
- In the left pane, select the desired control; drag to the preview pane to add the control (see Figure 4-102).

Figure 4-102. Drag and drop controls in the layout editor
- Next you can extend an existing control. Just as you did for the S2 view, right-click the project, select New Extension, select Extend View/Fragment, and click Next (see Figure 4-103).
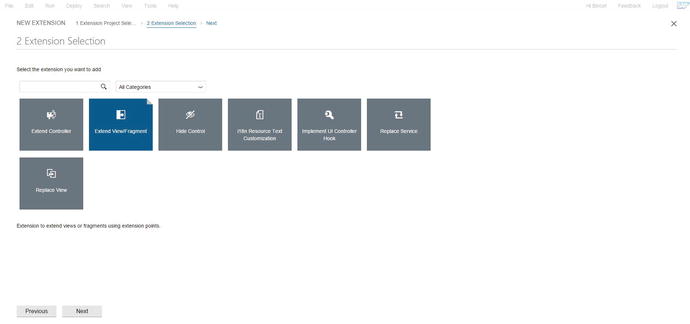
Figure 4-103. Extending a view
- Select the S3 view, and choose detailsHeader as the extension point (see Figure 4-104).
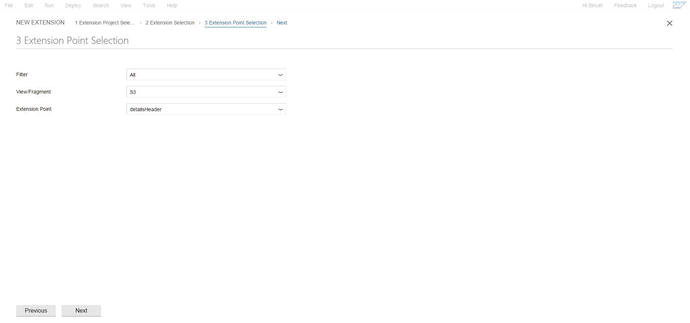
Figure 4-104. detailsHeader extension for the S3 view
- Click Finish to complete the extension (see Figure 4-105).
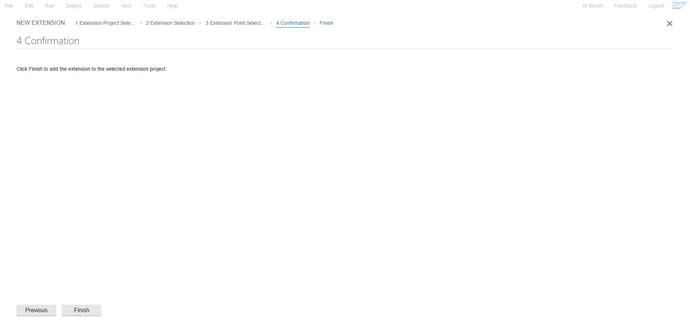
Figure 4-105. Completing the extension for the S3 view
- The extension for the controller is created in the view folder as a fragment (see Figure 4-106).
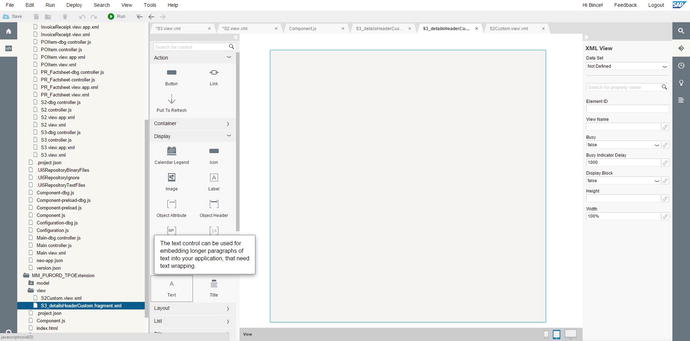
Figure 4-106. Fragment file for the detailsHeader extension
- You can choose to manually code the page or open the fragment in the layout editor (see Figure 4-107).
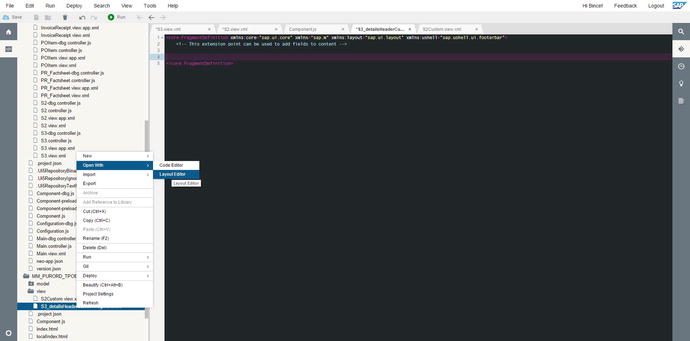
Figure 4-107. Open the S3 extension view in the layout editor
- Drag and drop the custom controls you want to add to the fragment (see Figure 4-108).
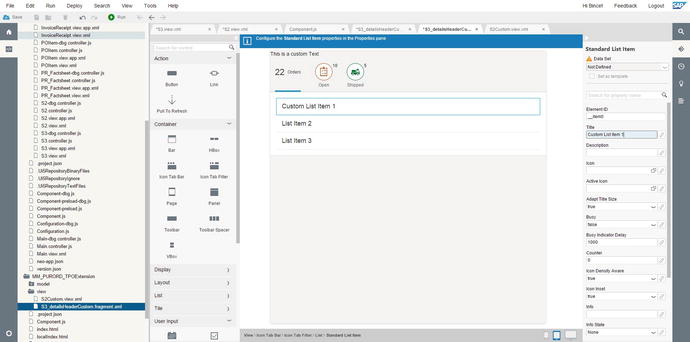
Figure 4-108. Adding custom controls to the S3 extension view via the layout editor
- To replace the standard OData service of the extended project, click Replace Service from the extension view (see Figure 4-109).
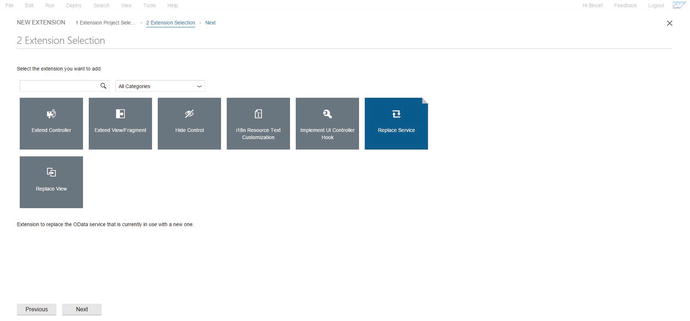
Figure 4-109. Creating a Replace Service extension
- On the next screen, select the desired back-end system. From the drop-down list, select your OData service (see Figure 4-110).
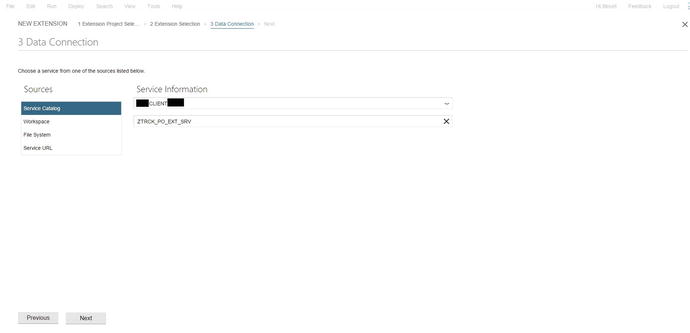
Figure 4-110. Select the custom OData service from the back-end server
- The new OData service is added to the metadata: JSON body along with other extensions and modifications you chose earlier (see Figure 4-111).
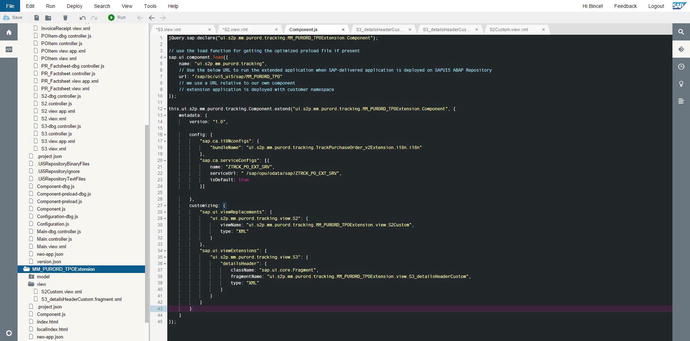
Figure 4-111. Component.js updated with the replaced OData service URL
- You can also hide an existing control as you did in the Eclipse project. Select Hide Control from the extension view (see Figure 4-112).
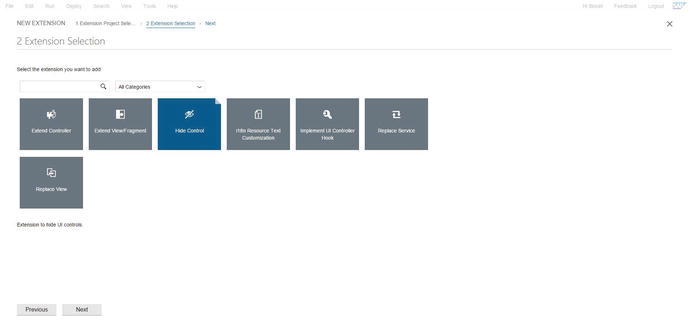
Figure 4-112. Hiding a control in the view
- Select the control you want to hide. In this example, hide delivery_form (see Figure 4-113).
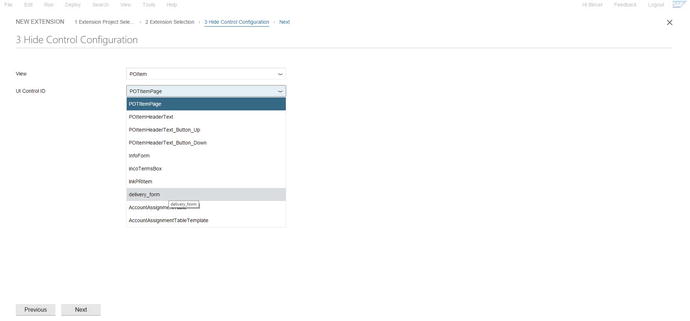
Figure 4-113. Hiding delivery_form
- Click Finish to complete the extension (see Figure 4-114).
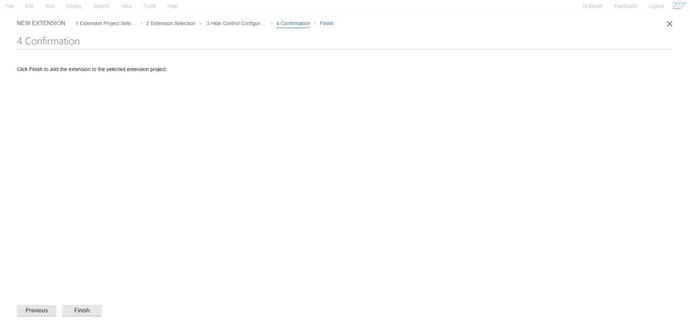
Figure 4-114. Completing the extension
- All the enhancements, customizations, and modifications are now complete (see Figure 4-115).
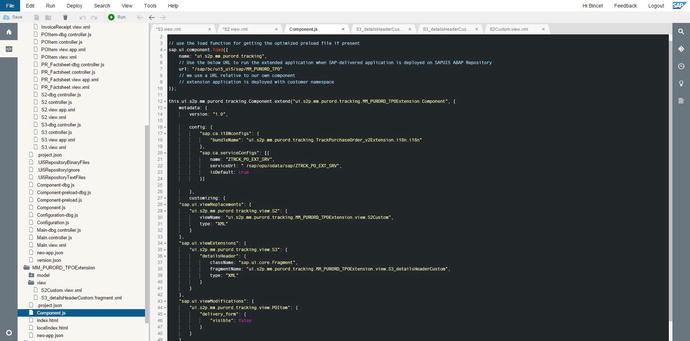
Figure 4-115. Component.js updated with all the extensions in the metadata: JSON
- To preview the app, select the project’s main folder or Component.js, and click the green Run button on the toolbar (see Figure 4-116).
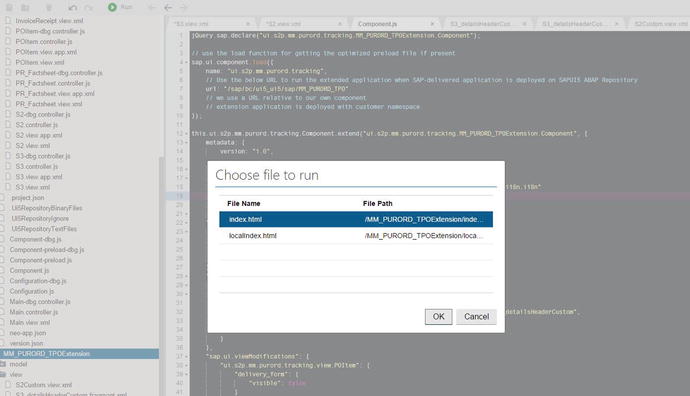
Figure 4-116. Previewing the app
- You need to deploy this extended project back to the Gateway server as a BSP app and activate the service for the app. To deploy the app, right-click it, select Deploy, and click Deploy To SAPUI5 ABAP Repository (see Figure 4-117).
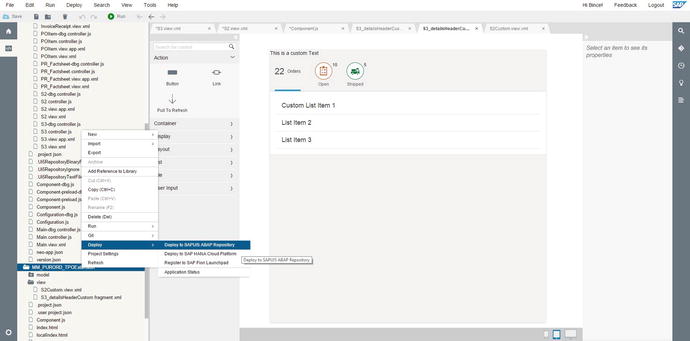
Figure 4-117. Deploy the app to the ABAP repository
- Select the Gateway system from the drop-down list, and click Next (see Figure 4-118).
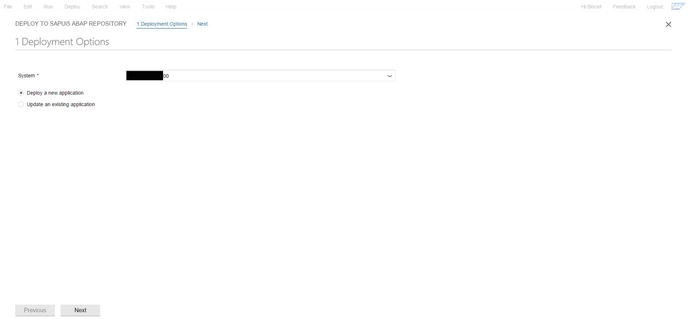
Figure 4-118. Select the Gateway system to deploy the app
- Enter the app name, a description, and a package name to deploy the app to the Gateway server (see Figure 4-119).
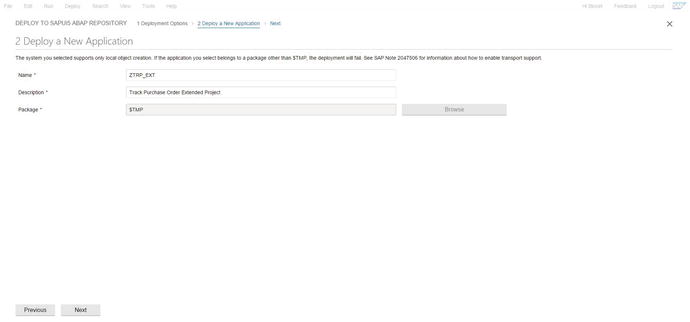
Figure 4-119. Give the package and details for the app
- Click Finish to deploy the project (see Figure 4-120).
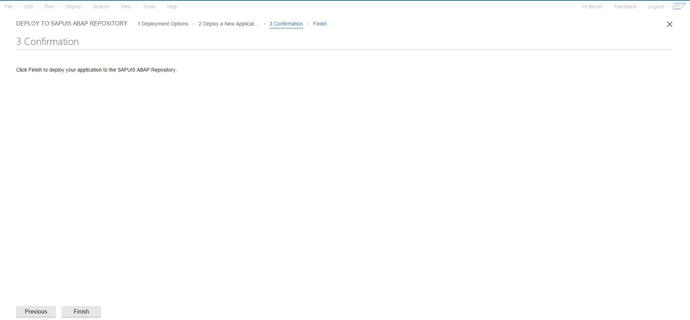
Figure 4-120. Completing the deployment of the app
The next chapter covers Fiori OData customizations and NetWeaver Gateway in detail.