
So far you have learned the Gang of Four patterns and select patterns from Patterns of Enterprise Application Architecture. You applied your knowledge of patterns to the server-side C# code. However, patterns are not limited to server-side code. They are also applicable to the client-side JavaScript code. Modern ASP.NET applications rely heavily on the client-side script. Features such as Ajax are not at all uncommon these days. So, it is important for ASP.NET developers to understand how patterns apply to JavaScript code.
To that end, this chapter will introduce you to some of the JavaScript code-organizational patterns. These patterns will help you to structure and organize your JavaScript code so that it becomes more maintainable. This chapter will also illustrate how some of the GoF patterns can be utilized in JavaScript.
To be specific, this chapter will cover the following topics:
- What JavaScript code organizational patterns are
- How to organize your code in object literals and function objects
- How to create and use namespaces in JavaScript
- The module, revealing module, and sandbox patterns
- How to implement some of the GoF patterns in JavaScript
Although this chapter will cover a broad range of topics, in no way it is meant to give extensive coverage of these areas. The idea is to make you aware of various patterns used in the JavaScript world so that you can explore further.
Note
This chapter assumes that you are familiar with the basics of JavaScript programming. It also assumes that you are aware of some of the popular JavaScript libraries and frameworks, such as jQuery and AngularJS.
Organizing JavaScript Code Using Objects
As an ASP.NET developer using C# you are already familiar with object-oriented programming. Concepts such as encapsulation, namespaces, classes, objects, inheritance, interfaces, and polymorphism are quite common in server-side code. As a C# developer you might expect JavaScript to support all these features as a part of the language. If so, you might be surprised by how JavaScript deals with these features and object-oriented programming in general.
This book is not intended to give you a sound understanding of object-oriented JavaScript. It aims to familiarize you with various features and concepts that are commonly used by professional JavaScript developers. This section and the sub-sections that follow limits themselves to illustrating how code can be organized in JavaScript objects.
In C# the basic unit of programming is a class. You create one or more classes and then you create objects of those classes as and when required. When it comes to JavaScript, many beginners organize their code using only functions. However, there is better way—JavaScript objects.
JavaScript doesn’t have any formal way to create classes. There is no keyword such as class that specifically defines a class. Instead, you define an object. This object contains properties and methods. There are two ways to create objects in JavaScript:
- Object literals
- Function objects
The following sections will discuss each type of object creation, including examples.
Note
ECMAScript 6 (ES6) introduces many improvements to the JavaScript language, including a way to create classes. However, as of this writing ES6 is not fully supported in most of the leading browsers. One needs to use a transpiler to convert the ES6 code to JavaScript that can be understood by the current versions of the browsers.
Object Literals
A JavaScript object literal is like a dictionary in that it contains key-value pairs. A key represents a property or method name, and its value represents a property value or method body. You can add key-value pairs to an object at the time it is defined, or you can create an empty object first and then add key-value pairs to it. Consider the following JavaScript code:
var employee = {
"employeeID": 1,
"firstName": "Nancy",
"lastName": "Davolio",
"display": function () {
alert("#" + this.employeeID +
" - " + this.firstName +
" " + this.lastName);
}
};
The preceding code creates an object literal and stores it in the employee variable. Notice the following things about the object literal syntax:
- The object begins with { and ends with }
- It consists of four key-value pairs. Each pair is separated by a comma (,). A key and its value are separated by a colon (:).
- The employeeID, firstName, and lastName keys act like a property or field of a class. The display key is a method that simply displays the values of other keys using an alert.
- Inside the display method body, “this” points to the object being created.
You could have created the employee object using an alternate (and more C#-like) syntax, as shown here:
var employee = {};
employee.employeeID = 1;
employee.firstName = "Nancy";
employee.lastName = "Davolio";
employee.display = function () {
alert("#" + this.employeeID +
" - " + this.firstName +
" " + this.lastName);
};
The preceding code creates an empty object using {} syntax. It then adds employeeID, firstName, and lastName key-value pairs using object-property syntax. Finally, a display key is also added, pointing to an anonymous function.
Once created, you can change the values of the existing members of the object literal using the familiar syntax:
employee.firstName = "Janet";
You can also invoke the display() method using the familiar syntax:
employee.display();
You can even add more members to the object at a later point in time.
Note
Most of the code fragments illustrated in this chapter can be tested in any HTML page. You can also create and configure an ASP.NET application as before and test these code snippets in MVC views.
Function Objects
In the preceding section you created an object using the object literal syntax. Many times when you need to create multiple objects they are based on a template. In C# you do that using the new keyword. If you wish to accomplish something similar in JavaScript, you need to define a
Function
Object.
Every JavaScript function is an object with properties and methods. You can create a function that houses the properties and methods required for an object. You can then create an object using the new keyword. This is best understood with an example:
var employee = function () {
this.employeeID = 0;
this.firstName = "";
this.lastName = "";
this.display = function () {
alert("#" + this.employeeID +
" - " + this.firstName +
" " + this.lastName);
}
}
The preceding code creates an anonymous function and stores it in the employee variable. Inside, the employee function declares three properties, namely employeeID, firstName, and lastName. It also defines the display() method, which shows the values of these properties using an alert.
To create an object based on the template you just created, the new keyword is used as shown here:
var emp = new employee();
emp.employeeID = 1;
emp.firstName = "Nancy";
emp.lastName = "Davolio";
emp.display();
The preceding code creates a new employee object and stores it in an emp variable. Note that the employee function (from an earlier snippet) acts like a constructor while instantiating an object using the new keyword. After the object creation, employeeID is 0 and the firstName and lastName properties are empty strings. You could have also designed the employee function to accept parameters if required. If so, it would have been a parameterized constructor.
The code then sets the employeeID, firstName, and lastName properties of the employee object. Finally, it calls the display() method to show these values.
Function Prototype
The employee object created in the preceding section works as expected. But there are a couple of issues that you should be aware of:
- All the properties of the employee object are public.
- All the properties and methods are contained in the employee object.
Since all the properties of the employee object are public, there can’t be any check or validation of the property values. This is because the calling code is directly setting the property values. There are no getter and setter methods to access the actual value.
Secondly, every new employee object is going to have an exact replica of the template. This is quite alright with the properties, because different instances usually maintain their own values for the properties. But this behavior is not suitable for methods. Since each object also gets its own methods, there is duplication (and wastage).
The remedy is to create methods (getter or setter as well as methods such as display) using the function prototype
.
Note
This section is not intended to give you a thorough understanding of JavaScript prototypes. This section will discuss only the bare minimum amount of information on this topic that is sufficient to carry on the pattern-related discussed in later sections.
It was mentioned earlier that every JavaScript function is actually an object and gets a few pre-built properties and methods. One of these properties is the prototype property. The prototype property—often referred to as a function prototype—allows you to add properties and methods to the function under consideration. Let’s review this by adding the display() method to the employee object’s prototype rather than to the employee object (Listing 11-1).
var employee = function (id,firstname,lastname) {
this._employeeID = 0;
this._firstName = "";
this._lastName = "";
if (arguments.length == 3) {
this._employeeID = id;
this._firstName = firstname;
this._lastName = lastname;
}
}
employee.prototype.display = function () {
alert("#" + this._employeeID +
" - " + this._firstName +
" " + this._lastName);
}
Listing 11-1.
Adding Display() to the Prototype
The code creates the employee function. This time, however, the function accepts three constructor parameters: id, firstname, and lastname. Inside, the code declares three private variables, namely _employeeID, _firstName, and _lastName. Notice the JavaScript convention of prefixing a member with an underscore (_) to make it private. This way these members won’t be directly accessible to the external world.
The constructor assigns some default values to these private members. It then checks whether parameters are passed to the constructor. This is done using the arguments.length property. If so, the parameter values are assigned to the private members. The employee function ends here.
The latter part of the code uses the prototype object of the employee function to add the display() method. The display() method has access to the private members since it’s the part of the employee’s prototype.
You can now create one or more employee objects as shown here:
var emp = new employee(1,"Nancy","Davolio");
emp.display();
As you can see, the first line of the code creates a new employee object by passing three constructor parameters. The display() method is then called on it to display the private member values.
This way you can add as many methods as you want to the prototype object. And now the methods won’t be duplicated with each employee object, since they are part of the prototype. Listing 11-2 shows how getter and setter methods can be added to the prototype to access the respective private members.
employee.prototype.getEmployeeID = function () {
return this._employeeID;
}
employee.prototype.setEmployeeID = function (id) {
this._employeeID = id;
}
employee.prototype.getFirstName = function () {
return this._firstName;
}
employee.prototype.setFirstName = function (firstname) {
this._firstName = firstname;
}
employee.prototype.getLastName = function () {
return this._lastName;
}
employee.prototype.setLastName = function (lastname) {
this._lastName = lastname;
}
employee.prototype.display = function () {
alert("#" + this._employeeID +
" - " + this._firstName +
" " + this._lastName);
}
Listing 11-2.
Getter and Setter Methods
Added to the Prototype
Once the getter and setter methods are in place, you can access the private members through them as follows:
var emp = new employee();
emp.setEmployeeID(1);
emp.setFirstName("Nancy");
emp.setLastName("Davolio");
emp.display();
This time the code doesn’t supply any constructor parameters. The employeeID, firstName, and lastName members are set individually using the corresponding setter methods. Along the same lines, you could have used the getter methods to retrieve the values of the private members.
Immediately Invoked Function Expressions (IIFE)
Usually you create a function first and then somewhere in the code you call that function. For example, consider the following code:
var HelloWorld = function () {
alert("Hello World!");
}
HelloWorld();
Here, the function HelloWorld() is created first before being called on the next line.
An immediately invoked function expression (IIFE)
is a JavaScript function that is executed immediately after it is created. Consider the following code:
(function () {
alert("Hello World!");
})();
As you can see, the preceding code creates an anonymous function. The whole function is enclosed in brackets and is immediately followed by (). This way function creation and execution are combined together. The IIFE can take parameters just like any other JavaScript function. An IIFE is useful in situations in which you wish to execute a piece of code immediately without formally creating a function.
Note
This term Immediately Invoked Function Expression (IIFE) was introduced by Ben Alman to accurately capture the essence of this technique. You may visit
https://en.wikipedia.org/wiki/Immediately-invoked_function_expression
for more details about IIFE.
Suppose you are developing an Ajax-driven web application. You want to display some advertisement or graphical announcement on the launching page of the application. The JavaScript code to do so is used only once, and hence there is no need to create a named function. Moreover, it would be a good idea not to pollute the global namespace with variables and functions that are needed only once. In this case an IIFE can do the trick. Listing 11-3 shows sample code that illustrates this:
(function (elemID) {
$.ajax({
url: "/home/GetAdvert",
success: function (advertData) {
var markup = "<strong>" + advertData.Title + "</strong>";
markup += "<div>" + advertData.Description + "</div>";
markup += "<a href='" + advertData.Url + "'>" +
advertData.Url + "</a>";
$("#" + elemID).html(markup);
},
dataType: "json"
});
})("advert");
Listing 11-3.
IIFE for Displaying Advertisements
The code consists of an immediate function that makes an Ajax call to the GetAdvert() action method from the Home controller. The immediate function receives ID of an HTML element that contains the advertisement. The success function receives a JavaScript object with properties such as Title, Description, and Url. An HTML markup is then formed based on these details and is added to the element.
We won’t go into the details of jQuery Ajax here. What is important is to understand how the immediate function is a good fit here. Notice that while invoking the function the element ID, advert, is passed to it. The GetAdvert() action used in this code is shown in Listing 11-4.
public IActionResult GetAdvert()
{
return Json(new
{
Title = "Buy ONE Get one FREE!",
Description = "Buy one large size Pizza and get one small size Pizza absolutely FREE!!!",
Url = "http://localhost"
});
}
Listing 11-4.
GetAdvert() returns JSON data
The GetAdvert() action simply returns an object consisting of Title, Description, and Url properties. Of course, you can make it database driven if you so wish.
If you have ever developed a jQuery plugin, you might find this concept familiar. It is a common practice to wrap the plugin code inside an IIFE. Although a discussion of jQuery plugins is beyond the scope of this book, a skeleton of a sample plugin named decorate is shown in Listing 11-5.
(function ($) {
$.fn.decorate = function (settings) {
//plugin code here
}
})(jQuery);
Listing 11-5.
jQuery Plugin and IIFE
As you can see, the plugin template consists of an immediate function that accepts a jQuery parameter. The jQuery library uses $ as an alias to the jQuery object. What if some other JavaScript library being used in the application also uses $ for its own use? If so, it is possible that $ no longer points to the jQuery object. Obviously, the plugin code won’t work as expected, as it depends on $. The immediate function can avoid this problem. By wrapping the plugin code inside an immediate function and passing a jQeury object to it, the meaning of $ is preserved inside the plugin code.
Note
The JavaScript features discussed so far—object literal, function object, prototype, and IIFE—are useful while organizing the code. Moreover, these features are also used along with the patterns discussed in the following sections.
Namespace Pattern
As a C# developer you are already familiar with the concept of namespaces. Namespaces
allow you avoid ambiguity between class names. A similar need arises in JavaScript also, especially when your JavaScript code consists of a lot of functions and objects.
When you create a JavaScript function or a variable inside a <script> block, it belongs to a global namespace. Suppose you are building a web application that heavily uses JavaScript for its functioning. Imagine that there are two JavaScript files, each containing a set of functions. It is quite possible that there could be name collisions between the two files. For example, say both of the files contain a HelloWorld() function.
It's not a good idea to place too many functions, objects, and variables inside the global namespace. It is best to house functions, objects, and variables needed by one library in its own namespace. Unfortunately, JavaScript doesn’t have any inbuilt language construct for creating namespaces. That’s where the namespace pattern comes to the rescue. The namespace pattern can help you devise a scheme that avoids naming collisions and organizes the related functions, objects, and variables in a better way.
Note
In complex JavaScript-driven applications you may need to check whether a namespace has already been defined by some other part of the code. To keep things simple, we won’t go into implementing such checks in our code. You may read Stoyan Stefanov’s book JavaScript Patterns for more details about the namespace pattern and other related concepts.
To understand how the namespace pattern can be used, you will create an application as shown in Figure 11-1.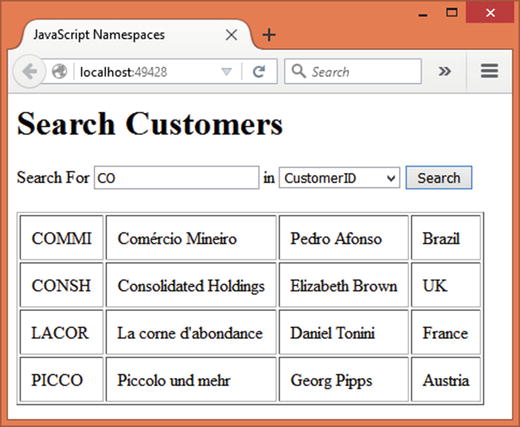
Figure 11-1.
Application using JavaScript namespaces
The application allows you to search the Customers table of the Northwind database. You can enter a search condition in the textbox, select the search field (possible search fields are CustomerID, CompanyName, ContactName, and Country), and then click on the Search button. An Ajax call is then made to an action method using jQuery Ajax. The action does the searching and returns the results to the browser. The results are displayed in an HTML table.
To develop this application, begin by creating a new ASP.NET web application project using Visual Studio and configure it to use MVC and Entity Framework (see Chapter 1 for more details). Also store the database connection string of the Northwind database in the appsettings.json file.
Then add the AppSettings class to the Core folder and add the ConnectionString static property to it. Open the Startup class and write the code to set the ConnectionString property to the one stored in the appsettings.json file. Also create the Customer model class and the AppDbContext class required for the data access. You are already familiar with these steps, and hence they are not discussed here.
Next, add HomeController to the Controllers folder. In addition to the default Index() action, you need to create four actions that do the searching on the basis of CustomerID, CompanyName, ContactName, and Country columns. The
SearchByID() action
that searches the Customers table on the basis of the CustomerID column is shown in Listing 11-6.
public IActionResult SearchByID(string id)
{
using (AppDbContext db = new AppDbContext())
{
var query = from c in db.Customers
where c.CustomerID.Contains(id)
orderby c.CustomerID ascending
select c;
return Json(query.ToList());
}
}
Listing 11-6.
SearchByID() Action Searches for CustomerID
The SearchByID() action is quite straightforward. It simply queries the Customers DbSet for all the CustomerIDs that contain the search condition (id parameter). Notice the use of the Contains() method to accomplish this.
The search results are returned to the caller in JSON format. This is done using the
Json() method
of the Controller base class.
Create the remaining three actions—SearchByCompany(), SearchByContact(), and SearchByCountry()—in a similar way by using the appropriate column in the query. To save some space, these actions will not be discussed here.
Now create a Scripts subfolder within the wwwroot folder and place the jQuery library in it. Also add an empty JavaScript file—CustomerApp.Search.js—to the Scripts folder. You can add this file using the Add New Item dialog. This file will contain all the JavaScript code pertaining to the namespace being created.
Note
You can reference the jQuery library from a CDN instead of referencing a local copy. Moreover, you can use the Bower package manager integrated into the Visual Studio IDE to deal with the client script libraries. To keep things simple, we won't use those features in our examples.
Open the CustomerApp.Search.js file in the Visual Studio editor and write the skeleton of the namespace, as shown in Listing 11-7.
var CustomerApp = {};
CustomerApp.Search = {};
CustomerApp.Search.SearchByID = function (id, target) {
// code here
}
CustomerApp.Search.SearchByCompany = function (companyname,target) {
// code here
}
CustomerApp.Search.SearchByContact = function (contactname,target) {
// code here
}
CustomerApp.Search.SearchByCountry = function (country,target) {
// code here
}
Listing 11-7.
Skeleton of the CustomerApp.Search Namespace
Observe the skeleton code carefully. The code begins by creating the CustomerApp empty object. This object acts as the top namespace (or container) for your searching library. Further, the code adds the Search empty object to the CustomerApp object. Thus, Search becomes the nested namespace of CustomerApp.
The code then proceeds to add four search functions—SearchByID, SearchByCompany, SearchByContact, and SearchByCountry—to the Search namespace. Each of these functions accepts two parameters—the search condition and the ID of the target element where search results are to be loaded.
These search functions are not part of the global namespace. Rather, they are part of the CustomerApp.Search namespace. Along the same lines you could have created other namespaces inside the CustomerApp object (say, CustomerApp.Utils).
Now it’s time to add some code to these methods. Listing 11-8 shows the completed
SearchByID() function
.
CustomerApp.Search.SearchByID = function (id, target) {
$.ajax({
url: "/home/SearchByID",
data: { "id": id },
success: function (results) {
var table = "<table border='1' cellpadding='10'>";
for (var i = 0; i < results.length; i++) {
table += "<tr>";
table += "<td>" + results[i].CustomerID + "</td>";
table += "<td>" + results[i].CompanyName + "</td>";
table += "<td>" + results[i].ContactName + "</td>";
table += "<td>" + results[i].Country + "</td>";
table += "</tr>";
}
$("#" + target).html(table);
},
dataType: "json"
});
}
Listing 11-8.
SearchByID() Makes Ajax Call
The SearchByID() function receives two parameters—CustomerID to look for and target HTML element that houses the search results. Inside, the code makes an Ajax call to the SearchByID() action method of the HomeController. This is done using the $.ajax() method of jQuery.
The $.
ajax() method
accepts an object containing the settings that are to be used while making the Ajax request. The settings are as follows:
- url: The url property points to the server-side resource that is to be invoked. In this case, /home/SearchByID.
- data: The property holds the data accompanying the Ajax request. The SearchByID() action method requires the search criteria as an id parameter. So, a JavaScript object with an id property is created.
- success: The success property points to a callback function that is invoked once the Ajax call completes successfully. The success function receives the search results in the form of an array (recollect that the SearchByID() action returns a List of Customer objects). The success function iterates through this array and forms an HTML table displaying CustomerID, CompanyName, ContactName, and Country properties. The HTML table is loaded into the target element using the html() jQuery method.
- dataType: The dataType property indicates the type of data returned from the server; JSON in this case.
Along the same lines, create the remaining search functions: SearchByCompany(), SearchByContact(), and SearchByCountry(). These functions are quite similar to the one just discussed and hence will not be discussed here. You may get them from this book’s source code.
This completes the searching library. Now add the Index view to the Views/Home folder. Add a <script> reference to the jQuery and CustomerApp.Search.js in the head section of the Index view as shown here:
<script src="∼/scripts/jquery-2.1.1.js"></script>
<script src="∼/Scripts/CustomerApp.Search.js"></script>
Then add the HTML markup shown in Listing 11-9 in the <body> section of the view.
<h1>Search Customers</h1>
<div>
Search For
<input id="criteria" type="text" />
in
<select id="searchfield">
<option>CustomerID</option>
<option>CompanyName</option>
<option>ContactName</option>
<option>Country</option>
</select>
<input type="button" value="Search" id="search" />
</div>
<br />
<div id="results"></div>
Listing 11-9.
Markup of the Index View
The HTML markup consists of a textbox (criteria), a dropdown list (searchfield), and the Search button (search). The searchfield dropdown list contains four option elements: CustomerID, CompanyName, ContactName, and Country. The results div element is used to display the search results.
Next, add a new <script> block in the head section and write the code shown in Listing 11-10 in it.
$(document).ready(function () {
$("#search").click(function () {
var criteria = $("#criteria").val();
var searchField = $("#searchfield").val();
switch (searchField) {
case "CustomerID":
CustomerApp.Search.SearchByID(criteria,'results');
break;
case "CompanyName":
CustomerApp.Search.SearchByCompany(criteria, 'results');
break;
case "ContactName":
CustomerApp.Search.SearchByContact(criteria, 'results');
break;
case "Country":
CustomerApp.Search.SearchByCountry(criteria, 'results');
break;
}
});
});
Listing 11-10.
Using the Search Library
The code handles the click event of the Search button by using the click() method of jQuery. The function supplied to the click() method grabs the search criteria entered in the textbox and stores it in the criteria local variable. The code also stores the selected searchfield value in the searchfield variable.
A switch statement checks the value of the searchfield variable and invokes the appropriate searching methods from the search library. Notice how the search functions are invoked using namespace-like syntax:
CustomerApp.Search.SearchByID(criteria,'results');
Also notice that results is passed as the target parameter since search results are to be displayed in the results <div> element.
This completes the application. Run the application, enter a search condition, and test the functionality of all the search methods.
Module Pattern
If your ASP.NET application uses JavaScript heavily to function, chances are the amount of JavaScript you need to maintain is quite large. Moreover, as the application grows even the JavaScript code might increase to cope up with the added functionality.
Organizing the JavaScript code using the namespace pattern is a good starting point when it comes to organizing JavaScript code. However, if your JavaScript code base is quite large and you wish to make it modular for the sake of easy maintenance and extensions, you may consider using the module pattern.
As the name suggests, the module pattern allows you to create self-contained modules of JavaScript code. The module pattern helps you to develop modules that are decoupled and can be added as and when needed. The module pattern uses many of the concepts you learned earlier in this chapter, such as object literals, IIFE, and namespaces.
Just to give you an idea of how a typical module is developed using the module pattern, see Listing 11-11.
var JsApp = {};
JsApp.Module1 = (function () {
return {
HelloWorld: function () {
alert("Hello World!");
}
};
})();
Listing 11-11.
A Sample Module Using the Module Pattern
The code creates an empty JsApp object. Then a module—Module1—is created using an immediate function and an object literal.
The immediate function
can contain local variables and private functions that are required for the internal processing. They won’t be exposed to the external world. In this case the immediate function doesn’t contain any such private members.
The public API of the module is exposed using an object literal
. In this case an object with a single method, HelloWorld(), is formed and is returned from the immediate function.
In effect, Module1 points to an object with the HelloWorld() method. To invoke the
HelloWorld() method
from Module1 you would write:
JsApp.Module1.HelloWorld();
You could have created any number of modules to the JsApp.
Now that you know the basics of the module pattern, let’s develop a more realistic example that demonstrates how it works. In this example you will develop an application, as shown in Figure 11-2.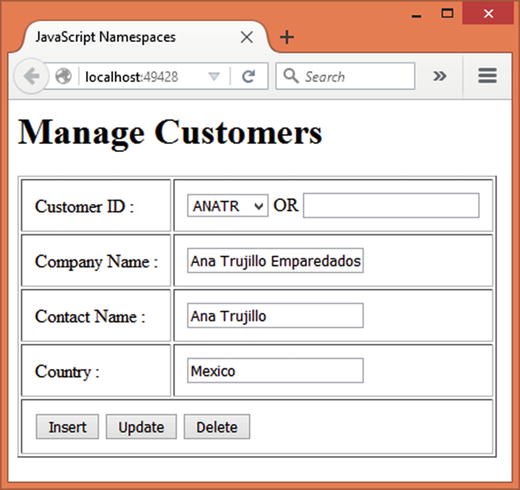
Figure 11-2.
Customer manager application
The application allows you add, modify, and delete customers from the Customers table of the Northwind database. You can select a CustomerID from the dropdown list, and its corresponding CompanyName, ContactName, and Country values are displayed in the respective textboxes. You can then modify the details and click on the Update button to save the changes. To add a new customer you need to specify a new CustomerID and all the other details and click on the Insert button. Selecting a CustomerID and clicking on the Delete button deletes a customer.
More important, the operations just explained are performed by calling a Web API through jQuery Ajax. The jQuery code involved in performing these CRUD operations is organized using the module pattern.
To develop this application, begin by creating a new ASP.NET web application project using Visual Studio and configure it to use MVC, Web API, and Entity Framework (see Chapter 1 for more details). Also store the database connection string of the Northwind database in the appsettings.json file.
Then add the
AppSettings class
to the Core folder and add the ConnectionString static property to it. Open the Startup class and write the code to set the ConnectionString property to be the one stored in the appsettings.json file. Also create the Customer model class and the AppDbContext class required for the data access. You are already familiar with these steps, and hence they will not be discussed here.
Next, add a Web API controller named CustomerService to the Controllers folder. The CustomerService Web API wraps all the Entity Framework code to perform the CRUD operations
and is shown in Listing 11-12.
[Route("api/[controller]")]
public class CustomerService : Controller
{
[HttpGet]
public List<Customer> Get()
{
using (AppDbContext db = new AppDbContext())
{
return db.Customers.ToList();
}
}
[HttpGet("{id}")]
public Customer Get(string id)
{
using (AppDbContext db = new AppDbContext())
{
return db.Customers.Where(i => i.CustomerID == id).SingleOrDefault();
}
}
[HttpPost]
public void Post([FromBody]Customer obj)
{
using (AppDbContext db = new AppDbContext())
{
db.Entry(obj).State = EntityState.Added;
db.SaveChanges();
}
}
[HttpPut("{id}")]
public void Put(string id, [FromBody]Customer obj)
{
using (AppDbContext db = new AppDbContext())
{
db.Entry(obj).State = EntityState.Modified;
db.SaveChanges();
}
}
[HttpDelete("{id}")]
public void Delete(string id)
{
using (AppDbContext db = new AppDbContext())
{
Customer obj = db.Customers.Where(i => i.CustomerID == id).SingleOrDefault();
db.Entry(obj).State = EntityState.Deleted;
db.SaveChanges();
}
}
}
Listing 11-12.
CustomerService Web API Performs CRUD Operations
The
CustomerService controller
consists of five actions, namely Get(), Get(id), Post(), Put(), and Delete(). We won’t go into the details of these operations here, because you created a similar Web API in earlier chapters. Here it is sufficient to say that Get() returns a list of Customer entities and Get(id) accepts a CustomerID and returns a single Customer entity matching that value. The Post(), Put(), and Delete() actions add, modify, and delete a Customer from the database, respectively.
This completes the CustomerService controller. It’s now time to create the CustomerManager module that invokes this Web API through jQuery Ajax. Add a Scripts folder to the wwwroot folder and place the jQuery library into it. Also add a new JavaScript file—CustomerApp.CustomerManager.js—to the Scripts folder. Listing 11-13 shows the skeleton of the
CustomerManager module
that you will develop shortly.
var CustomerApp = {};
CustomerApp.CustomerManager = (function () {
return {
SelectAll: function (callback) {
// code here
},
SelectByID: function (id, callback) {
// code here
},
Insert: function (obj, callback) {
// code here
},
Update: function (obj, callback) {
// code here
},
Delete: function (id, callback) {
// code here
}
};
}());
Listing 11-13.
Skeleton of the CustomerManager Module
As you can see, the CustomerManager module is being added to CustomerApp. The immediate function returns an object with five methods:
- SelectAll: To fetch all the customers from the database
- SelectByID: To fetch a customer matching a specific CustomerID
- Insert: To add a new customer to the database
- Update: To modify an existing customer from the database
- Delete: To delete an existing customer from the database
Notice that all these methods accept a callback parameter. The callback parameter is a callback function that gets invoked upon a successful Ajax call. The SelectByID() and Delete() methods accept a CustomerID as the id parameter. The Insert() and Update() methods accept a Customer object to be added or modified, respectively.
These methods form the public API of the CustomerManager module. They are used to invoke the respective Web API methods. Listing 11-14 shows the code that goes inside the
SelectAll() method
.
CustomerApp.CustomerManager = (function () {
return {
SelectAll: function (callback) {
$.ajax({
url: "/api/customerservice",
type: "GET",
dataType: "json",
success: function (data) {
callback(data);
}
});
},
...
...
}());
Listing 11-14.
SelectAll() Calls the Get() Action of CustomerService
The SelectAll() method accepts a callback function as its parameter. Inside, the code makes a GET request to the CustomerService Web API. This is done using the $.ajax() method of jQuery. Since the Ajax request is being made using the GET verb, it is mapped with the Get() action of CustomerService.
The
success function
receives the data returned by CustomerService (a list of Customer objects, in this case). The
callback function
is then invoked by passing this data to it. The other Ajax calls look similar, with a few changes. For example, the Ajax call that invokes the Put() action looks like this:
$.ajax({
url: "/api/customerservice/" + obj.CustomerID,
type: "PUT",
data: JSON.stringify(obj),
contentType: "application/json",
dataType: "json",
success: function (msg) {
callback(msg);
}
});
As you can see, the CustomerID is appended to the url, and the type property is set to PUT. Moreover, the data property holds a Customer object containing the modified details.
The remaining Ajax calls and methods will not be discussed here as they are quite similar to the calls just discussed. You can pick up the complete code of these methods from the code download of this book.
This completes the
CustomerManager module
. Now it’s time to put it to use inside a view. Add HomeController to the Controllers folder and also add the Index view to the Views/Home folder.
Add <script> references to the jQuery library and also to the CustomerApp.CustomerManager.js file in the head section of the Index view:
<script src="∼/scripts/jquery-2.1.1.js"></script>
<script src="∼/Scripts/CustomerApp.CustomerManager.js"></script>
Next, add the HTML markup shown in Listing 11-15 to the body section of the
Index view
.
<h1>Manage Customers</h1>
<table border="1" cellpadding="11">
<tr>
<td>Customer ID :</td>
<td>
<select id="customerid"></select>
OR
<input id="newcustomerid" type="text" />
</td>
</tr>
<tr>
<td>Company Name :</td>
<td><input id="companyname" type="text" /></td>
</tr>
<tr>
<td>Contact Name :</td>
<td><input id="contactname" type="text" /></td>
</tr>
<tr>
<td>Country :</td>
<td><input id="country" type="text" /></td>
</tr>
<tr>
<td colspan="2">
<input id="insert" type="button" value="Insert" />
<input id="update" type="button" value="Update" />
<input id="delete" type="button" value="Delete" />
</td>
</tr>
</table>
Listing 11-15.
Markup of the Index View
The markup is quite straightforward. It consists of a table that houses four textboxes, a dropdown list, and three buttons. The four textboxes—newcustomerid, companyname, contactname, and country—are used to accept CustomerID, CompanyName, ContactName, and Country values, respectively.
The customerid dropdown list displays a list of existing customer IDs. The three buttons—Insert, Update, and Delete—are used to trigger the corresponding operations.
Now add a new <script> block in the head section, just below the script references added earlier, and write the code shown in Listing 11-16 into it.
$(document).ready(function () {
CustomerApp.CustomerManager.SelectAll(function (data) {
for (var i = 0; i < data.length; i++) {
$("#customerid").append("<option>" + data[i].CustomerID + "</option>");
}
});
});
Listing 11-16.
Calling the CustomerModule’s Public API
This code calls the
SelectAll() method
of the CustomerManager module as soon as the view loads in the browser. The callback passed to the SelectAll() method iterates through the list of customers (data) and adds the CustomerIDs to the customerid dropdown list. This is done using the append() method of jQuery.
Upon selecting a CustomerID from the dropdown list, its details need to be displayed in the other textboxes. This is done by handling the change-event handler of the dropdown list (Listing 11-17).
$("#customerid").change(function () {
CustomerApp.CustomerManager.SelectByID($("#customerid").val(), function (data) {
$("#companyname").val(data.CompanyName);
$("#contactname").val(data.ContactName);
$("#country").val(data.Country);
});
});
Listing 11-17.
Fetching and Displaying Customer Details
The code uses the
SelectByID() method
of the CustomerManager to fetch the details of a single customer. The CustomerID selected in the dropdown list and a callback function are passed to the SelectByID() method as its parameters. The callback function fills the textboxes with the CompanyName, ContactName, and Country properties.
To add a new customer, you need to handle the click event of the Insert button, as shown in Listing 11-18.
$("#insert").click(function () {
var obj = {};
obj.CustomerID = $("#newcustomerid").val();
obj.CompanyName = $("#companyname").val();
obj.ContactName = $("#contactname").val();
obj.Country = $("#country").val();
CustomerApp.CustomerManager.Insert(obj, function (msg) {
alert(msg);
});
});
Listing 11-18.
Adding a New Customer
The code creates an empty object—obj—and adds CustomerID, CompanyName, ContactName, and Country properties to it. These properties get their values from the respective textboxes. Then the code invokes the Insert() method of the CustomerManager module by passing obj and a callback to it. The callback simply displays the message returned from the Web API in an alert.
The click-event handlers
of the Update and Delete buttons are quite similar and hence will not be discussed here. You can get the complete code of this script block from this book’s code download.
This completes the application. Run the application and check whether you can add, modify, and delete the customer records as expected.
Revealing Module Pattern
The module pattern puts all the functionality of the module directly into an object literal and then returns it from the immediate function. While developing a larger and more complex module you may not be aware of the exact methods that are to be exposed as the public API. For example, there might be several private methods, helper functions, and variables that are used internally by the module but are not to be exposed to the external world.
In such cases the revealing module pattern
comes in handy. With the revealing module pattern, you create functions and variables as you develop the module. At this stage you don’t return anything. Once all the functionality of the module is in place, you decide what should be included in the public interface of the module. You return an object containing only those methods. Consider the code fragment shown in Listing 11-19.
var JsApp = {};
JsApp.Module1 = (function () {
var msg = "Hello World!";
var SayHello = function () {
alert(msg);
}
return {
HelloWorld:SayHello
};
})();
Listing 11-19.
Using the Revealing Module Pattern
The immediate function
declares a private variable—msg—that holds a string value—Hello World! The SayHello() function is a private function and it simply displays the value of msg in an alert. At this point, the public API of the module is not yet decided.
Then the code creates an object literal with a HelloWorld property that points to the
SayHello() function
. This object is returned from the immediate function. This is where, after the completion of the module, you decide the public interface of the module. Here you decide to expose the SayHello method as HelloWorld.
If you wish to use the revealing module pattern instead of the module pattern, the CustomerManager module developed in the preceding example would have looked as shown in Listing 11-20.
var CustomerApp = {};
CustomerApp.CustomerManager = (function () {
var Get = function (callback) {
//code here
}
var GetByID = function (id, callback) {
//code here
}
var Post = function (obj, callback) {
//code here
}
var Put = function (obj, callback) {
//code here
}
var Delete = function (id, callback) {
//code here
}
return {
SelectAll: Get,
SelectByID: GetByID,
Insert: Post,
Update: Put,
Delete: Delete
};
}());
Listing 11-20.
CustomerManager Module Uses Revealing Module Pattern
As you can see, the immediate function now defines five private functions, namely Get(), GetByID(), Post(), Put(), and Delete(). These private functions make the Ajax call to the appropriate Web API actions (not shown in the listing for the sake of simplicity) and perform the respective operations.
Then an object literal
is created with five properties, namely SelectAll, SelectByID, Insert, Update, and Delete. These five properties point to the Get(), GetByID(), Post(), Put(), and Delete() private functions, respectively. These five properties form the public API of the module. The object is then returned from the immediate function.
Sandbox Pattern
In the preceding sections you used the namespace pattern. Although it worked as expected there, is a drawback—more typing due to long namespace names. You can imagine a situation in which such long namespaces are used in dozens of places in your code.
The sandbox pattern
can be used to avoid this issue. A sandbox is a self-contained object that includes APIs from only those modules that your code needs at a given point in time. Suppose your library has three modules, namely Module1, Module2, and Module3. At a given point in time, you want to work with the API exposed by Module1 and Module2. So, you construct a “sandbox” that contains the API from those two modules. Your code deals with this sandbox and not with the modules directly. Thus, your code reduces to:
sandbox.<some_method>();
Note
There is one more issue with the namespace pattern. Since it depends on one, and only one, global instance of your library, you can’t use two versions of the library on a page. When you use the sandbox pattern, your code gets its own sandbox and is not dependent on the application’s global object as such. You may read Stoyan Stefanov’s book JavaScript Patterns for more details about the sandbox pattern and its benefits.
To understand how the sandbox pattern works, let’s modify the example you developed for the namespace pattern. Copy the same project and perform the modifications that follow.
Add the CustomerApp.Sandbox.js file to the Scripts folder using the Add New Item dialog and write the code shown in Listing 11-21 in it.
(function (global) {
var CustomerApp = function (modules, callback) {
if (!(this instanceof CustomerApp)) {
return new CustomerApp(modules, callback);
}
for (var i = 0; i < modules.length; i++) {
CustomerApp.modules[modules[i]](this);
}
callback(this);
};
CustomerApp.modules = {};
global.CustomerApp = CustomerApp;
})(this);
Listing 11-21.
Creating a Sandbox Object
This code is the heart of the sandbox pattern. It consists of an immediate function that receives a parameter—global. The object referenced by this is passed to the global parameter during the invocation. In JavaScript this points to the global object (window object, for web browsers) when used outside of any function. So, here the immediate function receives a reference to the global window object.
Inside, the CustomerApp object gets created. The CustomerApp function receives two parameters, namely modules and callback. The modules parameter is a string array that contains a list of modules required by your code. The callback parameter is a function that uses the sandbox being generated.
Inside the CustomerApp function, the first if statement checks whether this points to the CustomerApp object. If not, a new instance of CustomerApp is created by passing the modules array and the callback to it.
A for loop iterates through the modules array and generates a sandbox object containing the API of all the requested modules. Then the callback function is invoked by passing this sandbox object to it.
After the function definition, the code sets the modules property on the CustomerApp to an empty object and also sets the CustomerApp property on the global (window) object to point to the CustomerApp object.
Next, define the
search module
as per the skeleton shown in Listing 11-22.
CustomerApp.modules.search = function (sandbox) {
sandbox.SearchByID = function (id, target) {
}
sandbox.SearchByCompany = function (companyname, target) {
}
sandbox.SearchByContact = function (contactname, target) {
}
sandbox.SearchByCountry = function (country, target) {
}
};
Listing 11-22.
Skeleton of the Search Module
As you can see, the search function receives a sandbox object. Methods such as SearchByID(), SearchByCompany(), SearchByContact(), and SearchByCountry() are added to this sandbox object.
Note
The code inside these four methods is exactly same as discussed in the namespace pattern example. You can simply copy and paste those Ajax calls here to complete the module. To save some space, that code will not be discussed again.
Just for the testing, add another module—hello—to the file as shown in Listing 11-23.
CustomerApp.modules.hello = function (sandbox) {
sandbox.HelloWorld = function () { alert("Hello World!"); };
sandbox.HelloUniverse = function () { alert("Hello Universe!"); };
}
Listing 11-23.
Hello Module
The Hello module is quite straightforward and adds two methods to the sandbox: HelloWorld() and HelloUniverse().
This completes CustomerApp.Sandbox.js. Now open the Index view and adjust the <script> reference to point to the CustomerApp.Sandbox.js file. Then modify the <script> block from the
Index view
as shown in Listing 11-24.
$(document).ready(function () {
$("#search").click(function () {
var criteria = $("#criteria").val();
var searchField = $("#searchfield").val();
switch (searchField) {
case "CustomerID":
CustomerApp(['search', 'hello'], function (sandbox) {
sandbox.SearchByID(criteria, 'results');
sandbox.HelloWorld();
});
break;
case "CompanyName":
CustomerApp(['search'], function (sandbox) {
sandbox.SearchByCompany(criteria, 'results');
});
break;
case "ContactName":
CustomerApp(['search'], function (sandbox) {
sandbox.SearchByContact(criteria, 'results');
});
break;
case "Country":
CustomerApp(['search'], function (sandbox) {
sandbox.SearchByCountry(criteria, 'results');
});
break;
}
});
});
Listing 11-24.
Using the Sandbox
Notice the code shown in bold letters. This code calls the CustomerApp function (remember CustomerApp is a global property) by passing the modules array and a callback function. The modules array contains two elements—search and hello—that indicate the modules your code wants to use.
The
callback function
receives the sandbox object as its parameter. Your code within the callback function invokes the SearchByID() and HelloWorld() methods on the sandbox object.
Notice the other instance of the switch statement. There, you specify only the search module in the modules array. Hence, the sandbox object received by those calls won’t have the API of the hello module. Your callback function won’t be able to call HelloWorld() on the sandbox object.
This completes the application. Run the application and test it as discussed. If you log the sandbox object to the browser’s console (console.log()) then Firefox will display it as shown in Figure 11-3.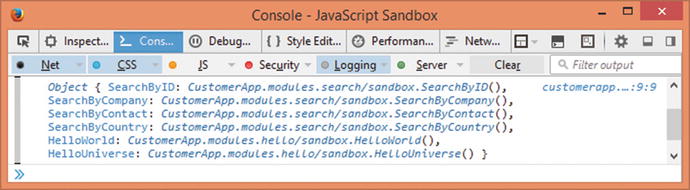
Figure 11-3.
Sandbox object in Firefox
Notice how the sandbox object includes six methods—two from hello module and four from the search module.
Using Design Patterns in JavaScript
You have learned all the GoF design patterns in earlier chapters. As mentioned earlier, these patterns are not tied to a particular programming language. The concepts and ideas suggested by these patterns can be implemented in any object-oriented programming language, including the JavaScript. Of course, the code-level implementation details will vary from one language to another.
In this section and the subsections that follow, you will see how some of the GoF patterns can be put to use in JavaScript. Specifically, you will learn to implement the following patterns:
- Singleton pattern (creational)
- Façade pattern (structural)
- Observer pattern (behavioral)
Since you already know the intent of these patterns, details such as the purpose and the UML diagram will not be discussed here.
Singleton Pattern
The singleton pattern
ensures that only one instance of a class gets created. While implementing the singleton pattern in JavaScript, you need to keep the following things in mind:
- In JavaScript there are no classes as such. All are objects. Each object is unique in itself (even if its properties bear the same values as another object).
- Object literals are actually singletons. You don’t need to do anything special to implement the singleton pattern in this case.
- While creating objects using the new keyword, you may wish to return the same object no matter how often new is called. Here you will need to implement the singleton pattern yourself.
Suppose you want to store various page-specific themes in an object. Also assume that the same settings are accessed at several places in your code, and hence you decide to make that object a singleton. Listing 11-25 shows a simple implementation of the singleton pattern that fulfills this requirement.
var ThemeSettings = function () {
var instance = this;
this.colorTheme = "Office";
this.fontTheme = "Modern";
this.layoutTheme = "SideBySide";
ThemeSettings = function () {
return instance;
}
}
Listing 11-25.
Singleton in JavaScript
The code creates a function—ThemeSettings—that has a private instance variable. The instance variable points to. Then the code sets three properties of the object, namely colorTheme, fontTheme, and layoutTheme. In a more realistic case, these settings might be fetched from the server using an Ajax call.
The code cleverly rewrites the constructor of ThemeSettings. The new constructor simply returns the instance variable to the caller. So, when new is called on ThemeSettings for the first time, the original constructor is invoked. The original constructor sets the three properties and returns as usual. The next time new is called on ThemeSettings, the new constructor takes this into effect and simply returns the existing instance. Thus, each call to new returns the same object—the essence of the singleton pattern.
To test the working of the ThemeSettings object, write the code shown in Listing 11-26.
var settings1 = new ThemeSettings();
var settings2 = new ThemeSettings();
alert("Is ThemeSettings instance same? " + (settings1 === settings2));
settings2.colorTheme = "Nature";
alert("settings1.colorTheme is " + settings1.colorTheme);
Listing 11-26.
ThemeSettings Is a Singleton
The code creates two variables—settings1 and settings2—using the new keyword on ThemeSettings. It seems that two independent objects of ThemeSettings are being created. The alert then checks settings1 and settings2 using the strict equality operator of JavaScript (===). The strict equality operator returns true if the operands are equal and are of the same type.
If you run this code, you will find that the alert confirms that settings1 and settings2 indeed point to the same object (true is returned). The code then changes the colorTheme property of settings2. Finally, the value of settings1.colorTheme is displayed using an alert. As you might have guessed, the alert displays Nature, confirming that both variables are pointing to the same object.
You can implement the singleton pattern with one more variation. Consider the code shown in Listing 11-27.
var ThemeSettings = (function () {
var instance;
function createInstance() {
var settings = new Object();
settings.colorTheme = "Office";
settings.fontTheme = "Modern";
settings.layoutTheme = "SideBySide";
return settings;
}
return {
getInstance: function () {
if (!instance) {
instance = createInstance();
}
return instance;
}
};
})();
Listing 11-27.
Alternate Implementation of the Singleton Pattern
Here, the code creates an immediate function. The immediate function declares the private instance variable. The private createInstance() function creates a settings object using the new Object() syntax. Then three properties, namely colorTheme, fontTheme, and layoutTheme, are set on the settings object, which is then returned to the caller.
The function returns an object literal with a getInstance property. The getInstance() code checks whether the instance variable is null or not. If it is null, the createInstance() private function is called. The object instance returned by createInstance() is assigned to the instance variable. When getInstance() is called for the first time, the instance gets created. The next time and thereafter, the existing instance will be returned to the caller.
Listing 11-28 shows a code fragment that can be used to test the working of this alternate implementation.
var settings1 = ThemeSettings.getInstance();
var settings2 = ThemeSettings.getInstance();
alert("Is ThemeSettings instance same? " + (settings1 === settings2));
settings2.colorTheme = "Nature";
alert("settings1.colorTheme is " + settings1.colorTheme);
Listing 11-28.
Testing ThemeSettings
This code is quite similar to what you wrote earlier. The only difference is that instead of using the new keyword it calls the getInstance() method on the ThemeSettings object. If you were to run this code, the first alert would confirm that settings1 and settings2 are pointing to the same object. The second alert would display Nature, proving that a change to a property on the second variable gets reflected on the first variable too.
Façade Pattern
The façade pattern
provides a high-level, easy-to-use interface to the client by shielding the different interfaces of the subsystems. The primary goal of the façade is to simplify the client interaction with the other objects involved in an operation.
Suppose that you are developing an Ajax-driven application that processes orders submitted by the users. The application needs to perform three checks before approving or rejecting the application:
- Verify the address details.
- Ensure that the bank details are correct.
- Confirm the employment details furnished by the user.
Considering these requirements, you may come up with the JavaScript objects illustrated in Listing 11-29.
var AddressDetails = function () {
this.validate = function () {
//complex code here
return true;
}
}
var BankDetails = function () {
this.validate = function () {
//complex code here
return true;
}
}
var EmploymentDetails = function () {
this.validate = function () {
//complex code here
return true;
}
}
Listing 11-29.
JavaScript Objects Required to Process the Load Application
As shown in the code, three objects, namely AddressDetails, BankDetails, and EmploymentDetails are involved in the processing of a loan application. How these objects perform the processing is not our primary concern here. Let’s assume that the validation process is complex and involves several server-side calls as well as client-side processing. So, for the sake of testing, the validate() method of each of these object simply returns true.
The OrderProcessor object (you will create it shortly) needs to use all three objects to proceed with the order. The AddressDetails object can implement the façade pattern, as shown in Listing 11-30.
var OrderProcessor = function () {
//constructor code here
}
OrderProcessor.prototype.validateDetails = function () {
var addresss = new AddressDetails();
var bank = new BankDetails();
var employment = new EmploymentDetails();
var result = true;
if (!addresss.validate()) {
result = false;
} else if (!bank.validate()) {
result = false;
} else if (!employment.validate()) {
result = false;
}
return result;
}
Listing 11-30.
AddressDetails Implements Façade
The code adds the validateDetails() method to the OrderProcessor class. The validateDetails() method implements the façade pattern by simplifying the validation process for the client code. It makes use of the AddressDetails, BankDetails, and EmploymentDetails objects and invokes their validate() methods. The final outcome is returned to the caller as true (all validations succeed) or false (at least one validation failed).
The client code can then use the validateData() façade like this:
var app = new OrderProcessor();
var status = app.validateDetails();
alert("Are details valid? " + status);
The preceding code creates an OrderProcessor object and then calls the validateDetails() method. The outcome of the validation is displayed in an alert.
Observer Pattern
The observer pattern
defines a one-to-many dependency between objects so that when one object changes its state all the others are notified about the change. It follows the publisher-subscriber model where one or more subscribers subscribe to an event, and the publisher notifies all the subscribers when that event takes place in the system.
The observer pattern is commonly used in JavaScript code for event-handling purposes. The parts of the application that are interested in certain events (subscribers), such as click or keypress, wire event handlers to the events. The controls such as button or textbox (publishers) raise the respective events and the handlers are invoked.
Let’s understand this with a more specific example. Suppose you are building a blogging engine. Each post displayed by the blog allows users to post comments. The comment box needs to have the following features:
- As a user types in the comment, you need to show the preview of the comment.
- A character counter informing the user about the number of characters entered so far is to be displayed.
Figure 11-4 shows a simplified version of such a comment box.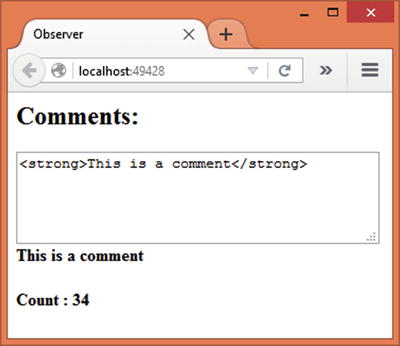
Figure 11-4.
Comment box with preview and character counter
Let’s assume that a blog comment is represented by a BlogComment object. The BlogComment object is the publisher and implements the observer pattern as shown in Listing 11-31.
function BlogComment() {
this.observers = [];
}
BlogComment.prototype = {
subscribe: function (fn) {
this.observers.push(fn);
},
unsubscribe: function (fn) {
this.observers = this.handlers.filter(
function (item) {
if (item !== fn) {
return item;
}
}
);
},
broadcast: function (data) {
this.observers.forEach(function (item) {
item.call(null, data);
});
}
}
Listing 11-31.
BlogComment Object
The BlogComment object maintains an array of subscribers—observers. Initially the observers array is empty. To add and remove the subscribers and to broadcast notifications, three methods are added to the prototype of the BlogComment object—subscribe, unsubscribe, and broadcast.
The subscribe method adds a subscriber to the observers array using the push() method. The unsubscribe method removes a subscriber from the observers array. It does so using the filter() method on the handlers array. The filter() method regenerates the observers array by filtering out the subscriber that equals the one passed to the unsubscribe() method.
The broadcast() method notifies all the subscribers with some data. In this case, the data is the comment text. Notice how the broadcasting of data is done. The code iterates through the observers array using the forEach() method. Inside, the code invokes the call() method on an observer and passes the data to it. The call() method calls a function (item is a function in this case). The first parameter of the call() method is null, indicating that no specific value for this is to be used. The second parameter is the parameter(s) to be passed to the function being called.
This completes the BlogComment object. The HTML markup that renders the comment box is quite straightforward:
<h2>Comments:</h2>
<textarea cols="40" rows="4" id="text1"></textarea>
<br />
<div id="div1"></div>
<div id="div2"></div>
It consists of a text1 text area and two <div> elements. The div1 element is used to display the comment’s preview, whereas the div2 element is used to display the character counter.
The jQuery code that attaches the subscribers is shown in Listing 11-32.
$(document).ready(function () {
var Subscriber1 = function (data) {
$("#div1").html(data);
};
var Subscriber2 = function (data) {
$("#div2").html("<h4>Count : " + data.length + "</h4>");
};
var comment = new BlogComment();
comment.subscribe(Subscriber1);
comment.subscribe(Subscriber2);
});
Listing 11-32.
Creating and Attaching the Subscribers
The code creates two subscriber objects—Subscriber1 and Subscriber2. The first subscriber simply displays the comment’s preview by setting the HTML content of div1 to the data received from the broadcast method. This is done using the html() method.
Along the same lines, the second subscriber displays a character counter inside div2 using the length property of the data.
Then the code creates a new BlogComment object and calls its subscribe() method to add the two subscribers to the observers array.
Whenever you key in text within the text area, the BlogComment object needs to broadcast the comment data to the subscribers. This is accomplished by handling the keyup event of text1, like this:
$("#text1").keyup(function () {
comment.broadcast($("#text1").val());
});
As you can see, the keyup callback invokes the broadcast() method on the comment object and passes the value of text1 to it.
This completes the example. You can run the application and try entering some text in the text area. You should see the preview as well as the character counter.
MVC, MVVM, and MVW Patterns
As an ASP.NET MVC developer, you are already familiar with the Model-View-Controller (MVC) pattern
. The MVC pattern separates the application concerns into three distinct parts—Model, View, and Controller. Simply put, the Model represents the application data, a View represents the application’s user interface, and a Controller acts like a middleman between the other two parts and also manages the overall application flow.
Note
This section doesn’t attempt to teach you any specific JavaScript frameworks as such. The idea is just to make you aware about the patterns used by modern JavaScript frameworks.
ASP.NET MVC applies the MVC pattern to the server-side framework. In the context of client-side JavaScript frameworks, you will find these patterns mentioned frequently:
- Model-View-Controller (MVC)
- Model-View-View Model (MVVM)
- Model-View-Whatever (MVW)
In the context of JavaScript applications, a Model is usually a JavaScript object or a collection of objects. A View consists of HTML markup from the document object model (DOM)
tree. A Controller acts as a layer that connects the Model and the View. The Controller might do tasks such as handling events, validating data, performing some business-specific processing, and changing the model data.
A
View Model
used by the MVVM pattern is an object that takes care of the presentation logic. The presentation logic might include things such as data binding and event handling. JavaScript libraries such as Knockout are based on the MVVM pattern.
The “Whatever” used by the pattern can be a View Model or a Controller or whatever suits the application requirements. JavaScript frameworks such as AngularJS are based on the MVW pattern.
Although this book doesn’t go into any detailed discussion of using these frameworks, just to give you some idea a simple example built using AngularJS is shown in Figure 11-5.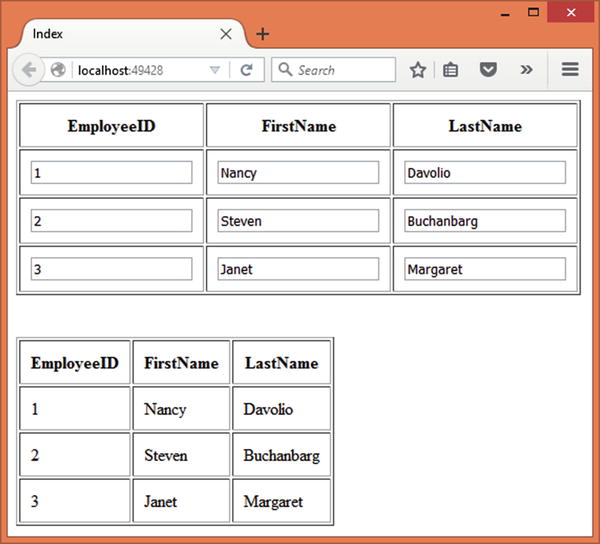
Figure 11-5.
AngularJS application illustrating two-way data binding
The application displays a list of employees in two tables. The table shown at the top allows you to edit the employee details, such as EmployeeID, FirstName, and LastName. The table towards the bottom of the page is read-only. It is solely used to illustrate the two-way data binding.
To develop this application, begin by creating a new ASP.NET web application project using Visual Studio and configure it to use MVC (see Chapter 1 for more details). Also, place the AngularJS framework files in the Script folder under wwwroot.
Note
I used AngularJS 1.2 to develop this example. You can download the AngularJS framework files from
https://angularjs.org
. You may even use a CDN to reference these files.
Then add HomeController to the Controllers folder and an Index view to the Views/Home folder. You need to add a script reference to the AngularJS as shown below:
<script src="∼/Scripts/angular-1.2.js"></script>
Also add an empty <script> block below this script reference. Write the code shown in Listing 11-33 inside the script block.
var app = angular.module("EmployeeApp", []);
app.controller("EmployeeController", function ($scope) {
var Model = [
{ EmployeeID: 1, FirstName: "Nancy", LastName: "Davolio"},
{ EmployeeID: 2, FirstName: "Steven", LastName: "Buchanbarg" },
{ EmployeeID: 3, FirstName: "Janet", LastName: "Margaret" }
];
$scope.Model = Model;
});
Listing 11-33.
AngularJS Model and Controller
The code creates an AngularJS module named EmployeeApp by using the AngularJS module API. The second parameter to the module() method is an empty array indicating that this application doesn’t have any dependencies. The module
() method returns a reference to the newly created module.
The code then proceeds to create EmployeeController—an AngularJS controller. This is done using the controller() method. The first parameter to the controller() is the name of the controller, and the second parameter is a function that wraps the controller code. This function receives a $scope parameter—the AngularJS model.
Inside, the code creates a JavaScript array of employee objects consisting of three elements. The Model array is stored in the $scope object as its Model property (you could have used any property name of your choice, or even store data directly in the $scope).
The View of the application is defined in the HTML markup
shown in Listing 11-34.
<div ng-app="EmployeeApp">
<div ng-controller="EmployeeController">
<table border="1" cellpadding="10">
<tr>
<th>EmployeeID</th>
<th>FirstName</th>
<th>LastName</th>
</tr>
<tr ng-repeat="item in Model">
<td><input ng-model="item.EmployeeID" /></td>
<td><input ng-model="item.FirstName" /></td>
<td><input ng-model="item.LastName" /></td>
</tr>
</table>
<br /><br />
<table border="1" cellpadding="10">
<tr>
<th>EmployeeID</th>
<th>FirstName</th>
<th>LastName</th>
</tr>
<tr ng-repeat="item in Model">
<td>{{item.EmployeeID}}</td>
<td>{{item.FirstName}}</td>
<td>{{item.LastName}}</td>
</tr>
</table>
</div>
</div>
Listing 11-34.
HTML Fragment Acting as the View
The
Angular view
consists of a container <div> element that houses another <div> element. The ng-app attribute of the outermost <div> is set to EmployeeApp—the name of the AngularJS module you created earlier. The ng-controller attribute of the inner <div> is set to EmployeeController—the AngularJS controller. Attributes such as ng-app and ng-controller are defined and processed by AngularJS. They are called directives in AngularJS. Thus the outer <div> marks the application’s boundary, whereas the inner <div> marks the EmployeeController’s boundary.
The inner <div> houses two tables. The first table displays EmployeeID, FirstName, and LastName in an editable fashion. The table is rendered by iterating through the $scope.Model array using the ng-repeat directive. Notice how employee object properties are bound to the textboxes using the ng-model attribute. The second table is rendered using the ng-repeat directive. This time, however, the employee details are displayed in a read-only fashion. Notice the use of {{ and }} to display the data. As you might have guessed, ng-model performs two-way data binding (model to view and from view back to the model), whereas {{ and }} are used to perform one-way data binding (from model to view).
This completes the application. You can run it and try modifying some employee details. You will observe that as soon as you change the values in the textboxes the second table also reflects the changes. This happens automatically due to the two-way data binding feature of AngularJS.
Summary
This chapter covered a broad range of JavaScript patterns. Modern ASP.NET applications rely heavily on JavaScript and JavaScript libraries. That’s why it is important for you to understand the code-organization techniques possible in JavaScript.
Although JavaScript doesn’t support classes along the lines of C#, you can create objects. Two common ways to create objects include object literals and function objects.
This chapter covered several code-organization patterns, such as the namespace pattern, the module pattern, the revealing module pattern, and the sandbox pattern.
The namespaces pattern helps you to organize JavaScript code in namespaces. Although JavaScript doesn’t natively support namespaces, you can still achieve a similar effect.
The module pattern is quite popular among JavaScript developers because it allows you to create modular libraries. Using the module pattern, you expose the public interface of a module to the client code. The revealing module pattern is a variation of the module pattern that organizes the code in private members and functions and then decides the public interface of the module.
The sandbox pattern helps you write sandbox code. It eliminates using long namespaces by creating a sandbox—- an object containing the API of specified modules.
Finally, the chapter gave you a quick introduction to MVC, MVVM, and MVW patterns as applicable to JavaScript libraries and frameworks.
Learning design patterns involves understanding their intent and usage guidelines and also the practical experience of using them. This book discussed SOLID principles, Gang of Four design patterns, select Patterns of Enterprise Application Architecture, and select JavaScript patterns in an attempt to give you a good understanding of the subject matter. It also presented many real-world examples to make the topic being discussed more relevant and practical. With this knowledge under your belt, you can leverage the full power and flexibility of these principles and patterns in your applications.