
Now that we are done examining creational and structural patterns, this chapter will introduce you to a few behavioral patterns. As the name suggests, behavioral patterns concern themselves with how classes and objects behave, communicate, and message within a given system. This chapter will discuss four such patterns, namely chain of responsibility, command, interpreter, and iterator. It will include the following:
- Overview of behavioral patterns
- The purpose of chain of responsibility, command, interpreter, and iterator
- UML diagrams and overall structures of these design patterns
- Proof of concept example for each of these patterns
Behavioral Patterns
So far in this book you have learned about creational and structural patterns. The creational patterns deal with object creation, while the structural patterns deal with the arrangement of classes in a given system. Now it’s time to look into the third category of GoF patterns—behavioral patterns.
Behavioral patterns
concern themselves with the following:
- How classes and objects behave in a system
- How objects communicate and message with each other
- How different algorithms that a system relies upon are dealt with
In all there are eleven patterns in this category. They are as follows:
- Chain of Responsibility : Allows you to pass a request through a chain or series of objects, with each participant object performing some specific responsibility
- Command : Encapsulates an instruction or command in an object so that it can be played based on some application-specific logic
- Interpreter : Allows the defining and interpreting of an instruction set with specific notation and grammar
- Iterator : Allows sequentially iterating and accessing items from a collection of items
- Mediator : Allows a simplified way of communicating between multiple objects by routing the communication through a specific object
- Memento : Allows the storing and restoring of an object’s private state information without compromising the access scope of the state
- Observer : Allows the notifying of a number of objects when something happens in the system
- State : Allows altering the behavior of an object when its state changes
- Strategy : Allows encapsulating a number of algorithms in their own classes and the use of them interchangeably
- Template Method : Defines the skeleton of an algorithm and allows subclasses to redefine some or all of the steps
- Visitor : Defines an operation to be performed on elements of an object structure without affecting the elements
Out of these eleven patterns, this chapter will discuss chain of responsibility, command, interpreter, and iterator. The remaining patterns will be covered in the next two chapters.
Chain of Responsibility
A given task to be accomplished need not be performed by a single object. It can be handled by multiple objects, each contributing to the task completion in a specific and limited way.
Consider a loan application being submitted at a bank. From the point the request for a loan is received to the point it is sanctioned or rejected there might be many people contributing to the processing of that request. A clerk might check that the loan application is properly filled and all the supporting documents are attached. The clerk, however, doesn’t have authority to approve the loan request. He then passes it to his supervisor. The supervisor may check the application in detail in terms of amount asked for, credibility of the requester, and so on. He may then send the application to the manager for approval. If the requested loan amount is within the limits that the manager can approve, he will approve it. Otherwise, he may send it to his senior for the approval. Finally, the application may get approved or rejected based on the bank’s policies.
As you can see, the loan request passes through a series of handlers, and each handler performs a specific task and passes it to the next handler. This is where the chain of responsibility pattern can be used.
The chain of responsibility pattern allows you to pass a request through a series of handler objects. Thus a chain of objects is formed wherein one object receives the request, does some specific work, and passes the request to the next object in the chain. At the end of the chain the request is either successfully handled or an exception is generated.
Design and Explanation
The UML diagram in Figure 7-1 illustrates the chain of responsibility pattern.
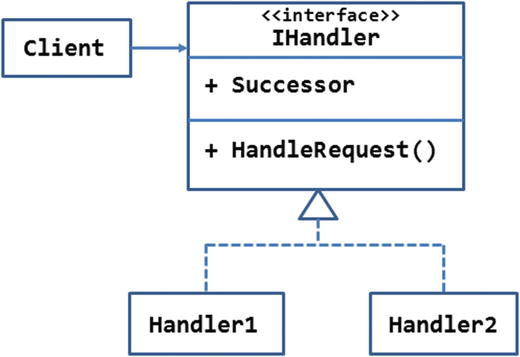
Figure 7-1.
UML diagram illustrating chain of responsibility pattern
The IHandler interface defines the members to be implemented in each handler class. In this case, the
HandleRequest() method
is supposed to act on the request and also pass it to the next handler in the chain.
Notice that the interface also defines a pointer to the successor object in the chain through the Successor property. This property when implemented in the handler classes holds a reference to the next handler in the chain.
The IHandler interface is implemented by two handlers—Handler1 and Handler2. The handlers are independent of one another except that one handler passes the request to the other.
The client decides on the initial handler to which the request is made. From that point onward, the request runs through the chain of handlers and results in its successful or erroneous completion. So, a sample run could be Client -> Handler1 -> Handler2 -> complete.
Note that the logic that decides the next handler in the chain is application specific. It is possible that based on some condition a request doesn’t pass through certain handlers at all. Another possibility where all handlers may not get chance to act on the request is when an exception is raised while processing the request.
Example
Now that you know how the chain of responsibility pattern works, let’s implement it in an example.
Suppose that you are building a web-based data-import utility. The end user will upload files with .txt or .csv extensions that are supposed to contain the data to be imported.
It is possible that the user may upload files with an incorrect extension or files containing data not adhering to the required structure. So, the application must validate these aspects before accepting the file as a valid source.
Once the file is accepted, it is copied to a folder as a record or as the original source of data. Then, the data is imported into an SQL Server table.
You can identify three responsibilities in the overall data-import operation
:
- File-format and file-content validation
- Source-file storage on the server
- Importing data into the table
These operations are to be performed in a series. As you might have guessed, these three steps call for three handlers, and the request to import the data passes from one handler to another. In the future you may also add more handlers if required.
Figure 7-2 shows the UML diagram of the intended system.
Figure 7-2.
A chain of three handlers dealing with the data-import request
The IHandler interface consists of a property, NextHandler, and a method, Process(). The NextHandler property holds a reference to the next handler in the chain. The
Process() method
contains the processing logic that processes the request in some way. Moreover, Process() is also responsible for continuing the chain by invoking the Process() method on the NextHandler.
The IHandler interface is implemented by three classes, namely FileFormatHandler, FileStorageHandler, and DataImportHandler. Each of these handlers has specific responsibilities.
The FileFormatHandler checks whether the file extension is .txt or .csv. It also checks whether the data contained in the files matches with the expected structure. The FileStorageHandler does the job of storing a copy of the source file in a folder and also adds an entry for that file in a table. This is done for record-keeping purposes and tracking. The DataImportHandler class does the job of importing the source data into a database table. In addition to these handlers, you may have additional handlers as per your needs. Also notice that each handler is an independent class in itself and doesn’t have any control as to what the next handler should be. It simply invokes the next handler (if any), but the wiring of the handlers is taken care of by the client code.
In this example, the client code invokes Process() on the FileFormatHandler since that is the first step in the chain.
Figure 7-3 shows what the main page of the application looks like.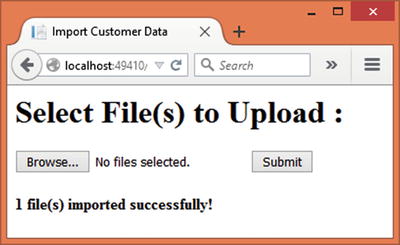
Figure 7-3.
Uploading files to be imported
The page consists of a file-input field that allows you to select one or more files. After selecting the files you can click on the Submit button to start the file upload and import process. If the data from the files is imported successfully, a message is displayed confirming the successful completion of the process.
To develop this application, begin by creating a new ASP.NET web application project named COR using Visual Studio and configure it to use MVC and Entity Framework (see Chapter 1 for more details). Also store the database connection string of CorDb—the database used by the application—in the appsettings.json file.
Then add the AppSettings class to the Core folder and add two static properties to it, as shown in Listing 7-1.
public class AppSettings
{
public static string StoragePath { get; set; }
public static string ConnectionString { get; set; }
}
Listing 7-1.
AppSettings Class
The StoragePath property holds the path to a folder where the uploaded files are stored. The ConnectionString property holds the database connection string of the CorDb database. These properties are assigned in the Startup class constructor, as illustrated in Listing 7-2.
public Startup(IHostingEnvironment env, IApplicationEnvironment app)
{
...
...
AppSettings.ConnectionString = config.Get<string>("Data:DefaultConnection:ConnectionString");
AppSettings.StoragePath = env.MapPath("Uploads");
}
Listing 7-2.
Assigning StoragePath and ConnectionString
The code uses the
MapPath() method
of the IHostingEnvironment instance to compute the full physical path of the wwwrootUploads folder. The path is then assigned to the StoragePath property of AppSettings. The database connection string is picked from appsettings.json and assigned to the ConnectionString property.
public interface IHandler
{
IHandler NextHandler { get; set; }
void Process(string filename, string filecontent);
}
Listing 7-3.
IHandler Interface with NextHandler and Process( )
The IHandler interface consists of a NextHandler property and Process() method. Notice that the type of NextHandler is IHandler. This way any class implementing IHandler can act as the next participant in the chain.
The
Process() method
takes two parameters. The filename parameter is the name of the file containing the data to be imported. The filecontent parameter contains the actual content of the file.
Next, add the FileFormatHandler class to the Core folder and implement IHandler in it. The complete code of the FileFormatHandler class is shown in Listing 7-4.
public class FileFormatHandler : IHandler
{
public IHandler NextHandler { get; set; }
public void Process(string filename, string filecontent)
{
string ext = Path.GetExtension(filename);
if (ext != ".txt" && ext != ".csv")
{
throw new Exception("Invalid file type!");
}
else
{
string[] records = filecontent.Split(new string[] { "
" }, StringSplitOptions.RemoveEmptyEntries);
if (records == null || records.Length == 0)
{
throw new Exception("Invalid data!");
}
else
{
string[] cols = records[0].Split(',');
if (cols.Length != 5)
{
throw new Exception("Missing or incomplete data!");
}
}
}
if (NextHandler != null)
{
NextHandler.Process(filename, filecontent);
}
}
}
Listing 7-4.
FileFormatHandler Class
The
NextHandler property
is quite straightforward. The Process() method does three things:
- It checks whether the file has a permitted extension.
- It detects whether the file is empty.
- And it also checks whether the file contains data that matches with the target table.
The code detects the file extension using the GetExtension() method of the Path class (System.IO namespace). If the file extension is anything other than .txt or .csv, the code throws an exception. If the file extension is alright, the code proceeds to validate the content.
Then the code checks whether the file content is empty. This is done by calling the
Split() method
on the file content. Notice that the content is split on the basis of
so that all the CSV records are obtained in the records array. If records array is empty, it indicates that the file is empty, and an exception is thrown.
The final task is to check whether the file contains valid data. This example assumes that the data is to be imported into a Customers table with five columns. So, records from the file must contain four comma-separated values. To detect this, the code splits the first record and checks whether the cols array contains exactly five elements. If the number of elements is anything other than five, an exception is thrown.
Once FileFormatHandler does its job, it needs to hand over the control to the next handler object in the chain. Note that FileFormatHandler doesn’t know which object will be handling the request next. All it can check is whether the NextHandler has been set or not. If it is set, the code calls the Process() method on the NextHandler object.
Now, add the
FileStorageHandler class
to the Core folder and implement the IHandler interface in it. Listing 7-5 shows the complete code of the FileStorageHandler class.
public class FileStorageHandler : IHandler
{
public IHandler NextHandler { get; set; }
public void Process(string filename, string filecontent)
{
filename = AppSettings.StoragePath + "\" + Path.GetFileNameWithoutExtension(filename) + DateTime.Now.ToString("yyyy-MM-dd") + Path.GetExtension(filename);
System.IO.File.AppendAllText(filename, filecontent);
using (AppDbContext db = new AppDbContext())
{
FileStoreEntry fse = new FileStoreEntry();
fse.FileName = filename;
fse.UploadedOn = DateTime.Now;
db.FileStore.Add(fse);
db.SaveChanges();
}
if (NextHandler != null)
{
NextHandler.Process(filename, filecontent);
}
}
}
Listing 7-5.
FileStorageHandler Class
FileStorageHandler does two things:
- It stores the uploaded file in a folder.
- It adds an entry in the FileStore table indicating that such-and-such file was uploaded to the server.
The filename received in the Process() method is just a filename of the uploaded file. So, the code computes its full path by appending the filename to the StoragePath property of AppSettings. Also notice that a date stamp is added to the filename so that one can easily know the date on which the file was uploaded.
The file content is written to the file, and the file is saved using the
AppendAllText() method
.
Then a database entry is added indicating that a new file was received by the system. This is done using a FileStoreEntry entity and FileStore DbSet (they are discussed later). The FileName and UploadedOn properties indicate the full path and filename of the file being saved and its time stamp, respectively.
The code then checks whether control needs to be handed over to NextHandler. If so, Process() is called on the NextHandler object.
Next, add the
DataImportHandler class
to the Core folder and implement the IHandler interface in it. The complete code of DataImportHandler is shown in Listing 7-6.
public class DataImportHandler : IHandler
{
public IHandler NextHandler { get; set; }
public void Process(string filename, string filecontent)
{
using (AppDbContext db = new AppDbContext())
{
string[] records = filecontent.Split(new string[] { "
" }, StringSplitOptions.RemoveEmptyEntries);
foreach (string record in records)
{
string[] cols = record.Split(',');
Customer obj = new Customer();
obj.CustomerID = cols[0];
obj.CompanyName = cols[1];
obj.ContactName = cols[2];
obj.Phone = cols[3];
obj.Location = cols[4];
db.Customers.Add(obj);
}
db.SaveChanges();
}
if (NextHandler != null)
{
NextHandler.Process(filename, filecontent);
}
}
}
Listing 7-6.
DataImportHandler Class
The Process() method of DataImportHandler does the job of importing the content into the Customers table. The file content is split into a records array using the Split() method.
A foreach loop iterates through the records array and adds Customer entries to the Customers DbSet. This is done by splitting each record array element into a cols array and then setting the CustomerID, Companyname, ContactName, Phone, and Location properties of the Customer object (the Customer object and AppDbContext classes will be discussed later).
Once all the customers are added, SaveChanges() is called on the AppDbContext to save the data to the Customers table.
As before, DataImportHandler checks whether any NextHandler is available. If so, it invokes the Process() on it.
Note that although our requirements conclude that data import is the last step, the class still checks whether NextHandler is available and, if so, calls Process() on it. This design ensures that if additional handlers are wired in the future, the DataImportHandler class need not undergo any changes.
Now it’s time to look into the Customer, FileStoreEntry, and AppDbContext classes. The Customer class represents a single customer from the Customers table, and the
FileStoreEntry class
represents a single file entry record from the FileStore table. These classes are shown in Listing 7-7.
[Table("Customers")]
public class Customer
{
[Key]
public string CustomerID { get; set; }
[Required]
[StringLength(40)]
public string CompanyName { get; set; }
[Required]
[StringLength(40)]
public string ContactName { get; set; }
[Required]
[StringLength(20)]
public string Phone { get; set; }
[Required]
[StringLength(100)]
public string Location { get; set; }
}
[Table("FileStore")]
public class FileStoreEntry
{
[DatabaseGenerated(DatabaseGeneratedOption.Identity)]
public int Id { get; set; }
[Required]
[StringLength(500)]
public string FileName { get; set; }
[Required]
public DateTime UploadedOn { get; set; }
}
Listing 7-7.
Customer and FileStoreEntry Classes
The Customer class is mapped to the Customers table using the [Table] attribute and contains five properties—CustomerID, CompanyName, ContactName, Phone, and Location. These properties also have some data annotations attached to them.
The FileStoreEntry class is mapped to the FileStore table using the [Table] attribute. It contains three properties—Id, FileName, and UploadedOn.
The properties of Customer and FileStore are quite straightforward and hold the respective pieces of information.
public class AppDbContext:DbContext
{
public DbSet<Customer> Customers { get; set; }
public DbSet<FileStoreEntry> FileStore { get; set; }
protected override void OnConfiguring(DbContextOptionsBuilder optionsBuilder)
{
optionsBuilder.UseSqlServer(AppSettings.ConnectionString);
}
}
Listing 7-8.
AppDbContext with Customers and FileStore DbSets
The AppDbContext class is the entity framework DbContext and contains two DbSets—Customers and FileStore.
Now it’s time to code the client, HomeController. Add the HomeController class to the Controllers folder. In addition to the default Index() action, add the Upload() action to it as shown in Listing 7-9.
[HttpPost]
public IActionResult Upload(IList<IFormFile> files)
{
foreach (var file in files)
{
ContentDispositionHeaderValue header = ContentDispositionHeaderValue.Parse(file.ContentDisposition);
string fileName = header.FileName;
fileName = fileName.Trim('"');
fileName = Path.GetFileName(fileName);
MemoryStream ms = new MemoryStream();
Stream s = file.OpenReadStream();
s.CopyTo(ms);
byte[] data = ms.ToArray();
s.Dispose();
ms.Dispose();
string fileContent = System.Text.ASCIIEncoding.ASCII.GetString(data);
FileFormatHandler handler1 = new FileFormatHandler();
FileStorageHandler handler2 = new FileStorageHandler();
DataImportHandler handler3 = new DataImportHandler();
handler1.NextHandler = handler2;
handler2.NextHandler = handler3;
handler3.NextHandler = null;
handler1.Process(fileName, fileContent);
}
ViewBag.Message = files.Count + " file(s) imported successfully!";
return View("Index");
}
Listing 7-9.
Upload() Method
Starts the Chain
The Upload() method is called when a user clicks on the Submit button after selecting a file. The file uploaded by the user is received as a list of IFormFile objects.
A foreach loop then iterates through the uploaded files. This initial part of the code should be familiar to you, because you used it in earlier examples. It basically reads a file into a MemoryStream (System.IO namespace).
The MemoryStream contains data in binary form. This data is converted into a string using the
GetString() method
.
The code then instantiates the three handlers—FileFormatHandler, FileStorageHandler, and DataImportHandler (COR.Core namespace). The next three lines of code set the NextHandler properties. Notice that FileStorageHandler object acts as the NextHandler for FileFormatHandler, and the DataImportHandler object acts as the NextHandler for FileStoreHandler. The NextHandler for DataImportHandler is set to null because that is where the process ends.
Once the handlers are assigned, the Process() method of the first handler (FileFormatHandler) is invoked. Upon completion of processing, a Message is added to the ViewBag, indicating the successful completion of the data-import operation.
Finally, add an
Index view
to the Views/Home folder and write the markup shown in Listing 7-10 in it.
<html>
<head>
<title>Import Customer Data</title>
</head>
<body>
<h1>Select File(s) to Upload :</h1>
<form asp-action="Upload" asp-controller="Home" method="post" enctype="multipart/form-data">
<input type="file" name="files" id="files" multiple />
<input type="submit" value="Submit" />
</form>
<h4>@ViewBag.Message</h4>
</body>
</html>
Listing 7-10.
Markup of Index View
The Index view consists of a form that submits to the Upload action (asp-action attribute) of the HomeController (asp-controller attribute). Notice that the enctype attribute is set to multipart/form-data since the form is used to upload files.
The form consists of a file-input field and a Submit button. The Message from the ViewBag is also outputted at the end of the form.
This completes the application. Before you run and test the application, create the CorDb database, Customers table, and FileStore table (see Chapter 1 for more details). You will also need a sample .txt or .csv file containing the customer data to be imported. You can grab one from the code download of this chapter.
Set a breakpoint at the Process() method of each of the handler classes and run the application. Pick the file containing CSV data and click on the Submit button to upload the file. When the control halts at the break points, check and confirm the inner workings of all three handlers.
Command
Usually when one object invokes an operation on another object, the requested operation is performed immediately. At times, however, you will need to add a spacer between the object invoking a request and the object actually fulfilling the request.
Consider an example where you wish to send bulk mailing list emails to the respective recipients. When a client issues a “send” command, the bulk emailing system might already be busy sending emails from other senders. It might become necessary to queue your send request so that it can be executed at some later time when the bulk emailing system is available. The system may even need to route the request to a backup emailing system in case something goes wrong. This means there is a distance between the command invocation and actual command execution.
If your application needs such a feature, then the command pattern can come to the rescue. The command pattern encapsulates a request or a command as an object. This object can be queued and played at a later time. One can even undo and redo the command if required.
With the command pattern in place, a client doesn’t invoke a request directly onto a target. Instead, a client makes use of an Invoker object. The Invoker object then decides when to play the command.
Design and Explanation
The UML diagram shown in Figure 7-4 illustrates the command pattern.
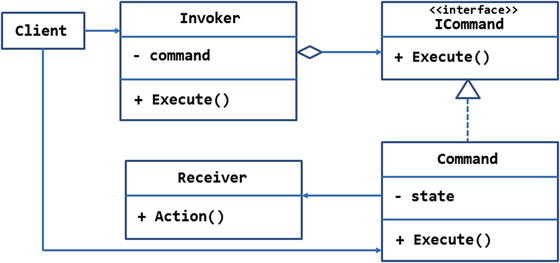
Figure 7-4.
UML diagram illustrating command pattern
As shown in the figure, the ICommand interface represents an abstraction for a command. It has an Execute() method that is supposed to execute a requested operation on the targeted receiver.
The
ICommand interface
is implemented by the Command class. There can be many such implementations of ICommand depending on the application requirements. The Command class may hold some state specific to that command as indicated by the state private member. It also contains the implementation of the Execute() method. Execute() actually executes an operation on the target—the Receiver class.
The Receiver class is the actual object whose operation is to be invoked. The operation to be invoked is indicated by the Action() method.
The client doesn’t call the
Execute() method
of the Command object directly. Instead, it makes use of the Invoker class, which holds one or more command objects as indicated by the aggregation symbol. The Execute() method of the Invoker decides when to invoke the Execute() method of the Command object(s) it holds. The Invoker may also do tasks such as queuing the command and redoing / undoing a command.
Notice that the Client is shown to be using the Invoker and Command objects. This is because the client needs to tell the Invoker which command(s) are to be invoked.
Example
Now that you know how the command pattern works, let’s go ahead and develop an example that illustrates how it behaves.
Suppose you are developing a web application that is intended to be used by the human resources department of a company. When a newly selected candidate is about to join the company, the human resources department wants to ensure the timely availability of the employee’s e-mail account, identity card, and visiting cards.
The human resources department employee initiates a request for all the three operations from a web interface. These three operations are, however, handled by three independent systems. For example, the request to create an e-mail account might be handled by the company’s IT department whereas the request for printing the visiting cards might be handled by some third-party vendor or other department.
In order to simplify the overall tracking of these operations, it is decided that the three requests should be executed as a single transaction. If any part of the request fails for some reason, all the other requests should also be cancelled. This way all the operations are processed as a single bundle.
Considering these requirements, one may design the system as shown in Figure 7-5.
Figure 7-5.
Requesting employee operations through the command pattern
As you can see, the ultimate Receiver object that performs the tasks is the EmployeeManager class. This class has six methods, namely CreateEmailAccount(), UndoCreateEmailAccount(), OrderVisitingCards(), UndoOrderVisitingCards(), PrepareIdentityCard(), and UndoPrepareIdentityCard(). As you might have guessed, the “Undo” methods cancel the corresponding tasks whereas the other methods perform the requested task.
The client shouldn’t call these methods directly, because it might not be aware of the cancellation logic. The client should simply place the requests.
So, we need to encapsulate these three pairs of operations into the respective command objects. The classes CreateEmailAccount, OrderVisitingCards, and PrepareIdentityCard represent these commands.
The command classes are based on the ICommand interface, which consists of two methods—Execute() and Undo(). The Execute() method, when implemented, executes the requested operation on the EmployeeManager. The Undo() method, when implemented, cancels the preciously performed operation.
The Invoker class maintains a generic list of ICommand objects. This list is exposed as the Commands property. The Invoker needs a list because there could be more than one command to be executed. The Execute() method of the Invoker class executes the commands and contains logic to cancel the requests if something goes wrong.
Figure 7-6 shows the main page of the application that uses these classes.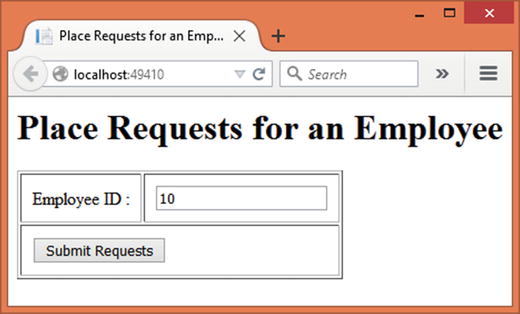
Figure 7-6.
Placing requests for employee accessories
As you can see, the page accepts an employee ID. Upon entering the employee ID and clicking the Submit button, requests for e-mail address, visiting cards, and identity card are placed and a success message is displayed to the user.
To develop this application, begin by creating a new ASP.NET web application project named Command using Visual Studio and configure it to use MVC and Entity Framework (see Chapter 1 for more details). Also store the database connection string of CommandDb—the database used by the application—in the appsettings.json file.
Then add the AppSettings class to the Core folder and add the ConnectionString property to it. Also, set this property from the Startup class exactly like in the previous example.
Now, add the
CommandQueueItem class
to the Core folder and write the code shown in Listing 7-11 in it.
[Table("CommandQueue")]
public class CommandQueueItem
{
[DatabaseGenerated(DatabaseGeneratedOption.Identity)]
public int Id { get; set; }
[Required]
public int EmployeeId { get; set; }
[Required]
public string CommandText { get; set; }
}
Listing 7-11.
CommandQueueItem Class
The CommandQueueItem class is mapped to the CommandQueue table and represents a single request to be processed by the processing system. It contains three properties—Id, EmployeeID, and CommandText. The CommandText property is merely a string indicating the requested operation. In a more realistic system, some separate system would be involved in processing the requested operation.
public class AppDbContext:DbContext
{
public DbSet<CommandQueueItem> CommandQueue { get; set; }
protected override void OnConfiguring(DbContextOptionsBuilder optionsBuilder)
{
optionsBuilder.UseSqlServer(AppSettings.ConnectionString);
}
}
Listing 7-12.
AppDbContext Class
Then add the
EmployeeManager class
to the Core folder. Listing 7-13 shows the skeleton of the EmployeeManager class.
public class EmployeeManager
{
private int employeeId;
public EmployeeManager(int employeeid)
{
this.employeeId = employeeid;
}
public void CreateEmailAccount()
{
}
public void UndoCreateEmailAccount()
{
}
public void OrderVisitingCards()
{
}
public void UndoOrderVisitingCards()
{
}
public void PrepareIdentityCard()
{
}
public void UndoPrepareIdentityCard()
{
}
}
Listing 7-13.
Skeleton of EmployeeManager Class
The EmployeeManager class constructor accepts an employee ID and stores it in a private variable for later use. The EmployeeManager contains six methods, namely CreateEmailAccount(), UndoCreateEmailAccount(), OrderVisitingCards(), UndoOrderVisitingCards(), PrepareIdentityCard(), and UndoPrepareIdentityCard().
The “Do” methods perform the corresponding operation whereas the “Undo” methods cancel the request. For example, the CreateEmailAccount() method places a request for creating an e-mail account whereas the UndoCreateEmailAccount() method cancels the request.
These methods are quite similar in that the “Do” methods create a CommandQueueItem object and add an entry to the CommandQueue table, and the “Undo” methods remove an entry from the CommandQueue table. To save us some space, all the methods are not discussed here. The CreateEmailAccount() and UndoCreateEmailAccount() methods will be discussed. Listing 7-14 shows the
CreateEmailAccount() method
.
public void CreateEmailAccount()
{
using (AppDbContext db = new AppDbContext())
{
CommandQueueItem item = new CommandQueueItem();
item.EmployeeId = this.employeeId;
item.CommandText = "EMAIL_ACCOUNT";
db.CommandQueue.Add(item);
db.SaveChanges();
}
}
Listing 7-14.
CreateEmailAccount() Method
The CreateEmailAccount() method creates a CommandQueueItem object and sets its EmployeeID and CommandText properties. The entry is then added to the CommandQueue DbSet and saved to the underlying table using the SaveChanges() method.
The UndoCreateEmailAccount()
that cancels the request is shown in Listing 7-15.
public void UndoCreateEmailAccount()
{
using (AppDbContext db = new AppDbContext())
{
CommandQueueItem item = db.CommandQueue.
Where(i => i.EmployeeId == employeeId
&& i.CommandText == "EMAIL_ACCOUNT")
.SingleOrDefault();
if (item != null)
{
db.Entry(item).State = EntityState.Deleted;
db.SaveChanges();
}
}
}
Listing 7-15.
UndoCreateEmailAccount() Method
The
UndoCreateEmailAccount() method
grabs an entry matching a specific EmployeeID and CommandText (EMAIL_ACCOUNT, in this case) and then deletes the record from the table by setting its State property and calling the SaveChanges() method.
You can complete the other methods along similar lines just by changing the CommandText to the appropriate value. You may also grab the complete source code of the EmployeeManager class from the source code download of this book.
public interface ICommand
{
void Execute();
void Undo();
}
Listing 7-16.
ICommand Interface
with TargetDate and Execute( )
The ICommand interface consists of two methods—Execute() and Undo().
Now, add three classes—CreateEmailAccount, OrderVisitingCards, and PrepareIdentityCard—to the Core folder. All of these classes implement the ICommand interface and call the respective methods on the EmployeeManager. Since these classes are quite identical to each other, all will not be not discussed here. The CreateEmailAccount class is shown in Listing 7-17.
public class CreateEmailAccount :ICommand
{
private EmployeeManager manager;
public CreateEmailAccount(EmployeeManager manager)
{
this.manager = manager;
}
public void Execute()
{
manager.CreateEmailAccount();
}
public void Undo()
{
manager.UndoCreateEmailAccount();
}
}
Listing 7-17.
CreateEmailAccount Class
The constructor of the CreateEmailAccount class accepts an EmployeeManager object as a parameter. A reference to the EmployeeManager is stored in a local variable for later use.
The
Execute() method
then calls the CreateEmailAccount() method on the EmployeeManager. Along the same lines, the Undo() method calls UndoCreateEmailAccount() on the EmployeeManager.
You can create the remaining two classes in a similar way by calling the respective pairs of methods on the EmployeeManager.
public class Invoker
{
public List<ICommand> Commands { get; set; } = new List<ICommand>();
public void Execute()
{
try
{
foreach (ICommand command in Commands)
{
command.Execute();
}
}
catch
{
foreach (ICommand command in Commands)
{
command.Undo();
}
}
}
}
Listing 7-18.
Invoker Class Invoking the Commands
The
Invoker class
maintains a list of ICommand objects. The client code adds the commands to this list as per the requirements. A try-catch block traps any exceptions that arise while placing the requests.
A foreach loop inside the try block iterates through the command list and invokes the Execute() method on each command object. If something goes wrong while placing the requests, another foreach loop from the catch block iterates through the command list and invokes the Undo() methods on the command objects.
Next, add the HomeController class to the Controllers folder. In addition to the default Index() action, add a ProcessEmployee() action to it, as shown in Listing 7-19.
[HttpPost]
public IActionResult ProcessEmployee(int employeeid)
{
EmployeeManager manager = new EmployeeManager(employeeid);
Invoker invoker = new Invoker();
ICommand command = null;
command = new CreateEmailAccount(manager);
invoker.Commands.Add(command);
command = new OrderVisitingCards(manager);
invoker.Commands.Add(command);
command = new PrepareIdentityCard(manager);
invoker.Commands.Add(command);
invoker.Execute();
ViewBag.Message = $"Commands executed for employee #{employeeid}";
return View("Index", employeeid);
}
Listing 7-19.
ProcessEmployee() Action Initiates the Requests
The ProcessEmployee()
action is called when a user clicks the Submit button on the Index view. It receives the employee ID entered by the user as its parameter. Inside, the code creates an EmployeeManager object by passing the employee ID to it. An instance of the Invoker class is also created.
Then a series of commands are added to the Commands list of the Invoker object. This code fragment adds all three commands—CreateEmailAccount, OrderVisitingCards, and PrepareIdentityCard—to the command list. Once the commands are added, the Execute() method of the Invoker is called. A message is set in the ViewBag to flag the success of the operation to the user.
Finally, add the
Index view
to the Views/Home folder and add the markup shown in the Listing 7-20 to it.
<html>
<head>
<title>Place Requests for an Employee</title>
</head>
<body>
<h1>Place Requests for an Employee</h1>
<form asp-action="ProcessEmployee" asp-controller="Home" method="post">
<table border="1" cellpadding="10">
<tr>
<td><label for="employeeid">Employee ID :</label></td>
<td><input type="text" name="employeeid" value="@Model" /></td>
</tr>
<tr>
<td colspan="2">
<input type="submit" value="Submit Requests" />
</td>
</tr>
</table>
</form>
<h4>@ViewBag.Message</h4>
</body>
</html>
Listing 7-20.
Markup of Index View
The Index view consists of a form that submits to the ProcessEmployee action (asp-action attribute) of the HomeController (asp-controller attribute). A textbox accepts the values of the employee ID, and a button submits the form. The success message from the ViewBag is also outputted at the bottom of the page.
This completes the application. Before you run and test the application, create the CommandDb database and CommandQueue table (see Chapter 1 for more details). Then set a breakpoint in the ProcessEmployee() action and run the application. Enter some test employee IDs and click the Submit button. Once the breakpoint is reached, step through the code to understand how the control flows from Invoker to commands and ultimately to the EmployeeManager.
Interpreter
While building .NET applications you rarely need to develop your own “language.” Most commonly you utilize the features available in the framework and C# to accomplish your task. However, in some cases defining your own instruction set and then interpreting it within your code might become necessary.
Let’s understand this with an example. Suppose you are developing a complex website that allows parts of the user interface to be stored in the database. This means the HTML markup that makes the user interface is pulled from some database table and then rendered on the user interface.
Going one step ahead, assume that now it is required that the staff managing the portal be allowed to define a part of the user interface as a part of its customization features. Further assume that the staff is not proficient in HTML or web markup in general. So, you will need to develop a simplified markup that they can easily understand and use. For example, to represent a date picker, the standard HTML uses this syntax:
<form action="/home/process" method="post">
<input type="date" name="datepicker1" min="some_min_val" max="some_max_val" />
</form>
You may want to simplify this to:
[form postTo="process"]
[datePicker minDate="some_val" maxDate="some_val" allowTime="false"]
[end]
The later piece of markup becomes the new “language” in the context of this application. Since this is a newly defined instruction set, an interpreter is necessary to decode its meaning for the rest of the system. That is where the interpreter pattern comes into the picture.
The interpreter pattern interprets a given instruction set in the context of a given application. The instruction set must have clearly defined rules of grammar so that the instructions are interpreted correctly. For instance, it must be clear to the system what possible values can be assigned to the allowTime attribute, or how date values are to be specified.
Design and Explanation
The UML diagram
in Figure 7-7 illustrates the interpreter pattern.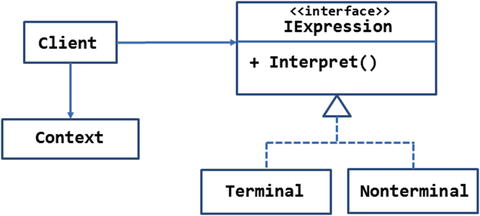
Figure 7-7.
UML diagram illustrating the interpreter pattern
The
IExpression interface
represents an expression or a statement of the new language under consideration. It has the Interpret() method that, when implemented, is supposed to interpret the expression.
The two concrete classes, Terminal and Nonterminal, implement the IExpression interface. The Terminal class represents a single language statement to be interpreted, whereas the Nonterminal class represents a group of expressions (usually nested) that are to be interpreted. The Nonterminal class may use recursion or a similar technique to evaluate all the statements.
The Context class represents the global state that might be needed by the interpreter. This class is optional. If there is no global state to be used you can omit this class.
The Client class has the instruction set (a list of language statements or expressions) that is to be interpreted. How this instruction set is gathered depends on the application. For example, some applications may store the instruction set in a text file. Some other applications may accept it from the end user. And yet some other applications may pick it from the database.
Example
Now that you know the use of the interpreter pattern, let’s apply this knowledge to an example.
Suppose that you are building a very big and complex website. You have created a set of class libraries that define various website management tasks, such as backing up the files and database, moving files from one location to another, deleting temporary files, and so on.
The administrator and the support staff have an administrative module at their disposal. The administrative module provides a user interface that calls the class libraries and gets the required task done.
Although the preceding arrangement works in most of the cases, at times the administrators find they need to define custom tasks that are not covered by the administrative module. Moreover, such tasks are quite unique in themselves, and modifying the administrative module to cover all the possibilities is impossible.
So, it is decided that there should be a way to invoke the APIs from the class libraries dynamically at runtime. A couple of possibilities could be:
- A command-line tool that accepts the assembly name, class name, method name, and method parameters and then invokes the said method using .NET reflection.
- A JSON file (*.json) that stores details such as assembly name, class name, method name, and method parameters. The JSON file can be uploaded onto the server and then handled using .NET reflection.
As an illustration we will use the JSON file approach
just mentioned . To get an idea as to how the JSON might look, consider the following markup:
{
"AssemblyName": "FileManagerLib.dll",
"ClassName": "FileManagerLib.FileManager",
"MethodName": "CreateFolder",
"Parameters": [ "TestFolder" ]
}
This JSON fragment means this to the application—Load the FileManager assembly and call the CreateFolder method on its FileManagerLib.FileManager class by passing TestFolder (the name of the folder to be created) as a parameter.
Note
Don’t worry too much at this stage if you find the JSON and the instruction bit complex to understand. Things will be clear as you proceed and develop the complete example.
As you can see, the instruction set defined by the JSON file is application specific and hence needs an interpreter that can decode it for the rest of the system. AssemblyName, ClassName, and MethodName become the vocabulary of the instruction set. And rules such as parameters must be in the same sequence as the actual methods become the grammar in the given context.
Figure 7-8 shows the arrangement that makes use of the interpreter pattern to achieve the goal.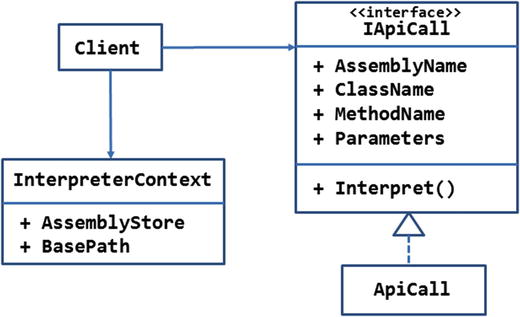
Figure 7-8.
ApiCall class interprets the JOSN and invokes the class library
The IApiCall interface represents the abstraction for an API call. Here, an API call means invoking a method on a class residing in a particular assembly. The IApiCall interface consists of four properties—AssemblyName, ClassName, MethodName, and Parameters—and the Interpret() method. The properties represent the corresponding pieces of information. The implementation of the
Interpret() method
is supposed to load the assembly and make the API call. The IApiCall is implemented in the ApiCall class.
The InterpreterContext class holds two pieces of information that are needed by the ApiCall class—AssemblyStore and BasePath. The AssemblyStore property indicates the folder in which the assemblies (compiled class libraries) are stored. The BasePath property points to the full path to the wwwroot folder of the web application. This path is required for file system operations such as copying files and deleting files.
A controller acts as the Client, fills the InterpreterContext properties, and also loads a JSON file containing the instruction set. The instruction set is then fed to the ApiCall class.
The main page of the application you develop in this section simply allows you to pick one or more JSON files using a file-input field (Figure 7-9). Upon clicking the Submit button, the JSON files are processed, as discussed earlier.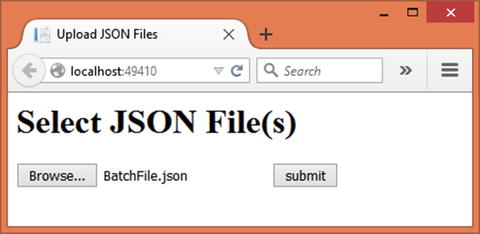
Figure 7-9.
Selecting *.json Files Containing the Instruction Set
To develop this application, begin by creating a new ASP.NET web application project named Interpreter using Visual Studio and configure it to use MVC (see Chapter 1 for more details).
Then add an
InterpreterContext class
to the Core folder and add AssemblyStore and BasePath properties to it, as shown in Listing 7-21.
public class InterpreterContext
{
public string AssemblyStore { get; set; }
public string BasePath { get; set; }
}
Listing 7-21.
InterpreterContext Class
The AssemblyStore and BasePath properties are quite straightforward and were discussed earlier.
Then add the
IApiCall interface
to the Core folder and add the property and method definitions shown in Listing 7-22.
public interface IApiCall
{
string AssemblyName { get; set; }
string ClassName { get; set; }
string MethodName { get; set; }
List<string> Parameters { get; set; }
void Interpret(InterpreterContext context);
}
Listing 7-22.
IApiCall Interface
The IApiCall interface consists of four properties—AssemblyName, ClassName, MethodName, and Parameters. Notice that the Parameters property is a generic list of strings. Each entry in this collection represents a parameter value of a method to be invoked. The parameters must be added in the order in which they appear in the method signature.
The Interpret() method accepts the InterpreterContext object as its parameter. This way information such as AssemblyStore and BasePath is made available to the code that interprets the instructions.
Next, add an
ApiCall class
to the Core folder and implement the IApiCall interface on it. The complete ApiCall class is shown in Listing 7-23.
public class ApiCall : IApiCall
{
public string AssemblyName { get; set; }
public string ClassName { get; set; }
public string MethodName { get; set; }
public List<string> Parameters { get; set; }
public void Interpret(InterpreterContext context)
{
Assembly assembly = Assembly.LoadFile(context.AssemblyStore + $"\{AssemblyName}");
Type type = assembly.GetType(ClassName);
object obj = Activator.CreateInstance(type, context.BasePath);
MethodInfo method = type.GetMethod(MethodName);
method.Invoke(obj, Parameters.ToArray());
}
}
Listing 7-23.
ApiCall Class Interprets the Instructions
The Interpret() method uses classes from the System.Reflection namespace (make sure to delete the dnxcore50 entry from the frameworks section of Project.json). First, it loads the assembly containing the classes and the methods to be invoked. This is done using the LoadFrom() static method of the Assembly class and by supplying the full path and name of the assembly (*.dll) file. Notice the use of the InterpreterContext AssemblyStore property in obtaining the path of the assembly.
The Type instance of the required class is then obtained using the GetType() method of the Assembly object.
This Type is then instantiated using the Activator.CreateInstance() method. The
CreateInstance() method
takes two parameters—the Type object whose instance is to be created and the constructor parameters (if needed). The code passes BasePath to the constructor.
So far you haven’t created the FileManagerLib assembly. You will create it later. For now, it is suffice to say that the FileManager class constructor accepts the path of the website root folder as its parameter.
Once the object is obtained, the GetMethod() method is used to get a MethodInfo object describing the method as indicated by the MethodName property.
Finally, the method is invoked on the object using the Invoke() method of the MethodInfo instance. The Invoke() method accepts the object on which the method is to be invoked as well as an array of method parameters. In this case, method parameters are obtained from the Parameters generic list.
Now, add HomeController to the Controllers folder. In addition to the default Index() action, you need an action that deals with the uploaded JSON files. The ExecuteJSON()
action that does this is shown in Listing 7-24.
public IActionResult ExecuteJSON(List<IFormFile> files)
{
foreach (IFormFile file in files)
{
ContentDispositionHeaderValue header = ContentDispositionHeaderValue.Parse(file.ContentDisposition);
string fileName = header.FileName;
fileName = fileName.Trim('"');
fileName = Path.GetFileName(fileName);
string filePath = env.MapPath("BatchFiles\" + fileName);
file.SaveAs(filePath);
List<ApiCall> apiCalls = JsonConvert.DeserializeObject<List<ApiCall>>(System.IO.File.ReadAllText(filePath));
InterpreterContext context = new InterpreterContext();
context.AssemblyStore = env.MapPath("AssemblyStore");
context.BasePath = env.WebRootPath;
foreach (ApiCall call in apiCalls)
{
call.Interpret(context);
}
}
ViewBag.Message = "API calls from the file(s) have been executed!";
return View("Index");
}
Listing 7-24.
ExecuteJSON() Action that Deals with the JSON Files
The code saves the uploaded files to the wwwroot/BatchFiles folder. This code should be familiar to you since you used it many times in the previous examples.
Once the JSON file(s) is saved on the server, you need to read the JSON file and convert it into ApiCall objects. This is accomplished with the help of a Json.Net component. Make sure to add the NuGet package of Json.Net to your project before you write this code. Once added, you can use the JsonConvert class (Newtonsoft.Json namespace) to parse and read the JSON files. The DeserializeObject() generic method of the JsonConvert class accepts the JSON string data and returns a generic List of ApiCall objects. Notice that since the
DeserializeObject() method
requires a string, the uploaded JSON file is read in a string using the ReadAllText() method of the File class.
The InterpreterContext is then created and its AssemblyStore and BasePath properties are set to the /wwwroot/AssemblyStore folder and /wwwroot folder, respectively. This is done using the MapPath() method and the WebRoot property of the constructor injected IHostingEnvironment object.
A foreach loop iterates through the list of ApiCall objects and calls the Interpret() method on each ApiCall object. The InterpreterContext is also passed to the Interpret() method.
Once the foreach loop completes, a message is set in the ViewBag that indicates the successful completion of the operation.
Finally, add the
Index view
to the /Views/Home folder and write the markup shown in Listing 7-25 in it.
<html>
<head>
<title>Upload JSON Files</title>
</head>
<body>
<h1>Select JSON File(s)</h1>
<form asp-controller="Home" asp-action="ExecuteJSON" method="post" enctype="multipart/form-data">
<input type="file" name="files" id="files" multiple />
<input type="submit" value="submit" />
</form>
<h2>@ViewBag.Message</h2>
</body>
</html>
Listing 7-25.
Markup of Index View
This markup should be familiar to you since you used it in earlier examples. It basically consists of a form that houses a file-input field and a Submit button. The form is posted to the ExecuteJSON() action you wrote earlier.
Although this completes the web application, you still need to create the FileManagerLib class library that is being used by the web application. To create it, add a new Class Library project to the same solution and name the project as FileManagerLib. Then add the FileManager class to the project. Listing 7-26 shows the complete code of the
FileManager class
.
public class FileManager
{
private string basePath;
public FileManager(string basepath)
{
this.basePath = basepath;
}
public void CreateFolder(string location)
{
Directory.CreateDirectory(basePath + "\" + location);
}
public void CopyFiles(string sourceFolder,string destinationFolder,string pattern)
{
sourceFolder = basePath + "\" + sourceFolder;
destinationFolder = basePath + "\" + destinationFolder;
string[] files = Directory.GetFiles(sourceFolder,pattern);
foreach(string source in files)
{
string destination = destinationFolder + "\" + Path.GetFileName(source);
File.Copy(source, destination);
}
}
public void DeleteFiles(string location,string pattern)
{
location = basePath + "\" + location;
string[] files = Directory.GetFiles(location, pattern);
foreach (string file in files)
{
File.Delete(file);
}
}
}
Listing 7-26.
FileManager Class
We won’t go into a detailed discussion of the FileManager class, because this class is used merely for testing purpose and performs the basic filesystem management tasks. It is suffice to note the following:
- The FileManager constructor takes a string parameter—the physical base path of the wwwroot folder. Recollect that the Interpret() method of ApiCall passes this parameter using reflection.
- The FileManager class contains three methods—CreateFolder(), CopyFiles(), and DeleteFiles(). The CreateFolder() method creates a new folder at a given location. The CopyFiles() method copies files from a source folder to a destination folder. The DeleteFiles() method deletes files from a folder. The CopyFiles() and DeleteFiles() methods allow you to specify a file-matching pattern (for example, *.png).
- The FileManagerLib assembly, FileManager class, and the three methods are specified in the JSON file.
Once you complete the FileManagerLib class library, compile it and copy its assembly (FileManagerLib.dll) to the AssemblyStore folder under wwwroot (you will need to create this folder). Also create the BatchFiles folders under wwwroot.
This completes the application; now it’s time to test it. You will need to create a JSON file containing the instructions in order to test the application. You can do so either in Notepad or in Visual Studio. Listing 7-27 shows a sample JSON file.
[
{
"AssemblyName": "FileManagerLib.dll",
"ClassName": "FileManagerLib.FileManager",
"MethodName": "CreateFolder",
"Parameters": [ "TestFolder" ]
},
{
"AssemblyName": "FileManagerLib.dll",
"ClassName": "FileManagerLib.FileManager",
"MethodName": "CopyFiles",
"Parameters": ["Images","TestFolder","*.*"]
},
{
"AssemblyName": "FileManagerLib.dll",
"ClassName": "FileManagerLib.FileManager",
"MethodName": "DeleteFiles",
"Parameters": ["TestFolder","*.gif"]
}
]
Listing 7-27.
BatchScript.json File Containing Instructions
As you can see, the BatchScript.json file consists of an array with three elements. Each array element specifies an AssemblyName, ClassName, MethodName, and Parameters. The Parameters themselves are specified in the form of a string array.
Notice that the JSON property names, such as AssemblyName and ClassName, must batch to the properties of the ApiCall class. This is because the JsonConvert class deserializes the JSON file into ApiCall objects based on this mapping.
The AssemblyName points to the assembly FileManagerLib.dll. The ClassName specifies the fully qualified name of the class—FileManagerLib.FileManager. The MethodName specifies the method to be invoked, such as CopyFiles. And the Parameters array specifies a list of parameter values as expected by the method. Then add a few files to the wwwroot/Images folder.
That’s it! Now run the web application and upload the BatchScript.json file to the server. If everything goes well, you will find a TestFolder folder getting created under wwwroot. Files from the Images folder also get copied to the TestFolder. And all the GIF files (if any) get deleted from the TestFolder.
Note
In the preceding example, a JSON file acted as a source of the instruction set. However, that’s not always necessary. You can even accept the instructions (AssemblyName, ClassName, MethodName, and Parameters) from a user interface and then invoke them using the Interpret() method of the ApiCall class.
Iterator
Many times your code will need to deal with a collection of objects. You are probably aware that the System.Collections and System.Collections.Generic namespaces provide many classes that represent a collection of objects. An ArrayList, List, and Dictionary are some of them.
Iterating
through a collection of object is quite common in .NET applications. In C# the foreach loops simplify the overall access to the individual elements of a collection.
In many cases the built-in collection classes serve the purpose of iterating and accessing a collection sequentially quite well. However, in some cases you may want to devise your own way to iterate through a collection.
Suppose you have some data stored as a JSON file. The client wants to read and access the data—it must know how the JSON file is structured. The Iterator pattern can separate that logic away from the client and provide a simplified, cursor-like way to iterate through the JSON files.
In such situations the iterator pattern comes handy. The iterator pattern allows your code to access the individual elements of an aggregate object sequentially. In doing so, the client is shielded from knowing the internal details of the aggregate object.
Design and Explanation
The UML diagram
in Figure 7-10 illustrates the iterator pattern.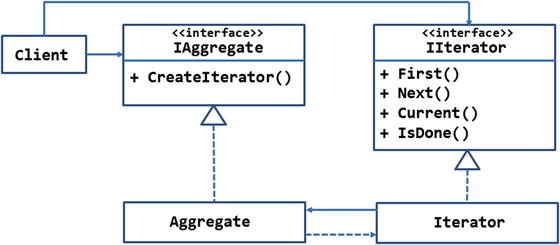
Figure 7-10.
UML diagram illustrating iterator pattern
The IIterator interface defines the abstraction for the iterator. It has methods such as First(), Next(), Current(), and IsDone(). The First() method takes the cursor to the first element of the aggregate. The Next() method moves the cursor to the next element of the aggregate. The Current() method returns the element pointed to by the cursor at a given point in time. Finally, IsDone() indicates whether all the elements of the aggregate object have been iterated or not.
The Iterator class implements IIterator and provides the concrete implementation for the methods just mentioned.
The Iterator object simply iterates through an aggregate. The actual collection is represented by the IAggregate interface. The CreateIterator() method of the IAggregate interface, when implemented, is supposed to return an Iterator object for iterating through the aggregate.
The Aggregate class implements the
IAggregate interface
and represents the collection of elements to be iterated upon.
Notice the links between Aggregate and Iterator classes. The dashed arrow between Aggregate and Iterator represents the dependency of Aggregate on the Iterator. The solid arrow between Iterator and Aggregate represents an association between them.
The client uses both objects—IAggregate and IIterator.
Although the iterator pattern can be implemented in C# as shown in Figure 7-10, the .NET framework has a built-in way to implement it in the form of IEnumerable and IEnumerator interfaces. So, the next section will discuss and use that approach instead of the one just discussed.
Example
Suppose you have a database table with a very large number of records in it. To reduce the memory footprint of the code and for performance reasons, it is decided to use SqlDataReader instead of fetching the data and storing it in advance.
However, using SqlDataReader may make the client code a bit difficult and less readable due to the following reasons:
- To use SqlDataReader the client will also need to be aware of the table schema. The client needs to know the data types and column ordinals, or names, in order to use methods such as GetString() and GetInt32().
- The client code will have tight coupling with the SQL Server data provider, and any future changes in the data-access logic might need changes in the client code also.
- The client will need to take care of closing the SqlDataReader once done to ensure that the underlying database connection is closed properly.
So, it is decided that the client code should not use the SqlDataReader directly. The client code should look as if a standard collection is being iterated.
The scenario just described is a good candidate for using the iterator pattern. Figure 7-11 shows the design of the said system. The design assumes that the Orders table of the Northwind database is to be iterated using the implementation.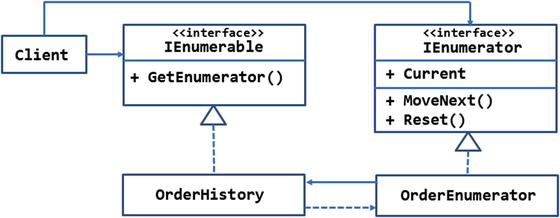
Figure 7-11.
Iterating through SqlDataReader using the iterator pattern
The design shown in Figure 7-11 makes use of the .NET framework’s built-in interfaces—IEnumerable and IEnumerator—for implementing the iterator pattern. These interfaces come in two flavors—generic and non-generic. The former flavor is available in the System.Collections.Generic namespace and the later flavor is available in the System.Collections namespace. Since generic collections are better than non-generic ones, we will use the generic interfaces in our implementation.
The
IEnumerator interface
consists of two methods—MoveNext() and Reset(). The OrderEnumerator class represents the concrete implementation of the IEnumerator interface. The MoveNext() implementation is responsible for shifting the current element pointer to the next Order. The Reset() method shifts the pointer back to the beginning of the collection. The Current property returns the current order pointed to by the iterator.
The IEnumerable interface can be implemented by any object that represents an aggregate or collection. In this example, OrderHistory is such an aggregate object and deals with all the orders from the Orders table. The IEnumerable interface requires the OrderHistory class to implement the GetEnumerator() method. GetEnumerator() returns an IEnumerator object (OrderEnumerator in this case) to the aggregate for iterating its elements.
The client code uses a foreach loop to iterate through the OrderHistory class. It can also access an order currently pointed to by the iterator.
The application that you build in this section looks a bit like the one shown in Figure 7-12.
Figure 7-12.
Table rendered by iterating through OrderHistory
As you can see, the application simply displays a table of orders. For every order, its OrderID, CustomerID, OrderDate, and ShippedDate are displayed.
To develop this application, begin by creating a new ASP.NET web application project named Iterator using Visual Studio and configure it to use MVC (see Chapter 1 for more details).
Also store the database connection string for the Northwind database in the appsettings.json file. Then add the AppSettings class with the ConnectionString property to the Core folder. You will need to set the ConnectionString property in the Startup class as you did for many of the earlier examples.
Then add the
Order class
to the Core folder. The Order class represents an element of the OrderHistory class and is shown in Listing 7-28.
public class Order
{
public int OrderID { get; set; }
public string CustomerID { get; set; }
public DateTime OrderDate { get; set; }
public DateTime ShippedDate { get; set; }
}
Listing 7-28.
Order Class Holding Details of an Order
The Order class consists of four properties, namely OrderID, CustomerID, OrderDate, and ShippedDate. These properties correspond to the respective columns of the Orders table of the Northwind database.
Now add an OrderHistory class to the Core folder and implement the IEnumerable<T> interface in it. This complete, the code of the OrderHistory is shown in Listing 7-29.
public class OrderHistory : IEnumerable<Order>
{
public SqlDataReader Cursor { get; set; }
public OrderHistory(bool openImmediately)
{
if (openImmediately)
{
this.OpenCursor();
}
}
public void OpenCursor()
{
SqlConnection cnn = new SqlConnection(AppSettings.ConnectionString);
SqlCommand cmd = new SqlCommand();
cmd.Connection = cnn;
cmd.CommandType = CommandType.Text;
cmd.CommandText = "select OrderID,CustomerID,OrderDate,ShippedDate from orders where shippeddate is not null order by orderdate";
cnn.Open();
this.Cursor = cmd.ExecuteReader(CommandBehavior.CloseConnection);
}
public IEnumerator<Order> GetEnumerator()
{
return new OrderEnumerator(this);
}
private IEnumerator GetEnumerator1()
{
return this.GetEnumerator();
}
IEnumerator IEnumerable.GetEnumerator()
{
return GetEnumerator1();
}
}
Listing 7-29.
OrderHistory Class Implementing IEnumerable<Order>
Before you write any code in the OrderHistory class, make sure to import System.Data, System.Data.SqlClient, System.Collections, and System.Collections.Generic namespaces at the top of the class file. You need to import both the System.Collections and the System.Collections.Generic namespaces because IEnumerable<T> from the latter namespace is based on IEnumerable from the former namespace.
The
OrderHistory class
implements the IEnumerable<T> interface and specifies Order as its generic type.
Then the OrderHistory class defines the Cursor public property. The Cursor property is an SqlDataReader and needs to be public because the OrderEnumerator class needs to iterate through it.
The Constructor of the OrderHistory class accepts a Boolean parameter, openImmediately, that indicates whether the SqlDataReader should be immediately created or not. If this parameter is true, the code calls the OpenCursor() private method.
The OpenCursor() private method opens a connection with the Northwind database and fires a SELECT statement using an SqlCommand object. The SELECT statement fetches OrderID, CustomerID, OrderDate, and ShippedDate column values from the database. Notice that the ExecuteReader() method specifies the CommandBehavior value to be CloseConnection. This way, calling the Close() method on the SqlDataReader will also close the underlying database connection.
The GetEnumerator() method returns IEnumerator<Order> in the form of an OrderEnumerator object (you will create OrderEnumerator shortly).
The next two methods—GetEnumerator1() and IEnumerable.GetEnumerator()—implement the GetEnumerator() method of IEnumerable privately. This is required because IEnumerable<T> itself inherits from the IEnumerable interface.
Next, add an
OrderEnumerator class
to the Core folder and implement IEnumerator<T> on it. The complete code of the OrderEnumerator class is shown in Listing 7-30.
public class OrderEnumerator : IEnumerator<Order>
{
private OrderHistory history;
public OrderEnumerator(OrderHistory history)
{
this.history = history;
}
public bool MoveNext()
{
if(history.Cursor.IsClosed)
{
history.OpenCursor();
}
return history.Cursor.Read();
}
public void Reset()
{
history.Cursor.Close();
}
public Order Current
{
get
{
Order currentOrder = new Order();
currentOrder.OrderID = history.Cursor.GetInt32(0);
currentOrder.CustomerID = history.Cursor.GetString(1);
currentOrder.OrderDate = history.Cursor.GetDateTime(2);
currentOrder.ShippedDate = history.Cursor.GetDateTime(3);
return currentOrder;
}
}
private object Current1
{
get
{
return Current;
}
}
object IEnumerator.Current
{
get
{
return Current1;
}
}
public void Dispose()
{
if (history.Cursor != null && history.Cursor.IsClosed == false)
{
history.Cursor.Close();
}
}
}
Listing 7-30.
OrderEnumerator Implementing IEnumerator<Order>
The OrderEnumerator class begins by declaring a private variable of OrderHistory. This variable is assigned in the constructor.
The
MoveNext() method
checks whether the SqlDataReader exposed by the Cursor property is open or not. If it is closed, the OpenCursor() method opens it so that the code can iterate through the records. The Read() method is then called on the SqlDataReader so that the record pointer is advanced to the next record. Note that initially the record pointer is placed before the beginning of the records. Thus, calling Read() for the first time moves it onto the first record. Subsequent calls to Read() advance the record pointer in the forward direction one record at a time.
The
Reset() method
closes the SqlDataReader by calling its Close() method. Recollect that earlier the CommandBehavior was set to CloseConnection. So, calling close on the SqlDataReader also closes the underlying connection.
The Current property is a read-only property and hence has only the get block. The code inside the get block creates a new Order object and populates it with the data from the SqlDataReader. Notice the use of the GetInt32(), GetString(), and GetDateTime() methods to read the integer, string, and DateTime column values, respectively. The newly created Order object is then returned to the caller.
The next two properties—Current1 and IEnumerable.Current—are required in order to implement the Current property of IEnumerable privately. This is because IEnumerator<T> inherits from IEnumerator.
The
Dispose() method
closes the SqlDataReader if it is open so that the underlying database connection is also closed.
Next, add HomeController in the Controllers folder. Modify its Index() action to include the code shown in Listing 7-31.
public IActionResult Index()
{
OrderHistory history = new OrderHistory(true);
List<Order> orders = new List<Order>();
foreach (Order o in history)
{
orders.Add(o);
}
return View(orders);
}
Listing 7-31.
Iterating Through OrderHistory Collection
The Index() action creates an instance of OrderHistory. The value of true passed to the constructor indicates that the cursor should be opened immediately.
Then a list of Order objects is created. This is purely for the sake of testing purposes. In a more realistic case you would iterate through the OrderHistory, access each and every Order object, and process it as per your requirement. Here, for the sake of testing, the code simply grabs Order objects from the OrderHistory and puts them into another collection. This is done using the foreach loop.
Notice that the foreach loop expects that the collection being iterated implements either the IEnumerable or the IEnumerable<T> interface. So, it works as expected with the history object.
The generic list of Order objects is then passed to the Index view to be displayed in a table.
Finally, add the
Index view
to the Views/Home folder and write the markup shown in Listing 7-32 in it.
@model List<Iterator.Core.Order>
...
<h1>List of Orders</h1>
<table border="1" cellpadding="10">
@foreach(var item in Model)
{
<tr>
<td>@item.OrderID</td>
<td>@item.CustomerID</td>
<td>@item.OrderDate</td>
<td>@item.ShippedDate</td>
</tr>
}
</table>
...
Listing 7-32.
Markup of Index View
The Index view is quite straightforward. It displays a table by iterating through the list of Order objects passed as the Model. The table displays the OrderID, CustomerID, OrderDate, and ShippedDate properties of each order.
This completes the application. You can run it and confirm whether the records are displayed as expected.
Summary
Behavioral patterns concern themselves with how a system behaves and communicates. This chapter covered four behavioral patterns, namely chain of responsibility, command, interpreter, and iterator.
The chain of responsibility pattern is used when a request is to be handled by multiple objects in a chain-like manner. The objects that handle the request can be wired by the client code. One handler, after completing its work, invokes the next handler in the chain.
The command pattern encapsulates a request as an object. Since a command is being represented as an object, operations such as queuing, redo, and undo can be easily performed.
The interpreter pattern is used to interpret a language or instruction set in an application’s context. It allows you to define, parse, and execute an instruction set that is application specific.
The iterator pattern allows you to access individual elements of an aggregate object sequentially.
The next chapter will continue the discussion of behavioral patterns by discussing the mediator, memento, and observer patterns.