This chapter introduces the shell, obviously the most important component for shell scripting. It describes the choices among shells, as well as how to find out which shells are available. In modern graphical desktop environments, it is not always easy to find the shell, but you'd be surprised at how many systems actually support shells, from Zaurus PDAs to Audrey network appliances to the beautifully designed Mac OS X systems.
No matter how nice a graphical user interface your system sports, adding the power of a shell can dramatically increase the speed and efficiency of what you can do on your computer. Shells provide greater control over your system and allow you to do some things that simply cannot be done from the graphical environment. Shells often allow you to perform tasks remotely, which is especially useful if you need to do something to a large number of computers or computers located at another site.
Even in an environment such as Apple's Mac OS X, shell scripting is a useful, powerful tool in anyone's kit. Apple had the forethought to make it possible to connect shell scripts to the GUI environment via a number of custom utilities that ship with the OS, so you can link UI-level scripts done in AppleScript to the shell environment for more power than either environment alone would have.
Because shells exist to accept your commands, each shell provides help for entering complicated commands, a set of sometimes-complicated shortcuts that can speed up your work immensely. These shortcuts include special editing modes, based on the two traditional text editors, emacs and vi.
In this chapter, I discuss the following:
Understanding shells, including a number of different shells with interesting names such as bash, ksh, and csh.
Finding your shell, which is not always easy in a graphical desktop environment.
Entering commands into shells, editing those commands, and storing a history of your commands.
Using wildcards in your commands.
If you're already familiar with the shell, parts of this chapter will likely cover material you already know. If so, you may want to skim through for anything new and then jump to the next chapter.
A shell is a program that takes commands typed by the user and calls the operating system to run those commands. The shell interprets your commands. For example, you may use the shell to enter a command to list the files in a directory, such as ls, or a command to copy a file, such as cp.
There are a number of different shells, which are introduced later in this chapter.
Here's a short example to give you a taste of using a shell. Launch a shell window, or access a shell. Type the following command to list all the files in the current directory:
If you don't know how to launch a shell window on the desktop or log into a shell, that's okay. See the section Determining Which Shell You Are Running for more on how to track down the elusive shell on your system.
$ ls
configuration  eclipse   icon.xpm     plugins  startup.jar
cpl-v10.html   features  notice.html  readme   workspace
In this example, you simply type ls and press Enter (or Return, depending on your keyboard). The $ is the shell prompt, which tells you the shell awaits your commands. The remaining lines are the names of the files in the current directory.
Just going over the basics of running a simple command introduces a lot of complex topics, as shells are not all that simple. If the following sections don't make sense, don't worry. Each topic will be covered in detail later in this book.
The shell displays its prompt, shown here as $, and then passively awaits your commands. When you type a command and press Enter (or Return on Mac OS X systems), you are telling the shell to execute your command.
The shell looks for a program—that is, a file with execute permissions—with the name ls. The shell looks at all the directories in your command path. The shell runs the first program found that matches the name (and the execute permissions) and then displays the results of the program to your screen, as in the second and third lines in the code example.
The command path is stored in the environment variable named PATH. Read more on environment variables in Chapter 4.
The way the shell interprets commands and executes programs is fairly complicated. Back when shells were first created, their developers thought shells were pretty nifty. The fact that you're reading this book now, more than 30 years later, means those developers were right.
Back in the ancient days of computing, computers ran no shell, or the shell, if it existed, was so connected to the operating system that it was indistinguishable. You can still see the legacy of these single-shell systems in the MS-DOS shell on Windows.
Don't worry, I'll show you how to break free of the single-shell monopoly on Windows.
A shell acts as a form of wrapper around the OS, hence the term shell. (Nowadays, with object-oriented parlance, a shell would be called something like a CommandReadingOperatingSystemDecorator.)
Shells were designed long before graphical interfaces existed. As graphical environments mature, most users explicitly run shells less and less for their daily work. But a shell can automate some very complex sequences of commands. In addition, most Linux systems are designed to be updated from typed-in commands—that is, from a shell. Furthermore, whether you know it or not, a shell often powers many of the graphical commands users run. Learning the shell can help you better understand your computer.
Unix was the first popular operating system to break free of the single-shell monopoly. In Unix (and Linux), a shell is simply a program. What makes the shell special is that a shell is the program run when most users log in. (You can configure which program [shell] gets run.)
As such, the shell fits in well with the Unix philosophy that each command should do one thing and do it well. Complex commands are then built by combining small commands. In this context, a shell is simply another command—a command that facilitates combining other commands.
You can use shell scripts to automate administrative tasks, encapsulate complex configuration details, and get at the full power of the operating system. The ability to combine commands allows you to create new commands, thereby adding value to your operating system. Furthermore, combining a shell with a graphical desktop environment allows you to get the best of both worlds. You get all the friendliness of the graphical user interface and all the power of the command line.
On Unix and Unix-like systems such as Linux, a shell interprets your commands, running one or more programs for each command you enter. In addition, most shells allow you to group a number of commands in a file, called a shell script. When you run the shell script file, the shell executes the commands in the script file in order.
For example, you can create a shell script to look for all files that have the text string "abc" in the file name and then sort those files by the date they were last modified and back up those files that contain the most recent changes. The same script could send you an email when it finishes its work and also deliver an affirmation that you are a good person.
Each shell provides a different syntax as to what you can enter. The syntax supported by most shells includes a lot of support for working with files. For example, you can list all the files that start with an uppercase A or a lowercase a, using a simple command like the following:
$ ls [Aa]*
The ls part tells the shell to launch the command named ls (which lists file names). The [Aa]* part is interpreted by the shell and is part of the syntax supported by most shells.
The bracket syntax, [Aa], is considered a regular expression. Many commands, such as grep, support regular expressions, sometimes with a slightly different syntax. See the Working with Wildcards section for more on regular expressions and wildcards.
Since there is no monopoly on shells, you are free to run any shell you desire. That's all well and good, but choosing a shell without knowing the alternatives isn't very helpful. The following sections introduce the main shells.
The original Unix shell is known as sh, short for shell or the Bourne shell, named for Steven Bourne, the creator of sh. As shells go, sh remains fairly primitive, but it was quite advanced for the 1970s, when it first appeared (as part of the Seventh Edition Bell Labs Research version of Unix). The Bourne shell has been considered a standard part of Unix for decades. Thus, sh should be available on almost all systems that support Unix or Unix-like commands, including Linux, Unix, and Mac OS X systems.
The Bourne shell feature set, therefore, forms the least common denominator when it comes to shells. If you truly need to write portable shell scripts, stick to only the features supported by sh. (I'll highlight where I go beyond these features in the examples.)
The basic Bourne shell supports only the most limited command-line editing. You can type characters, remove characters one at a time with the Backspace key, and press Enter to execute the command. If the command line gets messed up, you can press Ctrl-C to cancel the whole command. That's about it. Even so, the Bourne shell supports variables and scripting, and remains in wide use today, especially for system administration scripts.
For many years, the Bourne shell was all that was available for interactive Unix usage. Then along came the C shell, or csh, the first major alternative to the Bourne shell.
Designed by Bill Joy at the University of California at Berkeley, the C shell was so named because much of its syntax parallels that of the C programming language, at least according to the official documentation. Finding similarities is not always that easy, so don't expect C programming skills to help with the C shell, unfortunately. What is true, however, is that a great many C programmers use the C shell.
The C shell caught on quickly and became the default shell on Unix systems derived from the Berkeley Software Distribution, or BSD, flavors of Unix. Among the surviving players today, Solaris, based originally on BSD Unix and later on System V Unix, has many die-hard C shell users.
Csh added some neat features to the Bourne shell, especially the ability to recall previous commands (and parts of previous commands) to help create future commands. Because it is very likely you will need to execute more than one command to perform a particular task, this C shell capability is very useful.
The most commonly used special C shell commands include !! to execute the previous command again and !$ to insert the last argument of the previous command. See the section Entering Commands for more on these handy shorthand commands.
Note how virtually all shells have sh in their names, such as csh, ksh, bash, and so on. The major exception is the rc shell, covered later in this chapter.
For many years, the C shell and the Bourne shell were the only games in town. Anyone who used Unix heavily in the 1980s or early 1990s likely learned the C shell for its superior feature set and command-line editing capabilities. Most Bourne shell scripts, however, will not run in the C shell because of differences in syntax.
The C shell was an essential part of the Berkeley, BSD, version of Unix. And the C shell formed one of the reasons why users wanted to run BSD Unix instead of the official Unix, which came from AT&T at the time. During this period of rivalry between West Coast Unix (BSD) followers and East Coast Unix (AT&T) followers, the AT&T folks created an alternative to the C shell called the Korn shell.
The Korn shell became one of the main salvos in AT&T's response to the growing popularity of BSD Unix. When AT&T developed System V (five) Unix, the developers realized they needed a shell to match the capabilities of the C shell. (As per software developers everywhere, they chose not to use the freely licensed C shell that already existed but instead created something new.)
Created by David Korn at AT&T Bell Laboratories, the Korn shell, or ksh, offers the same kind of enhancements offered by the C shell, with one important difference: The Korn shell is backward compatible with the older Bourne shell syntax. While the C shell created a brand-new syntax, the Korn shell follows the earlier Bourne shell syntax, extending the syntax as needed. This means that the Korn shell can run most Bourne shell scripts. The C shell cannot.
You can find out more about the Korn shell at
www.kornshell.com.
The Korn shell has been standardized as part of POSIX, the Unix suite of standards, covered later in the chapter.
The Korn shell ships as a standard part of System V Unix. This means that everyone with a commercial version of Unix, such as AIX, HP-UX, or Solaris, has the Korn shell (and this is likely the default shell, too). Users of Berkeley Unix and Linux, however, had no access to the proprietary Korn shell. And that was a shame because users liked the features of the Korn shell. The proprietary nature of the Korn shell created a rift. Just about everything in Unix could be made to run on any other version of Unix. But users of commercial versions of Unix had the Korn shell. Users of free versions of Unix did not because there was no free alternative for the Korn shell. That meant that Korn shell scripts would not run on the free versions of Unix. Furthermore, many organizations ran both commercial and free versions of Unix, adding to the problem of having scripts that run on one system and not on another. The whole idea of Open Systems, especially promoted by Unix, was that programs could run on any Unix or Unix-like system. The Korn shell was one of the first major programs that broke this covenant. The rise of Linux just made the problem worse because Linux did not run the Korn shell as well, as covered following.
This situation left Unix administrators pulling their hair out because the shells available on different flavors of Unix acted differently.
To help with this problem, Eric Gisin wrote a public domain Korn shell, called pdksh, that remains popular today. Years later, the source code to the official Korn shell was released under an open-source license. But this all occurred too late to stop the rise of bash.
The Korn shell was king of the shells on proprietary Unix, but that now pales in comparison to the installed base of Linux. Linux, a Unix work-alike operating system, grew faster than anyone predicted, and Linux users wanted an advanced shell with features like that of the Korn shell. But Linux users needed a shell that was freely available under an open-source license. This led to the development of bash.
Where the Korn shell was a form of answer to the success of the C shell, the bash shell can be considered an answer to the Korn shell.
The bash shell answered a clear need, a need shown by the initial success of the Korn shell. Users wanted a shell that was compatible with Bourne shell scripts but with advanced features such as command-line editing. Users also needed a freely available shell, free of proprietary licenses. All of this led to bash, or the Bourne Again shell, a play on words to link it to the earlier Bourne shell.
Bash offers command-line editing like the Korn shell, file-name completion like the C shell, and a host of other advanced features. Many users view bash as having the best of the Korn and C shells in one shell. That's good because the Korn shell was available only on System V Unix systems. It was not available on BSD Unix, Linux, or other systems. On these systems, bash filled in the gap left by the lack of a Korn shell. All this occurred as Linux grew at a spectacular rate, often at the expense of Unix systems. This led to the situation today, where there are far more bash users than Korn shell users.
Years later, the Korn shell sources were released under an open-source license, but it was too late. Bash rules the roost now. Bash is by far the most popular shell and forms the default shell on Linux and Mac OS X systems. The examples in this book focus on the Bourne shell with the extensions provided by bash.
Note
Be aware: Linux and Mac OS X systems actually use the bash (Bourne Again) shell as the default shell. Bash then masquerades as sh, the Bourne shell. But on standards-compliant Unix systems such as Solaris, from Sun Microsystems, the sh command is supposed to be the Korn shell, ksh (covered following). This can lead to a conflict, unless—and this is very important—you stick to just the older Bourne shell features supported by both bash and ksh. Another "gotcha" for Mac OS X is that versions of that environment prior to 10.3.X used tcsh, or T shell, as the default, which is a csh, or C shell derivative. Because most shell scripts are assuming sh or an sh derivative, not checking which shell your script is running in can cause problems. Luckily, there's an easy way to deal with this, and you learn about it in the book.
Linux systems popularized the T C shell, or tcsh. Tcsh extends the traditional csh to add command editing, file-name completion, and more. For example, tcsh will complete file and directory names when you press the Tab key (the same key as used in bash). The older C shell did not support this feature.
For the most part, tcsh acts as a C shell on steroids. It is mostly backward compatible with the C shell. In fact, on Linux, tcsh is the program that acts both as csh and tcsh, so many Linux C shell users are really running the enhanced tcsh instead.
Over the years, a number of other shells have appeared, each with a small but devoted following. These shells include ash, zsh, and rc.
Created by Kenneth Almquist, ash is a Bourne shell–compatible shell that is smaller than bash and runs certain scripts more accurately than bash. Almquist created ash on NetBSD Unix to better run INN, a program for exchanging newsgroup postings with other computers. INN had troubles running under bash.
The Z shell, or zsh, focuses on interactive usage. Zsh offers a zillion extended options for working with wildcards, file listings, directories and paths. These are all very useful on Unix or Linux systems, which all have a very deep directory hierarchy.
See
www.zsh.orgfor more on the Z shell.
The rc shell comes from the Plan 9 operating system, developed by Bell Laboratories, where Unix originated. Plan 9 sports some interesting features and takes the Unix philosophy to the next level. With Plan 9, users can log in to any system on the network and see their home directory, regardless of where the directory is actually stored. A small number of users adopted rc outside of Plan 9.
At a time when Unix vendors felt they could compete against Windows in the desktop software arena, these vendors created a number of graphical extensions to shells, particularly the Korn shell. The Common Desktop Environment, or CDE, was meant to provide a standard desktop experience for Unix users. CDE combined elements developed by Hewlett-Packard, Sun, and other Unix workstation vendors. In the end, however, CDE was too little, too late. It wasn't until years later, with the development of the Mac OS X operating system's Aqua UI, and the Linux GNOME and KDE desktop software, that Unix systems could really compete with Windows on the desktop.
Out of the CDE effort, however, came dtksh, short for the desktop Korn shell (many CDE programs sport names that start with dt). Dtksh is the Korn shell and supports all the standard ksh features. In addition, you can create windows, menus, dialog boxes, and text-input fields using shell commands built into dtksh.
Another shell with graphical commands is tksh, which combines the Tk (pronounced tee kay) graphical toolkit that comes with the Tcl (pronounced tickle) scripting language with the Korn shell. Tksh extends the Korn shell with graphical commands but otherwise uses the Korn shell syntax in place of the Tcl syntax.
For more on tksh, see
www.cs.princeton.edu/∼jlk/tksh/.
POSIX, the Portable Operating System Interface for Computer Environments standard, defines a standard for writing portable applications. This is really a standard for writing portable applications at the source code level on systems that look similar to Unix. Because many applications depend on a shell (especially for installation), POSIX also standardizes on a shell—the Korn shell.
The POSIX shell, however, is called sh. This means that a host of slightly different applications all masquerade as sh, the venerable Bourne shell:
Some Unix systems still include the AT&T-created Bourne shell.
Most modern commercial Unix systems, however, include the POSIX shell, which is really ksh under the covers in a POSIX compatibility mode.
On Mac OS X and Linux systems, bash acts as sh.
On the Cygwin environment for Windows, as well as NetBSD Unix, ash acts as sh. Each of these shells can act mostly like the Bourne shell, but all sport some differences. As you can imagine, this situation can lead to problems when trying to write portable shell scripts.
Note that bash should conform to most of the POSIX 1003.2 standard. The problem occurs, however, when script writers make assumptions based on whichever shells act as sh for their systems.
To help resolve these problems, you can run bash with the --posix command-line option. This option tells bash to operate with the POSIX standard default operations instead of the bash-specific operations where they differ. In other words, this makes bash act more like a POSIX shell. See the Command-Line Options section for more on how to use command-line options.
The default shell on Linux and Mac OS X is bash, the Bourne Again shell. Bash provides a modern shell with many features, and it runs on many, many systems where it is not the default. Hence, I use bash as the primary shell for the examples throughout this book.
Barring extra configuration, the default shells for many systems appear in the following table.
Operating System | Default Shell |
|---|---|
Mac OS X | bash (Mac OS X 10.3, earlier versions use tcsh) |
Solaris, HP-UX, System V Unix | ksh |
QNX 6 | ksh |
Zaurus PDA | bash |
Yopy PDA | bash |
Windows with Cygwin | bash |
Windows with Services for Unix | ksh (not a full version, however) |
If your system does not have bash, you can download the sources from
www.gnu.org/software/bash/.
Unless you are the administrator or have administrator permissions, you are stuck with the default shell as defined by your administrator. That's usually okay because modern shells are all pretty good, and you may need to deal with assumptions regarding shells as you work. For example, when administrators assume everyone runs the Korn shell, they may set up parts of the environment that break in strange ways for users of other shells, particularly users of the C shells. This often happens with commands that are not specifically shell scripts. And these types of problems can be really hard to track down.
So your best bet is to stick with the default shell as defined by your administrator. If you are the administrator or you have administrator permissions, you can change your startup shell to run the shell you prefer.
If you are free to choose but you don't have any particular requirements or a history with a particular shell, choose bash if it is available. Bash is under active development and forms the default shell on a great many systems.
If you don't have bash available, go with the Korn shell if it is available. (This is sad to say, coming from a die-hard C shell user.) The C shell was the best thing around in its day, but bash is clearly the most-used shell today. Bash has most of the good features of the C shell, too.
If you do have a history with a particular shell, go ahead and use that shell, as you will be the most productive with a familiar shell.
The chsh command, if available, allows you to change your default, or login, shell. This is handy if you just hate your current shell and your administrator is not open to changing your shell for you. The chsh command, short for change shell, allows you to modify the system environment for your login. The basic syntax follows:
chsh username new_default_shellFor example, to change user ericfj to use bash, run the chsh command as follows:
$ chsh ericfj /bin/bashNote that you need to enter the full path to the shell. The chsh command will likely require you to type in your password, so that only you and the administrator can change your default shell. The new login shell will be available for use the next time you log in. (You can log out and log back in to run the new shell.)
On Linux, you need a slightly different syntax:
chsh -s new_default_shell usernameOn BSD Unix, use the chpass command, which requires the following syntax:
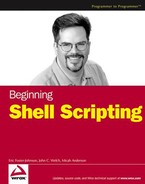
chpass -s new_default_shell usernameOn Mac OS X, there are a number of ways to change your shell, depending on your setup. First, you can run either chpass or chsh (they are both the same program), using the chpass syntax listed previously. The second and more common way is to change the settings in the Terminal application. (You talk to the shell in Mac OS X via Terminal, which is just a, well, terminal to the shell environment in Mac OS X.) From the /Applications/Utilities directory open the Terminal application. From the Application menu, select Preferences, or press
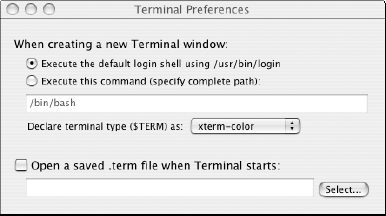
Another way to change the shell for a specific user is to use NetInfo Manager, which is the GUI interface to the directory system Mac OS X uses to store user account settings. From the /Applications/Utilities/ directory, open up NetInfo Manager. NetInfo Manager displays a hierarchy of settings in a columnar fashion; the root is on the left, and the current branch opens to the right. In the middle column, click the "users" entry, and find your short username (in our example, "admin") Notice that when you click admin, the bottom window displays various settings for that user, as shown in Figure 1-2.
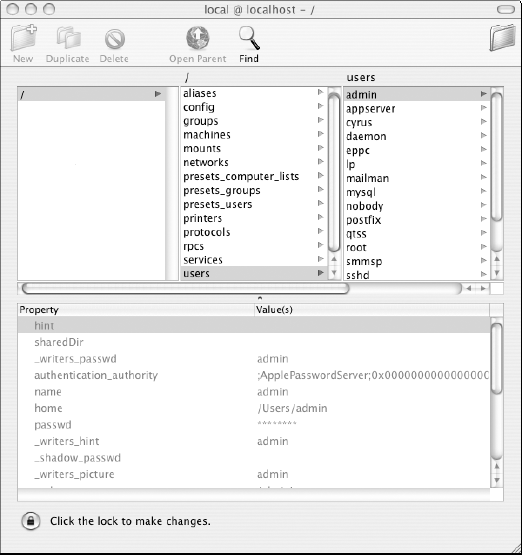
To make changes, click the "Click the lock to make changes" button. You must be an admin user to authenticate; otherwise, you won't be allowed to change your shell here. After you've authenticated, scroll down in the settings area of the window until you see the "shell" entry. Double-click the path for the current default shell in the Value(s) column, and enter the full path to the new default shell, as in Figure 1-3.
After you've entered the new shell path, hit
Shells are simply programs. Because a shell can run programs, nothing is stopping you from running a shell from within a shell, or a shell within a shell within a shell, and so on. To do this, simply type in the shell command you want to run. For example, if your default shell is bash, but you want to try the features of tcsh, simply type in tcsh and try it out:
$ tcsh
$
The tcsh program responds with a prompt, ready for your commands. Remember now, however, that you are running a different shell, so the syntax of some commands may differ.
The shell, combined with the cryptic commands it supports, such as cp and rm, helped form the impression that Unix and Linux systems are hard to use. Today, just about every system offers a graphical desktop environment that makes using the computer a lot easier.
As the various desktop environments mature, users tend to run shells less and less. Some users may even end up believing that there is no such thing as a shell. For example, you can work with a Macintosh system for a long time and never need a shell. That's good. The shell just gives you extra power and flexibility.
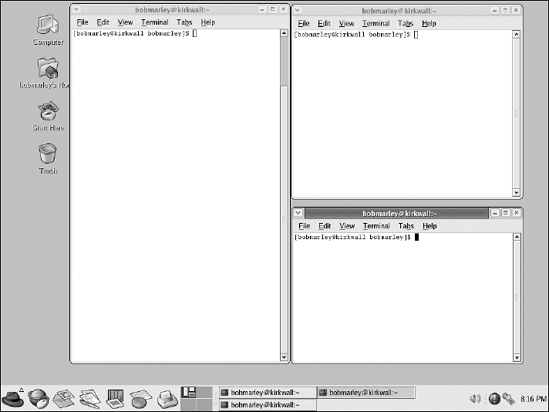
The problem of how to embed a shell into a graphical environment was solved years ago with the Unix xterm application and the Macintosh Programmer's Workshop (MPW). In both these cases, the shell runs inside a window on the normal desktop display. The problem was, prior to Mac OS X, the OS didn't have the concept of a shell, so it was always a bit of a kludge. Now that Mac OS X is based on BSD Unix, you now have the full abilities of a true Unix shell environment available, a great improvement over earlier attempts. This provides a very powerful tool. Shell windows typically add scroll bars, control over fonts and font sizes, and, most important, the ability to copy and paste text. Place two or more shell windows on your display, and you have a powerful environment because you can run commands in one window and then select text for placement into commands entered in another.
The image in Figure 1-4 shows a typical power-user Linux desktop with multiple shell windows.
Because a great many shell commands work on files, you can often use a graphical file manager to eliminate the need for a shell. Graphical file manager programs, however, don't work well for those tasks that shells work best at. For example, if you want to change the case of all the file names in a directory from uppercase to lowercase, shells work far better than file managers. Also, if you want to copy those files that have been modified after a certain date, for a backup perhaps, shells again work better than file managers.
Once you determine you need a shell, the next step is to find it.
In modern desktop environments, shells run inside special shell windows that hold a shell-based command line. Most shell windows also support scroll bars that allow you to review the output of past commands.
If the shell is the first program run when you log in to a system, it seems odd to have to find the shell. But on today's modern operating systems, the desktop environments often hide the shell on purpose. The intent is not to stop you from using the shell; instead, the goal is to reduce the level of fear of users taught that Unix-like systems are difficult to use.
If you are logging in using the telnet or ssh programs, then the first program you see will likely be a shell. Problem solved. You've found your shell. If instead you run a graphical desktop environment, you may need to look around. The following sections describe how to start a shell window for a number of Unix and Unix-like systems, starting with Linux.
Linux systems typically run one of two major desktop environments, GNOME or KDE. Both the GNOME and KDE environments, however, try to appear somewhat like Windows, with the Linux equivalent of the Windows Start menu usually appearing in the lower-left corner.
On a Fedora or Red Hat Linux system with a GNOME or KDE desktop, choose Terminal from the System Tools menu. With the default KDE environment, choose Terminal from the System menu.
Your Linux system may sport slightly different menus, but the concept is the same. Nowadays, the shell is considered a tool or utility and will be available on a sub-menu under the main system menu.
These applications are called terminals or terminal windows because they create a pseudo, or virtual, terminal, which mimics the behavior of an old-fashioned ASCII terminal. To the underlying operating system, these actually are terminals, albeit software-only terminals.
Figure 1-5 shows the gnome-terminal window, which provides the default shell under the GNOME desktop. Choose Terminal from the System Tools menu to launch this program. (The KDE terminal window looks similar to the gnome-terminal window, as covered in the following section.)
The first thing you should notice about the gnome-terminal window is the menu bar, which spans the top of the window. The menus on this menu bar allow you to customize the terminal window. For example, you can control the size of the text from the View menu.
The second thing to notice is the very handy scroll bar along the side, which allows you to scroll through the output. For example, if you list all the files in a large directory, the listing will scroll because there are likely more file names to display than will fit within the window.
The third thing to notice is the shell prompt, usually ending with a $ character, which shows the shell running inside the window awaits your commands. The gnome-terminal window will launch your default shell, usually bash. (As with most things, you can configure this in the profile settings within the gnome-terminal window.)
To configure the gnome-terminal window, select Edit
The other shell windows on Linux all appear very similar to the gnome-terminal window. There's not much you can do with a shell window, anyway.
The KDE shell window, called konsole, looks and feels very similar to the gnome-terminal window. The konsole application offers a comparable set of features to the GNOME offering. The konsole program extends what the gnome-terminal offers, however, with greater support for multiple sessions.
Each session is really a separate instance of the shell running. By default, sessions appear in separate tabs within the konsole window. (The gnome-terminal also supports multiple sessions, each in its own tab.) You can click the tabs to switch to additional shells.
Another excellent feature of the konsole application is support for bookmarks. Unlike web pages, konsole allows you to bookmark directories. Choose the Add Bookmark choice from the Bookmarks menu to store the current directory as a bookmark. You can then select the bookmark directory from the Bookmarks menu to jump immediately to that directory. The konsole application does this by issuing a cd command to change to the bookmarked directory.
The KDE konsole window uses Shift-Ins (or Insert) to paste, while the gnome-terminal window uses Shift-Ctrl-V. These shortcut differences can make it difficult to go back and forth between terminal windows. It is usually better to stick with one type of terminal window.
One thing that may confuse people used to Macintosh or Windows systems is the active select and paste model used by the X Window System. The X Window System, or X, provides the low-level graphics on Linux and Unix systems. (You can also run X on Mac OS X or Windows systems, in emulation.)
With X, selected text is instantly available for other programs to use. You can use the left mouse button to select text and then paste that text into a different window. Typically, the middle mouse button of a three-button mouse pastes the currently selected text. (Press the two buttons simultaneously on a two-button mouse to emulate the missing middle button.)
This may seem like the traditional copy and paste model, but you get to skip the copy step. With the X Window System's active select and paste model, you can simply select and paste.
In addition, X supports the normal copy and paste model with a clipboard. You can place some text in the clipboard while selecting other text for active pasting.
A long time ago in a galaxy far, far away, you could be really productive using active select and paste with the vi text editor in multiple shell windows. Nowadays, most users run graphical text editors, covered in Chapter 2, instead of vi.
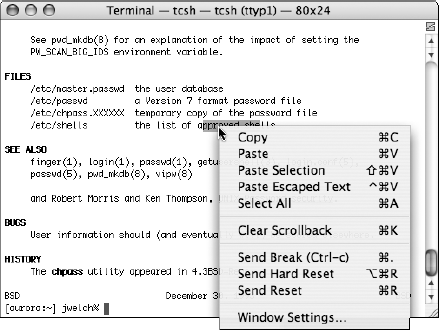
On Mac OS X, you'll find a shell window available by using the Terminal application, located in the /Applications/Utilities/ folder. It defaults to a base terminal window for your default shell. Because Mac OS X ships with a single-button mouse, there are some oddities that you don't find in other systems. With a single-button mouse, or the trackpad on a portable, to emulate the second button, you Control-click (press the Control key and click the mouse). This brings up a contextual menu that allows you to make use of features like pasting the selected text without going to the keyboard, as shown in Figure 1-6.
If you find Ctrl-clicking annoying, just replace the standard Mac mouse with a mouse or trackball that you prefer. Without any added software, Mac OS X supports two buttons and a scroll wheel. Most of the better mice from Microsoft or Kensington come with improved drivers so you can program the extra buttons for specific tasks.
If you want to use the Xterm application to get to your shell environment under OS X, you can do that with Apple's X11 application (in Mac OS X 10.3 or later, it's a custom install), or by using XFree86. (X11 is Apple's implementation of XFree86, so they're essentially the same thing.) X11 lives in the /Applications/Utilities/ folder, and when you start it, it opens an xterm window for you by default. To emulate the second and third buttons, use Option-click and Command-click.
On Unix systems under the CDE, or Common Desktop Environment, click the terminal icon that appears on the taskbar at the bottom of the screen. You'll see a dtterm window.
The dtterm program appears similar to that of the gnome-terminal or konsole window, although dtterm supports fewer options from the menu bar.
With the GNOME desktop environment making inroads into commercial Unix systems, especially Sun's Solaris, CDE is being used less and less.
MS-DOS provides a primitive shell called command.com, or cmd.exe, depending on the version of Windows. Command.com is the old name for the program that provided the MS-DOS command line on PCs. On modern Windows systems, you can still see the legacy of command.com with the MS-DOS Prompt window, the Windows equivalent of a shell window.
This shell, however, doesn't offer the features of modern Unix and Linux shells, especially when it comes to shell scripting. Because of this, if you want to write shell scripts on Windows, you need to install another shell.
Cygwin is the name for a set of packages that provide a surprisingly large number of Unix-like utilities for Windows systems. With Cygwin installed, you can make your Windows system act very much like a Unix system, at least from a user perspective.
For shells, Cygwin includes ash, bash, tcsh, zsh, and pdksh. The default shell is bash, which you should use for the examples in this book. Download the Cygwin package from www.cygwin.com.
Note
By default, Cygwin installs in C:cygwin, which becomes the virtual root directory of the Cygwin environment. When you run the Cygwin bash shell, for example, the shell starts in your user home directory, from the perspective of Cygwin. This directory is /home/username, such as /home/ericfj for a user named ericfj. In reality, however, this directory is located in C:cygwinhomeericfj. From the bash shell, however, this appears as /home/ericfj. You need to pay attention to this if you work with files.
To launch a Cygwin shell, use the Windows Start menu.
Because the Cygwin package includes a number of shells, as well as a plethora of commands, this is probably the best shell package for Windows users. But you may decide to instead install Microsoft's Windows Services for UNIX.
Microsoft's Windows Services for UNIX provide a number of Unix commands on Windows. For shells, this package offers both the Korn shell and the C shell but not bash. Furthermore, the Korn shell as part of this package is not a complete Korn shell. Because of this, you are better off, from a shell-scripting perspective, to load Cygwin instead.
For more on the Microsoft's Windows Services for UNIX, see
http://www.microsoft.com/windows/sfu/default.asp.
In addition to running shells on desktop and server systems, you can also run shells on quite a few small systems such as PDAs, especially Linux-based PDAs.
On the Yopy PDA, click the Linupy menu (similar to the Windows Start menu), and choose Terminal from the Utilities menu. The Yopy will start a shell window running bash. On low-resolution PDA displays such as that on the Yopy, however, you will likely see only part of the width of each line, which makes entering commands and editing files more difficult.
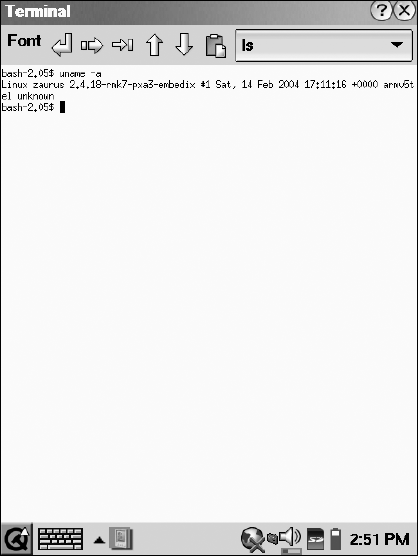
The latest Zaurus PDAs solve the screen resolution problem by providing a 480 × 640 pixel screen in portrait mode and 640 × 480 in landscape mode. In both modes, you can see the entire width of a line.
On the Zaurus, choose Terminal from the Applications menu to launch a shell window. Or click the Home button to see the application launcher. Click the Applications tab, and select the Terminal icon. Figure 1-7 shows a bash shell window running on the Zaurus.
With QNX 6.0 on an Audrey Internet appliance, choose Terminal from the main Infinity menu (for those using the Infinity operating system images).
In most cases, it is not that hard to launch a shell window, regardless of the system you use. As you can see from these examples, even PDAs and Internet applications sport shell windows, ready for you to play with.
Once you have a shell available, the next step is to start entering shell commands. Shell commands form the basis of shell scripting.
Shells display a command prompt and then await your commands. The prompt indicates the shell is ready.
The prompt usually ends with a dollar sign ($), a percent sign (%) for C shell users, or a hash mark (#, also called a sharp sign) if you are logged in as the root, or super user. Modern shells often come configured to show your username, machine name, and current directory in the prompt.
For example, the following line shows the default tcsh prompt for user ericfj on a machine named kirkwall, in the user's bin directory:
[ericfj@kirkwall ∼/bin]$
Note that the tilde character, ∼, is shorthand for the user's home directory.
Bash, by default, shows a prompt like the following on Linux systems:
[ericfj@kirkwall bin]$
Note how bash just displays the current directory name relative to its parent directory. You can really see the difference when you change to a user's home directory. The following shows a bash prompt for the user's home directory:
[ericfj@kirkwall ericfj]$
But if you use tcsh, you will see a prompt like the following:
[ericfj@kirkwall ∼]$
Prompts are configurable, so your system may differ. In many cases, however, the default prompt is useful enough so that you don't need to change it. These examples come from a Fedora Core 2 Linux system.
In this book, a dollar sign ($) will act as a shorthand for your shell prompt. While the prompts may differ, shells all act the same: they patiently await your commands. The examples in this book show $ for the shell prompt and # for the shell prompt of the root user.
This patience has limits. On some Unix systems, for example, the C shell defaults to a 60-minute automatic logout setting. If you enter no commands for an hour, the shell quits and logs you out. This time period is also configurable.
Once you launch a shell window, the next step is to determine which shell you are running.
Each command interprets its arguments differently, although usually arguments are file or directory names. Each command may also accept command-line options that control how the command behaves.
In most cases, a command-line argument provides data for a command to work on, while a command-line option selects among the command's many options for how to work on the data. This distinction is not always clear. In the end, you are at the mercy of whoever wrote the command in the first place. The options and arguments differ by command and are often strangely named.
Unix, which popularized these concepts and commands, has a long, long history that doesn't always make sense. For example, the command that alerts users to newly received email is called biff, after the name of a dog that barked when the postal carrier brought the mail.
So you should always check the documentation for each command you intend to use to see what options are supported by the command. The basic format for a command can be expanded to include the following:
command option1 option2...argument1 argument2...
Command-line options almost always come first. And command-line options almost always start with a dash character, -. Newer commands (meaning anytime after the late 1980s) often support options that start with two dashes, --.
Nowadays, the two-dash and the one-dash folks have mostly come to a détente, where the two-dash options are used with longer, more understandable, names for the options, and the one-dash options are used with single-letter options. The two-dash options are also often designed for infrequent use, with the single-dash short options used for the most common options.
For example, the -v option is often (although not always) used to request verbose output. The long form of this option is often --verbose. You can choose -v or --verbose as you see fit for those commands that support both options. In most cases, there will be a long option that corresponds to each single-letter option.
What you consider verbose and what the creator of the command considers verbose may differ greatly. Verbose may merely mean outputting a few cryptic hex numbers.
On MS-DOS, a forward slash, /, is used in place of a dash for many command options. This is especially disconcerting to Unix and Linux users, as these systems use a forward dash to separate directories. Many MS-DOS commands accept either the slash or dash to precede options.
You can determine what options a command supports and, more important, what these options mean by using the online manuals. The man command displays the online manual entry for a given command. The basic format follows:
man command_nameFor example:
$ man uname
UNAME(1)                         User Commands                        UNAME(1)

NAME
       uname - print system information

SYNOPSIS
       uname [OPTION]...
DESCRIPTION
Print certain system information. With no OPTION, same as -s.
-a, --all
print all information, in the following order:
-s, --kernel-name
print the kernel name
-n, --nodename
print the network node hostname
-r, --kernel-release
print the kernel release
:The man command displays the manual entries one screenful at a time, using the more command. (See Chapter 8 for details on how to create command pipelines using the more and less commands.) You can use the man command to determine the available command-line options.
The man command is your friend. This is one of the best commands on Unix and Linux systems and can tell you a lot about your system.
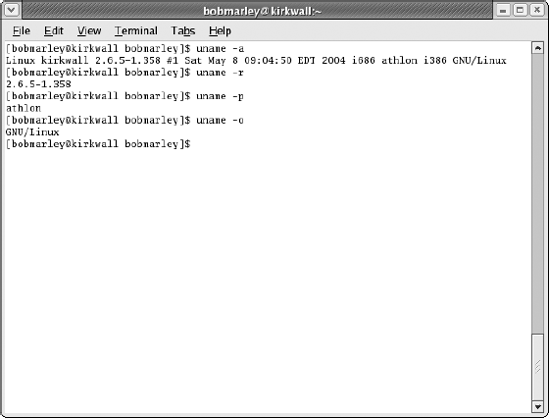
To show how Unix and Linux commands differ, you can try the uname command on another system, such as Mac OS X.
The normal format for command-line options is to precede the option letter with a dash, as in the following command:
$ uname -r
2.6.5-1.358
You can typically provide more than one option. For example:
$ uname -r -p
2.6.5-1.358 athlon
Most Unix and Linux commands also support combining a number of options with just a single dash. For example:
$ uname -rp
2.6.5-1.358 athlon
This example combines the -r and the -p option but places both on the command line with a single dash, as -rp. This command has the same effect as if the options were presented separately.
As mentioned earlier, most Unix and Linux commands support options starting with a single dash. Some newer commands, especially those that come from the GNU project (www.gnu.org), support longer-named options starting with two dashes.
A few options don't use either the single or double dash. The dd command, for example, supports a very different command-line option format. With dd (short for data dumper), the options take the following format:
ddoption1=value1 option2=value2...
For example:
$ dd if=backup.iso of=/dev/tape bs=20bThe dd, cpio, and tar commands, all related to backups (at least originally), take radically different command-line options and syntax. This is just one of the quirks with Unix and its long history.
See the online manual entry for dd for more details. Just remember that Unix and Linux commands are not all consistent. You should look up the commands you need to use in the online manuals.
With the ability to create long, complex command lines, it becomes essential that you be able to edit the command line to create these commands. That is where a number of shell features come in handy.
The original command-line editing feature was essentially just the Backspace key. You could delete from the end and retype commands. Pressing Ctrl-C cancels the entire command. This is useful if your command is so messed up, it is no longer worth it to fix. Since those early days, shells have advanced quite far, and now most offer a plethora of features to help edit complex commands.
The original Bourne shell supports only Backspace and Ctrl-C editing of commands. But since the C shell, all new shells have supported ways to help edit commands. The facilities shells offer include the ability to repeat previous commands, or parts of previous commands, to recall commands from a history of commands and the ability to use real text editors to edit commands.
Note
Unfortunately, command editing also brings out the differences between shells. The format and syntax differ greatly between shells.
Most Unix and Linux commands deal with files and directories. Furthermore, the file system supports a deep hierarchy of directories, something that comes from the rich command sets on Unix and Linux, which leads to long, complicated commands. Type in a directory name incorrectly and you may wipe out crucial data, miss an important backup, or inadvertently damage your system.
One thing shell designers noticed right away was that commands usually occur in a sequence. That is, you will typically enter a number of commands, all of which repeat parts of the previous commands. For example, you may enter a number of commands that work within a given directory. This can be as simple as copying a number of files to the same directory or changing the permissions of a number of files or directories.
To help with this, shells offer a number of ways to repeat parts or all of previous commands.
The C shell introduced the double-exclamation mark syntax, !!. This command repeats the previous command in its entirety. Now, why in the world would anyone want to repeat a command that just ran? Didn't the command already do its work? Actually, not always. Trying a command again after an error is one of the most common reasons for repetition. Other reasons you may want to repeat a previous command include the following:
To check the status of a system or application: For example, if users report problems with an Oracle database, you may want to issue a command to check its status. If Oracle appears to be down, you may want to restart Oracle in another shell window and then repeat the command to check the status of Oracle until you verify that the database is running again.
To rebuild a software application, especially after modifying files: Software developers do this all the time. You may edit a file with a graphical editor and then want to rebuild the software to see if you have fixed a problem or that everything is working properly. (See the Tools to Edit Shell Scripts section in Chapter 2 for more on graphical text editors.)
Attempting the same thing over and over again but expecting different results is considered a sign of insanity.
For another example, the ping command checks network connectivity to a given machine, represented by the machine's hostname or network (IP) address. The name ping comes from the pinging sound of submarine radar systems. Ping sends a certain type of network packet to another system, which should then send the packet back.
For example, the following command runs the ping command to a system identified by an IP address:
$ ping 192.168.0.4
PING 192.168.0.4 (192.168.0.4) 56(84) bytes of data.

--- 192.168.0.4 ping statistics ---
11 packets transmitted, 0 received, 100% packet loss, time 9998ms
The ping command runs forever unless it encounters a very serious error. In most cases, you need to terminate ping by pressing Ctrl-C. When you press Ctrl-C, ping displays some statistics, as shown at the end of the output in the example.
This example shows that you cannot reach the system identified by its IP address 192.168.0.4 (a system on the local network). This may lead you to check network cables and routers and whether the remote system is even running.
The ping command is not a full network testing application. If ping works, you know your system can reach the remote system on the network. If ping doesn't work, however, you cannot always assume the network is down. Many network firewalls disable ping messages. Or, the remote system may not run the process that responds to pings.
A better means to test network connectivity is usually trying to connect to the remote application you are interested in, such as a remote Web server, file server, database, or other application.
Once you think the network link is repaired, you can try the command again. For example:
$ !!
ping 192.168.0.4
PING 192.168.0.4 (192.168.0.4) 56(84) bytes of data.
64 bytes from 192.168.0.4: icmp_seq=0 ttl=64 time=0.069 ms
64 bytes from 192.168.0.4: icmp_seq=1 ttl=64 time=0.062 ms
64 bytes from 192.168.0.4: icmp_seq=2 ttl=64 time=0.060 ms
64 bytes from 192.168.0.4: icmp_seq=3 ttl=64 time=0.059 ms
64 bytes from 192.168.0.4: icmp_seq=4 ttl=64 time=0.061 ms
64 bytes from 192.168.0.4: icmp_seq=5 ttl=64 time=0.063 ms
64 bytes from 192.168.0.4: icmp_seq=6 ttl=64 time=0.060 ms
64 bytes from 192.168.0.4: icmp_seq=7 ttl=64 time=0.060 ms

--- 192.168.0.4 ping statistics ---
8 packets transmitted, 8 received, 0% packet loss, time 6998ms
rtt min/avg/max/mdev = 0.059/0.061/0.069/0.010 ms, pipe 2
In this case, the ping command succeeded in reaching the other system.
The Korn shell uses the r command instead of !! to repeat the previous command. You must first set up the command history feature, however. See the section Viewing the Command History for more on command histories.
In addition to repeating the entire previous command, you can also ask the shell to insert parts of the previous command in any new command. The most useful feature is the ability to type !$ in place of the last item on the previous command.
The !$ syntax does not work on the Korn shell.
Even with the limitation that you have to pay attention to what the previous command held, the !$ syntax is one of the most useful features provided by the shell. This feature originated with the C shell and was also picked up for the bash shell. The Korn shell doesn't support this feature, unfortunately.
In addition to using !! to repeat the last command and !$ to repeat the last item from the last command, you can use the up and down arrows to cycle through the previous command.
You can edit each command that appears, modifying the command. Or you can simply run the command again.
This is one of the few features that appeared to come from the MS-DOS world and the old doskey program. Normally, features in Unix and Linux find their way into Windows and MS-DOS, not the other way around.
The shell can keep track of more than just the previous command. In fact, you can ask the shell to keep an entire history of the commands you typed in, as the up and down arrows show.
The command-history feature originated with the C shell. The Korn shell uses a different syntax, and bash supports both the C shell and the Korn shell syntaxes.
In the C shell, you can enable the command history with a command like the following:
$ set history=60This command tells the C shell to store the 60 previous commands in its history. When the history list fills, the shell will dump the oldest entry to make room for a new entry. See the section Customizing Your Account in Chapter 4 for more on setting up the command history when you log in.
Once set up, you can use the history command to view the command history, as shown following:
$ history
     1  12:30   echo $history
     2  12:30   history
     3  12:30   pwd
     4  12:30   cd web_files/
     5  12:31   history
In this example, only a few commands are in the history, all executed at about the same time, 12:30. If the history is long, you may want to pipe the output to the more or less command.
The history holds a number for each command. You can use the number with the exclamation mark, !, to repeat that command from the history. For example:
$ !3
pwd
/home2/ericfj/writing/beginning_shell_scripting/web_files
In this case, command number 3 in the history is the pwd command, which prints the current working directory.
You can also use the exclamation mark with the start of a command in the history to repeat that command. For example, the previous command, pwd, starts with p. Use the following example as a guide:
$ !p
pwd
/home2/ericfj/writing/beginning_shell_scripting/web_files
You don't have to use the first letter. You can provide one or more characters. Usually providing a number of characters ensures that you get the right command. In Unix and Linux, for example, the rlogin command, which logs in to a remote system, and the rm command, which deletes files, both start with r. Unless you want to accidentally delete files, you should include a number of characters when running a command from the history.
The Korn shell supports a command history as well but uses the r command instead of an exclamation mark. Like the C shell, you may need to set up the history feature first, but set the HISTSIZE value instead of the C shell's history:
$ HISTSIZE=60Once set up, run the fc command (short for fix command) to view the history, with the -l (ell) option:
$ fc -l
1      set -o vi
2      fc
3      pwd
4      pwd
5      fc -l
The fc command can also call up an editor.
When you've selected a command, you can execute that command by number or partial text, similar to the feature in the C shell. Remember to use the r command in the Korn shell, as ksh does not support the exclamation-mark syntax.
The bash shell supports most of the C shell and Korn shell history features. Like the C shell, bash supports the history command for listing the command history. Bash supports the !!, !number, and !partial_txt means to execute previous commands. Like the Korn shell, you can execute the fc -l command to list the command history. Bash uses the Korn shell HISTSIZE setting to control the size of the command history. Bash does not support the Korn shell r commands.
The following table shows the main shell history commands.
Shell | List Command History | Run Last | Run by Text | Run from Number |
|---|---|---|---|---|
bash | history, fc -l | !! | !partial_text | !number |
csh | history | !! | !partial_text | !number |
ksh | fc -l | r | r partial_text | r number |
tcsh | history | !! | !partial_text | !number |
In addition to executing commands from the history list, you can call up a text editor to edit any particularly complex command. Of course, you have to imagine you live in a parallel universe where only two text editors exist: vi and emacs. Even so, this can be handy in rare occasions where you face a particularly troublesome command.
Each shell, excluding csh, supports a set of editing commands. You can turn on the vi or emacs editing mode with a command, set -o for bash and ksh or bindkey with tcsh.
This style of command editing is not supported by csh. The tcsh shell adds this ability (one of the additional features tcsh adds to the csh feature set).
The following table shows the commands to control the editing mode.
Shell | Set vi Editing | Set emacs Editing |
|---|---|---|
bash | set -o vi | set -o emacs |
csh | not supported | not supported |
ksh | set -o vi | set -o emacs |
tcsh | bindkey -v | bindkey -e |
Once you have set up a particular editing style, you can use the various key sequences supported by these text editors to work on the command line. For example, in emacs mode, Ctrl-A moves the cursor to the beginning of the line. If you use vi or emacs for text editing, these key combinations should come naturally to you. If you don't, you're likely better off using the text editor of your choice to create command lines or full scripts.
The bash and ksh shells also support the ability to call up a full-screen editor. The fc command, used previously to list the command history, can call up a text editor. Type fc alone to call up an editor, vi or emacs, on the previous command. Pass a number to fc to edit the given command in the history, such as fc 3 to edit command 3 in the history. Pass some text of a previous command, such as fc cp, to edit the previous command that starts with the given text.
See Chapter 2 for more on vi, emacs, and other text editors.
File-name completion occurs when the shell offers to help you enter file and directory names. This is one of the most useful shell features because Unix and Linux systems have many, many directories. To ask the shell to complete a file name, simply start typing the name and then press Tab to expand the name. For example, type the following:
$ ls /usr/loNow press the Tab key. The shell will expand /usr/lo to /usr/local/:
$ ls /usr/local/Now type b, the start of bin, and press the Tab key:
$ls /usr/local/b<Tab>
The shell will expand the b to bin:
$ ls /usr/local/binPress Esc- in ksh in vi editing mode. Ksh doesn't support the Tab character for file-name completion. Bash supports Tab or Esc-/. Note the difference between Esc-/ (bash) and Esc- (ksh).
The bash shell also supports a few more features for completing commands. If there is more than one name the shell can use, press Esc-? to see a list of all the possible files. Type ls /usr/local/ and then press Tab. Nothing will happen because there is more than one name the shell can expand. Then press Esc-? to see all the possible files, as shown in the following example.
$ ls /usr/local/ Esc-?
bin      games    lib      man      share
etc      include  libexec  sbin     src
Use Ctrl-D in the C shell (and tcsh), or Esc-= in the Korn shell to list all the possible names.
The bash shell goes further. Use Esc-∼ to expand a username. Use Esc-$ to expand shell variables (a topic covered in Chapter 2). The Esc-∼ comes from the use of a tilde character, ∼, to refer to your home directory.
Shells support a rich set of wildcards to help work with files. A wildcard is an expression that the shell uses to expand to a number of file names—that is, to all files that match the expression.
Wildcards are often called globs. The use of globs is called globbing.
The main wildcard is a star, or asterisk (*), character. (Java programmers sometimes call this a splat.) A star alone matches anything and nothing, sort of Zen-like. Typically, you need to pair a star with some other characters to form a more specific expression. For example, *.txt matches all file names ending with .txt, including all of the following:
.txt
a.txt
a_very_long_name.txt
A_FILE_NAME_WITH_UPPERCASE_LETTERS.txt
The * means that you don't care what letters there are before the .txt.
Typically, an expression such as *.txt will match all text files. You can refine the wildcard expression further. For example, a*.txt matches all file names that start with a lowercase letter a and end with .txt. Again, the * means you don't care about any letters in between. Using the files from the previous list, a*.txt would match just the following:
a.txt
a_very_long_name.txt
If you want files that start with an uppercase A or a lowercase a and end with .txt, use the expression [Aa]*.txt. This expression would match the following files:
a.txt
a_very_long_name.txt
A_FILE_NAME_WITH_UPPERCASE_LETTERS.txt
You can use the star more than once—for example, with the expression a*v*.txt. This expression would match only one file in the example list of files:
a_very_long_name.txt
On MS-DOS, each program has to support wildcards on its own. A few DOS commands, such as DIR, support a limited number of wildcard expressions. This is very different with Unix and Linux, as the shell supports the wildcard expressions so each program doesn't have to.
You can combine expressions, such as the following:
$ ls /usr/lib/l*[Az]*
/usr/lib/libbz2.a                            /usr/lib/libkudzu_loader.a
/usr/lib/libbz2.so                           /usr/lib/libmusicbrainz.a
/usr/lib/libbz2.so.1                         /usr/lib/libmusicbrainz.so
/usr/lib/libbz2.so.1.0.2                     /usr/lib/libmusicbrainz.so.2
/usr/lib/libFLAC++.so.2                      /usr/lib/libmusicbrainz.so.2.0.1
/usr/lib/libFLAC++.so.2.1.2                  /usr/lib/libOggFLAC++.so.0
/usr/lib/libFLAC.so.4                        /usr/lib/libOggFLAC++.so.0.0.4
/usr/lib/libFLAC.so.4.1.2                    /usr/lib/libOggFLAC.so.1
/usr/lib/libkdeinit_kaddprinterwizard.la     /usr/lib/libOggFLAC.so.1.0.2
/usr/lib/libkdeinit_kaddprinterwizard.so     /usr/lib/libz.a
/usr/lib/libkorganizer_eventviewer.la        /usr/lib/libz.so
/usr/lib/libkorganizer_eventviewer.so.1      /usr/lib/libz.so.1
/usr/lib/libkorganizer_eventviewer.so.1.0.0  /usr/lib/libz.so.1.2.1.1
/usr/lib/libkorganizer.la                    /usr/lib/libzvt.a
/usr/lib/libkorganizer.so.1                  /usr/lib/libzvt.so
/usr/lib/libkorganizer.so.1.0.0              /usr/lib/libzvt.so.2
/usr/lib/libkudzu.a                          /usr/lib/libzvt.so.2.2.10
This command lists files in the /usr/lib directory that start with a lowercase l and have an uppercase A or a lowercase z in their names. Unlike the previous example, this expression does not require that the file end in .a, or any extension for that matter.
You can use more than two letters inside the square brackets. For example:
$ ls /usr/lib/l*[AFLz]*.a
/usr/lib/libBrokenLocale.a  /usr/lib/libkudzu_loader.a  /usr/lib/libSDL_mixer.a
/usr/lib/libbz2.a           /usr/lib/libmusicbrainz.a   /usr/lib/libSDL_net.a
/usr/lib/libIDL-2.a         /usr/lib/libSDL.a           /usr/lib/libz.a
/usr/lib/libIDL.a           /usr/lib/libSDL_image.a     /usr/lib/libzvt.a
/usr/lib/libkudzu.a         /usr/lib/libSDLmain.a
This example lists all files in /usr/lib that start with l; have an uppercase A, F, L, or lowercase z in their names; and end with .a.
While the star expression matches all or nothing, the question-mark expression, ?, matches precisely one character. You might need the question mark to winnow a long list of files names down to a few.
In addition, the question mark proves very useful when working with dot files. Dot files are files and directories that start with a period, or dot. In Unix and Linux systems, dot files are normally hidden. The ls command, for example, will skip dot files unless you explicitly ask for them.
A big problem with dot files and wildcard expressions is that the current directory has a name of a single period (.), and the parent of the current directory has a name of two periods (..), which creates a big problem if you use a wildcard expression such as .* to list all files that start with a dot. The shell can simply treat all files in the current directory as having a name that begins with ./, which refers to files in the current directory, such as ./a.txt. Also, files in the parent directory can be accessed as ../file_name, such as ../a.txt.
If you just want to view dot files and directories, use the question-mark syntax. In this case, you can start with all files with names beginning with a period and having at least two more characters, which eliminates the . and .. directories. For example:
$ ls .??*On a typical Linux system, you will likely have hundreds of files matching this expression. (Mac OS X systems, by default, sport far fewer dot files and directories.) When you have a better idea what files are available, you can further refine expressions. For example:
$ ls .j*
.jedit:
abbrevs       jars        modes                   recent.xml
activity.log  jars-cache  perspective.xml         session
dtds          jtidy       PluginManager.download  settings-backup
history       macros      properties              startup

.jpi_cache:
file  jar
This command lists all files starting with a .j or all files in a directory with a directory name starting with .j.
When you run a shell command, the shell waits until the command finishes. You cannot execute any more commands, at least in that shell, until the command finishes or you kill it (typically by pressing Ctrl-C). All the operating systems discussed in this book, however, support multitasking. So why doesn't the shell? It does. Place an ampersand after a command to run it in the background. For example:
$ xmms &
[1] 2280
$
The shell responds with the process ID of the command. (See Chapter 9 for more on processes and how you can use this process ID.) Next, the shell displays a prompt. It is ready for further commands. When the background task completes, you'll see an extra message from the shell, such as the following:
[1]+ Done xmms
This chapter introduced the shell, the program that accepts your commands on Unix and Unix-like systems such as Linux. Shells provide the main interface to the underlying operating system. In this chapter you learned:
Even if you run a graphical environment, you'll find one or more shells under the hood, running commands. Using these shells gives you access to the full power of your system.
Unix and Linux systems offer a plethora of shells. Of these, the most popular shell is bash, the Bourne Again shell. Bash is the default shell on Linux and the current version of Mac OS X.
Each shell offers a number of features to help enter commands, such as command-line editing and a history of commands.
Shells differ in syntax, especially between the C shell and the Korn shell. That's unfortunate because it makes using a shell harder if you need to switch systems. Luckily, the bash shell supports many features of the Korn shell and the C shell. For example, bash supports both the
historyand thefc -lcommands to list the command history.
The next chapter takes you from shells to shell scripting.