Chapter 1 introduced the shell, a program that patiently awaits your input in the form of commands. These commands range from a simple ls command to complex command lines made up of multiple commands. Each shell, such as bash, ksh, or csh, requires a slightly different syntax for entering commands, although the basics are very similar. Commands often require command-line options as arguments. All of this can make for complex commands.
Furthermore, you often need to issue a number of commands to accomplish your task. Add this all together and you can see why Unix has the reputation for being hard to use.
Shell scripts help slice through this mess. Shell scripts can hide the complex command syntax, specialized command-line options, and the long directory paths needed for many commands. Shell scripts can gather multiple commands together into one script and thereby act as a single command.
But shells aren't the only way to write scripts. Specialized scripting languages provide another means to write scripts for your system. These specialized languages include Perl, Python, and Tcl.
This chapter introduces shell scripts, as well as writing scripts to interact with the user. It addresses other scripting languages and the tools needed to create your own scripts.
This chapter covers the basics for shell scripts, including:
Writing your first scripts
Choosing a text editor for creating your scripts
Writing scripts to remember strange commands, commands you won't likely remember
Outputting text in your scripts, to provide data to the user
Storing values in variables
Gathering input from the user
The chapters to follow examine major topics in shell scripting in depth. For now, the best way to learn is to get started writing scripts.
A shell script is a text file that contains one or more commands. This seems pretty simple after all this buildup, but that's all a script really is. The power of shell scripts, however, lies not in the simplicity of the concept, but in what you can do with these files.
In a shell script, the shell assumes each line of the text file holds a separate command. These commands appear for the most part as if you had typed them in at a shell window. (There are a few differences, covered in the chapters to follow.) For example, this code shows two commands:
df -k
ls
The following Try It Out shows you how to make these two commands into a script and run it. You'll see a number of very short examples that should provide a quick overview to scripting.
You can use wildcards in your shell scripts, too, just as if you were entering commands at the command line. The following Try It Out shows you how to use wildcards.
You have to be careful, however, with the commands you place in your shell scripts. Interactive commands, especially full-screen commands, don't tend to work very well. The following Try It Out lets you experiment with how shell scripts work when you invoke an interactive command.
The vi text editor, discussed in the section Learning vi Modes, will wait until you enter the proper cryptic vi command to exit. If you are not familiar with vi, try :q!—that is, colon, q, bang (exclamation point). This will exit the vi command. The shell will then execute the next command in the script3 file, ls in this example.
Chapter 9 covers some mechanisms to execute programs and capture the output instead of just waiting for the program to terminate.
If for some reason you make a mistake in a shell script file, the shell will quit executing the command and display an error message. In many cases, but not always, an error will stop execution of the whole script. For example, if you accidentally typed the vi command as vex (because that is what it does to many), you would have a script like the following:
vex
ls
Enter this text and save the file under the name error. Now you can run the script:
$ sh error
error: line 1: vex: command not found
error  readpipe.tcl  script1  script2  script3  tktext.pl  vercompare.py
In this example, the shell continued executing the script even after the error on Linux and Mac OS X.
Chapter 11 covers more on handling errors and debugging scripts.
Shells each provide their own scripting language. For example, C shell scripts are not the same as Bourne shell scripts. You can choose from any shell you have available for scripting (although the Bourne shell and bash are good shells to stick with, for reasons explained in the last chapter). In addition, you can create scripts in a number of specialized languages, languages created just for scripting.
Note that there are a number of reasons why you should write your scripts for the Bourne shell instead of the C shell. See
www.faqs.org/faqs/unix-faq/shell/csh-whynot/for an interesting list of reasons why you should avoid the C shell for scripts. The C shell provides a great interactive shell, but you probably want to use sh or bash to run your scripts. This book covers the C shell, but the main focus remains on bash and sh.
While this book focuses on shell scripting, you should be aware that there are alternatives. Only you can determine which language fits your needs.
Some of the reasons to choose one language over another include the following:
Your experience and comfort level: This is similar to the old saying, "If all you have is a hammer, then all your problems look like nails." If you know just one scripting language, that language is the right choice for you. And this is not really a bad idea. There is quite an overlap across scripting languages.
The experience and comfort level of others in your organization: If your organization needs to maintain a number of scripts for a long time, then you'll want to choose the language that works best for the rest of the team.
Availability: Some languages may be available, and others may not. For example, if you want to script a web site, then the two most available languages are PHP and Perl. These are the languages supported by the majority of web-hosting firms.
What feels right: Some scripting languages support syntaxes that seem, well, downright odd. This is really a matter of personal preference. But if you really hate the syntax of a language, you should probably pick another.
What you need to learn: One of the advantages of using the shell for scripting is that you need to learn the shell as well, just to enter commands. Scripting doesn't add much more to learn than what you already need to know about the shell. This is not true for other scripting languages, where you need to learn an entirely new language.
This book, obviously, focuses on shell scripting. But the following sections should provide a flavor of other major scripting languages to help you decide. There are literally hundreds of scripting languages, but three of the most popular are Perl, Python, and Tcl.
Short for Practical Extraction and Reporting Language, Perl originated as a tool to help system administrators generate reports on system activities. Perl excels at generating reports.
Perl includes many of the powerful text-processing abilities of another language called Awk, covered in Chapter 7. In addition, thousands of add-on modules provide extra features for Perl, such as networking and database access.
Perl runs on Windows, Linux, Unix, Mac OS X, and a host of other systems. Furthermore, most web-site hosting firms support Perl, allowing you to write Perl scripts to process web requests. (These are called CGI, or common gateway interface, scripts.)
The following shows a Perl script:
#!/usr/bin/perl -w

#
# Reads DBM file, printing entries.
#
# Usage:
#  Perl sdbm2.pl database

use SDBM_File;
use Fcntl;

# Print format for STDOUT.
format STDOUT=
@<<<<<<<<<<<<<<<<<<<<<<  @<<<<<<<<<<<<<<<<<<<<<<<<<<<<<<<<<<
$key, $value
.


format STDOUT_TOP=
Program        File Name            page @<<<
$%
.

$database  = $ARGV[0];


# Open DBM database.

$mode = 0666;

$flags =  O_RDONLY | binary();

tie(%execs, 'SDBM_File', $database, $flags, $mode)
   or die
  "Can't open "$database" due to $!";

  # Process entries.
while ( ($key,$value) = each(%execs) ) {

    write;
}

# Close database.
untie(%execs);


# Subroutine to return
# O_BINARY value on Windows,
# and nothing if not on Windows.
#
sub binary() {
  return O_BINARY if is_windows();
}
#
# Subroutine to detect if running under
# Windows.
#
sub is_windows() {
return $^O =∼ /^(MS)?Win/;
}This script reads through a DBM database, printing out all the values using a Perl report format. Many of the concepts in this script, including using a hash or sharp sign, #, for comments, come originally from shell scripting.
Note how the first line uses the #! format to specify the program to run the script, /usr/bin/perl in this case. In addition, note how Perl uses double quotes similar to the Bourne shell. When you want to place double quotes within a double-quoted text string, you need to use a backslash character, , to escape the quotes.
Detractors of Perl don't like the large amount of punctuation you see in even the simplest Perl scripts. Perl uses a $, @, and % to reference variable values, depending on the type of variable. Perl supports many more special variables, such as $!, than the shell does. This can also make Perl scripts harder to understand.
For more on Perl, see Cross-Platform Perl, Second Edition by Eric Foster-Johnson (Wiley, 2000).
Python, named for the Monty Python comedy troupe, provides a relatively modern scripting language, at least compared to Perl, Tcl, bash, ksh, and csh. Python supports object-oriented development and in its most controversial feature, uses program indenting to define blocks of commands.
The following is a sample Python script:
#!/usr/bin/python

# Reads in package header, compares to installed package.
# Usage:
# python vercompare.py rpm_file.rpm
#

import rpm, os, sys

def readRpmHeader(ts, filename):
    """ Read an rpm header. """
    fd = os.open(filename, os.O_RDONLY)

    h = ts.hdrFromFdno(fd)

    os.close(fd)
    return h


ts = rpm.TransactionSet()
h  = readRpmHeader( ts, sys.argv[1] )
pkg_ds = h.dsOfHeader()
for inst_h in ts.dbMatch('name', h['name']):
inst_ds = inst_h.dsOfHeader()
if pkg_ds.EVR() >= inst_ds.EVR():
print "Package file is same or newer, OK to upgrade."
else:
print "Package file is older than installed version."This Python script compares a software package in RPM format with an RPM file to see which package should be considered more recent: the installed package or the package file. Most Linux systems use RPM (short for RPM Package Manager) to manage installed applications.
Python is well known for using whitespace, such as the tab character, to define blocks. While a Bourne shell script will start an if statement with if and go until the fi statement, Python starts with if and then all indented lines underneath form the block. While indenting your scripts can improve readability, mandating the indenting has been the most controversial feature of Python.
Python is more object-oriented than Perl or shell scripts. Although you can create object-oriented scripts in any language, if you have experience in Java or C++, then Python is more likely to appeal to you.
Tcl, pronounced tickle, stands for Tool Command Language. Tcl was created as a lightweight means to add scripting to applications such as word processors, integrated-circuit testers, and spreadsheets.
Tcl sports a simpler syntax than most shells but even so has proved itself highly useful. The following script shows how to open a pipe to a program, a topic covered for shell scripting in Chapter 8.
# Opening a pipe for reading.

#
# Opens command as a pipe for reading.
# Pass command without the leading | character.
#
proc read_pipe { command } {

    # Initialize
    set data ""

    # Start piped command.
    set fileid [open |$command r]

    if { $fileid != "" } {

        # Read data.
        set data [read $fileid]

        close $fileid
}
return $data
}
# readpipe.tclTcl has been compared by many to appearing as LISP without all the parentheses. If you know LISP, Tcl will be easy to learn. Tcl works best if you have a C or C++ program for which you want to add scripting. The Tcl interpreter can easily be embedded within a C or C++ application, allowing you to run scripts from within the application.
You will find that Tcl shares many features with shell scripts, including using a dollar sign, $, to reference variables.
These sample scripts should give you at least a flavor of these different languages, enabling you to better decide if one of these will meet your needs.
You could consider MS-DOS batch files as another form of scripting language. While you can write scripts using the MS-DOS batch syntax, even sophisticated scripts, the batch syntax misses a number of features provided by modern shells such as bash or ksh. For example, DOS does not support file globbing using wildcards. A true shell scripter, therefore, will look disdainfully on MS-DOS batch files as being inadequate.
Even so, MS-DOS batch files are proof that scripting has shown itself useful in just about every environment.
Once you have selected a scripting environment (hint: pick sh or bash), the next step is to choose a tool for editing shell scripts. Because shell scripts are merely text files, the tool you need to select is a text editor.
To write shell scripts, you really need two tools:
A shell
A text editor
The main tool you need to edit shell scripts is a text editor. This makes sense because shell scripts are simply text files, albeit special text files. If you've programmed in any computer language, chances are you have selected a text editor that meets your needs. By all means, stay with any editor that has proved productive for your work. There is no reason to change.
If you haven't selected an editor, or you are running on an operating system you have not used much before, then the following sections will prove useful.
Unix, Linux, Mac OS X, and many other operating systems support two legacy editors: emacs and vi. These are editors that have been around for years and run on nearly every platform you can think of.
As of 10.3.5, Mac OS X actually uses vim, or vi Improved. If you're new to vi, this won't really make a difference, although differences between vi and VIM are noted in this book as needed.
The mere mention of these editors makes some people shudder in fear. They aren't that bad. Really. Older than many software developers, these editors sport a certain retro feel. They are useful for three main reasons:
Many people have been trained on these editors. You would be amazed at how muscle memory works; just watch diehard emacs or vi users as their fingers fly over the keyboard. True diehards don't even use the arrow keys or other such modern innovations. These people are most entertaining when they use Macintosh systems.
These editors are available anywhere. Well, mostly anywhere. There once was an awful Unix system from Prime Computer that didn't even have vi, but that is thankfully long gone. You can run vi on PDAs and supercomputers and most everything in between. Vi used to even be an example program for the Borland C compiler on DOS.
These editors don't require a graphical environment. If you connect to a remote system via telnet or ssh, for example, graphical editors will likely not work. Vi or emacs will, however. For this reason alone, you may want to learn one of these text editors.
The following sections introduce these two retro text editors. Imagine you are back in the 1970s. Disco is big. Computers are rare and expensive. Computers actually work. And you have an ASCII terminal as your only means to access computers.
If there is a wonder editor that can meet all needs for all people, it is emacs. A product of the GNU project, emacs can do anything. Literally anything. That's because emacs has a built-in LISP program interpreter. Originally written by Richard Stallman, leader of the Free Software Foundation and a champion of free software, emacs provides an extensible text editor with a plethora of features. You can read your email, browse the news, and even play games, all from within emacs.
Emacs does not ship with all versions of Unix. For example, System V Unix does not include emacs. You can download emacs from
www.gnu.org/software/emacs/emacs.html.
Unlike vi (covered following), emacs is a modeless text editor. So with emacs, you can just type. This makes editing documents easy. The hard part, however, comes when you want to perform a command in the editor, such as saving a file. Because emacs is modeless, you need some way to let the emacs program know you want to save the file. In modern applications, you'd simply choose Save from the File menu. Emacs, however, predates the common usage of the mouse and graphical desktops, although modern versions of emacs work with both.
Like modern desktop applications, emacs uses the equivalent of keyboard shortcuts, but emacs uses these key combinations for every editor command, and there are hundreds of commands. Thus, for emacs commands, two keys are important: Control and Meta. Most keyboards show Control as Ctrl, with Macintosh keyboards showing "control." The Meta key, however, is nowhere to be found. There used to be systems that actually showed a Meta key, but for modern keyboards emacs usually maps Meta to the Alt or Esc key. In most cases, this will be Esc, but you should check the emacs documentation or online help for your system. (Directions for consulting the emacs documentation and online help appear later in this section.) On Mac OS X systems, the Meta key maps to the option key, which, on most Mac keyboards, reads as "option" but may read "alt" instead.
Emacs includes extensive online help available within the application from the Help menu or from help commands. In the emacs documentation, the key combinations appear as C-x or M-x, short for Ctrl-X and Alt-X or Esc-X (based on your Meta key mapping). So, for example, the command to save the current text is C-x C-s. This translates to Ctrl-X, Ctrl-S. The key combination C-x b for jumping to the next buffer translates to pressing Ctrl-X and then B. The tables following use the same conventions to get you used to the emacs way of documenting key combinations.
To get started with emacs, simply type the emacs command:
$ emacsThis launches either an emacs window or the text-only version of emacs. Both versions work the same, but the graphical version provides extra help in the form of menus and scroll bars. You may find emacs available from the system menus, usually in a programming or tools section, as emacs is most used by software developers.
Emacs starts up with a handy help screen unless you provide a command-line argument of a file name or have otherwise told emacs not to display this help.
Figure 2-1 shows the default emacs help screen.
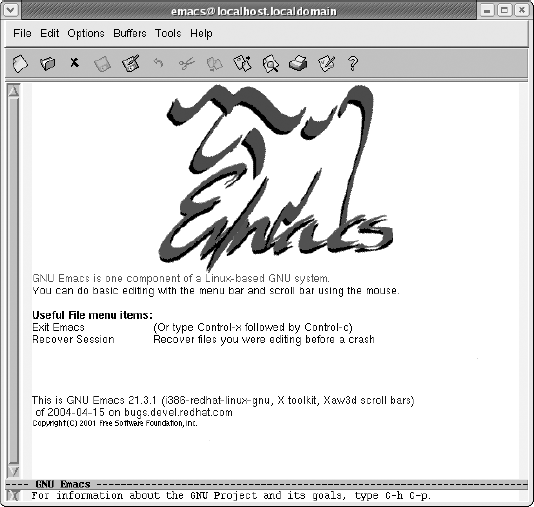
As you can see in the figure, modern versions of emacs include a menu bar. The commands available from the menu bar are invaluable for learning emacs. You don't have to remember all the strange key combinations. Many of the menu choices show the corresponding key combination, which helps you learn emacs gradually instead of all at once.
Emacs can be highly customized. Your version of emacs may differ. Don't worry. Use the online help to get started.
You can also tell the emacs command to load a particular file or files on startup, speeding up your work. For example, to start an emacs session with the script1 file from the first example in this chapter, use the following command:
$ emacs script1This command tells emacs to load the file named script1 in the current directory.
The most important commands for using emacs appear in the following table.
Emacs Key Combination | Editing Command | Long Name |
|---|---|---|
C-x C-s | Save text in the current buffer with the current filename. | save-buffer |
C-x C-c | Save and quit. Saves text in the current buffer and exits emacs. | save-buffers-kill-emacs |
C-x C-w | Save text in current buffer under a different file name. | write-file |
C-x C-f | Open file. | find-file |
C-g | Magic operation to cancel a running operation that appears hung. | keyboard-quit |
In the previous table, the long name is the official emacs name for the given operation. The long name is useful should you decide to customize emacs, an advanced topic. The long names also give you an idea of how emacs names its commands and what kinds of commands are available. You can run a long command by pressing M-x and then typing the command name.
Press Enter after typing in the command name. For example, to open a new file, you can choose Open File from the File menu; type C-x C-f; or, to prove you know emacs, type M-x find-file.
The great claim that emacs is modeless isn't entirely true, as you can find out if you try the M-x key combination to run an emacs command. M-x won't always work because of hidden emacs modes. Try M-x in a buffer that you can edit, which is not a help buffer.
Emacs supports an extensive online help system. This is great because unless you've been trained with emacs, most newcomers get confused by the huge number of editor commands available. The following table lists the main help commands.
Help Command | Long Name | |
|---|---|---|
C-h C-h | Get help on using emacs help | help-for-help |
C-h i | View the emacs manuals | info |
C-h c key | Show the long command for the given key | describe-key-briefly |
C-h k key | Show more description for the given key | describe-key |
C-h t | Enter the emacs tutorial | help-with-tutorial |
Ch-x command | List the keys for a given long command name | where-is |
C-h b | List all key bindings (long) | describe-bindings |
C-h a text | List all commands containing text | command-apropos |
The Help menu also provides a lot of options. You'd be amazed to see all the online material on emacs available from the Help menu. The emacs manuals support a primitive type of hypertext, called info. The info system was created long before the Internet and HTML became popular.
Because there are so many key combinations, emacs provides a lot of help to figure out which key does what. You can use the C-h c or C-h k combination to figure out which command emacs will execute for a given key. With either the C-h c or C-h k combination, you need to press the actual key combination to see the description. For example, to determine what the C-h t combination does, press C-h c C-h t.
The area at the bottom of the emacs window, called the minibuffer, should then display the following:
C-h t runs the command help-with-tutorial
This feature is great if you try one of the commands listed in this chapter and it doesn't do what you think it should.
Emacs provides a huge number of commands to navigate through a file. Remember that emacs was designed before users could rely on having arrow keys, let alone a mouse or a standardized keyboard. The following table shows the main emacs navigation commands.
Emacs Key Combination | Navigation Command | Long Name |
|---|---|---|
C-f | Jump forward one character | forward-char |
C-b | Jump backward one character | backward-char |
C-n | Jump down one line | next-line |
C-p | Jump up one line. | previous-line |
M -f | Move forward one word | forward-word |
Move back one word | backward-word | |
C-a | Move to beginning of the line | beginning-of-line |
C-e | Move to the end of the line | end-of-line |
M-< | Move to beginning of file | beginning-of-buffer |
M-> | Move to end of file | end-of-buffer |
C-v | Jump forward one screen | scroll-up |
M-v | Jump backward one screen | scroll-down |
C-l | Clear screen, move cursor to center of file, and redraw | recenter |
C-s | Search forward | isearch-forward |
C-r | Search backward | isearch-backward |
Yow. Don't worry, though. If you run the graphical version of emacs, you can use the scroll bar, the mouse, Page Up and Down keys, arrow keys, and other modern features you'd expect. In addition, most versions of emacs come preconfigured for standard PC keyboards. So, for example, the Home key should move the cursor to the beginning of the line, and the End key should move the cursor to the end of the line.
In older versions of emacs, pressing the Home key moved you to the start of the whole file, while End moved you to the end of the file. You may still see this behavior, depending on how emacs has been customized for your platform.
To type at a particular location, just click the mouse where you want to type.
Emacs supports a powerful search engine. Type C-s to start searching. As you type the text to search for, emacs already starts searching. This is called an incremental search, and it proves very powerful and fast. To search for the next occurrence of the text, type C-s again, and so on. Use C-r to search backward.
Emacs uses a block cursor that may confuse you. The Macintosh pioneered the idea that the cursor appears between two characters, which simplified a lot of issues for how selections and keys should work. Emacs, however, always places the cursor on a character position rather than between characters. This can be a bit disconcerting at first.
Emacs also causes confusion with its support for copy and paste. The keys chosen by emacs, at least by default, conflict with the standardized shortcuts for cut, copy, and paste on most platforms. The following table shows the emacs copy and paste commands.
Emacs Key Combination | Copy and Paste Command | Long Name |
|---|---|---|
C-w | Cut selected text | kill-region |
M-w | Copy selected text | kill-ring-save |
C-y | Paste text | yank |
Emacs provides a powerful concept called a kill buffer. A buffer in emacs is an area that holds text. The kill buffer is where emacs places text that has been cut. You can bring text back from the kill buffer (what most people call a paste operation). To copy or paste text, select the text you want with the mouse. You can also mark text by moving the cursor to the beginning of the text block, marking the start, moving the cursor to the end of the text block and marking the end, and then cutting or copying the text. Using the mouse proves a lot easier.
See the online help within emacs for more on how to mark text.
The classic emacs keys for cut, C-w, and paste, C-y, were chosen long, long ago, before the Macintosh appeared, before IBM's CUA (Common User Access) interface guidelines (the guidelines for the Windows interface), even before DECwindows. These keys become a problem, however, when you try to work with other applications. Now you can do everything, really everything, in emacs But, most users also run other programs such as word processors, web browsers, and so on.
Microsoft Word in particular conflicts with emacs. C-y, which is the default shortcut for paste in emacs, is redo in Word (and also in the OpenOffice.org Writer application). C-w, which is the default shortcut for cut in emacs, closes the current window in both Word and Writer (and in many other applications).
You can remap keys in emacs to help mitigate this problem with interoperability. But C-x, which should be the cut command in Word, is problematic because C-x is the prefix used for a huge number of emacs commands.
To be fair, emacs predates Word, Writer, and most other desktop applications. That's no consolation, however, when you try to work with multiple applications together.
In addition to cutting selected text, emacs provides a number of commands to delete text, from characters to words to lines. The following table lists these commands.
Emacs Key Combination | Text Deletion Command | Long Name |
|---|---|---|
Delete, C-d | Deletes the character under the cursor | delete-char |
Backspace | Deletes the character to the left | backward-delete-char-untabify |
C-Delete, M-d | Deletes word, to the right of the cursor | kill-word |
C-k | Deletes to the end of the line | kill-line |
C-t | Transposes (swaps) two characters | transpose-chars |
Insert | Toggles overwrite mode | overwrite-mode |
As usual, these key combinations can be customized, so your version of emacs may differ slightly.
As mentioned previously, emacs is an old application, appearing prior to graphical windowing systems. Over the years, however, emacs developed its own text-based windowing system. These textual windows are called buffers.
A buffer is both an area of memory that holds text and a subwindow in the emacs window. Sometimes this second meaning is called a window, but the documentation is not always consistent. Separate top-level windows in emacs are called frames.
With emacs, the C-x 2 key combination splits the current window into two buffers. That is, press Ctrl-X, followed by 2. You can edit two separate files, one in each buffer. Or both windows can refer to the same buffer, allowing you to view and edit at two places in the file at once. This feature can prove very convenient.
The following table lists the emacs buffer-related commands.
Emacs Key Combination | Buffer-Related Command | Long Name |
|---|---|---|
C-x 2 | Split window | split-window-vertically |
C-x 1 | Return to one window | delete-other-windows |
C-x b | Jump to next buffer | switch-to-buffer |
C-x b buffer | Switch to the named buffer | switch-to-buffer |
C-x 4 b | Jump to next buffer and create a subwindow for it | switch-to-buffer-other-window |
C-x C-b | List current buffers | list-buffers |
C-x C-f | Load file into buffer | find-file |
C-x 4 f | Load file into new subwindow | find-file-other-window |
C-x C-s | Save current buffer to current file name | save-buffer |
In addition to splitting the current window into two subwindows, emacs keeps a list of buffers. You can have a number of buffers hidden off-screen, such as the kill buffer. The C-x b key combination jumps to the next buffer in the buffer list. The C-x C-b combination lists all the available buffers.
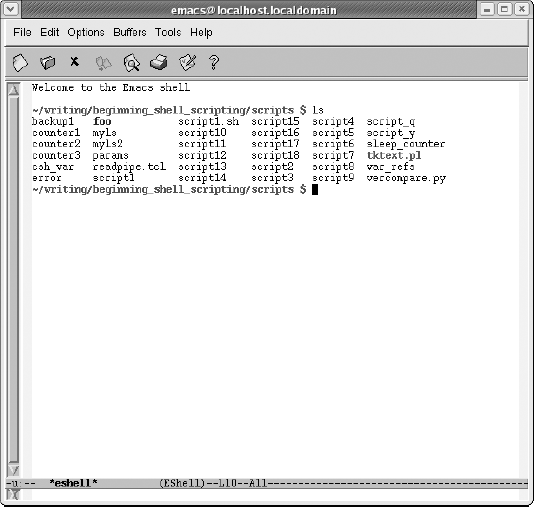
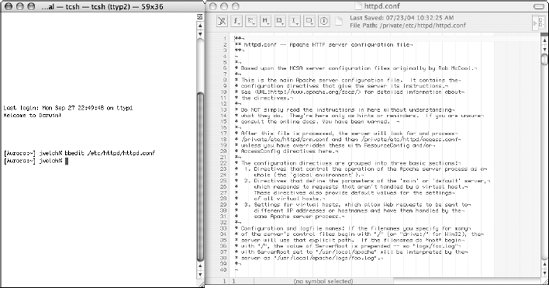
Once you can find your way around a file and edit text, you can make use of the interactive shell inside emacs. Using the M-x eshell command starts an eshell, or emacs shell, inside an emacs buffer. This shell appears in Figure 2-2.
Because this shell appears inside an emacs buffer, you can select text, copy and paste from other buffers, and grab previous shell commands. Thus, you can edit a shell script in one emacs window while trying out the commands in another window.
As you can imagine, back in the day emacs was a very, very productive tool. Nowadays, emacs shows its age, but it still has many users. The embedded shell helps when writing shell scripts.
There is another version of emacs called xemacs, available at
www.xemacs.org. Xemacs provides more support for graphical environments. The two versions differ, and there seems to have been a bit of conflict in the past between the emacs and xemacs partisans. Choose whichever version of emacs you prefer.
Emacs may show its age, but before there was an emacs, vi was the best thing around. The fact that vi is still here, and still being used, shows that it, like shells and shell scripts, still serves a purpose for many users. Vi, short for visual editor, is a modal editor. In vi, there are two modes: insert and command. In insert mode, the text you type gets entered into the file you are editing. In command mode, the keys you type are interpreted as vi commands, short cryptic commands that can have a major effect on your files.
To start vi, simply enter the vi command:
$ viYou can also start vi with a session editing a particular file. For example:
$ vi script1This command tells vi to edit a file named script1 in the current directory. Vi can create the file if it does not exist.
You can pass more than one file name on the command line. For example:
$ vi script1 script2 script3Vi shows each file one at a time. The :n command (see the second table following) jumps to the next file.
When you start vi, the editor places you in command mode. Thus, any keys you start typing are assumed to be commands. Unlike emacs, you cannot just start typing text. Instead, you have to enter a command to switch to insert mode. The most common command to enter insert mode is a lowercase i, short for insert.
The following table lists the commands to switch over to insert mode.
Vi Insert Command | Purpose |
|---|---|
i | Inserts before the current character |
I | Inserts at the beginning of the line |
a | Appends after (to the right of) the current character |
A | Appends at the end of the current line |
o | Inserts a new line after the current line |
O | Inserts a new line before the current line |
Once in insert mode, the text you type gets entered into the file you are editing. Press Esc to exit insert mode.
Some versions of vi display text at the bottom of the editor telling you that you are in insert mode, such as the following:
-- INSERT --
But many versions of vi provide no feedback as to which mode you are in. If you're ever unsure, just press Esc twice. If you are already in command mode, vi merely beeps at you. When you get into command mode, vi beeps at you.
One of the best descriptions of vi is that it is a program that beeps at you a lot.
In command mode, you can use the arrow keys to navigate through the file. You can also use special keys to navigate, as listed in the following table.
Vi Navigation Key | Purpose |
|---|---|
h | Move one character left. |
j | Move one line down. |
k | Move one line up. |
Move one character right. | |
Ctrl-D | Move down one-half page. |
Ctrl-U | Move up one-half page. |
Ctrl-F | Move forward one page. |
Ctrl-B | Move back one page. |
G | Jump to the end of the file. |
1G | Jump to the first line. |
number G | Jump to the given line number. |
The G command takes you to a given line number. This is very useful when you get an error from the shell about a shell script. Usually the error message tells you which line had the error. While this may not always be accurate, you can use the G command to quickly jump to the line in question. Simply enter the line number and then an uppercase G, and vi takes you there.
Chapter 11 covers how to deal with errors and fix them in your scripts.
You can use this method of placing a number before a command to perform the command that many times. For example, 4j moves the cursor down four lines.
Remember, you must be in command mode for these commands to work.
Vi supports a number of file-related operations, as you'd expect from any text editor. The following table lists the main file-related operations.
Vi File-Related Command | Usage |
|---|---|
ZZ | Save current file and quit vi. |
:w | Save current file. |
:wq | Save current file and quit vi. |
:q | Quit vi. Does not save. |
:q! | Really quit vi. (Like shouting.) |
:n | Jump to the next file. |
:rew | Go back to the first file. |
:w filename | Save the current text under a different filename. |
:f | Report the name of the current file and the current position. |
Vi supports a number of special commands that start with a colon character (:). These include :w to write the current contents to disk (under the current file name) and :q to quit vi. If you try to quit vi without saving, vi beeps at you. You can force vi to quit with the :q! command. The exclamation mark, !, acts as a way to force vi to do your bidding. You can use it with other commands, such as :n! to jump to the next file without saving the current file. Note that any changes you made will be lost, the same as if you quit without saving.
You can also use :w! to overwrite a read-only file if you are logged in as root.
Like emacs, vi supports yanking (copying and pasting) text, although with a different set of commands, as shown in the following table.
Vi Copy and Paste Command | Usage |
|---|---|
yy | Yanks current line into buffer, similar to copying to the clipboard. |
p | Puts the yanked text on the next line after the current position of the cursor. |
number yy | Yanks more than one line, as specified by number. |
u | Undoes the last command. |
r | Redo, when called after an undo, performs the undone command again. Not supported by default in vim. |
. | Repeats the last command. |
You can yank, or copy, four lines of text with the 4yy command. You can then move the cursor about and paste the lines into the text with the p command.
You can search in vi with the / command. Just type / and then the text to search for. The following table summarizes the vi search commands.
Vi Search Command | Usage |
|---|---|
/text | Search for text going forward. |
/ | Search again for the same text, going forward. |
?text | Search for text going backward. |
? | Search again for the same text, going backward. |
n | Repeat last search. |
N | Repeat last search, but reverse the direction. |
Over the years, versions of vi have advanced far beyond the original simple program that beeps a lot. A version of vi called vim, short for vi improved, adds a host of new features to vi. Vim provides for syntax highlighting for programming files, including shell scripts, and an amazing amount of extended functionality. Vim includes extensive online help and multiple split windows.
Linux ships with vim as the default implementation of vi. Thus, if you type vi or vim, you get the vim command. Mac OS X does the same, using vim for vi.
See
www.vim.orgfor more on vim. Vim is free but considered charityware. The vim web site asks that if you find vim useful, you consider helping needy children in Uganda.
You may also want to load Cream for Vim, a graphical front-end to vim. This add-on makes vim appear almost as a fully graphical editor, including scroll bars and menus.
Download Cream for Vim from cream.sourceforge.net.
If vi or emacs isn't your cup of tea, you can choose from a large variety of graphical modern text editors.
In addition to the legacy text editors, you can choose from a wide variety of more modern graphical text editors. These editors usually include menus, the ability to change the text font, and scroll bars—all useful features for text editors.
Editors are personal tools. Just as different people like different types of cars, people have different tastes in text editors. What works for one person may bug the heck out of another. There's no one right editor for everyone, so choose one that works for you.
If you are starting with Linux, Mac OS X, or Unix, then you should begin with a more modern editor. And there are modern editors for just about every taste. You can choose from editors that just run on a particular platform, such as Mac OS X, or choose from a number of excellent cross-platform editors.
Moving between systems can be hard. If you work on any combination of Mac OS X, Linux, Windows, or Unix systems, you'll be faced with learning how each system operates over and over. Even something as simple as quitting an application or closing a window differs by platform. This problem only gets worse when dealing with text editors, something most script developers use for hours a day.
If you need to work on different systems, especially Linux and Windows systems, you probably want to get a cross-platform text editor. Instead of having to relearn all the special options for text editors on each platform, you can learn an editor once and then reuse your skills on multiple boxes. These are all programs that can run on multiple operating systems and should act the same, or nearly the same, on all supported systems.
Note that emacs and vi are cross-platform editors as well. You can download versions of either editor for a plethora of systems. See the section Using Legacy Editors for more on emacs and vi.
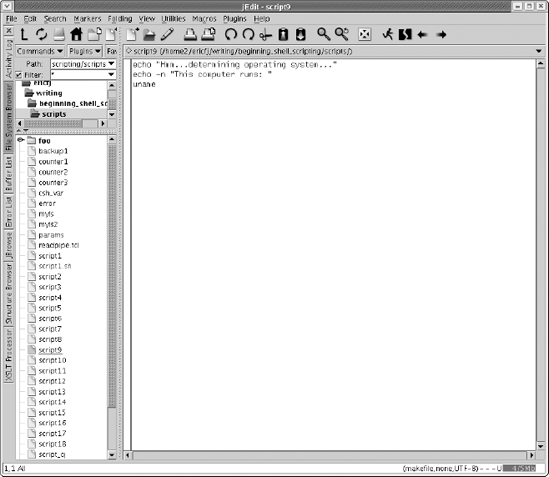
jEdit provides one of the favorite cross-platform text editors. Available at www.jedit.org, jEdit runs on any system that supports Java on the desktop, including all the desktop systems listed so far. jEdit requires a Java Runtime Environment available from www.java.com, to execute. jEdit is too large a program for most PDAs, however.
jEdit supports syntax highlighting, showing comments, for example, in a different color. jEdit supports most source file formats and includes a lot of features. You can download plugins that extend jEdit, adding new functionality. jEdit can manage the task of downloading and installing plugins, which makes this whole process painless. In addition, you can customize the jEdit display to place, or dock, windows where you want them.
jEdit appears in Figure 2-3.
Another cross-platform editor, known simply as J, includes a huge amount of functionality right out of the box. J supports special modes for editing Java, JavaScript, XML, and a number of other file syntaxes. J works the same for all formats, providing a consistent editing environment. J supports reading and sending email and the CVS source code control system. There are other neat aspects to J that you just have to discover.
In addition, J doesn't barrage you with a huge number of options. This is also the downside of J. You have to be able to edit J's property files to customize the editor. If you work in a text editor for a large part of every day, J can prove quite productive.
Like jEdit, J runs on any system that supports Java on the desktop. Download J from http://armedbear-j.sourceforge.net.
Jext provides yet another Java-based text editor. Jext, available from www.jext.org, provides a simply beautiful text editor with a host of features. Like jEdit, Jext supports plugins to extend the functionality of the editor.
Of these three Java-based text editors, jEdit provides the largest number of features.
Eclipse is a full-blown IDE (Integrated Development Environment) for developing Java applications. A handy editing plugin called color editor performs syntax highlighting on approximately a hundred file formats, including shell scripts. The color editor plugin actually uses the jEdit syntax definition files to highlight the source code.
Download Eclipse from www.eclipse.org and the color editor plugin from http://gstaff.org/colorEditor/. You will also need a Java Runtime Environment.
Another popular editor for those who work with software is SlickEdit, an editor that runs on Windows, Linux, Mac OS X, and most popular Unix systems. You need to get a different version of SlickEdit for each platform. You can purchase SlickEdit from www.slickedit.com.
For text editors on Mac OS X, you have an embarrassment of riches. Along with the editors mentioned previously, you have a number of free, shareware, and commercial editors that exist only for Mac OS X and take advantage of some of the unique features of the Mac operating system.
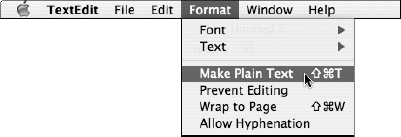
Luckily, you get one for free, namely TextEdit. This lives in the /Applications folder and is a basic text editor, with some additional features. One feature that you have to watch out for is that by default, TextEdit uses RTF, not plain text, for its normal format. Because RTF is not usable for shell scripts, you want to make sure that you select Make Plain Text from the Format menu, as shown in Figure 2-4. This ensures that the file you save is a plain text file, as required for shell scripts.
While TextEdit is a good basic editor, it's really not designed for shell scripting. It's a bit of a station wagon in that it does everything okay, whereas you want something that's built with your needs in mind.
There are a lot of editors out there, but the best one that won't cost you a lot of money is SubEthaEdit, by the appropriately named Coding Monkeys, at www.codingmonkeys.de/subethaedit/. SubEthaEdit is a programmer's editor and has a lot of the things you want out of such a beast. First, everything is plain text. Second, it supports features like syntax highlighting. It's reasonably extensible. It also allows other people using SubEthaEdit on your local network to collaborate with you on a document at the same time. Aside from the shared editing, it also supports features such as regular expression searching (introduced in Chapter 1), the ability to jump to different parts of your script, and split-screen views, which are great for things such as long scripts where you have one part of the script relying on another part, and there are 8 billion lines of code between them. Split-screen views let you see both at once, so you spend more time scripting and less time coding.
If you're using SubEthaEdit for personal use (read: not in a commercial environment), then it's free. If you're using it in a commercial environment, then the cost for three licenses is $35 U.S., which is pretty reasonable for such an amazing product.
But the true leader in the Mac OS X text-editor race is BBEdit from Bare Bones Software, at www.barebones.com/products/bbedit/. BBEdit is one of those products that have so many tricks and shortcuts you don't even realize how badly you need it until you use it. To start with, if you're an emacs user, you can tell BBEdit to use emacs keybindings, or keyboard commands, so that your muscle memory still works. BBEdit has command-line components, so if you're in a shell window, you can open a file in BBEdit directly from the shell, edit it, close it, and never have to deal with the Mac OS X open/save dialog boxes. BBEdit is shown in Figure 2-5.
BBEdit doesn't support every emacs shortcut. (For all its coolness, it's only a text editor. You can't send email from it. Although if you need to send email from something with a Bare Bones logo, they'll happily sell you an email program.)
But wait, there's more! BBEdit has built-in support for regular expressions and can apply them to multiple files in multiple folders at once. It's tightly integrated into the shell environment, so you can run the scripts you're working on from within BBEdit and never have to switch between BBEdit and a Terminal window.
Do you want to use Perl or Python within BBEdit? It's in there. Want to be able to connect to a remote machine securely via SFTP to edit scripts there? Built in. Want to open those remote files from the shell in BBEdit via SFTP? Can do. Want to use BBEdit from the shell to check differences between two or more files? In two or more folders? Got it. BBEdit's not shareware, nor is it Open Source, but if you want the ultimate text tool on Mac OS X, then BBEdit is what you want.
Each of the Linux desktop environments includes one or more text editors, and you can choose from a plethora of other graphical text editors for Linux.
For the GNOME desktop, one of the main editors is gedit, which appears in Figure 2-6.
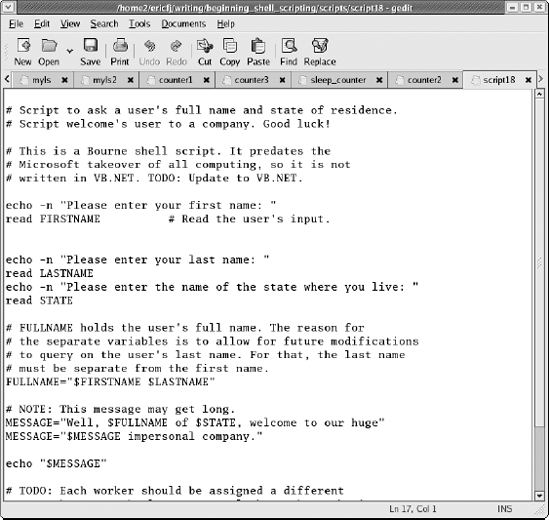
Gedit provides a basic text editor in a friendly-looking window. In addition to basic text editing, gedit supports the syntax of a number of programming and markup languages, such as Java, C++, XML, and HTML. Gedit does not highlight shell scripts, unfortunately.
A special gedit plugin allows you to run commands, such as shell scripts, and capture the output of these commands. Gedit shows the output in a separate window. As with the emacs editor, the ability to run shell scripts from within the text editor is a great help.
For the KDE desktop, kate defines the main KDE text editor. Kate provides a full-featured text editor, supporting many more features than gedit, including the capability to manage projects. Each project includes a number of files, and this feature is very useful for Web site development or programming.
You can rearrange the kate interface, moving and customizing toolbars and keyboard shortcuts. Kate supports plugins to extend its functionality. For example, the default kate installation includes plugins for working with C++ programs, HTML web pages, and XML documents.
Cute, available at http://cute.sourceforge.net, provides a text editor aimed at beginners. This editor is built on the Qt (pronounced cute) libraries. Qt forms the base of the KDE desktop software.
Other graphical editors for Linux include SciTE and Glimmer. SciTE, from www.scintilla.org/SciTE.html, started as a demonstration application that evolved into a comprehensive programmer's text editor. Glimmer, from http://glimmer.sourceforge.net, provides another graphical editor with syntax highlighting for shell scripts and other programmer-related file formats.
Just about all the Linux editors can work on Unix, although the GNOME or KDE editors may require too many Linux libraries to make the porting effort worthwhile. For example, unless you have the full GNOME desktop for your Unix system, it is unlikely you can get an editor such as gedit to work. That's because GNOME (and KDE) applications have a large number of dependencies on libraries that come with the full desktop environments.
The standard Unix desktop is called CDE (Common Desktop Environment). CDE should be available on most commercial versions of Unix such as Solaris or HP-UX, except for Mac OS X, where there is no reason to run the CDE in place of the Macintosh desktop interface.
The CDE desktop includes a text editor, available from an icon on the task bar. This is a fairly bare-bones editor but friendlier than vi or emacs.
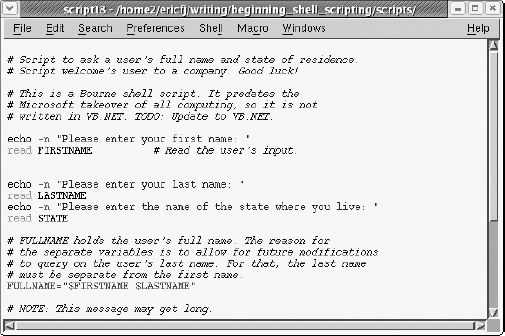
A favorite Unix text editor is NEdit. NEdit, available at www.nedit.org, requires the Motif libraries (now freely available for most platforms as OpenMotif from www.openmotif.org). Motif forms the basis of the CDE as well. You can download prebuilt versions of NEdit for Linux and most versions of Unix from the NEdit web site.
NEdit looks a bit dated with the standard Motif look, but don't let that put you off. For Unix text editors, NEdit provides an amazing amount of power and simplicity. NEdit has been optimized for speed and keyboard efficiency. It supports shell scripts and lots of other programming-related file formats, such as C, Java, and so on. You can see NEdit in Figure 2-7.
In addition, NEdit can run in a server mode. You can type in the nc command to launch an NEdit window with a given file or, if NEdit is already running, call up the given file in the running NEdit. This proves very handy when you browse directories and want to edit or view files.
Microsoft Windows includes an ancient editor called Notepad. Generally, because of the way Notepad handles the end-of-line characters, you should not use this editor for scripting or programming.
Instead, Textpad provides a very good Windows editor. Like many of the other editors listed here, Textpad highlights the syntax of shell scripts. You can download specific syntax definitions for the Bourne, C, and Korn shells. Textpad is one of the fastest and most responsive editors for Windows. There are lots of additional editors to choose from on Windows.
You can download Textpad from
www.textpad.com. It is a shareware application.
When you have selected a text editor, you can begin to create shell scripts in earnest. The next sections cover some of the basics for scripting. The next few chapters continue with the basics.
Writing scripts is as simple as editing text files with the commands you want in your scripts. The hard part comes when you need to enter the commands correctly and tie the commands together into useful scripts. The following sections introduce the basics of scripting, starting with a very useful task: letting scripts remember for you.
A lot of commands sport complex, hard-to-remember arguments. You may find yourself looking up the online manual pages for a command each time you want to run it. If you run this command a lot, you'll start to remember. But if you run this command infrequently, you'll likely forget.
Even if the commands are simple with a few options, you may want to store the commands in scripts so that you can simply execute the scripts instead of remembering and typing the whole commands. The following Try It Out examples illustrate this procedure.
Most scripts need to output text of some sort. The output may be the results of a command, covered in Chapter 8. Or you may just want to prompt the user to enter data for the script. In any case, the primary way to output text from a script is the echo command, introduced in Chapter 1. Recall that the basic syntax is:
echo text_to_outputPass echo the text you want to output. The following example shows how to use echo in a script.
In addition, you can use the -n option to echo to build up an output message on a number of lines. This can make your output messages easier to understand inside your script. That is, your script becomes easier to read should you ever need to look at it again.
Comments, covered below, also make scripts easier to read.
In addition, the punctuation, commas, and a period in this example also help make the output more understandable. Try making the script without spaces or punctuation. Enter the following text and name the file script7:
echo -n "A man"
echo -n "a plan"
echo -n "a canal"
echo "Panama"
When you run this script, you'll see a less understandable output:
$ sh script7
A mana plana canalPanama
The -n option to the echo command works very well if you want to explain the output of a command or just show that the computer is magical, as in the following Try It Out.
Following on the topic of letting the computer, in the form of shell scripts, remember data for you, you can use the echo command to remind yourself of hard-to-remember data as well, as in the following Try It Out.
In addition to these uses, the echo command proves very useful to prompt the user to enter data. You want the user to enter the right data, so you need a prompt to tell the user what to enter. See the section Gathering Input later in this chapter for more on this.
As shown in Chapter 1, the echo command can output more than just plain text. You can also store values in variables and have echo output those values. As with programming, a variable is a named item that can hold a value. You can store a value in a variable and later use the variable as a placeholder for that value. This proves very useful for shell scripts.
With scripts, each variable has a name and a value. You assign the named variable to a value. You can then access the variable's value using a special syntax. This syntax is:
VARIABLE_NAME=VALUE
The VARIABLE_NAME is the name of the variable. Variable names must start with a letter or an underscore (_). Subsequent characters in variable names can be letters, numbers, or underscores. You cannot use spaces in variable names. Most older scripts tend to use all uppercase letters for variables, as this was considered the most portable across systems. This is not necessary, however. Even from the beginning of the Bourne shell, you could create variables with lowercase letters.
This syntax applies to the Bourne shell, bash, and ksh. The C shell uses a different syntax, discussed later.
Do not place a space or anything else between the variable name, the equal sign, and the value.
To access the value of a variable, use a dollar sign, $, as a prefix to the variable name:
$VARIABLE1
This syntax tells the shell to replace the text $VARIABLE1 with the value held in the variable VARIABLE1.
The shell expands the text with the variable name, not the individual commands.
If you need to place a space in a variable value, use double quotes around the entire value, as in the following Try It Out.
The syntax shown so far for setting variables does not work with the C shell (or the T C shell). For example, if you run script11 with the C shell, you will see the following error messages:
$ csh script11
VARIABLE1=A value: Command not found.
VARIABLE1: Undefined variable.
With the C shell, you need to use the set command:
setvariable_name=value
Typically, you should use lowercase variable names with the C shell. You must use the set command. You can place spaces around the equal sign. Spaces are not required but can often add clarity to your scripts.
The following example shows how to set a variable from the C shell:
set variable1="A value"
echo "My variable holds: $variable1"
This script is essentially the same as the script11 script for the Bourne shell. If you run this script, however, you need to run it with the csh command, not sh:
$ csh csh_var
My variable holds: A value
If you skipped past it in Chapter 1, see
www.faqs.org/faqs/unix-faq/shell/csh-whynot/for a list of reasons why you should avoid the C shell for scripts. This document is very technical, but suffice it to say that industry practice is to use sh, not csh, for scripts.
You can combine more than one variable in a script, as well as in an individual command line. Practice with the following Try It Out and then let your imagination run wild.
The script12 example shows the start of building up a command line with variables. The following examples show how to continue this task and create commands entirely from variables.
This may not seem that useful, but if you are writing cross-platform scripts, you may need different command names for the same purpose on different platforms. For example, some Unix systems do not have a command named install. On those systems you need to use the cp (copy) command instead. You can use a variable to hide this difference:
INSTALL=install
Or, on other systems, use a different value:
INSTALL=cp
The difference in the script is then isolated to one section. The rest of this hypothetical installation script would remain the same regardless of the platform.
As a similar example, the C compiler (for programs written in the C language, not for the C shell) usually has a name of cc. The GNU C compiler may be named gcc. A compiler from a company named LPI may be named lcc. You can hide these differences by setting a variable named CC to the C compiler command for a particular platform.
You may or may not have a command named cc that executes gcc. On Mac OS X systems, you have to do a separate install of the developer tools to get gcc. If you are going to be doing a lot of shell scripting in Mac OS X, it is highly recommended that you do this install, because it is free and installs quite a few nifty tools for you.
To de-assign a variable, use the unset command:
unset VARIABLE1
This command essentially removes the variable named VARIABLE1. Do not try to access this variable again without setting it to a new value.
Up to now, I've concentrated on the display of output and storing values. The next step is to gather input, especially input from the user.
The read command reads in data from the terminal (really, the keyboard). The read command takes in whatever the user types and places the text into the variable you name. The syntax is:
read VARIABLE_NAMEBecause you are setting a variable value, do not use a dollar sign, $, with the variable name.
You can try out the read command with the following example, which shows prompting the user for input and then, lo and behold, reading in the input from the user.
You are not limited to just one read command in your scripts. You can prompt the user and read in as many values as you need, as shown in the following Try It Out.
Up to now, all of the example scripts have been short and very easy to understand. You don't need to engage in detective work to decipher these scripts. But when you start writing real scripts, your scripts will likely be a lot more complex. To help with this, you can enter comments in your scripts.
Comments are messages to yourself and to future archaeologists (other users) that describe what a script is supposed to do and how it works. Comments help others understand your script. Comments also help you understand your own script, should you need to examine the script months after writing it.
Your memory is never as good as you think it is. No matter what your IQ is, Murphy's law dictates that when the script you wrote in a panic at 2 a.m. to keep your company afloat and your job intact finally breaks six months after you wrote it, you're going to look at it and wonder just how much caffeine is required for you to keep track of 300 variables all named x1, x2, and so on. Comments are, all too often, the only documentation you will ever have for your code or anyone else's code. Comments: Use them, love them.
Comments are especially useful if you found some very clever technique to create a command. Others of lesser intelligence may not understand the full might of your cleverness. (This will not be a problem when you take over the world. But until then, comments can help.)
Another way to pass on knowledge is to sit around a campfire, or at a bar, at night and tell others the crucial details that ought to have been placed in comments. This technique works best on your last day at an organization. Refuse to write anything down. Some companies actually use this technique. And they can see nothing wrong with this method. Until something breaks.
To enter comments in your script, start each comment line with a sharp sign (#). For example:
# This is a comment.
The # sign is often called a pound sign, a hash, or a sharp. British users cringe at the use of # as a pound sign, because # looks nothing like the symbol for pounds sterling.
With a comment, the shell ignores all the text from the sharp sign to the end of the line. You can place commands inside a comment, but the shell will not execute them. For example:
# This is a comment with a command, ls /
You can place a comment after a command so long as you use the sharp sign to start the comment. For example:
ls /usr/local # List the files in the directory /usr/local
The following Try It Out provides some practice in commenting a script.
To create good comments, don't describe the obvious in boring detail. Instead, with each script, you should describe, briefly, what the script does. Particularly tricky parts of the script deserve extra comments to help explain what is going on.
You can lie in your comments, but that is not a good idea. You end up merely confusing yourself. You should also skip profanity, if only to avoid future embarrassment. When the source code for parts of Microsoft Windows appeared on the Internet, people were amazed at the amount of profanity in the code. This is one thing that nontechnical people can see and understand in otherwise incomprehensible source code.
Another thing to avoid are names that have, shall we say, insulting connotations. When Mac OS X was released, people who had never dealt with Unix before, or the rather unique sense of humor of the Unix community, went browsing through the various shell scripts that are a part of the system startup and ran across the term "luser" (rhymes with "loser"). A long time ago, it was short for "local user" or someone sitting at the physical computer versus someone on a remote terminal. Well, people read comments by an Apple employee talking about "keeping the lusers from doing something stupid" and were rather snarky about the whole thing. In general, even if you're in a bad mood, save the pejoratives for the bar after work.
Most shells, including bash, sh, ksh, and csh, support the capability to type in long commands. You can keep typing away until you enter the entire command. But very long lines are hard to read and harder to understand. Because of this, you can break up your command using the line-continuation marker. Type a backslash, , at the end of a line to continue a command on the next line, as in the following Try It Out.
This chapter presents the basics for creating shell scripts. Starting with your choice in text editors, you can create your own scripts.
For editors, you can choose from a plethora of choices including emacs and vi, two legacy editors, as well as a number of graphical editors that sport more modern interfaces.
Shell scripting is not the only scripting language. There are quite a few others, including Perl, Python, and Tcl, discussed in this chapter.
When beginning with scripts, some of the first tasks include displaying output, or text, to the user. For scripts, the
echocommand provides the main way to output text to the user. You can useechowith a command-line option,-n, to skip outputting a new line after the text. This is most useful when creating prompts for user input.Most scripts need to store data in some way. For scripts, you can store values in named variables. These variables can be combined, set to new values, or accessed (read) using the dollar-sign character,
$.To gather input from the user, use the
readcommand. Thereadcommand reads in one line of user input, terminated by the Enter key. Read places the user input into a variable, the variable you pass to thereadcommand.You can (and should) place comments in your script with the
#character. You can use thecharacter to continue a command on the next line.
The next chapter covers how you can use scripts to make decisions and perform different commands in the case of different conditions, an important technique for writing your own real-world shell scripts.
Try at least two text editors and choose one that you find productive.
Regardless of which editor you picked in Exercise 1, try entering at least three of the example scripts in this chapter with vi. Try three more scripts with emacs. Discuss what you like and dislike about each editor.
Write a script to output the text message "A man, a plan, a canal, Panama" with as many commands as possible. Each command must perform something useful for the script. Furthermore, comments don't count for the total. See how many commands you can use in your most inefficient script. Use only the shell scripting concepts introduced so far.
Write a command to list the contents of the /usr/bin directory (or a directory that has many commands). You can only set and evaluate variables in your script. You cannot call any commands directly. Extend this script to add some command-line options for the file listing. Try
−1(one) to list the files in one column.Modify the example
script17file for users in Canada. Instead of asking for the state the user lives in, Canadian users should be asked which province they live in. Extra credit goes to those who can output all text in both English and French.To prove you are truly an emacs guru, use
M-x backward-charandM-x forward-char, the long commands, instead of the left and right arrow keys when modifying thescript17file for the previous question. Aren't you glad emacs provides this option?Do the same thing with vi when modifying the file
script17. Show disdain for the arrow keys and use h, j, k, and l exclusively. If you start to like these keys and become productive, be afraid. Be very afraid.