C H A P T E R 18
Digital Photos
The PC has become a vital tool in the field of photography. In fact, you’re unlikely to find any photographer—professional or amateur—who doesn’t use a PC somewhere in his or her work.
Ubuntu includes a number of applications for cataloging and editing images. Chief among these is GIMP (GNU Image Manipulation Program), which compares favorably with professional software such as Photoshop. But there are also applications for more casual users. This chapter begins with a brief tour of F-Spot, an application ideal for cataloging and managing image collections and also doing some basic edits. F-Spot is not the default photo manager in Ubuntu, that’s Shotwell, but F-Spot has a lot more to offer and that’s why in this chapter you’ll read about F-Spot and not Shotwell. After reading about F-Spot, you’ll read about the GIMP. The GIMP is not part of the default Natty install, but you can quickly and easily install it via the Ubuntu Software Center.
Downloading and Cataloging Images
Before you can undertake any image editing, you need to transfer the images to your PC. Depending on the source of the pictures, there are a variety of methods of doing this, but in nearly every case, the work of importing your photos can be handled by F-Spot. But before we cover F-Spot, let’s briefly recap the various methods of transferring images to your PC, some of which were outlined earlier in this book.
![]() Tip To have your photo’s easily imported by F-Spot, now is a good moment to install the program. From Ubuntu Software Center, type f-spot in the Search bar and click Install to install it.
Tip To have your photo’s easily imported by F-Spot, now is a good moment to install the program. From Ubuntu Software Center, type f-spot in the Search bar and click Install to install it.
Connecting Your Camera
Most modern cameras use memory cards to store pictures. If you have such a model, when you plug the camera into your PC’s USB port, you should find that Ubuntu instantly recognizes it. An icon should appear on the Desktop, and double-clicking it should display the memory card’s contents in a Nautilus window. Along the top of the window, you’ll see an orange bar reading, “This media contains digital photos” alongside a button marked Open F-Spot Photo Manager. Clicking this button starts F-Spot, with which you can copy the images to your hard disk, as explained in the next section. Of course, you can also drag and drop pictures to your hard disk manually using Nautilus.
In the unlikely event that your camera doesn’t appear to be recognized by Ubuntu, you might have more luck with a generic USB memory card reader, which will make the card appear as a standard removable drive on the Desktop. These devices are relatively inexpensive and can usually read a wide variety of card types such as SD, XD, and CompactFlash (CF), making them a useful investment for the future. Some new PCs even come with card readers built in, but they often are hard to address in Linux environments. Most generic USB card readers should work fine under Linux, though, as will most new digital cameras.
![]() Caution Before detaching your camera or removing a photo card, you should right-click the Desktop icon and select Safely Remove. This tells Ubuntu that you’ve finished with the device. Using this method to eject the device ensures that all data is written back from memory to the photo card. Failing to eject in this way could cause data errors, as information may be partially written back to the card, or transfers between the two devices may not have finished.
Caution Before detaching your camera or removing a photo card, you should right-click the Desktop icon and select Safely Remove. This tells Ubuntu that you’ve finished with the device. Using this method to eject the device ensures that all data is written back from memory to the photo card. Failing to eject in this way could cause data errors, as information may be partially written back to the card, or transfers between the two devices may not have finished.
If you’re working with print photos, negative film, or transparencies, you can use a scanner and the Simple Scan program to digitize them, as explained in Chapter 7.
Importing Photos Using F-Spot
F-Spot is designed to work in a similar way to applications you may have encountered under Windows or Mac OS X, such as iPhoto or Picasa. After you run F-Spot (from the Panel, select Applications and type F-Spot in the Search bar), or after you click the Open F-Spot Photo Manager button that appears along the top of a Nautilus file browser window when you insert a memory card or attach your digital camera, the F-Spot Import window will appear. (Depending on your configuration, the Import window may appear within a file browser.) For some devices, though, this doesn’t happen automatically. If, for instance, you attach your mobile phone to your computer, you may have it attached as a disk device by default. To import photos in that case also, use the Import button in F-Spot to browse to the appropriate device and import your pictures from there.
The Import window contains a preview of the pictures stored in your camera, the option to tag the pictures, and the target directory where the photos will be copied. If you have no camera attached, you’ll see some default pictures that are available in the F-Spot program directory. While working on your camera, by default, all the pictures are selected. You can deselect and select photos by using the standard selection techniques (Ctrl-click or Shift-click). Embedded tags are very useful in filtering and searching for pictures, as discussed in the “Tagging Images” section a little later in the chapter. The default target directory where the photos will be copied is Photos in your /home directory, but you can change it to any directory you want.
To import the pictures from your camera to your hard disk, just click the Import button. F-Spot will import your photos in the target location, in directories named after the year, month, and day the photos were originally taken.
Importing pictures from a folder on your computer’s hard disk is easy. Click Photo ![]() Import. In the Import window, click the Import Source drop-down list and then click Select Folder. Using the file browser, navigate to the folder containing your images and then click Open. (Don’t double-click the directory, because that causes F-Spot to open the directory in the file browser.) After you’ve selected the folder, F-Spot displays thumbnail previews of the images, and this might take some time. Keep your eye on the orange status bar. When this indicates “Done Loading,” you can click the Import button to import all the images in one go, or Ctrl-click to select photos in the left side of the window and then click the Import button.
Import. In the Import window, click the Import Source drop-down list and then click Select Folder. Using the file browser, navigate to the folder containing your images and then click Open. (Don’t double-click the directory, because that causes F-Spot to open the directory in the file browser.) After you’ve selected the folder, F-Spot displays thumbnail previews of the images, and this might take some time. Keep your eye on the orange status bar. When this indicates “Done Loading,” you can click the Import button to import all the images in one go, or Ctrl-click to select photos in the left side of the window and then click the Import button.
If you’re importing the photos from a particular event, this is also a great time to define a set of tags for the whole set, which will save having to manually tag pictures later. Using tags makes it much easier to find back your photos later. Of course, a well-organized directory tree containing your photo albums might suit you as well. As with photos from a camera, by default, F-Spot copies the images into a directory it creates within your /home directory, called Photos. Therefore, after you’ve imported the photos, you can delete the originals if you want. You may also choose to keep them; at least that will give you the option to go back to the original picture and start all over if something goes wrong with your photo in F-Spot.
![]() Tip You may be familiar with Picasa from Google. This software is available for Ubuntu from
Tip You may be familiar with Picasa from Google. This software is available for Ubuntu from http://picasa.google.com/linux/. One advantage of Picasa is that it integrates well with Google’s own photo-sharing service and also has a plug-in that allows one-click uploading from your library to Facebook.
After the photos have been imported, the main F-Spot window will appear. On the left are the default tags and a list of any tags added to imported files. On the right is the picture preview window, which can be set to either Browse or Edit Photo mode. You can switch between these two modes by using the buttons on the toolbar. You can also view an image full screen or start a slide show that will cycle through the images in sequence.
Above the picture window is the timeline. By clicking and dragging the slider, you can move backward and forward in the photograph collection, depending on when the pictures were taken. Each notch on the timeline represents a month in the year marked beneath the timeline. The graphs on the timeline give a general idea of how many photographs were taken during that particular month (or, indeed, if any were taken during a particular month). The arrows to the left and right of the timeline can be used to expose a different set of months.
Tweaking Photos
F-Spot offers you all you need to do basic photo editing. By either double-clicking an image or selecting an image and clicking Edit Photo on the toolbar, you can tweak images by cropping them, adjusting brightness and contrast, or setting the color saturation/balance. The available tools appear in a docked toolbar, replacing the default tags pane, as shown in Figure 18-1. In addition, you can convert images to black-and-white or sepia tone, and you can remove red-eye caused by an indoor flash. All of this can be achieved by clicking the buttons at the left side of the image. (Hovering the mouse cursor over an icon will cause a tooltip to appear, explaining what the button does.) Simple rotations on single images or multiple selections can be performed by using the Rotate Left and Rotate Right buttons on the toolbar.
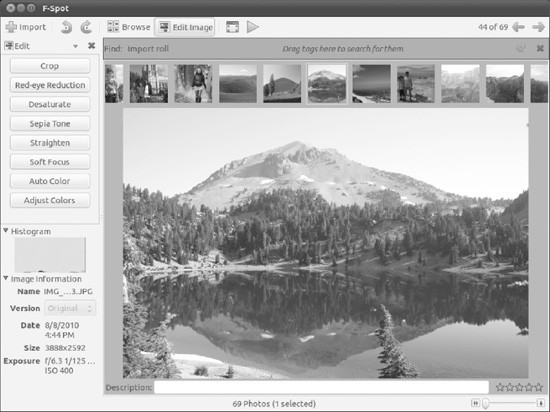
Figure 18-1. Any edits to the image are made live, so it’s a good idea to move the adjustment dialog box out of the way.
You can also add a comment in the text field below the image. This is then attached to the image for future reference and can act as a useful memory aid.
A note of caution is required when tweaking images with F-Spot, because there is no traditional undo mechanism. However, F-Spot keeps a copy of the original image alongside the modified one, which you can access by clicking Photo ![]() Version
Version ![]() Original if F-Spot is in browse mode. It’s possible to create a new version of the image complete with modifications by clicking Photo
Original if F-Spot is in browse mode. It’s possible to create a new version of the image complete with modifications by clicking Photo ![]() Create New Version. You can then name this separately and, if necessary, continue to edit while retaining both the original and the intermediate version. You can do this as many times as you want, perhaps to save various image tweaks to choose the best one at a later date.
Create New Version. You can then name this separately and, if necessary, continue to edit while retaining both the original and the intermediate version. You can do this as many times as you want, perhaps to save various image tweaks to choose the best one at a later date.
Tagging Images
F-Spot’s cataloging power comes from its ability to tag each image. A tag is simply a word or short phrase that can be attached to any number of images, rather like a real-life tag that you might find attached to an item in a shop. After images have been tagged, you can then filter the images by using the tag word. For example, you could create a tag called German vacation, which you would attach to all images taken on a trip to Germany. Then, when you select the German vacation tag, only those images will be displayed. Alternatively, you could be more precise with tags—you could create the tags Dusseldorf and Cologne to subdivide pictures taken on the vacation.
If your collection involves a lot of pictures taken of your children at various stages during their lives, you could create a tag for each of their names. By selecting to view only photos tagged with a particular child’s name, you could see all the pictures of that child, regardless of when or where they were taken.
Images can have more than one tag. A family photo could be tagged with the words thanksgiving, grandma's house, family meal, and the names of the individuals pictured. Then, if you searched using any of the tags, the picture would appear in the list.
A handful of tags are provided by default: Favorites, Hidden, People, Places, and Events. To create your own tags, right-click under the tag list on the left of the F-Spot program window and select Create New Tag. Simply type in the name of the new tag in the dialog box and click OK.
If you tagged items on importing, these will appear under the Import Tags parent. Drag and drop these tags to the appropriate parent tag (Germany under Places, for example).
![]() Note Tags can have parents, which can help organize them. For instance, you might put the names of family members under the
Note Tags can have parents, which can help organize them. For instance, you might put the names of family members under the People parent tag, or put Birthday under the Events parent. You can reveal or hide child tags by clicking the disclosure arrow next to the parent.
Tags can also have icons attached to them. An icon based on the first photo that is tagged will automatically be added to the tag name, but to manually assign one, right-click it in the list and select Edit. Next, in the Edit Tag dialog box, click the icon button and select from the list of icons under the Predefined heading.
To attach a tag to a picture, use Ctrl+T, or select Tags > Attach. You’ll now see a dialogue opening on the lower part of the screen where you can enter the tag you want to use.
To filter by tag, double-click the tag in the tag list, as shown in Figure 18-2. To remove the filtering, right-click the tag in the orange bar at the top of the display and select Remove from Search.
F-Spot has a good range of export options for when you want to share your pictures with the wider world. You’ll find these under the Photo ![]() Export To option, and supported services include Picasa Web Albums, SmugMug, and Flickr. When using Flickr, F-Spot even includes an option to turn your tags into Flickr tags during the upload process.
Export To option, and supported services include Picasa Web Albums, SmugMug, and Flickr. When using Flickr, F-Spot even includes an option to turn your tags into Flickr tags during the upload process.
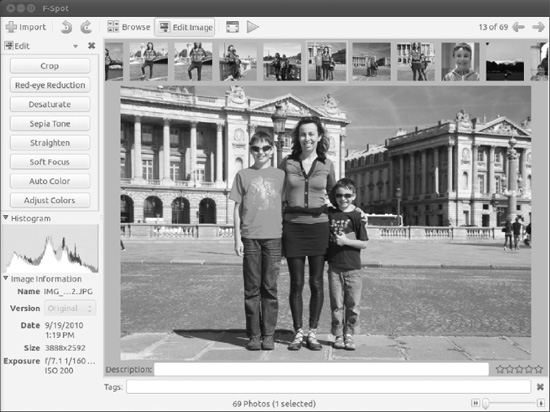
Figure 18-2. Tag an image by using the Ctrl+T shortcut.
Using GIMP for Image Editing
GIMP is an extremely powerful image editor that offers the kind of functions usually associated with top-end software like Adobe Photoshop. Although GIMP is not aimed at beginners, those new to image manipulation can get a lot from it, though it may demand a little more work than the limited options available in F-Spot.
The program relies on a few unusual concepts in its interface, which can catch many people off guard. The first of these is that each of the windows within the program, such as floating dialog boxes or palettes, gets its own panel entry. In other words, the GIMP’s icon bar, image window, settings window, and so on have their own buttons on the Ubuntu Desktop panel alongside your other programs, as if they were separate programs.
![]() Note GIMP’s way of working is called a Single Document Interface, or SDI. It’s favored by a handful of programs that run under Linux and seems to be especially popular among programs that let you create things. If your taskbar is getting a little crowded, edit its Preferences to “Always group windows.”
Note GIMP’s way of working is called a Single Document Interface, or SDI. It’s favored by a handful of programs that run under Linux and seems to be especially popular among programs that let you create things. If your taskbar is getting a little crowded, edit its Preferences to “Always group windows.”
Because of the way GIMP runs, before you start up the program it’s a wise idea to switch to a different virtual desktop, which you can then dedicate entirely to GIMP.
Having installed GIMP via the Ubuntu Software Center, you can run it from the Applications interface on the Panel. You’ll be greeted by what appears to be a complex assortment of program windows.
Now you need to be aware of a second unusual aspect of the program: its reliance on right-clicking. Whereas right-clicking usually brings up a context menu offering a handful of options, in GIMP it’s the principal way of accessing the program’s functions. Right-clicking an image brings up a menu offering access to virtually everything you’ll need while editing. Ubuntu offers the latest version of GIMP, 2.6.11 (as of this writing), which includes a more traditional menu bar in the main image-editing window, so you can choose your preferred method of working.
The main toolbar window, shown in Figure 18-3, is on the left. This can be considered the heart of GIMP, because when you close it all the other program windows are closed too. Version 2.6 also introduces a blank window that is visible when no image is open. This means that the traditional menus are available at all times. Closing this window also causes the entire application to close. The menu bar on the toolbar window offers most of the options you’re likely to use to start out with GIMP. For example, File ![]() Open opens a browser dialog box in which you can select files to open. It’s even possible to create new artwork from scratch by choosing File
Open opens a browser dialog box in which you can select files to open. It’s even possible to create new artwork from scratch by choosing File ![]() New.
New.
![]() Tip To create vector artwork, a better choice is a program like Inkscape (
Tip To create vector artwork, a better choice is a program like Inkscape (www.inkscape.org), which can be downloaded via the Ubuntu Software Center (to learn about software installation, see Chapter 20).
Beneath the menu bar in the main toolbar window are the tools for working with images. Their functions are described in Table 18-1, which lists the tools in order from left to right, starting at the top left. To find the name of any of these icons, just hover the mouse pointer over them and the name will display.

Figure 18-3. GIMP’s main toolbar window
Directly beneath the image-editing tool icons, on the left, is an icon that shows the foreground and background colors that will be used when drawing with tools such as the Paintbrush. To define a new color to be used for either of these, double-click either the foreground (top) or background (bottom) color box.
Beneath these icons, you’ll see the various options for the selected tool. The brush selector lets you choose the thickness of the brushstrokes and patterns that are used with various tools. Simply click each to change them. By using the buttons at the bottom of the window, you can save the current tool options, load tool options, and delete a previously saved set of tool options. Clicking the button on the bottom right lets you revert to the default settings for the tool currently being used (useful if you tweak too many settings!).
If you use particular options regularly, use the disclosure arrow on the right edge of the context-sensitive part of the toolbox to add a tab to the window. When you begin to experiment, having the Layers tab available here is useful, but you can add and remove as many as you like.
The Basics of GIMP
After you’ve started GIMP (and assigned it a virtual desktop), you can load an image by choosing File ![]() Open. The browser dialog box offers a preview facility on the right side of the window.
Open. The browser dialog box offers a preview facility on the right side of the window.
You will probably need to resize the image window, or change the zoom level, so the image fits within the remainder of the screen. You can then use the Zoom tool (see Table 18-1) to ensure that the image fills the editing window, which makes working with it much easier. Alternatively, you can click the Zoom drop-down list in the lower left part of the image window.
You can save any changes you make to an image by right-clicking it and selecting File ![]() Save, or create a new, named version of the picture by using Save As. You can also print the image from the same menu.
Save, or create a new, named version of the picture by using Save As. You can also print the image from the same menu.
Before you begin editing with GIMP, you need to be aware of some essential concepts that are vital in order to get the most from the program:
Copy, cut, and paste buffers: Unlike some Windows programs, GIMP lets you cut or copy many selections from the image and store them for use later. It calls these saved selections buffers, and each must be given a name for future reference. Create a new buffer by using any of the selection tools to select, and then right-clicking within the selection area and selecting Edit
Buffer
Copy Named (or Cut Named). Pasting a buffer back is a matter of right-clicking the image and selecting Edit
Buffer
Paste Named.
Paths: GIMP paths are not necessarily the same as selection areas, although it’s nearly always possible to convert a selection into a path and vice versa (right-click within the selection or path, and look for the relevant option on the Select menu: Select
To Path, or Select
From Path, as shown in Figure 18-4). In general, paths allow the creation of complex shapes, rather than the simple geometric shapes offered by the selection tools. You can save paths for later use or take one from one image and apply it to another. To view the Paths dialog box, right-click the image and select Dialogs
Paths.
![]() Tip Getting rid of a selection or path you’ve drawn is easy. In the case of a path, simply click any other tool or some other part of the canvas, and the path disappears. To get rid of a selection, use any selection tool to quickly click once on the image, being careful not to drag the mouse while doing so.
Tip Getting rid of a selection or path you’ve drawn is easy. In the case of a path, simply click any other tool or some other part of the canvas, and the path disappears. To get rid of a selection, use any selection tool to quickly click once on the image, being careful not to drag the mouse while doing so.
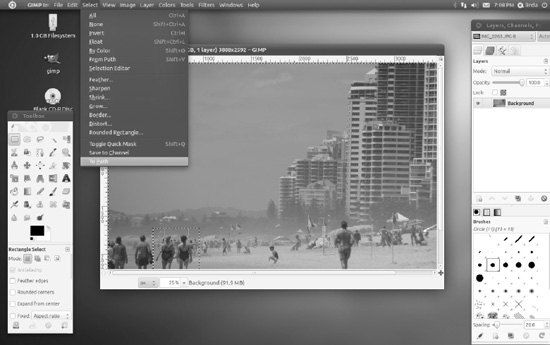
Figure 18-4. Paths allow for more elaborate and intricate selections, such as those that involve curves.
Layers: In GIMP (along with most other image-editing programs), layers are like transparent sheets of paper that are placed on top of the image. Anything can be drawn on each individual transparent sheet, and many layers can be overlaid in order to create a complicated image. Layers also let you cut and paste parts of the image between them. Though layers might be thought of as high-end, they’re great if you need to add text to an image; the text is added to a new layer, which can then be moved or resized simply. The Layers dialog box, shown in Figure 18-5, appears by default, but if you closed it earlier, you can open it again by right-clicking the image and selecting Dialogs
Layers. The layers can be reordered by clicking and dragging them in the dialog box. In addition, the blending mode of each layer can be altered. This refers to how it interacts with the layer below it. For example, you can change its opacity so that it appears semitransparent, thereby showing the contents of the layer beneath. You can also define how the colors from different layers interact by using the Mode drop-down list. The Layers menu also offers an option to collapse all of the layers back down to a single image (Layers
Merge Visible Layers or Flatten Image).
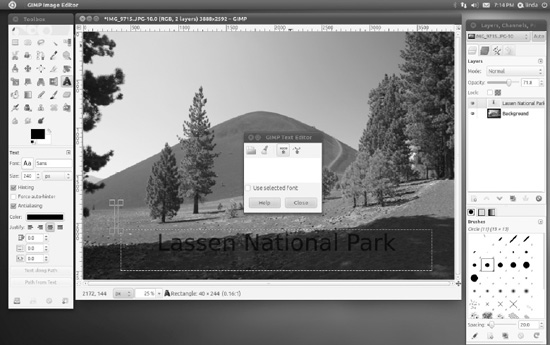
Figure 18-5. Set the opacity of various layers by clicking and dragging the relevant slider in the Layers dialog box.
Making Color Corrections
The first step when editing most images is to correct the brightness, contrast, and color saturation. This helps overcome some of the deficiencies that are commonly found in digital photographs or scanned-in images. To do this, right-click the image and select Colors. You’ll find a variety of options to let you tweak the image, allowing you a lot of control over the process.
For simple brightness and contrast changes, selecting the Brightness-Contrast menu option opens a dialog box in which you can click and drag the sliders to alter the image. The changes you make will be previewed on the image itself, so you should be able to get things just right.
Similarly, the Hue-Saturation option lets you alter the color balance and the strength of the colors (the saturation) by clicking and dragging sliders. By selecting the color bar options at the top of the window, you can choose individual colors to boost. Clicking the Master button lets you once again alter all colors at the same time.
The trouble with clicking and dragging sliders is that it relies on human intuition. This can easily be clouded by a badly calibrated monitor, which might be set too dark or too light. Because of this, GIMP offers another handy option, which can ensure that the whites in your image are white and that your blacks are truly black: Levels. To access the Levels feature, right-click the image and select Colors ![]() Levels. This presents a chart of the brightness levels in the photo and lets you set the dark, shadows, and highlight points, as shown in Figure 18-6. Three sliders beneath the chart represent, from left to right, the darkest point, the midtones (shadows), and the highlights within the picture. The first step is to set the dark and light sliders at the left and right of the edges of the chart. This will make sure that the range of brightness from the lightest point to the darkest point is set correctly. The Input Levels chart in Figure 18-6, for instance, shows a flat part to the right of the chart. This indicates that there is not enough brightness, so in that case, it makes sense to put the slider on the right directly under the end of the peak in the chart. The next step is to adjust the middle slider so that it’s roughly in the middle of the chart. This will accurately set the midtone point, ensuring an even spread of brightness across the image.
Levels. This presents a chart of the brightness levels in the photo and lets you set the dark, shadows, and highlight points, as shown in Figure 18-6. Three sliders beneath the chart represent, from left to right, the darkest point, the midtones (shadows), and the highlights within the picture. The first step is to set the dark and light sliders at the left and right of the edges of the chart. This will make sure that the range of brightness from the lightest point to the darkest point is set correctly. The Input Levels chart in Figure 18-6, for instance, shows a flat part to the right of the chart. This indicates that there is not enough brightness, so in that case, it makes sense to put the slider on the right directly under the end of the peak in the chart. The next step is to adjust the middle slider so that it’s roughly in the middle of the chart. This will accurately set the midtone point, ensuring an even spread of brightness across the image.
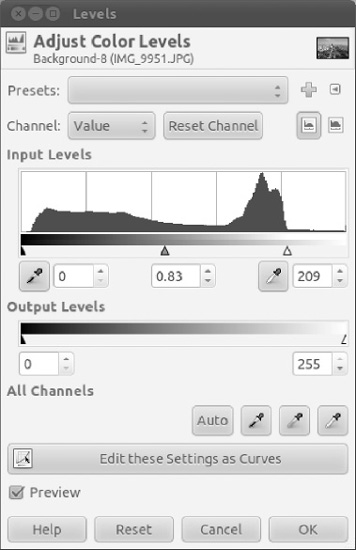
Figure 18-6. The Levels function can be used to accurately set the brightness levels across an image.
A little artistic license is usually allowed at this stage, and depending on the effect you want in the photo, moving the midtone slider a little to the left or right of the highest peak might produce more-acceptable results. However, be aware that the monitor might be showing incorrect brightness or color values.
Cropping and Healing
After you’ve adjusted the colors, you might want to use the Crop tool to remove any extraneous details outside the focus of the image. For example, in a portrait of someone taken from a distance away, you might choose to crop the photo to show only the person’s head and shoulders, or you might separate a group of people from their surroundings, as shown in Figure 18-7.
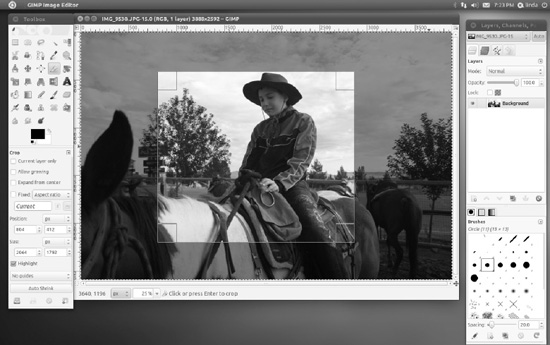
Figure 18-7. You can use the Crop tool to focus on one part of a picture or introduce a dramatic new shape.
The Healing tool is great for removing small blemishes, not just on people, but also dust from an unclean lens or scratches on an old scanned photo. Start by using the Zoom tool to close in on the area. If the blemish is small, you might need to go in quite close. Then try to find an area of the image that is clear and from which you can copy. Ctrl-click that area. Then click and draw over the blemish. The crosshair indicates the area from which you’re copying.
Applying Filters
To take you beyond basic editing, GIMP includes a selection of filters that can add dramatic effects to your images. Filters are applied either to the currently selected layer or to a selection within the layer. To apply a filter, right-click the image and choose the Filters menu option. After applying a filter, make sure to give your computer enough time to render the option you have applied. Some filters may take a minute or so before rendering completely. If you don’t like an effect you’ve applied, you can reverse it by choosing Edit ![]() Undo, or by pressing Ctrl+Z.
Undo, or by pressing Ctrl+Z.
The submenus offer filters grouped by categories, as follows:
Blur: These filters add various kinds of blur to the image or selection. For example, Motion Blur can imitate the effect of photographing an object moving at speed with a slow shutter. Perhaps the most popular blur option is Gaussian Blur, which has the effect of applying a soft and subtle blur and is great for creating drop shadows.
Enhance: The Enhance effects are designed to remove various artifacts from an image or otherwise improve it. For example, the Despeckle effect attempts to remove unwanted noise within an image (such as flecks of dust in a scanned image). The Sharpen filter discussed in the previous section is located here, as is Unsharp Mask, which offers a high degree of control over the image-sharpening process.
Distort: As the name of this category of filters suggests, the effects available distort the image in various ways. For example, Whirl and Pinch allow you to tug and push the image to distort it (imagine printing the image on rubber and then pinching or pushing the surface). This category also contains other special effects, such as Pagecurl, which imitates the curl of a page at one corner of the picture.
Light and Shadow: Here you will find filters that imitate the effects that light and shadow can have on a picture, such as adding sparkle effects to highlights or imitating the lens flare caused by a camera’s lens.
Noise: This collection of filters is designed to add speckles or other types of artifacts to an image. These filters are offered within GIMP for their potential artistic effects, but they can also be used to create a grainy film effect—simply click Scatter RGB—or white noise.
Edge-Detect: This set of filters can automatically detect and delineate the edges of objects within an image. Although this type of filter can result in some interesting results that might fall into the category of special effects, it’s primarily used in conjunction with other tools and effects.
Generic: In this category, you can find a handful of filters that don’t seem to fall into any other category. Of particular interest is the Convolution Matrix option, which lets you create your own filters by inputting numeric values. According to GIMP’s programmers, this is designed primarily for mathematicians, but it can also be used by others to create random special effects. Simply input values and then preview the effect.
Combine: Here you’ll find filters that combine two or more images into one.
Artistic: These filters allow you to add paint effects to the image, such as making it appear as if the photo has been painted in impressionistic brushstrokes or painted on canvas. Figure 18-9 shows an example of applying the Oilify filter for an oil painting effect.
Decor: This section has some interesting rendered effects such as coffee stains, bevels, and outlines that can be applied to images or layers.
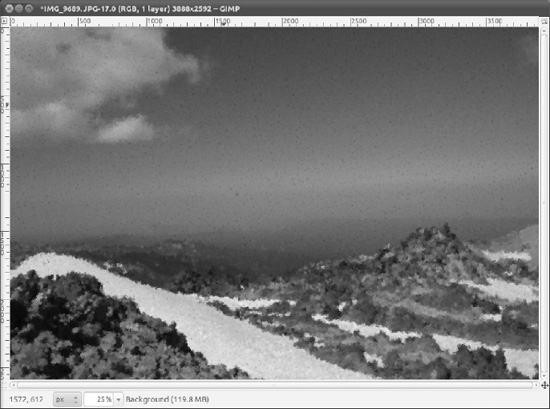
Figure 18-8. The Artistic effects can be used to give images an oil painting effect.
Map: These filters aim to manipulate the image by treating it like a piece of paper that can be folded in various ways and stuck onto 3D shapes (a process referred to as mapping). Because the image is treated as if it were a piece of paper, it can also be copied, and the copies placed on top of each other to create various effects.
Render: Here you’ll find filters designed to create new images from scratch, such as clouds or flame effects. Most of the options here will completely cover the underlying image with their effect, but others, such as Difference Clouds, use the base image as part of its source material.
Web: Here you can create an image map for use in a web page. An image map is a single image broken up into separate hyperlinked areas, typically used on a web page as a sophisticated menu. For example, an image map is frequently used for a geographical map on which you can click to get more information about different regions. There’s also a useful Slice tool, which can be used to break up a large image into smaller parts for display on a web page.
Animation: These filters aim to manipulate and optimize GIF images, which are commonly used to create simple animated images for use on web sites.
Alpha to Logo: These filters are typically used to create special effects for text. They are quite specialized and require an in-depth knowledge of how GIMP works, particularly the use of alpha channels.
![]() Tip If you like GIMP, you might be interested in Beginning GIMP: From Novice to Professional, Second Edition by Akkana Peck (Apress, 2009). This book offers a comprehensive, contemporary, and highly readable guide to this software.
Tip If you like GIMP, you might be interested in Beginning GIMP: From Novice to Professional, Second Edition by Akkana Peck (Apress, 2009). This book offers a comprehensive, contemporary, and highly readable guide to this software.
GIMPSHOP
Sharpening
One handy trick that can improve your photos, when used with care, is to use the Sharpen filter. This has the effect of adding definition to the image and reducing any slight blur caused by camera shake or poor focusing. To apply the Sharpen filter, right-click the image and select Filters ![]() Enhance
Enhance ![]() Sharpen.
Sharpen.
As shown in Figure 18-9, a small preview window shows the effect of the sharpening on the image (you might need to use the scrollbars to move to an appropriate part of the image, or resize the preview by clicking and dragging the bottom-right corner). Clicking and dragging the slider at the bottom of the dialog box alters the severity of the sharpening effect. Too much sharpening can ruin a picture, so be careful. Try to use the effect subtly.
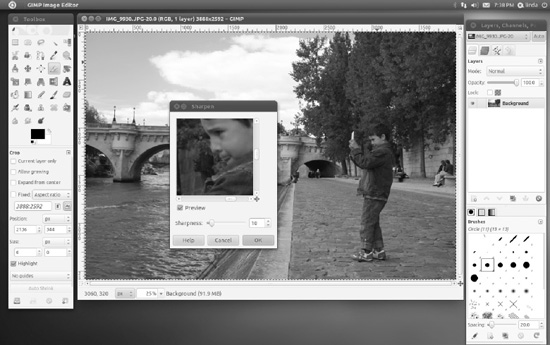
Figure 18-9. Sharpening an image can give it better definition, but keep checking the preview.
Summary
In this chapter, you’ve taken a look at working with images under Ubuntu. First you looked at the F-Spot photo manager tool. F-Spot lets you easily import pictures, catalog them, and make some adjustments. Then you learned how to edit your images by using GIMP, one of the best programs available for the task under any OS. As with most areas, we could have selected many more applications to cover such as Google’s Picasa, digiKam, and gphoto2, but F-Spot and GIMP provide perfect tools for both users and uses across the spectrum.


