C H A P T E R 15
Social Networks and Cloud Computing
From the very beginning, computer networks were about more than just connecting devices. They were about connecting people.
The day two computers first got connected, a communication path between two human beings was formed. As the number of connections increased, more and more people were sharing information, experiences, and their lives. Today, of course, we have the web. With its ubiquity, the possibilities are bounded only by our collective imagination.
Social networks have emerged to harness the communication power of the web. You want to get back in touch with your old classmates from high school? Check. You want to create a virtual business card and relate to colleagues? Check. You want to publish your activities so people know what you are doing all the time? Check.
However, administering your online persona can be an overwhelming task. Social networking sites are currently self-centered and poorly, if at all, integrated, so you have to check and update them one by one.
What we need are applications that do the heavy work for us and let us concentrate on what we want to publish and where—not on how to do it.
A second web trend has emerged: so-called cloud computing. As the processing power and storage capacity of the Internet as a whole rises exponentially, so do the benefits of running applications and saving data online, rather than doing so on your own PC. We are in the middle of a computing revolution in which the core processing unit is no longer the individual PC, but the “cloud” of connected devices.
Today, more and more sites provide free space to store personal information in the cloud, whether in order to share with others (for example, a photo in an album you create), or just to have an online copy of your private data.
In this chapter, we talk about how Ubuntu can leverage those two trends and make our online life a lot easier and pleasant.
![]() Note One of the main applications you will be using with social networks and cloud-based services is your favorite web browser. Most browsers that you can use with Ubuntu are very well suited for social networking. In this chapter we talk about other applications that connect directly to the Internet to perform specific tasks, using its resources as if they were local to your PC.
Note One of the main applications you will be using with social networks and cloud-based services is your favorite web browser. Most browsers that you can use with Ubuntu are very well suited for social networking. In this chapter we talk about other applications that connect directly to the Internet to perform specific tasks, using its resources as if they were local to your PC.
Social Networking Applications
In the last few years, the use of social networks has experienced staggering growth. Sites like Twitter and Facebook serve millions of users per day and generate terabytes of data.
WELCOME TO WEB 2.0
Ubuntu 10.04, released on April, 2010, was designed to be “social from the start,” which means that it integrated with social networks seamlessly. Natty Narwhal builds upon this solid foundation. In the first section of this chapter we look at some of the applications you can use for this purpose.
Introducing the MeMenu
Natty Narwhal includes the applet known as the MeMenu, located in the top panel, next to the Date and the Shutdown button, as is shown in Figure 15-1. It was so important for the developing team that its interface was sketched by Mike Shuttleworth himself. The MeMenu is the cornerstone of a strategy to make you feel like there is no real difference between your local account and your online persona; they are one and the same. Once you log in to Ubuntu, you are online!
The MeMenu allows you to set status for instant messaging (IM) accounts and to broadcast posts to all your social networks, including Twitter and Facebook.
Not all sections are shown by default; some only appear after you have configured certain types of accounts.
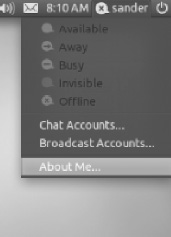
Figure 15-1. The MeMenu allows you to set IM status and to broadcast to your social networks.
Title: The Title section includes an icon representing the online status of your IM accounts, and your short name as specified in About Me (see Chapter 9). It could be that your multiple Chat accounts will have different statuses; in that case, the icon appears as a thick dash—or as disabled if no Chat account has been created.
Broadcast: The Broadcast section consists of a text box. It is shown only if you have created at least one Broadcast account. You can enter text in the box, and it’s posted to all checked Broadcast accounts the moment you press Enter. Be aware that some social networks limit the number of characters of your posts (Twitter’s tweets are limited to 140 characters; Facebook status updates can run to 420 characters).
IM Status: The IM Status section lets you set the status for multiple Chat accounts. You have several options: Available, Away, Busy, Invisible, and Offline. Selecting one option sets all Chat accounts to that status.
Account Configuration: The Account Configuration section lets you associate your online accounts with your profile. You can create both Chat accounts and Broadcast accounts. There’s also a pointer to Ubuntu One, a cloud-based storage service about which we will talk later in this Chapter.
The MeMenu relies on Empathy (already seen in Chapter 14) for Chat accounts and on Gwibber (more about it later) for Broadcast accounts. Those applications should be installed if you want to create accounts of each type.
Microblogging with Gwibber
Gwibber is a microblogging client for the GNOME desktop environment that you can use to access Twitter, Facebook, and other social networking sites.
Microblogging is a complex cultural phenomenon, but in itself consists of only two basic operations: to post content, and to read other users’ posts (called following, as on Twitter). It is the aggregation of millions of such operations a day that renders microblogging so interesting.
As the number of social network sites continues to grow, it is hard for users to keep up the pace. We want our posts to have the greatest impact, so we need to send it to every single microblogging site available, just to make sure no one misses it. On the other hand, we want to receive the most relevant content, no matter where it was originally posted. We can’t stick to a single service, we must use them all.
Without tools that help us with these tasks, to fulfill that simple objective we would have to update every site manually, using a web browser, and then check them one by one to see if there is some interesting stuff. We would rarely have time to do this.
Someone once said: “I will work 24 hours a day, and nights too.” That sentiment also seems to apply to social networking.
Here’s where Gwibber comes in. It allows you to post to multiple sites at the same time and follow content from different sources. Whereas the MeMenu can post short messages to some microblogging sites, Gwibber lets you also read other people’s threads.
Gwibber is installed by default, and you can easily start it from the Applications icon in the Unity Panel. The basic interface, as shown in Figure 15-2, is quite simple.
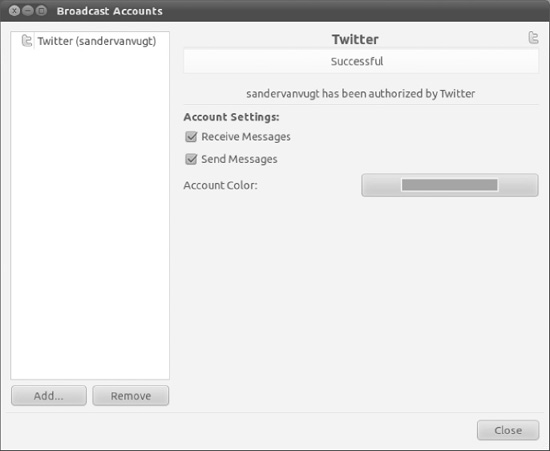
Figure 15-2. Gwibber lets you configure multiple social networking sites.
At the top is a menu that contains only three entries: Gwibber, Edit, and Help.
The main section is divided into two panes: the Streams pane, where you can see your mailboxes, and the Details pane, where the selected mailbox actual posts are shown.
At the bottom, the Broadcast text box is shown, along with icons representing each of your microblogging accounts. You can enter your thoughts into this text box, and when you press the Enter key they will be automatically posted online. You can select which sites to post the message to by enabling or disabling the icons in the Send with: area. If the microblogging sites have a restriction for post’s length, the number of remaining characters available will be displayed at the right inside the text box. Very handy!
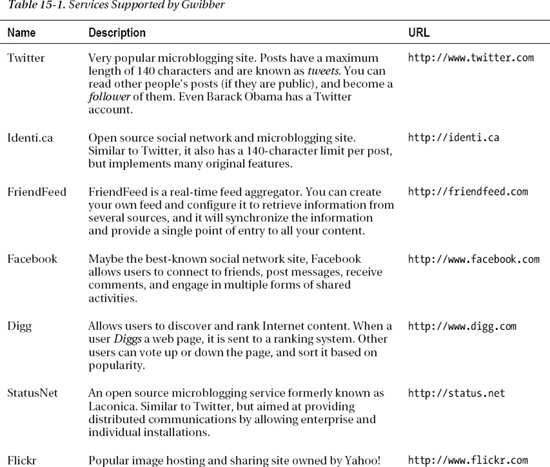
Gwibber supports many social networking sites, as listed in Table 15-1, but for Gwibber to work with them you must first have an account created for that site, and in some cases you must explicitly allow Gwibber to access your information. Only Twitter, Facebook and Identi.ca are supported by default. If you want to use any of the other sites, you need to install the corresponding Add-on through Ubuntu Software Center. Search for the packet Gwibber Social Client and click More Info; you will see a list of available add-ons. Select the ones you want to install and then press the Apply Changes button. More information about installing software on Chapter 20.
Once you have created your microblogging accounts, you’re ready to add them to Gwibber. Select Edit ![]() Accounts and click the Add… button. Select the account type from the list and click Add. Depending on the type of account you add, you will be asked for various information.
Accounts and click the Add… button. Select the account type from the list and click Add. Depending on the type of account you add, you will be asked for various information.
For each account you configure, you will have a new group in the Streams pane. You can display all the posts from all your sites by selecting the Home section, or view more specific streams of posts by selecting the mailbox of the specific site. You have also the Search sections, in which you can look for specific text in the social networks to see what other people are saying about a particular topic. From now on, you can read other people’s posts, create your own messages and post them online, and master the social network from a single, easy-to-use application.
Cloud-Based Services
In the last few years ever-increasing processing and storage capacity led to reduction of their costs. It soon became evident how much efficiency could be gained just by outsourcing those resources to the cloud.
WELCOME TO CLOUD COMPUTING
Ubuntu, or Linux for that matter, is not a cloud-centric operating system the way Google Chrome OS is. It still relies on the local PC for most of its operations. Nonetheless, Natty Narwhal comes equipped with some functionality that allows you to have the best of both worlds, by making the most of your PC’s hardware resources, while being able to use cloud-based services transparently.
Storing Your Data Online with Ubuntu One
Ubuntu One is an online storage and synchronization service operated by Canonical Ltd. This means it provides you with space in the cloud and synchronizes its content with your computers.
It is not the first service of this kind to have hit the market. Dropbox and Live Mesh have similar functionality. Nonetheless, it has certain characteristics that make it a good choice for Ubuntu users, namely its capacity for synchronizing notes and contacts between several computers (in addition to just storing files). Currently, only Ubuntu clients are supported, although a beta version for Windows that only synchronizes files is currently available.
Ubuntu One subscriptions come in two flavors. A basic subscription is available for free, and it enables you to store up to 2GB of personal information on Ubuntu One servers. If you need more space, you can upgrade your subscription to a 20GB plan, for a monthly fee (at the time of writing, the fee was $2.99 a month).
In order to use Ubuntu One, you must first subscribe to the service and then configure your computers to connect and synchronize files, notes, and contacts.
Subscribing to Ubuntu One
Follow these instructions to create your account and subscribe to the free Ubuntu One service.
Clickon the Ubuntu One launcher.- Click “Join Now.”
- Complete the Create Ubuntu One account window with your name, e-mail address, and password. You also need to fill the captcha to continue.
- The service will send you an email with a verification code. Upon receiving you can enter the code in the next window to enable your Ubuntu One account (this is the same account that you will use to rate and review applications, as explained in chapter 20).
![]() Caution Ubuntu One is a free service and as such is very useful. But you should carefully read its Terms of Service and its Privacy Policy, available here:
Caution Ubuntu One is a free service and as such is very useful. But you should carefully read its Terms of Service and its Privacy Policy, available here: https://one.ubuntu.com/terms/ and here https://one.ubuntu.com/privacy/ and make sure they don’t affect the use you will give to the service. Make sure you understand that Ubuntu One is not a replacement for regular backups, since Canonical Ltd. cannot be held responsible for lost information.
Configuring Your Computer to Synchronize Files
After the subscription is created, you can start synchronizing folders and other information.
The concepts behind Ubuntu One Synchronization are simple. You create an account that reserves space in the Ubuntu One online service. A special Ubuntu One folder is created in your home directory and files stored there are automatically synchronized to Ubuntu One. If there’s more than one computer associated with your Ubuntu One account, files will be synchronized to them all. If you install the advanced features, you can also synchronize notes and contact information.
Click the Ubuntu One launcher icon to open the Ubuntu One Control Panel. Here you can configure different options. On top of the window you will see how much space you’re using compared with the amount available (depending on your plan) and the current status of the synchronization process, whether if all files are up to date or if file synchronization is in progress.
On the Account tab you can edit your personal information and change your storage plan. In both cases you will be taken to the Ubuntu One web page.
The Cloud Folders tab allows you to granularly select which online folders you want to synchronize with this particular computer. Maybe you have many computers associated with your account and don’t want all the files on all your computers at the same time. You have to do this selection on each computer where the default selection does not apply.
In the Devices tab you can see all the computers and mobile devices currently associated with your account. You can deauthorize a device and it will stop synchronizing files or other information.
In the Services tab you can enable or disable which services will synchronize with Ubuntu One. By default only file synchronization is available, but you have the option to install an additional package, desktopcouch-ubuntuone, to expand Ubuntu One’s capabilities. You can install it through Ubuntu Software Center, or by clicking the Install now button at the bottom of the window in the Services tab.
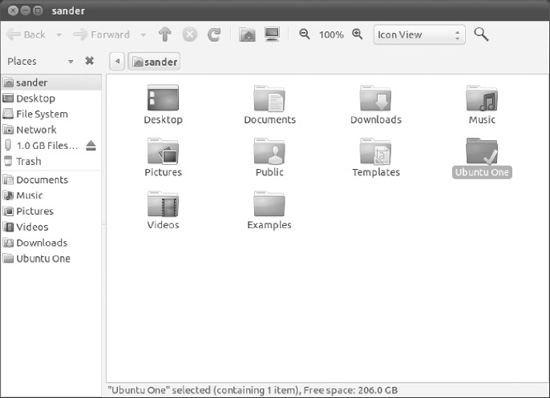
Figure 15-3. The Ubuntu One folder inside Nautilus
A notification will appear when Ubuntu One is synchronizing files, and when it finishes doing so. When a file is being synchronized, Nautilus will display a special emblem, called ubuntuone-updating, with two arrows, one green and one blue, pointing each other in a circular fashion. When synchronization has finished, the emblem changes to ubuntuone-synchronized, which is a large green checkmark (see Figure 15-3).
You can also share folders with other Ubuntu One users. To do this, right-click a subfolder of Ubuntu One in Nautilus and select the option Ubuntu One ![]() Share… You will need to provide the e-mail address of the person you want to share the folder with, and that e-mail account must be associated with an Ubuntu One subscription.
Share… You will need to provide the e-mail address of the person you want to share the folder with, and that e-mail account must be associated with an Ubuntu One subscription.
If other people share their folders with you, you will see them in the subfolder Shared with Me, inside Ubuntu One in Nautilus.
![]() Note It might happen someday that you want to cancel your Ubuntu One subscription. If you do, the information will be deleted from Ubuntu One, but not from your computer. If you have a free plan it will be deleted immediately, whereas a paid subscription will remain active until the end of the current billing period.
Note It might happen someday that you want to cancel your Ubuntu One subscription. If you do, the information will be deleted from Ubuntu One, but not from your computer. If you have a free plan it will be deleted immediately, whereas a paid subscription will remain active until the end of the current billing period.
Synchronizing Notes
Another kind of information that you can synchronize with Ubuntu One is Tomboy Notes. Tomboy is an application that allows you to take notes, which comes installed by default in Natty Narwhal. Each note consists of a title and a body.
To configure the application follow these steps:
- Access the Tomboy Notes application, available in the Applications Item in the Unity Panel.
- Once the application opens, click the Edit menu and select Preferences.
- Click the Synchronization tab and select the option Ubuntu One in the Service drop-down list, as shown in Figure 15-4.
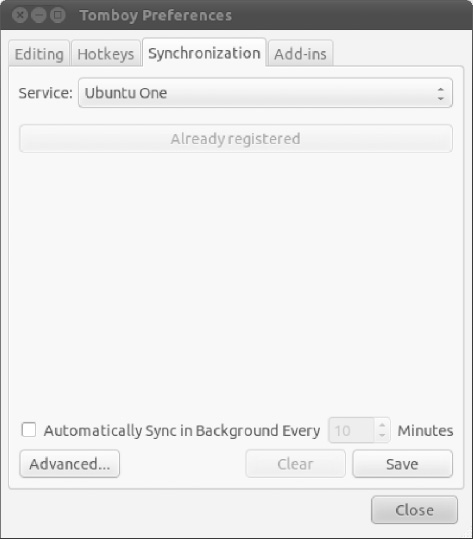
Figure 15-4. Tomboy Notes Synchronization options.
- If you have already registered your computer and associated it with an Ubuntu One account, you are ready to go. Otherwise you’re granted the opportunity to create an account or sign in with an existing account at this moment.
- Go back to Tomboy and click Save to start synchronizing notes.
From that point onwards, your notes will be synchronized to Ubuntu One, and from there to any other computers that you configure with the same Launchpad account.
You can force synchronization by expanding the Tools menu and choosing the option Synchronize Notes.
Synchronizing Evolution Contacts
You can also synchronize Evolution contacts (for an introduction to Evolution, see Chapter 14).
First you need to install the desktopcouch-ubuntuone additional package, as was mentioned earlier. Then go to the Services tab in the Ubuntu One Control Panel and, in the section Enable Contact Sync, press the Install now button. This step will install the package evolution-couchdb.
![]() Note You may encounter a bug that prevents you from succeeding on your first attempt. If that happens to you, just restart your computer and it will probably fix the problem automatically.
Note You may encounter a bug that prevents you from succeeding on your first attempt. If that happens to you, just restart your computer and it will probably fix the problem automatically.
- Open Evolution, available in Applications
Office. If this is the first time you open Evolution, you will need to create an account.
- Access the Contacts section of Evolution.
- Only contacts residing in the CouchDB
Ubuntu One Address Book will be synchronized. If you already have contacts created in other address books, you can copy them by expanding the Action menu and clicking on the option Copy All Contacts to… Select CouchDB
Ubuntu One as the destination Address Book.
- You can also set the CouchDB
Ubuntu One Address Book as the default by selecting its properties and checking the option “Mark as default address book.”
Accessing Your Information on the Web
Now that you have configured synchronization, you don’t need your PC to access your information stored on Ubuntu One. All you need is a web browser.
Go to http://one.ubuntu.com and log in with your Ubuntu One account. You will be presented with a web page from where you can go to the files, notes, and contacts sections as if you were on your PC (see Figure 15-5). You can also administer the list of PCs associated with this Ubuntu One subscription by clicking the My Account link in the top right of the page and clicking the View the machines connected to this account link.
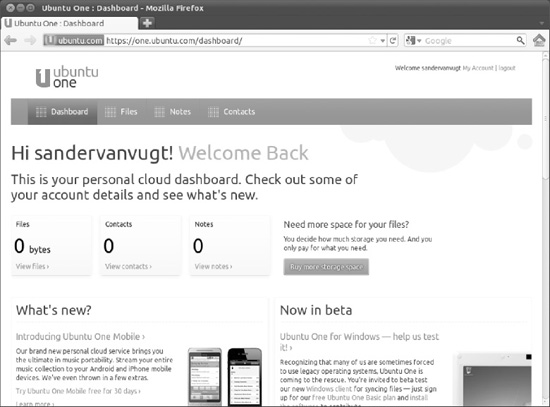
Figure 15-5. The Ubuntu One web page.
Summary
The Internet is constantly evolving. Ubuntu evolves with it, allowing the user to unleash its power without losing control of the PC. Ubuntu is designed so you can think of our online persona as the same as your local account, and of the cloud as a resource of your PC.
The web browser is no longer the only portal to the Internet. Many more applications are prepared to connect directly to the Internet and do things like upload photos and post to a blog.

