One of the best things about Ubuntu is that it’s ready for use as soon as it’s installed. You can get almost anything done immediately, and new applications are just a couple of clicks away. Some of the power of Ubuntu is in its differences from other operating systems.
Ubuntu is best approached as its own experience, without comparison to other operating systems—in fact, all operating systems are best approached this way. Therefore, the rest of the chapters in this book talk about Ubuntu directly. But it’s hard to leave behind the habits and experience we’ve formed from working with computers. You’re probably fairly handy with a computer running Windows or OS X. This chapter will help you take what you already know and apply that knowledge to Ubuntu, so that you will feel comfortable more quickly. And it will help you work more closely with your other computers as well. It’s a lot like a travel guide, complete with a phrasebook!
Tip
All modern operating systems using the desktop model of interaction have the same fundamentals. You can think of switching between them a bit like visiting a different country. There are different languages and customs, but with a bit of preparation you can fit right in.
Try to think of learning a new operating system like the same kind of adventure, and you’ll find the experience a lot more fun—and enjoyable.
Ubuntu Desktop
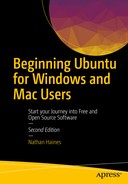
The Ubuntu desktop is simple and elegant right out of the box. Your new Ubuntu system has several programs preinstalled, and the desktop interface is called Unity, with a launcher along the left-hand side, a panel along the top of the screen, with information about the running program and its menus on the left, and informative indicator menus on the right. Each window has several window controls on the top left of its title bar (see Figure 2-1).
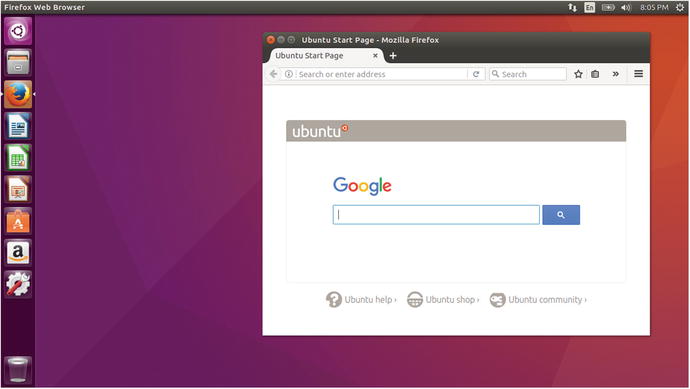
Figure 2-1. This is the default Ubuntu desktop with a web browser running
Unity Launcher
On the left edge of the screen is the Unity Launcher. This is where you can pin and launch your favorite applications, and see which applications are running. The top icon opens the Dash home lens, where you can search your computer’s programs and files. The other icons are application launcher icons, and you can click them to run the corresponding application. Running applications will have a pip or arrow on the left, and will display two pips if two windows are open, or three pips for three or more windows. Clicking a running application’s launcher icon will display the application window. If an application has more than one window open, scrolling the mouse wheel with the mouse pointer over the launcher icon will cycle through the open windows. Clicking the launcher icon when an application with multiple windows is already focused will display all open windows. You can then click a window to select it, or click the red X button to close any particular window.
Right-clicking a launcher icon will display a quick menu that lists application-specific commands. Different commands may be available depending on whether the application is currently running. The quick menu will also list all open windows, which can be selected with the mouse. The Quit option will close all open windows of that application.
Locking an icon to the Launcher keeps the icon displayed when it is not running. This gives you instant access to your favorite and most commonly used applications at a single click. Likewise, you can unlock icons as well.
You can also rearrange most of the Launcher’s icons. Simply click and drag the icon off to the right. It will pop off the Launcher, and you can place it in any position you like, or drag it to the trash. This will remove the launcher icon—not the application. You can hold down the Super key (the Windows Logo or Command key) and press a number key to automatically run or switch to the corresponding launcher icon, so arranging them can help you launch applications even more quickly. Pressing and holding the Super key by itself displays not only the corresponding number over the launcher icon but also the entire list of keyboard shortcuts you can take advantage of in Unity.
You can make the Launcher disappear until you need it by turning on the auto-hide feature. To do this, run System Settings from the Dash or the Gear indicator menu . Click the Appearance icon and then the Behavior tab. Then you can turn on the “Auto-hide the Launcher” feature. This setting takes effect immediately, so you can test it out before closing System Settings. By default, the hidden Launcher will appear when you push the mouse pointer “past” the left side of the screen. This gives you fast access to the Launcher without it getting in the way of your running applications.
Unity Dash
The Unity Dash (see Figure 2-2) is designed to streamline the way you search for information on your computer. You can use it to search for applications and recently opened files and folders. The most useful thing to know is that pressing “Enter” activates the first result listed at any time, and you can use the arrow keys to select results as well as the mouse. Pressing Esc will clear the search field. You can use the “Maximize” and “Unmaximize” buttons in the top-left corner of the screen to switch in and out of full-screen mode for the Dash if you do not prefer the default setting, which is based on your screen resolution.

Figure 2-2. The Unity Dash shows recent applications, files and folders, and online results
These results are custom-tailored to the information they provide. For instance, clicking an application result will launch the application. Clicking a file result will show a larger preview and file options, and double-clicking the file result will open the file in the default application. Clicking a song or music album will show a track list and let you listen to the song as a preview . From here, you can click the left and right arrows or use the left and right arrow keys on your keyboard to move between results.
This is the primary way that you’ll run applications that you have not pinned to the Launcher. To open the Dash, either click the “Dash Home” button at the top of the Launcher or press the Super key on your keyboard. Figure 2-2 shows a typical Home display. The top row shows the last six applications you’ve run—not including any that are locked to the launcher. You can expand that list to show more. You can drag any application icon to your launcher to lock it there. Underneath are files and folders that have recently been opened. You can click any result for more information.
The Dash Home will return search results from your computer, and you can use the “Filter Results” drop-down to choose specific categories as well as sources to refine your search. However, there are five other lenses you can use to search for specific types of information. You can select them by pressing Ctrl+Tab when the Dash is open, clicking directly on their icon at the bottom of the Dash, or using the shortcut key for a specific Lens. For example, Super+A opens the Applications Lens, Super+M opens the Music Lens, and so on. These shortcuts are displayed on the Keyboard Shortcuts overlay that appears when you hold down the Super key, under the Dash section.
The App Lens displays all installed applications and can be used to browse or search through this list. This lens also shows software that is available from Ubuntu’s software repositories and can be used to search for and install new applications. Finally, it shows Dash plugins that can be individually enabled or disabled to customize your search experience.
Application searches search both application titles and descriptions. A search for “graphic,” for example, will display the installed Image Viewer as well as the Cheese webcam application. This means that you do not have to know the exact name of an application beforehand. You can also type a keyword that relates to its function . Right-clicking any application result will display information about the application and allow you to launch the application (see Figure 2-3).
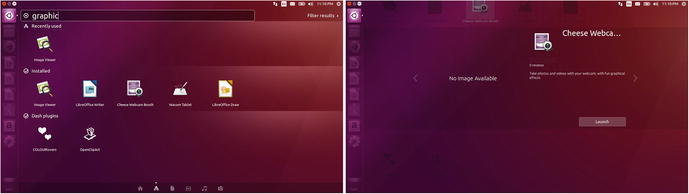
Figure 2-3. The App Lens shows installed applications, and right-clicking a result gives you more information and the chance to run it
The various other scopes are very similar. The Files scope shows files in your home folders, the Photos scope shows images in your Pictures folder, and so on. The Dash lets you think about what you want to find without having to worry about where it is.
Dash Privacy
Earlier versions of Ubuntu provided the ability to search online sources out of the box. This was a powerful, useful feature, but widespread concerns from users about searching the Internet by default lead to this feature being disabled in new installs, and most of the plugins being removed from Ubuntu due to the need for constant maintenance, since online services are always changing.
There are several online search plugins which can be manually enabled. Searches related to your online accounts such as Google, Facebook, and so on are sent directly to the relevant service provider. For some people this can be a privacy or performance concern. In addition, you may find some online sources unhelpful or uninteresting. There are two simple ways to change Dash behavior with regard to online searching.
To enable certain search plugins, or to disable them so they are not used in future searches, simply go to the App Lens and expand the Dash plugin section or search for the name of the plugin. Click the plugin to see a description of what it does, and simply click the “Disable” button to turn the plugin off (see Figure 2-4). That local or online search plugin will not be used again unless you manually reenable it by selecting it and clicking the “Enable” button.
Figure 2-4. Each search scope can be enabled or disabled by right-clicking it in the App Lens
By default, all online search capability is disabled in Ubuntu. If you would like to enable online search results, there is a master setting that applies to all Dash scopes . You can run System Settings from the Dash (or from the Gear menu in the top right-hand corner of the screen), then click the “Security & Privacy” icon. From there, you can click the “Search” tab and turn on the option that says “Include online search results” (see Figure 2-5). The default setting of “off” will prevent the Dash from accessing the network altogether until you turn the feature on. It does not change the status of individual plugins, so any plugins you have enabled or disabled will keep their status if you change the online results setting. However, online plugins will not be able to contact the Internet and will not interfere with your search results unless “Include online search results” is enabled.
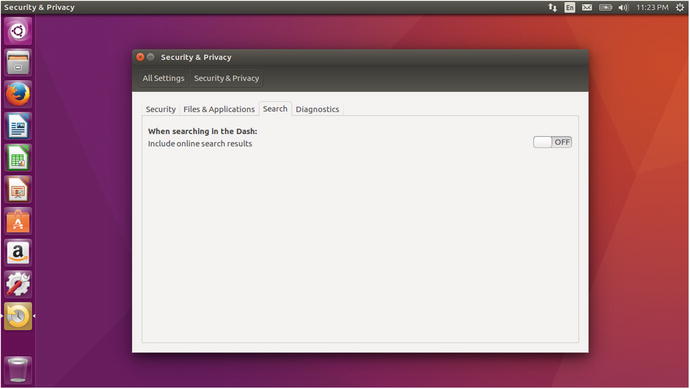
Figure 2-5. System Setting’s Security & Privacy applet lets you globally enable or disable online searching in the Unity Dash
Unity Menu Bar and Indicators
The panel at the top of the screen is very versatile (see Figure 2-6). On the left it shows the name of the currently active application. It also displays the current application’s menu when you bring your mouse over the panel or hold down the Alt key. These drop-down menus work just as the application menus in Windows or OS X—including responding to menu accelerator keys when holding Alt—but they remain hidden when not in use for a less cluttered screen.

Figure 2-6. The Unity panel shows the global Application menu as well as indicator menus
The right side of the panel is dedicated to application and system indicators. They provide an instant visual cue to your computer’s status. The network indicator displays your connection status, the power indicator displays your laptop or wireless mouse battery, the messaging indicator alerts you to new emails or instant messages, the sound indicator shows you the current volume, and the date/time indicator shows you the time.
Clicking an indicator displays a menu with further information. For example, the sound indicator will give you the option to mute or unmute the master volume, or adjust your speakers or microphone volumes using a slider control. If a supported media player is running, it will display information about the current media file and allow you to quickly pause and resume playback or seek through your current playlist. For instance, you can run Rhythmbox and start playing music, then close Rhythmbox. The sound indicator provides fast access to your playlist without having to switch away from your current application.
Unlike system notification tray applets in Windows, indicator icons only display menus—they do not perform actions when clicked, double-clicked, or right-clicked. Therefore, both clicking and right-clicking display the menu for that indicator. This provides a consistent experience for all indicators. The sound indicator does have a special feature that mutes or unmutes the system volume when middle-clicked .
Unity HUD
One unique and very powerful feature of Unity is called HUD. Just like a Heads-Up Display , it gives you quick access to your application’s menus at the press of a button.
Traditionally, you access a menu using either the mouse or the Alt key combined with a menu accelerator key, such as Alt+F for the File menu, Alt+E for the Edit menu, and so on. Application menus were a way to expose commands to the user in the days before graphical interfaces and before application toolbars were invented. But many powerful applications have extremely complex menus. LibreOffice Writer is an example of an application with an overwhelming array of commands. This makes the software very versatile, but finding and remembering where any menu command is located can be daunting. HUD provides the answer to this.
By tapping the Alt key, you activate the HUD. Then, you can begin typing the command or feature you are looking for (see Figure 2-7). As you type, the search will narrow down through the application menu items, and you can simply press Enter when you see the result you want in the first position. Alternatively, you can click on an option or use the arrow keys to select an option and press Enter. The HUD remembers the last 30 days of use and will begin to favor your most frequently used items.
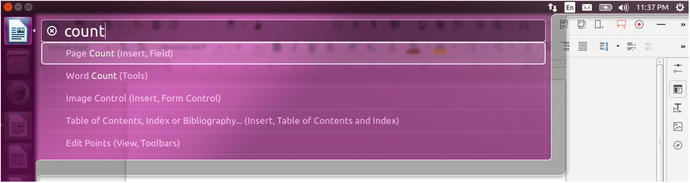
Figure 2-7. HUD lets you search any application’s menu system
Using HUD not only keeps you from needing to search and read through the menus yourself but also gives you context as you search. For example, in LibreOffice Writer, if you are looking for the Word Count feature, you can simply search for the word “count” (see Figure 2-7). Several options are available, and HUD indicates that the Word Count feature can be found under the Tools menu. This can allow you to access advanced application options without taking your hands off the keyboard, but it also teaches you where in the menus these options “live,” increasing your efficiency and speed .
Managing Windows
Most application windows have three window controls on the left of the title bar. In order, these close the window, minimize (or iconify) the window, and maximize the window. Maximizing a window merges its title bar with the Unity menu bar, and its window controls appear along with the application menu when you bring the mouse to the top panel. This makes for very efficient screen use, and combined with auto-hiding the Launcher dedicates all but the top 24 pixels of the screen to your application. This gives you more space on smaller screens and better focus even on larger screens.
You can also resize windows by dragging a window to the top, left, or right of your screen. Dragging to the top of the screen maximizes a window. You can drag it down from the panel to restore the window’s unmaximized size. Dragging a window to the left or the right maximizes it to that half of the screen, and is perfect for displaying two windows side by side. Dragging a snapped window away from the edge of the screen restores the previous window size as well.
You can switch between applications by pressing Alt+Tab. If you continue holding Alt, the application switcher will appear and you can choose any running application as long as you are holding Alt. Each time you press Tab, you will cycle forward through the list to the next running application. Releasing Alt when the desired application is highlighted will switch to that application. Alt+Shift+Tab moves in reverse. You can also click on a displayed application icon with the mouse to switch to it while you are holding Alt.
If you have multiple windows open in the same application, you can easily switch between them by pressing Alt+` (backtick) on a US English keyboard. If your keyboard layout is set to match your physical keyboard, you can press the leftmost key above the Tab key even if it is not the backtick key.
If you want to see all open windows, simply press Super+W. This spreads all running applications’ windows out visually, and you can use the arrow keys or the mouse to select a window to bring into focus. If you start typing, Unity will narrow down the displayed windows to show only those that match your search.
Installing and Updating Software
Ubuntu is a comprehensive operating system. As discussed in the last chapter, the Ubuntu operating system consists of a Linux kernel, the standard GNU userspace, X for the graphics display system, and tens of thousands of other Free Software and open source projects. All of the software that comes with Ubuntu has been built from its source code directly on Ubuntu and packaged for delivery and installation. (Technically, some proprietary software and drivers were not compiled by Ubuntu, but they are installed and updated in the same manner). This includes not only the software included on your installation media and in a newly installed Ubuntu system but thousands upon thousands of other applications that are available from the Ubuntu software repositories.
Ubuntu Software
The easiest way to install new software is through the Ubuntu Software store (see Figure 2-8). This is a catalog where you can browse, search for, and install new software that is provided by Ubuntu. You are also provided with reviews and ratings from other Ubuntu users and can write your own as well. This is the best way to install software if you don’t know exactly what you’re looking for.
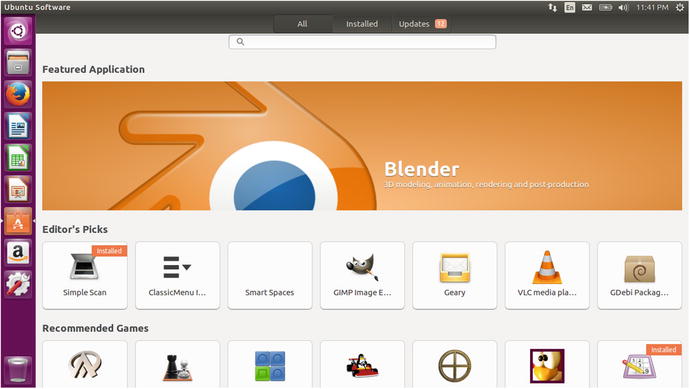
Figure 2-8. Ubuntu Software provides a catalog with thousands of free and paid applications
Ubuntu Software provides a look at thousands of software packages. Because the packages are located in the Ubuntu software repositories, it always downloads and installs the most up-to-date version of an application for the current Ubuntu release. In addition, anything installed will receive updates through the Software Updater along with all other software. This makes Ubuntu Software an easy way to install software, and will be the primary method of installation used for the rest of this book. Some software is not displayed in Ubuntu Software, and when this software is featured in this book, instructions for installing in a Terminal window will be given. You can see Chapter 6 for a full explanation of what it means to install software via the command line, and how it can be a faster way to install software if you know precisely what you are looking for.
Additional third-party software is available from Ubuntu Software, and these applications may be free or for sale. The price, if applicable, will be displayed with the software listing and payment goes to the third party, with a small portion of the sales price going to Canonical to cover the payment processing fees and indirectly used to support Ubuntu development. In order to purchase third-party software (even if “free”), you will need to create an Ubuntu One account. This account is used for many Ubuntu community resources, so it is useful beyond software purchases. You can use your Ubuntu One account in the future to download compatible purchases to any new Ubuntu computer without additional payment.
Ubuntu now uses the “snap” technology to allow third-party developers to offer their applications to Ubuntu users. Snaps are mostly restricted to their own files and data, which provides protection against undiscovered security flaws or undetected malicious software. Over time, more and more software will be available via snaps—including newer versions of software included in Ubuntu, like LibreOffice and VLC. These applications do not replace or conflict with Ubuntu-provided software and are automatically upgraded when newer versions are published.
Other Sources
If you download software for Ubuntu directly from a web site, you’ll be provided with a .deb file. This is a Debian package file and is used by Debian and Ubuntu to allow your operating system to install and uninstall software cleanly by using the Debian package manager. You can simply double-click the deb file, and Ubuntu Software will open and display the information provided by the Debian package. You can choose whether or not to install the software from that screen. With the exception of certain packages like Google Chrome and Steam, which add their own repositories to Ubuntu’s list of software repositories, software you install manually will not receive automatic updates with bug or security fixes and in any case have not been reviewed by Ubuntu developers, so make sure to only install software you trust.
Updating Ubuntu
The Ubuntu repositories are where all Ubuntu-provided software is contained, and are shared between desktop, server, and cloud versions of the operating system, not to mention Ubuntu flavors. In principle, the only differences between these versions are the default set of installed software packages and some system settings. This means that all software on your system in your default install as well as all software you install from Ubuntu Software is maintained and supported by Ubuntu. Your computer will check for updates on a daily basis (see Figure 2-9).
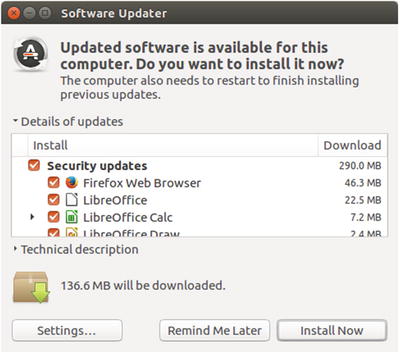
Figure 2-9. Software Updater tells you about software updates. This is the detailed view.
Once a week, Ubuntu will inform you about recommended updates. These updates will only provide maintenance updates, not newer feature releases of software. If security updates are available, Ubuntu will notify you immediately. Installing the updates is automatic once you click “Install Now” and only requires your password authorization to begin.
The Software Updater provides updates for all software contained in the Ubuntu repositories, and it acts as a single way to make sure all of your applications are secure and up to date. All updates are signed and verified by the Ubuntu developers so you can be assured that updates are trustworthy.
Upgrading Ubuntu
Because all software provided by Ubuntu is also maintained by Ubuntu, this makes OS upgrades simple as well. Ubuntu will notify you when a new version of Ubuntu is available. If you do not upgrade at that time, the Software Updater tool will also offer you the chance to upgrade (see Figure 2-10).

Figure 2-10. Upgrading to a new version of Ubuntu is simple
A new version of Ubuntu is released every six months: once in April and once in October. Every fourth release is supported for five years instead of nine months, and is considered a Long Term Support (LTS) release. Ubuntu 16.04 LTS is the release covered in this book, and the next LTS release will be Ubuntu 18.04 in April 2018.
When a new version of Ubuntu is released, the Software Updater will notify you of the available update. LTS releases, by default, will only notify you once the next LTS release is available, and only after a delay of three months. This allows for any major bugs to be addressed, and post-release updates to settle down with the help of early adopters, which in turn allows you to enjoy a stable system at all times.
When you are notified of a newer version of Ubuntu, it’s important to install all updates still pending for your current release. Once your software is up to date, you can click the “Upgrade…” button in the Software Updater. This will display the release notes for the new version of Ubuntu. After reading the release notes, you can choose to continue with the update. This is a lengthy process that downloads a very large amount of data and cannot be interrupted once it begins.
This process upgrades all software on your computer with newer versions. For the most part, it actually uses the same methods as minor software updates—a testament to the power of the software packaging system. While it should be safe to browse the Web or play a simple game, you should make sure your system is plugged into AC power if you are upgrading a laptop and refrain from doing any important work on your computer during the upgrade. Once finished, reboot immediately. Your system will restart and you will be running the new version of Ubuntu.
Managing User Accounts
Ubuntu was designed to handle multiple users on a single computer, and it is easy for each user to have his or her own account where each user’s settings and program data can be stored separately from the others’. While any installed applications are available to every user, application settings are stored in each user’s home folder. Things like mail, personal files, language settings, and desktop and wallpaper preferences are user-specific. Giving each computer user a dedicated account allows each user to use the computer without affecting other users’ experience.
Creating a new user account can be done from the Gear Menu ➤ System Settings, by clicking the “User Accounts” applet. This applet displays all user accounts installed on the system, and the panel is initially locked (see Figure 2-11). While locked, you can only make changes to your own user account, such as changing your display name or password.

Figure 2-11. User Accounts is where you can add, remove, and modify accounts
Adding, removing, or changing other user accounts modifies the operating system’s settings, and requires administrative access. You can click the “Unlock” icon at the top right of the window. You will be prompted for your password and then you will be able to modify other user accounts. The applet will automatically lock again after 15 minutes of disuse. The “+” and “-” buttons, to add or remove a user account, respectively, also become available.
To add a new user, click the “+” button under the user list. The “Add account” window will appear, and you can choose between a “Standard” account or an “Administrator” account (see Figure 2-12). A user with an administrator account is able to install or remove software with his or her password just like the user account created during installation. Standard accounts cannot authorize system-level changes, and an administrator user will need to authorize any such action taken by the standard user when prompted. The “Full name” field shows the display name of the user that will be shown on the Ubuntu welcome screen, and the “Username” field must start with a letter and must only contain letters, numbers, and periods (“ . ”) and no spaces or other symbols. The down arrow to the right of the username field will display some suggested usernames based on the “Full name” field. The username is used for the user’s home folder, so something simple is often better. Fill in these fields and click “Add” to create the new account .

Figure 2-12. A new account can be added to the computer in seconds
Once the user account is created, a password must be set up. The User Accounts applet will show the new account with “Account disabled” to the right of the “Password” field. Click “Account disabled” to show the password options window. The “Action” field lets you choose whether to set a password or allow the account to be used without a password. The last option, “Enable this account,” and its toggle, “Disable this account,” only function after a password has been set. Once you choose one of the first two options and set a password, clicking the “Change” button will enable the account, which will become visible on the Ubuntu welcome screen. The password options window also has a link to the help topic “How to choose a strong password,” which has additional tips to keep in mind when changing an account password.
The User Accounts applet can also be used to change an account between standard and administrator status and to set the language that will be used on screen when the user logs in .
Guest Access
The guest account on the computer’s welcome screen creates a temporary guest session with an isolated, temporary guest account and home folder. It provides visitors access to an Ubuntu computer in a secure manner. The account is prevented from making system changes or viewing the home folders of other users, and once the guest session is logged out, Ubuntu destroys the temporary account and its files. This means that no settings are permanent and the visitor must use an external drive or online storage to keep any work done during the session. Only one guest account can be logged in at a time.
Multiple user accounts work together with the guest session to allow each computer user to work with the computer and customize his or her experience without affecting other users. Whether to allow for file security or enhance computer accessibility through different appearance and language settings, Ubuntu’s user account system is a versatile way to maximize the utility of your computer.
Finding Things in Ubuntu Instead of Windows
If you’re coming from Microsoft Windows (Figure 2-13), you should find Ubuntu fairly easy to adapt to.

Figure 2-13. A typical Windows 10 desktop with one Web browser window open
Here are some guidelines that should help you make the transition:
The Windows Logo key is called the Super key in Linux. The Alt key is still called Alt but is also sometimes referred to as Meta. These names refer to modifier keys used on Unix terminals long before Windows or PCs existed.
The Windows Taskbar is replaced by the Unity Launcher on the left side of the screen. The Launcher cannot be moved to other sides of the screen, but it can be resized in System Settings, under Appearance. The system notification area (sometimes called the system tray) on the right side of the Taskbar is similar to the indicator menus at the top right corner of the screen in Ubuntu. The Action Center in Windows 10 is duplicated by the Messaging and Date indicators.
The Start Menu and Start Screen are replaced by the Dash search. File search is provided by the Dash and the File Lens can be accessed directly by pressing Super+F. The Control Panel and Settings apps are replaced by the System Settings menu under the Dash or the Gear indicator menu. Task Manager is replaced by System Monitor in the Dash.
Changing the desktop wallpaper image can be performed by right-clicking the desktop and choosing “Change Desktop Background.” This brings up System Settings, Appearance. The theme can be changed from the default Ambience theme—which is a dark theme—to Radiance, which is a light theme. The High Contrast theme assists users with visibility problems. Custom themes are not supported by Unity and require third-party software.
Windows are controlled similarly in both Windows and Ubuntu. The window controls in Ubuntu are located on the left of the title bar instead of the right. The system menu in Windows is accessed by clicking the window icon or the top left corner of the title bar, and in Ubuntu it can be accessed by pressing Alt+Space or right-clicking a title bar in Ubuntu. The menu bar in most applications is accessible at the very top of the screen and not in the window itself. You can move the menu bar from the top of the screen to each window’s title bar by going to the Gear menu, then System Settings, then Appearance, clicking the Behavior tab, and changing the setting under “Show the menus for a window.” This is particularly handy for very large monitors.
The Windows Explorer file manager is replaced by the Nautilus file manager, labeled “Files” in the Launcher and Dash. The C: drive in reference to the system drive is known as the root directory. Disks and storage drives are not assigned drive letters but are mounted inside the existing file system, usually under /media/username. Folders are often referred to by the older term directories—especially on the command line. The user folder is known as the home folder. Hidden files begin with a . (period) and are often called “dot-files.” The Windows Registry is replaced by a combination of text configuration files, often in /etc and individual dot-files in each user’s home folder, usually in a hidden directory such as .mozilla or . config.
The functionality of the Windows Store is provided by Ubuntu Software. Windows Update is replaced by Software Updater, which tracks maintenance and security updates for all applications installed via Ubuntu Software or otherwise installed from the Ubuntu software repositories (such is as on the command line with apt).
Finding Things in Ubuntu Instead of OS X
If you’re coming from OS X (Figure 2-14), Ubuntu will feel extremely familiar.
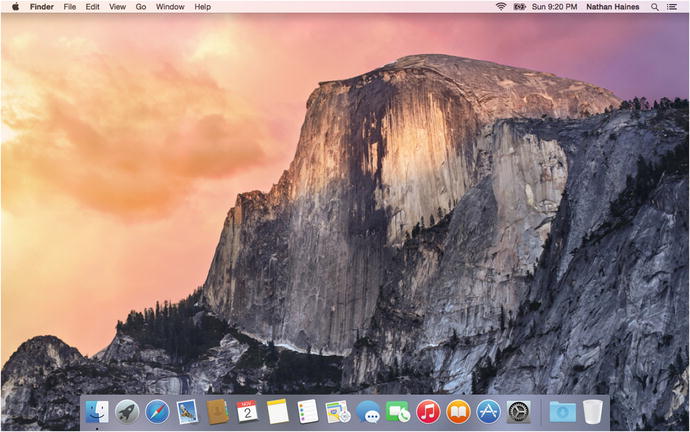
Figure 2-14. A typical Mac OS X desktop with Finder focused
Here are some guidelines that should help you make the transition:
The Option key is used for Alt but is also sometimes referred to as Meta. These names refer to modifier keys used on Unix terminals long before Mac OS or OS X existed. The Command key is used for the Super key.
The Dock is replaced by the Unity Launcher on the left side of the screen. The Launcher cannot be moved to other sides of the screen, but it can be resized in System Settings, under Appearance. The menu bar extras are similar to the indicator menus at the top right corner of the screen in Ubuntu.
Launchpad and the Apple Menu are replaced by the Dash search. Spotlight-like file search functionality is provided by the Dash, and the File Lens can be accessed directly by pressing Super+F. System Preferences is replaced by the System Settings menu under the Dash or the Gear indicator menu. Activity Manager is replaced by System Monitor in the Dash.
Changing the desktop wallpaper image can be performed by right-clicking the desktop and choosing “Change Desktop Background.” This brings up System Settings, Appearance. The theme can be changed from the default Ambience theme—which is a dark theme—to Radiance, which is a light theme. The High Contrast theme assists users with visibility problems. Custom themes are not supported by Unity and require third-party software to install.
Windows are controlled similarly in both OS X and Ubuntu. The window controls are located at the left of the title bar, but the Maximize control in Ubuntu functions like the Full-Screen control in OS X. Additional window controls in Ubuntu can be accessed by pressing Alt+Space or right-clicking a title bar. The menu bar in most applications is accessible at the top of the screen. The App Menu features can sometimes be found by right-clicking the application’s Launcher icon. You can move the menu bar from the top of the screen to each window’s title bar by going to the Gear menu, then System Settings, then Appearance, clicking the Behavior tab, and changing the setting under “Show the menus for a window.” This is particularly handy for very large monitors.
Finder is replaced by the Nautilus file manager, labeled “Files” in the Launcher and Dash. The Mac drive in reference to the system drive is known as the root directory. Disk and storage drives are mounted in the existing file system, usually under /media/username. Folders are often referred to as directories—especially on the command line. The user folder is known as the home folder.
The functionality of the Mac App Store is provided by Ubuntu Software. The App Store’s app update functionality is replaced by Software Updater, which tracks maintenance and security updates for all applications installed via Ubuntu Software or otherwise installed from the Ubuntu software repositories (such is as on the command line with apt).
Connecting to a Windows Desktop Remotely
You may find it useful to run Windows programs during your transition to Ubuntu, or you may want to use Windows-only programs from time to time. Luckily, Ubuntu comes with a remote desktop client preinstalled. Remmina Remote Desktop Client can connect to other computers in a variety of different ways, including Remote Desktop Connection, VNC, and SSH. Remote Desktop Connection (also known as Terminal Services) is available in Windows 10 Pro and higher editions, and SSH (Secure Shell) is available in all Unix or Linux-based operating systems. In order to connect to a computer remotely, it must be powered on and must not be sleeping or hibernating.
Your first step is to set up your Windows system to accept remote desktop connections. This is fairly simple, and you can do so by right-clicking Computer or This PC in the Start Menu or Windows Explorer and choosing “Properties” from the context menu. When the System Properties window appears, you can click the “Remote” tab or the “Remote settings” option and make sure that “Allow remote connections to this computer” is enabled. If you have trouble logging in, make sure that “Allow connections only from computers running Remote Desktop with Network Level Authentication (recommended)” is unchecked.
You can run Remmina by searching for its name or “remote desktop” in the Dash. The first time you run it, it will display an empty window. You can save various profiles for connecting to remote computers and double-click them in the future. To set up a connection to a Windows computer, you’ll need to know the IP address of the computer, or the host name if your router supports Windows host name resolution. You’ll put this in the Server field, as well as your Windows username and password to save time. If you are connecting over the Internet, keep the color depth at 256, but if you are connecting to another computer on the same network, you may want to increase the color depth to 16-, 24-, or even 32-bit color.
Changing the connection name and clicking “Save” will save the connection for later. You can connect to the same computer in the future just by double-clicking the entry when Remmina starts up. Clicking “Connect” will connect to the Windows machine (see Figure 2-15). By default the wallpaper is hidden to save bandwidth and increase performance, but in most other respects you will be able to interact with Windows just as though you were running it on your local machine. Others may or may not be able to use the remote machine while you are connected depending on your version of Windows.

Figure 2-15. You can connect to remote Windows machines and use them with ease
The toolbar allows you to scale the display to match the available space or enter full-screen mode and focus on Windows only. You can customize these options in the toolbar or in the connection preferences to tune the experience to your preferences.
Running Windows Applications
Sometimes you’ll find it convenient or necessary to run Windows applications that aren’t available for Ubuntu. Whether it’s a game or a utility, it can be difficult to live without some applications, and connecting to a remote Windows machine isn’t always possible or convenient. Luckily, there is a utility that allows Windows software to run directly under Ubuntu.
The Wine project is often described as an emulator. This is not technically true; in fact, Wine is an acronym for “Wine Is Not an Emulator.” Technically, it is an application compatibility layer, and it works by independently providing the parts of Windows that Windows applications rely on. This means that an application running under Wine thinks it’s running under Windows. The good news is that unlike emulating an entire operating system (which we’ll talk more about in Chapter 6 ), there is no extra overhead while running Windows programs this way. But the bad news is that many complex Windows applications that rely on undocumented behavior or fancy programming tricks may work only partially or not at all in Ubuntu. The bottom line is that once you install Wine, you can run Windows programs simply by double-clicking them in the file manager. You can also install Windows programs and pin them to the Launcher or run them from the Dash.
To install Wine, open Ubuntu Software. Then search for “wine.” Find “Configure Wine” and click “Install.” During installation, you will be asked to accept the Microsoft TrueType core fonts for the Web license agreement. This will install some standard Windows fonts on your system and is required to install Wine. Once the installation is complete, you can simply run Windows applications by double-clicking them. Both Windows installers, as well as the applications they install, run alongside your other applications (see Figure 2-16).
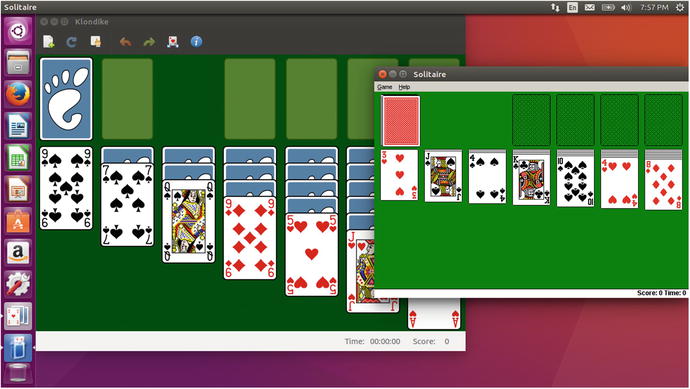
Figure 2-16. With Wine, you can pit Aisleriot Solitaire and Windows Solitaire against each other. Fight!
While many applications will run without further effort, some applications can be made to run using various amounts of configurations changes. For a place to find reviews on whether an application will run or tips to improve performance for any specific application, visit the Wine Application Database at https://appdb.winehq.org/ . Other Wine users review Windows applications and rate them using a color scale, where Platinum applications run perfectly right “out of the box” and Gold applications just need a little special configuration. Silver applications have some issues that shouldn’t get in the way of normal usage. Bronze applications run but have issues that interfere with typical usage and Garbage applications are completely unusable. Reading the reviews will help you decide whether an application will work and can save you a considerable amount of time instead of testing on your own.
Connecting to Windows Shared Folders and Printers
One of the nicest things about having multiple computers is the ability to share information between them. This pays off in many ways—from being able to continue work on a document on a second computer and saving the changes to the original computer to buying one big hard drive to store large files on to being able to watch a movie stored on another computer from a netbook or a set-top media box. Sharing resources also means being able to print from any computer in your home to a printer that’s attached to one computer instead of a network.
There are many different ways for computers to communicate, but one common language between Windows, Mac, and Linux systems is called Server Message Block (SMB) . An early attempt by Microsoft to standardize this Windows protocol for multiple operating systems named a specific version the Common Internet File System (CIFS) , which is sometimes referred to in documentation and software library names. But today, Windows, OS X, and Linux use SMB to share files and printers together. In Ubuntu, the software that supports this is called Samba. This chapter will use the term “Windows file sharing” to refer to SMB-compatible file sharing across all operating systems.
The first step is to make sure that your Windows system is sharing folders and printers properly. To ensure this, it should not be part of a Homegroup and if you have a File & Sharing Wizard it is the simplest way to ensure that Windows Firewall is set up properly to allow File and Printer Sharing connections. To set up a shared folder, simply right-click any folder you would like to share and then click “Sharing,” “Share with…,” or “Sharing and Security” (see Figure 2-17).
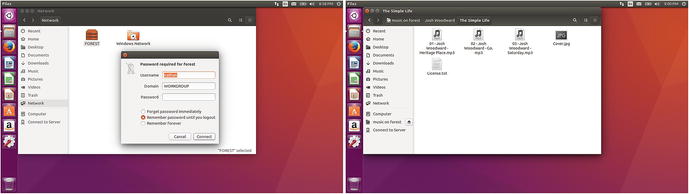
Figure 2-17. After connecting to a Windows shared folder it works just like a local folder
If you are on the same network as a Windows machine with shared folders or printers you would like to connect to, simply open Files and click “Network” in the sidebar. After a short search, the available computers and workgroups on your current network will be displayed. Navigate to the computer you wish to connect to and double-click it. You will see a prompt asking for a username and password. Enter a username and password to log in to the remote computer, then click “Connect.” You’ll see that computer’s shared folders displayed. Simply double-click to open one (see Figure 2-17). You can bookmark a shared folder with the Bookmarks menu.
Shared Printers are just as simple. First, open Printers via the Dash. You can also open System Settings via the Dash or Gear indicator menu and click Printers. Either way, the printer configuration window will appear. Click the “Add” button in the toolbar and the New Printer window appears. Under Select Device, click the arrow next to Network Printer. Choose “Windows Printer via SAMBA,” and the right side of the window will show “SMB Printer.” Click Browse to open a SMB Browser. The first time you do this on a new Ubuntu 16.04 LTS install, you will be prompted to install additional software to enable this functionality. Simply click “Install” and enter your password and this will happen automatically. Once the SMB Browser is open, it displays the local Windows network, and you can navigate to the corresponding workgroup and computer that is sharing the printer (see Figure 2-18). You may be prompted to log in to the Windows computer. Simply enter a username and password for the Windows computer to show the shared printers.

Figure 2-18. Shared printers work just like local ones—if the remote computer is turned on!
Select the desired printer and then click OK. The SMB Browser will disappear and the printer URI will have been filled in for you in the New Printer screen. Click Forward, and you can choose a compatible printer driver by selecting a manufacturer and model. If you are prompted to install more software first, confirm the installation. Once you have selected your printer manufacturer, click “Forward,” then choose your model and click “Forward” again. The next screen will show any optional features of the printer such as a duplexer. Check any printer options that apply to the shared printer. Click “Forward” again and you will be able to give your printer a name. Once you confirm these options, Ubuntu will ask if you wish to print a test page. This is a good way to test the printer as well as save a copy of your printer settings. Now the printer will be listed as a choice when you print from any application.
Sharing Files and Printers with Other Computers
Samba has two components—a client that can access shared files and printers on other computers and a server that can share files and printers on an Ubuntu system with other computers. Ubuntu 16.04 LTS ships with only the client for space-saving reasons, and will automatically ask you to install the server if you try to share a folder (and will perform the install automatically with your permission).
With the client installed, Ubuntu will automatically detect other computers with Windows file sharing enabled. This is enabled by default on Windows systems attached to “home”- or “work”-type networks and Ubuntu systems, and must be explicitly enabled on Macs under System Settings. In Ubuntu, opening “Files” and clicking “Network” on the left sidebar will begin searching for shared resources on the local network. After a moment, all computers that have Windows file sharing enabled should appear on the right side of the screen (see Figure 2-19). If they do not (due to workgroup settings), double-clicking “Windows Network” should display each workgroup, and double-clicking a workgroup will display its computers.

Figure 2-19. Ubuntu automatically detects other computers with available shared folders
Windows Vista and later require remote computers to log in using a user account and password that exists on the host computer. This changes the old behavior in Windows XP, which allowed anonymous access by using the username “Anonymous” and an empty password to access publicly shared folders. While this can be changed in Windows , it’s a much better idea to leave the default setting and log in with your username and password for the remote computer. Once you have logged in, if you have an administrator account on the Windows machine you will see several hidden shares that end in the character “$,” which would be invisible on Windows. “C$”, for instance, is the C: drive on the remote machine. Any public shares are listed as well. You can simply open any share and navigate through its files and folder as you would a local folder. You can drag and drop files or double-click files to open them locally. Ubuntu will handle the file transfers behind the scenes.
Sharing folders with other computers is quite simple in Ubuntu. Just right-click any folder in Files and choose “Local Network Share.” A “Folder Sharing” window will appear, and you can set up sharing options by checking the “Share this folder” option (see Figure 2-20). You may be prompted install the Windows networks sharing service the first time you do this. If so, simply click “Install service” and then “Install” when you are asked if you want to install the “samba” package. Confirm this action with your password and the software will be downloaded and installed automatically.
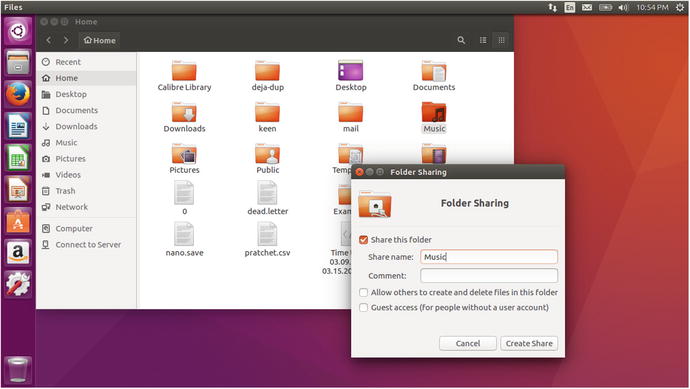
Figure 2-20. Sharing your own folders with others is simple to configure
The share name is the name that will be displayed to other computers and can be different than the folder’s actual name. For backward compatibility with old versions of Windows, you may want to keep the share name to 12 characters or less. The “comment” field appears in Windows on some screens and gives further information about the share. By default, a shared folder can be modified by the owner but is read-only by others. The option “Allow others to create and delete files in this folder” is self-explanatory but makes the shared folder editable by anyone who can access the share. “Guest access (for people without a user account)” is also useful if you want to share a folder with your local network without requiring each remote user to have a user account and password on your computer. This may not work on Windows Vista and later.
Sharing Printers Between Computers
Reliable printer sharing is one of the great joys in life. When your home has only one printer but you have multiple computers, there’s no beating the convenience of being able to print to a central location no matter where you are. Depending on your printer and your network environment, there are two main ways to connect to remote printers.
Many printers have built-in network support, and this is by far the easiest way to connect to a printer over a network. Part of what makes this so simple is that most network printers simply implement SMB or Samba and can be left on during the day so that they can be printed to by all computers on the same network. As long as Ubuntu includes a driver for your printer, this tends to be the easiest way to connect, and Hewlett-Packard printers tend to be very reliable because the manufacturer maintains open source drivers that are included with Ubuntu.
Ubuntu’s support for Windows file and printer sharing means that accessing files on other computers and making them accessible from other computers is quick, easy, and should work no matter which operating system your other computers or network appliances are using.
Sharing Office Documents with Others
On Ubuntu, you’ll start off with LibreOffice . This full-featured office software is more than capable of opening, editing, and saving Microsoft Office documents. But by default it uses the Open Document Format to save its files in. This standard format is now supported by all modern office software, but legacy office software may have limited support.
LibreOffice supports saving files in many various formats. By default, an edited document will be saved in its original format. However, you may find it convenient to offer files in different formats to ensure an optimal viewing experience for others.
In LibreOffice, you can choose “Save As…” from the File menu. You can either type a file name with a standard extension (“.odt” for Open Document Text format, “.doc” for Word 97 format, “.docx” for Microsoft Word 2007 XML format, “.html” for HTML, and so on) or choose a specific format from the drop-down list under the folder view. Clicking Save will save a copy of the document and continue saving under the new filename and format. Word formats are useful for sharing files that must be edited by users with Microsoft Office, which may have limited support for the Open Document format.
If you would like to ensure that the other user can view and print a document precisely as you formatted it, but you do not need or want them to edit it, you can save a copy of the file as a PDF. This is available via the “Export as PDF…” option under the File menu in LibreOffice, and will create a file that represents a printed document that can be viewed and printed by others on any operating system with a PDF viewer.
Note
In producing this book, my editors needed Word 2010-format documents and provided Word template files. However, I don’t own a modern copy of Microsoft Word and use Ubuntu exclusively. I opened the template in LibreOffice and saved it in Open Document Text format and started typing. When I finished a chapter, I would save it as Microsoft Word 2007-2013 XML (DOCX) format and send it to my editors. Each of us was able to use our preferred tools to deliver this book into your hands.
Sharing Photos and Graphics with Others
Graphics images are among the easiest files to share between operating systems, as the Internet has seen to it that the most common and useful file formats are supported and shared between all modern operating systems. Therefore, most formats should work without issue. I will simply add a note about each of the most common file formats.
JPG files are the most common format around. This is a “lossy” format, which means that it saves space by not encoding all of the data perfectly when it’s compressed. This format is designed for real-world photographs and takes advantage of how the human eye works. This does mean that editing and saving JPG files results in a slight loss of quality that can build up over time. For a finished photograph that does not need to be edited more than once or twice, JPG is the clear winner. For art with large single-color fields or line art, the compression can interfere with the image quality.
GIF is a fairly ancient file format that was developed to be easy for the slow computers available in 1987 to process. GIFs have only 256 colors, and therefore tend to be low quality, but they are often used online to show short animations. For any other purpose they are a bad choice, even if they work everywhere.
PNG was developed as a response to a patent lawsuit regarding the GIF format, and it is probably the most versatile image format around today. With good lossless compression, the resulting files are not subject to quality loss over multiple edits, and while photographs result in much larger file sizes in JPG, line art is much smaller and crisper than GIF. This is a perfect format for works in progress and can be opened in almost every image browser.
TIFF was an early black-and-white-only format that was developed as a common format for desktop document scanners. It is still often seen as a format for scanners and faxes. While the format became quite versatile for grayscale and color documents and can flexibly hold lots of notes and other information about a scanned document and can even use JPEG compression for documents, it’s probably better to choose JPG for a final file or PNG for a file that will be edited by others.
Formatting Disks to Work with Other Operating Systems
Computers store data on hard disks, floppy disks, CD, DVD, and Blu-ray discs, magnetic audiotape, paper tape, solid state disks, and flash memory, and the physical formats have changed tremendously since the 1940s. The logical formats have changed even more rapidly. I’ll use an analogy to help illustrate how computers and disks work.
A disk is like a ruled piece of paper. You might have a single sheet, or various sizes of notepads. They can be opened and viewed by anyone. Internal and external hard disks, optical discs, and media cards are all like a notepad.
When you write in a physical notepad, the notepad doesn’t really care what you write. You can write in English or German. Japanese kana represents sounds. Hebrew characters represent sounds but are written from right to left. Chinese ideograms represent ideas. All of these can be written between the lines on the same notepad. But only some of these ways of writing will make sense to readers. These writing systems are like the disk format and file system and the readers are like the operating system.
Windows and Mac computers were typically used in offline, homogeneous environments. This meant that in the days before networking was widespread, Microsoft and Apple were free to develop their own way of reading and writing data to a disk in a manner that was efficient and supported the way their software worked. For this reason, Windows computers first supported only FAT file systems written to a nonpartitioned or MBR-formatted disk. Mac computers supported HFS on a full or Apple Partition Map-formatted disk. As their needs became more complex, Windows computers began supporting NTFS and GPT, and Apple computers began supporting FAT so they could read and write Windows-formatted disks, and started using HFS+ and GPT. But priority was given to the native file formats on each system.
Linux grew up in a networked world where it needed to read a lot of different file formats. So while the Linux “extended file system” was developed to serve its needs better than the Minux file system it started with and Ubuntu today uses the fourth version of this system, ext4fs, it also often needed to read Windows- and Mac-formatted disks. This resulted in rich file system support that Ubuntu users benefit from today. The upside is that Ubuntu can read almost any disk format that it sees. But Windows and OS X are still very limited in the formats that they support. Here are some tips for formatting disks so that they can be used on Windows and Mac computers.
Both Windows and OS X can read MBR- and GPT-formatted disks. MBR is good for small media devices, but GPT should be used for any hard drive and is required for drives larger than 2.1 TB. Apple Partition Map can only be read by OS X and Ubuntu and has been replaced by GPT on OS X.
File system support is trickier. The only format that Windows and OS X both support for reading as well as writing is FAT32. This format can be read in almost any consumer device on the market, but it can be prone to corruption if a computer or device loses power while writing, and also has a file size limit of approximately 4 GB. Especially for video and backup files, this can be restricting.
The native Windows format is NTFS, and Ubuntu can read and write this format reliably. However, OS X can only read NTFS and not write to it. For sharing between Windows and Ubuntu computers, however, this is a very robust and reliable format.
The native OS X format is HFS+. Ubuntu doesn’t have trouble reading this format, but Windows cannot read it at all without third-party software. While it is suitable for sharing between Windows and Ubuntu computers, it will cause problems with Windows.
The write-once-only nature of early optical discs posed special problems, and therefore early CD-ROMs used a file system called ISO 9660. This was extended in a few different ways to support long file names and was eventually replaced by UDF (Universal Disc Format). The upside is that CD, DVD, and Blu-ray data discs use these formats exclusively. This means that optical discs can be read by any computer with a compatible disc drive. So you’ll never need to worry about formats—your burning software will take care of that decision.
Summary
Using a new operating system can be very much like living in a different part of the world with different customs: much is still familiar, and just a little bit of context can make your environment much more comprehensible.
Ubuntu has its own strengths and works very well with others. Whether you move to Ubuntu only or use it along with other operating systems, Ubuntu is flexible enough to work with other computers over the network or via floppy disk. Armed with this knowledge, you’re ready to begin using Ubuntu as a part of your everyday routine.